
Chapter 5. Starting the Hyperbola Prototype
At this stage you have created the skeleton for Hyperbola. You know how to run it and debug it, and you are familiar with the basic classes that are part of all RCP applications. The next few chapters focus on iteratively developing Hyperbola. This next iteration is interesting because it allows you to quickly get something running so that you can show it to your mom, your boss, or your friends. It’s also a lot more fun to learn RCP while developing something concrete.
The iterative approach used to develop Hyperbola is how software is developed in most organizations. You start by creating a prototype that could be used to demo Eclipse RCP to your friends or colleagues. You iterate again and augment the prototype with real domain logic—in our case the messaging library—and start to think about packaging and branding the product. You then continue iterating, adding functionality, and managing the complexity until you have a product to ship.
Prototypes are often crude but provide an excellent way of exploring various aspects of the application to be built. In this chapter we show you how to extend the skeleton version of Hyperbola by adding the following features:
• A primitive contacts list that shows a list of contacts and contact groups
• A simple messaging model that is used to drive the UI components
• Images to make the contacts list look real
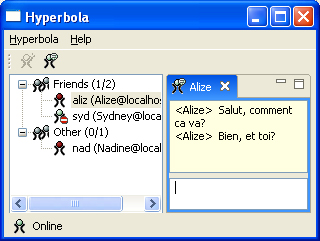
For the moment we ignore the details of how to chat with someone—the focus is on getting familiar with the basics. Here we add the contacts list and its supporting model. In the next two chapters we will add the chat editor and associated actions. Figure 5-1 gives a peek at Hyperbola after that work is completed.
Figure 5-1 Hyperbola prototype
5.1 Continuing from the Shell
Chapter 4, “The Hyperbola Application,” gave you a good idea of all the classes and files needed for the skeleton Hyperbola application. Let’s critique the skeleton as shown in Figure 5-2 and see how we can improve it.

• If you resize the window, exit, and rerun Hyperbola, the window size and position are reset to their defaults.
• The menu bar, toolbars, and status line are not shown.
• There is no indication in the task tray that Hyperbola is running.
Let’s fix the resize and position bug; we’ll address the other issues in the next few chapters.
5.1.1 Saving Window Location and Size
One of the problems with the skeleton code is that when the window is resized or moved and the application rerun, the window’s size and position are reset. This is annoying. The good news is that it’s really easy to fix—the Workbench contains code that saves settings for open windows. It’s disabled by default, as saving and restoring window state can be expensive and for some applications not even necessary.
To enable it, first override the WorkbenchAdvisor.initialize() method from within ApplicationWorkbenchAdvisor, as shown in the snippet below. A trick is to open the ApplicationWorkbenchAdvisor class and type ini, then press Ctrl+Space. A pop-up appears, listing the possible methods that can be overridden. Simply select the initialize() method to get a skeleton. This method is called by Eclipse to mark the beginning of the advisor’s lifecycle. This hooks in at the earliest possible point to enable save and restore.

5.2 Adding a Contacts View
Since Hyperbola is a chat client, one of the most essential UI elements is a contacts list that displays your friends and their presence status (i.e., whether or not they are online).
In Eclipse, users interact with applications through views and editors. Perspectives are a mechanism for arranging views and editors and supporting scalable UIs. Put another way, views and editors contain the content for your application; perspectives allow those elements to be organized for users. We already have a perspective; it’s just empty.
A view is added by contributing a view extension to the org.eclipse.ui.views extension point. Open the org.eclipsercp.hyperbola project’s plugin.xml and go to the Extensions page. Click Add... and create an extension of type org.eclipse.ui.views. Right-click on the extension and add a view attribute using New > view from the context menu. When you click on the new view attribute, the Details pane at the right shows the default values for the view. Update the id and name fields to match those shown in Figure 5-3.
Figure 5-3 Adding ContactsView to Hyperbola’s plugin.xml

You also need a class to implement the view. Click on the class link to create a new class. When the New Class wizard appears, most of the fields, including the superclass ViewPart, are already filled in. All you have to do is type ContactsView for the class name. Click Finish and a skeleton view class is created and opened in an editor.
Tip
You are building a view from scratch to understand how everything fits together. However, the next time you add a view, you can use the handy PDE templates. You may have noticed that the New Extension wizard lists the set of available templates for each extension point. There’s a template for a view that creates a sample view with actions and dummy contents.
Before moving on, make a constant for the view ID. Set the value to be the same as in the extension and add it to the newly created ContactsView class. This will come in handy later. Save the Java file and go back to the plug-in editor. Notice that the name of the new view class is set in the class attribute of the extension.

Finally, set the view’s icon. View icons are optional but typically specified. You can either create your own GIF image and place it in Hyperbola’s icons directory or copy the images supplied with the sample code for this chapter. Either way, fill in the icon field by browsing to the image or entering the location directly.
Save the plug-in and now you have created a skeleton view. The next step is to customize the perspective to include the new view and have it appear in the Hyperbola window.
5.2.1 Adding the Contacts View to a Perspective
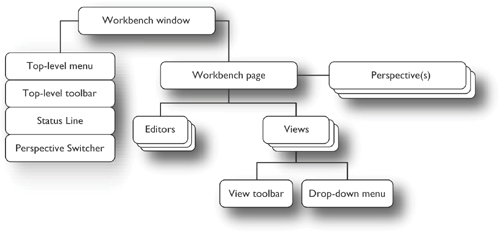
All RCP applications must define at least one perspective; otherwise, there would be nothing to lay out the views. Think of a perspective as a set of layout hints for a window. Every IWorkbenchWindow has one page. The page owns its editor and view instances and uses the active perspective to decide its layout. The perspective details where, and whether or not, to show certain things, such as views, the editor area, and actions. Figure 5-4 provides an overview of the main parts of an IWorkbenchWindow.
Figure 5-4 Overview of a Workbench window’s parts
The initial perspective, and thus the look of Hyperbola when it is first run, is identified by WorkbenchAdvisor.getInitialWindowPerspectiveId(). The Hello RCP template defined the Hyperbola Perspective and contributed to the Workbench’s perspective extension point, as shown in Figure 5-5. Notice that the extension defines an ID and identifies a class for the perspective.
Figure 5-5 Hyperbola Perspective defined

A perspective factory provides the initial layout for a perspective. When a perspective is needed, the factory is created and passed an IPageLayout to which views are added. The factory is then discarded. As the user rearranges the contents of the perspective, the Workbench saves the settings on exit and restores them at startup (if so configured).
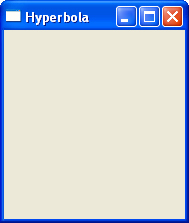
The perspective generated by the PDE template uses the default layout. This layout is just an editor area with no additional views. That’s why Hyperbola is just an empty shell—the perspective is empty. Now that we have a view defined, go ahead and add the Contacts view to the Hyperbola perspective as shown here:

IPageLayout contains several methods for defining the layout of a perspective. Everything added to a perspective is related to something else. Here the editor area is used as the base for placing the Contacts view. The Contacts view is added to the left of the editor area and is given all available space in the page by specifying 1.0f as the layout ratio. The ratio describes how to divide the available space between the Contacts view and its reference part, in this case, the editor area. The ratio must be between 0.0f (only the title bar is shown) and 1.0f (the view takes up the entire window area).
Note
Editors cannot be added to a perspective layout. Instead, you position the area in the perspective in which editors are opened. It’s also possible to hide and show the editor area using IWorkbenchPage.setEditorAreaVisible(boolean).
When you run Hyperbola now, you should see the Contacts view, as shown in Figure 5-6.
Figure 5-6 Hyperbola showing the Contacts view

It looks a little strange to have a tab when there is only one view shown, and there is no reason to allow the view to be closed. Views added to a perspective using IPageLayout.addView() inherit various default behaviors that allow them to be moved, undocked, closed, minimized, and maximized. Using IPageLayout.addStandaloneView(), however, adds a stand-alone view. Stand-alone views hide the title area, thus preventing the view from being closed, moved, and so forth.
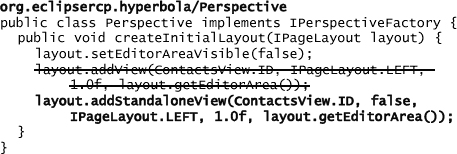
Make the Contacts view stand-alone by changing the code to use addStandaloneView(), as shown here. Notice that the new code is almost identical to the previous except for the Boolean parameter that specifies whether the title area should be hidden. The new Hyperbola looks like Figure 5-7.
Figure 5-7 Hyperbola with the stand-alone Contacts view
When you rerun Hyperbola, you may be surprised. The view still shows a title. The changes you made to the perspective seem to have been ignored. Since we told the Workbench to save settings on shutdown, it saves the perspective layouts in the workspace location and on startup does not consult with the perspective factory at all. IPerspectiveFactory is needed only the first time a perspective is created.
To debug changes to a perspective factory, you must configure your launch configuration to clear the workspace area on each launch. Open the launch configuration dialog as shown in Section 4.3.2, “Launch Configurations,” and check the option called Clear workspace data before launching and uncheck Ask for confirmation before clearing. Rerun Hyperbola. You should see the empty view without a title bar, as shown in Figure 5-7.
5.3 The Chat Model
At this point the Contacts view is empty because there is no underlying list of contacts to show; that is, Hyperbola does not have a model. A model that supports Hyperbola’s chat domain will prove helpful as we work through building the application. You could go straight to a messaging library and start implementing the UI pieces on top of its model. But there is a danger that the UI work will get bogged down in the details of sending bytes around. What we really need is a simple chat model that has all the right entities and is sufficient to drive the UI parts of Hyperbola. When it comes time to use a real chat library, some rework will be needed, but we hope not too much.
The Hyperbola chat model shown in Figure 5-8 is very basic. A Session comprises the central object. It allows connecting to a messaging server and provides access to contacts, which are either groups or individuals. A Session has a reference to the root group for the logged-in user. Listeners can be attached to a Session and receive notifications when the root ContactsGroup changes.
Figure 5-8 Classes in the prototype chat model

You can code the model yourself, or to save time you can copy the code for this chapter using the Samples Manager described in Section 3.4, “Sample Code.” Here you want only part of the sample code, so copy just the package called org.eclipsercp.hyperbola.model by selecting the package in the top part of the compare editor and selecting Copy to Workspace from the context menu.
5.4 Filling in the Contacts View
Now that you have a model, you have something to put in the Contacts view. In the model, contacts are organized into groups of contact entries. A UI for this should be some sort of tree design that allows users to organize their contacts and groups. To help create that UI, this section shows you how to
• Add a tree viewer to the ContactsView class
• Initialize a Session object with test data
• Add a content provider to populate the tree based on the contents of the contacts list
• Add a label provider to display the labels and images in the ContactsView
Note
For the rest of the UI discussion, it is useful to have some knowledge of SWT and JFace. We do not go into great detail about their usage in Hyperbola since we want to focus on RCP-specific concepts. See Section 5.7, “Pointers,” for more pointers to information on SWT and JFace.
5.4.1 The ContactsView
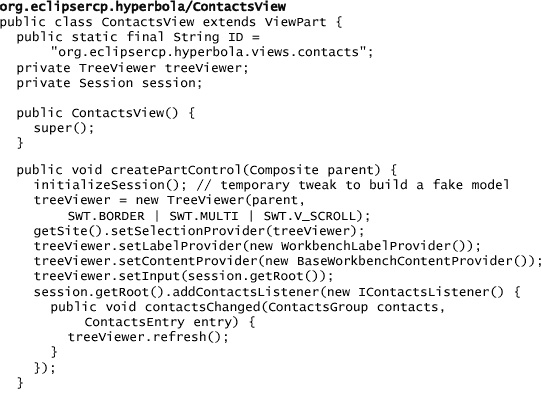
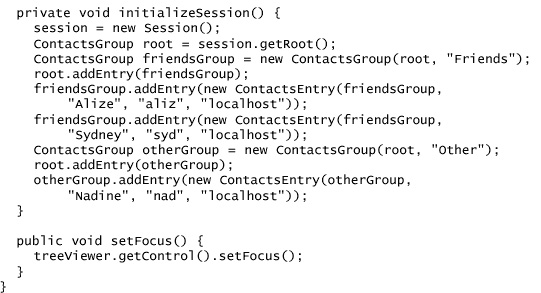
When the Workbench creates the Contacts view, it calls createPartControl(Composite) on the view so that it can create its controls. The code below does two things: It spoofs up a fake model, and it adds a TreeViewer to the view. Add the code to the ContactsView class and then let’s take a look at it.
The fake model is created in initializeSession() out of convenience. Once a real chat model is integrated into Hyperbola in Chapter 10, “Messaging Support,” this code will be removed. In any event, the model is built and is set as the input to the TreeViewer. The TreeViewer is also set up as a selection provider so that actions can determine the selection in this view.
TreeViewers do just what their name implies—display tree structures. This is done using two providers: the content provider and the label provider. Content providers supply the tree nodes (e.g., parents and children), and the label provider produces human-readable names and representative images for the nodes. TreeViewer.setInput(Object) tells a TreeViewer to build the tree using the supplied object. It is up to the configured content providers to interpret the object and make it look like a tree.
Note
Do not confuse views with JFace viewers. It’s unfortunate that their names are so similar, but they are two separate concepts. A viewer is a model-based adapter for an SWT widget. A viewer can be used to show content within a view. Moreover, a view can contain multiple viewers, and even editors can contain viewers.
5.4.2 Content Providers Overview
TreeViewers require content providers that implement ITreeContentProvider, as shown below. This allows the viewer to query the structure of its input object using methods such as getChildren(Object) and getParent(Object).

The arguments to these methods are the elements being shown in the viewer. As shown in Figure 5-9, TreeViewer.setInput(Object) is called when ContactsView is created. This in turn uses the configured ITreeContentProvider.getChildren(Object) method to find the first level of elements to display. Notice that this means the root input object for the TreeViewer is never displayed—it provides the starting point from which the visible tree is built. The collaboration between the viewer and the content provider continues as more elements in the tree are expanded.
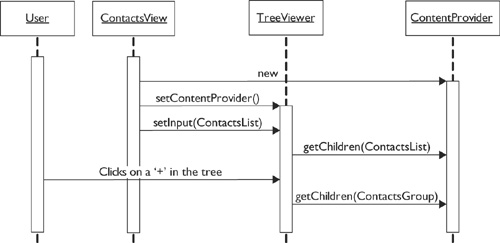
Figure 5-9 shows how viewers and providers work together, but not how providers and input model objects interact. For example, how does the provider discover the children of a model object? There are several possible techniques:
• Make the model objects implement ITreeContentProvider.
• Wrap the model objects with another object that an existing ITreeContentProvider understands.
• Supply a customized content provider.
• Extend the objects with the required provider function.
Adding the provider methods—for example, getChildren(Object) and getParent(Object)—to ContactsEntry and ContactsGroup is simple and straightforward. The methods simply expose the inherent structure of the underlying model objects. This approach has the drawback that it pollutes the chat model with UI concerns. It is better to keep the model and UI layers decoupled from one another.
Wrapping chat objects in provider-friendly objects gets around this limitation but introduces the overhead of having two objects for every model object. It also makes identity maintenance, such as equality checks, difficult, as more than one object—the model and the wrapper—can represent the same entity.
TreeViewers are customizable and allow you to supply your own content providers. We could simply implement providers that directly access model objects and navigate their object structure. This approach requires control over the providers and is not extensible as all object types handled must be known in advance.
The final approach is to use the Eclipse adapter mechanism to extend the behavior of the model objects. The Workbench defines a standard content provider called BaseWorkbenchContentProvider that knows how to navigate the IWorkbenchAdaptable type shown here:

If an object can adapt to IWorkbenchAdapter, it can be shown in a tree viewer using the standard content provider. In fact, objects that adapt to IWorkbenchAdapters can be shown in a wide range of viewers. All you have to do to enable this is have the model object implement IAdaptable and supply an adapter factory that produces IWorkbenchAdapters for the model objects.
5.4.2.1 Adding the IWorkbenchAdapters
Let’s look at this in more detail. There are four things you have to do to use the adapter technique:
1. Configure the TreeViewer to use an instance of BaseWorkbenchContentProvider as its content provider.
2. Implement IWorkbenchAdapters for the chat model elements that need to be displayed.
3. Implement an adapter factory that returns an IWorkbenchAdapter for each model element.
4. Register the Hyperbola adapter factory with Eclipse.
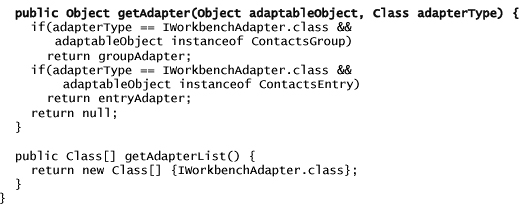
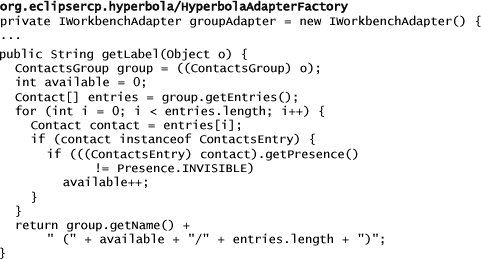
The first point was covered in Section 5.4.1, “The ContactsView,” when the TreeViewer was created. The HyperbolaAdapterFactory class below covers the next two requirements. It contains inner class implementations of IWorkbenchAdapter for ContactsGroup and ContactsEntry. The adapters do not maintain any state, so the same instances are used for all relevant model objects. When getAdapter(Object, Class) is called, the factory picks an adapter to return.

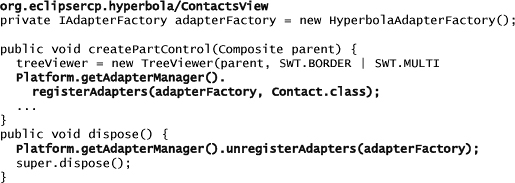
The last step is to register the adapter factory with Eclipse when the ContactsView is created and unregister it when the view is closed, as shown here:
5.4.3 The Label Provider
The content provider gives you the tree structure to display, but not the labels and icons needed to paint elements on the screen. This is the role of the label provider. When the ContactsView was created in Section 5.4.1, a default WorkbenchLabelProvider was configured as the TreeViewer’s label provider. Like BaseWorkbenchContentProvider, it used IWorkbenchAdapters to determine the label and image to show in the tree.
Minimally, you should update the adapter created in the adapter factory to return the name of the group or contact it adapts. To make things a little more interesting, the code below defines the label for group names to include the number of logged-in contacts in the group. Update the entry adapter as well, perhaps to show contacts with a nickname followed by their real name and server. Decorating the entries with images is covered in the next section.
Now Hyperbola is starting to look a bit more interesting, as shown in Figure 5-10.
Figure 5-10 Hyperbola showing a mock-up Contacts view

5.5 Adding Images
A contacts list without images doesn’t look quite right. Beyond aesthetics, images are useful for showing the status of each contact. In this section we
• Add images to the Hyperbola plug-in
• Add images to the Contacts view
The first thing is to create the needed images. Use your favorite image-editing program to create a couple of 16-×-16-pixel images in GIF format. Images used in trees and toolbars usually have a transparent background; as such, use a drawing tool that allows you to create GIF files with transparency. If you aren’t much of an artist, copy the images we supplied with the code for this chapter.1 Table 5-1 shows the images included in the prototype.
1. As you can see, we are not artistically inclined, but the images serve their purpose.
Table 5-1 Hyperbola Contacts View Icons

Add the images to the standard Eclipse location in the Hyperbola plug-in—in a directory called icons at the root of the plug-in project. Next, identify the images in code so they can be referenced without having to remember where they are located on disk. A standard approach is to create an interface to track the image paths in your product. Create the IImageKeys interface shown here. The constants identify the relative path to each image in the icons directory.

Adding images to the Contacts view is easy; you simply update the appropriate IWorkbenchAdapters to provide an image for each item in the tree. In Eclipse there are two image representations: Images and ImageDescriptors.
Images—Images are graphical objects ready to be displayed. They maintain a handle to an underlying OS resource and as such are considered heavyweight objects. Care must be taken to dispose of these system resources when the image is no longer needed.
Image descriptors—Descriptors are lightweight representations of an image. They know where to find the image and can create images but do not do so immediately.
Descriptors are handy tokens you can use to talk about images before you actually need an Image object. The relationship is similar to the one between Java File and, say, FileInputStream. Files are lightweight and are not directly associated with any OS resources, whereas FileInputStreams retain file handles and trigger disk access.
The code below shows how to create an ImageDescriptor. The code first uses Bundle.getEntry(String) to locate the image file and then calls createFromURL(URL) to create an instance of the descriptor.

Since this is such a common coding pattern, AbstractUIPlugin has a static helper called imageDescriptorFromPlugin(String, String) that looks in all the right places for the requested image and returns a descriptor. This method uses the Bundle instance to access files in the plug-in but does other bookkeeping that allows icons to be loaded from other locations. Since these and other methods need the plug-in’s ID, it’s a good time to create a constant for it. The ID is defined on the first page of the plug-in editor. Add the following to the Application class:
![]()
Tip
Since plug-ins can be anywhere and can be in a directory or a JAR, you cannot access your plug-ins’ files directly from disk (e.g., using java.io.File). Rather, the Eclipse Runtime provides several convenient methods for accessing files within particular plug-ins. See Bundle.getEntry(String) and related methods.
As we discussed earlier, images need to be managed because they represent OS resources. Fortunately, when using the IWorkbenchAdapter, the Workbench manages the images that are created and all you have to do is return the appropriate image descriptor.
The image shown for a ContactsEntry depends on each user’s presence. Add the presenceToKey() method below to HyperbolaAdapterFactory. It should return the appropriate image key given the provided presence.

Also, change the Workbench adapters to return the image for both a contact group and a contact entry:

Run Hyperbola and notice that the contacts have detailed labels and presence images, as shown in Figure 5-11—the UI is coming together.
Figure 5-11 Hyperbola with images in the Contacts view

5.6 Summary
In this chapter Hyperbola gained a simple model. You added the first view and learned about managing images. You should be getting more comfortable with using the RCP and doing plug-in development with Eclipse. If you were just skimming or had trouble, you can catch up by getting the completed code for this chapter as described in Section 3.4, “Sample Code.”
5.7 Pointers
• For more on perspectives, views, and editors, see Chapter 16.
• To learn how to customize Workbench windows, see Chapter 19.
• For customizing views and editors, see Chapter 20.
If you want to learn more about JFace and SWT, here are several good starting points:
• Northover, Steve, and Mike Wilson. SWT: The Standard Widget Toolkit, vol. 1 (Addison-Wesley, 2004), ISBN 0321256638.
• Clayberg, Eric, and Dan Rubel. Eclipse Plug-ins, 3rd ed. (Addison-Wesley, 2009), ISBN 0321553462.
• Harris, Robert, and Rob Warner. The Definitive Guide to SWT and JFACE (Apress, 2004), ISBN 1590593251.
• Eclipse Help > Platform Plug-in Developer Guide > Programmer’s Guide > Standard Widget Toolkit.
• Eclipse Help > Platform Plug-in Developer Guide > Programmer’s Guide > JFace UI Framework.
• SWT snippets: http://eclipse.org/swt/snippets.