
In the last few chapters, we started with the basics of Force.com. We saw how to create database objects, we created page layouts and tabs. Business logic is the brain of the application; it make sense of the data and also responds to the button clicks of UI.
With Force.com providing an easy way to handle the data and the visual UI, the developers can focus most of their energy and time in developing amazing business logic. As always, Force.com provides us with easy-to-use, point-and click-options to develop business logic.
In this chapter, we connect the data to the view using the controller. We will be seeing:
- Logic as a service
- Formulae
- Validation rules
- Assignment rules
- Workflows
- Approval process
As mentioned in the previous chapter, we won't be covering Apex in detail, but only giving an overview. Let's start creating some robust business logic for the application.
Force.com provides some basic controls for the validation of data, automating a process, triggering an e-mail alert after a particular duration, and auditing and tracking important fields such as status, and so on.
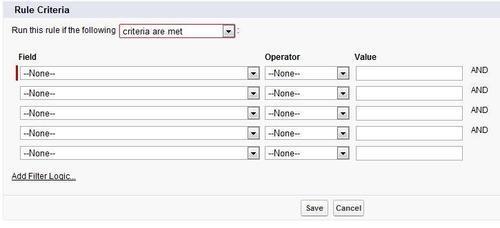
Force.com provides us with two ways of creating a rule; the simplest way is setting the fields to values, for example, Field X equals value Y or Field A does not equal value B as shown in the following screenshot:
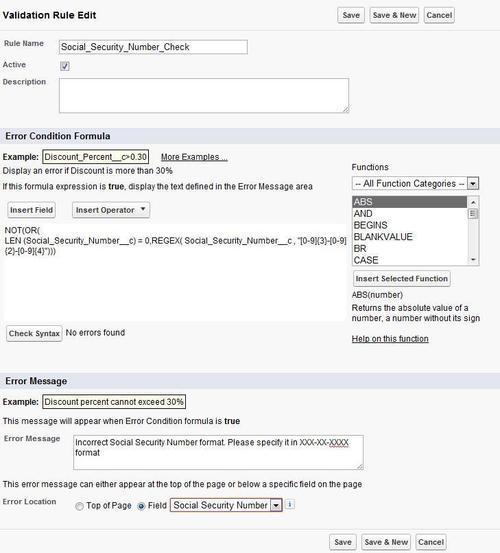
We can also write complex rules using formulae, which offer flexibility to use advance logic such as AND, OR, IF, and so on. The following screenshot shows the setting up of the validation rules:

There are different types of rules used in different areas. They are as follows:
- Validation rules:Validation rules are used to validate the data populated in the field of a record. They can be used to provide a user-friendly error message in case of data discrepancy. For example, to check if the discount is not greater than 35 percent.
- Workflow rules: Workflow rules are used to automate a process that is usually done manually. They can trigger an action when the rule is set true. For example, setting the checkbox to true if the value of X is Y.
- Approval process entry rules: The rules here ensure that only a particular set of records enter this approval step. For example, if the amount is greater than 50,000 it should only go to the head of the finance department for approval.
The rules that are used in any of the above have a common syntax. A rule syntax consists of the following components:
- Literal value: A literal value can be any string or a numeric component. For example, 0 in the above formula.
- Field values: These are references to the existing fields on the object. For standard fields we use the API name as the reference, for custom fields we append a __c to the API name.
- Global values: These refer to the value of a system or environment variable, such as information about the logged in user or the organization settings.
- Function and operators: Force.com provides us with functions to operate on the data. There are different sets of functions provided by Force.com for different sets of operations.
Tip
Please refer to the cheat sheet of Force.com formulae for the different functions and operators provided by Force.com http://media.developerforce.com/cheatsheets/SF_formulas_developer_cs-2Pg_HR.pdf
Validation rules are attached to fields. They are executed when a record is created or updated. We define the validation rule and the condition for execution of the rule along with an error message. If the evaluation of error condition results in a true value, the record is not saved, and the error message is generated.
When we create a general field, some validation rules are set by default due to the property of the field, for example, an E-mail field checks for the pattern of @ and . (dot) in the entered string, the number field checks for numbers entered in the string.
For custom validations, we use validation rules. Validation rules are permanently bound by the field and are universal. Every time the field is inserted it validates the field value with the validation rule.
For example, the following validation rule checks for the Social Security Number of the customer and throws an error if it is incorrect.
Validation rules are used to preserve the data quality of the data. We can use validation rules to prevent data loss in the record. We can use the formula isChange to determine if the value in a certain field is changed and the user profile.
The general library wishes to store the social security number and a valid credit card number for the subscription. How do they ensure that the right pattern is entered in the respective fields?
To create a validation rule perform the following steps:
- Navigate to Setup | Objects | Validation Rules | New as shown in the following screenshot:
- Add a user-friendly Rule Name to identify the rule in the first section.
- In the second section on the right hand side we see the list of all the Functions available to create the formula.
Note
The formula uses basic functions, which are provided by Salesforce.com. These functions are similar to the Excel-based functions. For a complete list of functions please visit The Formula Quick reference guide at: https://na3.salesforce.com/help/doc/en/salesforce_formulas_cheatsheet.pdf
- We can also use Insert Field to insert fields in the formula to create a dynamic formula. The fields that can be selected while creating a formula are, $ fields, which are globally available like login user fields. For example:
$User.City - The fields from related objects such as master object or a lookup object are also available to link in the field name. We can include other custom object fields in the formula field using
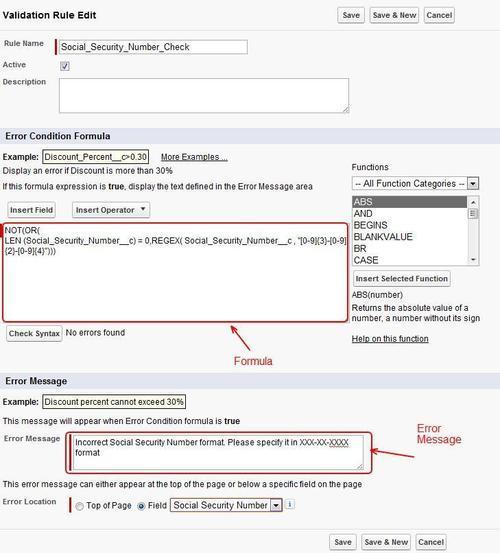
ObjectType. - In the Error Message section, we add the error message that will appear on the page if the validation rule is successful.
A formula is similar to a spread sheet formula field that is executed at run time. The formula can make use of existing data to create a new set of data.
Here's an example of a formula that can be used in a custom formula field on a media object. It calculates the number of days after the due date is over (assuming, we have all the fields in media object):
If(TODAY ()>BookIssueDate__c,TODAY()-BookIssueDate__c,0);
The general library has a fixed pattern in returning the media items. The members are allowed to borrow the media items for only 15 days. They want to reduce the typing work for the entry clerk and wish to auto calculate the return date of the book.
The return date will be calculated on the CustomerMedia object that will record the transaction of book issue. To create the Return Date formula:
- Create a Date field titled Issue Date, this field will store the date of issue for the media item.
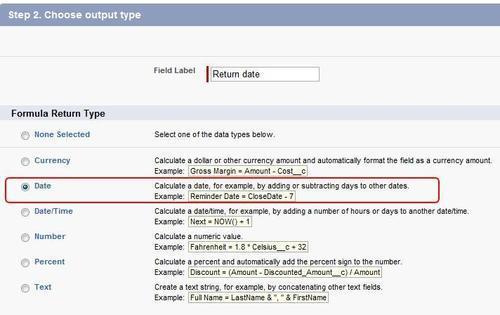
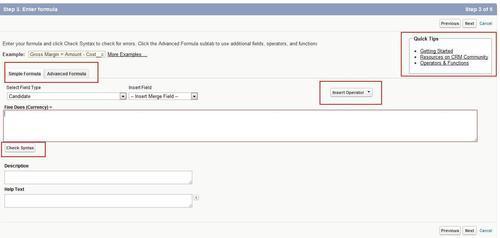
- Create a new field titled Return date as shown in the following screenshot, it is of type Formula and the return type is Date and click on the Next button.
- The next page is the formula editor. We can create a Simple Formula or an Advanced Formula. A Simple Formula gives us the list of the fields on the existing object on which the formula is written along with some global variables. The Advanced Formula editor helps in writing the cross object formulae. The other highlighted parts are Insert Operator, which helps in building the formula. Check syntax checks for syntax error before saving the formula.
- Add the formula
Issue_Date__c +15in the formula editor as shown in the following screenshot: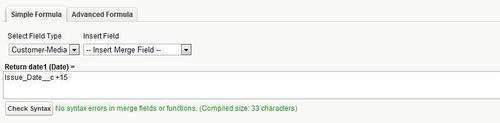
- Here
Issue_Date__c+15is the date field used to store the issue date for the media. We can also use the Insert Field drop-down list to insert this field. Make sure to click on Check Syntax button to compile the formula and check for errors.
Every time a new record is created with the Issue Date, the Return Date field will automatically calculate and store the return date for it.
One of the most powerful features of the Force.com formula are the cross object formula fields. In cross object formula fields we can navigate up to five levels of child-parent-grandparent relationship. Formula fields are calculated on the run time according to the formula stored in the fields.
Record owner and activity fields cannot be used in a cross object formula fields. Let us create the cross object formula field for the customer object.
The general library wishes to calculate the Penalty Amount of the media resource when it is checked out late. Write a formula field that can calculate the amount on the Customer-Media object.
To create a formula field first go to the field creation dialog box on the object that we saw in Chapter 2, Creating a Database on Force.com, Force.com data-types section. Select the Formula field in the list of fields. It will open the formula creation wizard.
- Choose the return type of the formula. For the purpose of the exercise as we are calculating the fine amount on the book, the return type would be Currency as shown in the following screenshot:

- Click on Advance Formula to open the Advance Formula Editor. In the Advance Formula Editor click on Insert Field to open a field pop-up as shown in the following screenshot:
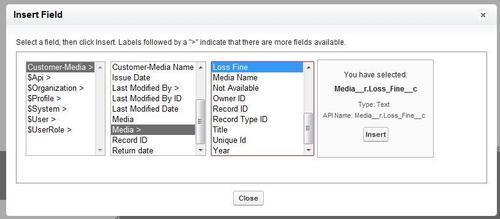
- The Insert Field dialog box allows us to access fields on different objects that are related to the current object. In this case, we can access the field, Loss Fine, which is stored on the Media object in the Customer-Media object, to generate the formula. To access the field click on the object name with the > suffix. Once the field is selected, click on Insert in the last column.
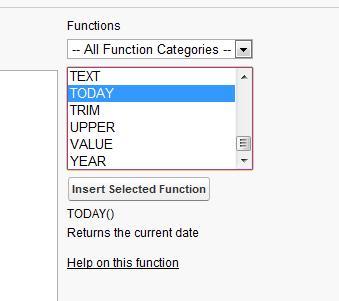
- The formula for calculating the penalty amount would be the number of days after return date x the fine amount. The formula editor also provides us with the system dates in system functions. Select the formula for Today from the Functions on the right side of formula editor, as shown in the following screenshot:
Note
The formula quick reference guide on Force.com provides an effective cheat sheet for the formulae. It can be visited at https://na3.salesforce.com/help/doc/en/salesforce_formulas_cheatsheet.pdf
- Now we have both the functions and the fields we require in the formula editor, we also need one more field called 'Return_date__c' we created in the previous section. Create the formula
(TODAY() - Return_date__c )* Media__r.Loss_Fine__cto calculate the fine as shown in the following screenshot:
- For now we can skip the Field Level Security step in the wizard, so simply click on the Next button. We will be covering this in the Security Chapter, Roles and Profiles section.
- Select the appropriate page layout where the formula should appear. A word of caution, if we don't select a page layout, the field is not displayed on the page.
Roll-up summary fields are used to aggregate child information on the master object. The roll-up summary uses special functions such as SUM, MIN, MAX, and COUNT.
In the roll-up summary field, unlike the formula field, the field is placed on the master object. The values are aggregated in the object. The values are stored in the field and calculated periodically.
The general library wishes to keep a track of the total media items issued to the customer. They want the total number of items issued in a single field called Media Issued against the member record.
The media that are issued against the customer are stored in the CustomerMedia object; we will be storing their count in the Customer object.
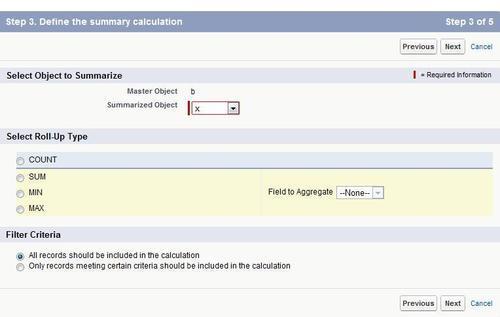
- Go to Customer Object and click on new fields. When your object is the master object for another (in this case Customer is the master for CustomerMedia object) a new type of data type is available, called the Roll-Up summary as shown in the following screenshot. Select the data type and click on the Next button.

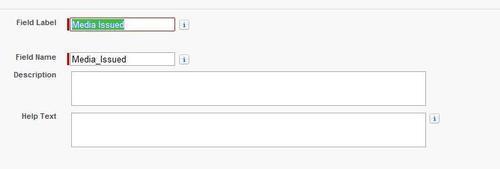
- We will name this field Media Issued. Please fill in the details as shown in the following screenshot and then click on Next.
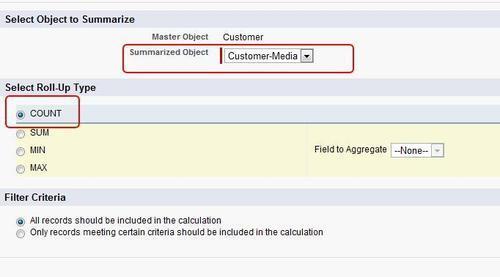
- On the next page select the child object available for roll-up. In the example, select Customer-Media as shown in the following screenshot :
- As previously mentioned we will be skipping the field-level security for now and leave it for the further chapters in security. On the final page, select the page layout to add the field and Save the field.
This covers the basic formulae and the logic that help us simplify the work. In the following section we will be discussing how to automate the business processes using workflows and approval process. We will understand the use of workflow and approval process and distribute the workload to people.