
The most crucial part of any enterprise-level application (built on Salesforce or otherwise) is the control of data. The litmus test for effectiveness of an enterprise-level application is the way we restrict unauthorized access to data.
The following diagram illustrates the record sharing in an organization:
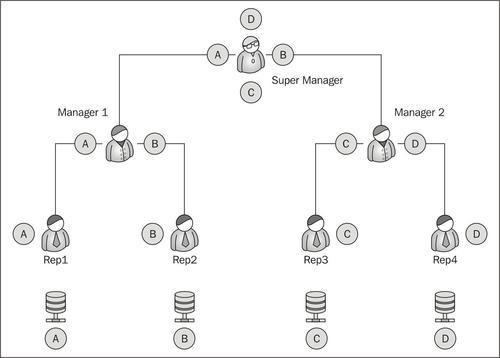
The four records A, B, C, D are evenly distributed between the reps and the manager. Rep 1 should only see record A, Rep 2 should only see record B, and so on.
On the top of the chain, the Super Manager can see all the records under him.
Before designing the application we first need to consider the stake holders of the application:
- Who will be using the application?
- What will these users do?
- Is the data sensitive or critical?
- Who will be customizing the application?
- Are there any global records that should not be edited by the users?
- Which set of users will be editing which data?
These are some of the questions that need to be addressed before we understand the security model of the application.
Let us go back to the problem statement of the Library Management System. The purpose of this exercise is to determine the actors in the system. Let us have a recap of the Library Management System. What objects do we have so far?
|
Library Management System | ||
|---|---|---|
|
Object name |
Related to (relationship) |
Comments |
|
Media |
CustomerMedia (detail object of media) |
The media object is the master table to store the collection of media. Books and videos are separated by record type to show different types of media. |
|
Customer |
CustomerMedia (detail object of customer) Book Penalty (detail object of member) |
The Customer object stores the customer information. It also stores the total fine paid by the customer as a roll-up field. |
|
CustomerMedia |
Customer, Media (master object) |
The CustomerMedia object stores the customer and media in a junction object and is used during the checkout and check-in function of the library management. |
|
Book Penalty |
Customer |
This is a child object on customer and stores the amount of late fees paid to the customer. |
Let us keep our library system very simple. There are two types of users who will be using this application:
Based on the above information, prepare the matrix diagram for record sharing in the library system.
The easiest way to prepare a matrix diagram is to draw a table with object information on the X axis horizontal and user information on the Y axis on the left. In every column check the access the users will need to perform the task. The basic access rights are called CRUD, which is an abbreviation of Create, Read, Update, and Delete.

The matrix diagram for the Library Management System is shown below:

The matrix diagram is important while designing the Force.com application. In the next chapter we will be seeing the different ways of restricting access to users and separating the data. We need to have the matrix diagram ready so that we can prevent unauthorized access to the data.
The security of Force.com model is split into four parts:
- Organization wide default
- Profile and role-based sharing
- Sharing rules
- Manual sharing
The four types of sharing can be visualized as a reverse pyramid with the maximum number of people accessing the data increasing as we move above in the pyramid, as shown in the following diagram:

Let us climb on top of the pyramid one by one and look at the different types of security offered by Force.com.
For example, if a user sees a record due to Organization Wide defaults and profiles, there is no way we can restrict him from seeing the using Sharing Rules or Manual Sharing. However, if the user cannot access the object due to Organization Wide defaults, we can make it visible using the Sharing Rules or Manual Sharing.
As we have already seen in Chapter 1, Getting Started with Force.com that users need the combination of user name + password + IP address or security token to login to any Force.com application. As with any multiple-users based system the most important aspect is not what the user sees, but what the user should not see.
Once the user is authenticated using any of the combinations mentioned above, the level of user is determined. If the user has certain restrictions or special privileges, the data is displayed accordingly. The restrictions and privileges are stored by the system administrator in the Profile.
Based on the permission set in the profile associated with the user, the data, application and logic is displayed. By default, Salesforce provides us with six standard profiles. These six profiles cannot be modified; if we wish to change some permission in any of them, we clone the profile and modify the clone:
- System administrator
- Authenticated website user
- Standard platform user
- Force.com user
- Contract manager
- Standard user
Let us create a user and assign him a profile.
The library management system is now in place and users can't wait to try it out. Create a user with a Standard User profile so that he/she can access the system.
- To create a user go to Username | Setup | Administration Setup | Manage Users |Users.
- Click on New User, as shown in the following screenshot:
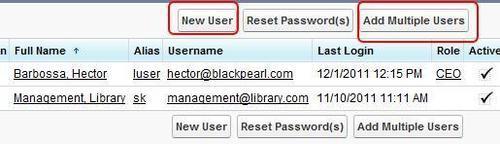
Alternatively if this is the first instance of the organization, we can add multiple users at a time.
- The Add New User page is self-explanatory; we will look into the important aspects of it only. As shown in the figure, assign the profile of the Standard User to the profile.

- The checkboxes on the right determine the functionality and other desktop applications used by the user. For instance, if the user is allowed to access Salesforce from a mobile application, please select Mobile User. Similarly, if the user can access the service cloud console select service user.
- Fill in the contact information for the user. The contact information is like any other user information. The user can change it later himself.
- Locale settings determine the language and the time zone for the user when he/she logs in.
- Finally, if the user is to be notified there is a separate checkbox at the bottom of the page. If the user is created for testing purposes, there shouldn't be a need to notify the user at the time. Checking this box will send the user a temporary one-time expiry password, which the user has to change at the first login.

- Save the record.
There is one important step skipped purposely in the form, which is adding of the role, which we will see in the coming sections.
Another important step in user security settings is the password policy for the users. Password policies help maintain a strict and complex pattern in password with the automatic expiry.
By default Salesforce passwords expire in 90 days and the user cannot use three previous passwords. They are 8 characters in length and should be a combination of alpha-numeric characters. These policies can be changed using the Password Policies settings.
To change the Password Policies perform the following steps:
- Go to User name | Setup | Administration Setup | Security Controls | Password Policies.
- Change the policies according to the requirements as shown in the following screenshot:

- The message and help link can be provided to the users in case they forget the password. If the system administrator forgets the password we can reset it using the reset link sent to the e-mail.
The security of the system depends on how the data is shared with the users and how to prevent access to the unauthorized user. Roles and profiles together determine how the data is accessed by the actors in the system.
The role determines what data the user can accesses, while the profile determines all things the user can do with the data.
Let us explore these two things in more detail.
A profile contains information on what the user should see and what he can do in the Force.com application. The profiles control the following things:
- What apps the user can see
- What tabs the users are permitted to use
- What objects can the user operate on and what CRUD-level permission is given to them
- The profile also determines the default RecordType and the default page layout available for the user
- Fields can be enabled or restricted for the profile
- What Apex class and Visualforce codes are accessible for the user
- The profile also determines the hours in which the user logs in as well as the IP restriction
- What all system-level configurations are the users permitted to change is also controlled by the profile
Force.com limits editing of the standard profile hence it is recommended to create a custom profile for special permission-set users. In this section we will be creating a custom profile for the librarian.
To create a profile, perform the following steps:
- Go to Username | Setup | Administration Setup | Manage Users | Profiles.
- Click on the New button.
- We need to select the base standard or existing custom profile to clone the new one. This will copy the existing permissions to the new one.
- The new profile page is very large so let's look at it section wise.
- The first section as shown in the next screenshot is the Custom App Settings.It allows us to select which applications the user can see. Depending upon the apps loaded in your system, it might look like the following screenshot:

- The next section is Tab Settings where we choose what tabs the user is going to see as shown in the following screenshot:

There are three options we can choose for the tab settings.
Default On
Makes the tab default to the user when he opens the app
Default Off
Hides the tab from the user but the user can personalize his app to add the tab again.
Tab Hidden
Hides the tab from the user and the user cannot add it.
If there are some sensitive tabs containing the important data, the tab has to be specifically hidden from the user. The user can personalize his app and add new tabs to it as well. It is always recommended therefore to hide the tab separately along with the app.
- Administration Permissions determine the administrative capabilities of user in the Force.com app. General User Permissions are usually the data.
- There are different permissions available in the General User Permissions and the Administration Permissions category. The entire list of permissions is available at:
https://login.salesforce.com/help/doc/en/admin_userperms.htm
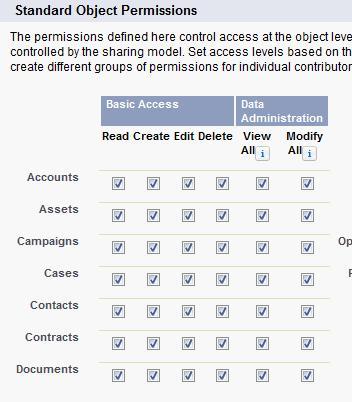
- As shown in the following screenshot Standard and Custom Object permissions are the CRUD permissions we can give to all the standard and custom objects in the Force.com org. These permissions determine what access control the user has on the object specified. The View All and Modify All checkbox makes the object visible and sharable regardless of any other sharing settings.
- Save the profile.
Thus we can now create a custom profile. The profile determines what data can be seen by the user. Now let us see how the user should see the data using roles.
Roles are created according to the corporate hierarchy of the system. Roles determine how the data is shared with the user. While profiles determine what objects can be seen by which users, roles determine which records from the object can be seen by the user. The user can be separated on the basis of their work department, territory, or company hierarchy.
The following diagram illustrates a basic sample role hierarchy:

As seen in the diagram A, B, C, and D are records of the same objects owned by Rep1, Rep2, Rep3, and Rep4 respectively. While all the four reps have access to the same objects, they do not have access to each other's records. Manager 1 can see the data and reports from Rep1 and Rep2 as they come under his hierarchy. He cannot, however, access the data for Rep3 and Rep4. The Super Manager can see the entire organizations data as he is topmost in the hierarchy.
Role hierarchy prevents the data being seen by people at the same level in the hierarchy, at the same time it grants full access to the people on top of the hierarchy. In the above example, Manager 1 will get all access to the Rep1 data.
To achieve this we set up a role hierarchy.
Use the following steps to set up role hierarchy:
- Go to Username | Setup | Administration setup | Manage Users |Roles.
- If it is your first time it will show a splash page for roles with the button Set Up Roles. Click on the button to proceed.
- As shown in the next screenshot, the default view is the tree view for the roles. The view can be changed in the upper right hand corner to normal view or list view.

- As shown in the screenshot, with the link Add Roles, we can create roles at any level in the hierarchy.
- Once we define the role, using the Assign link, we can assign users to the role.
In the next section we will deal with the object-based security in Salesforce and understand the significance of role hierarchy in distributing the records.
The general library now wishes to install this system across multiple locations. They have branches in the east coast as well as the west coast.
The structure of the organization is as follows:
- They have a separate head librarian for every coast who in turn gets reports from multiple sub-librarians
- Each branch has a clerk who handles the check-in and checkout of books and maintains the customer profiles
While roles and profiles are used to determine the user-based security, the organization wide default determines the distribution of data with the user. We use the defaults in the object to determine which people across the role hierarchy can access which objects.
To set up Organization Wide defaults, follow the steps:
- Go to Username | Setup | Administrative Setup | Security Controls | Sharing Settings as shown in the following screenshot:

- As shown in the screenshot the general sharing diagram for the organization will be displayed:
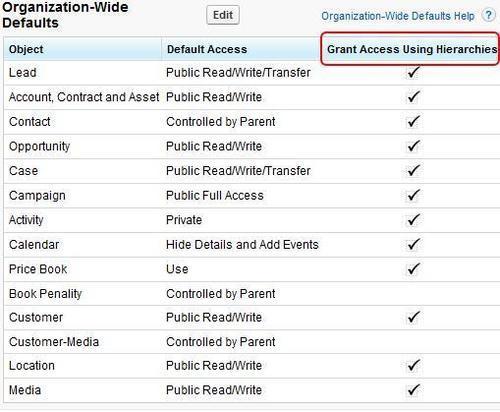
- Select the object to configure for the organization wide tabs. We get three options to choose from as shown in the following screenshot:

The following options determine the sharing settings of the object:
The role hierarchy is observed and people cannot view their peer records. In the figure above, Rep1 cannot see the data for Rep2 in the object that has private settings
This is useful if we have master data that the people refer to for example, the books info in the library. They can be kept public read only. In this case everyone across the hierarchy can see the data
This option does not obey any role hierarchy and anyone can edit/ modify or even delete the objects depending on their profile permissions.
To set up organization-wide defaults follow the simple method:
- First find out which user requires least access to an object. Set the organization-wide default to all the objects based on this user. For example, the library clerk is the person in a library who mostly handles the issuing and the return of the books. He needs the least access on the customer object (assuming that only the librarian can handle membership) set the customer object to private read only.
- Most restrictive record access is defined using a organization-wide default. Access to additional records is made available through the role hierarchy, sharing rules, and manual sharing.
- Changing organization-wide default settings can delete manual sharing if that sharing is no longer needed.
A new addition to the profile-based permission is the permission sets. A user can have only one profile at a time with a static set of permission. With the new permission sets, we can create a separate set of permissions for the uses. For example, to give access to an object, instead of modifying the profile we can create a permission set and assign it to user.
Sharing rules are the special sets of privileges set by the administrator to automatically grant record access to certain users or the group of users. There is a limit of 100 owner-based sharing rules.
Sharing rules can allow the records for the user, which are restricted by the roles. However, if the object is not visible to the user profile, the records cannot be made visible by sharing rules.
Sharing rules are one-off sharing options for complex sharing logic that cannot fit in the normal sharing structure.
Let us set up the sharing rules:
- Go to Username | Setup | Administrative Setup | Security Control | Sharing Settings.
- Below the organization wide defaults there are multiple sections of objects as shown in the following screenshot:
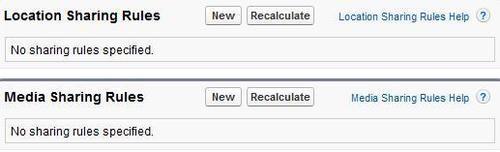
- We can set the sharing rules based on criteria or the users as shown in the following screenshot:
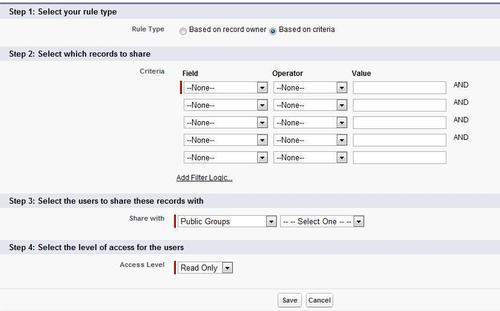
- In Step 1, we can choose the sharing based on record owner or based on criteria.
- In Step 2, if it is Criteria as seen in the preceding screenshot, select the Criteria. The rules are same as formula fields.
- In Step 3, select the users to share the records and finally specify the access levels.
Finally, the last option in sharing is the manual sharing option given to the individual users with full access to a record. It is used if the organization wide defaults access for the object is set to Private. This is generally done by a record owner, for a single record. Only the record owner and users above the owner in the role hierarchy are granted full access to the record. It is not possible to grant other users full access.
Users with the Modify All object-level permission for the given object or the Modify All Data permission can also manually share a record. User-managed sharing is removed when the record owner changes or when the access granted in the sharing does not grant additional access beyond the object's organization-wide sharing default access level.
Sharing can be a bit complex because we need to fix the complex business problems using different tools, so here is a quick guide to understand sharing
- The owner of the record can view/edit/modify and delete the record
- If the organization uses sharing and security, the person above the owner can also view/ edit the record
- If it is any object having sharing settings public read/write or greater it can be seen/edited
- If the record is private, a user can access it only when there is a sharing rule giving him the access or if it is manually shared