
Chapter 6

Building in Four Dimensions!
Since obtaining his diploma in 1984, architect–engineer Koenraad Nys has concentrated on the development and application of information and communication technologies (ICT) in the field of construction. Armed with his great experience in this field after 15 years at STAR-APIC, where he developed CAD and GIS software and BIM applications before the term was even coined, Koenraad Nys set up his practice, The Dimensions-Studio, in 1999. It now concentrates on the integration of 4D/xD and project management. The Dimensions-Studio is currently involved in several ICT and research projects, as well as with BIM working groups. He teaches at Saint Luc Grand-Bruxelles University, as well as at various other European architectural institutes.
Project: 4D visualization for architecture and infrastructure projects.
Tools: Google SketchUp 7, xD Virtual Builder Light, xD Virtual Builder r5.4, MySQL 5, MS Project.
Small construction projects often have a multitude of facets, but an experienced site foreman will draw upon experience and intuition to keep an overall view of the project: knowing that the volume of delivered material must not exceed the available storage space and the contractors must not all be put to work at the same time. But in larger projects, it is difficult to maintain a broad overview of the project and thus keep everything under control.
As construction projects become larger and ever more complex, the need for optimal collaboration and communication grows, and these practices should be implemented from the very first planning stages of the project. Visualization in four dimensions allows you to do just that. The construction process and all its attendant parameters can be controlled in an entirely virtual, construction management-based manner.
Construction management techniques have been around for a long time. But the traditional approach, with its Gantt diagrams, can be difficult to understand for people external to the project. When the project management becomes extremely complex, containing many hundreds of rules, it is especially difficult for project managers to clearly explain the project organization to members of the team. However, by tying project management tools to SketchUp, it is possible to remedy this problem. The entire process of construction is represented in a simple and readable 3D form. In addition, SketchUp’s capabilities facilitate the production of animations, presentations, or reports. These 4D models are usually used for communication between the partners involved in the construction, but they can also be used for dissemination of information to the wider public, or for the more technical aspects of construction and site management.
The Dimensions-Studio has been working since 1999 on 4D visualization techniques and, in 2008, added Google SketchUp to its suite of programs. Although at first its use was restricted to certain projects where the client had requested that SketchUp be used, gradually its use has spread to a growing number of other projects and users.
Technical Context
Visualization in four dimensions is a technique whereby the time factor is inserted into a 3D model or into a 2D drawing. The basic technique consists of giving SketchUp objects temporal characteristics that define construction activity. Thanks to certain specific functions that allow us to navigate through time, we can move the clock forward and, in this way, reproduce the process of construction. It is still possible, for example, to show which tasks have been carried out in time or have been delayed compared to the original schedule.
When 4D models are being created, it is best to get away as much as possible from the actual detailed modeling.
The basic principle consists of creating elements in SketchUp with the correct construction activities. Each activity is defined by an xD object that has, at a minimum, the following properties: start of activity, end of activity, and type of activity (construction, demolition, etc.). For each xD object, SketchUp elements belonging to this activity are assigned via a simple selection.
Thanks to the temporal navigation, these elements are sometimes shown and sometimes hidden and their color can change according to the situation. Basically, the user determines the material or the color of each element according to its type of activity and its status. For example, a shuttered concrete construction could be colored red while it is being poured and textured gray once it has cured and set.
The basic data unit in these studies is the xD Object. They can be created locally within SketchUp (xD Virtual Builder Light) or, for example, can be linked directly to a schedule generated in MS Project (xD Virtual Builder Classic). If a project date slips, this shows up directly in the 4D model, and the consequences for the rest of the project become immediately apparent.
In addition, modifications can be made to xD Objects via an interactive xD window. This allows for the selection, modification, and deletion of all the xD Objects. It also gives access to a complete series of related functions.
These 4D models are, essentially, classic SketchUp models, but they also include all the elements that take part in the construction process: cranes, site access, site closure, and all symbol designations like text labels, etc.
Any version of SketchUp above version 6 (free as well as Pro) can create 4D models. Once the model has been created, we generate all the representative scenes based on a list of key dates. These scenes can then be printed out, or an animation can be made from them.
Techniques Used
As explained earlier, Google SketchUp plays a central role in the creation of 4D models, and all of SketchUp’s basic toolset can be used for their creation. Any type of SketchUp element can be used, from simple lines to 3D solids, text, scanned images, etc. Library files such as components and groups can also be used. Working with groups is always recommended because it makes management simpler when dealing with more complex phases of the project and, at the same time, keeps the performance of the program snappy. Assigning these groups to layers is not necessary at the beginning of the modeling stage. This can be done later while you are working with the model.
The xD Virtual Builder Light plug-in for SketchUp entirely functions independent of third-party software packages. The xD Objects are created in applications, and these data are also saved in the SketchUp model. The xD Virtual Builder Light plug-in works on both PC and Mac.
The xD Virtual Builder Classic module is a more complete implementation, in which all the data can be tracked via a relational database, and so it is more transparent to the end user. With this application, any existing project management material—like MS Project files—is also dynamically linked, which means that all the changes are immediately reflected directly within the 4D model. This plug-in runs only on the PC.
MS Project, Primavera, and Powerproject are applications that have been developed specifically for project management in the field of construction. All these applications are based on the same working principle that allows the manipulation of project-management data, most often using Gantt charts. However, they differentiate themselves in their power, their control functions, and their interface. The xD Virtual Builder Classic plug-in can interact with all these popular programs.
New Approaches
The originality of this solution is twofold: on the one hand, it puts complex techniques into practice within a simple 3D environment; on the other hand, it capitalizes on SketchUp’s simplicity to communicate an overview of the process of construction, its various phases, and any potential difficulties to all those taking part in the project.
The possibility of running through all the aspects of the construction process in a virtual environment is particularly useful for identifying and resolving any possible problems before the construction work starts. This facility is even more interesting when there are many contractors involved in the work or if the project is either complex or one of urban design, encompassing a wide area. This not only avoids cost overruns but also greatly improves the management, upkeep, and longevity of the final building.
By taking advantage of the “best of both worlds,” we have been able to uncover complex data, often buried deep within inaccessible databases, and present them in an extremely visual manner. What is more, although this works for following the progress of the construction project, it also allows us to demonstrate other visualizations, based on other approaches, thanks to the xD Virtual Builder database.
Example 1: Project Using xD Virtual Builder Light
For our first case study, we will use the SketchUp plug-in, xD Virtual Builder Light, which works completely independently within Google SketchUp. All the time-based data are input manually and are stored within the model. In order to access these data, you simply need a plug-in. This works with version 6 and above of SketchUp and is available on both Mac and PC.
Stage 1: Base Model and Preparatory SketchUp Model
Objective: To create the base model in SketchUp, including all the final elements and also including temporal or logistical elements such as cranes, site access, etc.
Data: Model created using project database. This model can, of course, be built using external files such as AutoCAD DWGs, for example.
Tools: SketchUp’s modeling functions.
We started off by creating a “classic” SketchUp model, all the time keeping in mind that this was a 4D project. This means that we have to model more than just the final result: temporary elements also needed to be modeled, like, for example, bicycle parking spaces, as well as logistical elements (e.g., cranes), excavations, demolitions, etc. The presence of these elements would vary according to the project stage.
The SketchUp model can be organized any way you like in terms of layers, groups, or components, although it is better to group objects before linking them to the database and reviewing the visualization. Layers, too, can be a great help in organizing and visualizing the individual phases of the project, although, as stated, this organization has no bearing on the database functions.
As in a traditional SketchUp model, materials and textures were applied to the various elements. It should be remembered that in a 4D visualization, the colors change as the visualization progresses, according to a palette chosen by the user. Each element, however, stores its original material in the database.
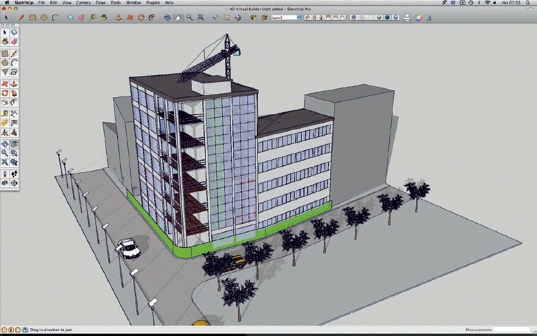
FIG 6.1 Alongside “classic”-modeled entities, 4D modeling also contains logistic and temporary elements, as well as any necessary demolition work.
Stage 2: Creation of xD Objects with Start and Finish Date
Objective: To create xD Objects. Each xD Object designates one activity.
Data: Inserting tasks and activities at the same time as their start and finish dates. Defining the type of activity. All these data are entered manually into xD Virtual Builder.
Tools: xD Objects in SketchUp.
An xD Object is a virtual object defined by its name, a start and finish date, and type of activity. This xD Object possesses the necessary information, and it can be linked to other objects already created in SketchUp that have the same start and finish time for their particular activity.
The 4D data type presents the area of activity: you can choose between construction, demolition, environment, finishes, and landscaping. For each of these 4D activities, three materials are automatically created in SketchUp’s materials library: Name4DType_pre (before the start date), Name4DType_act (between the start and the finish dates), and Name4DType_post (after the finish date). All these materials can be modified in exactly the same way as any other SketchUp material (see stage 5).
To create xD objects, you should follow these steps:
1. On the xD toolbar, click on the icon to open the Show xD Objects window.
2. Click on the New xD Object icon in the xD Objects window.
3. Enter the data that define your xD Object:
a. Name
b. 4D type
c. Start date (select it from the calendar drop-down list via the ellipses icon)
d. End date (select it from the calendar drop-down list via the ellipses icon)
4. Click on OK.
The xD Objects window is updated and contains your newly created object.
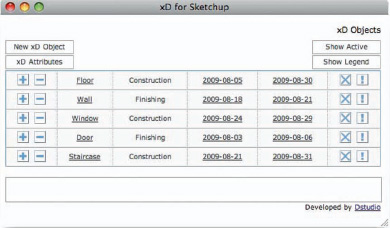
FIG 6.2 All the creation and management functions for xD Objects can be accessed from the xD window.
Stage 3: Assigning xD Objects to a SketchUp Selection
Objective: To link selected SketchUp elements to the relevant xD Objects.
Data: The basic data are the xD Objects and the current SketchUp model.
Tools: The xD Objects window in SketchUp.
Assigning the xD Objects is carried out via the following steps:
• Select the relevant SketchUp elements.
• Click on the icon for the desired xD Objects.
• If the above is successful, you will get the following message: The SketchUp Entities Have Been Linked.
At first glance, nothing appears to have changed in the model: But, of course, all the elements are now linked together.
This assignment can also be carried out over various stages, based on different selections, either because it is easier or because there are some elements that were left out of the initial selection.
Stage 4: Navigating in Time
Objective: To show the state of construction of the project at a specific date.
Data: SketchUp xD model created in the preceding stages.
Tool: The xD toolbar in SketchUp.
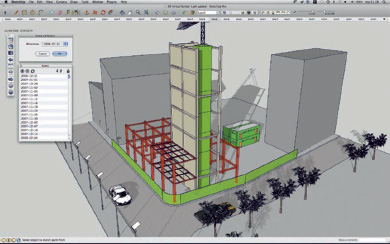
As indicated in the introduction, when you navigate in time, certain elements are either visible or hidden. Their colors also change according to the prevailing situation. The color and material are chosen by the user according to the type and status of the activity. So, for example, a construction in concrete might be red while it is being poured, but textured gray once set.
All the temporal navigation functions are found in the xD Virtual Builder toolbar.
FIG 6.3 All the temporal navigation functions are easily accessible from the xD Virtual Builder toolbar.
Navigating in time can be done in several ways: either by choosing a specific date or by “scrubbing” through the entire construction process. You can choose a specific date via the Calendar tool.
Starting with a particular date, you can continue moving the process forward or rewind back to any particular point in the past:
View past or future dates, moving backwards and forwards by a defined time interval.
Show the Time Interval list.
Run the simulation automatically, stepping forward by a defined time interval.
The time intervals can be chosen by the user. The standard interval is found under the Stages list. This list gathers together all the start and the end dates of the xD Objects. Other available intervals are Every Week, Every 15 Days, Every Month, Every Quarter, Every Six Months, or Every Year. To select this, go to the Plug-Ins menu and choose xD Virtual Builder > Tools > Select Time Interval.

FIG 6.4 The pop-out Calendar tool allows you to easily choose any date.
Attention!
To get back to the original model, click on the Restore Original Colors or Show All Scheduled Entities.
When a 4D material is removed,
When a 4D material is defined to be totally transparent, the original color or texture will be seen!
Stage 5: Changing 4D Types
Objective: Adapting the colors for the chosen types.
Data: Material automatically generated by type.
Tool: SketchUp’s Materials editor.
Each 4D type has a particular activity associated with it. The basic types are as follows: Construction, Demolition, Environment, Logistics, Finishes, and Landscaping. For each these 4D types, three materials are automatically created in SketchUp’s Materials library:
• Name4DType_pre: The material that the 4D SketchUp object will receive before the start date for the activity (before the start date)
• Name4DType_act: The material that the SketchUp object will receive while its activity is being carried out (i.e., between the start and finish dates)
• Name4DType_post: The color that the 4D SketchUp object will receive when its activity is completed (after the finish date)
All these colors can be edited using SketchUp’s Materials editor.
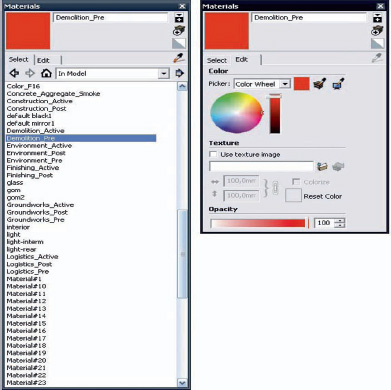
FIG 6.5 The 4D types are denoted by their SketchUp materials, and it is possible to modify these using SketchUp’s Materials editor.
Stage 6: Improving the Image by Adjusting the Shadows
Objective: To increase the model’s readability.
Data: The SketchUp xD model created in the preceding stages.
Tool: SketchUp’s Shadows option.
For each visualization date chosen, the shadows are now generated. If the model is large, this can result in a slowdown.

FIG 6.6 Shadows improve the depth of the images, something which is especially true when project managing the construction phases.
Stage 7: Automatically Generating Scenes and Managing Them in the Scenes Palette
Objective: To generate scenes for certain dates within the project and to process them so that they can be used for the production of documents.
Data: The SketchUp xD document created in the previous stages.
Tool: The xD toolbar in SketchUp.
From the Plug-Ins menu, choose xD Virtual Builder > xD Scene Generator. This will allow you to generate the scene for each time interval that you have set.
FIG 6.7 Scenes can be generated simply by selecting dates; one scene is generated for each date chosen.
Once these scenes have been generated, you can manage them in SketchUp’s Scenes palette. Some examples are as follows:
• The scenes can be exported in any desired file format (JPEG, PNG, PDF, etc.). From the Menu Bar, choose File > Export > 2D Graphic.
• You can use any scenes generated by xD Virtual Builder as keyframes in an animation.
• Animations can be exported by choosing File > Export > Animation.
Example 2: xD Virtual Builder Classic
When using xD Virtual Builder Classic, the same basic workflow is followed, although you have many more options at your disposal. Thanks to the dynamic linking to existing project management data, managing 4D types is much more powerful. Furthermore, the visualization capabilities are enhanced, something which allows a more accurate comparison between the current and projected situations.
The creation of the base model is identical to that in the preceding project. However, the creation and management of xD Objects is rather different. In the Light version, all the data are processed within SketchUp itself. In the Classic version, these data are processed outside SketchUp, and the quantities are handled by a relational database, a more complex level of organization, but at the same time one that offers many more possibilities. Below, we will give you an idea of these possibilities, but without going into too much technical detail.
The order in which you carry out the actions is not really crucial. In most cases, we will first input the project management data so that we can then pass them on to the xD Objects and then add the SketchUp entities. However, you could just as well do it the other way around.
Stage 1: Starting an xD Virtual Builder Classic Project
Objective: To set up an xD project.
Data: Model to be created using supplied project database. Of course, the model can also be started by using other external files such as AutoCAD DWGs.
Tool: xD Virtual Builder Classic.
Thanks to xD Virtual Builder Classic’s well-thought-out interface, the database can be constructed in five key stages. The project can then begin. The organization at this stage is transparent for the user; there are no complex database manipulations to be carried out.
Stage 2: Linking to a Project Management Application (MS Project or Similar)
Objective: To link with data from MS Project.
Data: Basic MS Project file.
Tools: xD Virtual Builder Classic and MS Project.
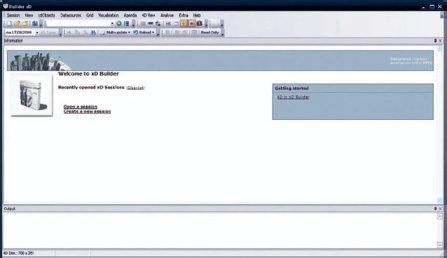
FIG 6.8 xD Virtual Builder is a far more capable application that is set up via a web interface.
Once the project is begun, the relevant project management file can be opened in MS Project.
Linking the MS Project tasks with the xD Objects is easily carried out: After the selection of the relevant task or tasks in MS Project, they can be brought into xD Virtual Builder via drag and drop. All the xD Objects are created automatically and linked. The start and finish dates are placed into MS Project’s database and synchronized. Furthermore, any other attributes from MS Project can be linked at this stage, but we will not go into this technique here.
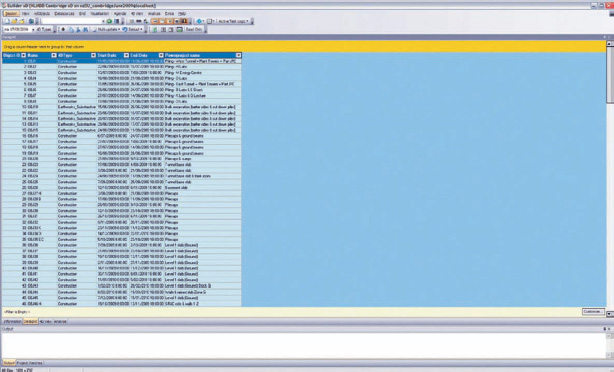

FIG 6.9 Here, the time-based data are extracted from MS Project. The xD Virtual Builder application dynamically links them to the elements.
Stage 3: Linking the xD Objects to the Selection in SketchUp
Objective: To link the data to entities in SketchUp.
Data: xD Virtual Builder project and SketchUp model.
Tools: xD Virtual Builder Classic and SketchUp.
Once all the different tasks have been linked, the corresponding entities in SketchUp can be linked, too. To do this, the SketchUp entity must be selected, then it is simply a case of selecting the corresponding xD Object in xD Virtual Builder and clicking on the command Link Selected DS Item in xD Virtual Builder.
If we wanted to do this the other way around, we could, for example, start with the selection of an xD Object in SketchUp and then attach an MS Project task to it. This can be carried out by using the xD Toolbar.
To finish, a 4D type (representing a type of construction activity) needs to be selected within xD Virtual Builder. Unlike in the Light version, there is no limit on the number of types. The user may also create new types according to his or her needs.
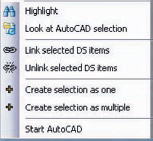
FIG 6.10 Within xD Virtual Builder, many functions are available, which enable you to link entities together.
Stage 4: Navigating Time and Modifying 4D Types
Objective: To manipulate the 4D model.
Data: The xD SketchUp model created in the preceding stages.
Tool: The xD Toolbar in SketchUp.
Navigating in time and modifying the 4D types is carried out in the same way as in the Light version of the program.
Stage 5: Generating Scenes and Images
Objectives: To generate scenes for certain dates within the project and to process them so that they can be used for the production of documents.
Data: the SketchUp xD document created in the previous stages.
Tool: the xD toolbar in SketchUp.
The Scene Generator is identical to that in the Light version of the program, but it adds the possibility of automatically saving the images in a file transfer–friendly format such as JPEG, BMP, or PNG. The choice of a date is still central to this part of the process.
This is an easy way of quickly generating different images that can be processed in an external program like PowerPoint or that can be dropped directly into a webpage.
Stage 6: PowerPoint Presentation
Objective: To create a report using a PowerPoint presentation.
Data: Images generated in the preceding stage.
Tool: MS PowerPoint.
Of course, the product presented here puts the accent on the interactive processing of the SketchUp xD model, but it is still often necessary to produce visual reports. The technique employed here makes creating and editing our report extremely easy, even for beginners.

FIG 6.11 The integrated scene and image generator lets you manage all aspects of image production.
The presentation can be put together simply by processing all the images using PowerPoint’s Photo Album functions. As an alternative, the functions of xD Virtual Builder can also be used to this end. This way, it is easy to combine a timescale, colored captions, different views, etc.
Conclusion
As already stated, The Dimension-Studio has had many years of experience with 4D models. At the beginning, we made use of classic CAD and GIS software—and sometimes we still have to. But SketchUp has opened up a world of innumerable possibilities.
SketchUp has a simple, approachable interface. The visuals that it produces are comprehensible and clear, even for beginners. Because it is a simplified solution, SketchUp’s toolset can sometimes be a little restrictive. But as a communication tool, it is (for the moment) unbeatable!
The combination of the Light version and the more powerful Classic version offers multiple possibilities for usage and communication. While the Classic version can be used daily by the project leaders in combination with their other usual project management software, the xD model can be easily shared with other participants via the Light version.
In the near future (the end of 2009), we also hope to have a 4D tool available for Google Earth and for the more usual channels of web publishing.
Resources
Software
Google SketchUp or Google SketchUp Pro.
xD Virtual Builder Classic – Around $3,500, excluding sales tax.
Available at http://www.dstudio.be.
Microsoft Project – Around $800, excluding sales tax.
Applications for SketchUp
xD Virtual Builder Light – Around $79, excluding sales tax. Available at http://www.dstudio.be.