
Chapter 14

Concept Art Techniques
Alex Jenyon is a concept artist and matte painter working in the visual effects industry in London. He has produced concept designs, storyboards, background paintings, and illustrations for commercials, TV shows, and feature films. Credits include the features Rock’n’Rolla; Telstar and Stardust; Human Body: Pushing the Limits for the Discovery Channel; and commercials for Toyota, Hyundai, and UEFA. At the time of this writing, he is working on designs and matte paintings for The Day of the Triffids miniseries. His website is www.aj-concepts.net
Project: Using SketchUp to plan and compose a concept painting
Tools: SketchUp Pro 6, Painter X, Photoshop CS4
I am often hired in the early stages of a project to produce concept illustrations that will help “sell” the pitch to potential clients or investors, and help get the project off the ground. As you can imagine, these images are often highly confidential and become valuable intellectual properties of the company that has hired me.
It is, therefore, not possible to do a case study of one of the illustrations I have produced commercially. So instead, I have chosen one of my personal projects as a study of my workflow.
The CGSociety (which you may be familiar with from their popular forum http://www.cgtalk.com) runs regular online competitions (or challenges), and this painting was created for their “Steampunk Myths and Legends” challenge.
This represents a good facsimile of a commercial project: This painting project has a set brief and a set deadline, rather than being simply an open-ended personal exercise.
The brief here is to take a classic myth or legend and “reimagine it” in a “Steampunk” style. The deliverable is a single image, and because I was working on it in my own time, I had about four days in which to create it.
Project Context
I am using exactly the same techniques here that I would use on a commercial project. SketchUp is used to plan and compose my scene, and the illustration is finished using a combination of Painter and Photoshop. The planning, design, and layout stage normally takes about 50% of the time, so I would spend 2 days on this, and 2 days on painting the final image.
Technical Aspects
SketchUp is the perfect choice for this project because of its sheer speed. It is simply one of the fastest modeling applications on the planet, and offers one of the quickest ways I know to develop my design ideas. There are some downsides to this high speed: slightly messy geometry and difficulty in producing nice UV maps. But because I am not going to render my model in another package, these are not of any concern to me at all.
It is also a great tool because of my background as a 2D artist. SketchUp is the closest thing I have found to actually “drawing” in 3D. I do not have to worry about pushing individual polygons around; I just draw the edges with a WACOM pen, and SketchUp does the rest for me. Therefore, there is not so much of a mental boundary between the different stages of my work. Working in 3D requires a similar mind-set and approach to working in 2D when SketchUp is involved.
When I used to paint manually (i.e., with paper and “hairy sticks”), the first stage of any painting would be a black and white line drawing, usually black ink on watercolor paper. I would then paint over the line drawing using ink washes, and finish off the details in gouache or acrylic.
A large WACOM tablet and a copy of Painter has taken away the need to mix colors and wash brushes (which I am very thankful for), and SketchUp now provides me with a line drawing in perfect perspective on which I can start laying down color. There is no need to work out vanishing points, which could sometimes be meters outside the canvas, and no need for endless thumbnails to plan the composition. I can look at my scene through a realistic camera, and even choose the focal length of the virtual lens I am using.
I can also use SketchUp to experiment with different light directions, seeing where the shadows fall, and plan how to use light to enhance my scene or the composition of the painting. I do not really use that many plug-ins, since all I am interested in is laying down rough forms as quickly as possible. It does not matter if a curved surface is rather jagged and low poly. I can just smooth it out when I come to paint over it. In some respects, I am producing a massing study rather than a polished model and do not really need many advanced tools to do this.
New Approaches
I used the Film and Stage plug-in to help position my camera. It is really useful to have a physical object to drag around the scene, rather than just judging the position using viewport. The script is getting a bit old now (it was created before Google bought @last), but it still seems to work reasonably well with SketchUp 6.
I made use of 3D warehouse while creating the 3D model, picking and choosing elements that might be useful in my design. I never use models exactly as they are downloaded; using parts of prebuilt models can save a lot of valuable time without compromising on the creative vision of a scene.
Step 1: Rough Sketch
Goal: To create a rough sketch that contains all the elements that will be in the final image, as well as an idea of the atmosphere and colors that will be used.
Inputs: I have chosen as my source material the epic from Greek mythology The Odyssey – the story of Odysseus’ troubled journey back from Troy at the end of the Trojan War. I am going to specifically choose the scene in the story where Odysseus’ ship passes through a narrow strait between high cliffs. On one side of the strait lies the whirlpool “Charybdis,” and high up in the cliffs opposite lives the six-headed sea monster “Scylla.” Avoiding one hazard will cause the ship to pass close to the other. Odysseus chooses to pass close to the sea monster (and lose six men) rather than the whirlpool (and risk losing the entire ship).
Tool: Painter.
This image is created very quickly (in an hour or so), straight from my imagination, without requiring any reference materials. Although the composition, perspective, and detailing of the image, therefore, leaves a lot to be desired (there is a reason we use reference materials, after all), I have now got a definite idea of where I want the image to end up and what elements I need to start modeling the image in SketchUp.

FIG 14.1
Step 2: Refined Sketches and Elevations
Goal: To gather together any sketches or drawings that will aid the 3D modeling process
Inputs: Research into the construction and design of mythological and contemporary Greek warships (the trireme), nineteenth-century paddle steamers, as well as a steam engine of the type known as a “reciprocating beam engine”
Tools: Pen, paper, Painter.
Although the scene I am creating is quite clearly one of fantasy, I like to ground my work in reality wherever possible as this always helps to sell the final image. I could simply turn straightaway to modeling (which is quite good fun), but it is not a very efficient way of working. I, therefore, create a rough elevation of the ship, as well as a more refined sketch of my sea-monster head, which I will import to SketchUp to aid the modeling process.

FIG 14.2
Step 3: Constructing the Hull
Goal: To construct the main forms of Odysseus’ ship.
Inputs: Elevation sketch, reference photographs of reconstructed Greek warships, Greek art.
Tool: SketchUp.
Using the elevation sketch I imported to SketchUp, as well as other reference materials, I create a series of construction lines using the Line and Arc tools.
I then create the solid form of the hull by joining the construction curves by hand. I could have used the Skin.rb plug-in for this purpose, but since I am working quite low poly, it is not a time-consuming process to manually “loft” the hull. I select the partial hull and make it a component.
Tip
Because it is a symmetrical object, I only have to model one half of the hull to complete the base of the ship. I select the half-hull component and use the Scale tool with a value of –1 while holding down the Shift key to create a mirrored copy. I move the new mirrored copy to its place. Now, every modification I make on one half is mirrored automatically on the other half.
Then I construct the deck plate on top of it as a separate object. I also construct the gunwales (the rails along the edge of the deck) by extruding a low-poly circle along a curve using the Follow Me tool, and then duplicating it several times.

FIG 14.3

FIG 14.4
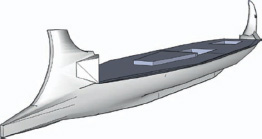
FIG 14.5

FIG 14.6
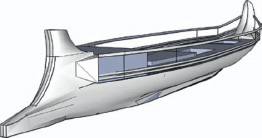
FIG 14.7
Step 4: Ship Details
Goal: To add the superstructure and finishing details to the ship.
Inputs: Research into paddle steamers and beam engines, Ballista model from 3D warehouse.
Tool: SketchUp.
The steam engine and paddle wheels are created from groups of simple primitives (primarily cylinders) or extruded from a 2D profile using the Push/Pull tool.
The Ballista model on the prow is a (reasonably) historically accurate model that I downloaded from 3D warehouse. Since parts of this model fitted my purposes perfectly, it made sense to save time by using prebuilt geometry rather than making my own identical copy from scratch. With a bit of scaling and some simple tweaks to the prow, the Ballista model fitted into my model just fine, saving valuable time.
After some consideration, I felt that the balance of the ship design was not quite right, and reversed the layout of the steam engine and boiler. Because I had grouped all the relevant objects when I built them, this process took only a matter of seconds, unlike for a 2D drawing.
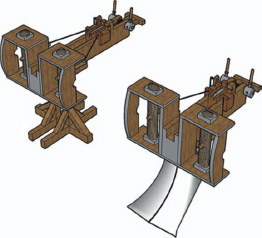
FIG 14.8

FIG 14.9
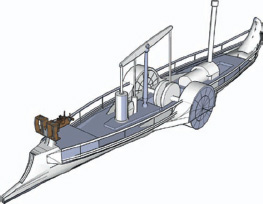
FIG 14.10

FIG 14.11
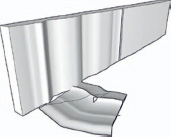
FIG 14.12
Step 5: Background Objects
Goal: To add some context to the scene by creating some rough background geometry.
Input: My original rough sketch.
Tool: SketchUp.
I created rough geometry for the cliffs and the wave surface by using the free-form curve tool to create an organic shape, and extruding it along a path. The result was not pretty, and certainly would not stand up to texturing or rendering. However, it took only a matter of minutes to create, and was more than sufficient for my purposes.
Step 6: Scylla
Goal: To create a 3D model of one of Scylla’s heads.
Inputs: My refined sketch; reference images of snakes, lizards, and Victorian clockwork automatons.
Tool: SketchUp.
To fit in with the Steampunk theme, I made Scylla a steam-powered clockwork creation, rather than a flesh-and-blood creature. Therefore, again I used only the standard drawing tools in SketchUp, rather than any of the organic modeling plug-ins (such as Subdivide and Smooth) that we now have access to. This gives the creature a very mechanical, artificial look – bad for an organic, living creature, but perfectly matched for my design.
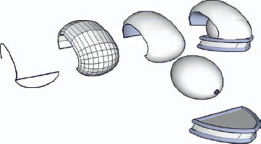
FIG 14.13
I started by creating the sweeping dome of the head using the Follow Me tool along a compound curve, as well as revolving a curve around a circle to construct the spheroid that forms the forehead. The final skull is constructed of several simple objects like these curves intersecting with one another, which is a very bad practice if I was exporting to an external renderer. But since SketchUp does not have a problem displaying them, neither do I.
The three rows of Scylla’s teeth (as specified by the story) were created by extruding one row using the Follow Me tool, and then duplicating and scaling the resulting geometry. Again, this would look very contrived on a real creature, but is perfectly in keeping with a mechanical construction.

FIG 14.14

FIG 14.15
The head and neck were created by duplicating and repeating groups of much simpler shapes, and the silhouette I had in mind was built up. From my original rough sketch, I know that the heads are largely going to be backlit, and the outline of the silhouette is going to be the most important feature of the design.
Step 7: Composing the Scene
Goal: To compose the scene and choose a camera angle.
Inputs: All the previously created geometry, my original rough sketch.
Tools: SketchUp, Film, and Stage plug-in.
I now take all the separate elements I have created in steps 1–6, and combine them to make my finished scene. The Scylla head is made into a component and duplicated six times, and I have added a standard 3D figure (from the Components browser window) to judge the correct scale of the elements.
This is where I experiment with different camera positions and fields of view (i.e., different lenses) to decide the final framing of my painting. I also experiment with different lighting directions, working out where I want the shadows to fall and how I am best going to match the atmosphere of my original sketch. I use the Film and Stage plug-in for this step so that I can view my camera positions as 3D movable objects.
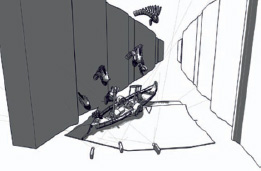
FIG 14.16 Positions of cameras 1, 2 and 3 (from left to right).
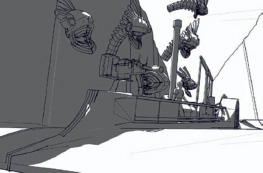
FIG 14.17 View from camera 1.
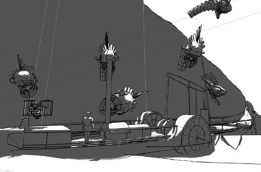
FIG 14.18 View from camera 3.
Step 8: Exporting from SketchUp to Painter
Goal: Export a line drawing from SketchUp to Painter.
Input: My 3D model.
Tool: SketchUp.
I eventually choose camera 2 as my favored viewing angle, and export my scene as a 2D image. I export the image as a .tiff file, which seems to be the most reliable uncompressed image format to use from SketchUp, at a resolution of 4000 × 2700 pixels.
In Painter, I copy this image into a new layer, and set it to the “multiply” blend mode. I then clear the canvas layer beneath it.
Anything I paint on the canvas will now sit “below” the exported image, allowing me to be quite rough with my brush strokes.

FIG 14.19 View from camera 2, exported.
Step 9: Laying Down Rough Colors
Goal: To lay down the “underpainting” as a rough color wash.
Input: My original rough sketch.
Tool: Painter.
Using a large digital watercolor brush, I lay down rough areas of color. This is the digital equivalent of the “ink wash” technique I used when painting traditionally. Initially, I use the Eyedropper tool to pick color from my original sketch in order to capture some of the “feeling” and “atmosphere” that I like about it. I then block out the major forms of the boat using a square chalk brush.
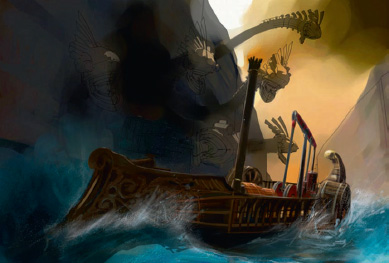
FIG 14.20
Step 10: Composition Adjustments and Details
Goal: To improve the composition and legibility of the image.
Tool: Painter.
The composition is still lacking in some respects; I do not feel that it is as dramatic as it could be, since the boat is almost parallel with the bottom of the frame. The first thing I do is rotate the entire canvas and crop the image down slightly. I feel this adds to the unbalanced feel of the boat being tossed around by huge waves.
I then start to define the forms using a small “wet gouache” brush, picking out the highlights on the metal heads of the monster, as well as giving the vessel a crew.

FIG 14.21
Step 11: Photograph Elements
Goal: To add detail and texture to the image.
Input: Personal photographs taken in the Canary Islands.
Tool: Photoshop.
It is quite easy to make surfaces in digital paintings look flat and “plastic.” There is no differentiation in surface texture between the rock of the cliffs and the water splashing against them.
I therefore take some photographs I took on holiday, and put them through a high-pass filter. I then overlay them over my image, giving more realistic textures to the surfaces I have painted.
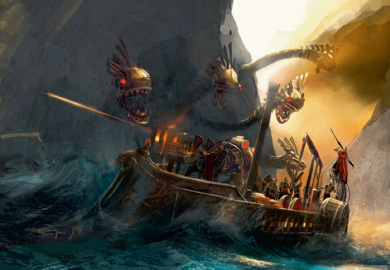
FIG 14.22
Step 12: Final Detailing
Goal: To give a final “polish” to the image.
Tool: Photoshop.
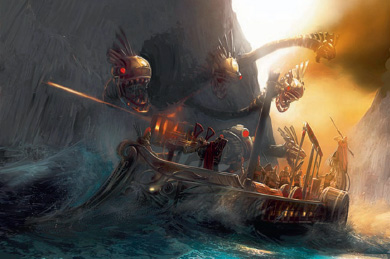
FIG 14.23
This is the final stage of designing the painting and one in which all the finishing touches are added. I also do a final color correction; add some haze, smoke, and glare; and apply some film grain to “finish off” the image.
Conclusion
SketchUp was a valuable tool in creating an interesting, dynamic painting. It allowed me to be a lot freer and more adventurous than when using conventional tools, as I knew the underlying structure of the painting to be 100% sound. There is nothing more frustrating than realizing (after finishing a painting) that the underlying composition had ruined it from the very beginning. Here, I knew that I was painting from a good foundation, and could spend more time concentrating on color, texture, and atmosphere rather than worrying about perspective lines and vanishing points.
I do not know of any other 3D application that would have enabled me to create my scene as quickly or efficiently, although a lot of that is down to my own skills and personal preference. I am sure a user highly skilled in another package could have done something very similar, since I did not really use any features of SketchUp that cannot be replicated in other applications. However, using Maya for something like this would have been a frustrating case of overkill, and SketchUp is definitely the right choice for me.
I have been developing this workflow over a number of years, and it is always evolving and changing based on different project requirements, availability of new tools, and my own moods. But the fundamental technique of starting a 2D painting as a rough 3D sketch model is one technique I do not see myself abandoning any time soon.
Resources
Software
Corel Painter X: $399
Note : This is the price for Painter 11, which replaced painter XAdobe
Photoshop CS4.
SketchUp Plug-Ins
SketchUp “film and stage” plug-in; available at http://sketchup.google.com/download/previousplugins.html
Ballista model from Google 3D warehouse by Erez