
Chapter 8. Model-Based Testing
When Boeing designs a new jet such as the 787 Dreamliner, they model the airplane in software, where they run millions of simulations to understand how the shape of the fuselage, weight of the components, position of the cockpit, and numerous other variables affect lift and fuel efficiency.
When I first learned how to drive a car with a stick shift, I was horrible. For some reason, I just couldn’t get the timing right between releasing the clutch and pressing the gas. Finally, someone drew a diagram for me, showing me what happened when I pressed the clutch in, and how giving the car gas interacted with the process. Amazingly, once I visualized the system, I didn’t have a problem with the manual transmission anymore. I never even had a problem with “riding the clutch”—the entire system made sense to me.
Models help us understand how complex things work. In school, I learned basic math through models. Rather than starting directly with “9 – 4 = 5,” a teacher uses a model to explain the concept, as shown in Figure 8-1.
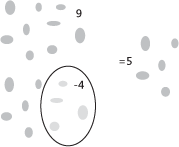
If you start with 9 objects, and then remove 4, your are left with 5 objects. The model explains this simply and efficiently. It is a perfect way to express a complex (to a 6-year-old) problem. Throughout our lives, models help explain what we do not fully understand. They give meaning to the abstract and answer what-if questions and help drive design. The act of modeling forces the modeler to break down complex issues into understandable and well-defined units, and in the end allows for better understanding of the entire problem space.
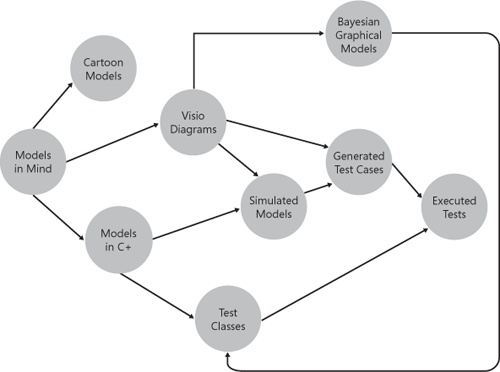
Model-based testing (MBT) is one (very natural) way to approach this perennial problem. This chapter outlines the basic workflow testers at Microsoft often take to render a model in their mind to some actionable form. The form might be a drawing on a whiteboard or a sketch on the back of an envelope. Modelers that are more ambitious use a visualization tool such as Microsoft Visio or custom modeling tools to create their models. Of course, a model alone is not sufficient for testers; they need test cases. Testers’ favorite modeling technology is one that can generate test cases from their models.
Modeling Basics
Figure 8-2 is a model of how testers at Microsoft approach modeling. It is a model of a model! Testers often write models on napkins during lunch conversations, write them on a whiteboard, or sketch them on the backside of a specification. They might even create them directly in Visio or use internal tools that assist testers in creating model-based tests.
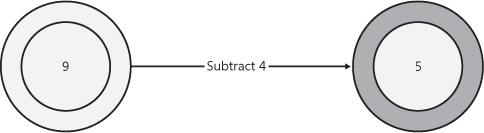
A model can be any description of a system. A typical behavioral model contains a starting state, one or more transitions, and an ending state. In the math model in Figure 8-1, the starting state is 9, the action is “remove 4,” and the ending state is 5.
A finite state machine (FSM) is the term used to describe a collection of states and associated transitions. FSMs are a natural way to express any functionality that is represented by states and transitions. Figure 8-3 represents the FSM for the mathematical expression “nine minus four.”
Testing with Models
Testing can be (and often is) done through models. Many testers have used models without even knowing it. I’ve seen many testers sketch the functionality of the feature they were testing in a diagram on their whiteboard, and then trace the program flow to understand how the feature works. My hunch is that these testers could be even more effective after they learn how to take explicit advantage of model-based testing.
Designing a Model
Creating models isn’t terribly difficult. It is often more difficult to know when to stop creating models. My first car was a 1962 AMC Rambler. It was fun to drive, yet quite simple. It had push button gears—one each for Drive, Low 1, Low 2, and Reverse. The Neutral button doubled as the starter. When I got in the car to go somewhere, it was always in the same state—parked and off. After I got in the car, I would take an action (pressing the green start button) to take the car to a new state—running! From here, I usually put the car into drive (yet another state) and went to school. Sometimes I forgot something and had to return the car to the previous state (off) while I ran inside to grab my homework, books, or whatever else I missed the first time I ran out the door. I could also go from gear to gear whenever necessary. Technically, the car could be put into reverse at any time (I never tested that), but for simplicity, let’s pretend that I had to put the car into neutral first, as shown in Figure 8-4.

This model (like my Rambler) is rather simple. The “problem” is that there are many more actions I could take with my car. The model in Figure 8-4 doesn’t take the actions of the brake or gas pedal into account and those could be modeled as well. The windows could be in varying states of openness, and the headlights could be in any of three different states (off, on, bright). The heating system, the windshield wipers, and the radio all had entirely different models, some, unbelievably, that interacted with each other. Models can grow quite quickly. As mine grow, I always recall a bit of advice I heard years ago: " ‘Too small’ is just about the right size for a good model.” By starting with small models, you can fully comprehend a subarea of a system before figuring out how different systems interact. When I first learned to drive, I learned the basics of each part of the car (how to make it go, how to turn, and how to stop). As I gained experience and learned more about each subsystem of the car, I got better at driving. I never drew models of my Rambler, but I’m certain that in some sense, I thought of the different pieces of the system as models.
Modeling Software
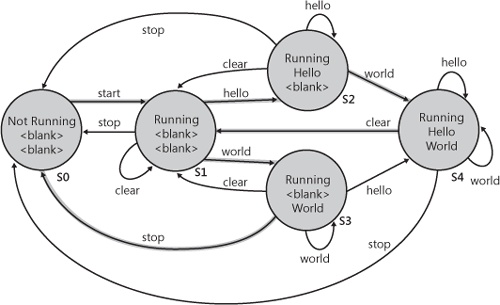
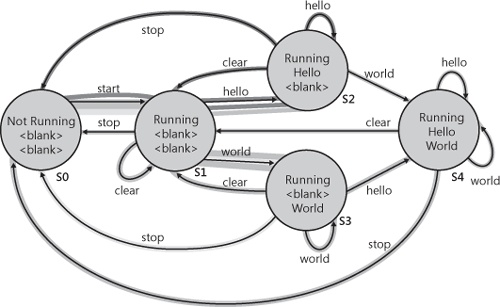
A great deal of software is state based and can benefit from a state-based testing approach. Figure 8-5 shows a simple application with three buttons. The first button prints “Hello” to a text box, the second prints “World” to a text box, and the third button clears the fields. When the application starts, both text boxes are clear regardless of their state when the application terminated.

As far as applications go, this one is as uncomplicated and minimal as you will ever find. The first thing a tester on this application might do is generate simple, serial test cases, as shown in Figure 8-6.

At first glance, you might think that there are only three actions that need to be tested, one for each button. Experienced testers might wonder, “What happens if I click ‘Say Hello’ twice in a row—or 50 times in a row?” (Good testers seem to understand that no matter how absurd clicking a button 50 times in a row might sound, somewhere, a customer will do exactly that.) Scripted tests for this application could look like the four tests listed in Table 8-1.
Test 1 | Test 2 | Test 3 | Test 4 |
1. Start | 1. Start | 1. Start | 1. Start |
2. Hello | 2. Hello | 2. Clear | 2. World |
3. Clear | 3. World | 3. World | 3. Stop |
4. Hello | 4. Hello | 4. Clear | |
5. Hello | 5. World | 5. World | |
6. Stop | 6. Clear | 6. World | |
7. Stop | 7. Hello | ||
8. Stop |
For this application, these test cases may be enough for adequate testing. There are, however, drawbacks to tests like this. First, these test cases require manual maintenance. If a tester forgets to add a new test case (for example, the tester later realizes that he needs to create a test where he closed the application without clicking any button), the tester would need to make updates to the scripts. More important, because these tests are static, they will always test the same thing. Although this is often a good (and expected) attribute (any regressions in functionality will be found quickly), many scripted test cases never find bugs after they are created and executed once. In a sense, the tests train the software to succeed against the test cases. Figure 8-7 shows a state model for this application, along with bold lines to show which transitions and states in the model the tests in Table 8-1 “visit.”

A state model can clarify understanding of how the application works and what the different test permutations might be. Figure 8-8 contains a state model for this application. The four boxes represent the four possible states of the application, and the lines represent the actions that can be taken from each state. The states are as follows:
Both text boxes are clear (S1).
The first text box contains “Hello” and the second text box is clear (S2).
The first text box is clear and the second text box contains “World” (S3).
The first text box contains “Hello”, and the second contains “World” (S4).

The connecting lines represent actions that cause transitions from state to state. For example, from the start state (both text boxes clear), there are three possible actions. Clicking the clear button returns the application to the same state (or does nothing depending on your point of view). Clicking either “Say Hello” or “Say World” changes the application to a new state.
A random walk through the transitions and expected states might look like what is shown in Table 8-2.
Test step | Action | Text box 1 | Text box 2 |
0 | Start Application | Empty | Empty |
1 | Say World | Empty | World |
2 | Clear | Empty | Empty |
3 | Say Hello | Hello | Empty |
4 | Say Hello | Hello | Empty |
5 | Clear | Empty | Empty |
6 | Say World | Empty | World |
7 | Say Hello | Hello | World |
8 | Say World | Hello | World |
9 | Clear | Empty | Empty |
10 | Stop Application | Empty | Empty |
Building a Finite State Model
Building a model can be a little challenging at first but with practice becomes an almost unconscious act for most testers. As I explore applications or specifications and draw models, I find myself thinking of the following same three questions repeatedly as I generate the model:
Where am i? I need to know what state the application is in now, and I need to be able to describe (or know how to verify) the current state.
What actions can i do? From my current state, what are the different things I can do?
What happens when i do them? If I take an action, what state does it bring me to?
As my model grows, I find it useful to continue to think of scenarios and expectations as I work. Because the model lets me see early how all of the states interact, I frequently find bugs before I ever actually run any of the tests.
Automating Models
The automation approach for state-based models is slightly different from traditional approaches. Rather than automate an end-to-end scenario, test automation for models focuses on automating the transitions and verifying the states.
The application modeled in Figure 8-8 contains four possible states and three possible actions: “Say Hello,” “Say World,” and “Clear Text.” Each of the actions is valid in all four states.
To create model-based automation for this application, I would implement just a few functions, one each for the three buttons (the actions), and four others to verify each of the states.
At this point, I can execute any of the available actions and have oracles in place to ensure that the application is in the expected state. Tools and frameworks for MBT (discussed later in this chapter) take this testing to a new level by running through transitions and states using a myriad of different paths.
Graph Theory and MBT
In 1737, Leonhard Euler solved the problem of the Seven Bridges of Königsberg. The city of Königsberg is set on a river and connected across the mainland and two islands by seven bridges. Apparently, the popular pastime of the day was to determine whether it was possible to walk a path that crossed each bridge once (and only once).
Euler determined that the task was impossible. In doing so, he defined relationships between nodes (dry land in this case) and edges (the bridges), and created theorems that demonstrated conditions (using a different number of bridges or connections) where the task could be completed. Euler’s solution is considered to be the first theorem of graph theory.
In mathematics, a graph is a collection of edges (or links) and nodes. In MBT, edges and nodes represent transitions and states, respectively. It turns out that the math behind graph traversal is very interesting for testing state models. Much of the power in MBT is in the traversal algorithms. Tests that run randomly through every state are interesting and often find bugs, but applying graph theory concepts to the traversal is powerful and effective.
A random walk traversal chooses an available transition at random. It has no guidance or plan; it just strolls through the states for as long as you let it. Random walks often find bugs (some consider these to be a “smart monkey test”), but can take an extremely long time to traverse through large models.
A weighted traversal is a slightly better solution. A weighted traversal is somewhat of a guided random walk. The choices of which transition to choose are still random, but the most likely choices are weighted so that they occur more often.
The shortest path traversal walks the path between two nodes using the least number of transitions.
There are many other ways to traverse a state model using graph theory algorithms. An all transitions path, as its name implies, ensures that all transitions have been exercised. Note that an all transitions path includes all nodes as well. The all states traversal, on the other hand, does not guarantee that all transitions have been exercised. Revisiting the model from Figure 8-8, Figure 8-9 shows an example of a traversal that exercises all states, and Figure 8-10 shows an example traversal that reaches all transitions.
Models for API Testing
At a lower level, testing of many operating system or platform functions is also amenable to a state-based approach. Common file reading and writing functionality is one such example. Common file APIs can change the state of the file system by creating files, opening files, modifying files, and closing files.
The model shown in Figure 8-11 is simple and provides a starting point for a suite of file function tests. As the model grows, I might differentiate between opening a file, creating a new file, or attempting to open a file that is already open. Over time, I will add the actions of reading from a file, writing multiple times to the same file, and closing a file previously closed. Other related file functionality, such as functions that set the location of the reader within the file, could also be included in this model. Models can grow quickly, so it is important to start small and grow as you understand more about the functionality you are modeling.

Random Models
Another simple form of model-based testing is monkey testing. A monkey test[1] generates random (or pseudo-random) input with the hope of finding a bug. Monkey tests are common in stress testing and are typically not difficult to create. I wrote an extremely simple one several years ago that looked something like the pseudo-code in Example 8-1.
Launch Text Editor

// "simulate" typing
Repeat 1000 times //slightly less than infinite, but suitable for this example!
{
  Repeat 500
  {
    Press Random Key
  }
  Select some portion of text
  Select Random Font, Font Size, and Font Color
  Press one of ToolBar Buttons [Cut | Copy | Paste | ]
}
Close Text Editor
This test was fun to watch, but the only bug it ever found was a slight memory leak (which is a critical bug on embedded systems). The drawback of monkey tests is that they are generally difficult to debug. Finding the exact combination of commands that led to the memory leak required that I write some additional tests. In this case, it was a leak in the Clipboard functionality, so a targeted test on cut, copy, and paste would have found the bug sooner.
Grammar Models
Another common form of MBT is testing with a grammar model. A grammar model describes the characteristics and structure of data such as an e-mail address, name, or text.
Regular expressions are an example of an implementation of a grammar model. A common use of regular expressions is to search text. If I wanted to find all occurrences of my name (Alan) across a large set of documents, I could use a search tool to find instances of Alan in the text. However, if I want to search for alternate spellings such as Allen and Allan at the same time, I could build a model using regular expressions to search for all three at the same time. For example, a search for Alan|Allan|Allen (the model) would find all instances of all three spellings of my first name. The model language of regular expressions also allows me to simplify (although some would argue) the model to (A|Al)l(a|e)n.[2] A model for the former pattern is in Example 8-2
Grammar models are great for creating test data. Let’s say that you are testing Microsoft Windows Live Hotmail and want to send 10,000 e-mail messages covering a variety of different inputs (assume that you have ample test accounts and sufficient automation to accomplish this). The first thing you might do is create a model of the data you care about for the message. The model can look like Example 8-3 and generate the data in Table 8-3:
<To>      ::= <Valid Address | Invalid Address>
<Cc>      ::= <Valid Address | Invalid Address>
<Bcc>     ::= <Valid Address | Invalid Address>
<Subject> ::= <Empty | Not Empty>
<Body>    ::= <Empty | Not Empty>
Invalid address | Empty | Not empty | |
<blank> | Length == 0 | Length > 0 | |
... | ... |
A test generator could use the model along with a database containing valid and invalid e-mail addresses, random subject lines, and message bodies to generate 10,000 unique e-mail messages. Note that yet another tester could easily create another grammar model to create random strings for the subject and message body.
Modeling Without Testing
As exciting as modeling sounds, model-based testing is not the same thing as modeling. Many testers, however, fail to make this distinction. A model can be a very powerful tool for the design/development team, even if it never generates a test case. In this section, we examine two examples of modeling power that do not directly affect test cases. One example demonstrates how to model uncertainty or risk, and the other provides a method for testers to use to ensure that their models behave as they should.
Bayesian Graphical Modeling
Bayesian Graphical Modeling (BGM)[3] is notably different from the other modeling approaches used at Microsoft.[4] The goal of BGM analysis is to measure and reduce the uncertainty of testing. It is a method of modeling for risk analysis. Every tester comes to an application to test with some measure of confidence in the code she tests. Many factors inform this confidence (reputation of the developer, complexity of the code, number of dependencies on other binaries taken, time and cost of testing, and other factors). If every tester and every application starts out with the same presumption, we have a good starting point for measuring and reducing uncertainty.
If a tester presumes the quality of the code tested is good (especially if there are strong internal development controls in place), a proper starting point for all testers is to answer this question: How confident am I that there are no defects in this code? In a BGM, the tester specifies his confidence for all the components he will test and fully describes his reasoning in a model. The BGM takes into account that uncertainty and risk affect dependent components as well. Testers then run tests, and as they find bugs, they update the BGM. The model and tests form a feedback loop of updates throughout the product cycle. An example of a BGM is shown in Figure 8-12.

We testers will never enjoy complete certainty in our job, but we can measure and take steps to reduce the uncertainty of our task. At some point, we have to ship, and it’s nice to know when the odds of success are in our favor.
Petri Nets
A Petri net is a modeling tool that consists of places, transitions, and arcs that connect places to transitions. Places can contain tokens; the number of tokens in each place gives the current state of the modeled system. Transitions model activities that can occur (that is, the transition fires), thus changing the state of the system. Transitions are allowed to fire only if they are enabled, which means that all the preconditions must be fulfilled. When a transition fires, it removes tokens from its input places and adds some at all of its output places. Using Petri nets is kind of like playing a board game with the computer. The player/tester moves the tokens and observes the state of the system to get a better understanding of the system.
Petri nets provide a visual (and with Petri net tools, interactive) method of interacting with software behaviors. Petri nets are useful for a variety of purposes but are particularly useful for modeling systems with concurrency and resource sharing.
Model-Based Testing Tools at Microsoft
Perhaps the biggest mistake I’ve seen testers at Microsoft make in regards to model-based testing is to dive into model-based testing tools before they understand the basics of modeling. Modeling tools often behave much the same as programming languages with which testers are familiar, but for many testers thinking of tests as models is still somewhat of a mind shift that can be difficult to take on simultaneously with learning any new toolset. In many cases, and numerous times in my own career, I have had great successes merely creating the model in the first place. Drawing a picture of how the software under test works is a powerful tool and the value of this tool cannot be underrated.
For many modelers, at some point the complexity of the models, the variations in the traversals, and the scope of what they are modeling require some help. This help typically comes in the form of tools to assist in model-based testing.
The first model-based tools at Microsoft appeared sometime around 2001. Product teams and Microsoft Research both have been involved in creating tools for model-based testing, with a few tools gaining widespread use. The variety of tools provides solutions to different types of testers and testing problems. By approaching the modeling challenge from different ends of the technology spectrum, more teams can use modeling successfully.
Spec Explorer
One powerful tool used for model-based testing at Microsoft is Spec Explorer, created by Microsoft Research in 2002, and used in Microsoft product groups since 2003. The Hypervisor team created a full model of their product using Spec Explorer and developed around 10,000 lines of model code, which they successfully used to test their core technology. (See Chapter 15, for more on Hypervisor.) More than 20 different product groups at Microsoft used Spec Explorer over the years.
The third-generation of the tool family, Spec Explorer for Visual Studio 2008, has been transferred from Microsoft Research to the Server Tools and Business division in Microsoft. Here it is used among other areas for the testing of a large number of protocols for Microsoft’s interoperability initiative. Some of the characteristics of Spec Explorer for Visual Studio are that it runs as an add-in to the Microsoft development environment and allows creating models in C#, using a rich model state. The tool supports both scenario-oriented and state-oriented modeling, and it supports event-based testing and nondeterminism (the implementation has multiple choices to react).
Perhaps the best thing about Spec Explorer is that it will soon be available to everyone as a power tool for Visual Studio and should be available before this book hits the streets. Before we look inside a Spec Explorer model, let’s look at its overall design. What is the intent of Spec Explorer? What problems does it solve, and how?
Modeling with Spec Explorer
Spec Explorer can do impressive analysis and transformation of the model program that generates the FSMs. The problem with a finite state machine is that it can quickly explode in complexity. Spec Explorer manages this complexity by emitting only those states that make a difference.
The model program is the most crucial part of an advanced model-based testing application. This is the place where special modeling attributes inform the runtime of which methods drive the model logic. It’s in the model program that the tester specifies the contract, and the rules of engagement that make a model program a model, such as preconditions, postconditions, and invariants.
When the model program is finished, we might have a very complex state space on our hands. To step down the amperage of this model we need a separate file that can extract only specific scenarios, specific actions, or even sequences of actions that will actually drive our tests. Indeed, one test of the model’s effectiveness is to check for the presence of some known scenario. If we are generating conformance tests for some implementation, we also need to bind our model and its test cases to some binary we want to test.
Spec Explorer for Visual Studio
Figure 8-13 shows Spec Explorer in action running under Microsoft Visual Studio 2008.
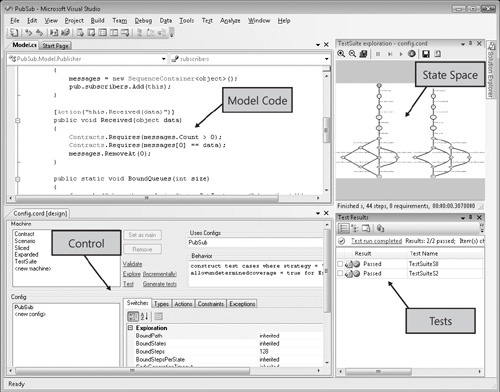
The upper left pane contains the model program code, given in regular C# with custom attributes. The lower left part is the control center of Spec Explorer, where you can configure various parameters and select exploration goals. The upper right pane is an automatic visualization of an exploration result. The lower right part represents test cases generated from the model and then managed and executed under Visual Studio Test Tools.
To get a better idea of how to use Spec Explorer for model-based testing, consider a simple stopwatch application with the following attributes:
The stopwatch has two display modes:
Current time
Stopper
The watch has three buttons:
Switch Mode (always available)
Reset stopper (only available in stopper mode and when stopper is running)
Start/Stop stopper (only available in stopper mode)
Each button on the stopwatch represents an action, and we can query the application to know whether the stopper is running. A tester modeling the stopwatch application could create the actions and code in Example 8-5 to describe the stopwatch model.
using System; using Microsoft.Modeling;

namespace Model
{
    static class Stopwatch
    {
        static bool modeTime = true;
        static bool stopperRunning = false;

        [Action]
        static void ModeButton()
        {
            modeTime = !modeTime;
        }

        [Action]
        static void StartStopButton()
        {
            Contracts.Requires(!modeTime);
            stopperRunning = !stopperRunning;
        }
                [Action]
        static void ResetButton()
        {
            Contracts.Requires(!modeTime);
            Contracts.Requires(stopperRunning);
            stopperRunning = false;
        }

        [Action]
        static bool IsStopping()
        {
            return stopperRunning;
        }
    }
}
Two items in Example 8-5 will probably be unfamiliar to most readers. The [Action] attribute comes from the Spec Explorer library and differentiates methods between model actions and regular C# methods, and the Contracts class (specifically the Contracts.Requires method) is used to enforce preconditions. Put differently, when you generate a finite state machine from this model, Spec Explorer will scan the model’s state and execute any Action method if it is enabled in that state.
The configuration file is the core of modeling with Spec Explorer. The configuration represents a set of switches and parameters to control exploration, state graph display, and testing. Figure 8-14 shows the configuration file in design view.
From here, a tester can create a model visualization, as shown in Figure 8-15, or generate test code to traverse the model.

Testers can also explore and test the model directly, create scenarios to extract “slices” from the full model, or continue to change dozens of other permutations of the model. By using the model, testers can develop testing strategies and model key scenarios (especially when they become more apparent upon viewing the graphical representation of the model).
In the model configuration file, testers can specify a strategy for the test suite. One example of a Spec Explorer strategy is in Example 8-6.
machine TestSuite() : Config
{
construct test cases where strategy = "shorttests"
for Model
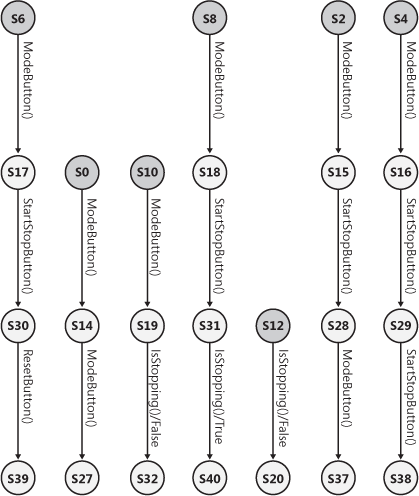
}A tester can then generate (and run!) tests from the model, or can continue to add constraints and other configuration details to the model. Model-based testing and Spec Explorer are certainly a different way to approach testing than many testers are used to, but the results so far at Microsoft have been remarkable. Figure 8-16 contains examples of tests generated from the stopwatch model using Spec Explorer.
A Language and Engine
Another successful MBT implementation in use at Microsoft also simply uses the Common Language Runtime (CLR) for language and an engine to exercise the entire model graph at run time. The difference with Spec Explorer is that the engine, in this case, uses the CLR for execution, too.
With this simple, yet powerful solution, testers can create models quickly. As in Spec Explorer, creating the models is similar to object-oriented programming with which most testers are familiar with using. Testers can work with multiple models, models can inherit from other models, models can nest, and models can call other models. Writing models feels like working with a programming language and feels natural for those who use it. There are no separate compilers or tools needed. Testers just write code using custom C# attributes to define the model behavior and run an execution engine to interpret those annotations. Because the models are based on annotations only, it is seamless to integrate modeled and nonmodeled tests.
The teams using this particular modeling tool are able to model quickly on a small scale, and then grow the scope of their modeling while integrating with other, sequenced tests as needed.
Example 8-7 shows a model written in C# using attributes to describe the model, and Example 8-8 shows code for a test that runs this model.
 [Model]
public class AppModel : Model
{
    [ModelVariable]
    public bool _running = false;
    public bool _hello = false;
    public bool _world = false;

    [ModelAction]
    [ModelRequirement(Variable = "_running", value = false)]
    public void StartApp()
    {
        //start application
        _running = true;
    }

    [ModelAction]
    [ModelRequirement(_running = true)]
    public void SayHello()
    {
        buttonHello.Press();
        _hello = true;
    }

    [ModelAction]
    [ModelRequirement(_running = true)]
    public void SayWorld()
    {
        buttonWorld.Press();
        _world = true;
    }

    [ModelAction]
    [ModelRequirement(_running = true)]
    public void Clear()
    {
        buttonClear.Press();
        _hello = false;
        _world = false;
    }
}Modeling Tips
I have observed many test teams add model-based testing to their arsenal of test techniques. I have seen teams succeed, and I have seen teams fail to adopt model-based testing successfully. Some of the most common errors I have observed when teams adopt model-based testing are the following:
Too much modeling. Teams that try to model everything end up testing nothing. The most important item to keep in mind when beginning to model is to start with small models of simple features. Remember that not everything is a candidate for modeling, and large models are difficult to maintain.
Modeling doesn’t replace other testing. MBT is one tool of many that you will use to test. Teams that look to MBT as a silver bullet soon find that it isn’t. Develop a test strategy that uses all of the tools in the test toolbox effectively.
Only model what you can verify. Random monkey tests can be interesting, but the bugs they find are extremely difficult to debug and diagnose. Good models include verification at every step that confirms that the current state conforms to the expected state.
Design carefully. When a tester makes a mistake or two writing a typical automated test, it just causes a test or two to report false results. When a tester makes a mistake creating a model, an entire suite of tests can break. The design of the model is critical and is worthy of extra caution and review—especially as the team is learning modeling.
Summary
Any sort of modeling is good, but accompanying models with tests generated from models is powerful. Models help testers understand (and explain) complex systems, they help manage risk, and they help find bugs.
Generated test cases from models can do some interesting things, things human testers might not think of or have the patience to do. This unexpected behavior in the model generates unexpected behavior in the application (and this is good for testers). For example, a test of 100 randomly generated steps might or might not (but usually does) find a bug that’s deeply buried in the tested application. If you were as thorough as the random walk that generated these 100 steps, you, too, might find the bug, but why trouble yourself when, with the proper instructions, the computer can randomly walk the tested app day and night until it finds a crash?
Model-based tests, of course, do much more than random walks through an application. Microsoft teams have used model-based tests in conjunction with traditional test automation to test many features and applications effectively. Teams that are successful using modeling also understand that modeling is just one tool of many test tools in a tester’s toolbox.
Recommended Reading and Tools
Model-Based Software Testing and Analysis with C# by Jonathan Jacky, Margus Veanes, Colin Campbell, and Wolfram Schulte
Practical Model-Based Testing: A Tools Approach by Mark Utting and Bruno Legeard
Testing Object Oriented Systems by Robert Binder
Spec Explorer, http://research.microsoft.com/projects/specexplorer/
NModel Modeling tool, http://www.codeplex.com/NModel
[1] The term monkey test comes from the infinite monkey theorem, which states that a thousand monkeys at a thousand typewriters will eventually type the complete works of William Shakespeare.
[2] Note that this regular expression also would find instances of Alen. This is simple to fix, but outside the scope of this book.
[3] Also known as a Bayesian Belief Network (BBN).
[4] Heckerman, David, A Tutorial on Learning with Bayesian Networks, Technical Report MSR-TR-95-06 (Redmond, WA: Microsoft Corporation, March 1995).