

Managing guests from a web interface
This chapter describes how to manage guests systems by using a web interface.
Managing guests includes the following tasks:
•Manage guest networks.
•Manage storage.
•Create new guests by using templates.
•Start and stop guests.
•Remove guests.
•Access guests.
3.1 Kimchi
Kimchi is open source software that allows a user to manage virtual machines on a single server. It has a web interface that runs on the serversubcore, so it does not require an extra management server.
Kimchi includes these features, among others:
•HTML5 interface
•Creating guests out of templates
•Using remote ISOs for the installation
•Storage pools, supporting local files, logical volumes, NFS, iSCSI, Fibre Channel
•NAT, and bridge networks
3.1.1 Accessing Kimchi
To access Kimchi, you need a web browser. Kimchi supports the following browser versions:
•Internet Explorer, version 9 or later
•Chrome, current stable version and the preceding version
•Firefox, version 17ESR, current stable version and the preceding version
•Safari, current stable version and the preceding version
•Opera, current stable version and the preceding version
•Safari iOS, current stable version and the preceding version
•Android browser, current stable version and the preceding version
|
Note: To access Kimchi, use the https://IPADDRESS:8001/ URL, where IPADDRESS is the IP address that you configured for the server during installation. For example, if you used 192.0.2.10, the URL is https://192.0.2.10:8001/.
|
To log in, use a username and password that is used for the server login. The root username and the password created for it during installation may be used. However, it is suggested that you create and use other users and passwords, instead.
Figure 3-1 shows the Log In panel. Type the username, the password, then click Log In.

Figure 3-1 Login panel
3.2 Storage pool
To provide space for your guest, you need a storage pool. Storage pools support the following media:
•Fibre Channel
•iSCSI
•NFS
•Logical volume
•Local directory
Figure 3-2 shows the Storage tab where pools can be listed, created, activated, and removed. You can list volumes in a pool by clicking the down arrow at the right of the pool.

Figure 3-2 Storage tab
3.2.1 Local directory
Figure 3-3 shows how to create a new local directory storage pool. The pool uses a local directory to create new volumes in the form of files.
Enter the name of the storage pool in the Storage Pool Name field, select DIR as the Storage Pool Type, enter the path of the directory in the Storage Path field, and then click Create.
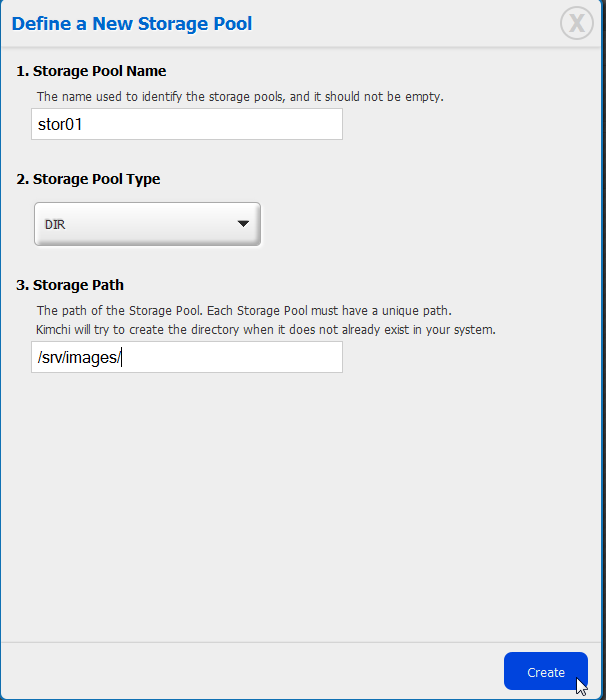
Figure 3-3 Local directory storage pool
Figure 3-4 shows how to activate a newly created storage pool by using the Actions menu and then clicking Activate.
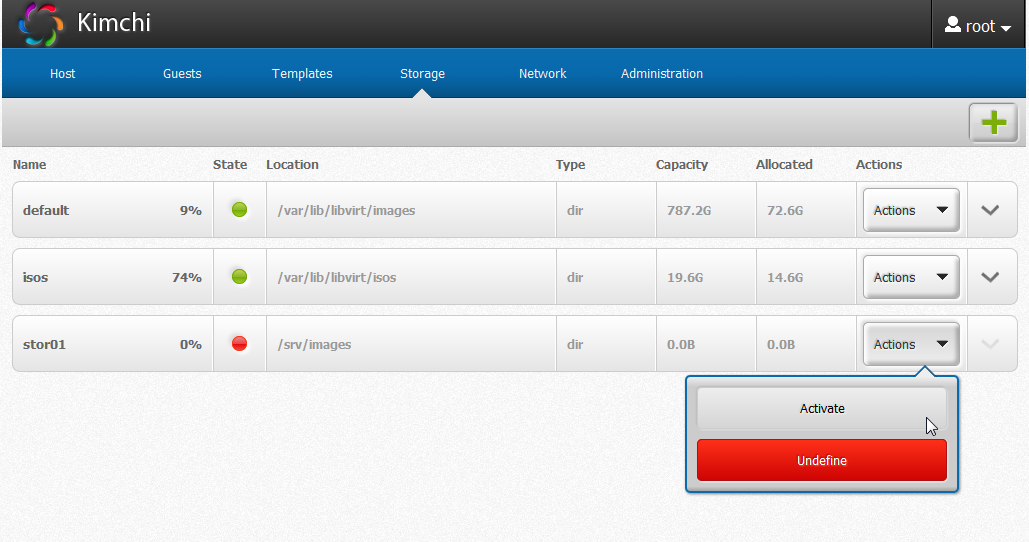
Figure 3-4 Activating a new storage pool
3.2.2 NFS
Figure 3-5 shows how to create a storage pool by using NFS. That allows a storage pool that may be shared between servers and is based on files. Creating new guests by using this storage is as simple as using a local directory.
To create the storage pool, enter the name of the storage pool on the Storage Pool Name field, select NFS as the Storage Pool Type, enter the NFS server IP address in the NFS Server IP field, enter the path of the remote directory in the NFS Path field, and then click Create.

Figure 3-5 NFS storage pool
3.2.3 iSCSI
Figure 3-6 shows how to create an iSCSI storage pool. New volumes in that pool need to be created by using your storage server management interface. It is not possible to do that from Kimchi.
To create the iSCSI storage pool, enter the name of the storage pool in the Storage Pool Name field, select iSCSI as the Storage Pool Type, enter the iSCSI server IP address in the iSCSI Server field, enter the iSCSI target name in the Target field, and then click Create.
To use authentication, select Add iSCSI Authentication, and type the user name and password on the respective fields before clicking Create.
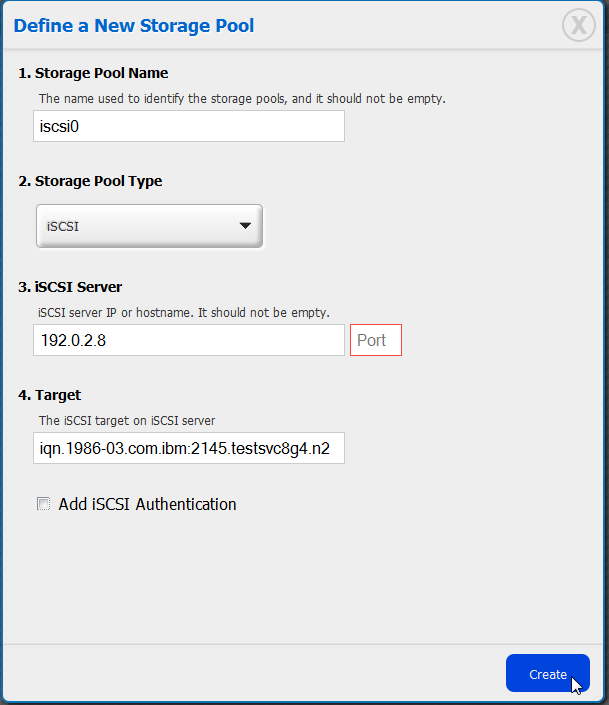
Figure 3-6 iSCSI storage pool
iSCSI volumes are detected from an iSCSI storage pool and can be listed, as shown in Figure 3-7.

Figure 3-7 iSCSI volumes list
Figure 3-8 shows a template that uses an iSCSI volume. In contrast to other storage pools, when an iSCSI and Fibre Channel storage pool is used, the guest is created by using a template that points to a specific volume. Other storage pools support new volumes that are created from the pool when a new guest is created by using the template.

Figure 3-8 Creating a template using an iSCSI volume
3.2.4 Logical volume
Figure 3-9 shows a Logical Volume Manager (LVM) storage pool. It creates a volume group by using physical devices on the system, and logical volumes are created for the guests by using that volume group.
To create an LVM storage pool, enter the name of the storage pool in the Storage Pool Name field, select LOGICAL as the Storage Pool Type, select the physical devices that are going to be used for the volume group, and then click Create.

Figure 3-9 LVM storage pool
3.3 Network
On Kimchi, you can create either a NAT network or a bridged network. Section 6.2, “Network virtualization” on page 92, describes the differences between those two types of networks.
Figure 3-10 shows the Network tab in Kimchi, where a default NAT network can be found. New networks can be created also.

Figure 3-10 Network tab
Figure 3-11 demonstrates how to start or activate a recently created network. Guests using a stopped network can be run, but they will not have network access.
|
Note: A new guest cannot be created by using a template configured with a network that is stopped. Make sure that the network is started when creating and running guests.
|

Figure 3-11 Starting a network
3.3.1 NAT network
Figure 3-12 shows how to create a new NAT network. Enter the network name, click NAT, and then click Create. That creates a new IPv4 NAT network that uses a private address range of 256 addresses.

Figure 3-12 Creating a new NAT network
3.3.2 Bridged network
Figure 3-13 shows how to create a bridged network. Type the network name, click Bridged, select a network interface from the Destination list, and then click Create. To enable VLAN support, before clicking Create, select the Enable VLAN check box, and type the VLAN ID in the VLAN ID field.
|
Note: The network interface used as the destination of a bridge must be configured and set up on the host.
|

Figure 3-13 Creating a bridged network
3.4 Templates
To create a new guest using Kimchi, you need to use a template. A template has a basic setup that you can use for new virtual machines. That enables you to create new machines with the same configuration without having to set up them again. The template configuration includes the following information:
•The local or remote ISO for the OS
•Number of CPUs
•Amount of memory
•Disk size
•Storage pool to allocate disk from
•Networks to be used
3.4.1 Create a new template
Figure 3-14 shows the Templates tab and the button to click to add a new template. After clicking that button, you can choose between Local and Remote ISOs.
Click Local ISO Image, click the ISO image that you want to use for the template, and then click Create Templates from Selected ISO.
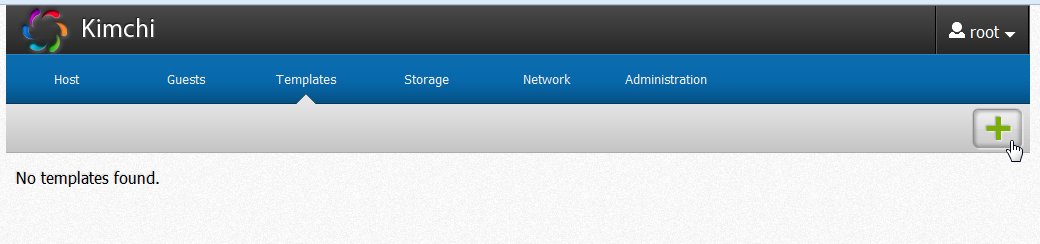
Figure 3-14 Template tab
Figure 3-15 shows a template and its Actions menu. Click Edit to change the template configuration.
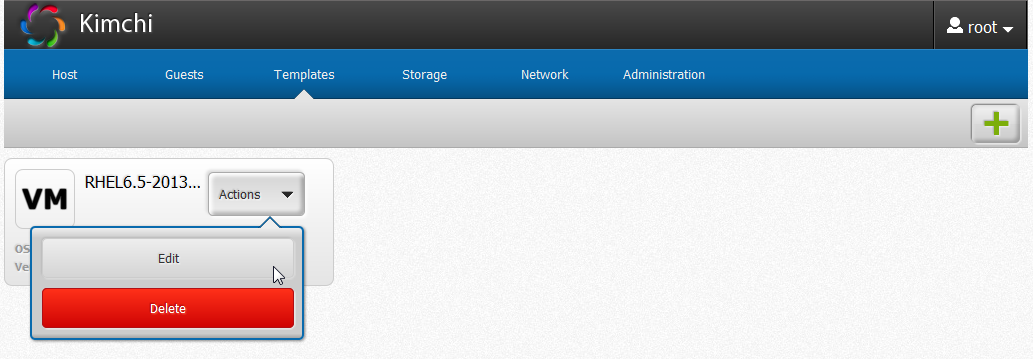
Figure 3-15 Editing a template
Figure 3-16 shows the Edit Template panel. It is possible to change the number of vCPUs, the amount of memory (in MB), and the size of the disk (in GB). When you finish, click Save.

Figure 3-16 Template editor
3.5 Guests
Managing guests involves creating guests from a template, and then starting or stopping them as necessary.
3.5.1 Creating a new guest
To create a new guest, create a template as described in 3.4.1, “Create a new template” on page 55.
On the Guests tab, click the add button, type a name for your new guest, select the template to use, then click Create.
3.5.2 Start and stop guests
To start a guest, click Actions to activate the menu, and then click Start.
To stop a guest, click Actions, and then click Stop.
The first time that a new guest is started, it will try to load from the disk. Because there is no operating system (OS) installed on the disk, it will fail, so it will load from the ISO. After that, it’s possible to proceed with the OS installation.
After the OS is installed, the guest will load the OS from disk when it is started.
3.6 Accessing a graphical interface
PowerKVM supports VNC to access a graphical interface console on the guest. Kimchi uses noVNC, which is a VNC client that runs in a browser.
3.6.1 noVNC
noVNC can be accessed either by clicking the preview image on the Guests tab or clicking Actions and then clicking Connect.
That opens a new browser tab or window that shows the graphical interface, which enables the user to interact with the guest machine.
|
Note: Your browser needs to allow pop-up windows to get a noVNC window. If your browser blocks pop-ups, you will not be able to see the noVNC window.
|
3.6.2 VNC
You can get a graphical display of a guest by using Virtual Network Computing (VNC). Each guest uses a different TCP port, 5900+N, where N is the display number.
Example 3-1 shows how to obtain the VNC display number for a guest named guest01, using the virsh command on a root shell on the server.
Example 3-1 Obtaining the VNC display number
# virsh vncdisplay guest01
:1
|
Note: Remember to open the VNC ports on the server firewall. It is suggested that a password be set for the VNC access.
|
..................Content has been hidden....................
You can't read the all page of ebook, please click here login for view all page.