


Host installation and configuration
This chapter covers IBM PowerKVM installation and configuration.
After reading this chapter, you should be able to perform the following tasks:
•Install PowerKVM through DVD media and NetBoot.
•Perform unattended installations.
•Reinstall PowerKVM.
•Configure an installed system.
•Upgrade firmware by using GUI and CLI.
2.1 Host installation
This section describes how to install PowerKVM on the host. You also have the option to order the PowerKVM system preinstalled.
PowerKVM supports physical DVD media and NetBoot installation methods. The OPAL firmware uses Petitboot, a kexec-based bootloader capable of loading kernel and initrd from any Linux mountable file system.
At the time of writing, PowerKVM is available in ISO format only. For DVD installation method, burn the ISO image file into a DVD media. To set up a NetBoot installation, you must extract the NetBoot files from the ISO image on the boot server, as explained in 2.1.1, “NetBoot installations” on page 29.
To start installing PowerKVM on your system, follow these steps:
1. Insert the DVD or configure NetBoot on another system to install from a remote server. See 2.1.1, “NetBoot installations” on page 29 for more details about how to configure NetBoot installation. The instructions that follow apply to both installation methods.
2. Connect to the system through the serial port or using SOL (Serial Over LAN) by using IPMI network console. IPMI console is provided by ipmitool package from most of the Linux distributions.
|
Important: IPMI network console must be enabled with a password on the ASM interface. See 2.2.1, “Console configuration” on page 37 for more information.
|
– To activate SOL, use the following command:
$ ipmitool -I lanplus -H <FSP IP ADDRESS> -P <IPMI PASSWORD> sol activate
– To deactivate SOL, run:
$ ipmitool -I lanplus -H <FSP IP ADDRESS> -P <IPMI PASSWORD> sol deactivates
3. Boot the system and wait for the Petitboot menu to display. You can use the ASMI interface or IPMI command line to power on the system. To power system on or off, run the following commands:
$ ipmitool -I lanplus -H <FSP IP ADDRESS> -P <IPMI PASSWORD> power on
$ ipmitool -I lanplus -H <FSP IP ADDRESS> -P <IPMI PASSWORD> power off
$ ipmitool -I lanplus -H <FSP IP ADDRESS> -P <IPMI PASSWORD> power cycle

Figure 2-1 Petitboot menu
4. Wait for PowerKVM installer to automatically start.
You can also choose the installation method from the Petitboot menu. If you are installing from DVD media, choose the POWERKVM_LIVECD entry from the menu options. For NetBoot installations, choose the menu entry label that was previously configured in the NetBoot server.
|
Note: Petitboot starts the installer automatically after 10 seconds timeout. You can also change or disable the automatic boot on a persistent basis by changing the Autoboot option on the System configuration menu.
|
Petitboot uses DHCP as default for the network configuration. Use the System configuration option from Petitboot menu to change network settings as shown in Figure 2-2. You can also choose to skip this step and configure network after installation is complete. See “Configure the network” on page 36 for more details.

Figure 2-2 Petitboot system configuration
5. Choose the language, as shown in Figure 2-3.
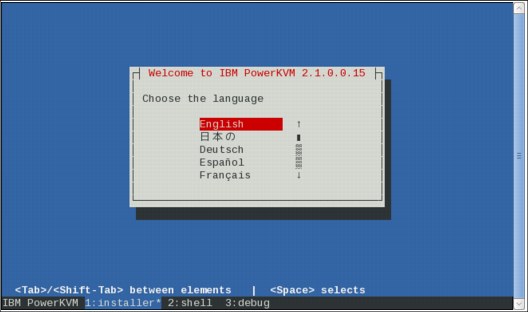
Figure 2-3 Language selection
|
Tip: PowerKVM installer allows you to switch from panels during the installation process. For example, if you want to switch to the shell panel, use CTRL-B and then type 2.
|
6. Select Install PowerKVM, click OK, and then hit Enter.

Figure 2-4 Welcome to IBM PowerKVM
7. Select the target device to install. A PowerKVM installation requires 70 GB of disk space.

Figure 2-5 Select the target device to install PowerKVM
8. Set a password for the root user. The password must have at least six characters. Choose a password that conforms with your site security rules.

Figure 2-6 Root password
9. Set the time zone for the system. Select the indicated box if the system clock uses UTC.

Figure 2-7 Time zone selection
10. Configure the NTP servers as shown in Figure 2-8.
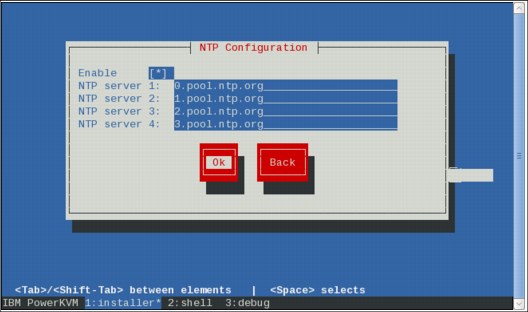
Figure 2-8 NTP configuration
|
Important: Setting up NTP servers is a preferred practice to keep the clock synchronized between host and guests. See 5.7, “Time management” on page 90 for more information.
|
11. Set the date and time. Figure 2-9 shows an example.
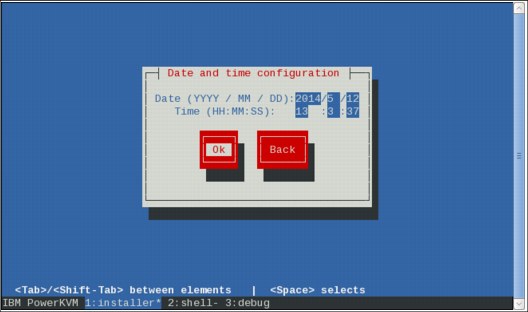
Figure 2-9 Date and time configuration
12. Configure the network devices. Figure 2-10 shows the network configuration step.

Figure 2-10 Configure network

Figure 2-11 Network device configuration
14. Configure the DNS, as shown in Figure 2-12.
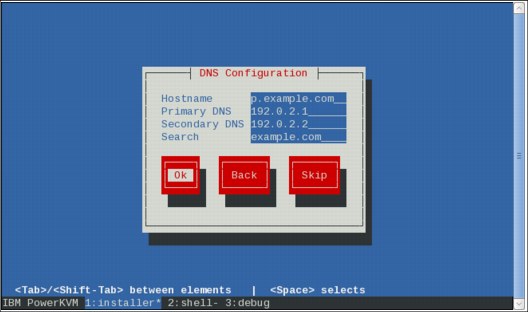
Figure 2-12 DNS configuration
15. Review the installation summary. See Figure 2-13 for an example.
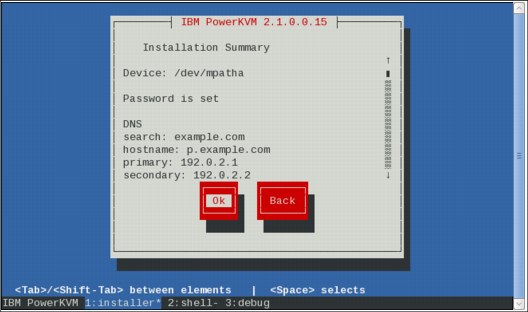
Figure 2-13 Installation summary
16. Confirm the device that you have chosen to install, as illustrated in Figure 2-14.
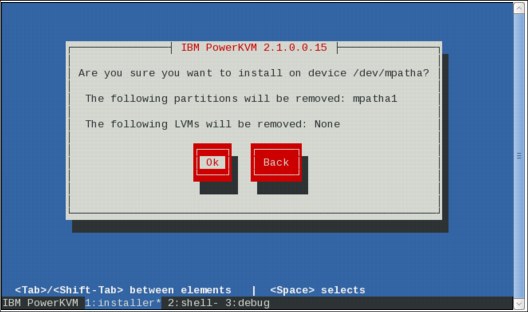
Figure 2-14 Device confirmation
17. A progress bar is displayed while installing files into the selected device. The example in Figure 2-15 shows a progress bar status of 25% complete.

Figure 2-15 Installer progress bar
18. When installation is finished, press Enter or the space bar to reboot the system. Figure 2-16 shows an example.
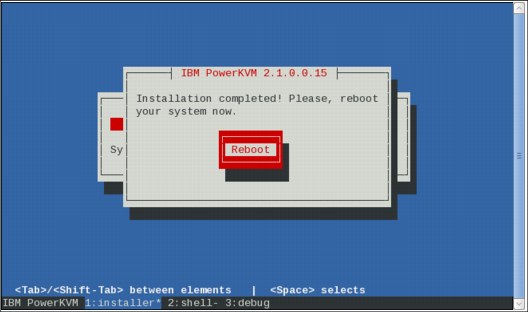
Figure 2-16 Reboot the system
19. The system reboots and automatically and loads PowerKVM from the installed device, as shown in Figure 2-17.
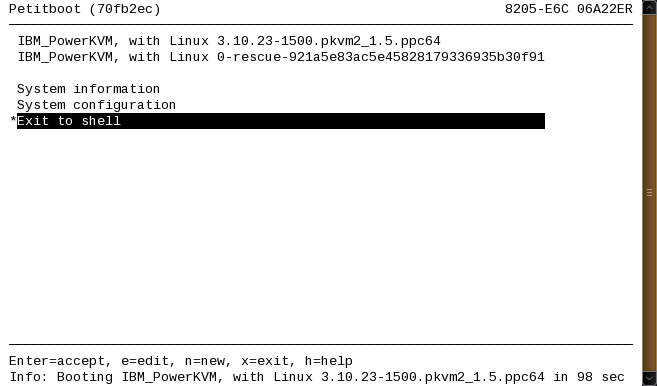
Figure 2-17 PowerKVM is automatically loaded from installed device after reboot
2.1.1 NetBoot installations
This section guides you through preparing the necessary infrastructure to perform NetBoot installations of PowerKVM. The NetBoot installation method requires DHCP and HTTP (or FTP) servers to be configured on another Linux system.
These are the NetBoot installation requirements for PowerKVM:
•PowerKVM image (ISO)
•A DHCP server in the same subnetwork as the machine targeted for installation
•An HTTP (or FTP) server that can be reached from the target machine being installed (the server is referred to as the NetBoot server in this book)
To prepare the NetBoot installation, follow these steps:
1. Obtain an PowerKVM image (ISO) and upload it to your NetBoot server.
2. Set up a DHCP server, as described in “Configure DHCP” on page 31, and then restart DHCP service.
3. Create a boot configuration file for the target machine.
4. Set up a NetBoot server (HTTP or FTP). See “Configure HTTP” on page 31 for an example. Then, restart the configured services to apply changed settings.
5. Boot the PowerKVM machine.
6. Get access to the target Power machine through the Intelligent Platform Management Interface (IPMI) console.
7. Watch the boot process and wait for the Petitboot menu to be presented. The NetBoot option is in the Petitboot menu.
In a NetBoot installation, PowerKVM performs the following tasks:
•Reads the boot configuration file from DHCP server, called pxe.conf in this book
•Boots a kernel and initrd image from a remote server
•Loads a minimal root file system image from a remote server
•Installs packages from a repository on a remote server
PowerKVM NetBoot installation can load files from the network by using different protocols, as shown in Table 2-1.
Table 2-1 NetBoot supported protocols
|
NetBoot action
|
Configuration
|
Supported protocols
|
|
Read pxe.conf
|
option conf-file <location>
|
HTTP, FTP, and TFTP
|
|
Load kernel and initrd
|
kernel <location>
intrd <location>
|
HTTP, FTP, and TFTP
|
|
Load minimal root file system
|
root=<location>
|
HTTP and FTP (compressed read-only file system image);
NFS (ISO image)
|
|
Installation repository
|
repo=<location>
|
HTTP and FTP
|
The boot configuration file format is shown in Example 2-1.
Example 2-1 Petitboot configuration format
label <your label>
kernel {http,ftp,tftp}://<server address>/<path>/vmlinuz
initrd {http,ftp,tftp}://<server address>/<path>/initrd.img
append root=live:{http,ftp}://<server address>/<path>/squashfs.img selinux=0 rd.dm=0 rd.md=0 repo={http,ftp}://<server address>/<path> console=hvc0 console=tty0
The sections that follow describe how to configure the NetBoot services for HTTP, DHCP, and TFTP protocols.
|
Note: You must set permissions and the firewall to allow DHCP and HTTP or FTP services. Permission settings depend on the Linux distribution that you are using.
|
Configure DHCP
Petitboot reads text configuration files to load the kernel and the initrd file.
1. Configure the DHCP server to be capable of reading text files from TFTP server through the conf-file option. Example 2-2 shows a sample configuration.
Example 2-2 DHCP configuration sample
ddns-update-style none;
option conf-file code 209 = text;
subnet 192.0.2.0 netmask 255.255.255.0 {
option domain-name-servers 192.0.2.1, 192.0.2.2;
host powerkvm-host{
hardware ethernet 6c:ae:8b:01:a0:f4;
fixed-address 192.0.2.10;
option host-name "powerkvm-host";
option conf-file "http://192.0.2.1/powerkvm/pxe.conf";
}
}
2. To serve pxe.conf through TFTP, change the option conf-file line:
option conf-file "pxe.conf";
3. Restart the DHCP service to apply the changes.
Configure HTTP
The HTTP server needs to provide the following files:
•vmlinuz (kernel)
•initrd.img (initrd)
•squashfs.img (compressed read-only file system)
•repodata (RPM repository)
To serve the NetBoot install through HTTP, follow these steps:
1. Extract the PowerKVM ISO image under the WWW root directory on your HTTP server. You should then see the following directory layout:
etc/
LiveOS/
packages/
ppc/
TRANS.TBL
VERSION
.discinfo
2. Edit your boot configuration file to use the HTTP server. Place pxe.conf in a directory on your WWW root. In Example 2-3 on page 32, the files are under the wwwroot/powerkvm directory.
Example 2-3 Boot configuration sample
label PowerKVM Automated Install
kernel http://192.0.2.1/powerkvm/ppc/ppc64/vmlinuz
initrd http://192.0.2.1/powerkvm/ppc/ppc64/initrd.img
append root=live:http://192.0.2.1/powerkvm/LiveOS/squashfs.img selinux=0 rd.dm=0 rd.md=0 repo=http://192.0.2.1/powerkvm/packages console=hvc0 console=tty
Configure TFTP (optional)
You can also configure a TFTP server to host your pxe.conf. Enable TFTP, and copy pxe.conf that you set on DHCP to the TFTP root directory.
If your TFTP server is controlled by an xinetd service, the configuration file in /etc/xinetd.d/tftp might look like Example 2-4.
Example 2-4 TFTP configuration sample
service tftp
{
socket_type = dgram
protocol = udp
wait = yes
user = root
server = /usr/sbin/in.tftpd
server_args = -B 65464 -v -s /srv/netboot
disable = no
per_source = 11
cps = 100 2
flags = IPv4
}
2.1.2 Automated installation
PowerKVM installation can be performed in an unattended way by providing a kickstart-like file to the boot parameters in the Petitboot configuration file. The automated NetBoot installation requires these elements:
•pkvm.inst.auto=<path to kickstart> line added to the Petitboot configuration file
•kickstart-like file
|
Note: Automatic processing can be executed only on the hvc0 console. That is the console type supported by ipmitool and QEMU with the -nographic option.
|
The boot option pkvm.inst.auto supports HTTP, TFTP, and NFS. Example 2-5 on page 33 shows what to include in the Petitboot configuration file to perform automated NetBoot installations.
Example 2-5 Petitboot configuration sample for automated install
label IBM PowerKVM Automated Install (kickstart)
kernel http://192.0.2.1/kvmonp_netboot/vmlinuz
initrd http://192.0.2.1/kvmonp_netboot/initrd.img
append ksdevice=bootif lang= kssendmac text root=nfs:192.0.2.1:/var/www/kvmonp_netboot/iso/ibm-powerkvm.iso rd.dm=0 rd.md=0 ipv6.disable=1 kvmp.inst.auto=tftp://192.0.2.1/kickstart/powerkvm.ks ifname=net0:e4:1f:13:fd:cf:7d ip=192.0.2.10::192.0.2.254:255.255.255.0:powerkvm-host:net0:none
These options are supported options in the kickstart file:
•Preinstall scripts
%pre
<some shell script>
%end
•Post-install scripts
%post
<some shell script>
%end
•Partition (required)
partition --ondisk=<target disk>
Network (required)
•Network (required)
network --device <target nic> --bootproto dhcp
or
network --device <target nic> --bootproto static
--ip=<ip addr> --netmask=<netmask addr>
--gateway=<gw addr>
•Root password
rootpw --iscrypted <password in sha-512 format>
•Time zone
timezone <timezone>
|
Note: To determine the target devices, boot in manual installation mode first, and look at the System Information option from the Petitboot menu.
|
You can use the crypt module from Python to generate the encrypted password for the root user, as this example shows:
python -c ‘import crypt; print(crypt.crypt(“Your Password”,”$6$Your Salt”))’
The kickstart file might look like Example 2-6 on page 34.
Example 2-6 Kickstart sample
%pre
# Enter a script to be executed before the install
%end
partition / --ondisk=/dev/sda
network --device=net0 --ip=192.0.2.10 --netmask=255.255.255.0 --gateway=192.0.2.1
rootpw --iscrypted $6$yd0x1nIZmw$tYMypfhWeO/ehcUpXaxX5VXSmX/1aX59HReI1CwRtxUuyHdj0fe6FMbVHouaOvaaGNO4/YW/pkekJ57vSnk.b0
timezone America/New_York
%post
# Enter a script to be executed after the install
%end
On the installed system, you can the find the files for automated installation at the following locations:
•Logs: /opt/ibm/powerkvm/logs/
•Kickstart: /opt/ibm/powerkvm/kickstart/
•Scripts (post and preinstall): /opt/ibm/powerkvm/scripts/
Rename the network device
Network interface renaming is available for NetBoot installations. Typically, if you know your NIC MAC address, you can rename it at boot time and reference the renamed NIC in the configuration file.
Suppose that your NIC MAC address is 00:11:22:33:44:55. You must rename your NIC by adding ifname=<NIC name> to the PowerKVM boot line in your pxe.conf file. if you are statically assigning an IP on your NetBoot configuration, you can pass the following to the PowerKVM boot line to rename its NIC to mynic0:
ifname=mynic0:00:11:22:33:44:55 ip=<ip>::<gateway>:<netmask>::mynic0:none
If you are using DHCP, use:
ifname=mynic0:00:11:22:33:44:55 ip=:::::mynic0:dhcp
In your installation automation file, you can reference the renamed NIC:
network --device mynic0 --bootproto dhcp
Or for static IP, use this, instead:
network --device mynic0 --bootproto static --ip=<ip> --netmask=<netmask> --gateway=<gateway>
2.1.3 Reinstallation
The reinstall method differs from a fresh installation that creates new partitions on the disk in that it leaves data and log partitions unchanged. When reinstalling PowerKVM, only the root, swap, and boot partitions are completely destroyed and re-created.
To reinstall PowerKVM, follow the steps as if you are performing a fresh install.
After you select the language, the installer presents the option to reinstall the system. Select Reinstall IBM PowerKVM, as shown in Figure 2-18 on page 35.

Figure 2-18 Reinstall IBM PowerKVM
2.2 System configuration
This section describes how to use the configure-system tool that is included in the PowerKVM installation to change some important settings of the machine.
You can use the configure-system tool to perform the following maintenance tasks on the installed system:
•Reset the root password
•Select the time zone
•Set the date and time
•Configure the network
•Configure the DNS
To execute the configuration tool, from the root shell, run this command:
# configure-system
The configure-system main panel is shown in Figure 2-19.

Figure 2-19 Configure-system tool
Reset the password
The root password can be changed from the configure-system tool by selecting the Root Password option from the menu. The password reset is shown in Figure 2-20.

Figure 2-20 Reset password
Configure the network
You can change network settings on a persistent basis by selecting the Configure Network option from configure-system tool.
|
Tip: Use the configure-system tool if the network is not yet configured. All of the network scripts and settings are automatically changed in the system.
|
The device list is shown in Figure 2-21. Select the device that you want to configure and click OK. The configuration details for the selected device are shown in Figure 2-22 on page 37.
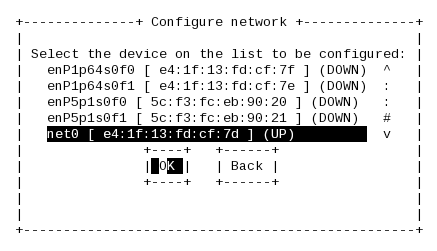
Figure 2-21 Select network device

Figure 2-22 Network device configuration
2.2.1 Console configuration
PowerKVM supports serial and SoL (Serial over LAN) console types. This section shows how to set an IPMI (SoL) console password on the FSP by using the ASM interface.
To configure an IPMI console password, follow these steps:
1. Ensure that OPAL is selected as the Hypervisor Mode.
2. Log in to the ASM interface and expand the System Configuration menu.
Click Hypervisor Configuration, and then verify that KVM is selected in the Hypervisor Mode drop-down meanu, as shown in Figure 2-23.
3. Type a password for the IPMI console and retype it to confirm.
4. Click Continue to apply your changes.

Figure 2-23 Hypervisor configuration
|
Note: To enable the IPMI console for the first time, reset the Service Processor after setting the IPMI console password. Expand System Service Aids on the left panel and click Reset Service Processor.
|
2.3 Firmware upgrade
OPAL firmware can be upgraded through the command line or web interface. You can install a new firmware level on the PowerKVM system by using one of the following methods:
•Kimchi interface (GUI)
•update_flash tool (CLI)
After the installation is complete, you can verify that the update installed correctly by using the lsmcode command or ASMI.
|
Note: The firmware level is displayed in the upper-right corner, below the copyright statement on the ASMI Welcome pane.
|
2.3.1 Kimchi
Kimchi automatically unpacks the firmware RPM file, runs the update_flash tool in the background, and reboots the machine on the new flashed firmware. To upgrade firmware on an PowerKVM machine, follow these steps:
1. Obtain the latest firmware rpm and place it at any directory on the PowerKVM machine.
2. Open Kimchi on your browser. Kimchi uses port 8001 by default. See Chapter 4, “Managing guests from a CLI” on page 59 for more details.
4. Type the path where you placed the firmware rpm file.
5. Click Update. The system is automatically powered off and the new firmware is flashed.
6. Wait for the process to complete. The system is automatically powered on running the new firmware level.

Figure 2-24 Firmware upgrade by using Kimchi
2.3.2 update_flash
You can also use the update_flash tool instead of Kimchi to upgrade the firmware. To unpack the RPM file enter the following command:
rpm -Uhv --ignoreos filename.rpm
Where filename is the name of the RPM file that contains the server firmware. For example, 01SF2xx_yyy_zzz.rpm.
When you unpack the RPM file, the server firmware update is saved as 01SF2xx_yyy_zzz.
To install the firmware using update_flash, run this command:
/usr/sbin/update_flash -f fwlevel
Where fwlevel is the specific server firmware update file name, such as 01SF2xx_yyy_zzz.
After the installation is complete, the system is automatically powered off and then on again.
..................Content has been hidden....................
You can't read the all page of ebook, please click here login for view all page.