

Processor and memory virtualization
Machine virtualization involves all of the major server components. Proper configuration and tuning of each component is important to maximize the server utilization. The four major areas of a virtualized system involve CPU, Memory, Network and Storage.
This chapter covers CPU and memory on IBM PowerKVM and the following topics:
•Resources overcommitment
•CPU compatibility mode
•SMT support
•Microthreading mode
•CPU pinning
•NUMA
•Huge pages
Chapter 6, “I/O virtualization” on page 91 covers the I/O subsystem, which includes networking and storage.
5.1 CPU virtualization
CPU virtualization is a technique that allows a virtual CPU to run over another CPU (virtual or physical). The process of running a virtual CPU on top of another virtual CPU is called nested virtualization, and that is not covered here. This chapter overs only CPU virtualization over a physical CPU.
In the beginning of CPU virtualization, most of the instructions that ran on the virtual CPU were emulated. But with recent virtualization technologies, most of the instructions run directly on the CPU, which avoids the translation overhead.
The different ways to virtualize CPUs are covered in the sections that follow.
5.1.1 Types of virtualization
When an operating system runs inside a virtual machine, it can work in two different ways, depending on how it interacts with the hypervisor layer: full virtualization or paravirtualization.
Full virtualization
In full virtualization mode, the guest operating system runs inside the virtual machine and does not know that it is running in a virtualized environment. This means that the guest operating system has instructions to run on real hardware, so the hypervisor needs to emulate the real hardware.
In this mode, the hypervisor emulates the full hardware, such as registers, timing, and hardware limitations. The guest operating system thinks it is interacting with real hardware. However, emulation is complex and inefficient.
Paravirtualization
In paravirtualization, the guest operating system knows that it is running inside a virtual machine, so it helps the hypervisor whenever possible. The advantage is the better performance of the virtual machine, mainly because the communication between hypervisor and guest can be shortened, which reduces overhead. With PowerKVM, all of the supported guests can run in paravirtualized mode.
Much of the paravirtualization optimization happens when the virtual machine operating system (OS) needs to do input and output (I/O) operations, which are processed by the hypervisor. One example is when the guest operating system needs to send a network packet outside of the server. When the guest OS sends the packet in full virtualization mode, it operates in the same way that it would when interacting with a physical NIC, using the same memory space, interruptions, and so on.
On the other side, when the guest uses the paravirtualization approach, the guest operating system knows it is virtualized and knows that the guest I/O will arrive in a hypervisor (not on a physical hardware), and it cooperates with the hypervisor. This cooperation is what provides most of the performance benefits of paravirtualization.
In the KVM world, this set of device drivers are called Virtio device drivers (see 1.3.11, “Virtio drivers” on page 16). There is a set of paravirtualized device drivers used initially on
IBM PowerVM that is also supported on PowerKVM, including ibmveth, ibmvscsi, and others.
IBM PowerVM that is also supported on PowerKVM, including ibmveth, ibmvscsi, and others.
5.1.2 Hardware-assisted virtualization
Hardware-assisted virtualization is a platform feature that enables the hypervisor to take advantage of the hardware when using guest virtualization. One of the main benefits is not changing the code of the guest images when running it, so the guest binary code can be run without any translation.
IBM Power Systems introduced virtualization assistance hardware with the POWER5 family of servers. At that time, Power Systems did a lot of the assistance by cooperating with the hypervisor for certian functions, such as fast page movement, micropartitioning, and microthreading.
5.2 CPU overcommitment
CPU overcommitment allows an under-used CPU to be shared among other virtual machines. The CPU overcommit is usually enabled when the virtual machines are not expected to use all of the CPU resources at the same time. Therefore, when one virtual machine is not using its share of the CPU, another virtual machine can use it.
A CPU assigned to a virtual machine is called virtual CPU (vCPU). In an overcommitment scenario, the number of vCPUs is larger than the number of CPUs available.
For example, Figure 5-1 shows a hypervisor with four CPUs that are hosting two virtual machines (VMs) that are using three vCPUs each. This means that the guest operating system can use up to three CPUs if another VM is not using more than one CPU.
If the vCPU gets 100% at of the time, the hypervisor will multiplex the vCPU in the real CPU according to the hypervisor policies.
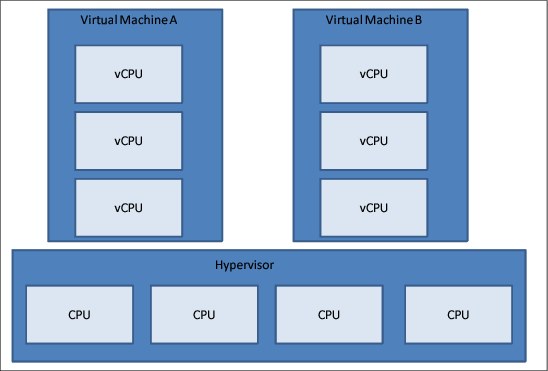
Figure 5-1 CPU overcommitment scenario
5.3 CPU compatibility mode
It is possible to run a guest in compatibility mode with IBM POWER8, IBM POWER7®, and IBM POWER6® modes.
To enable POWER7 compatibility mode, add or edit the XML element in the domain element of the guest XML configuration file as Example 5-1 shows.
Example 5-1 Enable POWER7 compatibility mode
<cpu mode=’custom’>
<model>power7</model>
</cpu>
|
Note: POWER7 compatibility mode is limited to up to 4 threads per core.
|
To enable POWER6 compatibility mode, add or edit the XML element shown in Example 5-2 on the domain element of the guest XML configuration file.
Example 5-2 Enable POWER6 compatibility mode
<cpu mode=’custom’>
<model>power6</model>
</cpu>
|
Note: POWER6 compatibility mode is limited to up to 2 threads per core.
|
5.3.1 Simultaneous multithreading
To run PowerKVM on Power Systems, the SMT option needs to be turned off in the hypervisor. The SMT (simultaneous multithreading) feature is visible only inside the guests, rather than on the hypervisor. In this scenario, a single core VM can use the SMT feature and have up to 8 threads activated in the virtual machine.
To disable SMT on the hypervisor, run the following command:
ppc64_cpu --smt=off
PowerKVM disables SMT in the hypervisor during the boot. Each virtual machine that needs to use the SMT feature should enable it in the virtual machine configuration.
To check whether the SMT is disabled on the cores, run the ppc64_cpu command with the --smt or --info parameter. The ppc64_cpu --info command shows the output of the CPUs, marking the threads for each CPU that are enabled with an asterisk (*) near the thread. Example 5-3 on page 75 shows that in a 20-core machine, only one thread per CPU is enabled.
Example 5-3 SMT disabled on the hypervisor
# ppc64_cpu --info
Core 0: 0* 1 2 3 4 5 6 7
Core 1: 8* 9 10 11 12 13 14 15
Core 2: 16* 17 18 19 20 21 22 23
Core 3: 24* 25 26 27 28 29 30 31
Core 4: 32* 33 34 35 36 37 38 39
Core 5: 40* 41 42 43 44 45 46 47
Core 6: 48* 49 50 51 52 53 54 55
Core 7: 56* 57 58 59 60 61 62 63
Core 8: 64* 65 66 67 68 69 70 71
Core 9: 72* 73 74 75 76 77 78 79
Core 10: 80* 81 82 83 84 85 86 87
Core 11: 88* 89 90 91 92 93 94 95
Core 12: 96* 97 98 99 100 101 102 103
Core 13: 104* 105 106 107 108 109 110 111
Core 14: 112* 113 114 115 116 117 118 119
Core 15: 120* 121 122 123 124 125 126 127
Core 16: 128* 129 130 131 132 133 134 135
Core 17: 136* 137 138 139 140 141 142 143
Core 18: 144* 145 146 147 148 149 150 151
Core 19: 152* 153 154 155 156 157 158 159 
If you want to start the VM using SMT, it needs to specify that manually. For example, if you wants to use only one core with SMT 8, the machine should be assigned with 8 vCPUs, which will use just one core and 8 threads, as covered in “SMT on the guests” on page 77.
To enable SMT support on a guest, the XML configuration file needs to set the number of threads per core. This number must be a power of 2, that is: 1, 2, 4, or 8. The number of vCPUs must also be the product of the number of threads per core and the number of cores.
Example 5-4 demonstrates how to set these numbers for 4 threads per core and 2 cores, resulting in 8 vCPUs.
Example 5-4 Setting number of threads per core
<vcpu placement=’static’>8</vcpu>
<cpu>
<model>power8</model>
<topology sockets=’1’ cores=’2’ threads=’4’/>
</cpu>
Example 5-5 on page 76 shows the CPU information from a guest running in POWER7 compatibility mode, with 4 threads per core and 2 cores. The example includes the information with SMT enabled and disabled.
Example 5-5 CPU information about a guest with SMT
# ppc64_cpu --smt
SMT is on
# cat /proc/cpuinfo
processor : 0
cpu : POWER7 (architected), altivec supported
clock : 2900.000000MHz
revision : 1.3 (pvr 004b 0103)
processor : 1
cpu : POWER7 (architected), altivec supported
clock : 2900.000000MHz
revision : 1.3 (pvr 004b 0103)
processor : 2
cpu : POWER7 (architected), altivec supported
clock : 2900.000000MHz
revision : 1.3 (pvr 004b 0103)
processor : 3
cpu : POWER7 (architected), altivec supported
clock : 2900.000000MHz
revision : 1.3 (pvr 004b 0103)
processor : 4
cpu : POWER7 (architected), altivec supported
clock : 2900.000000MHz
revision : 1.3 (pvr 004b 0103)
processor : 5
cpu : POWER7 (architected), altivec supported
clock : 2900.000000MHz
revision : 1.3 (pvr 004b 0103)
processor : 6
cpu : POWER7 (architected), altivec supported
clock : 2900.000000MHz
revision : 1.3 (pvr 004b 0103)
processor : 7
cpu : POWER7 (architected), altivec supported
clock : 2900.000000MHz
revision : 1.3 (pvr 004b 0103)
timebase : 512000000
platform : pSeries
model : IBM pSeries (emulated by qemu)
machine : CHRP IBM pSeries (emulated by qemu)
# lscpu
Architecture: ppc64
Byte Order: Big Endian
CPU(s): 8
On-line CPU(s) list: 0-7
Thread(s) per core: 4
Core(s) per socket: 1
Socket(s): 2
NUMA node(s): 1
Model: IBM pSeries (emulated by qemu)
L1d cache: 64K
L1i cache: 32K
NUMA node0 CPU(s): 0-7
# ppc64_cpu --smt=off
# cat /proc/cpuinfo
processor : 0
cpu : POWER7 (architected), altivec supported
clock : 2900.000000MHz
revision : 1.3 (pvr 004b 0103)
processor : 4
cpu : POWER7 (architected), altivec supported
clock : 2900.000000MHz
revision : 1.3 (pvr 004b 0103)
timebase : 512000000
platform : pSeries
model : IBM pSeries (emulated by qemu)
machine : CHRP IBM pSeries (emulated by qemu)
# lscpu
Architecture: ppc64
Byte Order: Big Endian
CPU(s): 8
On-line CPU(s) list: 0,4
Off-line CPU(s) list: 1-3,5-7
Thread(s) per core: 1
Core(s) per socket: 1
Socket(s): 2
NUMA node(s): 1
Model: IBM pSeries (emulated by qemu)
L1d cache: 64K
L1i cache: 32K
NUMA node0 CPU(s): 0,4
|
Note: The default setting is threads=1, which prevents SMT from being used on the guest. For guests, enable as many threads for each one as possible. If the guest workload performs better with fewer threads per core, that can be changed on the guest dynamically with the ppc64_cpu command.
|
SMT on the guests
To enable SMT on the guests, the virtual machine needs to be assigned with the number of threads that will run on the operating system. Keep this formula in mind:
vCPU = cores * threads
Table 5-1 shows how to configure the vCPUs in libvirt (QEMU) so that you can explore the SMT options on the guest.
Table 5-1 How to configure vCPUs on the guests
|
vCPU specified in the virtual machine
|
Cores
|
SMT
|
XML example
|
|
32
|
4
|
8
|
<topology sockets=’ 1’ cores=’4’ threads=’ 8’ />
|
|
16
|
2
|
8
|
<topology sockets=’ 1’ cores=’2’ threads=’ 8’ />
|
|
8
|
1
|
8
|
<topology sockets=’ 1’ cores=’1’ threads=’ 8’ />
|
|
2
|
2
|
off
|
<topology sockets=’ 1’ cores=’2’ threads=’ 1’ />
|
|
4
|
1
|
4
|
<topology sockets=’ 1’ cores=’1 threads=’ 4’ />
|
|
2
|
1
|
2
|
<topology sockets=’ 1’ cores=’1’ threads=’ 2’ />
|
|
1
|
1
|
off
|
<topology sockets=’ 1’ cores=’1’ threads=’ 1’ />
|
5.3.2 Microthreading
Microthreading is an IBM POWER8 feature that enables each POWER8 core to be split into up to four other subcores. Each subcore has also a limited number of threads, as described in Table 5-2.
Table 5-2 Threads per subcore
|
Subcores per core
|
Threads per subcore
|
Threads per core
|
|
4
|
1, 2
|
up to 8
|
This type of configuration provides performance advantages for some types of workloads.
Figure 5-2 shows the architecture of a POWER8 core using the microthreading feature. In this scenario, the core is configured to have 4 subcores, and each subcore configured in 2 threads.
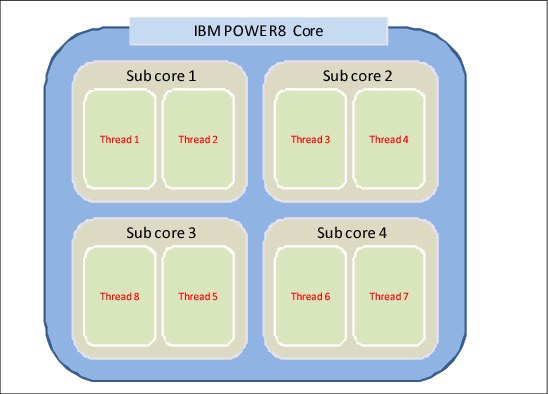
Figure 5-2 Example of a POWER8 core with 4 subcores and 2 threads each subcore
Another way to demonstrate how microthreading works is defining a scenario where a user wants to start 4 virtual machines on a single core. You can start it without using microthreading or with microthreading.
Figure 5-3 shows that four virtual machines are running in the same core, and each VM can access up to 8 threads. The core switches among the 4 virtual machines, and each virtual machine runs only about one-fourth of the time. This indicates that the CPU is overcommitted.

Figure 5-3 4 virtual machines running in a single core without microthreading enabled
Figure 5-4 on page 80 shows the same 4 virtual machines running on 4 different subcores in the same core. Each virtual machine can have up to 2 SMT threads. In this case, the VM is always running in the CPU.

Figure 5-4 4 virtual machines running in a single core with microthreading enabled
Microthreading benefits:
•Better CPU resources use
•More virtual machines per core
Microthreading limitations:
•SMT limited to 2 in per subcore
•Guests in single thread (SMT 1) mode cannot use the full core
Enabling microthreading on the PowerKVM hypervisor
To enable microthreading on the PowerKVM hypervisor, run the following procedures (the best way to do it is after a fresh reboot):
1. Ensure that all guests are not running.
2. Set the number of subcores to 1:
# ppc64_cpu --subcores-per-core=1
3. Enable SMT on the host:
# ppc64_cpu --smt=on
4. Set the number of subcores to 4:
# ppc64_cpu --subcores-per-core=4
5. Turn the SMT off on the host:
# ppc64_smt --smt=off
To verify that the machine has microthreading enabled, use the ppc64_cpu command and show the CPUs information with the --info parameters. Example 5-6 on page 81 shows the output of the ppc64_cpu command, displaying that the server has 20 cores and each core has 4 subcores.
Example 5-6 Checking if microthreading is enabled
# ppc64_cpu --info
Core 0:
Subcore 0: 0* 1
Subcore 1: 2* 3
Subcore 2: 4* 5
Subcore 3: 6* 7
Core 1:
Subcore 4: 8* 9
Subcore 5: 10* 11
Subcore 6: 12* 13
Subcore 7: 14* 15
Core 2:
Subcore 8: 16* 17
Subcore 9: 18* 19
Subcore 10: 20* 21
Subcore 11: 22* 23
Core 3:
Subcore 12: 24* 25
Subcore 13: 26* 27
Subcore 14: 28* 29
Subcore 15: 30* 31
Core 4:
Subcore 16: 32* 33
Subcore 17: 34* 35
Subcore 18: 36* 37
Subcore 19: 38* 39
Core 5:
Subcore 20: 40* 41
Subcore 21: 42* 43
Subcore 22: 44* 45
Subcore 23: 46* 47
Core 6:
Subcore 24: 48* 49
Subcore 25: 50* 51
Subcore 26: 52* 53
Subcore 27: 54* 55
Core 7:
Subcore 28: 56* 57
Subcore 29: 58* 59
Subcore 30: 60* 61
Subcore 31: 62* 63
Core 8:
Subcore 32: 64* 65
Subcore 33: 66* 67
Subcore 34: 68* 69
Subcore 35: 70* 71
Core 9:
Subcore 36: 72* 73
Subcore 37: 74* 75
Subcore 38: 76* 77
Subcore 39: 78* 79
Core 10:
Subcore 40: 80* 81
Subcore 41: 82* 83
Subcore 42: 84* 85
Subcore 43: 86* 87
Core 11:
Subcore 44: 88* 89
Subcore 45: 90* 91
Subcore 46: 92* 93
Subcore 47: 94* 95
Core 12:
Subcore 48: 96* 97
Subcore 49: 98* 99
Subcore 50: 100* 101
Subcore 51: 102* 103
Core 13:
Subcore 52: 104* 105
Subcore 53: 106* 107
Subcore 54: 108* 109
Subcore 55: 110* 111
Core 14:
Subcore 56: 112* 113
Subcore 57: 114* 115
Subcore 58: 116* 117
Subcore 59: 118* 119
Core 15:
Subcore 60: 120* 121
Subcore 61: 122* 123
Subcore 62: 124* 125
Subcore 63: 126* 127
Core 16:
Subcore 64: 128* 129
Subcore 65: 130* 131
Subcore 66: 132* 133
Subcore 67: 134* 135
Core 17:
Subcore 68: 136* 137
Subcore 69: 138* 139
Subcore 70: 140* 141
Subcore 71: 142* 143
Core 18:
Subcore 72: 144* 145
Subcore 73: 146* 147
Subcore 74: 148* 149
Subcore 75: 150* 151
Core 19:
Subcore 76: 152* 153
Subcore 77: 154* 155
Subcore 78: 156* 157
Subcore 79: 158* 159
Disabling microthreading
To disable the microthreading feature (SMT), follow the steps in the PowerKVM hypervisor (also see Example 5-7):
1. Ensure that all guests are stopped.
2. Set the hypervisor cores back to full core mode:
ppc64_cpu --subcores-per-core=1
3. Turn SMT on to “reset” the online thread topology:
ppc64_cpu --smt=on
4. Turn the SMT off before starting the guests:
ppc64_cpu --smt=off
Example 5-7 Disabling microthreading on a PowerKVM host
# ppc64_cpu --subcores-per-core=1
Subcores per core set to 1
# ppc64_cpu --smt=on
# ppc64_cpu --smt=off
To verify that the microthreading feature is disabled, check with the ppc64_cpu --info command, as shown previously in Example 5-3 on page 75.
5.3.3 Configuring NUMA
It is possible to restrict a guest to allocate memory from a set of NUMA nodes. If the guest vCPUs are also pinned to a set of cores located on that same set of NUMA nodes, memory access will be local, which improves memory access performance.
Example 5-8 presents a possible configuration to restrict a guest to NUMA node 0.
Example 5-8 NUMA node set
<numatune>
<memory nodeset=’0’/>
</numatune>
Example 5-9 presents the output of a command that shows how many pages have been allocated on every node on the system for a given guest.
Example 5-9 Verifying NUMA nodes used by a guest
# cat /sys/fs/cgroup/memory/machine/guest08.libvirt-qemu/memory.numa_stat
total=21038 N0=21038 N1=0
file=0 N0=0 N1=0
anon=21038 N0=21038 N1=0
unevictable=0 N0=0 N1=0
5.4 CPU pinning
CPU pinning allows a guest virtual machine to be pinned to a given CPU or set of CPUs. It means that the hypervisor will schedule only vCPUs in those CPUs that the guest is pinned to. By default, the guest can be scheduled on any CPU.
The advantage of pinning is that it improves data locality. Two threads on the same core using the same data will be able to share it on a local cache. The same thing happens for two cores on the same NUMA node.
On PowerKVM 2.1, a guest core may be pinned to a set of host cores or subcores. All guest hardware threads for a particular guest core run on the same host hardware core or subcore in a given moment. As an example, if the host has no microthreading enabled and the guest has 8 vCPUs, running with SMT 4, vCPUs 1 to 3 will run on CPU 8 whenever VCPU 0 is running on CPU 8.
|
Note: All vCPUs on the same core must be pinned to the same set of CPUs. Otherwise, when one vCPU is scheduled on a CPU out of the set, all threads will run on that core.
|
Example 5-10 shows how to pin 8 vCPUs on an SMT 4 guest to host CPUs 0 and 8. Pin to the number of CPUs that is equal to the product of sockets and cores on a guest.
Example 5-10 CPU pinning example
<vcpu placement=’static’ cpuset=’0,8’>8</vcpu>
<cpu>
<model>power8</model>
<topology sockets=’1’ cores=’2’ threads=’4’/>
</cpu>
5.5 CPU sharing
In a kernel-based virtual machine (KVM), the virtual machines run as processes on the host. This means they are scheduled to run on host CPUs just like any other processes. The implication is that CPUs are shared by default. This CPU sharing allows CPU overcommitment, that is, creating more vCPUs than there are CPUs on the system.
The Linux scheduler spreads the vCPUs among the CPU cores. However, when there is overcommitment, multiple vCPUs can share a CPU core. To balance the amount of time that a virtual machine has compared to another virtual machine, you can configure shares.
Example 5-11 demonstrates how to configure the relative share time for a guest. By default, guests have a relative share time of 1024. Two guests with share time of 1024 will share the CPU for the same amount of time. If a third guest has a share time of 256, it runs a quarter of the time, relative to the other guests. A guest with a share time of 2048 will run twice the time compared to the other guests.
Example 5-11 CPU shares
<cputune>
<shares>256</shares>
</cputune>
This share time applies only when there is sharing either because of CPU pinning or because of CPU overcommitment. If vCPUs are idle or only a few vCPUs have been allocated, it’s possible that a guest with a share time of 256 will be able to run on a CPU without sharing. If another guest needs to run on that same CPU, the configured share time will be in effect.
5.6 Memory
With virtualization, the memory is basically static, which means it is not virtualized like the CPU, and a block of memory is mapped directly to a single (and just one) virtual machine.
Because each virtual machine is also a hypervisor Linux thread, the memory can be overcommitted.
This section covers two methods to improve the performance of PowerKVM memory management. These methods involve resizing the guest memory dynamically and merging identical guests pages on the hypervisor.
5.6.1 Memory allocation
Guest memory is allocated by the host according to the guest configuration. It is possible to set a maximum amount of memory and a current amount. The guest will have the maximum amount of memory available, but it can choose to use only the current amount and release the remaining amount to the host. See 5.6.2, “Memory ballooning” on page 85,
Example 5-12 shows the configuration for the maximum amount of memory allocated to the guest on the memory element and the current amount of memory on the currentMemory element.
Example 5-12 Memory allocation
<memory unit=’KiB’>2097152</memory>
<currentMemory unit=’KiB’>1048576</memory>
|
Note: On the guest, you might notice that there is a total amount of memory that is less than what is set as the current amount. This might happen because the guest subcore has reserved an amount of memory for some reason. One example is the crashkernel command, which is used for a kernel dump.
|
5.6.2 Memory ballooning
Memory ballooning is a technique that allows the guest memory to be increased or decreased cooperatively, depending on the amount of free memory available on the guests and hypervisor.
When memory ballooning is enabled on the guest, the hypervisor can remove and add memory to the guest dynamically.
How to enable and manage memory ballooning on PowerKVM
The best way to enable memory ballooning in the guest is to edit the virtual machine configuration using the virsh edit command, and add the following line in the device section, as shown in Example 5-13 on page 86.
Example 5-13 Enable memory balloon on the guest
<devices>
..
<memballoon model=’ virtio’>
..
</devices>
After the virtual machine is configured to support ballooning, the memory can be added and removed from the virtual machine using the command virsh setmem myvm. The total memory allocated to the virtual machine can be seen with the command virsh dommemstat.
Example 5-14 shows a virtual machine called myvm initially with 8 GB memory. After the command virsh setmem myvm 3644800 --config --live. the memory assigned to that partition goes to 4 GB.
Example 5-14 Decreasing the virtual machine memory to 4 GB
# virsh dommenstat myvm
actual 786432
# virsh setmem myvm 3644800 --config --live
# virsh dommemstat myvm
actual 364480
|
Note: If the virtual machine or the guest operating system is not configured properly to support Virtio ballooning, the following message displays on the hypervisor:
Error: Requested operation is not valid: Unable to change memory of active domain without the balloon device and guest OS balloon drive. |
Monitoring
To check whether the memory ballooning is working on the guest, you need to check with the QEMU monitor that is running the command, as shown in Example 5-15. If the balloon is not available in the virtual machine, the output will be “Device balloon has not been activated.”
Example 5-15 Output of memory available on the balloon
# virsh qemu-monitor-command --domain ubuntu -=hmp ‘info balloon’
ballon: actual=2048
To change the amount of memory in the guest, the command ‘balloon <memory in MB>’ is used, as in Example 5-16, that changes the memory from 2 GB to 1 GB. After this command, only 1 GB of memory will be available to the guest.
Example 5-16 Changing the memory allocated to the virtual machine
(qemu) virsh qemu-monitor-command --domain ubuntu -=hmp ‘info balloon’
ballon: actual=2048
(qemu) virsh qemu-monitor-command --domain ubuntu -=hmp ‘ballon 1024’
(qemu) virsh qemu-monitor-command --domain ubuntu -=hmp ‘info balloon’
ballon: actual=1024
|
Note: Most of the operating systems have virtio-balloon embedded into the kernel. If you are using an operating system that does not have the virtio-balloon device driver in the kernel, you need to install it manually.
|
5.6.3 Kernel SamePage Merging (KSM)
Kernel SamePage Merging (KSM) is a KVM technology that merges blocks of memory pages with the same content to reduce the memory use in the hypervisor.
KSM technology can detect that two virtual machines have identical memory pages. In that case, it merges both pages in the same physical memory page, which reduces that amount of memory use. To do so, a certain number of CPU cycles is used to scan and spot these pages.
For example, Figure 5-5 shows that all three virtual machines have pages that contain the same content. In this case, when KSM is enabled, all four pages that contain the same content will use only one physical memory block.

Figure 5-5 KSM mapping when VM uses the same page
There is a similar feature found in the PowerVM hypervisor, called Active Memory Deduplication. For more information about that feature, see “Power Systems Memory Deduplication, REDP-4827.”
How to enable Kernel SamePage Merging on PowerKVM
KSM is supported in PowerKVM server virtualization, but it is not enabled automatically.
To verify whether KSM is running and to enable and disable it, you need to interact with the /sys/kernel/mm/ksm/run file.
|
Important: The ksmtuned daemon must be running to run KSM. PowerKVM already has this daemon running automatically, so you do not need to turn it on. To verify that the daemon is running, check Example 5-17.
|
Example 5-17 Verify that the ksmtuned daemon is running
# systemctl status ksmtuned
ksmtuned.service - Kernel Samepage Merging (KSM) Tuning Daemon
Loaded: loaded (/usr/lib/systemd/system/ksmtuned.service; enabled)
Active: active (running) since Sat 2014-05-10 10:55:52 EDT; 2 days ago
Main PID: 18420 (ksmtuned)
CGroup: name=systemd:/system/ksmtuned.service
17510 sleep 60
18420 /bin/bash /usr/sbin/ksmtuned
Example 5-18 shows that KSM is disabled and how to enable it.
Example 5-18 Enable KSM in PowerKVM
# cat /sys/kernel/mm/ksm/run
0
# echo 1 > /sys/kernel/mm/ksm/run
# cat /sys/kernel/mm/ksm/run
1
Monitoring KSM
To monitor the pages being merged by KSM, check the /sys/kernel/mm/ksm files. The subsections that follow explain some of the status files.
Pages shared
The /sys/kernel/mm/ksm/pages_shared file shows how many merged pages exist in the system. Example 5-19 shows that 2976 pages are shared by two or more virtual machines in the system.
Example 5-19 Amount of pages shared in the hypervisor
# cat/sys/kernel/mm/ksm/page_shared
2976
Pages sharing
The /sys/kernel/mm/ksm/pages_sharing file shows how many pages on the virtual machines are using a page that is shared and merged in the hypervisor. Example 5-20 shows the number of pages in the virtual machines that are linked to a shared page in the hypervisor.
Example 5-20 Number of pages that are linked to a shared page
# cat/sys/kernel/mm/ksm/page_sharing
6824
Looking at both of the previous examples, you see that 6824 virtual pages are using 2976 physical pages, which means that 2848 pages are saved. Considering 64 KB pages, this means that approximately 246 MB of memory was saved by using this feature.
There are some other monitoring options for KSM, as shown in the following table.
|
/sys/kernel/mm/ksm options
|
Description
|
|
pages_unshared
|
How many pages are candidates to be shared but are not shared at the moment
|
|
pages_volatile
|
The number of pages that are candidates to be shared but are being changed so frequently that they will not be merged
|
|
full_scan
|
How many times the KSM scanned the pages looking for duplicated content
|
|
merge_across_nodes
|
Option to enable merges across NUMA nodes (disable it for better performance)
|
|
pages_to_scan
|
How many pages the KSM algorithm scans per turn before sleeping
|
|
sleep_milisecs
|
How many milliseconds ksmd should sleep before the next scan
|
5.6.4 Huge pages
Huge pages is a Linux feature that uses the processor capability to use multiple page sizes. POWER processors support multiple page sizes since POWER5. Some workloads benefit from using a larger page size. IBM Power Systems that run Linux can use 16 MiB page sizes.
On IBM PowerKVM, a guest must have its memory backed by huge pages for the guest to be able to use it. You need to enable huge pages on the host and configure the guest to use huge pages before you start it.
Example 5-21 demonstrates how to enable huge pages on the host. Run the command on a host shell. The number of pages to use depends on the total amount of memory for guests that are backed by huge pages. In this example, 4 GB of memory is reserved for huge pages.
Example 5-21 Setting huge pages on the host
# echo 256 > /proc/sys/vm/nr_hugepages
# grep -i hugepage /proc/meminfo
HugePages_Total: 256
HugePages_Free: 256
HugePages_Rsvd: 0
HugePages_Surp: 0
Hugepagesize: 16384 kB
Example 5-22 shows an excerpt from an XML configuration file for a guest, demonstrating how to enable huge pages. The memoryBacking element must be inside the domain element of the XML configuration file.
Example 5-22 Enabling huge pages on a guest
<memoryBacking>
<hugepages/>
</memoryBacking>
If there are not enough huge pages to back your guest memory, you will see the error in Example 5-23. Try increasing the number of huge pages on the host.
Example 5-23 Error starting a guest with huge pages
# virsh start guest42
error: Failed to start domain guest42
error: internal error: early end of file from monitor: possible problem:
file_ram_alloc: can't mmap RAM pages: Cannot allocate memory 
5.7 Time management
If the time is not accurately synchronized between the guests and the hypervisor, the system might have some unexpected errors in the file system and network. One common problem in virtualization occurs when the hypervisor time is based on the real-time clock (RTC) and the guest time is synchronized with the Network Time Protocol (NTP) server. If the time on the hypervisor is ahead of the time of the guest, the time might go “back to the future,” which causes a lot of issues.
The recommended way of fixing this is to use NTP time synchronization on the guest and on the hypervisor. During the PowerKVM installation, turn NTP on by using any NTP server. A list of NTP servers can be found on the NTP Pool Project web page:
Figure 5-6 shows a screen capture of the PowerKVM installation fields to enter NTP servers.
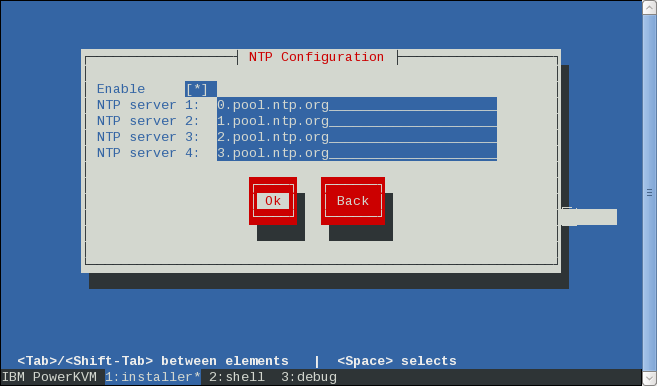
Figure 5-6 Setting up the NTP servers on PowerKVM
..................Content has been hidden....................
You can't read the all page of ebook, please click here login for view all page.