

Advanced topics
This chapter describes how to manage more advanced virtualizations with basic guest adapters. These methods are not covered in the previous chapters. It also presents options to add your host to cloud environments.
After reading this chapter, you should be able to perform the following tasks:
•Migrate a guest to another host
•Suspend and resume a guest
•Add the host to cloud
7.1 Guest migration
IBM PowerKVM allows guests to migrate between servers. A guest can be migrated offline, when it is not running. It can also migrate online, when it is running. Default online migration pauses the guest on the source host and unpauses it on the destination host. That might cause some downtime while the guest memory is copied between the hosts. To avoid that, it is possible to do a live migration. Live migration does not pause the guest on the source host, but it might take longer to complete and might not complete, depending on the workload.
To migrate a virtual machine from one PowerKVM instance to another, the following requirements must be met:
•Virtual machine volume resides on a shared storage, such as these types:
– Fibre Channel
– iSCSI
– NFS
•Both PowerKVM instances run the same software level
•Instances have equal network configuration
•Network ports are open
•Shared storage must be mounted at the same location
Migration requires that you use shared storage. Both hosts must use the same name for the storage. See 4.2, “Managing storage pools” on page 60 for how to create and configure a guest to use shared storage pools.
7.1.1 Transports
Guest migration can use an extra TCP port, in the range 49152 to 49215. That option is unencrypted and requires that those ports be opened on the firewall.
The other option is to use a tunnel through the libvirt connection. When using SSH, for example, it uses a tunnel through SSH, which uses encryption and does not require further firewall configuration. The p2p and tunneled flags are needed to use the tunnel.
7.1.2 Offline migration
Offline migration allows a persistent migration for a guest that is not running. Offline migrations uses the offline flag. The persistent flag is required, and the guest should be available on the destination server. Use the undefine source flag to undefine the guest on the source server. Otherwise, the guest remains available on both servers.
|
Note: If the guest is defined and running on two different servers, that could cause damage to the shared storage data. It is better that the guest is undefined when persistent migration is used to prevent the guest from running a second time.
|
Example 7-1 demonstrates how to run the command for an offline migration.
Example 7-1 Offline migration
root@source# virsh list --all
- guest69 shut off
root@source# virsh migrate --offline --persistent --undefinesource --p2p
--tunnelled guest69 qemu+ssh://192.0.2.2/system
root@source#
root@destination# virsh list --all
- guest69 shut off
7.1.3 Online migration
A running guest can be migrated by transferring its memory contents to the destination server. The guest is paused on the source and resumed on the destination when the transfer finishes. The transfer time depends on the guest use of memory and the network throughput between source and destination hosts.
Example 7-2 shows how to migrate a running guest online.
Example 7-2 Online migration
root@source# virsh list
69 guest69 running
root@source# virsh migrate --persistent --undefinesource --p2p --tunnelled
guest69 qemu+ssh://192.0.2.2/system
Example 7-3 shows the output of the list subcommand when the migration is not finished.
Example 7-3 Paused guest during online migration
root@source# virsh list
69 guest69 paused
root@destination# virsh list
69 guest69 paused
|
Note: An online migration of a guest that is not running fails with the following message:
Error: Requested operation is not valid: domain is not running.
|
7.1.4 Live migration
A live migration reduces downtime of the guest. Memory is transferred while the guest is still running on the source host. If the memory pages of the guest are changing faster than they can be migrated, the migration can fail, time out, or not finish.
Example 7-4 shows the command to use for a live migration.
Example 7-4 Live migration
root@source# virsh migrate --live --persistent --undefinesource --p2p
--tunnelled guest69 qemu+ssh://192.0.2.2/system
Example 7-5 shows the output of the list subcommand when the migration is not finished. Notice that the guest is still running on the source host but paused on the destination host.
Example 7-5 Running guest during live migration
root@source# virsh list
69 guest69 running
root@destination# virsh list
69 guest69 paused
The timeout option allows a live migration to complete by pausing the guest on the source host when the timeout expires. It is possible that the downtime is smaller than the downtime of a non-live online migration. A good value for the time is at least the number of seconds that a non-live online migration would take for the amount of memory that is used by the guest.
Example 7-6 shows the command used for a live migration with a timeout of 2 minutes (120 seconds).
Example 7-6 Live migration with timeout
root@source# virsh migrate --live --persistent --undefinesource --p2p
--tunnelled --timeout 120 guest69 qemu+ssh://192.0.2.2/system
|
Note: It is possible that a live migration is not complete because the guest is under high load. The migration can be interrupted and started again by using the timeout option.
|
7.2 Suspending and resuming
A virtual machine may be suspended. This feature pauses the guest and stops using CPU resources until it is resumed. However, it still uses host memory. A guest can be paused by using the suspend command. After a guest is suspended, it is changed to the paused state and can be resumed by using the resume command.
Example 7-7 shows the state of the guest before it is suspended, after it is suspended, and after it is resumed.
Example 7-7 Suspending and resuming a guest
# virsh list
Id Name State
----------------------------------------------------
27 guest21 running
# virsh suspend guest21
Domain guest21 suspended
# virsh list
Id Name State
----------------------------------------------------
27 guest21 paused
# virsh resume guest21
Domain guest21 resumed
# virsh list
Id Name State
----------------------------------------------------
27 guest21 running
#
7.3 Cloud management
PowerKVM hosts can be managed just like another KVM host. PowerKVM includes Kimchi in its software stack to provide a friendly user interface for platform management in a single server. For larger management, such as cloud environments, you may use IBM PowerVC or IBM Cloud Manager with OpenStack. Table 7-1 shows the possible management options for PowerKVM.
Table 7-1 Virtualization Management Systems
|
Management Software
|
Capabilities
|
Installation Type
|
|
Kimchi
|
Single server
|
Installed on the host
|
|
PowerVC
|
Multiple servers
|
Requires a dedicated server
|
|
IBM Cloud Manager with OpenStack
|
Multiple servers
|
Requires a dedicated server
|
|
OpenStack Nova Controller Services
|
Multiple servers
|
Installed on the host or dedicated server
|
Kimchi is an open source project for virtualization management within one server.
IBM PowerVC and IBM Cloud Manager are advanced management solutions created and maintained by IBM, built on OpenStack.
IBM PowerVC and IBM Cloud Manager are advanced management solutions created and maintained by IBM, built on OpenStack.
OpenStack is a cloud operating system that controls large pools of compute, storage, and networking resources throughout a data center. OpenStack Compute (the Nova component) has an abstraction layer for compute drivers to support different hypervisors, including QEMU or KVM, through the libvirt virtualization API.
The following sections introduce the virtualization management systems that can be used to manage the PowerKVM servers in cloud environments.
7.3.1 IBM PowerVC
IBM Power Virtualization Center (IBM PowerVC) is an advanced virtualization manager for creating and managing virtual machines on IBM Power Systems servers by using the PowerKVM hypervisor. PowerVC simplifies the management of virtual resources in your Power Systems environment. It is built on OpenStack technology to deliver an infrastructure as a service (IaaS) within the cloud. With PowerVC, you can deploy your VMs among other tasks, as shown in the following list:
•Create virtual machines and then resize and attach volumes to them.
•Import existing virtual machines and volumes so they can be managed by IBM PowerVC.
•Monitor the use of the resources that are in your environment.
•Migrate virtual machines while they are running (hot migration).
•Deploy images quickly to create new virtual machines that meet the demands of your ever-changing business needs.
This section gives an overview of how you can add PowerKVM hosts as a compute node and deploy cloud images by using PowerVC. For more detailed information about how to install and configure PowerVC, see IBM PowerVC Version 1.2 Introduction and Configuration, SG24-8199.
You can install PowerVC on a separate host and control your compute nodes through the interface by using your web browser. Figure 7-1 shows the PowerVC management interface.
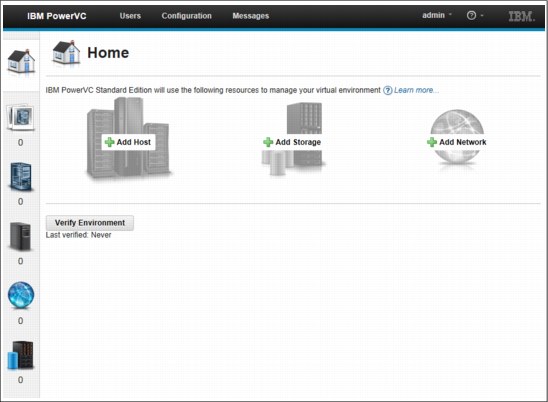
Figure 7-1 PowerVC interface for advanced virtualization management
Figure 7-2 shows an example of how to add a PowerKVM host as a compute node on PowerVC.
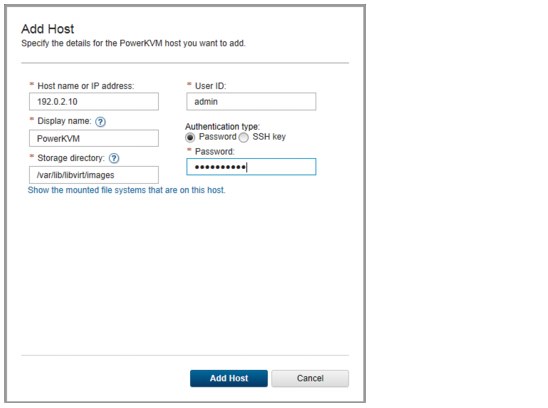
Figure 7-2 Adding a new host to PowerVC
The new added host is listed on the Hosts panel, as shown in Figure 7-3.
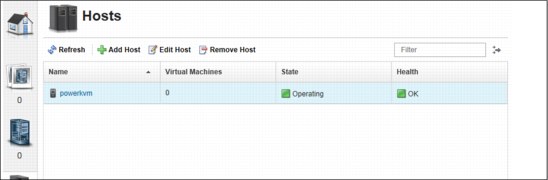
Figure 7-3 Hosts list on PowerVC
To deploy a virtual machine on PowerKVM hosts, you must upload an image first, as shown in Figure 7-4. You can upload ISO or QCOW2 image types. You can use the boot.iso image provided in the installation DVD as a minimal image suitable for installation over a network.
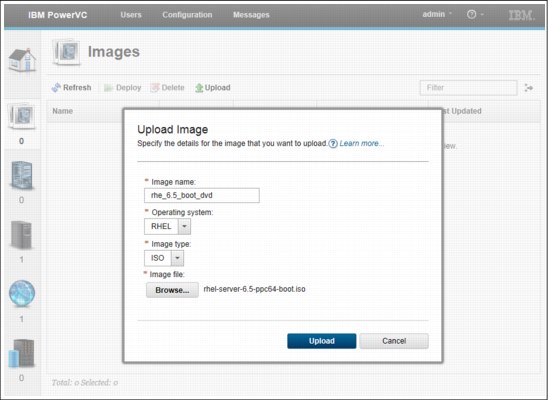
Figure 7-4 Image upload on PowerVC
Before creating instances on PowerVC, configure network and storage settings. At the time of writing, PowerVC supports deploy and capture features with local or NFS storage. Also, iSCSI volumes can be attached after deployment.
You should see the virtual machine in Active state on the Images panel, as shown in Figure 7-5.
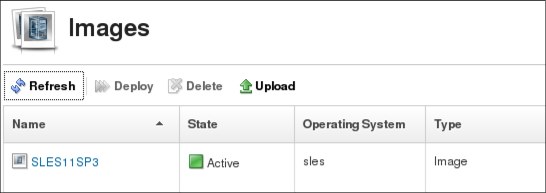
Figure 7-5 Displaying images
After the image is uploaded and ready to use, open the image properties and deploy a virtual machine by clicking Deploy, as shown in Figure 7-6.

Figure 7-6 Deploy an image on PowerVC
For boot.iso deployments, you can connect to your deployed images by using the virsh console command. For images based on preinstalled virtual machines with the network configured, you can connect using SSH. See IBM PowerVC Version 1.2 Introduction and Configuration, SG24-8199 for more details on how to manage PowerKVM hosts using PowerVC.
7.3.2 IBM Cloud Manager with OpenStack
IBM Cloud Manager with OpenStack for Power, formerly offered as IBM SmartCloud® Entry, can be used to get started with private clouds that can scale users and workloads. It is based upon the OpenStack project and provides advanced resource management with a simplified cloud administration and full access to OpenStack APIs.
These are among the benefits of using IBM Cloud Manager with OpenStack for Power:
•Full access to OpenStack Icehouse release APIs
•Simplified cloud management interface
•Heterogeneous support for multiple hypervisors, including PowerKVM
•Chef installation enables flexibility to choose which OpenStack capabilities to use
See the IBM Cloud Manager with OpenStack documentation for more information:
7.3.3 OpenStack controller services
The PowerKVM host can be managed by the open source controller services that are maintained by the OpenStack community. The compute and controller services on OpenStack enable you to launch virtual machine instances.
This section gives an overview of how to install and configure compute controller services to add your PowerKVM server to OpenStack. You can configure these services on a separate node or the same node. A dedicated compute node requires only openstack-nova-compute, the service that launches the virtual machines on the PowerKVM host.
RPM is the package management system used by PowerKVM. To install the open source version of OpenStack compute services on PowerKVM, get the RPM packages from your preferred Linux distribution or build your own packages.
IBM PowerKVM does not bundle OpenStack packages in version 2.1.0. The installation instructions in this section are based on Fedora repositories:
See the online documentation for how to install and configure compute controller services on OpenStack. You can find detailed information about how to configure OpenStack services on RPM based distributions on the OpenStack Installation Guide for Red Hat Enterprise Linux, CentOS, and Fedora page on the OpenStack.org website:
|
Note: IBM PowerKVM version 2.1.0 does not include OpenStack community packages. You may choose to install IBM Cloud Manager or IBM PowerVC to have full integration and support for cloud services.
|
Compute node
Follow these steps to add an PowerKVM host as a compute node to an existing cloud controller:
1. Install the openstack-nova-compute service. These dependencies are required:
– openstack-nova-common
– python-cinderclient
– python-glanceclient
– python-keyring
– python-keystoneclient
– python-nova
– python-novaclient
2. Edit the /etc/nova/nova.conf configuration file:
a. Set the authentication and database settings.
b. Configure the compute service to use the Apache Qpid or RabbitMQ message broker.
c. Configure Compute to provide remote console access to instances.
3. Start the Compute service and configure it to start when the system boots.
4. Confirm that the compute node is listed as a host on Nova, as shown in Example 7-8 on page 117.
|
Tip: Export Nova credentials and access the API from any system that can reach the controller machine.
|
Example 7-8 Listing hosts on Nova
[user@laptop ~(keystone_admin)]$ nova host-list
+-------------------------------------+-------------+-------------+
| host_name | service | zone |
+-------------------------------------+-------------+-------------+
| controller | consoleauth | internal |
| controller | scheduler | internal |
| controller | conductor | internal |
| controller | network | internal |
| controller | cert | internal |
| powerkvm | network | internal |
| powerkvm | compute | nova |
+-------------------------------------+-------------+-------------+
Controller node
As a preferred practice, choose a separate server for the controller node when planning to scale horizontally. The instructions to install the controller are in the OpenStack online documentation. There are no special requirements. A minimum OpenStack setup requires the authentication, image, and network services in addition to the controller services. These services include keystone, glance, and neutron (or nova-network).
To configure the compute services in the controller node, install these packages:
•openstack-nova-api
•openstack-nova-cert
•openstack-nova-conductor
•openstack-nova-console
•openstack-nova-novncproxy
•openstack-nova-scheduler
•python-novaclient
|
Note: It is also possible to add a PowerKVM compute node to an existing cloud controller running on an IBM x86 server. You might use host aggregates or availability zone to partition mixed architectures into logical groups that share specific types or images.
|
After the services are running in the controller, you can deploy your images on the PowerKVM host. To deploy an image and specify the host that you want to run, use the --availability-zone option, as shown in Example 7-9 on page 118.
Example 7-9 Deploying an image using Nova command line
[user@laptop ~(keystone_admin)]$ nova boot --image my-image --flavor 3 --availability-zone nova:powerkvm vm054
+--------------------------------------+-------------------------------------------------+
| Property | Value |
+--------------------------------------+-------------------------------------------------+
| OS-DCF:diskConfig | MANUAL |
| OS-EXT-AZ:availability_zone | nova |
| OS-EXT-SRV-ATTR:host | - |
| OS-EXT-SRV-ATTR:hypervisor_hostname | - |
| OS-EXT-SRV-ATTR:instance_name | instance-00002de6 |
| OS-EXT-STS:power_state | 0 |
| OS-EXT-STS:task_state | scheduling |
| OS-EXT-STS:vm_state | building |
| OS-SRV-USG:launched_at | - |
| OS-SRV-USG:terminated_at | - |
| accessIPv4 | |
| accessIPv6 | |
| adminPass | PcMpmee22G7M |
| config_drive | |
| created | 2014-05-28T19:25:18Z |
| flavor | m1.medium (3) |
| hostId | |
| id | 01271354-59dc-480f-a2db-53682fc3d37e |
| image | my-image (36b70fda-497d-45ff-899a-6de2a3616b32) |
| key_name | - |
| metadata | {} |
| name | vm054 |
| os-extended-volumes:volumes_attached | [] |
| progress | 0 |
| security_groups | default |
| status | BUILD |
| tenant_id | ad13d65a473f4cafa1db9479c3f7c645 |
| updated | 2014-05-28T19:25:18Z |
| user_id | 9b2ee46e7bbc405bb1816603445de08c |
+--------------------------------------+-------------------------------------------------+
At the time of writing, PowerKVM does not support the SPICE console. To see the supported features, see the HypervisorSupportMatrix page on the OpenStack website:
For more detailed options for creating virtual machines on OpenStack, see the online documentation.
..................Content has been hidden....................
You can't read the all page of ebook, please click here login for view all page.