

IBM SmartCloud Storage Access use in a storage cloud environment
This chapter is divided into three sections:
You learn how to configure your cloud environment.
You learn how to perform day-to-day tasks (for example, requests for network drives, approvals, and so on).
You learn how to monitor and work with metering in the IBM SmartCloud Storage Access environment.
|
Tip: As described in Chapter 7, “Planning, installation, and basic configuration of IBM SmartCloud Storage Access” on page 141, it is mandatory to set up storage and authentication servers before you can start using IBM SmartCloud Storage Access. For this IBM SmartCloud Storage Access demonstration, a storage server (IBM Tivoli Storage Productivity Center V5.2) and other necessary servers were already set up.
|
8.1 Cloud environment settings
This section explains how to use IBM SmartCloud Storage Access in a storage cloud environment. You will become familiar with various functions in IBM SmartCloud Storage Access. Also, you will learn to perform the following tasks in an IBM SmartCloud Storage Access environment:
•Perform various settings in an IBM SmartCloud Storage Access environment (such as setting up a storage profile and a storage environment).
•Work with network drives and the lifecycle process for approving a storage request from a user.
•Learn how to monitor the IBM SmartCloud Storage Access environment, and work with metering of the storage cloud environment.
Before you can use the storage cloud environment, you need to work with the necessary cloud environment settings.
These steps are important to be able to use the storage cloud environment:
1. Import the necessary number of users and user groups.
2. Create a storage profile and its associated service levels.
3. Create a storage environment and provide access to wanted users.
4. Set the policies.
The following sections illustrate these steps and relate them to the IBM SmartCloud Storage Access demonstration environment wherever applicable.
8.1.1 Users and user groups
Users and user groups are required to access the cloud environment. Multiple users can be imported from the authentication server for different purposes in storage cloud environment. Also, users can logically be grouped and put into a user group in IBM SmartCloud Storage Access. Several roles are defined in the IBM SmartCloud Storage Access storage cloud environment.
The following list includes brief explanations of these roles in the IBM SmartCloud Storage Access cloud environment. (For more details, see 7.1.4, “IBM SmartCloud Storage Access terminology” on page 144 for IBM SmartCloud Storage Access terminology):
Cloud administrator The cloud administrator manages the capacity pool, storage server, storage profile, storage environment, and environment owners. The cloud administrator can also monitor the cloud environment, approve the storage requests, and manage users. Cloud administrators have the highest level of privileges under the IBM SmartCloud Storage Access environment.
Users Users can log in to the IBM SmartCloud Storage Access environment and can request a network drive. Their requests can be approved by a cloud administrator or an environment owner for the specific storage environment. Users then can access and use the storage. There are two types of users in IBM SmartCloud Storage Access:
End user The end user uses IBM SmartCloud Storage Access in a self-service model to easily and rapidly provision file storage.
Block user The block user also uses IBM SmartCloud Storage Access in a self-service model to provision file storage, but also to provision block storage.
Environment owner The environment owner role is a special privilege given to a user that enables the approval of any storage request for the specific storage environment where the user is set as an owner. Multiple users can be set as owners for a storage environment.
Figure 8-1 represents the access model for these different users in the IBM SmartCloud Storage Access storage cloud environment. Be aware that there is one user role, Storage Admin, represented who manages the Tivoli Storage Productivity Center server and storage. Though this user does not exist on IBM SmartCloud Storage Access, the user plays a major role in managing the most vital component (Tivoli Storage Productivity Center Server and Storage subsystem) in the storage cloud environment.

Figure 8-1 IBM SmartCloud Storage Access access model
|
Prerequisite: To import a user and user groups into IBM SmartCloud Storage Access, it is a prerequisite to have the user and user groups created on the authentication server.
|
IBM SmartCloud Storage Access demonstration setup for this publication
For this publication, a scenario was created to be used as an example of a common cloud environment with users and groups in a company. All of the different types of users in IBM SmartCloud Storage Access, such as cloud administrator, environment owners, and users, are included in this publication environment.
At this point, it is assumed that users and groups were already created on the authentication server. For details about how to create user and user groups on the authentication server, see Chapter 4, “Authentication requirements for IBM SmartCloud Storage Access” on page 51.
Some of these users are listed in Table 8-1. These users are categorized in two departments:
•Lab Services
•Development
In the actual production environment, this kind of logical structure can be followed based on the organization’s hierarchy.
Table 8-1 Table for users role and privileges in IBM SmartCloud Storage Access demonstration
|
Microsoft Active Directory (AD) Group
|
User
|
Role
|
Storage Environment in IBM SmartCloud Storage Access
|
|
LabServices
|
scsaadmin
|
Cloud administrator
|
LabServices
|
|
clouduser01
|
Environment owner
|
||
|
clouduser02
|
Block user
|
||
|
clouduser031
|
Block user
|
||
|
Development
|
cloudadmin01
|
Environment owner
|
Development
|
|
clouduser03a
|
Block user
|
||
|
clouduser04
|
End user
|
1 Notice that clouduser03 belongs to both departments
Plan according to the use case suitable for your environment. For this example, only a few users and groups were created to be used as an example, but in an actual production environment, ideally you will have a few cloud administrators, more environment owners, and many users.
Importing users, user groups, and permission settings
The following steps illustrate these tasks:
•How to navigate through existing users and their information
•How to import a new user and user group
•How to add users to the user group
You need to log in as a cloud administrator to perform these activities. In this example, all of the user and user-related work is performed by logging in as cbadmin.
|
Importing: In the user and user group configuration, the operation does not generate any write operation into the authentication server. The configuration will only import the existing user and user group from the authentication server into IBM SmartCloud Storage Access. It will not create any new users or user groups in the authentication server.
|
Perform the following steps to search for and import a user:
1. Click Administration → Users on the IBM SmartCloud Storage Access management console. It displays the panel for user management, as shown in Figure 8-2.

Figure 8-2 Principal window for IBM SmartCloud Storage Access
2. In Figure 8-3, the example pane shows one user, cbadmin, meaning that there are no other users added in the IBM SmartCloud Storage Access environment at this stage. Clicking a user at the left side of the panel shows the properties of that user.

Figure 8-3 Panel when no user exists
3. Figure 8-4 shows the properties of user cbadmin. Click the plus (+) sign at the left side of this panel to import a new user into IBM SmartCloud Storage Access from the authentication server.

Figure 8-4 Administrator user details
4. This opens a window, as shown in Figure 8-5. Enter the user details and click the search button (magnifying glass icon) so that the user is searched in the authentication server. It is essential that the user already exists on the authentication server.

Figure 8-5 New user information
5. A window showing all of the users that match the information is displayed. If federated authentication (FA) is enabled in IBM SmartCloud Storage Access, a menu can be accessed from the Search range field to choose the domain from which the user will be imported, as shown in Figure 8-6. Select the user that you want to import and click OK.

Figure 8-6 Select domain and user to import to IBM SmartCloud Storage Access
|
Important: Users imported from domains different than the default domain need to use the full user name (<user id>@<domain>) to log in to IBM SmartCloud Storage Access. For example, users from otherdomain.com need to use [email protected] to log in to IBM SmartCloud Storage Access, because the default domain is sca.ibm.com.
|

Figure 8-7 New user information
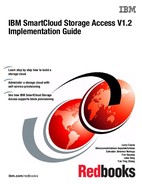
7. You can view the properties of the user upon successfully importing, as shown in Figure 8-8. Select Cloud administration in the Permissions field, to make this user a cloud administrator. Remember that it is rare to give cloud administration permission to everyone in an ideal environment, so make sure that you do not select this box accidentally for all users when you are logged in as a cloud administrator.
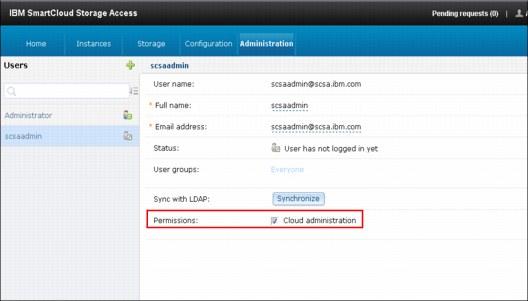
Figure 8-8 Properties of a newly added user
|
Tip: This method is one way of importing a single user in the IBM SmartCloud Storage Access environment. Ideally, you need to create some groups and add multiple users in the group on an authentication server (AD or LDAP). Afterward, these user groups can be imported on IBM SmartCloud Storage Access, and all the users belonging to it can be imported.
|
The next few steps illustrate how to import a user group with users:
1. Click Administration → User Groups on the IBM SmartCloud Storage Access panel, as shown in Figure 8-9.
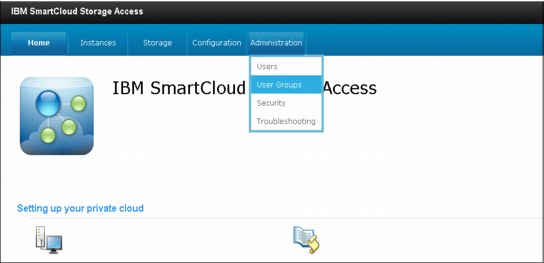
Figure 8-9 Import User Groups
2. Figure 8-10 shows that, in this example, no groups are imported yet. By default, the group Everyone exists in IBM SmartCloud Storage Access. All of the users belong to this group. Click Everyone to see the group properties. To import a new user group, click the plus (+) sign at the top left of the panel.

Figure 8-10 User Group window
3. Enter de information of the group that is going to be imported, as shown in Figure 8-11, and click the Search button.

Figure 8-11 New group information
4. All the possible groups with that information are displayed. If FA is enabled in IBM SmartCloud Storage Access, a menu can be accessed from the Search range field to choose the domain from which the User group will be imported, as shown in Figure 8-12. Select the User group that you want to import and click OK.

Figure 8-12 Select domain and user group to import to IBM SmartCloud Storage Access
5. Enter the user group Description and click Save, as shown in Figure 8-13. In this example, the user group is LabServices. As mentioned earlier, the group was already created on the AD server with three users assigned (scsaadmin + two others).

Figure 8-13 Create a new user group
6. User group LabServices is successfully imported, and now you can view its properties, as shown in Figure 8-14. In this example, user scsaadmin has been already imported, therefore it is shown in the Group members list. Click Import Users to import more users into this group.

Figure 8-14 New user group LabServices imported
7. After selecting Import User, the window in Figure 8-15 is displayed. Several options are available when you import users in a user group. In this example, the total number of users left (not imported yet) in that group is two, and all are selected to be imported. Click Import to import all of the users. Notice that there is a check box, Email notification after import. You can select the box to get email notification upon successful import.
Figure 8-15 Selection panel for importing users
8. After selecting Import, the User import starts. The progress of the import process can be monitored, as seen in Figure 8-16.

Figure 8-16 Importing members from a user group
9. A confirmation window is displayed when all of the selected users have been imported to the IBM SmartCloud Storage Access environment, as seen in Figure 8-17.

Figure 8-17 Selected users successfully imported
10. All of the users are now listed as members of the LabServices user group in this example, as shown in Figure 8-18.

Figure 8-18 User group members
|
Tip: In the IBM SmartCloud Storage Access publication environment, the second group (Development) was added, as shown in Figure 8-19. All of the users were imported by following the same method described in the previous steps.
|
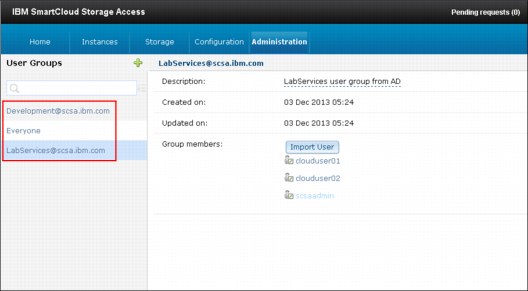
Figure 8-19 Results of user groups import
8.1.2 Setting up the storage profile, resource pools, and storage environment
This section explains how to create a storage profile and resource pool, and how to set up a storage environment. To review the definitions of these terms, see Table 6-4 on page 127. Before a user can submit a request for storage capacity, there are some logical components in the storage cloud environment that need to be set up.
As mentioned before, you need to have your storage manager added to IBM SmartCloud Storage Access to work with these logical components. In this example, we have already added the Tivoli Storage Productivity Center server, as described in Chapter 6, “Planning, installation, and configuration of IBM Tivoli Storage Productivity Center with IBM SmartCloud Storage Access” on page 111. The following section reviews the Tivoli Storage Productivity Center server setup before providing information about managing the storage.
Tivoli Storage Productivity Center server details and connection status
Perform the following steps to review the server details:
1. Click Storage → Storage Manager to see the storage manager added to IBM SmartCloud Storage Access on the left side of the panel. In this example, it is a Tivoli Storage Productivity Center V5.2 server, and you can see the storage manager properties (IP address, port, and so on) in the Overview and Status sections, as shown in Figure 8-20.

Figure 8-20 Tivoli Storage Productivity Center server details and connection status
Tivoli Storage Productivity Center server capacity pool information
Currently there are server storage pools, shown in Figure 8-21 on page 183. These were added in section 6.3.3, “Add resources into a capacity pool” on page 126. No service profiles display, and all of the capacity pools are unregistered. Notice that the service levels (File_High_Performance, Block_High_Performance, and File_High_Capacity) were defined as service classes using Tivoli Storage Productivity Center, and will further be used in IBM SmartCloud Storage Access for the service profiles.

Figure 8-21 Capacity pool view
These existing capacity pools will be used to create a new storage profile and storage environment. After you create a storage profile and associate service level to it, you will need to register capacity pools to create a storage environment. Table 8-2 shows the relationship between storage resources defined in Tivoli Storage Productivity Center and the definition of the storage resources in IBM SmartCloud Storage Access for this publication environment.
Table 8-2 Relationship among storage resources in IBM SmartCloud Storage Access publication environment
|
Storage Profile in IBM SmartCloud Storage Access
|
Service Level in IBM SmartCloud Storage Access
|
Service Class in Tivoli Storage Productivity Center
|
Resource Pool in IBM SmartCloud Storage Access
|
Capacity Pool in Tivoli Storage Productivity Center
|
|
Midrange
|
Regular File
|
File_Normal
|
V7K_V7KU_Normal
|
V7K_V7KU_Normal
|
|
Enterprise
|
High Performance File
|
File_High_Performance
|
V7K_V7KU_High_Performance
|
V7K_V7KU_HighPerformance
|
|
High Performance Block
|
Block_High_Performance
|
|||
|
High Capacity File
|
High_Capacity_File
|
IBM System Storage SAN Volume Controller (SAN Volume Controller)
|
SVC_HighPerformance
|
Next we explain how to complete the cloud environment by performing the following activities:
1. Create new Storage profiles
2. Associate a service level to the profile
3. Register a capacity pool
4. Create a new storage environment
Creating a new storage profile, assigning a service level, and registering a capacity pool
In this example, the storage profile Enterprise is created and associated with service level File_High_Performance. The following steps show how to create the storage profile:
1. Click Storage → Storage Profiles, as shown in Figure 8-22. It will display a new panel showing the existing storage profiles.

Figure 8-22 Storage profile option
2. In this example, currently no storage profiles exist. Click the plus (+) sign to open a window for storage profile creation, as shown in Figure 8-23.

Figure 8-23 Create a new Storage Profile
3. After clicking the plus (+) sign, a new panel is displayed for you to enter the details (Name and Description) of the storage profile. The profile name is Enterprise, and you enter a relevant description, as shown in Figure 8-24. Click Save.

Figure 8-24 Storage Profile information
4. You can see the storage profile created in Figure 8-25. It is a new storage profile, so there is no service level appearing at this time. Click New to add a new service level from the available ones.

Figure 8-25 New storage profile created
5. A window with the new service level information fields appears, as shown in Figure 8-26. Click the menu next to the Name field to see all of the available service levels (defined as service classes in Tivoli Storage Productivity Center).

Figure 8-26 New service level
6. Select one of the service levels to be added to the Storage Profile. For this example, File_High_Performance is selected, as shown in Figure 8-27.
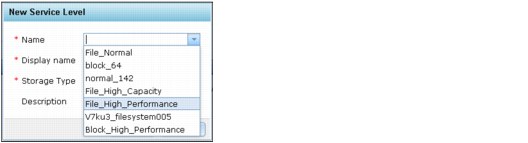
Figure 8-27 Available service levels
7. Type the Display name, which is the name that the service level will have in the IBM SmartCloud Storage Access environment. The Storage Type is filled automatically by detecting the type of storage of the service level. Finally, enter a description for the service level and click OK, as shown in Figure 8-28.

Figure 8-28 New service level fields
8. Now the new service level is created under the storage profile Enterprise shown in Figure 8-29.

Figure 8-29 Service level added
Use this same method to create more storage profiles and service levels in those storage profiles.
9. Figure 8-30 shows the storage profiles and service classes created for this publication environment.
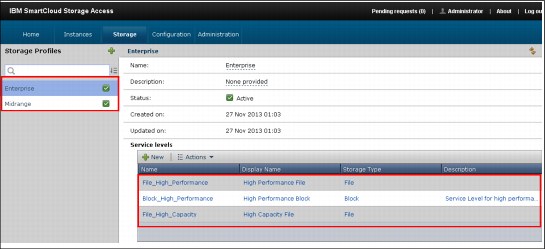
Figure 8-30 Storage profiles and service classes created
10. Figure 8-31 shows the Capacity Pools view for the storage manager, accessed by clicking Storage → Storage Managers. You have created a storage profile with an associated service level. Notice the changes as compared to Figure 8-21 on page 183, when there was no storage profile and no service level associated to it.
Some of the changes include that the service level has turned green, the service profile appears as the name given for the storage profile, and you have a Register button to click for registering the storage capacity pool.
11. Click Register to register the V7K_V7KU_HighPerformance Capacity Pool as a resource pool in IBM SmartCloud Storage Access.

Figure 8-31 Capacity Pool panel after adding a service level to the storage profile
12. After clicking Register, you are prompted to enter the storage resource pool details. Give a relevant name to the storage resource pool and add a meaningful description, as shown in Figure 8-32. Click Save.

Figure 8-32 Enter the Storage Resource Pool Detail
13. A success message displays, as shown in Figure 8-33, if the storage capacity pool registration is successful.

Figure 8-33 Message after registering capacity pool
14. Click Storage → Storage Managers (TPC-5.2), and then click the Capacity Pools tab. The Capacity pool shows its status as Registered now (Figure 8-34). Notice that one more button labeled Unregister also appears now. In addition, next to the name of the capacity pool V7K_V7KU_HighPerformance (Registered in Tivoli Storage Productivity Center), the storage resource pool in brackets is displayed (it is the storage resource pool defined in IBM SmartCloud Storage Access).

Figure 8-34 Panel after capacity pool is registered
The creation of the storage profile, association of the service levels, and the capacity pool registration are now complete.
15. In our demonstration environment, we followed the same steps (step 10 through step 13) to register all of the capacity pools as storage resource pools, which you can view:
a. Figure 8-35 displays the capacity pools registered as resource pools. The service levels created from those resource pools and the storage profile those service levels belong to, for this publication environment.

Figure 8-35 All storage capacity pools are registered
b. You can check resource pools under IBM SmartCloud Storage Access at this stage by clicking Storage → Resource Pools. You can now see all of the storage resource pools registered in this demonstration environment. To see the details of a resource pool, select it from the left panel, as shown in Figure 8-36. You can see the service levels that are related to that storage resource pool.

Figure 8-36 Storage resource pool panel
Before we can start provisioning storage for the user's request, the next step is to set up a storage environment on IBM SmartCloud Storage Access. Perform the steps in the following section to create the storage environment. In this example, two storage environments, LabServices and Development, are created based on the information in Table 8-3.
Creating a storage environment and assigning access to users
Now you are ready to set up the complete storage cloud.
The users are given privileges, as described in Table 8-3. In the IBM SmartCloud Storage Access demonstration system, two storage environments are created (LabServices and Development). Notice that in the actual production environment, you can divide the user and user groups based on your organization’s structure and division (for example, different user groups for different departments).
Table 8-3 Users role in IBM SmartCloud Storage Access demonstration environment
|
Storage Environment
|
User
|
Role
|
Service Levels assigned
|
|
LabServices
|
scsaadmin
|
Cloud Administrator
|
•Regular File
•High Performance File
•High Performance Block
•High Capacity File
|
|
clouduser01
|
Environment Owner
|
||
|
clouduser02
|
Block User
|
||
|
clouduser03
|
Block User
|
||
|
Development
|
cloudadmin01
|
Environment Owner
|
•Regular File
•High Performance File
•High Performance Block
|
|
clouduser02
|
Environment Owner
|
||
|
clouduser03
|
Block User
|
||
|
clouduser04
|
End User
|
The next several steps show how to create a storage environment (these tasks are performed by cloud administrator cbadmin):

Figure 8-37 Tab to display the storage environment
2. Click Storage Environments to see the panel to create the storage environment, as shown in Figure 8-38. Nothing appears on the panel in this example, because no storage environment exists. Click the plus (+) symbol to create a storage environment.

Figure 8-38 Storage environment panel
3. Enter the storage environment name and a meaningful description, as shown in Figure 8-39. In this example, the storage environment is named LabServices. Click Save.

Figure 8-39 Storage environment definition
4. After the storage environment is created, you can see all of the storage profiles and service classes under the type of storage, including File Storage and Block Storage. Expand the File and Block Storage tab to select a few or all of the service levels available under various storage profiles.
5. We selected all of the service levels available under storage profiles (Midrange and Enterprise) for both types of storage, file and block, as seen in Figure 8-40. The changes are saved automatically.

Figure 8-40 Select service levels for a storage environment
6. Next, set the capacity limit for the storage environment. Click Change in the Capacity limit field for the type of storage for which you want to modify the capacity limit, as shown in Figure 8-41.

Figure 8-41 Change capacity limit of a storage environment

Figure 8-42 Set new capacity limit for storage environment
|
Note: Notice that if more capacity than is available is entered, a warning message, shown in Figure 8-43, notifies you that you do not have enough space available to complete the task.
|

Figure 8-43 Warning message when there is not enough capacity available
8. A confirmation message is displayed, and now the capacity limit is set. You can set the capacity limit according to your environment needs and plan. Successful completion is shown in Figure 8-44.

Figure 8-44 Confirmation message for storage environment settings
By repeating steps 1 through 7, more storage environments can be created, and the capacity limit can be set according to the environment needs.
For this publication environment, another storage environment named Development is created. Figure 8-45 shows the storage environment created for this demonstration environment.

Figure 8-45 Storage environment created for this publication
So far we have worked with users, user groups, and created storage profiles (Midrange and Enterprise). The demonstration setup is defined with two departments, Development and LabServices. At this stage you can assign users in the different storage environments, and define the role of those users in the cloud storage.
The following section shows how a user will be assigned access to a specific storage environment.
Assigning access to the users storage environment
In this section, you assign access to specific users to a storage environment. Then you set a user as the owner of the storage environment:
1. Click Storage → Storage Environments and the wanted storage environment option on the left side of the panel.
2. Click LabServices followed by the Members tab, as shown in Figure 8-46. Click Import to add users to that storage environment.

Figure 8-46 Import members to storage environment
3. Select clouduser01 and set the role as Environment Owner, as shown in Figure 8-47. Notice that the role definition will apply to all of the selected users.
4. Click Import to complete the activity. If FA is enabled, you can import users and groups from the other domain by changing the Search range value. Use the menu to select another domain different than the default domain.

Figure 8-47 Import users for the storage environment access
|
Note: Entire user groups can also be imported to a storage environment, as shown in Figure 8-48. Notice that all of the users in the imported group will have access to the storage environment with an End User role. If a user requires a specific role (Environment Owner or Block User), it needs to be imported separately, and then assigned with that role.
|
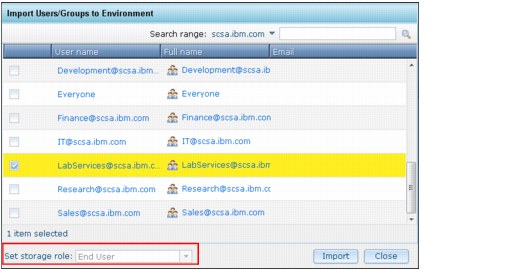
Figure 8-48 Import user groups to the storage environment
Figure 8-49 Success message after user import
For this publication environment, steps 1 through 3 were followed to import all of the users and groups belonging to the LabServices storage environment.
6. Also the specific role for each user was defined, as shown in Figure 8-50.

Figure 8-50 Imported members of the LabServices storage environment
Modify user roles
Roles of users can be modified after they were imported by following the next steps:

Figure 8-51 Select user to modify the role

Figure 8-52 Select new user role
The users can now access the storage environment on your cloud environment. Because the users have been assigned to specific storage environments and have different roles in the cloud environment, it is important to understand how the storage environment will be seen by them. The following section explains the storage environment functions in detail.
Navigating through the storage environment on IBM SmartCloud Storage Access
This section describes how to examine the storage environment panels and their associated functions, as used by the environment owner:
1. At the Login panel, log in as clouduser01, the storage environment owner for LabServices, as shown in Figure 8-53.

Figure 8-53 IBM SmartCloud Storage Access Login panel
2. The storage environment owner has limited access, as shown in Figure 8-54. Environment owners can manage the storage environments that they have been assigned to. In this example, clouduser01 is the storage environment owner for LabServices.
Figure 8-54 Home panel for clouduser01
Figure 8-55 illustrates the functions enabled for the storage environment owner in the IBM SmartCloud Storage Access environment.
Figure 8-55 Tabs enabled for storage environment user
3. Click Storage → Storage Environments to see that the clouduser01 owner for the LabServices environment is limited to that environment. See Figure 8-56.

Figure 8-56 Storage environment panel view of storage environment owner
4. Click the Requests tab, as shown in Figure 8-57, to see the request status in the LabServices storage environment. At this point there are no requests. Network drive requests and approvals are described in 8.3, “Monitoring global tasks and metering” on page 240.

Figure 8-57 Storage environment panel with Requests tab selected
5. Click the Network Drives tab to monitor the network drives that have been created in that storage environment, as shown in Figure 8-58. At this point there are no network drives created. Monitoring network drives is described in 8.3, “Monitoring global tasks and metering” on page 240.

Figure 8-58 Network drives in the storage environment
6. Click the Approval tab, shown in Figure 8-59, to work with approval settings. You can override global settings by selecting the box and selecting different approval options. In IBM SmartCloud Storage Access, there are global settings for approvals that can be overridden by a specific storage environment owner by selecting this option.

Figure 8-59 Storage environment panel with Approval tab selected
7. Select Override global settings as shown in Figure 8-60, and then select any of the boxes under Actions require approval. Figure 8-60 has the Create a network drive action box checked, and then the Advanced button is selected.

Figure 8-60 Approval panel with a selection of Create a network drive approval action
8. Click the Advanced button to display the pane shown in Figure 8-61. You have the option of selecting a specific service level for the approval policy.
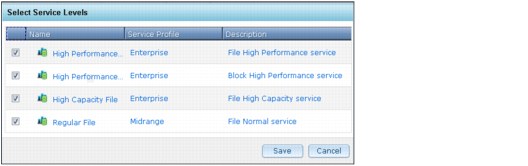
Figure 8-61 Service level selection option under Approval tab

Figure 8-62 Approval settings changed confirmation
10. Click the Policies tab to work with policies, and to enable warnings for thresholds based on your requirements. as shown in Figure 8-63.

Figure 8-63 Storage environment panel with Policies tab selected
8.1.3 Global policies
It is important to understand storage policies in an IBM SmartCloud Storage Access environment. Notice that policies mentioned in this section can only be set by a cloud administrator. There are four categories under the default global policies:
•General
You can modify policies related to network drive metering, metering data expiration, network drive naming, resource pool policy, and audit log expiration.
•Approval Policy
In an IBM SmartCloud Storage Access cloud environment, approvals play a key role and define the governance under the cloud environment. There are several options that you can modify under approval policy, based on your organization’s requirements.
•Cluster Configuration
For IBM SmartCloud Storage Access-supported file storage, if you want to mount the shares using the domain name of storage rather than their IPs (domain name is suggested), then you must set the cluster configuration in IBM SmartCloud Storage Access.
•Expiration Policy
You can set network drives to expire, after which the drives are deleted. You can also set a grace period so that the network drive owner, environment owner, and cloud administrator can extend the network drive reservation lease period.
Working with global policies
There are different sections within global policies under IBM SmartCloud Storage Access that can be edited. This section provides information about the activities that can be performed under global policies. Notice that for this section, the user is cbadmin, because administrator privileges are required.
To edit global polices, follow these steps:

Figure 8-64 Select Global Policies option
2. The Global Policies panel is displayed, showing four tabs related to policy (General, Approval Policy, Cluster Configuration, and Expiration Policy). We selected the General tab, as shown in Figure 8-65 and Figure 8-66 on page 205.

Figure 8-65 General Global Policies pane, part 1

Figure 8-66 General Global Policies pane, part 2
Types of global policies
You can work with the different policies shown in Figure 8-65 on page 204 and Figure 8-66:
•Network drive metering policy
You can set the network drive metering policy by selecting this box in the pane and providing values for these two different fields:
– Metering Interval
– Starting Time
In this example, the metering interval is 24 hours, and the starting time is 00:00.
•Network drive metering data expiration
You can set network drive data expiration by selecting this box and providing values for the Delete network drive metering data after (days) field. It will delete the metering data after a given fixed period of time. In this example, the value is set to 90 days.
•Network drive naming convention
Defines the naming format for the file shares created on IBM SmartCloud Storage Access:
– The Use this prefix before each network drive automatically option enables IBM SmartCloud Storage Access to create file sets and shares on the file storage systems. By default, the SCSA_ prefix will be added to the name of the file set, followed by the environment and drive name.
For example, a container ctnA is created in environment env1, and then the file set on the storage will have the name SCSA_env1_ctnA. The storage administrator can remove this SCSA_ prefix, or change it to something else. This same naming format will be used when mounting the network drive in the users device.
– The Define a regular expression used for checking the naming of Network Drive option means that a regular expression can be used to define the naming format of the network drives, such as length of the name, invalid characters, and so on.
– The Display the tooltip for the Name field in network drive creation dialog option displays a message showing the naming format that the network drive name should follow. This message is entered by the administrator in the text box beneath this option. In this example, the regular expression is configured so that only names with letters and numbers are entered.
•Resource pool policy
You can set the resource pool policy by selecting this box and providing values for the following fields:
– Metering interval
– Threshold on used capacity
– Threshold on requested capacity
In this example, values for the fields chosen are 60 minutes, 80%, and 80%. You can also enable the notification method by selecting the box in Notification method for Email notification.
•Audit log expiration
IBM SmartCloud Storage Access captures the audit logs. You can choose the audit logs to be deleted from the IBM SmartCloud Storage Access system after a specified period. In this example, a value of 90 days is selected for audit log expiration days.
|
Tip: All scheduled tasks must be restarted when the administrator modifies the system time. To restart a service (for example, Network drive metering policy), disable it first by clearing it, then enable it again.
|
Perform the following steps to modify policy options:
1. Click the next tab, Approval Policy, to work with various approval policy options, as shown in Figure 8-67.

Figure 8-67 Approval Policy panel
You need to enable approval policy support to support the approval lifecycle process described in 8.2, “Operations in a storage cloud environment” on page 210. If you disable this option, users can create drives on their own without requiring any approval. Ideally the entire environment will be enabled.
2. The following list describes the various options under Enable approval policy support. Select the boxes next to them to enable approval support policies for these activities:
– Create network drive.
– Resize a network drive.
– Delete a network drive.
– Extend expiration period for a network drive.
– Resize environment capacity limit. Notice that the environment capacity resize request can only be made by the storage environment owner.
3. The Advanced tab to the right of Create a network drive and Resize a network drive gives you the option to select specific service levels for these policies. Click the Advanced tab to enable the option of selecting the service level. In the example in Figure 8-68, all of the service levels are selected.

Figure 8-68 Service level selection for actions requiring approval
4. Click the next tab under Global Policies, which is Cluster Configuration. In this example, shown in Figure 8-69, currently there is no cluster. If you do not have a DNS to resolve the cluster name of IBM Scale Out Network Attached Storage or Storwize V7000 Unified to IP addresses, you can add the storage cluster on this tab.
This Cluster Configuration tab acts as a DNS, and it will replace the cluster name to a resolvable domain name or IP address in the network drive mounting script. If the DNS can resolve the cluster name, you do not need to configure it in Cluster Configuration.

Figure 8-69 Cluster configuration panel
5. To add a cluster definition, click + New, shown in Figure 8-69, and add new cluster information (IBM Scale Out Network Attached Storage or Storwize V7000 Unified).
6. Enter the cluster name and its IP or Domain name (can be resolved in DNS). In this example, the host name of the Storwize V7000 Unified is 7804033.ibm and the Public IP is 9.111.67.79, as shown in Figure 8-70.
7. Click OK. Only one IP address or domain name can be set for each cluster name.
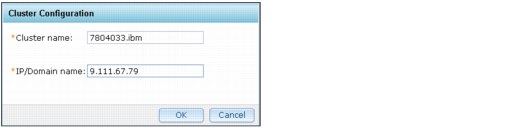
Figure 8-70 Cluster Configuration window with cluster details
8. You will get a success message, as shown in Figure 8-71.

Figure 8-71 Success for the cluster configuration
9. You can now see the cluster name added under the Cluster Configuration tab (Figure 8-72).

Figure 8-72 Cluster name added
10. Finally, go to the Expiration Policy tab to configure the expiration behavior of the network drives created in IBM SmartCloud Storage Access, as shown in Figure 8-73.

Figure 8-73 Expiration Policy settings
The Expiration Policy settings allow the administrator to manage the amount of time a network drive can be available for a user after its creation. After this time, the network drive expires and then it will be deleted.
The following settings can be configured in the Expiration Policy settings:
•Email Notifications
– The Send warning emails before expiration starts in (days) option defines the amount of time before a network drive expires to send an email to the user to warn him about the expiration.
– The Send follow up emails every (days) option sets the frequency on which the user will be notified by email about the network drive that is about to expire.
•Network Drive Expiration
– The Maximum expiration period (days) option is the number of days that a network drive will be available for the user. After that time, the network drive expires and will be deleted.
– The Maximum extension period (days) option is the number of days that a user can extend the expiration period when the network drive is about to expire. This value is the maximum amount of time a user can extend the expiration of a network drive.
•The Network Drive Deletion section describes options where, after a Network drive has expired, a grace time can be defined by the administrator for the user to take some actions before the network drive is deleted permanently.
8.2 Operations in a storage cloud environment
This section explains the approval process when the network drive is requested by the user.
8.2.1 Understanding the approval lifecycle
This flowchart illustrates the approval lifecycle and process in the IBM SmartCloud Storage Access environment, as shown in Figure 8-74.

Figure 8-74 Storage approval process flowchart
8.2.2 Network drive and approval in IBM SmartCloud Storage Access
This section helps you understand the approval lifecycle by going through an example in the IBM SmartCloud Storage Access demonstration environment. The following activities are explained in this section:
•Navigation through IBM SmartCloud Storage Access panes as a user
•User requests for file network drives
•User requests for block network drives
•Request status seen by the cloud user, cloud administrator, and environment owner
•Approval by the storage environment owner
•Request status change
•Capacity used by user after approval
•Changes in storage environment after request approval
This information can help you to perform these activities in IBM SmartCloud Storage Access, and better understand the environment.
Navigation through IBM SmartCloud Storage Access panels as a user
Follow these navigation steps:
1. Log in as a user (as shown in Figure 8-75). In this example, clouduser03 is a block user, and has been granted access to the Development and LabServices storage environment.

Figure 8-75 Login user panel
2. After the login, you will see the home page (as shown in Figure 8-76). The default panel displayed for a block user is block storage panel.
Figure 8-76 User home page

Figure 8-77 File storage panel
User requests for file network drives
The steps to perform requests for file network drives are explained in this section:
1. Click File Storage on the top bar to show the file storage pane (Figure 8-78). You can see if a file network drive exists, and you can create a new request for a file network drive.
Figure 8-78 File storage option
2. Figure 8-79 shows that there is no file network drive. Click the green plus (+) sign to create a new file network drive. After the first file network drive is created, you can create a new file network drive by clicking Actions → Create a file network drive.
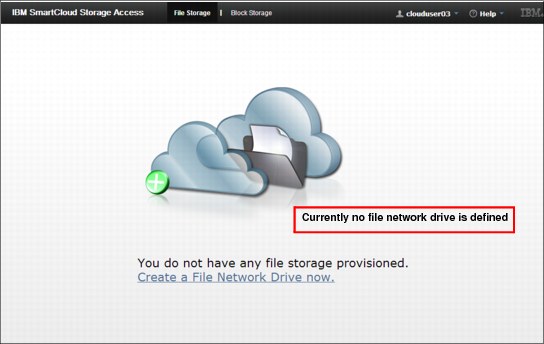
Figure 8-79 File storage panel with no file network drives
3. Enter the network drive request details in the window shown in Figure 8-80. The required fields include File Network Drive Name, Environment, Capacity, Expiration Period, and Storage Profile.
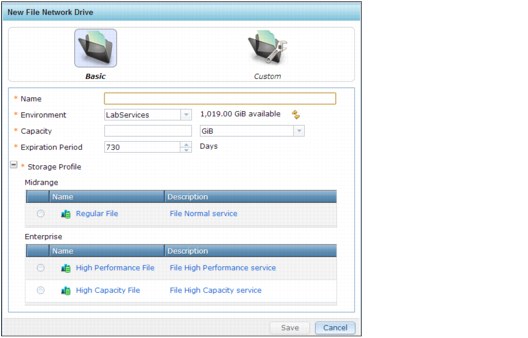
Figure 8-80 File network drive creation panel for user
4. Complete the details as shown in Figure 8-81 and click Save. In this example, 20 gibibytes (GiB) of storage is requested, the environment is set to be Development and the service profile is selected from Enterprise.

Figure 8-81 Details for the file network drive request
5. The confirmation message is displayed in Figure 8-82. Click Close to continue. The request is now waiting for approval.

Figure 8-82 File network drive Information message
User requests for block network drives
The steps to request block network drives are explained in this section:
1. Click Block Storage on the top bar to show the block storage panel shown in Figure 8-83. You can see if a block network drive exists, and you can create a new request for a block network drive as well.
Figure 8-83 Block storage option
2. Figure 8-84 on page 215 shows that there is no block network drive. Click the green plus (+) sign to create a new block network drive. After the first block network drive is created, you can create a new block network drive by clicking Actions → Create a block network drive.
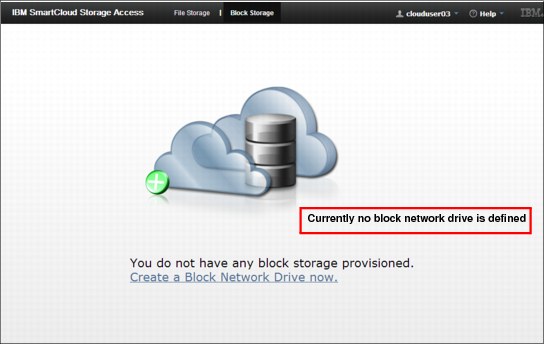
Figure 8-84 Block storage panel with no block network drives
3. Enter the block network drive properties in the window shown in Figure 8-85. The required fields include block network drive Name, Environment, Capacity, Expiration Period, and Storage Profile.

Figure 8-85 Block network drive creation panel for user
4. Complete the details as shown in Figure 8-86 and click Save. In this example, 20 GiB of storage is requested, the environment is set to be Development, and the service profile is selected from Enterprise.

Figure 8-86 Details for the block network drive request

Figure 8-87 Host mapping panel
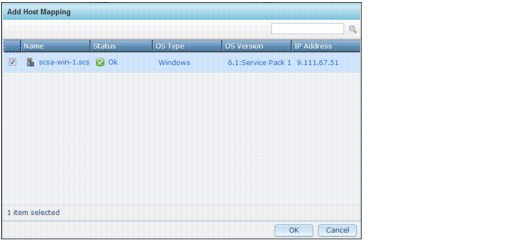
Figure 8-88 Add host mapping panel
7. The host mapping information is displayed in Figure 8-89. You can add more hosts if needed by repeating the previous step. When you finish, click Save to continue.
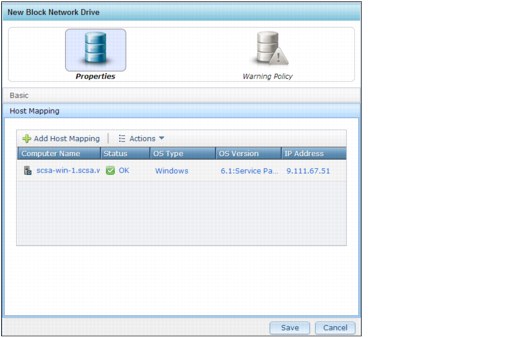
Figure 8-89 Host mapping for the block network drive request
8. The confirmation message is displayed in Figure 8-90. Click Close to continue. The request is now waiting for approval.

Figure 8-90 Block network drive Information message
Request status seen by various users
This section describes the difference in the way status is seen by different types of users:
1. The request status seen by a user (you can see only the request made by the user) is shown in Figure 8-91.

Figure 8-91 Request status seen by user
2. Figure 8-92 shows the drop-down box with actions available. Select the Latest request to see the panel with the option to withdraw the pending request. Actions not available for pending requests are disabled.

Figure 8-92 Select Latest request for panel with option to withdraw the request
3. Figure 8-93 shows the request queue seen by a cloud administrator. By logging in as the cloud administrator, you can click Configuration → Requests. In this example, notice that there are many requests visible in the queue. The cloud administrator is seeing requests from multiple storage environments.
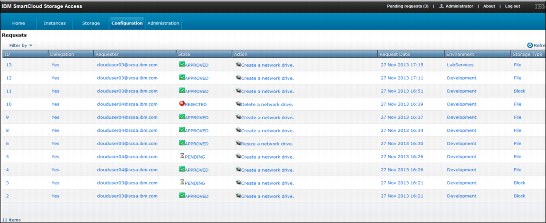
Figure 8-93 Request queue seen by the cloud administrator
4. As a cloud administrator, if you click a request made by the user (clouduser03 in this example), a window with the option to approve or reject the request is displayed (as shown in Figure 8-94). This window shows the cloud administrator capability, but the environment owner can approve the request in the IBM SmartCloud Storage Access demonstration environment.

Figure 8-94 Approval panel seen by cloud administrator
5. Figure 8-95 shows a request queue seen by a storage environment owner (cloudadmin01). Notice that an environment owner can see all of the requests in the queue for the environment they were assigned as an owner. In this example, cloudadmin01 is the owner of the storage environment Development, and all of the requests for this environment are visible.

Figure 8-95 Requests seen by storage environment owner
Approval by storage environment owner
Follow these steps to approve the request:
1. The request queue seen by an environment owner in Figure 8-95 shows the network drive request made by a user (clouduser04). To approve the request, click the request. It will show the approval page (Figure 8-96).
2. You can add a comment, and then click Approve.

Figure 8-96 Approval panel seen by environment owner
3. An approval confirmation message is shown in Figure 8-97.

Figure 8-97 Approval confirmation window
Status change in the requests
After the request is approved by the environment owner, the network drive request status is now shown as approved, as shown in Figure 8-98.

Figure 8-98 Network drive request status seen by environment owner
Capacity used by user after approval (Common Internet File System (CIFS), Network File System (NFS), and block)
The request has been approved, and the user can start using the approved storage capacity. This section explains the following topics:
•Navigation through file network drives
•Navigation through block network drives
•CIFS access by a Windows user
•NFS mount by a UNIX client
•Block storage used by a host
•Changes on the storage subsystem
|
Tip: If your storage cloud environment is planned to be used by both types of users (Windows and UNIX), plan your authentication and ID mapping accordingly. See Chapter 2, “IBM SmartCloud Storage Access architecture” on page 17 for more details about configuring your authentication (AD and LDAP).
|
Navigation through File Network Drives
Follow these navigation steps:
1. Log in as user (clouduser03 in this example), click File Storage on the top bar, and then click the file network drive name on the left side (devcontainer3 in this example). Notice that the current status of the network drive is ready to use, so the share can now be mounted. Figure 8-99 shows the overview of the file network drive.

Figure 8-99 File network drive view for user after approval
2. Move the cursor to the cloud icon, and then you can view the detailed properties panel of the file network drive, including owner, environment, service level, expiration day, CIFS shares, NFS shares, and so on, as shown in Figure 8-100.

Figure 8-100 File network drive property panel
3. To edit the file network drive, such as modifying capacity, expiration period, CIFS shares, and NFS shares, select Actions → Edit current network drive as shown in Figure 8-101.

Figure 8-101 Edit the current file network drive
Navigation through Block Network Drives
Follow these navigation steps:
1. Log in as user (clouduser03 in this example), click Block Storage on the top bar, and then click the block network drive name on the left side (devlun in this example). Notice that the current status of the network drive is ready to use, so the block storage can now be used by hosts. Figure 8-102 shows the overview of the block network drive.

Figure 8-102 Block network drive view for user after approval
2. Move the cursor to the cloud icon, and then you can view the detail properties panel of the block network drive, including owner, environment, service level, expiration day, host mapping, and so on, as shown in Figure 8-103.
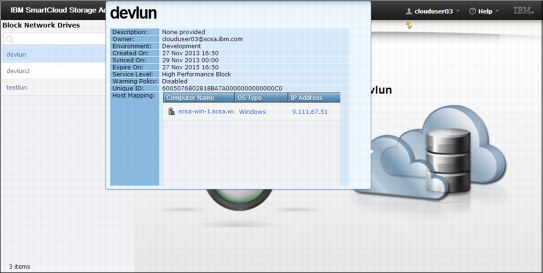
Figure 8-103 Block network drive property panel
3. To edit the block network drive, such as modifying capacity, expiration period, or host mapping, select Actions → Edit current network drive as shown in Figure 8-104.

Figure 8-104 Edit the current block network drive
CIFS access by a Windows user
This section describes how to use the share as a Windows user through CIFS:
1. Log in to IBM SmartCloud Storage Access from a Windows client. As shown in Figure 8-105 for file network drives, select Actions → Attach, and download the script to mount this share on a Windows client. Save the script and use it in the Windows client to mount the share.

Figure 8-105 Script download panel for CIFS access

Figure 8-106 Save the script file
3. Next, open the file on the client, and the pane shown in Figure 8-107 is displayed. Enter the user's credentials and choose the appropriate disk letter (In this example, it is Z:).

Figure 8-107 Enter user credentials
4. After providing the credentials, the Map key is highlighted. Click Map to complete the request (as shown in Figure 8-108 on page 227).
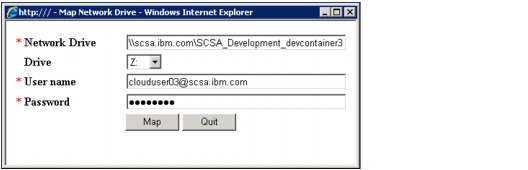
Figure 8-108 Map share window
5. The success message in Figure 8-109 shows whether the map of the share is successful.

Figure 8-109 Map success message
6. You can now see and explore your share, as shown in Figure 8-110.
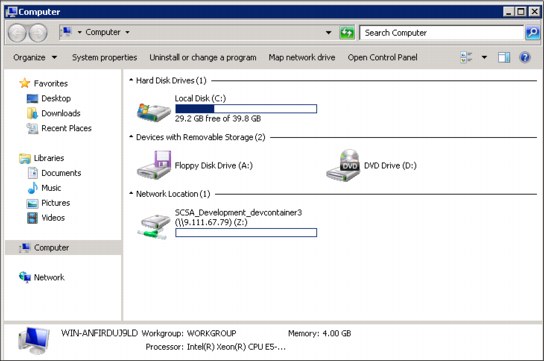
Figure 8-110 Share in use
NFS mount by a UNIX client
In this section, we explain how to mount an NFS export through IBM SmartCloud Storage Access:
1. To enable NFS access to a share, you need to click File Storage on the top bar, and click the file network drive on the left side (in this example, it is devcontainer3).
2. Select Actions → Edit current network drive and click the Advanced tab in the window. This gives you an option of enabling NFS access for the selected share. Notice that there is no NFS client in the current example, as shown in Figure 8-111.

Figure 8-111 File network drive panel selection to enable NFS access and modify NFS clients
3. Now you can enable NFS access and add NFS clients. Select the Enabled check box and click New, as shown in Figure 8-112.

Figure 8-112 Enable NFS access and modify NFS clients from Advanced selection
4. In the window shown in Figure 8-113, complete the NFS client IP address and select the option for read-only and secure (either Yes or No). In this example, an NFS client is entered, the read-only option is selected as No, and Secure is selected as Yes. Click OK to finish.
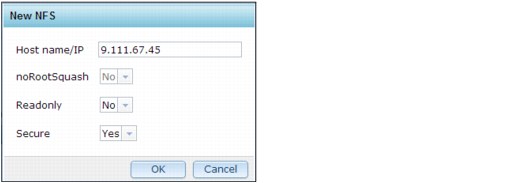
Figure 8-113 Panels for entering NFS client IP address and access option
5. The client is now added. At this stage, you can view the NFS client list, as shown in Figure 8-114 on page 231. Click Save to finish.

Figure 8-114 NFS client added and NFS option is now enabled
6. The network drive progress bar is shown in Figure 8-115.

Figure 8-115 Network drive progress bar
7. When the progress is complete, the success message is shown in Figure 8-116. After the NFS client is added and NFS is enabled, the share is ready to be mounted by a UNIX user as an NFS export.

Figure 8-116 Success message for NFS access request
8. Log in to IBM SmartCloud Storage Access from the Linux client, which is set to be the NFS client in the previous step, and select Actions → Attach, as shown in Figure 8-117.

Figure 8-117 Script download panel for NFS access
9. The pane for saving the file is shown in Figure 8-118. Notice that your pane might be different than the one shown because in this example, the Mozilla Firefox browser is used.

Figure 8-118 Save file panel
10. The script file has been downloaded, as shown in Figure 8-119.

Figure 8-119 Script to download example
You can use this script file to mount the NFS export on the wanted NFS client.
|
Tip: To avoid any possible access control list (ACL) issues, the authentication servers should be configured properly, and all the prerequisites must be met to use the cloud environment by both types of users (Windows and UNIX). See Chapter 2, “IBM SmartCloud Storage Access architecture” on page 17 for more information about configuration options of AD and LDAP.
|
11. In this example, the script is downloaded on a Linux client. Figure 8-120 shows the example of performing an ls -l command on a Linux client.

Figure 8-120 NFS export mount script on Linux client
12. Example 8-1 illustrates the way to run the script and mount the export. You need to provide a path that will become the mount point for the NFS export, as shown in Figure 8-121. In this example, the mount point is given as /mnt/devcontainer.
Example 8-1 Run script to mount NFS export
[root@rhclient ~]# ./AttachNetworkDrive_devcontainer3.sh
Mounting devcontainer3 to your system
Please input the mount point(e.g. /mnt/mycontainer)
/mnt/devcontainer
Press any key to quit

Figure 8-121 NFS export mounted
Block storage used by a host
Perform the following steps:
1. Log in to the host with host mapping set when creating a block network drive (in this example, a Windows server is used). Right-click Computer, and select Manage, as shown in Figure 8-122.

Figure 8-122 Manage disks on this host
2. In the window, select Storage → Disk Management, and you can see that the block storage is mapped to this host, as shown in Figure 8-123. You can perform disk initialization later to make full use of it.

Figure 8-123 Block storage mapped to this host
We have performed these activities:
•File and block network drive request
•Drive approval
•CIFS and NFS share mount
•Block storage host mapping
In the background, it was all Tivoli Storage Productivity Center, which helped process these requests through the back-end storage (Storwize V7000 Unified in this example). It is important to understand that you do not perform these activities on your storage subsystem anymore. It is done automatically for you.
The next section shows the changes on the storage subsystem due to these activities on IBM SmartCloud Storage Access.
Changes on the storage subsystem
The next steps show what exactly has happened in the back-end storage subsystem after performing the previously described activities on IBM SmartCloud Storage Access. In this example, a file network drive of 20 GiB was created (as shown in Figure 8-81 on page 214). There are two things that happened on Storwize V7000 Unified storage:
1. It first creates a dependent file set with a quota limit of 20 GiB.
2. A share was created with CIFS and NFS protocol enabled.
To view these details, follow these steps:
1. You need to log in to Storwize V7000 Unified as storage administrator. Notice that this user does not exist on IBM SmartCloud Storage Access.
2. After logging in, you can see file set information by clicking Files → File Sets. Figure 8-124 shows the table listing shares. In this example, the file set that is highlighted in a red box is the one that was requested and processed by IBM SmartCloud Storage Access cloud users (user and environment owner).

Figure 8-124 File set view in Storwize V7000 Unified
3. To view the property of this file set, right-click the file set name and click Edit. However, do not edit anything on the file set. It is just for viewing properties. You can see in Figure 8-125 that a file set is created, it is dependent, and the quota setting is 20 GiB.

Figure 8-125 File set summary in Storwize V7000 Unified
4. File share information is displayed by clicking Files → Shares. Figure 8-126 shows the table listing shares. In this example, the share that is highlighted in a red box is the one that was requested and processed by IBM SmartCloud Storage Access cloud users (user and environment owner).

Figure 8-126 Shares view in Storwize V7000 Unified
5. View the property of this share by right-clicking the file set name and clicking Edit. However, do not edit anything regarding the share. It is just for viewing properties. See Figure 8-127 for the summary of this share. Supported protocols are NFS and CIFS, and user clouduser04 with access, and the NFS client is shown as 9.111.67.45.

Figure 8-127 Share summary in Storwize V7000 Unified
6. Host mapping information is displayed by clicking Hosts → Host Mappings. Figure 8-128 shows the table listing host mappings. In this example, the share that is highlighted in a red box is the one that was requested and processed by IBM SmartCloud Storage Access cloud users (user and environment owner).

Figure 8-128 Host mapping in Storwize V7000 Unified
7. View the property of this volume by right-clicking the volume and clicking Properties (Volume). However, do not edit anything regarding the volume. It is just for viewing properties. See Figure 8-129 for the summary of this volume, including capacity, volume UID, storage pool, and status.

Figure 8-129 Volume summary in Storwize V7000 Unified
8.3 Monitoring global tasks and metering
Global tasks can be monitored from the Configuration → Task Queue menu, and you can get various usage reports from the Configuration → Reports menu selection in IBM SmartCloud Storage Access. The following sections explain how to monitor global tasks from the Task Queue menu, and get reports from the Reports menu.
8.3.1 Global task monitoring
IBM SmartCloud Storage Access provides a task queue page that enables a cloud administrator to view the background global task queue (resource pool metering, network drive metering, and so on). Notice that you need to log in as cloud administrator to perform these activities.
Windows for task queue monitoring activity
The following windows show how to monitor these tasks:
•Resource pool metering
•Network drive metering
•Request expiration deletion
•Audit log expiration deletion
•Metering data expiration deletion
•Network drive expiration deletion
Steps for task queue monitoring activity
Perform the following steps:
1. Select Configuration → Task Queue from the main menu. The steps from Figure 8-130 on page 241 to Figure 8-135 on page 243 walk you through each tab, showing each task.
View the status and the next run time, if the global setting is enabled. Running status indicates the task is running. Idle status indicates the task is waiting for the next runtime. Information in the task queue includes Date and time, Result, and Description.
2. Click Refresh to refresh the queue. Select Actions → Clear queue to clear the task queue as shown in Figure 8-130 on page 241.

Figure 8-130 Task queue for resource pool metering

Figure 8-131 Task queue for network drive metering
5. To monitor request expiration deletion, click the Request Expiration Deletion tab (Figure 8-132).

Figure 8-132 Task queue for Request expiration deletion

Figure 8-133 Task queue for audit log expiration
7. To monitor metering data expiration deletion, click the Metering Data Expiration Deletion tab (Figure 8-134).

Figure 8-134 Task queue for metering data expiration deletion
8. To monitor network drive expiration deletion, click the Network Drive Expiration Deletion tab (Figure 8-135 on page 243).
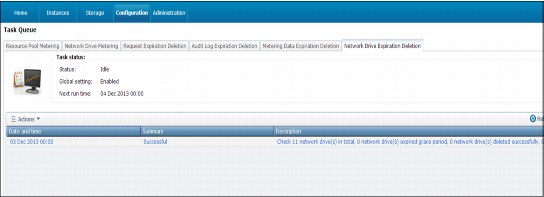
Figure 8-135 Task queue for network drive expiration deletion
8.3.2 Reports
Cloud administrators can monitor cloud usage in various ways by generating reports. Two different types of reports can be created using the IBM SmartCloud Storage Access reports:
•Storage pool usage reports
•Storage environment usage reports
Generating storage pool usage reports
Storage pool usage reports include two types of reports:
Resource pool usage report
The resource pool report is a bar chart that describes the current usage of a resource pool, including total capacity, requested capacity, and used capacity.
Storage profile usage report
The storage profile usage report describes the usage of each service level in a storage profile, including total capacity, requested capacity, and used capacity.
The following steps show how to generate these reports:

Figure 8-136 Select Reports

Figure 8-137 Report pane
3. Click the menu to select the report by Resource Pool or Service Profile. In this example, Resource Pool is selected, as shown in Figure 8-138.

Figure 8-138 Resource Usage Report options
4. You can select the wanted resource pools available in IBM SmartCloud Storage Access, as shown in Figure 8-139.
In this example, two storage pools (V7K_V7KU_High_Performance Pool and SONAS_Storage) are selected, and the report is displayed.

Figure 8-139 Usage report by resource pool
– Total capacity
– Requested capacity
– Used capacity

Figure 8-140 Resource pool usage report by service profile
Creating storage environment usage reports
Storage environment usage reports include three types of reports:
Environment current usage report
This report is a bar chart that describes the current status of the environment, including the used capacity and the requested capacity.
Environment year view usage report
This report is a line chart that demonstrates historical usage trends in the environment over a selected year.
Environment month view usage report
This report is a line chart that demonstrates historical usage trends in the environment over a selected month.
The following steps demonstrate how to generate these reports by logging in as cloud administrator on IBM SmartCloud Storage Access:
1. Click Environment Usage Report on the left side of the pane shown in Figure 8-141. All the environments available appear on the pane. You can select the wanted environment to create the report for your purpose (in this example, the available environments, LabServices and Development, are selected).

Figure 8-141 Environment Usage Report option
2. Expand the Time frame menu to see the three options of Current, Year View, and Month View, as shown in Figure 8-142. In this example, you select Current for the most recent report.

Figure 8-142 Time frame selection menu
3. Figure 8-143 displays the current report.

Figure 8-143 Current time frame report
4. To get the year view usage report, select Year View on the pane shown in Figure 8-144. Now you can select the year for the report that you want to create. In this example, year is selected as 2013. The report is created from the demonstration system and contains two months of data. In actual production environments where the solution has been set up for a longer period of time, more comprehensive and meaningful reports are available.

Figure 8-144 Year view storage environment usage
5. Create the month view usage report by selecting Month View, as shown in Figure 8-145. Now select year and month for the report that needs to be created. In this example, year and month are selected as 2013 and December. The report is automatically created.

Figure 8-145 Select reports by year and month
..................Content has been hidden....................
You can't read the all page of ebook, please click here login for view all page.