
In this section, we will describe how to run a sample machine learning application from the Spark shell, on the local machine as stand-alone mode, and finally we will show you how to deploy and run the application on the Spark cluster using Amazon EC2 (https://aws.amazon.com/ec2/).
Please note that this is just an exercise that checks the installation and running of a sample code. Details on machine learning application development will be covered from Chapter 3, Understanding the Problem by Understanding the Data to Chapter 9, Advanced Machine Learning with Streaming and Graph Data.
Now we will further proceed with one of the popular machine learning problem also called frequent pattern mining using the Frequent Pattern-growth or FP-growth. Suppose we have a transactional database as shown in the following table. Each line indicates a transaction done by a particular customer. Our target is to find the frequent patterns from the database, which is the prerequisite for calculating association rules (https://en.wikipedia.org/wiki/Association_rule_learning) from customer purchase rules. Save this database as input.txt in the /usr/local/data directory without transaction IDs:
|
Transaction ID |
Transaction |
|
1
2
3
4
5
6
7
8
9
10 |
A B C D F
A B C E
B C D E F
A C D E
C D F
D E F
D E
C D F
C F
A C D E |
Table 1: A transactional database.
Now let's move to the Spark shell by specifying the master and number of the computational core to use as standalone mode (here are four cores, for example):
$ spark-shell --master "local[4]"
Step 1: Loading packages
Load the required FPGrowth package and other dependent packages:
scala>import org.apache.spark.mllib.fpm.FPGrowth
scala>import org.apache.spark.{SparkConf, SparkContext}
Step 2: Creating Spark context
To create a Spark context, at first you need to configure the Spark session by mentioning the application name and master URL. Then you can use the Spark configuration instance variable to create a Spark context as follows:
val conf = new SparkConf().setAppName(s"FPGrowthExample with $params")
val sc = new SparkContext(conf)
Step 3: Reading the transactions
Let's read the transactions as RDDs on the created Spark Context (sc) (see Figure 6):
scala> val transactions = sc.textFile(params.input).map(_.split(" ")).cache()
Step 4: Checking the number of transactions
Here is the code for checking the number of transactions:
Scala>println(s"Number of transactions: ${transactions.count()}")
Number of transactions: 22
Scala>
Step 5: Creating an FPGrowth model
Create the model by specifying the minimum support threshold (see also https://en.wikipedia.org/wiki/Association_rule_learning) and the number of partitions:
scala>val model = new FPGrowth()
                   .setMinSupport(0.2)
                   .setNumPartitions(2)
                   .run(transactions)
Step 6: Checking the number of frequent patterns
The following code explains how to check the number of frequent patterns:
scala> println(s"Number of frequent itemsets:
    ${model.freqItemsets.count()}")
Number of frequent itemsets: 18
Scala>
Step 7: Printing patterns and support
Print the frequent pattern and their corresponding support/frequency counts (see Figure 10). Spark job will be running on localhost (refer to Figure 11):
scala> model.freqItemsets.collect().foreach { itemset => println(itemset.items.mkString("[", ",", "]") + ", " + itemset.freq)}
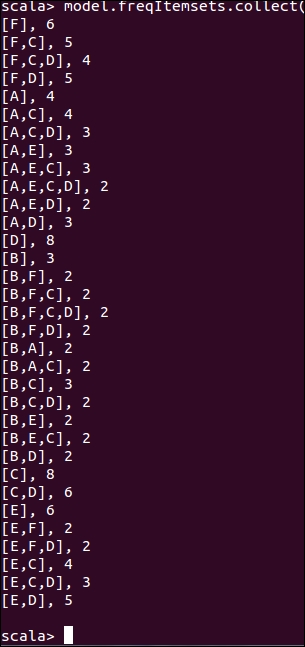
Figure 10: Frequent patterns.
Once a user application is bundled as either a jar file (written in Scala or Java) or a Python file, it can be launched using the spark-submit script located under the bin directory in the Spark distribution.
As per the API documentation provided by the Spark website at http://spark.apache.org/docs/2.0.0-preview/submitting-applications.html, this script takes care of setting up the class path with Spark and its dependencies, and can support different cluster managers and deploys models that Spark supports. In a nutshell, Spark job submission syntax is as follows:
$spark-submit [options] <app-jar | python-file> [app arguments]
Here, [options] can be: --class <main-class>--master <master-url>--deploy-mode <deploy-mode>, and a number of other options.
To be more specific, <main-class> is the name of the main class name, which is the entry point for our application. <master-url> specifies the master URL for the cluster (for example, spark://HOST:PORT for connecting to the given Spark standalone cluster master, local for running Spark locally with one worker thread with no parallelism at all, local [k] for running a Spark job locally with K worker threads, which is the number of cores on your machine, local[*] for running a Spark job locally with as many worker threads as logical cores on your machine have, and mesos://IP:PORT for connecting to the available Mesos cluster, and even you could submit your job to the Yarn cluster - for more, see http://spark.apache.org/docs/latest/submitting-applications.html#master-urls).
<deploy-mode> is used to deploy our driver on the worker nodes (cluster) or locally as an external client (client). <app-jar> is the jar file we just built, including all the dependencies. <python-file> is the application main source code written using Python. [app-arguments] could be an input or output argument specified by an application developer:

Figure 11: Spark job running on localhost
Therefore, for our case, the job submit syntax would be as follows:
$./bin/spark-submit --class com.example.SparkFPGrowth.JavaFPGrowthExample --master local[4] FPGrowth-0.0.1-SNAPSHOT-jar-with-dependencies.jar input.txt
Here, JavaFPGrowthExample is the main class file written in Java; local is the master URL; FPGrowth-0.0.1-SNAPSHOT-jar-with-dependencies.jar is the application jar file we just generated by maven project; input.txt is the transactional database as the text file, and output is the directory where the output to be generated (in our case, the output will be shown on the console). Now let's submit this job to be executed locally.
If it is executed successfully, you will find the following message including the output in Figure 12 (abridged):

Figure 12: Spark job output on the terminal.
In the previous section, we illustrated how to submit spark jobs in local or standalone mode. Here, we are going to describe how to run a spark application in cluster mode. To make our application run on the spark cluster mode, we consider the Amazon Elastic Compute Cloud (EC2) services, as Infrastructure as a Service (IaaS) or Platform as a Service (PaaS). For pricing and related information, please refer to this URL https://aws.amazon.com/ec2/pricing/.
Step 1: Key pair and access key configuration
We assume you have EC2 accounts already created. The first requirement is to create EC2 key pairs and AWS access keys. The EC2 key pair is the private key that you need when you will make a secure connection through SSH to your EC2 server or instances. To make the key, you have to go through the AWS console at http://docs.aws.amazon.com/AWSEC2/latest/UserGuide/ec2-key-pairs.html#having-ec2-create-your-key-pair. Please refer to Figure 13, which shows the key pair creation page for an EC2 account:

Figure 13: AWS key-pair generation window.
Name it my-key-pair.pem once you have downloaded it and saved it on your local machine. Then ensure the permission by executing the following command (you should store this file in a secure location for security purposes, say /usr/local/key):
$ sudo chmod 400 /usr/local/key/my-key-pair.pem
Now what you need is the AWS access keys, the credentials of your account, which are needed if you want to submit your Spark job to compute nodes from your local machine using spark-ec2 script. To generate and download the keys, login to your AWS IAM services at http://docs.aws.amazon.com/IAM/latest/UserGuide/id_credentials_access-keys.html#Using_CreateAccessKey. Upon the download completion (that is, /usr/local/key), you need to set two environment variables in your local machine. Just execute the following commands:
$ echo "export AWS_ACCESS_KEY_ID=<access_key_id>" >> ~/.bashrc
$ echo " export AWS_SECRET_ACCESS_KEY=<secret_access_key_id>" >> ~/.bashrc
Step 2: Configuring the Spark cluster on EC2
Spark distribution (that is, /usr/local/spark/ec2) provides a script called spark-ec2 for launching Spark Clusters in EC2 instances from your local machine (driver program), which helps in launching, managing, and shutting down the Spark Cluster.
Note
Please note that starting a cluster on AWS will cost money. Therefore, it is always a good practice to stop or destroy a cluster when the computation is done. Otherwise, it will incur additional costs. For more about AWS pricing, please refer to this URL https://aws.amazon.com/ec2/pricing/.
Once you execute the following command to launch a new instance, it sets up Spark, HDFS, and other dependencies on the cluster automatically:
$./spark-ec2 --key-pair=<name_of_the_key_pair> --identity-file=<path_of_the key_pair> --instance-type=<AWS_instance_type > --region=<region> zone=<zone> --slaves=<number_of_slaves> --hadoop-major-version=<Hadoop_version> --spark-version=<spark_version> launch <cluster-name>
We believe that these parameters are self-explanatory, or alternatively, please see details at http://spark.apache.org/docs/latest/ec2-scripts.html. For our case, it would be something like this:
$./spark-ec2 --key-pair=my-key-pair --identity-file=/usr/local/key/my-key-pair.pem --instance-type=m3.2xlarge --region=eu-west-1 --zone=eu-west-1a --slaves=2 --hadoop-major-version=yarn --spark-version=1.6.0 launch ec2-spark-cluster-1
It is shown in the following screenshot:

Figure 14: Cluster home.
After the successful completion, spark cluster will be instantiated with two workers (slave) nodes on your EC2 account. This task; however, sometimes might take half an hour approximately depending on your Internet speed and hardware configuration. Therefore, you'd love to have a coffee break. Upon successful competition of the cluster setup, you will get the URL of the Spark cluster on the terminal.
To check to make sure if the cluster is really running, check this URL https://<master-hostname>:8080 on your browser, where the master hostname is the URL you receive on the terminal. If everything was okay, you will find your cluster is running, see cluster home in Figure 14.
Step 3: Running and deploying Spark job on Spark Cluster
Execute the following command to the SSH remote Spark cluster:
$./spark-ec2 --key-pair=<name_of_the_key_pair> --identity-file=<path_of_the _key_pair> --region=<region> login <cluster-name>
For our case, it should be something like this:
$./spark-ec2 --key-pair=my-key-pair --identity-file=/usr/local/key/my-key-pair.pem --region=eu-west-1 login ec2-spark-cluster-1
Now copy your application (the jar we generated as the Maven project on Eclipse) to a remote instance (that is, ec2-52-48-119-121.eu-west-1.compute.amazonaws.com in our case) by executing the following command (in a new terminal):
$ scp -i /usr/local/key/my-key-pair.pem /usr/local/code/FPGrowth-0.0.1-SNAPSHOT-jar-with-dependencies.jar [email protected]:/home/ec2-user/
Then you need to copy your data (/usr/local/data/input.txt in our case) to the same remote instance by executing the following command:
$ scp -i /usr/local/key/my-key-pair.pem /usr/local/data/input.txt [email protected]:/home/ec2-user/

Figure 15: Job running status at Spark cluster.
Well done! You are almost done! Now, finally you will have to submit your Spark job to be computed by the slaves or worker nodes. To do so, just execute the following commands:
$./bin/spark-submit --class com.example.SparkFPGrowth.JavaFPGrowthExample --master spark://ec2-52-48-119-121.eu-west-1.compute.amazonaws.com:7077 /home/ec2-user/FPGrowth-0.0.1-SNAPSHOT-jar-with-dependencies.jar /home/ec2-user/input.txt
Upon successful completion of the job computation, you are supposed to see the status of your job at port 8080 like Figure 15 (the output will be shown on the terminal).
Step 4: Pausing and restarting spark cluster
To stop your clusters, execute the following command from your local machine:
$./ec2/spark-ec2 --region=<ec2-region> stop <cluster-name>
For our case, it would be:
$./ec2/spark-ec2 --region=eu-west-1 stop ec2-spark-cluster-1
To restart the cluster later on, execute the following command:
$./ec2/spark-ec2 -i <key-file> --region=<ec2-region> start <cluster-name>
For our case, it will be something as follows:
$./ec2/spark-ec2 --identity-file=/usr/local/key/my-key-pair.pem --region=eu-west-1 start ec2-spark-cluster-1
If you want your application to scale up for large-scale datasets, the fastest way is to load them from Amazon S3 or an Amazon EBS device into an instance of the Hadoop Distributed File System (HDFS) on your nodes. We will discuss this technique in later chapters throughout practical machine learning examples.