
Chapter 11
A Bare-Minimum Bookcase
The Great Eastern Temple in Japan’s Nara prefecture was built in the 8th century, rebuilt twice afterward, and remained the world’s largest wooden building until 1998. You can see a photograph of it in Figure 11-1. Amazingly, all the wooden sections were held together with wooden pegs.

Figure 11-1. The Great Eastern Temple.
You, too can use pegs to join pieces of wood together—for example, when you build a small bookcase.
Problems with Store-Bought Shelves
I’ve never felt entirely satisfied with store-bought bookcases, or kits to make bookcases. There are three reasons:
- ■ Although the shelves may be adjustable, they tend to average at least 10" apart. This is too much for many uses. When I make my own shelves, I can measure the items that I want to put on the shelves and design them to fit.
- ■ In store-bought kits to make bookcases, the shelves and end pieces are usually made of particle board, which isn’t very rigid, and they aren’t thick enough, because thicker shelves would cost more money. As a result, the shelves tend to sag.
- ■ I don’t like the look of shelves that rest on brackets inserted into tracks. I prefer a real bookcase, but bookcases are almost all designed to stand on the floor. A lot of wall space in my home is not used for anything above the six-foot line. It’s a perfect place for shelving—but only if I build it myself.
This project will address these problems. The design will be small, but you’ll be able to expand it significantly, if you wish.
Design Issues
By my definition, a shelf may or may not have an end piece, but a bookcase has two of them supporting the ends of the shelves. This raises the inevitable question: how should the shelves and the end pieces be joined together?
It’s the same basic problem that I described when building a box, in which the sides had to be attached to each other at 90 degrees. In that project, I was stuck with the limitations of plywood. In this project, ¾" boards allow me to use a plain-and-simple butt joint that is reinforced with wooden pegs—also known as plugs, and sometimes as dowels, even though they aren’t very similar to the dowels we have been using. To avoid confusion, I prefer to call them pegs.
You can buy pegs specifically designed for joining sections of wood. Your local hardware store may not have them, but you can find them in quantity online. They have grooves in them, or a rough, machined surface that is ideal for glue. Search for “grooved dowels,” “fluted dowels,” or “dowel pins,” and you should find what you need. For this project, they should be ¼" diameter and 1¼" long, which is a popular size.
Here’s the basic plan. First, you drill holes on the inside of each vertical support. The holes don’t go all the way through. Then you glue the pegs into the holes, leaving about half of each peg sticking out. You drill matching holes in the ends of the shelves, and glue the shelves onto the pegs. (Some people prefer to do all the gluing at once, instead of in two stages. I find that a bit more challenging.)
Measuring and Planning
Before you start cutting wood, some decisions are necessary. How many shelves do you want? Perhaps three will be enough, just as proof-of-concept. Two of these shelves can be for books, while the top shelf can be used for ornaments. See Figure 11-2.

Figure 11-2. A rendering of the bare-minimum bookcase consisting of three shelves and two end pieces.
How long do you want your shelves to be? Because this is just a test project, I’ll say 18", although the design will be horizontally scalable, so you can have shelves that are longer—even twice as long—if you prefer.
How tall should the end pieces be? Let’s suppose you are just going to use this miniature bookcase for old-style paperback books that measure 7" tall and 4¼" wide. Now you can draw a plan to figure out the dimensions, using graph paper, or vector graphics software, or just a freehand sketch.
My plan is in Figure 11-3. Using one-by-six board, each shelf will be ¾" thick and about 5½" wide. I’ve added a ½" margin above the books. I added another ½" to the top and bottom of each end piece, so that it sticks out above the top shelf and below the bottom shelf, because I think this looks nice.

Figure 11-3. Dimensions for an end piece of the bare-minimum bookcase.
If you’re inspecting my plan and wondering what the three small, dark-brown rectangles are, I’ll get to them in a moment.
Now that I have a plan, I can add up the dimensions from top to bottom. Like this:
½" + ¾" + 7½" + ¾" + 7½" + ¾" + ½" = ?
Some people have problems with adding fractions. If you are one of those people, I suggest you convert the fractions so they all use the same units. For instance, ½ is the same as 2/4, so the addition can be rewritten like this:
2/4 + 3/4 + 7 + 2/4 + 3/4 + 7 + 2/4 + 3/4 + 2/4
Group all the fractions together, and group the whole numbers together, and you get:
17/4 + 14
But 17/4 is really 4¼ . So 4¼ + 14 = 18¼".
Alternatively, you can use decimals, and put the numbers into a calculator, like this:
0.5 + 0.75 + 7.5 + 0.75 + 7.5 + 0.75 + 0.5 = 18.25
You now have enough information to figure out how much wood you need. Three shelves, each 18"—that’s a total of 54". Two vertical supports, each 18¼"—that’s a total of 36½". Grand total: 90½". If you allow a little bit for the widths of saw cuts, and trimming the ends, and maybe avoiding a defect here and there, you may be able to get everything out of a single one-by-six board that is 96" long.
Figure 11-4 shows what I have in mind. The dark areas show possible places where you will cut out shelves and end pieces. Their actual locations will depend on your need to avoid any defects.

Figure 11-4. If you have to reduce the length of a 96" board to transport it home, the location of the red line is a suitable place to cut it. The exact positions of the sections that you remove from the board later will depend on any defects that you wish to avoid.
My main concern, here, is that if a 96" board is too long for you to get it home, don’t let the lumber yard cut it in the middle. Ask them to make a cut 38" from one end, as shown by the red line in the diagram. That should be a fairly safe bet.
Making the Shelves
I suggest you begin in the usual way, by trimming your piece of lumber to make sure that the end is clean and square. You can suppress splintering with a sacrificial piece of two-by-four under it, and I think you’ll need a guide piece over it, because your cut has to be precisely vertical. If the cut is at an angle, it won’t look good when it butts up against the end piece.
You now have your reference cut, and you can measure your first shelf from it. You can use the sides of the shelf as they are, because a one-by-six is usually sold with pretty straight edges (so long as it has not warped), and in any case, the exact width of the shelves is not important in this project.
Align one end of your 18" ruler with the cut that you just made, and place your speed-square against the other end of the ruler, across the wood, as in Figure 11-5. Hold the speed square in position while you remove the ruler and extend your pencil line across the board.

Figure 11-5. Measuring one 18" shelf.
You will need to saw along the far side of this line, so allow enough space for the width of the saw blade, as in Figure 11-6.

Figure 11-6. Cutting the first shelf requires leaving room for the width of the saw.
Now you have one shelf, you can use it as a guide, to make two more. First align the end of the shelf precisely with the end of your remaining length of board, as in Figure 11-7. You can place a flat object across them, such as the side of your speed square.

Figure 11-7. Make sure the ends of the wood are precisely aligned.
Clamp the two boards together, turn them around, and now the end of your shelf is your new guide for cutting another 18" piece, as in Figure 11-8. If the concept isn’t clear, the diagram in Figure 11-9 may be helpful.

Figure 11-8. Cutting along the edge of one shelf, to make a second shelf.

Figure 11-9. The red line indicates the saw cut.
You can use this system to make multiple copies of a piece that you have cut, provided you do it the right way. Suppose you start with Piece A. You use Piece A to measure Piece B. Then you reuse Piece A to measure Piece C. Then you reuse Piece A to measure Piece D, and so on.
Don’t use Piece A to measure Piece B, and then Piece B to measure Piece C, and then Piece C to measure Piece D . . . because if you make small errors in that sequence (perhaps because your cuts are not precisely vertical), the errors will add up, in the same way that the quality of a photocopy deteriorates if you make a copy of a copy of a copy.
After you cut the shelves, rounding their long front edges with sandpaper is a good idea. When you remove books or replace them, they tend to rub over the front edge of a shelf, and if that edge is not rounded, paint or polyurethane doesn’t stick to it very well.
Reinforcing the Shelves
Going back to my list of requirements, the second one cited the tendency of store-bought shelves to sag when books are placed on them. The 18" shelf in this project is very short, and little paperbacks are relatively light, so you won’t see it sagging. But just for future reference, how long can a shelf be, before it does start to sag noticeably?
Answering that question would require knowing what kind of wood will be involved, how much load it will carry, and how thick it is. However, if the length of a shelf increases, I can tell you how much more it will sag, relatively speaking. A bit of math gives the answer (you can skip this if you dislike math).
Suppose you double the length of a shelf, while the load per linear inch remains constant. The doubled length will cause the shelf to sag eight times as much. If you triple its length, it will sag 27 times as much.
This is because the sag is proportional with the cube of the length of the shelf. In other words, if L is the length, the sag is proportional to L x L x L.
But, there is some good news. If you double the thickness of the shelf, you divide the sag by 8. If you triple the thickness, you divide by 27, because, the sag is inversely proportional with the cube of thickness. So, if T is the thickness, the sag is proportional with 1/T x 1/T x 1/T.
Okay, that’s the end of the math.
A Stiffening Strip
In practical terms, you can eliminate visible shelf sag by adding a strip to stiffen the shelf, which is what I want to do in this little bookcase. This will have two benefits.
First, you will be able to use the same design to make much longer shelves in the future, as shown in Figure 11-10.
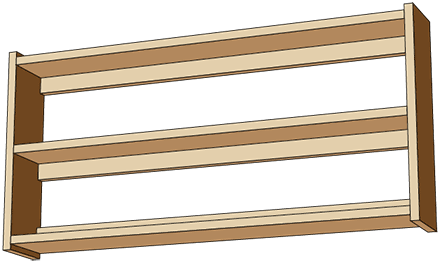
Figure 11-10. With a stiffening strip attached under (or above) each shelf, much longer shelves are possible without any visible sag.
The stiffening strip will be a piece of one-by-two hardwood, added under the back edge of each shelf. The hardwood can be oak, maple, or poplar, and I’m betting your local big-box store will have one of those. This will be stiffer, and will grip screws better, than comparable softwood. Incidentally, one-by-two is actually ¾" x 1½", but you probably guessed that.
The second advantage of these strips is that they are convenient for hanging the bookcase on the wall. If your wall has wooden studs in it, you find out where they are, drill holes in the stiffening strips at appropriate intervals, and use some screws that are 2¼" long. I’ll explain what studs are, and the whole topic of hanging things on walls, in the very next project.
For the bottom shelf in this little test project with 18" shelves, a stiffening strip isn’t necessary. The strips on the upper two shelves are sufficient to hang the bookcase on the wall, and the shelves are so short, sagging won’t be a problem.
The two strips of one-by-two hardwood will be 18" long, to match your top and middle shelves. I think the easiest way to attach them to the shelves is by using screws, which will be unobtrusive at the backs of the shelves. You could use more pegs instead of screws, but that would take longer.
Figure 11-11 shows a plan for drilling screw holes in the two shelves. All measurements derive from the top-left corner, because if you make a series of small measurements from one hole to the next, cumulative errors can occur.

Figure 11-11. Where to locate the screw holes in your shelves. Countersink each hole.
After you drill the 5/32" holes in the shelves, countersink each one to accept a flat-headed wood screw. Your next step is to clamp one of the shelves to one of the stiffening strips, in correct alignment. You can then use a 1/8" bit to make pilot holes in the stiffening strip for your #8 screws. (Check back to Figure 10-34, and you’ll see that if you are inserting a #8 screw into hardwood, a 1/8" pilot hole is appropriate.)
Simply drill with your 1/8" bit through each screw hole, into the strip below, as shown in Figure 11-12. This way, the pilot holes are automatically aligned. Note that I used a piece of scrap two-by-four in the background, to keep the shelf level during this process.

Figure 11-12. Make a pilot hole in the piece of one-by-two hardwood by drilling through the screw hole in the one-by-six board.
Insert the screws, without removing the clamps until the sections of wood are screwed tightly together. Then repeat the process for the second shelf.
Making the End Pieces
Figure 11-13 shows where you will be drilling holes for the pegs in the end pieces. The darker strips of color in the figure are included just to remind you where the shelves will be. All the measurements are made from one end of the wood, because if you make a sequence of short measurements, one after another, you will tend to get cumulative errors.

Figure 11-13. Locations of holes in each end piece for the bookcase.
Remember, these holes are for the pegs, and do not go all the way through the wood. You need to put a piece of masking tape around your drill bit, 5/8" from the tip of the bit, to remind yourself when to stop drilling.
A ¼" bit will be appropriate for the pegs, but I suggest you begin with a 1/8" bit, which will be easier to control. This is shown in Figure 11-14. Try to make the holes vertical, so that when you enlarge the holes and put pegs into them, the pegs will not lean at an angle.

Figure 11-14. Begin with a 1/8" bit, and don’t go deeper than 5/8".
Once you have the holes correctly located, you can enlarge them to ¼". Incidentally, you don’t need to worry if there is just a little bit of splintering around the edges, because the ends of the shelves should conceal this. The full-size holes are shown in Figure 11-15.

Figure 11-15. Plugs can be glued in place, as soon as debris has been removed from the holes.
Before you continue, make sure there are no wood chips in the holes. Blow into them, using a drinking straw and closing your eyes if you want to protect yourself from dust flying into your face.
Now dribble some carpenter’s glue into each of the holes, smear some more glue around each of the pegs, and push the pegs firmly into the holes. Tap them lightly with a hammer, if necessary, or rotate the peg while you continue to push it, to make sure it is completely seated. If you see some glue around the edge of the hole, wipe it away promptly with a wet rag or paper towel. The result should look like Figure 11-16.

Figure 11-16. All the plugs have been glued into the end pieces.
After your gluing is done, you need to make holes in the ends of the shelves that will exactly match the positions of the pegs. Of course the pegs should all be the same distance from the edges, but little errors may have crept in. So, you need to deal with the pegs where they actually are, not where they should be.
Number the backs of the shelves in pencil, so you won’t get them mixed up. Then stand each shelf beside the pegs that must fit into it, and draw around the pegs, as shown in Figure 11-17. Keep the pencil straight, so that the lines are accurately transcribed.

Figure 11-17. Mark the positions of the plugs on the matching shelf.
After you have penciled the outline of each peg, turn the shelf and extend the pencil marks down its edge, as in Figure 11-18. Make a mark where the peg will be centered between these lines, an equal distance from the top and bottom of the shelf.

Figure 11-18. Extend the marks around to the edge of the shelf, using your speed square.
Now you need to drill holes in the ends of the shelf. I think this will be easiest if the shelf is vertical. One way to secure the shelf vertically is by clamping it to a block of two-by-four at the bottom, and then clamping the two-by-four to your work surface. This is visible in Figure 11-19, which also shows a preliminary hole being drilled with a 1/8" bit. Some people prefer to clamp the shelf flat on the work area and drill into it horizontally, but doing it vertically is easier for me.

Figure 11-19. The end of the shelf is drilled while the shelf is clamped vertically.
When all your drilling is done, you’re ready for the final assembly. Clear your work area, and clean any dust or fragments off the parts of your project, especially the ends of the shelves. Remove little splinters from around the holes that could interfere with the shelves fitting tightly.
You will need to clamp the whole bookcase together, while the glue is drying, but your clamps aren’t long enough to reach across it. How can you address this problem? My suggestion is shown in Figure 11-20, using a couple of loops of nylon rope around blocks that spread the load.

Figure 11-20. An improvised system for applying clamps that aren’t long enough to reach across the bookcase.
But first, you need to do a rehearsal. Without applying any glue, make sure that everything fits together. If some of your holes are in the wrong place, you need to discover this now, not after the glue has been applied. Holes can be enlarged with your drill, or additional holes can be made if a measurement error resulted in holes being in the wrong place. An enlarged hole will make a weaker joint, but so long as some of the peg makes firm contact, it may be acceptable.
If everything looks okay, disassemble your bookcase, squirt glue into each hole, smear more glue on each peg, put everything back together, and tighten your clamps in the loops of rope.
Use your speed square to make sure that the angles between the parts of your bookcase are 90 degrees. If necessary, you may have to apply some sideways force to square it up. This can be done with another piece of rope or string, tied around a leg of your workbench or table.
My finished bookcase is shown in Figure 11-21, after being coated with polyurethane. In the next project, I’ll show you how to hang it (and other objects) securely on a wall.

Figure 11-21. The finished bookcase, coated with polyurethane.
Other Ideas
Pegs can be used to join boards edge-to-edge. In fact, that’s how furniture was made before the widespread use of composite materials such as plywood.
Ideally you should use a planer to put an absolutely straight edge on each piece of wood before you join it. A planer is a heavy expense, however, and if you just choose boards that are reasonably free from imperfections, an edge joint can be hard to see.
Using edge-to-edge joining, you can make traditionally styled furniture that avoids the messy edges of plywood. I constructed the little nightstand in Figure 11-22 from one-by-six maple boards joined edge-to-edge (with the exception of the back, which is 3/16" plywood). The grain patterns in the top, the sides, the door, and the interior shelf were chosen to conceal the joints. The project is shown before a finish was applied. Fabrication took about 25 hours. Power tools were used extensively.

Figure 11-22. A fabrication project made entirely from boards joined edge-to-edge with wooden plugs (except for the plywood back).