
10
Managing Group Policies
When I was preparing for this chapter, I was struggling somewhat as there is a lot to talk about in relation to group policies. Even though it was challenging, I tried my best to cover most of the key things related to group policies.
My council tax increased by 7% in April 2021. It is a rule, and whether I like it or not, I have to pay it every month. If not, I will have to face the consequences. This particular rule has a clear audience: it will only apply to houses under the Kingston council. We can consider Group Policy as an authority that executes a rule or set of rules against a clearly identified audience. This is similar to the council in my example.
It is impossible to describe the benefits of Active Directory (AD) without mentioning group policies. Group policies are one of the main reasons why Active Directory is so important in infrastructure management. Group policies are like a double-edged sword. They have lots of advantages as they help to manage various types of security, application, and system settings but, at the same time, if they have not been configured or used properly, this can affect things in many ways.
That said, in this chapter, we will cover the following topics:
- Benefits of group policies
- Understanding group policies and their capabilities
- Group Policy processing
- Group Policy inheritance
- Group Policy conflicts
- Group Policy filtering
- Loopback processing
- Guidelines for using group policies appropriately in the infrastructure
- Useful group policies
Before we dive into advanced topics about group policies, first we need to understand the benefits of group policies. Only then we can get the best out of it.
Benefits of group policies
A Group Policy has two types of settings: computer settings and user settings. Depending on the business and operation requirements, we will have to use both types of settings in policies. Let's go ahead and review what benefits group polices can deliver to a business.
Maintaining standards
I assume most of you have heard of International Organization for Standardization (ISO) standards. They allow organizations to run their operations in line with industry standards. Once an organization is complying with a relevant ISO standard, in return, a certification will be issued to prove the organization's commitment. Even though organizations have passed the ISO certification, the relevant authority will perform a yearly evaluation to make sure that they are maintaining standards continuously. Most companies follow these standards throughout the year, but for some, they come to attention only when the evaluation is due. This is because the implementation of these standards is easy, but maintaining them is challenging.
Our infrastructures are also subject to many standards. These standards can be based on the nature of the business, application and service best practices, business preferences, industry standards, and so on. Defining these standards within the organization is relatively easy when compared to the efforts required to maintain them. The best way to maintain the standards is to enforce them. As an example, a common security standard for a password is to use complex passwords. But whenever you're asked to define a password, by nature, people go for the easiest password they can remember. In the system, however, if we can enforce the practice of not accepting a non-complex password, users do not have a choice. They must comply with the password standards in order to define a password.
Group Policy allows us to enforce infrastructure standards. Group Policy can be based on user standards or computer standards. This policy ensures that companies will comply with standards with minimum maintenance efforts because once policy settings are applied, the target group of users or devices will not be allowed to opt out. It's almost like converting a standard into a rule.
Automating administration tasks
I started my career as a web developer and later moved on to system administration. My job title at that time was associate system administrator. One of the common service requests I used to receive from the development team manager was to deploy different software to engineers' computers. There were around 20 people in the company, and since I was a junior person, it was always my responsibility to install this software on computers. It was painful, but since it was just 20 computers, it was just about manageable. But imagine if it was hundreds of computers; I would be spending days doing boring and repetitive tasks.
From a company point of view, this is still at the cost of operations. This was just an example, but a regular helpdesk usually gets requests that are small but repetitive, such as mapping shared folders, printer installations, and customized application settings. Group policies allow engineers to automate these types of common and repetitive administration tasks. As an example, group policies can be used to push application installations, push new printer deployments, and map drives when the user logs in. This reduces the cost of operations and allows us to allocate IT resources for more important tasks.
Preventing users from changing system settings
By default, the Windows system has a software firewall to protect machines from threats, but sometimes, this prevents access to certain application traffic. Most of the time, the reaction to this will either be to disable the firewall or to allow application traffic via the custom rule. But if someone changes the firewall settings without the IT team's knowledge, it can possibly put the entire infrastructure at risk.
Group policies allow you to take control of these sensitive settings and prevent end users from making changes. As well as firewall settings, group policies can also be used to prevent the modification of services, prevent access to control panel features, prevent changes to applications, and much more.
Flexible targeting
At the beginning of this section, we learned about how group policies can be used to enforce standards. In a business, some of these standards apply to the entire organization, and others can be specific to departments, business units, or users/device groups. Group policies allow us to apply different policies based on Active Directory sites, domains, organization units, or groups.
As an example, we can use group policies to push two different firewall settings to IT department computers and Sales department computers.
We can create two group policies to cover the previous requirements and link them to a relevant organization unit. This flexible targeting allows us to apply different system settings for specific audiences.
No modifications to target
Group Policy also uses the server-client architecture. Active Directory domain controllers hold the group policies and process them when a client device's starts up or a user logs in. To apply Group Policy to a client, we do not need to do any system or profile modifications. If the target meets the Group Policy target criteria, it will process the Group Policy settings. This architecture simplifies the Group Policy processing as there are fewer dependencies.
Group Policy capabilities
Group Policy can be used to perform many different tasks in an infrastructure. Here, I have listed some of these capabilities:
- Group Policy can be linked to sites, domains, and organization units. This allows us to match the Group Policy requirements with the Active Directory structure. However, Group policies cannot be applied to default containers in Active Directory.
- Group Policy allows us to use security filtering to target specific groups, users, or computers.
- Windows Management Instrumentation (WMI) filters are capable of filtering the AD objects based on criteria such as the OS version, roles, and system configuration. Group Policy allows us to use WMI filters for targeting.
- The Group Policy Object (GPO) status can change based on operational requirements. If required, group policies can disable group policies completely, or disable user or computer settings individually.
- Group Policy management tasks can be delegated to individuals or groups.
- Group Policy can be used to install, redeploy, or remove programs from computers.
- Group Policy can be used to publish scripts to be executed upon computer startup, or to shut down a process.
- Group Policy can be used to deploy printers to computers.
- Group Policy is capable of applying different security policies, such as password policies, lock-out policies, Kerberos policies, firewall policies, and public key policies.
- Group Policy can be used to define system audit settings and enable/manage advanced system audit capabilities, which allow you to capture more data regarding the roles and their activities.
- Group Policy can be used to add registry keys to systems.
- Group Policy can be used to define software restriction policies and application control policies to control the application behaviors in computer systems.
- Group Policy can be used to set up policy-based QoS rules to define Differentiated Services Code Point (DSCP) and throttle values for the outgoing network traffic. It will allow you to prioritize/manage network traffic in a system.
- Group Policy administrative templates can be used to define the registry-based policies' targeting system, applications, and service settings.
- Group Policy can be used to apply preference settings to computers and users. For example, it can be used to define mapped drives, printers, power options, Internet Explorer settings, regional settings, local users and groups, and so on.
- Using Group Policy, it is possible to manage end user roaming profile settings, including folder redirection. It will automatically save user data to a network location instead of a local computer. It allows you to access the same profile data from any workstation in the domain.
Apart from the above listed capabilities, group policies have a lot more other capabilities that can be used to improve IT operations. Later on in this chapter, I will explain how to use some of these capabilities along with Group Policy examples.
Group Policy objects
When new Active Directory objects are added, the system saves the object data inside the Active Directory database. However, the way GPO is stored is different from the typical Active Directory object. GPO contents are stored in two locations (the Active Directory database and the SYSVOL folder) in the Active Directory environment.
The Group Policy container
As with any other object, the Active Directory database also holds GPO information. This information is more related to system settings and the path reference for the other dataset. When a GPO is created, as with any other Active Directory object, it will also have the Globally Unique Identifier (GUID) value. This is important as this value is used by both datasets to refer to each other. This value is used in the Common Name (CN), too. Before we look into datasets, we need to find the GUID value for the GPO. This can be done using the following command:
Get-GPO -name "Test Users"
The preceding PowerShell command will list the default properties of the Test Users GPO:

Figure 10.1: GUID value of GPO
In the preceding screenshot, the Id attribute represents the GUID value of the Test Users GPO.
Now that we have the GUID information, the next step is to review the Group Policy Container (GPC) information for the given GPO. This information can be accessed using ADSI Edit MMC or Ldp.exe. On this occasion, let's use Ldp.exe to review the data.
To open Ldp.exe, type Ldp.exe into the domain controller's Run box. Then, go to the Connection menu and select Bind. Select the default options if the logged-in account has relevant privileges (such as schema or Enterprise Admin). In the next step, click on Tree under View and select the DN domain.
As an example, in my demonstration, the DN value is DC=rebeladmin,DC=com. GPC values are located under CN=Policies,CN=System,DC=rebeladmin,DC=com:
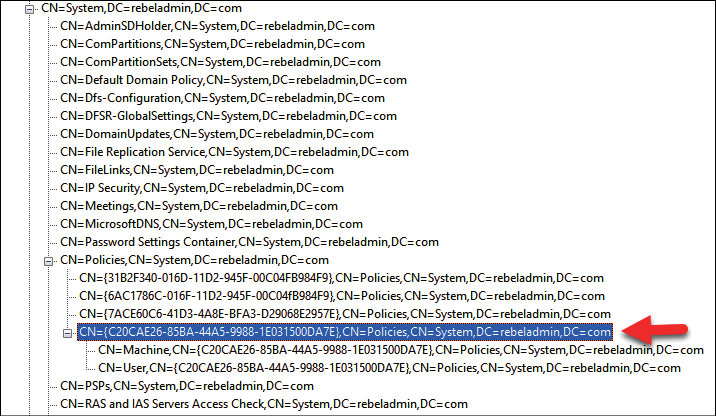
Figure 10.2: GPC information for policy
The policy object is further divided into two sections, which represent the computer configuration (machine) and the user configuration (user):

Figure 10.3: GPC information for policy – computer and user configurations
The preceding screenshot shows details about the GPO we selected, including certain attribute values:
displayName: This attribute contains the name of the Group Policy, which is defined during the GPO setup process.gPCFileSysPath: This attribute value represents the path to the other dataset of the GPO. This is called the Group Policy template path. It is always available under theSYSVOLfolder.gPCMachineExtensionNames: This attribute lists all of the client-side extensions (CSEs) that need to process the GPO computer settings. These are all listed with GUIDs, and https://bit.ly/3l6IBWV can be used as a reference to most of the known CSEs.
As mentioned at the beginning, GPO data is stored in two locations. In this section, we looked into data stored in the Active Directory database, and next, we are going to look into data saved in the SYSVOL folder.
The Group Policy template
When we looked at the Group Policy capabilities, we saw that policies can be used to publish applications, run start up/shutdown scripts, and more. From the Active Directory object's point of view, all of these policy settings are attributes and all scripts and files used in the policy need to be saved in a centralized location for processing. Instead of saving them in an Active Directory database, the system saves all of these policy-related files and settings in the SYSVOL folder. The default path for the Group Policy template (GPT) data is \rebeladmin.comSYSVOL
ebeladmin.comPolicies. Here, rebeladmin.com can be replaced with your domain's fully qualified domain name (FQDN).
Inside the policy folder, there are two subfolders called Machine and User. These folders contain files and settings related to the GPO's computer configuration and user configuration. There is another file called GPT.INI, which contains the version number of the group policy. In every Group Policy edition, the version number will increase automatically and it will be used as a reference to sync the Group Policy changes from one domain controller to another.
If healthy replication is in place, the version numbers should be equal:

Figure 10.4: GPT.ini file
Inside the Machine and User folders, there are several folders that will include the data according to GPO configurations. As an example, the Applications folder will contain the software installation files if the GPO is set to publish applications, while the Scripts folder will contain any start up/shutdown scripts that are published via the GPO:
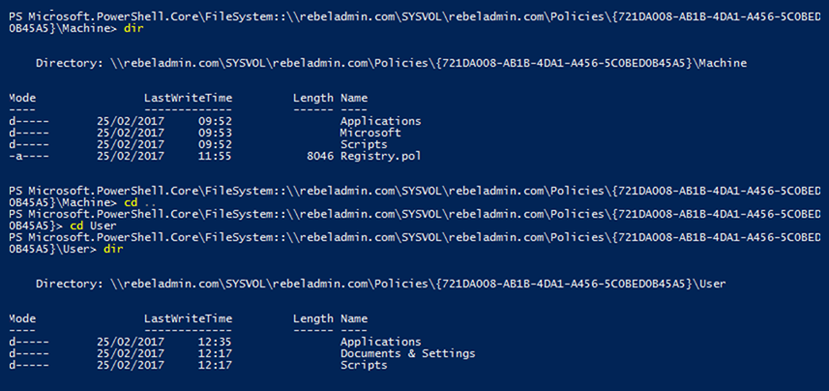
Figure 10.5: GPO folder structure
To process a Group Policy successfully, GPT data synchronization between domain controllers is crucial. SYSVOL replication issues will impact GPO policy processing. Before Windows Server 2008 domain services, SYSVOL replication used File Replication Service (FRS). After AD DS 2008, this was replaced by Distributed File System (DFS), which provides more efficiency and redundancy in terms of replication.
Group Policy processing
Evaluating Group Policy requirements may identify some settings that are common for objects in the entire domain. But at the same time, some settings may be unique to specific departments or groups. Any Group Policy that is applied at the root level will be inherited by other organization units by default. Therefore, organization units can have inherited group policies as well as directly linked group policies.
If multiple group policies are applying to an organization unit, in which order will it be processed? Will it prevent the processing of any Group Policy? If the same setting is applied to different policies, which one will be applied? To answer all of these questions, it's important to understand how Group Policy processing works.
There are two main types of policies in the Active Directory environment:
- Local policies: Windows systems are supported to set up local security policies. These policies are different from domain GPOs, and they contain limited features that are more focused on security settings. These are applied to any user who logs in to the system.
- Non-local policies: These policies are Active Directory-based policies that we will discuss throughout this chapter. These policies only apply to domain-joined computers and Active Directory users. These policies are feature-rich compared to local policies.
Group Policy can be applied to three levels in the Active Directory environment:
- Site: Group Policy can be linked to an Active Directory site. Any site-level Group Policy will apply to all domains on that site.
- Domain: Any Group Policy that is applied at the domain level will apply to all users' and computers' objects under that domain. By default, the system creates a Group Policy called Default Domain Policy at the domain level. Most of the time, domain-level policies will be used to publish security settings that apply to the entire infrastructure.
- Organization units (OUs): Group Policy at the OU level is applied to any user or computer object under it. By default, the system creates an OU-level Group Policy called Default Domain Controllers Policy, which is applied to the domain controller's OU. Group Policy settings applied at the OU level are more specific as the target audience is smaller compared to the site or domain.
The following diagram illustrates the policy levels in Active Directory:

Figure 10.6: Group Policy processing order
In the Active Directory environment, group policies will be processed in the following order:
- Local policies
- Site policies
- Domain policies
- OU policies
In general, this order is called LSDOU. The first policy to be processed is the local policy, and the last one to be processed is the OU policy. This doesn't mean that the most preferred policy is the local policy. Of all four policies, the policy that holds the lowest precedence value will be the winning GPO, which is the OU policy. This processing order is important when policies have conflicting values because the policy that is closest to the object will be the winning policy. The policy at the OU level will be the closest policy to the object.
As I said earlier, OU-level policy settings are more specific according to organizational requirements. Therefore, they hold the most accurate policy settings for the targeted objects. This order is the default processing order and, based on the requirements, it is possible to change the precedence order. We will look into this later on in this chapter.
The processing of local policies can be completely turned off if required. This will prevent the application of non-recommended settings that administrators do not have control over or awareness of. This can be disabled by using a Group Policy setting. The policy setting is located at Computer ConfigurationAdministrative TemplatesSystemGroup PolicyTurn off Local Group Policy Objects Processing. To disable policy processing, the value should be set to Enable.
To apply computer Group Policy settings successfully, the device should have a valid communication with a domain controller, and to apply user Group Policy settings, a user (the domain account) should log in to the domain-joined computer that can communicate with a domain controller.
Group policies are mainly processed in two different modes. By default, a Group Policy's computer settings will start to process during the OS startup. Once the user enters their username and credentials, the Group Policy's user settings start to process. This pre-processing mode is called foreground processing. During the foreground process, some policies will finish processing, but some will not. They will be processed in the background once login and network connections have been initialized. Also, once the user logs in, every 90 minutes, the group policies will run in the background by default. This is the second mode of Group Policy processing.
Foreground processing can be further divided into two sub-modes. Before Windows XP was introduced, all of the policy settings that ran in foreground mode will process before the user sees the desktop window. This is called synchronous mode. But after Windows XP, the default mode of processing is asynchronous, which means that the OS does not wait until Group Policy processing.
There are four policy settings that are defined by Microsoft, which are always processed in asynchronous mode. If any policy has folder redirection, software installation, disk quota, and drive mapping enabled, it will be processed in synchronous mode. Not only that, but all of the start up scripts will also run in the foreground in synchronous mode.
This default processing behavior provides a faster login time for users, but, at the same time, some policy settings can take up to two login cycles to apply the changes fully. This behavior impacts the security settings. As an example, if we want to block access to control panel settings, and if the policy settings are not processed in synchronous mode, when the user logs in, they can have access to the control panel. Then, it is not going to provide the expected results. This default mode is useful when users are connected through a slow link. Otherwise, it can take an awfully long time to finish the Group Policy processing. If there is no specific reason to use asynchronous mode, it is recommended that you always use synchronous mode. We can force this using Group Policy; the policy settings are located at Computer ConfigurationAdministrative TemplatesSystemLogonAlways wait for the network at computer startup and logon.
As we saw earlier, there are four Group Policy settings defined by Microsoft that always run in synchronous mode. Even if systems are connected via a slow link, they will process these Group Policy settings in synchronous mode. Therefore, it is recommended that you enable the following two Group Policy settings to force asynchronous mode when you log in via a slow link and remote desktop services. Asynchronous mode for slow links can be enabled via Computer ConfigurationAdministrative TemplatesSystemGroup PolicyChange Group Policy Processing to run asynchronously when a slow link is detected. Asynchronous mode for remote desktop services can be enabled via Computer ConfigurationAdministrative TemplatesSystemGroup PolicyAllow asynchronous user Group Policy processing when logging on through Remote Desktop Services.
Group policy processing has a direct impact on group policy inheritance. Based on group policy requirements, sometimes we have to disable the inheritance. Let's go ahead and explore Group Policy inheritance in more detail in the next section.
Group Policy inheritance
Any Group Policy that is applied to the upper level of the structure is inherited in the lower level. The order of the inherited policies is decided by the LSDOU model that we looked at in the Group Policy processing section. Group Policy inheritance for each OU can be reviewed using the Group Policy Management MMC.
To view the inheritance data, first, click on the OU and then click on the Group Policy Inheritance tab:

Figure 10.7: Group Policy Inheritance
The Group Policy inheritance details can also be viewed by using the Get-GPInheritance PowerShell cmdlet. As an example, the same information listed in the preceding screenshot can be viewed using the following command:
Get-GPInheritance -Target "OU=Users,OU=Europe,DC=rebeladmin,DC=com"
In this example, I have one site-linked Group Policy called Site 1. There are two domain-linked group policies called Root 1 and Root 2. I also have an OU-linked Group Policy called Test Users:

Figure 10.8: Group Policy precedence
In the list, the first precedence goes to the Test Users Group Policy, which is the OU-linked Group Policy. Then, precedence order 2 goes to the Group Policy linked to the parent OU. Precedence orders 3, 4, and 5 go to the domain-linked group policies.
The last in the order is the Site 1 Group Policy, which is linked to the Active Directory site.
This inheritance is not useful in every scenario. There can be situations where the OU needs to have very specific settings and should not be disturbed by any other inherited policy. When the number of group policies increases, the time they need for processing also increases. If my requirements can be achieved using one Group Policy that is linked to the OU, why should I still apply inherited policies that are not going to help me anyway? In a similar scenario, Group Policy inheritance can be blocked at the OU level. This can be done by using the Group Policy Management MMC or the Set-GPinheritance PowerShell cmdlet:
Set-GPInheritance -Target "OU=Users,OU=Europe,DC=rebeladmin,DC=com" -IsBlocked Yes
The preceding command will block the Group Policy inheritance in OU=Users,OU=Europe,DC=rebeladmin,DC=com:

Figure 10.9: Block Group Policy Inheritance
After the Group Policy inheritance block, the only policy in the inheritance list is the policy that is linked to the OU. Also, when we block inheritance, we can see a blue exclamation mark on the OU. That's the easiest way to identify whether group policy inheritance is blocked for an OU.
Group Policy conflicts
The precedence order of group policies in LSDOU and Group Policy inheritance also decide which policy will win when we have some conflicting settings. Let's look at this further with the help of an example:

Figure 10.10: Group Policy conflicts example
As per the preceding example, we have two policies inherited by the Users OU. Policy 01 is the domain-linked Group Policy, and Policy 02 is the OU-linked Group Policy. Each Group Policy has its own values defined for the three selected settings. Based on the default Group Policy inheritance, the Users OU will have both policies applied. According to LSDOU, Policy 02 will have the lowest precedence value as it is the closest policy to the Users OU. For Password Policy Settings, only Policy 01 has a value defined. Therefore, even though it's the least preferred Group Policy, that value will apply to the Users OU. For Windows Firewall Settings, only Policy 02 has a value. The same policy will also apply to the Users OU. When it comes to Internet Explorer Settings, both policies have values, which creates a conflict. The winning conflicting policy setting value will be decided based on LSDOU. Therefore, the winning value will be from Policy 02.
Microsoft allows you to change this default policy-winning procedure by enforcing policies. When a Group Policy has been enforced, it will have the lowest precedence value regardless of where it's been linked. Another advantage of the enforced policy is that it will apply even though the OU has blocked inheritance.
If the domain-linked policy is enforced, it will apply to any OU under the domain, and it will hold the lowest precedence. If multiple policies are enforced, all of them will take the lowest precedence numbers in order.
To enforce a policy, load Group Policy Management Console (GPMC), right-click on the selected Group Policy, and then select the Enforced option. This will enforce the policy and change the policy icon with a small padlock mark. This allows you to identify enforced policies quickly from the policy list:

Figure 10.11: Enforced Group Policy
In the preceding example, Policy 01 is enforced. It is the domain-linked Group Policy. Under normal circumstances, Policy 02 would get the lowest precedence value (for Users OU). But when the policy is enforced, Policy 01 will have the lowest precedence value. When we look into the winning policy values of the Users OU, for Password Policy Settings, the system will process the Policy 01 value as it is the only one with any value defined. For Windows Firewall Settings, Policy 01 does not have any value defined. So, even if a policy has been enforced, the winning policy setting will be from Policy 02 as it's the only one with a value defined. Policy 01 and Policy 02 both have values for Internet Explorer Settings, but the enforced Policy 01 is on top of the policy list and the winning policy setting will be from it.
So far, we have talked about conflicting policy settings from different levels in the domain structure. How will this work if it's at the same level? Policies at the same level also apply according to the precedence order.
When policies are at the same level, the LSDOU process is applicable. The winning policy will be decided based on its position in the policy list. The order of the list is decided based on the Linked Group Policy Objects list. This list can be viewed using the Linked Group Policy Objects tab in the OU detail window in GPMC:

Figure 10.12: Group Policy processing at the same level
The order of policies in the same level can be changed by using two methods. One method is to enforce the policy. When the policy is enforced, it will take priority over the other policies at the same level, but it will not change the link order of the policy. The order of the list can be changed using the up and down buttons in the Linked Group Policy Objects tab. The link order will match the precedence order of the group policies:
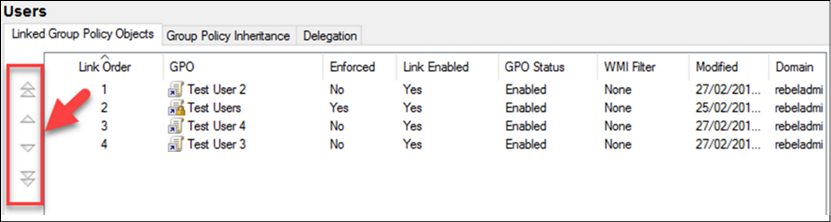
Figure 10.13: Group Policy Link Order
On rare occasions, you may also have conflicting settings between the computer configuration and the user configuration within the same policy. In such a situation, computer settings will always win.
Group Policy conflicts that occur in Active Directory environments are mostly due to unplanned GPO implementations and a lack of knowledge regarding the group policy processing order. Throughout this chapter, you can find relevant information that will help you to organize group policies properly and avoid conflicts.
Group Policy mapping and status
There are a few things we need to consider when we create and link a Group Policy object to a site, domain, or OU:
- If it's a new GPO, it can be created directly under the relevant OU or domain using GPMC.
- In sites, it's only allowed to link to an existing GPO. Therefore, if a new GPO needs to link to the site, first we need to add a new GPO using GPMC or a PowerShell cmdlet.
- An already added GPO can link to any OU, domain, or site. As an example, if policy A is created and linked under OU A, it can be reused in any other OU, domain, or site.
A new GPO object can be created using the New-GPO PowerShell cmdlet:
New-GPO -Name GPO-Test-A
The preceding command will create a GPO called GPO-Test-A. By default, it will not link to any OU, domain, or site. In GPMC, it can be viewed under the Group Policy Objects container.
Once an object is created, it can be linked to an OU, domain, or site by using the New-GPLink cmdlet:
New-GPLink -Name GPO-Test-A -Target "OU=Users,OU=Europe,DC=rebeladmin,DC=com"
The preceding command links a GPO called GPO-Test-A to OU=Users,OU=Europe,DC=rebeladmin,DC=com.
Both cmdlets can be combined to create and link a GPO at the same time:
New-GPO -Name GPO-Test-B | New-GPLink -Target "OU=Users,OU=Europe,DC=rebeladmin,DC=com"
The preceding command will create a new GPO called GPO-Test-B and link it to OU=Users,OU=Europe,DC=rebeladmin,DC=com at the same time.
There are occasions where a link to the group policies needs to be disabled. This is useful when you do Group Policy troubleshooting. When the link to the Group Policy is disabled, Group Policy will be removed from the Group Policy precedence list. However, it will not remove Group Policy from the Link Order list or from its location. This can be done via GPMC or by using the Set-GPLink PowerShell cmdlet:
Set-GPLink -Name GPO-Test-B -Target "OU=Users,OU=Europe,DC=rebeladmin,DC=com" -LinkEnabled No
The preceding command will disable the link between the GPO-Test-B GPO and OU=Users,OU=Europe,DC=rebeladmin,DC=com. This is usually used to temporarily disable a policy. It can be enabled at any time by using the -LinkEnabled Yes option.
However, if this requirement is permanent, this GPO link can be completely removed by using the Remove-GPLink cmdlet. This will remove the link, but it will not delete the GPO. It will also not affect any other existing links in the GPO:
Remove-GPLink -Name GPO-Test-B -Target "OU=Users,OU=Europe,DC=rebeladmin,DC=com"
This command will remove the GPO-Test-B policy from OU=Users,OU=Europe,DC=rebeladmin,DC=com. It will remove the GPO from the Precedence list, as well as the Link Order list.
If the GPO needs to be deleted completely, we can use the Remove-GPO cmdlet for that:
Remove-GPO -Name GPO-Test-A
The preceding command will delete the aforementioned GPO completely from the system. If the GPO was linked, it will forcefully remove it at the same time.
Without disabling links, removing links, or deleting the GPO, it is also possible to disable GPO settings only. This feature provides options to disable computer settings, user settings, or both.
Once the settings are disabled, it will not remove them from the Link Order or Precedence list. It will only disable the applied settings:

Figure 10.14: Group Policy status
In the next section, we are going to learn how group policies can be used to manage applications and service settings even if they have new updates.
Administrative templates
Group policies allow us to manage computer settings and user settings effectively. However, infrastructure operation requirements are changing frequently. As an example, this can be due to new application versions, new security requirements, new business policy requirements, and more. We know that group policies can be used to manage organization-wide settings, but not all of the requirements will be supported by default. By the time AD DS 2008 was released, it was not possible to have group policies that could manage settings in the Office 2016 application as it didn't exist.
So how can we manage new applications and new OS settings using group policies? Do we need to keep updating Active Directory? No, we don't. We can do this using administrative templates. Application vendors and developers can develop administrative templates and publish them via group policies to customize, manage, and optimize their products and services.
Administrative templates contain registry-based changes to the system. Administrative Templates, under Computer Configuration in the GPO, can be used to modify the registry entries under the HKEY_LOCAL_MACHINE key.
Administrative Templates, under User Configuration in the GPO, can be used to modify the registry entries under the HKEY_CURRENT_USER key. Microsoft also has pre-deployed administrative templates that can be used to edit more than 1,000 individual registry settings. Administrative templates are not just from the application vendors; if needed, we can also create custom administrative templates.
Before Windows Server 2008, administrative templates came as Unicode-formatted text files with the .adm file extension. These did have some drawbacks, however. It saves the .adm file as part of the Group Policy inside SYSVOL. If it is used in different GPOs, it will save a copy of .adm with every GPO. It increases the size of SYSVOL. Also, if you need to change a setting in the .adm file, it needs to be edited in each copy of .adm. One .adm file has support for only one language; if you need to use multiple languages, you need a copy of .adm for each language.
After Windows Server 2008, administrative templates were presented as two XML files. The file with the .admx extension is responsible for publishing registry settings and the file with the .adml extension is responsible for providing language-specific interface settings. This allows administrators to edit and manage policies in multiple languages. Unlike .adm files, if you need to edit the .admx file, it needs to be edited in one place only, and it will map the relevant .adml file to provide multi-language support if required.
The .adm file is part of the GPO, so it's always stored in the SYSVOL folder. However, by default, for ADMX/ADML, Group Policy holds the settings only for the policy, and when it needs editing, it will pull the ADMX and ADML files from the local workstation. It is possible to change this behavior and save these files in a central location. This provides easy access and better management for administrative templates.
We can move administrative templates to the SYSVOL folder by using the following steps:
- Log in to the domain controller as the Domain Admin or higher.
- Create a folder called
PolicyDefinitionsunder\rebeladmin.comSYSVOL ebeladmin.comPolicies. Therebeladmin.comdomain can be replaced by your own domain FQDN:mkdir \rebeladmin.comSYSVOL ebeladmin.comPolicies PolicyDefinitions - After that, copy the policy definition data into this new folder:
Copy-Item C:WindowsPolicyDefinitions*
\rebeladmin.comSYSVOL
ebeladmin.comPolicies
PolicyDefinitions -Recurse -Force
This will also move ADML files into \rebeladmin.comSYSVOL
ebeladmin.comPoliciesPolicyDefinitions with their language name. As an example, US English will be in
ebeladmin.comSYSVOL
ebeladmin.comPoliciesPolicyDefinitionsen-US
. The language to use in policy editing will be decided based on the language used in the workstation. The "PolicyDefinitions" folder in SYSVOL is also referred to as "Central Store."
Group Policy filtering
A Group Policy can map to sites, domains, and OUs. If a Group Policy is mapped to the OU, by default, it will apply to any object under it. But within an OU, domain, or site, there are lots of objects. Sometimes, we may have to target certain objects in the OU, domain, or site without changing the current Active Directory structure. Group Policy filtering capabilities allow us to further narrow down the Group Policy targets to security groups or individual objects.
There are a few different ways to perform filtering in Group Policy:
- Security filtering
- WMI filtering
Both of these methods have their own characteristics. It is up to engineers to choose the best method based on the filtering requirement.
Security filtering
Before you apply security filtering, the first thing to check is whether the Group Policy is mapped correctly to the site, domain, or OU. The security group or the objects you are going to target should be at the same level as where the Group Policy is mapped.
We can use the GPMC or PowerShell cmdlets to add security filtering to a GPO:
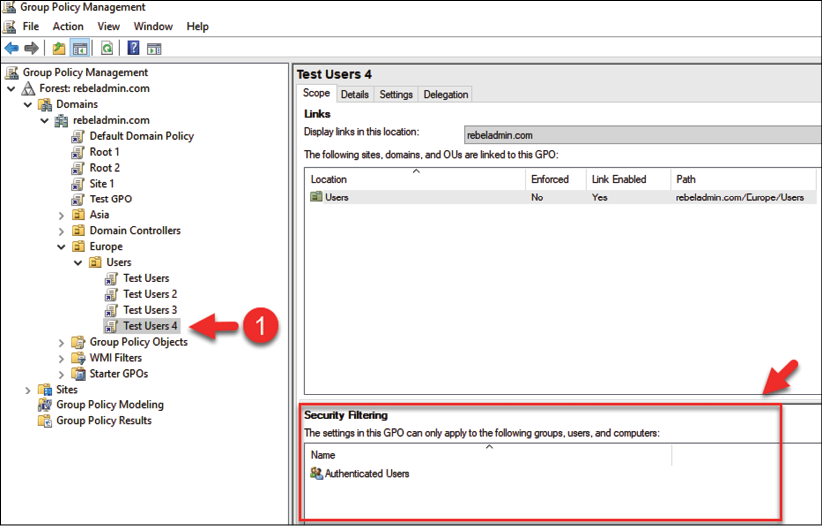
Figure 10.15: Security Filtering – default settings
As you can see, by default, every policy has an "Authenticated Users" group under the Security Filtering section. This means that, by default, the policy will apply to any authenticated user in that OU. When we add any group or object to security filtering, it also creates an entry under delegation. To apply a Group Policy to an object, it needs a minimum of the following permissions:
- Read
- Apply group policy
Any object added to the Security Filtering section will have both of these permissions set by default. In the same way, if an object is added directly to the delegation section of the policy and applies both permissions, that object will appear in the Security Filtering section.
Before we add custom objects to the Security Filtering section, we need to change the default behavior of the security filtering with authenticated users. Otherwise, it doesn't matter what security group or object we add—Group Policy settings will still be applied to any authenticated user. Before Microsoft released security patch MS16-072 in 2016, we could simply remove the Authenticated Users group and add the required objects to it.
With these new security patch changes, group policies will now run within the computer's security context. Earlier, group policies were executed within the user's security context. To accommodate these new security requirements, one of the following permissions must be available on the Group Policy's Delegation tab:
- Authenticated Users: Read
- Domain Computers: Read
To edit these changes:
- Go to the Group Policy.
- Then, go to the Delegation tab.
- Click on Advanced, select Authenticated Users, and then remove the Apply group policy permissions:

Figure 10.16: Group Policy delegation
- Click on the Scope tab.
- Add the required security group or objects to the Security Filtering section.
It will automatically add the relevant Read and Apply group policy permissions:

Figure 10.17: Group Policy Security Filtering with security groups
Here, although we are looking at how to apply group policies to a specific target, we are also allowed to explicitly apply policies to a large number of objects and then block groups or objects. As an example, let's assume we have an OU with a few hundred objects from different classes. From all of these, we have 10 computer objects that we do not need to apply to a given Group Policy. Which one is the easiest? Go and add every security group and object to Security Filtering, or allow the Group Policy for everyone and only block access for one security group.
Microsoft also allows you to use the second method in filtering. To do that, Group Policy should have default security filtering, which is Authenticated Users with the Read and Apply group policy permissions. Then, go to the Delegation tab and click on the Advanced option. In the next window, click on the Add button and select the group or object that you need to block access to:
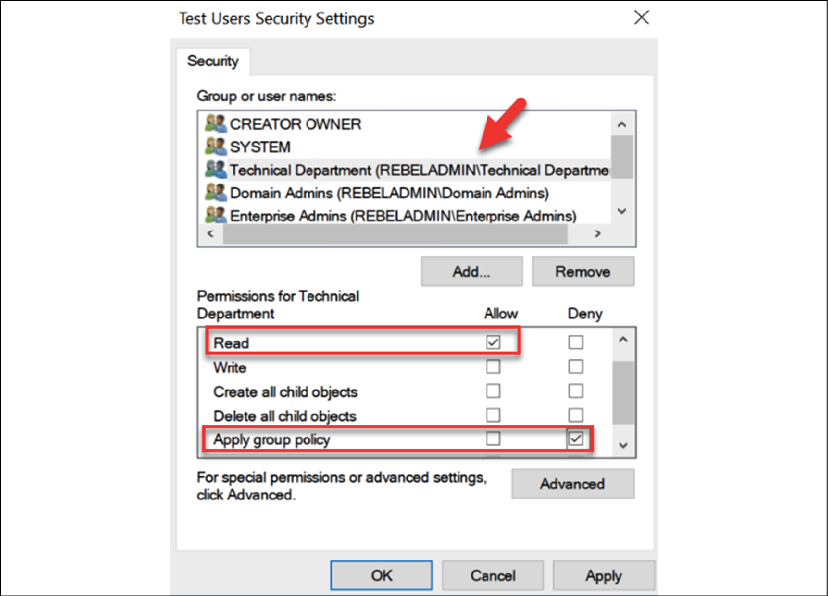
Figure 10.18: Group Policy permissions
Here, we are denying Apply group policy permissions to an object, while all other objects under that OU will still be able to read and apply the Group Policy.
WMI filtering
WMI filters are another method that we can use to filter the Group Policy target. This method can be used to filter computer objects only and is based on computer attribute values. As an example, WMI filters can be used to filter different OS versions, processor architecture (32 bit/64 bit), Windows Server roles, registry settings, event IDs, and more. WMI filters run against the WMI data of the computer and decide whether it should apply the policy. If it matches the WMI query, Group Policy will be processed. This method was first introduced with Windows Server 2003.
We can use GPMC to create/manage WMI filters. Before applying a filter to a GPO, first, we need to create it. A single WMI filter can be attached to many GPOs, but a GPO can only have a single WMI filter attached.
To create a WMI filter, open GPMC:
- Right-click on WMI Filters.
- Click on New...:

Figure 10.19: Creating WMI filters
This will open up a new window. There, we can define the WMI query:

Figure 10.20: WMI filter
By clicking on the Add button, we can define Namespace and WMI Query. As an example, I have created a WMI query to filter the Windows 10 OS that is running the 32-bit version:
select * from Win32_OperatingSystem WHERE Version like "10.%" AND ProductType="1" AND NOT OSArchitecture = "64-bit"
In the following commands, you can find a few examples of commonly used WMI queries:
- To filter a Windows 8 64-bit OS, use the following command:
select * from Win32_OperatingSystem WHERE Version like "6.2%" AND ProductType="1" AND OSArchitecture = "64-bit"
- To filter a Windows 8 32-bit OS, use the following command:
select * from Win32_OperatingSystem WHERE Version like "6.2%" AND ProductType="1" AND NOT OSArchitecture = "64-bit"
- To filter any Windows Server 64-bit OS, use the following command:
select * from Win32_OperatingSystem where (ProductType = "2") OR (ProductType = "3") AND OSArchitecture = "64-bit"
- To apply a policy to a selected day of the week, use the following command:
select DayOfWeek from Win32_LocalTime where DayOfWeek = 1In the preceding command, day 1 is Monday.
We can use Microsoft WMI Code Creator to create WMI code: https://bit.ly/3HR1sz1.
Once a WMI filter has been created, it needs to be attached to the GPO. To do that:
- Go to GPMC and select the required GPO.
- Make sure to select the Scope tab
- Then, in the WMI Filtering section, select the required WMI filter from the drop-down box:

Figure 10.21: Selecting the WMI Filter
Now it is time for testing. Our test query is to target the Windows 10 32-bit OS. If we try to run the query over a 64-bit OS, it should not apply. We can check and confirm the result by running gpresult /r:

Figure 10.22: gpresult /r output
The test was successful and the policy was blocked as we were running a Windows 10 64-bit OS.
Now we know how we can apply these different filtering options to target specific objects for a GPO. But in what order will all these apply? The following list explains the order of processing:
- LSDOU: The first filtering option will be based on the order in which policies are mapped in the domain structure. This has been covered in detail in an earlier section of this chapter.
- WMI filters: The next on the list is WMI filtering, which we looked at in this section. If the query/condition is true, the Group Policy will process.
- Security settings: The last on the list is security filtering. If the user or device is in filtering, the group policy will be processed.
Group Policy preferences
Group Policy preferences were introduced with Windows 2008 to publish administrative preference settings to Windows desktop OS and server OS. These preference settings can apply only to domain-join computers. Group Policy preferences provide granular-level targeting and provide easy management via enhanced GUI. Group Policy preferences have replaced many Group Policy settings that required registry edits or complex logon scripts. Group Policy preferences are capable of adding, updating, and removing settings such as the following:
- Drive maps
- Internet Explorer settings
- Registry entries
- Printer deployment
- Start menu items
- Power management
- Local users and groups
- File replication
- Managing VPN connections
- Schedule tasks
Group Policy settings and Group Policy preferences are processed in two different ways. Group Policy settings are applied during the boot-up process and the user logon process. After that, settings are refreshed every 90 minutes (default). Once the Group Policy setting is applied, its values cannot change easily. It is required to push new values via Group Policy. Otherwise, even if it's changed, it will be overwritten in the next policy refresh cycle. But Group Policy preferences will not be enforced. They allow users to alter them if required. This also allows you to configure applications that are not Group Policy-aware.
Group Policy preferences are also divided into computer configuration and user configuration. We can use GPMC to manage preference settings.
To access preference settings, select the Group Policy, right-click on Edit..., and expand the computer configuration or user configuration. There, we can see the Preferences container:

Figure 10.23: Drive Maps
As an example, we can see how we can configure Internet Explorer settings. This is one of the most commonly used preference settings in organizations, specifically to publish proxy settings. Before Internet Explorer 10, Internet Explorer settings were managed by using Internet Explorer Maintenance (IEM) in their Group Policy. If your organization has IE settings published using IEM, this will no longer apply to IE 10 and IE 11. Internet Explorer settings can also be applied via registry edits. Group Policy preferences made this easy as it can use a GUI similar to an actual IE settings window.
To configure the settings, open the Group Policy settings and then go to User Configuration | Preferences | Control Panel Settings | Internet Settings. Then, right-click and select New. There, we can select the settings based on the IE version. There is no option for IE 11, but any setting that applies to IE 10 will apply to IE 11 too:

Figure 10.24: Internet Explorer settings
Once you open the relevant configuration, you will see that it is very similar to the settings window we see in the application itself. Complex registry entries to configure IE settings are no longer required.
One thing you need to make sure of is that once you input the changes, press the F6 key to apply the changes. If they work fine, the red dotted line will change to a green dotted line. It doesn't matter what changes you make; if you do not activate them by pressing the F6 key, they will not publish:

Figure 10.25: Applying Internet Explorer settings
These preference settings will not prevent users from changing them. If it is necessary to prevent users from changing preference settings, then we need to use Group Policy settings for it.
Item-level targeting
In the previous section, we looked at how we can use WMI filters for granular-level Group Policy targets. Similarly, item-level targeting can be used to target Group Policy preference settings based on application settings and properties of users and computers.
We can use multiple targeting items in preference settings and make selections based on logical operators (such as AND, OR, IS, and IS NOT).
Item-level targeting in Group Policy preferences can be set up/managed using GPMC. To do that, open the Group Policy settings, go to the relevant preference settings, and then right-click and select Properties.
As per the previous example (IE 10 settings), the path should be User Configuration | Preferences | Internet Settings | Internet Explorer 10. Then, right-click and select Properties.
From the Properties window, perform the following steps:
- Select the Common tab.
- Tick Item-level targeting.
- Then, click on the Targeting... button:

Figure 10.26: Item-level targeting
In the next window, we can build granular-level targeting based on one item or multiple items with logical operators:

Figure 10.27: Targeting Editor
In the preceding example, I built a query based on three settings, which are the NetBIOS name, the OS, and the IP address. To apply the preference settings, all three statements should provide the true value as a result as I used the AND logical operator. If it's the OR logical operator, the result can have either true or false values.
In the preceding screenshot, the New Item menu contains items we can use for targeting. Add Collection allows you to create a parenthetical grouping. The Item Options menu is responsible for defining logical operators.
Loopback processing
Group Policy has two main configurations. One is targeted computer settings, and the other is targeted user configuration settings. When we apply user configuration to a user located in the OU, it doesn't matter which computer they log in to; their policy settings will follow them. As an example, let's assume that the user Peter is located under the Sales OU. The computer he usually logs in to is also located under the same OU. However, he occasionally logs in to the meeting room laptop that is located under the IT operations OU. The IT operations OU has its own computer configuration and user configuration policies assigned. But when Peter logs in to it, he still has the same settings he had in the Sales OU PC. This is the normal behavior of group policies. However, there are situations where it needs to apply user policy settings based on the computer the user logs in to.
Remote Desktop Services (RDS) and Citrix Xenapp/XenDesktop solutions are one of the greatest examples of this scenario. These solutions are mostly open for login from remote networks. Therefore, their security and operation requirements are different from a computer in LAN. If users who log in from different OUs are going to have different settings, it's hard to maintain the system with the required level of protection. Using loopback processing, we can force users to only have user policy settings that are linked to the OU where computers are located.
There are two modes of loopback processing:
- Replace mode: In replace mode, user settings attached to the user from the original OU will be replaced by the user settings attached to the destination OU. If loopback processing replaces the mode enabled, when Peter logs in to the meeting room laptop, he will get the same settings as the user in the
IT operationsOU. - Merge mode: If merge mode is enabled, in my example, Peter's sales user settings will apply when he logs in to the meeting room laptop first. Once the Group Policy settings are processed, it will also add the user settings from the
IT operationsOU. If there are any conflicting settings, theIT operationsOU user policy settings will prevail.
To enable loopback processing for Group Policy, go to the Group Policy edit mode and browse to Computer Configuration | Policies | Administrative Templates | System | Group Policy | Configure user Group Policy loopback processing mode:
- Click on the Enabled option.
- Then, select Merge or Replace mode:

Figure 10.28: Loopback policy settings
Group Policy best practices
In Sri Lanka, there is a common saying for explaining risky action: eating curd from a knife. Curd with honey is amazing, but if you have to eat it using a sharpened knife, there is a risk that you may cut your tongue. But it's still worth taking the risk (if you have ever tasted curd and honey before). Group policies are also like that; they can do so many useful things, but only if you use them correctly. In the Active Directory environment, Group Policy-related issues are the most painful and time-consuming troubleshooting tasks as there are so many things that can go wrong.
Here, I have listed a few tips that will be useful for designing group policies:
- Identify the best place to link the Group Policy: The Group Policy can be linked to the site, domain, or OU. Organizations have different Group Policy requirements that can also map with the aforementioned components. It is important to understand the best place in the hierarchy to publish each Group Policy setting. This will prevent repetition and Group Policy conflicts. As an example, password complexity settings are common for all of the objects under the domain, so the best place to link the policy for the password settings is the domain root, not the OU.
- Standardize settings: Today, infrastructure requirements are complex. Each business unit has its own operation and security requirements to address via group policies. When designing group policies, always try to summarize the changes as much as possible. If two business units have almost the same user settings requirements, discuss it with the relevant authorized people (such as the line manager and team leads) and try to use the standard settings. This will allow you to use one Group Policy and link it to two business units instead of creating two separate group policies. Always try to reduce the number of group policies that will be used in the system, since when the number of group policies increases, it also increases the time taken for the login process.
- Use meaningful names: This is a small suggestion, but I have seen people use Group Policy with names that don't explain anything. In such a scenario, when you are troubleshooting, it can take an awfully long time to find the relevant Group Policy. Make sure that you name the Group Policy to reflect the settings in there. It doesn't need to have details, but at least have something that you and your colleagues can understand.
- Avoid mixing user settings and computer settings: Group Policy has two main configuration sets that will apply to users and computers. Always try to avoid mixing these settings in the same Group Policy. Try to use separate group policies for computer settings and user settings. This will make it easy to organize policies.
After that, disable the unused configuration section in the Group Policy to avoid processing. This can be done by using GPMC. To do that, perform the following steps:
- Click on the relevant group policy.
- Go to the Details tab.
- Select the relevant mode under GPO Status:

Figure 10.29: Changing the GPO status
- Use Group Policy enforcing and block inheritance appropriately: These features are a good way to manage the default Group Policy inheritance, but use them carefully as they can prevent users/systems from applying critical policy settings from the top of the hierarchy. In the same way, by enforcing policies, you may enforce settings on users and computers that should not be targets. Therefore, always measure the impact before using enforce or blocking inheritance features.
- Never edit default policies: There are two default group policies: Default Domain Policy and Default Domain Controllers Policy. It is highly recommended that you do not use these to publish the Group Policy settings. These can be used as the baseline when you design the group policies, and they allow you to revert to the original settings with minimum effect. These can also be used as a reference to troubleshoot inheritance issues and replication issues.
- Be careful when using loopback processing: Issues related to loopback processing are due to a lack of knowledge, especially when they involve replace and merge modes. In this chapter, we covered both of these modes. If you are enabling loopback processing, always use a separate Group Policy and name it correctly so that everyone understands it when it comes to troubleshooting. My recommendation is that you use it in a situation where you can use replace mode. Merge mode can create lots of hassles with combined group policies plus conflicted settings. Loopback settings are also recommended to use only with Virtual Desktop Infrastructure (VDI) solutions such as Citrix and RDS, as they help to maintain consistency.
- Win or lose: Earlier in this chapter, we looked at which policy settings will win when there is a settings conflict. But in theory, there should not be any conflicts at all if the design is done correctly. Therefore, in design, always avoid repeating values in a hierarchical structure. If different values are used for the same setting, use filtering options and block inheritance to prevent the policy conflicts.
- Housekeeping: Last but not least, it is important that you review the group policies periodically and remove the policies that have not been used. Also, remove the legacy policy settings if they have been replaced by new policies or methods. Audit and make sure that the hierarchical order is maintained and objects are getting the expected group policies applied to them.
Useful group policies
So far in this chapter, we have talked about the benefits of group policies and how to use group policies appropriately. As the final section of this chapter, I choose to talk about some useful group polices that can be used in environments. It doesn't mean that every environment should have similar policies, but we can use this as an example and grow from there:
- Policy Name: Password Policy.
Policy Location: Computer Configuration | Policies | Windows Settings | Security Settings | Account Policies | Password Policy.
Description: This is one of the most commonly used group policies in an Active Directory environment. Passwords are no longer the best method for securing an account, but passwords are still widely used as the primary authentication method. When a system asks to set a password, as humans, we tend to use the easiest password we can remember. These passwords can also be easy for intruders to break. Using password policy, we can enforce complexity and other different standards on the user passwords. Under this policy, we have seven settings.
Enforce Password History: This setting defines the number of unique passwords that need to be used before an old password can be reused. The value for this setting can be between 0 and 24.
Maximum Password Age: This setting will define the validity period of a password before the system forces the user to change it. We can define any value between 0 and 999 here, but the default value is 42 days. It is recommended to use a value between 30 and 90.
Minimum Password Age: This policy setting defines the number of days that must go by before a user can change their computer password. The default value for this is 1 day. If you are enabling the enforce password history setting, this value must be more than 0. Also, the value should be below the maximum password age value.
Minimum Password Length: This setting defines the minimum number of characters a password should have. This can be any number between 0 and 14. It is recommended to use at least 8 characters for improved security.
Minimum Password Length Audit: This setting can have a value between 1 and 128. When the value of this setting is greater than the Minimum Password Length value and the new user account password length is less than the value of this setting, an audit event will be issued. This is normally used when engineers want to evaluate the impact of using minimum password length settings.
Password must meet complexity requirements: This policy setting determines the complexity of the new password. If this is enabled, it should meet the following minimum requirements:
- The password cannot contain the username or part of the user's full name that exceeds two consecutive characters.
- The password must be at least six characters (this will change if the minimum password length policy setting is specified).
- The password must have at least three of the following:
- English uppercase characters
- English lowercase characters
- Base 10 digits (0-9)
- Non-alphanumeric characters
Store passwords using reversible encryption: This policy determines whether passwords need to be stored with reversible encryption. Some applications need to know the user's password for authentication. This policy should not be enabled unless it is an application requirement to encrypt the password.
In the following table, I have listed a sample policy that we can use:
Setting
Value
Enforce Password History
24
Maximum Password Age
30
Minimum Password Age
1
Minimum Password Length
8
Password must meet complexity requirements
Enabled
- Policy Name: Removable Storage Access.
Policy Location: Computer Configuration | Policies | Administrative Templates | System | Removeable Storage Access.
Description: USB devices can be a source of malware and viruses. On corporate networks, they can also be used to steal sensitive data. Therefore, it is common security practice to disable USB access on corporate computers. There are a few different methods we can use to do this. We can use the registry entry to block it or we can use third-party software to block USB access. We also can use group policy to do this.
In this policy, we have the following settings that can be used to block USB access:
All Removable Storage classes: Deny all access: When you enable the policy setting, the system will block USB access to the device. If we disable the policy or set it to the Not configured value, USB access will be allowed and the system will have read/write permissions to the USB device.
- Policy Name: Prohibit access to Control Panel and PC settings.
Policy Location: User Configuration | Policies | Administrative Templates | Control Panel.
Description: We use a control panel on the PC to manage the hardware and OS settings. In a corporate environment, if users change the settings of the PC as they wish, it is hard to maintain standards, especially if the device is used by multiple users. As an example, if users are connecting to a WVD (Windows Virtual Desktop) or Citrix solution, we need to maintain configuration standards for every user. To do so, it's best to disable access to the control panel settings.
We can control access to control panel and PC settings by using the following policy setting:
Prohibit access to Control Panel and PC settings: To block access to control panel and PC settings, we need to enable this policy setting.
Once this policy setting is enabled, control panel settings will be removed from the Start screen and File Explorer. Also, PC settings will be removed from Start screen, Settings charm, Account picture, and Search result.
- Policy Name: Folder Redirection.
Policy Location: User Configuration | Policies | Windows Settings | Folder Redirection.
Description: In a PC, user settings and user files are, by default, saved inside the Users folder on the C: drive. This works well with standalone computers, but if users are logging in to different systems, it will be a nightmare to maintain settings and access to user files. Also, if a solution such as WVD or Citrix is in place, large numbers of users will appear on each session host server. If every user is saving files in their profile, it will be difficult to manage the storage requirements of session host servers. To address these sorts of issues, we have two options. We can use roaming profiles for users and redirect user profile data to a network location or else we can use Folder Redirection to redirect the path of known folder to a network location or specific folder on a local computer. We can also use both of these solutions together. By using both settings together, we can reduce the size of the roaming profile. To enable folder redirection, we have to use policy settings located under User Configuration | Policies | Windows Settings | Folder Redirection.
We can enable folder redirection for the following list of folders.
- AppData/Roaming
- Contacts
- Desktop
- Documents
- Downloads
- Favorites
- Links
- Music
- Pictures
- Saved Games
- Searches
- Start Menu
- Videos
Each folder in the preceding list has the following settings when it comes to the target configuration.
Basic—Redirect everyone's folder to the same location: By using this policy setting, we can force all redirected folders to save in the same location. These folders can be saved in a network location or a specific path in the hard drive.
Advanced—Specify locations for various user groups: This policy setting helps to redirect folders to different locations based on security group memberships. As an example, we can say that Sales Group users should use the
\fileserversalesfoldersnetwork share as the target, and Tech Group should use\fileserver echfoldersas the target.Create a folder for each user under the root path: When choosing this setting for the target folder location, each user will have their own folder under the root folder.
Redirect to the following location: By using this policy setting, we can force the system to use an explicit path for folder redirection. This way, users will share the same path for the redirection.
Redirect to the local user profile location: This policy setting can be used to force the system to save data under the C:Users folder.
It is best to redirect folders to the network share and use Create a folder for each user under the root path to create a unique folder for each user. This way, it will be easy to manage as well as easy to troubleshoot if something goes wrong.
- Policy Name: Turn off Windows Installer.
Policy Location: Computer Configuration | Administrative Templates | Windows Components | Windows Installer.
Description: On a PC, Windows Installer is responsible for installing, updating, and uninstalling applications. Users do not always need admin rights to install software; some applications can be installed in the current user context. In a corporate environment, if users have the ability to install applications on a PC as they wish, it will be difficult for engineers to maintain. Also, this can create security risks. Therefore, it is recommended to turn off the windows installer and this will prevent users from installing
.msipackages. However, this will not prevent the installation of applications using other methods.To turn off the windows installer, we can use the following setting:
Turn off Windows Installer: To enable this policy setting, click on Enable in the settings window and then select Always under Disable windows installer option.
- Policy Name: Do not store the LAN Manager hash value at the next password change.
Policy Location: Computer Configuration | Windows Settings | Security Settings | Local Policies | Security Options.
Description: Windows doesn't keep user passwords in cleartext format. It uses hash values instead. When the user changes their password, and provided it is less than 15 characters, the system generates an LM hash as well as an NT hash. Then, this hash value will be saved in the local SAM database or Active Directory.
Note: If the password is longer than 15 characters, the LM hash will be set to a fixed value and it is equivalent to a null password. Therefore, any attempts to break the hash will be in vain.
An LM hash is weak compared to an NT hash. As a security best practice, it is recommended to not save the LM hash in the local SAM database. We can do this using GPO. For that, we need to use the following policy setting:
Network security: Do not store the LAN Manager hash value at the next password change: To enable this policy setting, click on Enable in the policy settings window.
More information about hash values and Active Directory authentication is available in Chapter 15, Active Directory Rights Management Services.
- Policy Name: Rename administrator account.
Policy Location: Computer Configuration | Windows Settings | Security Settings | Local Policies | Security Options.
Description: In the Active Directory environment, we should not only consider protecting Active Directory accounts, but we also need to consider the protection of local administrator accounts. A compromised local administrator account will allow attackers to later move within the network and gain access to more privileged Active Directory accounts. In computers, we have a default administrator account called Administrator. If we can change the name of this account, it will be slightly difficult for attackers to guess the user name of the local account. We can change the default name of the account by using Group Policy.
Accounts: Rename administrator account: By using this policy setting, we can rename the administrator account. To enable this policy setting, click on Define this policy setting and then specify the new name for the administrator account. As a best practice, do not use a name that can be easily guessed, such as Admin or LocalAdmin.
In this section, we looked at some useful group policies. However, there are a lot more policies out there that can be used based on your requirements. When you test a new policy, make sure to use at least a separate OU with a few objects before introducing it to production. This will reduce the risk.
Summary
Group policies are one of the core values of the AD environment. As long as they are designed and maintained properly, they can be used to manage computer and user settings effectively. In this chapter, we learned about Group Policy components and their capabilities. This was followed by explaining features that can be used to design and maintain a healthy Group Policy structure. We also learned about Group Policy designing best practices. In the last section, we went through some useful group policies.
In the next chapter, we are moving on to the third part of this book, which will focus on Active Directory server roles. In this part, you will learn about the advanced features of AD DS, including schemas, replication, the read-only domain controller (RODC), and Active Directory recovery.