
14
Active Directory Federation Services
The COVID-19 pandemic has accelerated the digital transformation of businesses. Most businesses no longer operate in a closed or isolated mode. With digital transformation, they are collaborating more with other companies, partners, and consumers to provide better products or services. This also creates new challenges for IT to accommodate new collaboration requirements. As an example, a business might need to share one of its applications with another external company. Or, a business might want to share resources (such as access to certain servers or data shares) with a partner company. In such situations, the question is how to manage user accounts and access permissions in a secure, reliable, and scalable way.
In an Active Directory (AD) environment, most applications or services can be Active Directory-integrated. This means we can use Active Directory accounts to authenticate into applications or services. But what if we need to access applications or services hosted in a different environment where we do not have control over access management? In such situations, we usually end up having different user accounts and passwords to log in to different systems. This does not just affect end users. Let's look at the problem from the service provider's perspective.
Imagine that we have an application developed in-house, and we want to sell it as a service. External users need to access it in order to authenticate, and we have to create a user name and password for every one of them. Setting up an account is not the only thing we need to consider; when we create an account, it becomes a part of our identity infrastructure. We need to make sure it's secured and only has access to that particular application.
All of a sudden, new challenges arise for identity management, and if this isn't handled appropriately, it can make the whole system vulnerable. Active Directory Federation Services (AD FS) allows businesses to manage their own identity infrastructures and use claims-based authentication to access applications, services, or resources. With this method, users do not need to use a separate login to access systems, and the resource owners do not need to manage identities for external users. In this chapter, we are going to learn about the following:
- How does AD FS work?
- AD FS components and how to use them in the AD FS setup
- AD FS deployment and management
- Multi-Factor Authentication (MFA) in action
- How to enable federation with Azure AD
- Azure AD federation with AD FS
Before we look into AD FS role deployment and configuration, it is important to understand how AD FS works. This will help us to understand the full potential of AD FS role deployment.
How does AD FS work?
Rebeladmin Inc. is an IT service provider. There are many customers who use different IT and cloud-based services from the company. Recently, the company introduced a new web-based control panel where customers can log in and manage their resources. The same application is also used by internal staff to manage infrastructure services. Rebeladmin Inc. uses Active Directory Domain Services (AD DS) to manage identities. When a member of internal IT staff logs in to the portal, it doesn't ask for any login details. This is because the web application uses Integrated Windows Authentication (IWA) to allow access.
This process is also called NTLM authentication or domain authentication. It doesn't prompt for the login information initially, or transfer hashed data about the currently logged-in user to the web server to check whether it's allowed. This web server is domain joined and the application itself is Active Directory-integrated. Now, users of the Depache solution also like to get access to the same portal to manage their workloads.
There are two ways to facilitate this:
- Using a user account in Rebeladmin Inc.'s Active Directory: When external users try to access the web portal, the initial IWF will fail as the application doesn't understand the external users' accounts.
Then, it will prompt them for their login details. If a user has an account in Rebeladmin Inc.'s Active Directory instance, it can be used to authenticate into the portal. However, this method opens up a few security concerns. When users have an account in Active Directory, by default, Active Directory allows users to access any resources that have everyone or authenticated users permissions assigned. In the internal network, it is possible to force users to follow policies and best practices to protect their identities. However, it is not possible to apply the same standards to an external party. So, these accounts have a high likelihood of getting compromised. As an example, if an internal user resigns, then normally, their Active Directory login will be reset and disabled. But if it's an account that is shared with external users, then even if the relevant user resigns, they may still have access to the portal (until it is informed). Some vendors use Active Directory Lightweight Directory Services (AD LDS) for each customer to minimize the security impact. But this still adds management overhead to keep different instances running.
- Active Directory trust between two infrastructures: When there is Active Directory trust, resource access can be allowed from remote infrastructures. In order to have successful trust, there should be a connection between two infrastructures, which is based on TCP/UDP ports such as
389(Lightweight Directory Access Protocol (LDAP)) and53(Domain Name System (DNS)). These ports need to be allowed via firewalls in both infrastructures. This method adds additional security risks for both infrastructures.
As we can see, even though both options can allow access from the external infrastructures, both struggle with security and management-related challenges.
Federation trust is the answer to all these concerns. In simple English, a federation service is a web service that authenticates users from the Identity Provider (IdP) and provides access to claim-based applications from the Service Provider (SP). There are many federation service providers and the Microsoft federation service is called Active Directory Federation Services (AD FS):

Figure 14.1: Federation trust with a hosted app
In the preceding example, Rebeladmin Inc. is using AD DS to manage the identities. Its users are using a hosted web application (MyHostedApp1) from a cloud service provider. Rebeladmin Inc. uses AD FS to create federation trust between Rebeladmin Inc. and the SP. This allows the Rebeladmin Inc. users to launch MyHostedApp1 using their own Windows credentials. In this setup, the federation service is hosted in the Rebeladmin Inc. infrastructure and it becomes the IdP. From AD FS' point of view, it is also called the Claims Provider (CP). The users are authenticated by the CP. The vendors who host the application also have their own identity infrastructure. The application vendor becomes the SP, also known as the Relying Party (RP), in federation trust, and this depends on the claims provided by the federation service to allow/deny access to the application. Also, this setup only needs TCP port 443 opened.
Even if the connection is called trust, it cannot be used to replace Active Directory domains or forest trusts. If Active Directory trust is in place, then administrators can manage access to resources from remote users in the exact same way it was done for internal users. Users can be allowed to access folders and files based on New Technology File System (NTFS) permissions. Users can be given permission to log in to devices. Any application that works with internal users can be set to allow access for remote users too. But in a federated environment, access can only be allowed to claims-aware applications. A claim is simply an attribute and a relative value. As an example, a claim can have a username attribute and its value, dfrancis. The federation service will request access from the SP based on the claims. If the SP's application doesn't understand claims, it cannot decide whether to allow or deny access:

Figure 14.2: Federation trust in action
Let's revisit the previous example with a detailed explanation,
- In the first step, the Rebeladmin Inc. user logs in to a computer in the Rebeladmin Inc. infrastructure. This is a domain-joined device. The user uses their domain credentials to log in to the device.
- Once the user is logged into the device successfully, they launch their web browser and type the URL for MyHostedApp1. This application is hosted in the remote infrastructure.
- As soon as the application receives the access request from the Rebeladmin Inc. user, it first checks the data passing through the browser (IWF). Then, it realizes it is not from the internal infrastructure, but it's an account from the identity infrastructure, which the SP has a federated relationship with. If it's from a federated environment, the user access rights need to be decided based on claims. Therefore, the SP sends a redirect response to redirect users to the Rebeladmin Inc. federation service web interface.
- Then, the user is automatically redirected to the Rebeladmin Inc. federation service web interface. In the web interface, the user has to type in their login details.
- Once the user provides their credentials, they will be validated with the Rebeladmin Inc. AD DS and it will retrieve their access rights. Then, the federation service will create a security token that includes user claims, such as name, group memberships, User Principal Name (UPN), and email address. This security token will be signed by the issuer's digital certificate. At the end of the process, federation services send responses back to the user with a generated security token, plus a
redirectcommand to redirect the user's browser session back to MyHostedApp1. - The user browser session is redirected to the hosted application, and this time, it is the session presented with the security token it received from the federation service. Then, the web server's claims-aware agent decrypts the security token and looks into the claims it provided. Based on the claims, it will decide whether the user is allowed to access the application or not. If the claims are accepted, the user will be able to see the initial page of the application successfully.
In the preceding scenario, the federation trust is made directly with the application. But in some scenarios, the SP will also have the federation service environment on its end. This is mainly when the service provider has multiple clients with federation trusts. In such a situation, the following will happen:
- When the application finds out that the user needs to log in via the federation, the user will initially be redirected to the SP's federation service.
- Then, the SP's federation service will redirect the user to Rebeladmin's federation service.
- Once the user receives the security token, the security token will be presented to the SP's federation service. It will decrypt the token and retrieve the claims inside it. Then, it will map the claims to the SP's claims and filter them to match with application claim requirements.
- Based on the filtered claims, the SP's federation service will create a new security token, which will be signed using the SP's federation service digital certificate. This new security token is the one that will be forwarded to the application server.
A few times in the preceding example, I have mentioned the term "claims." But what exactly is a claim, and how is one generated?
What is a claim?
A claim is simply a statement about a user that is used for the authorization purposes of claim-aware applications. Each claim contains a value about a user such as their UPN, email address, and Common Name (CN).
AD FS supports many different claim types. Claim types are used to show what sort of value will be included in the claim. The following table contains the most commonly used claim types:
|
Claim type |
Description |
|
UPN |
UPN of the user |
|
|
RFC 5322-type email address |
|
Given name |
Given name of the user |
|
CN |
CN value of the user account |
|
Name |
Name of the user |
|
Surname |
Surname of the user |
|
Windows account name |
Domain account in domain/user format |
|
Group |
Group the user belongs to |
|
Role |
Role of the user |
|
AD FS 1.x UPN |
UPN of the user when interacting with AD FS 1.x |
|
AD FS 1.x email address |
RFC 5322-type email address of the user when interacting with AD FS 1.x |
Claims retrieve values from the attribute store. The attribute store is a directory or database that contains user accounts and associated attributes.
Active Directory can also play the role of an attribute store. As an example, in an Active Directory environment, if the claim type is UPN, the claim will retrieve its value through users' attributes.
AD FS also supports many industry standards, which are used to build third-party claim-based solutions. It guarantees the interoperability of many cloud-based or hosted applications in the market today.
Security Assertion Markup Language (SAML)
In the federated environment, the IdP and the SP need to exchange authentication and authorization data. SAML is an XML-based open standard that is used to pass authorization credentials from IdP to SP. This standard was first introduced in 2001 by the OASIS Security Services Technical Committee and the latest version available is 2.0. This is a commonly used standard by many federation service providers and application developers to provide an SSO experience. The claim requesting and claim processing process is exactly the same as the example used in the previous section, with the only difference being the format of the token request and response. SAML uses a signed XML file as the token. In SAML terminology, the security tokens generated at the IdP end are called asserts, and the decryption and processing of asserts at the SP end is called assertion.
WS-Trust
This is part of many WS* standards, including WS-Security, WS-Federation, and the WS-Security policy. WS stands for Web Services. WS-Trust defines the protocols used in requesting and issuing security tokens by WS-Security. The Security Token Service (STS) is a big feature of WS-Trust, and it can be used to convert locally issued security tokens into other security token formats that can be processed by the application. It can also convert incoming security tokens into supported token formats.
WS-Federation
WS-Federation is also a part of WS* standards. While SAML only works with SAML tokens, WS-Federation supports the use of many token types, including SAML. Basically, WS-Federation provides a mechanism to simplify the communication between an IdP and an SP. The fundamental goal of WS-Federation is to simplify the development of federated services through the cross-realm communication and management of federation services by reusing the WS-Trust STS model and protocol. More information about WS-Federation can be found at https://ibm.co/3CGyRbO.
AD FS components
Before we install the AD FS role, there are a few related components that we need to be aware of. Before Windows Server 2012 R2, there were four AD FS role services: the federation service, the federation service proxy, the claim-aware agent, and the Windows token-based agent (which supported AD FS 1.x interoperability). These are no longer available as role services, and when we go to install AD FS, it will only have the federation service role.
Federation service
This is the main role service for AD FS, and it can work at the IdP end as well as the SP end. In order to install the AD FS role service, the system needs to be a member server of an Active Directory domain. Depending on the workload, multiple federation servers can be installed under the same domain, and this is called an AD FS farm. The federation server is responsible for generating security tokens and signing them with its signing certificate. Let's look into the AD FS versions that have been released so far.
AD FS 1.0
AD FS was first introduced with Windows Server 2003 R2. This version of AD FS is no longer available as Windows Server 2003 is end of life. This provided basic SSO capabilities. It had less compatibility with other federation service providers in the market.
AD FS 1.1
This was introduced with Windows 2008, and it continued with Windows Server 2008 R2. It wasn't changed much from version 1.0. It also suffered from providing limited support to other federation services. It only supported the WS-Federation passive requester profile and SAML 1.0.
AD FS 2.0
This version was released after Windows Server 2008 R2 but as a separate installation. All other versions came as part of the OS. Before version 2.0, it was supported to use AD LDS as the authentication store. This meant users could authenticate with AD LDS, similar to Active Directory. With version 2.0, it no longer supports LDS as the account store. It can work as the attribute store, which can store AD FS data but cannot be used for authentication. AD FS 2.0 also supports a parent-child domain environment, so users in a child domain can use AD FS in another domain for the federation.
It reduces the management overhead. It also improved support for federation trusts with the use of industry-standard metadata formats. It allows organizations to create trust between federation partners quickly. Systems that run with version 1.x can have an in-place upgrade to 2.0.
AD FS 2.1
This version comes with Windows Server 2012 and no major changes from version 2.0 were made.
AD FS 3.0
This version was introduced with Windows Server 2012 R2. This removed the AD FS Proxy service from AD FS 2.0 and replaced it with Web Application Proxy (WAP). It operates from the Demilitarized Zone (DMZ) and doesn't need to be domain joined. The idea of it is to protect the identity infrastructure with a bogus token. It also removed the AD FS 1.x web agents, which provided connections with other systems.
Workspace Join is one of the greatest features that came with AD FS 3.0. It allows us to register mobile devices (even non-Windows) with a company or organization to access applications and data with SSO. AD FS 3.0 does not require Internet Information Services (IIS) anymore and is installed as a separate role. It also supports the group Managed Service Account (gMSA). This is a new type of service account that supports automatic password changes. The creation and management of this account are explained in Chapter 8, Managing Users, Groups, and Devices. This version also supports OAuth 2.0 standard access tokens. They are JSON format tokens and are easy to use with modern applications.
AD FS 4.0
AD FS 4.0 is the latest version available with Windows Server 2016/2019/2022. This is what we will use throughout this chapter. This version is supported by modern hybrid cloud requirements. If you are already using Azure AD, this version allows you to use Microsoft Azure MFA without installing and configuring additional components. With previous AD FS versions, it needed an additional server to configure. With the new version, AD FS has a built-in Azure MFA adapter. Similar to AD FS 3.0, the new version also supports mobile device registration to maintain an organization's compliance requirements. If it's in an Azure AD environment, then by using AD FS 4.0, you can apply conditional access policies to on-prem components.
This version also supports modern authentication standards, such as OpenID Connect and OAuth 2.0.
It provides an enhanced user experience with Windows 10 and the latest Android and iOS apps. AD FS 4.0 also supports authentication with LDAP v3.0-compliant directories. It allows people to use AD FS more and more, even when they are not running AD DS. Windows 10 introduced the new password-less login methods Windows Hello and Microsoft Passport. These are based on PIN and biometric input, such as fingerprint or facial recognition. AD FS 4.0 supports these new sign-in methods.
Migration from AD FS 2012 R2 has been simplified as well. Before, if we needed to migrate from one version to another, then we needed to build a farm parallel to a production AD FS farm, and then migrate the configuration over. But, with the new version, we can introduce the AD FS 2022 server to the existing Windows Server 2012 R2 farm, and it will start to work at the Windows Server 2012 R2 operation level. Once all the Windows Server 2012 R2 servers are removed from the farm, the operation level can upgrade to Windows Server 2022.
What is new in AD FS 2022?
As far as we know, AD DS 2022 doesn't have any significant changes from AD DS 2019. There is no new forest or domain functional level either. The same applies to AD FS 2022 as well. Below I have listed some enhancement AD FS 2019 had. This also applies to AD FS 2022:
- Primary authentication via third-party authentication providers: When authenticating via AD FS, so far, we have only been able to use built-in authentication methods such as form authentication, certificate authentication, or Azure MFA as primary authentication. Then, as secondary authentication, we were able to use any other external authentication methods. With AD FS 2022, we can now use any third-party authentication provider's login method as primary authentication (the provider needs to register with the AD FS farm first).
- Password-less authentication: AD FS 2022 is fully supported to use password-less authentication as a primary authentication method. With AD FS 2016, it required additional components and additional configurations in order to do so.
- Risk Assessment Model: Engineers can now build their own plugins to block or assign risk scores to authentication requests during the pre-authentication stage by using the AD FS 2022 Risk Assessment Model. More information about this module is available at https://bit.ly/3l2Qe0m.
- Extranet Smart Lockout (ESL) is built into AD FS 2022: ESL protects users' accounts from extranet account lockout when they log in from familiar locations. From a familiar location, if we detect multiple login failures for a particular user account, that means it could be an error rather than malicious activity. By using ESL, we can define different lockout thresholds for familiar and unfamiliar locations. AD FS 2022 also allows us to use audit mode to learn about familiar locations while the environment is still protected by classic extranet lockout functionality. With AD FS 2016, you do not have protection if you are using audit mode.
More information about other features and bug fixes is available at https://bit.ly/3FLLy6T.
The Web Application Proxy
We use proxy servers to access the internet because they perform the required communication with the internet on behalf of the internal users and protect them from external threats. The Web Application Proxy allows us to publish web applications (including AD FS) to the public without exposing the backend of them. This role is no longer a part of AD FS, and it comes as a part of the remote access role. AD FS does not require the Web Application Proxy to work, but it is recommended to use it if users log in from external networks. It also provides basic Denial-of-Service (DoS) protection by throttling and quieting connections.
The communications between proxy servers and web clients are encrypted (based on SSL). The Web Application Proxy is not supported for installing on the same AD FS server. It doesn't have built-in load balancing capabilities. If load balancing is required, it can be done using any supported software-/hardware-based load balancer.
AD FS configuration database
AD FS configuration settings need to be saved in a database. AD FS supports two types of databases. The simplest method is to use the Windows Internal Database (WID), which comes with the AD FS installation. This is not a standalone database installation, and it is capable of providing high availability by copying databases to other servers in the AD FS farm. When we go for the AD FS configuration, it gives two deployment options:
- Create the first federation server in a federation server farm
- Add the federation server to a federation server farm
If WID is used with the first option, then WID will be deployed with scalability, which allows servers to be added to the farm later and replicate WID. The first server in the farm will be the primary server and it will host the read/write copy of the database.
When we use the second option, the newly added server will replicate the copy of WID from the primary server, and it will be maintained as a read-only copy. Any configuration change should be replicated from the primary server. In the event of a primary server failure, other servers in the farm continue to process requests as normal, but no configuration changes will be possible until the primary server is brought online. If it's not possible to bring it online, then a secondary server can be forcefully nominated as a primary server.
AD FS can store configuration data in Microsoft SQL. This enhances the performance of the AD FS farm, especially if it deals with larger processing as it can read and write data faster. Unlike WID, we can add high availability to the SQL instance by using the SQL cluster method or the Always On method. If AD FS uses MS SQL, then every server in the farm has read/write access to the database. It also enables support for features such as SAML artifact resolution and SAML/WS-Federation token replay detection. Both features require a configuration that is stored in the shared SQL database instead of WID.
AD FS deployment topologies
There are a few different deployment models we can use for AD FS deployment:
- A single federation server
- A single federation server and single Web Application Proxy server
- Multiple federation servers and multiple Web Application Proxy servers with SQL Server
In this section, we are going to look into these different topologies and their characteristics.
A single federation server
This is the simplest AD FS deployment model available. It contains a single AD FS server. It doesn't have high availability (unless at the host level).
This is ideal for a lab environment or staging environment:

Figure 14.3: Single federation server deployment
In the preceding example, we have a web application, myapp.rebeladmin.com, that needs to allow access via AD FS. We have one AD FS server in the setup with WID. It is behind the corporate firewall and there are Network Address Translation (NAT) and access rules in place to do the following:
- Map a public IP address to
myapp.rebeladmin.comso users can make initial requests from external networks. It is recommended to use TCP443. - Map a public IP address to
secure.rebeladmin.com, map it to the IP address ofadfs1.rebeladmin.com, and open TCP443from the external networks to allow access.
The application should also have the relevant external and internal DNS records set up. If the request is coming from an external network, it should resolve to a public IP address and if the request is coming from an internal network, DNS should resolve to the internal IP addresses. This is also called a split-brain DNS setup.
My recommendation for this setup is to configure the AD FS server with a Windows Network Load Balancer (NLB). It is only going to cost you one additional IP address for the NLB cluster IP, but when we need to expand the AD FS farm, all we need to do is configure another server and add it to the NLB. The cluster IP will map to the public IP, and it will be used with an external DNS entry for AD FS.
In this setup, the Web Application Proxy hasn't been used:
|
Advantages |
Disadvantages |
|
Low cost to implement. Only one server required for AD FS and no SQL licenses have been used as it uses WID. |
No redundancy. Single point of failure. |
|
Easy to manage. |
Poor performance as there is no way to share workloads. |
|
No additional service role integration and therefore fewer dependencies. |
Less secure as it is not possible to relay the requests to the AD FS server, and this method uses a direct connection point to process the requests (no Web Application Proxy). |
|
Still can configure to support future expansions and can add servers to the AD FS farm whenever required. |
N/A. |
A single federation server and single Web Application Proxy server
This is an ideal setup to start with. This removes the security concerns we had with the single federation server. The Web Application Proxy server will be the initial connection point from the external network and it will relay requests into and out of the internal AD FS server.
This is still not going to provide high availability as each role holder only has one instance:
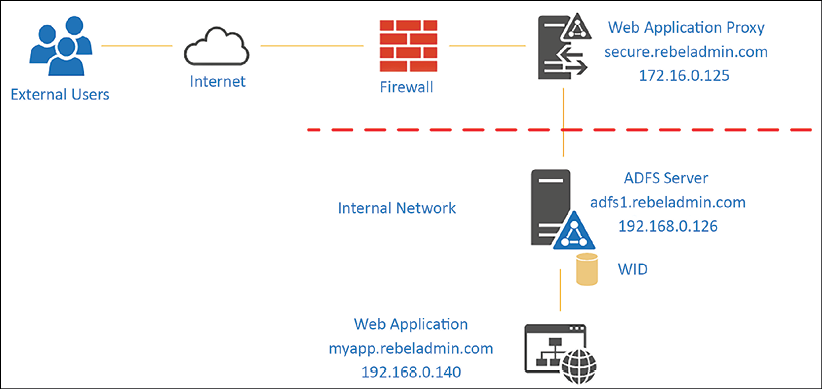
Figure 14.4: Single federation server and WAP deployment
In this setup, we can separate the network functionality between perimeter and corporate networks. The preceding setup needs NAT and access rules to accomplish the following communication requirements:
- Map a public IP address to
myapp.rebeladmin.comso users can make initial requests from external networks. It is recommended to use TCP port443. - Map a public IP address to
secure.rebeladmin.com, map it to the IP address of the Web Application Proxy server, and open TCP port443to allow access. - Allow access from the Web Application Proxy server to the AD FS server on TCP port
443.
In the preceding example, once the external user accesses the application's URL, it will redirect to the Web Application Proxy server. This doesn't need to be domain joined as it operates from the perimeter network. Proxy servers should be able to resolve the DNS name for the AD FS servers from the perimeter network. This can be done by using a DNS server or a host file.
Similar to the previous model, this can be implemented with NLB to allow future expansions with minimum impact. We need two NLB clusters for that. The first NLB cluster is for the Web Application Proxy and the second NLB cluster is for AD FS servers. The only changes are in the DNS records and firewall rules. Instead of pointing DNS and firewall rules to the server IP addresses, we need to use NLB cluster IP addresses:
|
Advantages |
Disadvantages |
|
Improved security as the Web Application Proxy acts as an intermediate layer between external users and corporate networks. |
No redundancy and a single point of failure. |
|
Basic DoS protection by throttling and queuing connections. |
The implementation cost is high compared to the single server model as additional servers need to be added. |
|
This setup supports future expansions. It can easily add servers to the AD FS farm and the Web Application Proxy group when required. |
Adding more roles also means more dependencies. Both roles need to function correctly to complete the process. |
Both of the above models use the WID method for the AD FS database. But when it comes to high availability, we need to consider using the MS SQL method as multiple servers can write to the configuration database.
Multiple federation servers and multiple Web Application Proxy servers with SQL Server
So far, we have looked into models that benefit from easy implementation and improved security. But this model is focused on high availability. Each role will be configured with NLB clusters. The AD FS database will be hosted in the SQL Always On cluster environment for high availability. This model is ideal for SPs and other businesses that work with high volumes of AD FS requests.
The NLB cluster is a software-based load balancing solution that comes with the Microsoft Windows server OS. It is easy to implement with no additional licenses. However, hardware load balancers provide higher performance and fewer dependencies.
The following diagram provides a sample design for the given topology:

Figure 14.5: A multiple federation server and multiple WAP server deployment
Similar to the previous model, this model's operations are clearly divided into two network segments: perimeter and corporate. The network firewall should have NAT and access rules to support the following requirements:
- Map a public IP address to
myapp.rebeladmin.comso that users can make initial requests from external networks. It is recommended to use TCP443. - Map a public IP address to
secure.rebeladmin.com, map it to the IP address of the Web Application Proxy server group's NLB cluster IP, and open TCP port443from the external networks to allow access. - Allow access from Web Application Proxy servers to the AD FS farm NLB cluster IP on TCP port
443.
For both NLB clusters, the initial connection point will be the NLB cluster IP. Apart from the application's external URL, the only external published URL will be the Web Application Proxy's URL. In the preceding example, secure.rebeladmin.com is mapped to the Web Application Proxy's NLB cluster IP.
AD FS servers use the Microsoft SQL Always On availability group to host the AD FS database. This is a read/write database for both hosts.
SQL Always On is a high-availability solution that runs on top of the Windows cluster. Windows Server 2022 supports a two-node cluster with Azure Cloud Witness. It reduces the number of servers that need to be used in a SQL Always On setup.
|
Advantages |
Disadvantages |
|
High availability: Each component hosts multiple servers with load balancers. AD FS databases also use a SQL high-availability environment. |
High cost: It needs multiple servers and licenses (OS, SQL Server). This also increases the management cost. |
|
High performance: Workloads are distributed between multiple hosts using load balancers. |
Complex setup: The implementation is time-consuming and requires advanced skills for planning and configuration. |
|
Support for features such as SAML artifact resolution and SAML/WS-Federation token replay detection. |
Troubleshooting an issue is time-consuming and complex as there are many systems and application dependencies. |
We just went through different deployment models and their pros and cons. The next step is to look into the AD FS configuration process.
AD FS deployment
In this section, we are going to look into AD FS deployment using a single federation server and a single Web Application Proxy server model. Before we move on to configuration, we need to sort out the following prerequisites:
- DNS records
- SSL certificates
Apart from that, we also need certain NAT and access rules in the firewall. But here, I am not going to talk about those in detail as I covered those when I explained the topologies in the previous section.
DNS records
We need to have a few DNS records (internal and external) set up prior to starting the deployment:
|
DNS Record |
External |
Internal |
|
Application URL |
Yes |
Yes |
|
WAP URL |
Yes |
N/A |
|
AD FS URL |
N/A |
Yes |
In the demo environment, the following URLs will be used:
myapp.rebeladmin.comwill be the application, and it will have the external DNS record created and mapped to the public IP address. It will NAT to the application server IP address using a firewall. It will also have the internal DNS entry and point to the internal IP address of the application server.secure.rebeladmin.comwill be the external WAP URL. WAP servers are in the perimeter network. It is not necessary to have the internal DNS record unless there are multiple WAP servers.adfs.rebeladmin.comwill be the AD FS server DNS entry, and it does not need to have an external DNS entry. However, WAP servers need to communicate with AD FS servers via the TCP port. Since it's one server, there is no point deploying a DNS server in the perimeter network, and it can be done using thehostsfile entry.
SSL certificates
AD FS deployment requires a few SSL certificates.
In this demonstration, we will use the following:
*.rebeladmin.com: This is a wildcard SSL certificate for external URLs. This is used for the application and WAP.rebeladmin.com: This SSL is for AD FS service communication.
In the lab environment, we can create these certificates using an internal Certification Authority (CA). If the domain name is the same, then wildcard certificates are used internally and externally as well. Wildcard certificates simplify certificate management.
Installing the AD FS role
Before installation, the SSL certificate for adfs.rebeladmin.com needs to be installed in the computer account as it is required during the AD FS installation. This can be checked using the following command:
dir Cert:LocalMachineMy
The AD FS server should be a member server of the domain and should log in as the domain administrator or the Enterprise Admin to do the installation.
The next step is to install the AD FS role service, which can be done by using the following PowerShell command:
Install-WindowsFeature ADFS-Federation -IncludeManagementTools
The following screenshot displays the output of the preceding command:

Figure 14.6: Install the AD FS role
Once this is completed, we need to configure the AD FS server. Let's use the following configuration for the demo setup:
Import-Module ADFS
$credentials = Get-Credential
Install-AdfsFarm `
-CertificateThumbprint:"938E369FA88B2F884A5BBC495F2338BE9FA0E0BB" `
-FederationServiceDisplayName:"REBELADMIN INC" `
-FederationServiceName:"adfs.rebeladmin.com" `
-ServiceAccountCredential $credentials
In this setup, we are using WID for AD FS, so there is no need for SQL configuration. In the preceding command, CertificateThumbprint specifies the SSL certificate (adfs.rebeladmin.com), and FederationServiceDisplayName specifies the display name of the federation service. FederationServiceName is the service name, and it should match the SSL we used. ServiceAccountCredential is used to define the service account details for the AD FS setup. In the end, the system needs to be restarted to apply the configuration:

Figure 14.7: Configure the AD FS role
The error about the alternative SSL name, certauth.adfs.rebeladmin.com, regards the certificate authentication. Before Windows Server 2016, this was an issue as the system didn't support different bindings for certificate authentication and device authentication on the same host. The default port 443 was used by the device authentication and couldn't have multiple bindings on the same channel.
In Windows Server 2016/2016/2019/2022, this is possible and now, it supports two methods. The first option is to use the same host (adfs.rebeladmin.com) with different ports (443 and 49443). The second option is to use different hosts (adfs.rebeladmin.com and certauth.adfs.rebeladmin.com) with the same port (443). This requires an SSL certificate to support certauth.adfs.rebeladmin.com as an alternate subject name.
Once the reboot completes, we can check whether the installation was successful by using the following command:
Get-WinEvent "AD FS/Admin" | Where-Object {$_.ID -eq "100"} | fl
This will print the content of event 100, which confirms the successful AD FS installation.
Installing WAP
The next step of the configuration is to install WAP. This doesn't need to be a domain-joined server and should be placed on the perimeter network. Before the installation process, install the required SSL certificates. In my demo, it is for *.rebeladmin.com. We can verify this by using this:
dir Cert:LocalMachineMy
Before proceeding, we also need to check whether a server can resolve to adfs.rebeladmin.com as WAP needs to connect to AD FS.
Once everything is confirmed, we can install the WAP role:
Install-WindowsFeature Web-Application-Proxy -IncludeManagementTools
Once it's completed, we can proceed with the configuration by using the following:
$credentials = Get-Credential
Install-WebApplicationProxy
-FederationServiceName "adfs.rebeladmin.com"
-FederationServiceTrustCredential $credentials
-CertificateThumbprint "3E0ED21E43BEB1E44AD9C252A92AD5AFB8E5722E"
In the preceding commands, FederationServiceName is used to define the AD FS service name, and it needs to match the name provided on the AD FS setup. FederationServiceTrustCredential is used to provide an account, which is authorized to register a new proxy server with AD FS. The account that is used here should have permissions to manage AD FS.
The CertificateThumbprint parameter is used to define the certificate for WAP. In our demo, it's the *.rebeladmin.com certificate. At the end of the configuration, we need to restart the system to apply the changes.
Once the reboot is completed, we can confirm the health of the configuration using the following event log in the AD FS server:
Get-WinEvent "AD FS/Admin" | Where-Object {$_.ID -eq "396"} | fl
Configuring the claims-aware application with new federation servers
At the start of this chapter, I explained that not every application can use AD FS for authorization. It should be a claims-aware application. I have an application called myapp.rebeladmin.com that is already set up. In the configuration, I set it up to use the existing STS and added the new AD FS server's metadata URL, which is https://adfs.rebeladmin.com/federationmetadata/2007-06/federationmetadata.xml.
If the configuration is successful, AD FS installs the metadata XML, and you should be able to view this using the web browser. If it cannot load, then you need to check it before this step.
Once the application is configured, when I go to my application, which is https://myapp.rebeladmin.com/myapp (internally), I can see the following error. This was expected as the AD FS setup does not know about my application yet:

Figure 14.8: AD FS login page
Creating a relying party trust
To get our application working, we need to create a relying party trust between our application and the AD FS setup. Then, only the AD FS setup will know about the application.
In order to do that, perform the following steps:
- Log in to the AD FS server as an administrator.
- Go to Server Manager | Tools | AD FS Management.
- Go to Relying Party Trusts (1), and then click on Add Relying Party Trust... (2):

Figure 14.9: Add Relying Party Trust
- The system will open the Add Relay Party Trust Wizard. Select Claims Aware and click Start.
- On the Select Data Source page, select Import data about the relying party published online or on a local network and enter the metadata URL for the application. For my application, I have created the metadata file under
https://myapp.rebeladmin.com/myapp/federationmetadata/2007-06/federationmetadata.xml:
Figure 14.10: Configure the relying party trust
When we establish a trust, we need to provide certain information to match the SP's application configuration. This is painful as even a small mistake can cause issues. Also, if these settings are changed on the SP's side, we will not know until they inform us of what to modify on the AD FS side. Therefore, service providers use metadata XML files to publish these required settings. This simplifies the configuration. If there is no metadata file, we still can create the trust using the required custom settings.
- On the next page, go to Specify Display Name for the claim and click on Next.
- On the Choose an access control policy page, select Permit Everyone, and click on Next. This is a new feature of AD FS 2016/2016/2019/2022, and it allows us to create access policies easily. It is possible to add customer access policies as well. In this demo, I am not going to use any MFA as it's a test lab:

Figure 14.11: Relying party trust access control policies
- In the next window, we can review the settings and click on Next to continue.
- On the Finish page, keep the check for Configure claims issuance policy for this application and click on Close:

Figure 14.12: Completing the relaying party trust wizard
- The Edit Claim Issuance policy window will open. If it does not, click on Edit Claim Issuance policy on the action pane. Once the window is open, click on the Add Rule button.
- In Add Transform Claim Rule Wizard, select Send Claims Using a Custom Rule and click on Next.
- On the next page, type the name for the custom rule and input the claim rule. The claim rule depends on the application requirements. Most application vendors specify what kind of claim rule you need to have. Once complete, click on Finish.
- Once finished, click OK to exit from the wizard.
Configuring the Web Application Proxy
Now, we have the application configured with AD FS. But our requirement is to use the Web Application Proxy to publish the application to the public.
In order to do that, log in to the Web Application Proxy server as an administrator and execute the following command:
Add-WebApplicationProxyApplication
-BackendServerUrl 'https://myapp.rebeladmin.com/myapp/'
-ExternalCertificateThumbprint '3E0ED21E43BEB1E44AD9C252A92AD5AFB8E5722E'
-ExternalUrl 'https://myapp.rebeladmin.com/myapp/'
-Name 'MyApp'
-ExternalPreAuthentication AD FS
-ADFSRelyingPartyName 'myapp.rebeladmin.com'
In the preceding command, ExternalUrl specifies the external URL for the application. BackendServerUrl specifies the internal URL for the application. ExternalCertificateThumbprint is the certificate to use from external networks. The Name parameter specifies the custom name for the app, which will be displayed on the proxy page. ExternalPreAuthentication defines the authentication mode. On our setup, we're using AD FS mode. It also supports pass-through mode. ADFSRelyingPartyName specifies the AD FS relying party name that will be used for this application.
The Web Application Proxy can translate hostnames used in the external URL and the backend URL. However, it cannot translate paths.
Once all is done, when we access the application from the external URL https://myapp.rebeladmin.com/myapp/, it successfully proxies to AD FS, and after successful authentication, the application page is displayed:

Figure 14.13: Application access
Integrating with Azure MFA
MFA is a common requirement today for online services, which could be for any hosted solution in organizations such as Citrix, RDS, or any other web application. MFA is also used in hybrid cloud environments to provide the same level of protection on-prem and in the cloud.
There are many MFA service providers in the market. Some of those are on-prem solutions, where we can install an appliance and use MFA services. Others are cloud-based solution providers and sell MFA services as subscriptions. Customers can simply install an agent on-prem and connect it to these cloud-based solutions. Azure MFA was first introduced to be used with Azure services and later improved to support on-prem workload protections too. Users can use SMS, calls, or a PIN on the Microsoft Authenticator application to authenticate. Most of the MFA SPs have a separate agent, which needs to be installed in the AD FS servers in order to connect it with the MFA services.
Azure MFA integration was complicated in Windows Server 2012 R2 environments. It needed an agent as well as an on-prem Azure MFA server. A big change with AD FS 2016/2019/2022 was the Azure MFA integration enhancement. With AD FS 2016/2019/2022, we no longer need to install these components. The AD FS Azure adapter allows integration with Azure AD in order to pull the configuration. In this section, we are going to look at how we can integrate the AD FS setup with Azure MFA.
Prerequisites
To configure Azure MFA, we need a few things:
- A valid Azure subscription.
- Azure Global Administrator privileges.
- The Azure AD federated setup. Azure AD needs to integrate with AD FS on-prem and synchronize identities to Azure. This will be covered later in this chapter.
- Windows Server 2022 AD FS in the local infrastructure.
- Enterprise Admin privileges for AD FS servers to configure MFA.
- Azure MFA needs to be enabled. The users that sync from on-prem AD need to have MFA enabled. I wrote an article about this before, and you can access it via https://bit.ly/3kZSTIc.
- The Windows Azure AD module for Windows PowerShell in AD FS servers. This can be downloaded from https://bit.ly/3l43zFG.
Creating a certificate in an AD FS farm to connect to Azure MFA
First, we need to create a certificate, which will be used by the AD FS farm. This needs to run from the AD FS server:
$certbase64 = New-AdfsAzureMfaTenantCertificate -TenantID 05c6f80c-61d9-44df-bd2d-4414a983c1d4
The preceding command generates the new certificate. TenantID is the subscription ID you have from Azure. This can be found by running this:
Login-AzureRmAccount
The preceding command will ask for the credentials for Azure and once we provide them, it will list TenantId:

Figure 14.14: Azure TenantId
This will create a certificate under Certificates (Local Computer):

Figure 14.15: New certificate
Enabling AD FS servers to connect with the Azure MFA client
Now, we have the certificate, but we need to tell the Azure MFA client to use it as a credential to connect with AD FS.
Before that, we need to connect to Azure AD by using Azure PowerShell. We can do that by using the following command:
Connect-MsolService
Then, it will prompt you for your login and use your Azure Global Administrator account to connect.
After that, we can pass the credentials by using the following command:
New-MsolServicePrincipalCredential -AppPrincipalId 981f26a1-7f43-403b-a875-f8b09b8cd720 -Type asymmetric -Usage verify -Value $certbase64
In the preceding command, AppPrincipalId defines the Globally Unique Identifier (GUID) for the Azure MFA client.
Enabling the AD FS farm to use Azure MFA
The next step of the configuration is to enable the AD FS farm to use Azure MFA. This can be done by using the following command:
Set-AdfsAzureMfaTenant -TenantId 05c6f80c-61d9-44df-bd2d-4414a983c1d4 -ClientId 981f26a1-7f43-403b-a875-f8b09b8cd720
In the preceding command, TenantId refers to the Azure tenant ID and ClientId represents the Azure MFA client's GUID.
Once the command successfully runs, we need to restart the AD FS service on each server in the farm:

Figure 14.16: Enabling Azure MFA for AD FS
Enabling Azure MFA for authentication
The last step of the configuration is to enable Azure MFA globally for the AD FS server.
In order to do that, log in to the AD FS server as the Enterprise Admin. Then, go to Server Manager | Tools | AD FS Management.
Then, in the console, navigate to Service | Authentication Methods. Then, in the Actions panel, click on Edit Primary Authentication Method:

Figure 14.17: AD FS Authentication Methods
This opens up the window to configure global authentication methods. It has two tabs, and we can see Azure MFA on both. If Azure MFA is used as a primary method by removing other options, then AD FS will not ask for logins and will use MFA as the only authentication method.
Its operation boundaries can be set to intranet or extranet:

Figure 14.18: AD FS Primary authentication methods
Another option is to select MFA as the secondary authentication method:

Figure 14.19: AD FS Additional authentication methods
This finishes the Azure MFA integration, and users can use MFA based on the options selected in the preceding wizards.
Azure AD federation with AD FS
Azure AD supports various integration methods with on-prem Active Directory. We can configure federation between on-prem AD FS and Azure AD to enable integration between two systems. When federation sign-in is in place, users can log in to Azure AD using the same on-prem Active Directory user name and password. This method ensures the user authentication occurs on-prem. We can use Azure AD Connect to configure the federation. During the configuration process, we can either deploy a new AD FS server/farm or configure existing AD FS servers. In this section, I am going to demonstrate how we can configure federation sign-in between AD FS and Azure AD. Before we go into that, it is important to understand how exactly the federation sign-in method works.
Federation sign-in with Azure AD

Figure 14.20: How AD FS federation works with Azure AD
Rebeladmin Inc. has federation between Azure AD and on-prem AD FS. The user Mark is trying to access the Office 365 portal using his browser. Let's see how the authentication and authorization work with federation sign-in:
- Mark opens his browser and types https://bit.ly/3oPeCUc to access the Office 365 portal.
- Office 365 has a trust relationship with Azure AD. Therefore Office 365 sends an authentication request to Azure AD via Mark's browser. Mark can see the Azure AD sign-in page in his browser. He goes ahead and enters his user name,
[email protected], and clicks on Next. Azure AD uses@rebeladmin.comas a hint and checks its configuration to see ifrebeladmin.comis a federated domain. In this scenario,rebeladmin.comis a federated domain and Azure AD knows where to send the sign-in request. This process is also called Home Realm Discovery. - Azure AD sends a sign-in request to the on-prem AD FS server via Mark's browser.
- Mark completes the authentication process with AD FS (Forms-based or Kerberos) by using his Active Directory user name and password. Upon successful authentication, AD FS responds to the original sign-in request by Azure AD with a token. Let's call it token A. This token represents the user. As
rebeladmin.comis federated, Azure AD can verify the authenticity of the token by validating the signature. - Azure AD responds to the sign-in request it received from the Office 365 portal with a new token. Let's call it token B. Office 365 has trust with Azure AD so it can also validate the token signature. After the validation process, Mark will have access to the Office 365 portal. It is important to understand there is no relationship between token A and token B. Both tokens are used by different systems in different stages of the federation sign-in process.
In the next section, I am going to demonstrate how to create federation trust between AD FS and Azure AD.
Creating federation trust between Azure AD and AD FS
The following illustration explains the planned demo setup for this exercise.

Figure 14.21: Planned demo setup
In the demo environment, I already have the Active Directory domain controller (PDC01.rebeladmin.com) up and running. It is using rebeladmin.com as the Active Directory domain name.
- The domain controller will also be used for Azure AD Connect.
- I have added the
rebeladmin.comdomain to the Azure AD custom domain list and completed the verification process already.
Figure 14.22: Azure AD custom domain status
In this demo, we are going to use a single AD FS server (
ADFSSRV01.rebeladmin.com). We will not use a web application proxy (WAP). - The federation service name is set to
adfs.rebeladmin.comand relevant public DNS records and firewall rules are in place to allowHTTPS(443) access to the server from the internet. - I am using a valid wildcard SSL certificate, which is issued to
*.rebeladmin.comfor AD FS.
In the AD FS Deployment section of this chapter, we've already demonstrated how to set up the AD FS service, so we won't repeat that here. We already have AD FS configured on ADFSSRV01.rebeladmin.com.
We can view the current configuration of the AD FS server by using Get-AdfsProperties.

Figure 14.23: Existing AD FS configuration
As per the above screenshot, we can see the server is configured with the adfs.rebeladmin.com service name. I also enabled the AD FS sign-in page for testing purposes by using Set-AdfsProperties -EnableIdpInitiatedSignonPage $true.
After that, I can access the https://bit.ly/2ZgF40k sign-in page over the internet and test logging in using the domain user account.

Figure 14.24: Initiated sign-in page
The next stage of the configuration is to configure Azure AD Connect for federation.
Configuring Azure AD Connect
In this demo setup, I am going to install Azure AD Connect on the PDC01.rebeladmin.com server. To do that:
- Log in to the VM as Domain Administrator.
- Download the latest Azure AD Connect file. Then double-click on
AzureADConnect.msi. - This will open up a new wizard. On the Express Settings page, click on Customize.

Figure 14.25: Azure AD Connect Express Settings page
- On the Install required components screen, click the Install button.
- This will install Azure AD Connect.
- After the installation, on the user sign-in page select Federation with AD FS and click Next.

Figure 14.26: User sign-in method selection
- On the next page, provide the Azure Global Administrator user name and password to connect to Azure AD.
- On the Connect your directories page, click the Add Directory button to create a new service account and add the existing domain to the configuration. Once the settings are in place, click on Next to proceed.
- On the Azure AD sign-in configuration screen, I can see
rebeladmin.comis already listed as the verified domain. So, we do not need to make any changes. Click on Next to proceed. - On the Domain and OU filtering, Identifying users, Filtering, and Optional Features pages, I am using default values.
- Then, on the Credentials page, we need to provide domain administrator account details and click Next.
- On the AD FS farm page, use the Use an existing AD FS farm option and then select the current AD FS server. After the information is in place, click on Next.

Figure 14.27: AD FS farm configuration
- On the Azure AD domain page, I select
rebeladmin.comas the domain to federate and click on Next to proceed.
Figure 14.28: Select the domain to federate
- Then, on the Ready to configure screen, click the Install button.
- This will start the configuration process and can take a few minutes to complete.
- Once the configuration is completed, exit the wizard and allow a few minutes to complete the initial synchronization process.
- The next stage of the configuration is to do testing to verify the federation setup.
Testing
We can start the testing process by confirming the Azure AD Connect configuration status. To do that:
- Log in to the Azure portal as Global Administrator.
- Then go to Azure Active Directory | Azure AD Connect. Then click on Federation under the user-sign in section. In there, we can see
rebeladmin.comis recognized as the federated domain.
Figure 14.29: Rebeladmin.com recognized as the federated domain
Now we need to test the login process. To do that:
- Go to https://office.com.
- Then enter
[email protected]as the user name. This account is synced to Azure AD from on-prem Active Directory.
Figure 14.30: Azure AD user login page
- When I clicked on Next, as expected, I was redirected to the AD FS login form page. In there, I have entered the user name and password and clicked on the Sign in button.

Figure 14.31: User redirected to the AD FS login form
Note: The way the user is authenticated depends on the AD FS authentication method. In this demo setup, I am only using Forms Authentication for extranet and intranet.
- After a successful login, I was redirected to the
Office.comhome page as expected.
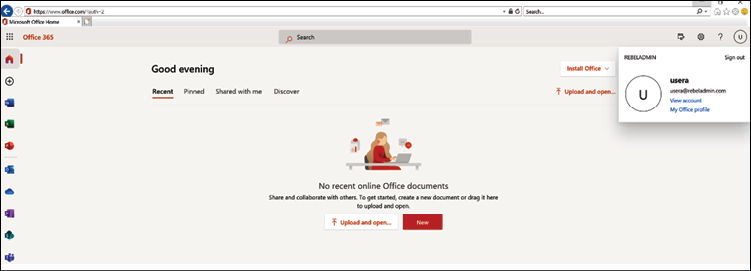
Figure 14.32: User access to the Office 365 portal
As we can see here, the Azure AD federation with AD FS is working successfully. This marks the end of the configuration process as well as the chapter.
Summary
We started this chapter by learning about the characteristics of each of the AD FS versions. This allows us to plan for version upgrades and get the benefits from the new features. AD FS deployment topologies change according to business requirements.
In this chapter, we also learned about different topologies, their characteristics, and their advantages and disadvantages. With the help of that, you have now learned about how to select the best topology based on business requirements. Not only did we go through the theory, but we also went through AD FS deployment using a single federation server and a single web application proxy server model.
MFA is a basic security requirement for public-facing web services. Azure MFA was first introduced to provide multi-factor protection to Azure services and later developed further to support on-prem workload protections. Prior to AD FS 2016/2019/2022, it was a complicated process to implement Azure MFA for AD FS. AD FS 2016/2019/2022 now has built-in Azure MFA integration support. Toward the end of the chapter, we learned about how we can integrate AD FS 2022 with Azure MFA successfully.
Last but not least, we learned how to enable federation between Azure AD and on-premises AD FS.
In the next chapter, we will look into another AD role service, the Active Directory Rights Management Service (AD RMS), which we can use to protect sensitive data in an infrastructure.