17
Advanced AD Management with PowerShell
The very first Active Directory (AD) instance I set up was based on Windows Server 2003. It was a completely different approach from today's Active Directory installations. In Windows Server 2003, there were a lot of prerequisite tasks, such as installing a DNS role, setting up DNS zones, and adding the domain prefix. Even those tasks were directly related to Active Directory Domain Services (AD DS), and I had to configure them separately prior to running the DCPORMO.exe command. But today, the Active Directory role installation process is very straightforward. With basic knowledge and resources, anyone can get a domain controller up and running with a few clicks.
Microsoft has made server role installations and configurations easy over the years, not just AD DS. The main reason behind all these enhancements was to save time for engineers. Installations, configurations, and repetitive infrastructure tasks take up the majority of an engineer's time. Also with the pandemic, an engineer has to wear many hats as businesses shrink IT budgets. To save time on repetitive administrative tasks, we should be looking at automation technologies. In the early days, we used DOS commands, VBScript, and batch files to automate administrative tasks. But there were problems with that. Applications, server roles, and services had limitations on working with these automation technologies. Not every function available in the GUI supported the use of commands or scripts. This lack of support and lack of flexibility was holding engineers back from automating tasks.
To bring automation to the next level, Microsoft released a more flexible, more powerful, more integrated scripting language.
PowerShell 1.0 was the starting point and it was available to the public from November 2006. During the last decade, there have been a few versions released and it's now at version 5.1 (mainstream). Microsoft also released a separate version of PowerShell called PowerShell Core 6.0 (January 10, 2018). It was compatible with Linux and macOS as well. Now it has been replaced by PowerShell 7.0. In Chapter 2, Active Directory Domain Services 2022, I mentioned PowerShell 7 and throughout this book, I have used PowerShell 7 for configurations and the administration of Active Directory roles. In this chapter, I will explain how we can use PowerShell to further improve AD DS environment management.
We are also going to look at managing identities in a hybrid environment using Azure AD PowerShell and Microsoft Graph.
The cmdlets and scripts used in this chapter were written and tested in an environment that has the following:
- Windows Server 2022
- An AD domain and forest functional level set to Windows Server 2016
- PowerShell 7.1
- Azure AD Premium P2
In this chapter, we will cover the following topics:
- PowerShell scripts and commands that can be used to manage AD objects
- PowerShell scripts and commands that can be used to manage and troubleshoot AD replication
- PowerShell scripts and commands that can be used to manage identities in a hybrid environment using the Azure AD PowerShell module
- Microsoft Graph for Hybrid Identity management
Before we start using PowerShell for Active Directory management, we need to make sure relevant tools are installed and configured.
AD management with PowerShell – preparation
A PowerShell module includes assemblies, scripts, and functionalities. In order to use the functionalities, we need to import the module. After that, we can call for the contents of the module to manage relevant server roles, services, or features.
Before we start Active Directory management with PowerShell, first we need to import the ActiveDirectory module.
There are a few ways to do this. These include installing the AD DS server role or by installing Remote Server Administration Tools (RSAT):
- AD DS server role:
- If we install the AD DS server role using Server Manager, the Active Directory module for Windows PowerShell is installed as a feature:
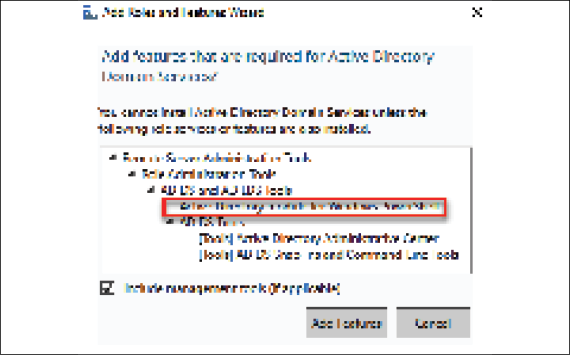
Figure 17.1: Active Directory module for Windows PowerShell feature
- If the AD DS role is installed using PowerShell, we need to include the management tools by using
-IncludeManagementTools. Otherwise, by default, it will not install the module:Install-WindowsFeature –Name AD-Domain-Services -IncludeManagementTools
- If we install the AD DS server role using Server Manager, the Active Directory module for Windows PowerShell is installed as a feature:
- Remote Server Administration Tools:
- Even if the server doesn't have the AD DS role installed, the existing domain environment can be managed using the AD DS PowerShell module. The AD PowerShell module is included with RSAT and can be installed using Server Manager or PowerShell.
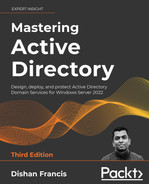
- On Server Manager, it can be found by navigating to Features | Remote Server Administration Tools | Role Administration Tools | AD DS and AD LDS Tools | Active Directory module for PowerShell, as shown in the following screenshot:

Figure 17.2: Active Directory module for Windows PowerShell feature under RSAT
- It can also be installed using PowerShell:
Add-WindowsFeature RSAT-AD-PowerShell
It is also possible to install RSAT on the Windows desktop OS. As an example, RSAT for Windows 10 can be downloaded from https://bit.ly/3HZ5k0W.
PowerShell 7
In the preceding section, I explained how we can prepare native Windows PowerShell for Active Directory administration. Most of the scripts and commands used in this book also work with native Windows PowerShell. But PowerShell 7works in a different way. It doesn't come as part of Windows and needs to be installed separately as an application. To install PowerShell 7, please follow the following guide: https://bit.ly/30Pu4HM
After prerequisites are in place, we can list all the commands available under the module using the following command:
Get-Command -Module ActiveDirectory
There are about 147 commands under the module. The complete syntax for any command can be viewed using this command:
Get-Command commandname -Syntax
As an example, the following command will list the syntax for the New-ADUser command:
Get-Command New-ADUser -Syntax
The Get-Help command provides help for any command. As an example, the following command provides help for the New-ADUser command:
Get-Help New-ADUser
We also can view an example for the New-ADUser command using this:
Get-Help New-ADUser -Example
More information on the command can be viewed using this:
Get-Help New-ADUser -Detailed
Technical information on the command can be viewed using the following:
Get-Help New-ADUser -Full
Online information about the command can be viewed using this:
Get-Help New-ADUser -Online
In this section, we learned how to install the Active Directory module for PowerShell. We also learned about the basic functions of the module. Now, let's move on and further explore the Active Directory management capabilities of the module.
AD management commands and scripts
The module has 147 commands, and they can be used in countless different ways to manage the Active Directory environment. In this section, we will look at the capabilities of these commands and see how we can use them to improve Active Directory management.
I'd like to start this section by explaining how we can review the existing configuration of an Active Directory environment. The quick way to review the directory server configuration and capabilities is to use the following command:
Get-ADRootDSE
This command provides important information, such as forest and domain functional levels, the default naming context, the current time, and the currently logged-in domain controller.
The next step is to find the domain controllers in the domain. We can use the following to list the domain controller name, the IP address, the status of the global catalog server, and the Flexible Single Master Operation (FSMO) roles:
Get-ADDomainController -Filter * | Select-Object Name,IPv4Address,IsGlobalCatalog,OperationMasterRoles
It is also important to know about the Active Directory site as it explains the physical topology of Active Directory:
Get-ADDomainController -Filter * | Select-Object Name,IPv4Address,Site
An Active Directory forest can have multiple domains. The following commands will list the forest names, the domain name, the domain controller, the IP address, and the Active Directory site:
$Forestwide = (Get-ADForest).Domains | %{ Get-ADDomainController -Filter * -Server $_ }
write-output $Forestwide -Filter * | Select-Object Name,Forest,Domain,IPv4Address,Site
If we know the domain name, we can list the domain controllers and the read-only domain controller (RODC) using the following command:
$Domain = Read-Host 'What is your Domain Name ?'
Get-ADDomain -Identity $Domain | select ReplicaDirectoryServers,ReadOnlyReplicaDirectoryServer
With this command, the system will ask the user to input the domain name. Once the user replies, it lists the domain controllers.
In the preceding command, ReplicaDirectoryServers represents the read and write domain controllers, and ReadOnlyReplicaDirectoryServer represents the RODCs.
Replication
Data replication is crucial for a healthy Active Directory environment. For a given domain controller, we can find its inbound replication partners using this:
Get-ADReplicationPartnerMetadata -Target REBEL-SRV01.rebeladmin.com
The preceding command provides a detailed description of the replication health of the given domain controller, including the last successful replication, replication partition, server, and so on.
We can list all the inbound replication partners for the given domain using the following command:
Get-ADReplicationPartnerMetadata -Target "rebeladmin.com" -Scope Domain
In the preceding command, the scope is defined as the domain. This can be changed to the forest to get a list of the inbound partners in the forest. The output is based on the default partition. If needed, the partition can be changed using –Partition to a configuration or schema partition. It will list the relevant inbound partners for the selected partition.
The associated replication failures for a site, forest, domain, and domain controller can be found using the Get-ADReplicationFailure cmdlet:
Get-ADReplicationFailure -Target REBEL-SRV01.rebeladmin.com
The preceding command will list the replication failures for the given domain controller.
Replication failures for the domain can be found using this:
Get-ADReplicationFailure -Target rebeladmin.com -Scope Domain
Replication failures for the forest can be found using the following command:
Get-ADReplicationFailure -Target rebeladmin.com -Scope Forest
Replication failures for the site can be found using the following command:
Get-ADReplicationFailure -Target LondonSite -Scope Site
In the preceding command, LondonSite can be replaced with a relevant site name.
Using both Get-ADReplicationPartnerMetadata and Get-ADReplicationFailure, I have created the following PowerShell script to generate a replication health report against a specific domain controller.
The first part of the script is used to define the objects that we'll use throughout the script:
## Active Directory Domain Controller Replication Status##
 $domaincontroller = Read-Host 'What is your Domain Controller?'
 ## Define Objects ##
 $report = New-Object PSObject -Property @{
 ReplicationPartners = $null
 LastReplication = $null
 FailureCount = $null
 FailureType = $null
 FirstFailure = $null
 }
In the preceding script, I have given an option for the engineer to specify the name of the domain controller:
$domaincontroller = Read-Host 'What is your Domain Controller?'
In the next part of the script, I am collecting the following data, which describes the replication connection status with the other domain controllers:
- Replication partner (
ReplicationPartners) - Last successful replication (
LastReplication)
## Replication Partners ##
 $report.ReplicationPartners = (Get-ADReplicationPartnerMetadata -Target $domaincontroller).Partner
 $report.LastReplication = (Get-ADReplicationPartnerMetadata -Target $domaincontroller).LastReplicationSuccess
Then, I also gather the following data, which helps engineers to troubleshoot replication issues, if any exist:
- Active Directory replication failure count (
FailureCount) - Active Directory replication failure type (
FailureType) - Active Directory replication failure first recorded time (
FirstFailure)
## Replication Failures ~##
 $report.FailureCount = (Get-ADReplicationFailure -Target $domaincontroller).FailureCount
 $report.FailureType = (Get-ADReplicationFailure -Target $domaincontroller).FailureType
 $report.FirstFailure = (Get-ADReplicationFailure -Target $domaincontroller).FirstFailureTime
The last part of the script formats the output of the collected data:
## Format Output ##
 $report | select ReplicationPartners,LastReplication,FirstFailure,FailureCount,FailureType | Out-GridView
The aforementioned script is displayed in an easy way for readers to understand. When it is used in PowerShell, make sure to prevent extra line spaces.
Further to Active Directory replication topologies, there are two types of replication:
- Intra-site: Replication between domain controllers in the same Active Directory site
- Inter-site: Replication between domain controllers in different Active Directory sites
We can review AD replication site objects using the Get-ADReplicationSite cmdlet. The following command returns all the Active Directory replication sites in the Active Directory forest:
Get-ADReplicationSite -Filter *
We can review Active Directory replication site links on the Active Directory forest using the following command:
Get-ADReplicationSiteLink -Filter *
In site links, the most important information is to know the site cost and the replication schedule. This allows us to understand the replication topology and expected delays in replication.
The following command lists all the replication site links, which includes the CanadaSite along with the site link name, link cost, and replication frequency:
Get-ADReplicationSiteLink -Filter {SitesIncluded -eq "CanadaSite"} | Format-Table Name,Cost,ReplicationFrequencyInMinutes -AutoSize
A site link bridge can be used to bundle two or more site links and enable transitivity between site links.
Site link bridge information can be retrieved using the following command:
Get-ADReplicationSiteLinkBridge -Filter *
An AD site uses multiple IP subnets that are assigned to sites for its operations. It is important to associate these subnets with AD sites so that domain controllers know which computer is located at which site.
The following command will list all the subnets in the forest in a table with the subnet name and Active Directory site:
Get-ADReplicationSubnet -Filter * | Format-Table Name,Site -AutoSize
Bridgehead servers operate as the primary communication point to handle the replication data that comes in and goes out of the Active Directory site.
We can list all the preferred bridgehead servers in a domain:
$BHservers = ([adsi]"LDAP://CN=IP,CN=Inter-Site Transports,CN=Sites,CN=Configuration,DC=rebeladmin,DC=com").bridgeheadServerListBL
$BHservers | Out-GridView
In the preceding command, the bridgeheadServerListBL attribute value is retrieved via the ADSI connection.
Information about the replication topology helps engineers in many ways, especially if engineers are troubleshooting Active Directory replication issues or performing an Active Directory audit. By using the preceding commands, I have created the following script to gather Active Directory replication topology data in one go.
As usual, the first part of the script is dedicated to defining objects:
## Script to gather information about Replication Topology ##
 ## Define Objects ##
 $replreport = New-Object PSObject -Property @{
 Domain = $null
 }
Before we move on to the replication, it is good to collect the Active Directory domain information. This is important if an organization is using multiple domains as we can easily separate the reports:
## Find Domain Information ##
 $replreport.Domain = (Get-ADDomain).DNSroot
I have used the next section of the script to list the Active Directory sites:
## List down the AD sites in the Domain ##
 $a = (Get-ADReplicationSite -Filter *)
 Write-Host "########" $replreport.Domain "Domain AD Sites" "########"
 $a | Format-Table Description,Name -AutoSize
Then, I am going to collect data about the Active Directory replication site link and the Active Directory replication site link bridge by using the following:
## List down Replication Site link Information ##
 $b = (Get-ADReplicationSiteLink -Filter *)
 Write-Host "########" $replreport.Domain "Domain AD Replication SiteLink Information" "########"
 $b | Format-Table Name,Cost,ReplicationFrequencyInMinutes -AutoSize
 ## List down SiteLink Bridge Information ##
 $c = (Get-ADReplicationSiteLinkBridge -Filter *)
 Write-Host "########" $replreport.Domain "Domain AD SiteLink Bridge Information" "########"
 $c | select Name,SiteLinksIncluded | Format-List
In a computer network, there can be multiple IP subnets. These subnets need to be assigned correctly to Active Directory sites. This way, Active Directory Domain Controller computers know which site they belong to. This also has a direct impact on Active Directory replication. In the next section, we are going to collect Active Directory subnet information and the preferred bridgehead servers for the domain:
## List down Subnet Information ##
 $d = (Get-ADReplicationSubnet -Filter * | select Name,Site)
 Write-Host "########" $replreport.Domain "Domain Subnet Information" "########"
 $d | Format-Table Name,Site -AutoSize
 ## List down Prefered BridgeHead Servers ##
 $e = ([adsi]"LDAP://CN=IP,CN=Inter-Site Transports,CN=Sites,CN=Configuration,DC=rebeladmin,DC=com").bridgeheadServerListBL
 Write-Host "########" $replreport.Domain "Domain Prefered BridgeHead Servers" "########"
 $e
 ## End of the Script ##
The aforementioned script is displayed in a way that's easy for readers to understand. When it is used in PowerShell, make sure to prevent extra line spaces.
In the preceding script, we need to replace the ADSI connection with the relevant domain name:
$e = ([adsi]"LDAP://CN=IP,CN=Inter-Site Transports,CN=Sites,CN=Configuration,DC=rebeladmin,DC=com")
Healthy replication is critical for Active Directory Domain controllers. The time it takes to replicate a change to all the domain controllers depends on the number of domain controllers in place, geographical locations, replication schedules, etc. In some situations, we have to force the replication of objects and in the next section, we are going to look into it in detail.
Replicating a specific object
Once an object is added to a domain controller, it needs to be replicated to all other domain controllers. Otherwise, users will face issues during login using AD-integrated applications and services. The replication is dependent on many different factors, such as the replication schedule and intra-site connectivity. Sometimes, we need to force the replication between domain controllers:
## Replicate Object to From Domain Controller to Another ##
$myobject = Read-Host 'What is your AD Object Includes ?'
$sourcedc = Read-Host 'What is the Source DC ?'
$destinationdc = Read-Host 'What is the Destination DC ?'
$passobject = (Get-ADObject -Filter {Name -Like $myobject})
Sync-ADObject -object $passobject -source $sourcedc -destination $destinationdc
Write-Host "Given Object Replicated to" $destinationdc
The preceding script will ask a few questions:
- Name of object: This need not be a distinguished name (DN). All that is needed is that text be included in the object name field.
- Source DC: The hostname of the source DC.
- Destination DC: The hostname of the destination DC.
Once the relevant information is provided, the object will be forcibly replicated:

Figure 17.3: Replicating a specific object
In this section of the chapter, we learned how the Active Directory module for PowerShell can be used to review the topology of an Active Directory environment. We also learned how we can audit, troubleshoot, and manage Active Directory replication using PowerShell. In the next section, we are going to look into Active Directory object management.
Users and groups
In this section, let's look at PowerShell commands and scripts that we can use to manage AD users and groups.
Last logon time
On certain occasions, we are required to find when a user successfully logs on to a domain. This can be for audit purposes or for troubleshooting purposes:
$username = Read-Host 'What is the User account you looking for ?'
   $dcs = Get-ADDomainController -Filter {Name -like "*"}
      foreach($dc in $dcs)
   {
     $hostname = $dc.HostName
     $user = Get-ADUser $userName -Server $hostname -Properties lastLogon
     $lngexpires = $user.lastLogon
     if (-not ($lngexpires)) {$lngexpires = 0 }
     If (($lngexpires -eq 0) -or ($lngexpires -gt [DateTime]::MaxValue.Ticks))
     {
       $LastLogon = "User Never Logged In"
     }
      Else
     {
       $Date = [DateTime]$lngexpires
       $LastLogon = $Date.AddYears(1600).ToLocalTime()
     }
  }
  Write-Host $username "last logged on at:" $LastLogon
The preceding script will ask for the username of the account and, once it is provided, the system will search for the lastLogon attribute value on all available domain controllers. If it cannot be found, it will return User Never Logged In or, if found, it will return the last logon timestamp.
Last login date report
Periodic housekeeping in AD is required for integrity. There may be user objects that have not been used for years. If we can create a report along with the last login dates, we can use it as a reference to clean up objects:
## Script For Filter user with Last logon Time ##
$htmlformat = "<style>BODY{background-color:LightBlue;}</style>"
Get-ADUser -Filter * -Properties "LastLogonDate" | sort-object -property lastlogondate -descending | Select-Object Name,LastLogonDate | ConvertTo-HTML -head $htmlformat -body "<H2>AD Accounts Last Login Date</H2>"| Out-File C:lastlogon.html
Invoke-Expression C:lastlogon.html
This script creates an HTML report that includes all the user accounts with their last login date timestamps:
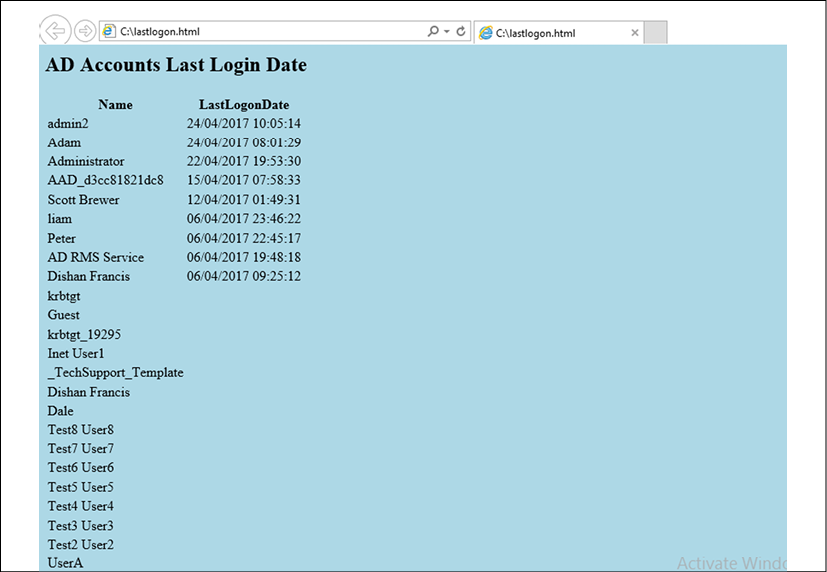
Figure 17.4: Last login date HTML report
Some of the accounts in the above reports don't show the last login date value. It means no one has logged into those accounts yet.
Login failures report
It is important to know about failed attempts to log in to the DC, not just the successful attempts. These can be a result of potentially malicious activity.
The following script will create a report to indicate the login failures on a given domain controller:
## Report for DC login Failures ##
$failedevent = $null
$Date= Get-date
$dc = Read-Host 'What is the Domain Controller ?'
$Report= "C:auditreport.html"
$HTML=@"
<title>Failed Login Report for $dc</title>
<style>
BODY{background-color :LightBlue}
</style>
"@
 $failedevent = Get-Eventlog security -Computer $dc -InstanceId 4625 -After (Get-Date).AddDays(-7) |
 Select TimeGenerated,ReplacementStrings |
 % {
 New-Object PSObject -Property @{
 SourceComputer = $_.ReplacementStrings[13]
 UserName = $_.ReplacementStrings[5]
 SourceIPAddress = $_.ReplacementStrings[19]
 Date = $_.TimeGenerated
 }
 }
 $failedevent | ConvertTo-Html -Property SourceComputer,UserName,SourceIPAddress,Date -head $HTML -body "<H2>Failed Login Report for $dc</H2>"|
 Out-File $Report
 Invoke-Expression C:auditreport.html
The aforementioned script is displayed in a way that's easy for readers to understand. When it is used in PowerShell, make sure to prevent extra line spaces.
When you run the preceding script, it will ask for the name of the domain controller that you wish to run this report against.
Then, in the background, it will search for event 4625 in the event viewer and then list the following data in a report:
- The source computer
- The username
- The source IP address
- The event time
The following screenshot shows the failed login report for REBEL-PDC-01:

Figure 17.5: Login failures report
The login failures records are different from one server to another. So when it comes to troubleshooting, make sure you select the correct domain controller.
Finding the locked-out account
If password policies are defined, accounts with a large number of login failures will be locked out. Locked-out accounts in an AD environment can be found using the following command:
Search-ADAccount -Lockedout | Select name,samAccountName,Lockedout
If any of those in the list need to be unlocked, we can use the Unlock-ADAccount cmdlet to unlock an account.
For an individual account, perform the following command:
Unlock-ADAccount tuser4
For all the accounts on the list, perform the following command:
Search-ADAccount -Lockedout | Unlock-ADAccount
It is not a good practice to unlock all the accounts unless there is a specific reason.
Password expire report
Issues due to expired passwords are a common support call type for helpdesks. The following script can generate a report about expiring passwords:
## Password Expire Report ##
$passwordreport = $null
$dc = (Get-ADDomain | Select DNSRoot).DNSRoot
$Report= "C:passwordreport.html"
$HTML=@"
<title>Password Expire Report For $dc</title>
<style>
BODY{background-color :LightBlue}
</style>
"@
$passwordreport = Get-ADUser -filter * –Properties "SamAccountName","pwdLastSet","msDS-UserPasswordExpiryTimeComputed" | Select-Object -Property "SamAccountName",@{Name="Last Password Change";Expression={[datetime]::FromFileTime($_."pwdLastSet")}},@{Name="Next Password Change";Expression={[datetime]::FromFileTime($_."msDS-UserPasswordExpiryTimeComputed")}}
$passwordreport | ConvertTo-Html -Property "SamAccountName","Last Password Change","Next Password Change"-head $HTML -body "<H2>Password Expire Report For $dc</H2>"|
Out-File $Report
Invoke-Expression C:passwordreport.html
The aforementioned script is displayed in a way that's easy for readers to understand. When it is used in PowerShell, make sure to prevent extra line spaces.
This script will search for the attribute values for SamAccountName, pwdLastSet, and msDS-UserPasswordExpiryTimeComputed in every user object.
Then, they will be presented in an HTML report:
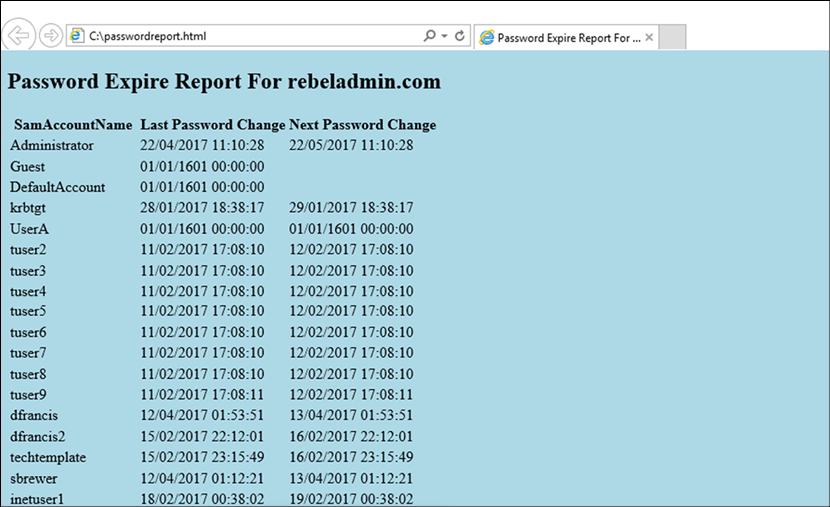
Figure 17.6: Password expire report
All these reports can run as scheduled jobs and were developed to be sent over as an email every week or month. This saves administrators time and also prevents mistakes that can occur with manual tasks.
Review the membership of the high-level administrative groups
As a security best practice, it is important to limit the number of privileged accounts used in an Active Directory environment. Sometimes we add users to privileged groups temporarily to do certain tasks and then forget to remove the permissions later on. Therefore, it is important to review members of the sensitive groups periodically and update those as required. In Active Directory, the following security groups are identified as sensitive groups:
- Enterprise Admins
- Schema Admins
- Domain Admins
- Account Operators (if present)
- Server Operators (if present)
- Print Operators (if present)
- DHCP Administrators
- DNSAdmins
To review the membership of a sensitive group we can use the following command:
Get-ADGroupMember -Identity "Domain Admins"
In the preceding command, Domain Admins is the group name and it can be replaced with any other sensitive group name. Once we have the list of members, the next step is to find out if those accounts are actively used. To do that we can use the value of the LastLogonDate user attribute. By considering all of the above requirements, I created the following scripts to list down all the sensitive groups with their members and LastLogonDate values:
## Sensitive Group Report ##
$HTML=@"
<title>Sensitive Groups Membership Report</title>
<style>
BODY{background-color :LightBlue}
</style>
"@
$enterpiseadmins = Get-ADGroupMember -Identity "Enterprise Admins" | where {$_.objectclass -eq 'user'} | Get-ADUser -Properties LastLogonDate | select Name,LastLogonDate | ConvertTo-Html -Property "Name","LastLogonDate" -Fragment -PreContent "<h2>Enterprise Admins</h2>"
$schemaadmins = Get-ADGroupMember -Identity "Schema Admins" | where {$_.objectclass -eq 'user'} | Get-ADUser -Properties LastLogonDate | select Name,LastLogonDate | ConvertTo-Html -Property "Name","LastLogonDate" -Fragment -PreContent "<h2>Schema Admins</h2>"
$domainadmins = Get-ADGroupMember -Identity "Domain Admins" | where {$_.objectclass -eq 'user'} | Get-ADUser -Properties LastLogonDate | select Name,LastLogonDate | ConvertTo-Html -Property "Name","LastLogonDate" -Fragment -PreContent "<h2>Domain Admins</h2>"
$accountoperators = Get-ADGroupMember -Identity "Account Operators" | where {$_.objectclass -eq 'user'} | Get-ADUser -Properties LastLogonDate | select Name,LastLogonDate | ConvertTo-Html -Property "Name","LastLogonDate" -Fragment -PreContent "<h2>Account Operators</h2>"
$serveroperators = Get-ADGroupMember -Identity "Server Operators" | where {$_.objectclass -eq 'user'} | Get-ADUser -Properties LastLogonDate | select
Name,LastLogonDate | ConvertTo-Html -Property "Name","LastLogonDate" -Fragment -PreContent "<h2>Server Operators</h2>"
$printoperators = Get-ADGroupMember -Identity "Print Operators" | where {$_.objectclass -eq 'user'} | Get-ADUser -Properties LastLogonDate | select Name,LastLogonDate | ConvertTo-Html -Property "Name","LastLogonDate" -Fragment -PreContent "<h2>Print Operators</h2>"
$dnsadmins = Get-ADGroupMember -Identity "DnsAdmins" | where {$_.objectclass -eq 'user'} | Get-ADUser -Properties LastLogonDate | select Name,LastLogonDate | ConvertTo-Html -Property "Name","LastLogonDate" -Fragment -PreContent "<h2>DNS Admins</h2>"
$Reportvalues = ConvertTo-HTML -Body "$enterpiseadmins $schemaadmins $domainadmins $accountoperators $serveroperators $printoperators $dnsadmins" -Head $HTML
$Reportvalues | Out-File "C:sensativegroupreport.html"
The preceding script will produce an HTML report similar to below.
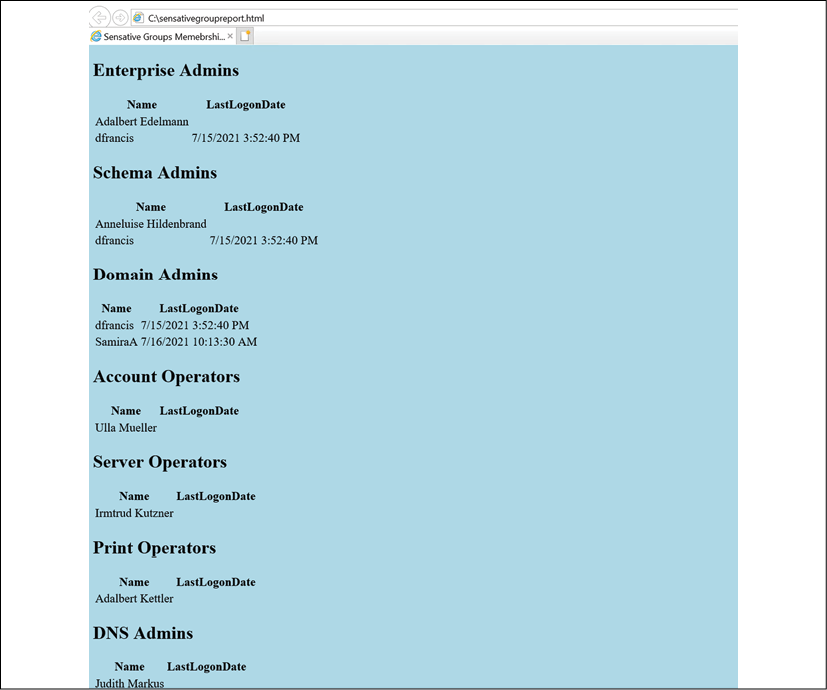
Figure 17.7: Sensitive group memberships
In this report, the LastLogonDate value can be used as a reference and if the account is not used often, we can go ahead and remove it from the sensitive groups.
In the script, I didn't mention DHCP Administrators as it is a local group.
In the above report, we are listing all the users in sensitive groups. Then it is up to engineers to tidy up the group membership. However, we can further develop this script and list down users who haven't logged in for a certain number of days. Then engineers can use it as a starting point to update the group memberships.
## Sensitive Group Members Inactive for 30 days ##
$30Days = (get-date).adddays(-30)
$HTML=@"
<title>Sensitive Groups Memebrship Report : USers Inactive for 30 days</title>
<style>
BODY{background-color :LightBlue}
</style>
"@
$enterpiseadmins = Get-ADGroupMember -Identity "Enterprise Admins" | where {$_.objectclass -eq 'user'} | Get-ADUser -Properties LastLogonDate |Where {$_.LastLogonDate -le $30Days}| select Name,LastLogonDate | ConvertTo-Html -Property "Name","LastLogonDate" -Fragment -PreContent "<h2>Enterprise Admins</h2>"
$schemaadmins = Get-ADGroupMember -Identity "Schema Admins" | where {$_.objectclass -eq 'user'} | Get-ADUser -Properties LastLogonDate | Where {$_.LastLogonDate -le $30Days}| select Name,LastLogonDate | ConvertTo-Html -Property "Name","LastLogonDate" -Fragment -PreContent "<h2>Schema Admins</h2>"
$domainadmins = Get-ADGroupMember -Identity "Domain Admins" | where {$_.objectclass -eq 'user'} | Get-ADUser -Properties LastLogonDate | Where {$_.LastLogonDate -le $30Days}| select Name,LastLogonDate | ConvertTo-Html -Property "Name","LastLogonDate" -Fragment -PreContent "<h2>Domain Admins</h2>"
$accountoperators = Get-ADGroupMember -Identity "Account Operators" | where {$_.objectclass -eq 'user'} | Get-ADUser -Properties LastLogonDate | Where {$_.LastLogonDate -le $30Days}| select Name,LastLogonDate | ConvertTo-Html -Property "Name","LastLogonDate" -Fragment -PreContent "<h2>Account Operators</h2>"
$serveroperators = Get-ADGroupMember -Identity "Server Operators" | where {$_.objectclass -eq 'user'} | Get-ADUser -Properties LastLogonDate | Where {$_.LastLogonDate -le $30Days}| select Name,LastLogonDate | ConvertTo-Html -Property "Name","LastLogonDate" -Fragment -PreContent "<h2>Server Operators</h2>"
$printoperators = Get-ADGroupMember -Identity "Print Operators" | where {$_.objectclass -eq 'user'} | Get-ADUser -Properties LastLogonDate | Where {$_.LastLogonDate -le $30Days}| select Name,LastLogonDate | ConvertTo-Html -Property "Name","LastLogonDate" -Fragment -PreContent "<h2>Print Operators</h2>"
$dnsadmins = Get-ADGroupMember -Identity "DnsAdmins" | where {$_.objectclass -eq 'user'} | Get-ADUser -Properties LastLogonDate | Where {$_.LastLogonDate -le $30Days}| select Name,LastLogonDate | ConvertTo-Html -Property "Name","LastLogonDate" -Fragment -PreContent "<h2>DNS Admins</h2>"
$Reportvalues = ConvertTo-HTML -Body "$enterpiseadmins $schemaadmins $domainadmins $accountoperators $serveroperators $printoperators $dnsadmins" -Head $HTML
$Reportvalues | Out-File "C:inactiveusers.html"
In the above, I am creating an HTML report that lists down the members of sensitive groups who haven't logged in for the last 30 days.
Dormant accounts
In Active Directory, at least 10% of user accounts are dormant (inactive) accounts. These accounts can represent:
- Test accounts
- Contractors
- Former employees
- Disabled accounts
It is important to review these dormant accounts periodically and remove all unnecessary accounts from Active Directory as they are a possible security threat. If it is not possible to remove some of these accounts, at least remove them from sensitive groups and disable the accounts.
We can find these accounts in Active Directory by looking at the LastLogonDate attribute value and the account status. By considering these requirements, I created the following script to find dormant accounts:
## Dormant Accounts ##
$InactiveDate = (Get-Date).Adddays(-30)
$HTML=@"
<title>Dormant Accounts Report</title>
<style>
BODY{background-color :LightBlue}
</style>
"@
$disabledaccounts = Get-ADUser -Filter {Enabled -eq $false} | select samAccountName,GivenName,Surname | ConvertTo-Html -Property "samAccountName","GivenName","Surname" -Fragment -PreContent "<h2>Disabled Account</h2>"
$inactiveaccounts = Get-ADUser -Filter {LastLogonDate -lt $InactiveDate -and Enabled -eq $true} -Properties LastLogonDate | select samAccountName,GivenName,Surname,LastLogonDate | ConvertTo-Html -Property "samAccountName","GivenName","Surname","LastLogonDate" -Fragment -PreContent "<h2>Inactive Accounts</h2>"
$Reportvalues = ConvertTo-HTML -Body "$disabledaccounts $inactiveaccounts" -Head $HTML
$Reportvalues | Out-File "C:dormantusers.html"
In the above, I am looking for disabled accounts by using Get-ADUser -Filter {Enabled -eq $false} | select samAccountName,GivenName,Surname. Then, after that, I am searching for users who have been inactive for the last 30 days by using Get-ADUser -Filter {LastLogonDate -lt $InactiveDate -and Enabled -eq $true} -Properties LastLogonDate | select samAccountName,GivenName,Surname,LastLogonDate. Here, I am ignoring disabled accounts as they are already recorded as separate entities. At the end, I am passing the findings to an HTML report called dormantusers.html.

Figure 17.8: Dormant accounts
If required, this data can also be exported into a CSV file. But in these examples, I used the HTML format to show the results in a user-friendly way.
Users with the Password Never Expires setting
In an Active Directory environment, we use password policies to enforce users to follow complexity standards and other best practices related to passwords. Users should use complex passwords and should update their passwords at regular intervals. This is one of the basic requirements of identity protection. However, if the user account has the Password Never Expires setting enabled, the user will not be forced to update the passwords according to the password policy.
We can find Active Directory user accounts that have the Password Never Expires setting enabled by using the following PowerShell commands:
Get-ADUser -Filter {passwordNeverExpires -eq $true -and Enabled -eq $true } -Properties * | Select samAccountName,GivenName,Surname
In the preceding command, I am looking for the passwordNeverExpires attribute value and if it's set to true, it means the setting is enabled. At the same time, I also checked if the user account is active.

Figure 17.9: Users with the Password Never Expires setting
In the next section of this chapter, we are going to look into managing Active Directory objects in a hybrid environment.
Azure Active Directory PowerShell
Similar to on-prem Active Directory, we also can use PowerShell to manage Azure Active Directory.
Let's see why we should use PowerShell to manage Azure Active Directory:
- Early bird access to features: Microsoft keeps releasing new features, bug fixes, updates, and feature enhancements more frequently to Azure AD services than on-prem Active Directory.
Microsoft releases new features to the public in two stages. In the first stage, they are released as a preview version. This is not recommended for use in production, but IT professionals can use them for testing and provide feedback to Microsoft. At this stage, the features can have many updates and, most of the time, it will take some time to update the GUI accordingly. Some of these changes will not be available on the GUI until general release. But if we are using PowerShell, we do not have to wait. We can have early access to features as soon as they are released.
- Faster response: The Azure Active Directory portal has many different windows, wizards, and forms to configure and manage users, groups, roles, and associated features. The GUI makes it easy to do things, but it takes time. As an example, if you add a user account using the Azure AD portal, you have to go to four sub-windows at least. But PowerShell allows us to do it using one window and a few lines of commands.
- Granular control: The Azure AD portal visualizes the data and configuration of the service using different windows. However, it may not always show what we want. As an example, let's assume we are looking for a specific value in two user accounts. If we use the GUI, we need to go to a few different windows to gather this information. But using a PowerShell command or script, we will be able to gather the same information in one window. This is really helpful when troubleshooting.
- Microsoft Graph integration: Microsoft Graph provides a unified programmability model to access a vast amount of data in Microsoft 365, Azure Active Directory, Enterprise Mobility Suite, Windows 10, and so on. As part of it, the Azure AD PowerShell for Graph module allows you to retrieve data, update directory configurations, add/update/remove objects, and configure features via Microsoft Graph.
In this chapter, I will be using the Azure Active Directory PowerShell for Graph module to manage an Azure AD hybrid environment.
Installation
The Azure Active Directory PowerShell for Graph module comes in two versions. The public preview version is the most recent, but it is not recommended for use in production.
The installation steps for this version can be found at https://bit.ly/3HR3EpU.
The general availability version is the stable, recommended version for production environments. It can be installed on any computer that runs Windows Server 2008 R2 or above with the latest updates. Microsoft .NET Framework 4.5 or above is also required.
Once the prerequisites are in place, perform the following steps:
- Log in to the computer you have selected for the Azure Active Directory PowerShell for Graph module.
- Launch the PowerShell console as an administrator.
- Run the
Install-Module -Name AzureADcommand. AnswerYesif it is a required repository update:
Figure 17.10: Install AzureAD PowerShell module
- After installation, we can verify the module installation using
Get-Module AzureAD. - After successfully installing the module, run
Connect-AzureADto initiate a connection to the Azure AD tenant. - Then, it will prompt you with a login window. Use Azure AD global administrator account details to connect.
Now we have the Azure Active Directory PowerShell for Graph module installed. Let's see how we can manage an Azure AD hybrid environment using this module.
Azure AD and MSOL modules are not supported in PowerShell 7.x. Therefore, here, I am using default Windows PowerShell running on Windows 10.
General commands
We can start by listing all the available commands under the Azure AD module, which can be done by using the following:
Get-Command -module AzureAD
We can view the full syntax for a command by using the Get-Help command. As an example, we can view the full syntax for the Get-AzureADUser command using the following:
Get-Help Get-AzureADUser
We can verify the status of Azure AD domains using the following command:
Get-AzureADDomain | fl
The preceding command helps to identify the domain verification status by referring to the value of the IsVerified attribute.
If you are using a custom domain in Azure AD, we need to verify ownership of the domain using DNS records. If it is not verified, we can retrieve the required DNS records by using the following command:
Get-AzureADDomainVerificationDnsRecord -Name M365x562652.onmicrosoft.com | fl
In the preceding example, M365x562652.onmicrosoft.com represents the domain name:

Figure 17.11: Required DNS records for domain verifications
We can view the details of the Azure AD tenant by using the following:
Get-AzureADTenantDetail | fl
In a hybrid environment, the health of the on-prem AD sync is crucial. We can view the time of the last directory sync by using the following command:
Get-AzureADTenantDetail | select CompanyLastDirSyncTime
Managing users
We can view the user account details for a known account using the following:
Get-AzureADUser -ObjectId [email protected] | fl
In the preceding command, [email protected] represents the UPN of the user.
We also can use user attributes to find user account details:
Get-AzureADUser -Filter "startswith(GivenName,'Adele')"
The preceding command will filter Azure AD users with GivenName as Adele.
We can also filter users based on a specific attribute value:
Get-AzureADUser -Filter "GivenName eq 'Adele'"
The preceding command will search for the exact user with the given name value Adele.
In my demo environment, I'd like to see a list of disabled accounts. I can do this using the following command:
Get-AzureADUser -All $true -Filter 'accountEnabled eq false'
We can modify the output of the filtered data further:
Get-AzureADUser -All $true -Filter 'accountEnabled eq false' | select DisplayName,UserPrincipalName,Department
The preceding command will display the value of the DisplayName, UserPrincipalName, and Department attributes of the filtered accounts.
In a hybrid environment, we can filter accounts that are synced from on-prem AD by using the following:
Get-AzureADUser -All $true -Filter 'DirSyncEnabled eq true'
In the preceding command, the value of the DirSyncEnabled attribute defines whether it's a cloud-only account or a synced account.
We also can check the last sync value for the synced accounts:
Get-AzureADUser -All $true -Filter 'DirSyncEnabled eq true' | select DisplayName,UserPrincipalName,LastDirSyncTime
In the preceding command, the LastDirSyncTime value defines the last sync time of the object.
We can also export the output to a CSV file using the Export-CSV command:
Get-AzureADUser -All $true -Filter 'DirSyncEnabled eq true' | select DisplayName,UserPrincipalName,LastDirSyncTime | Export-CSV -Path .syncaccount.csv
The ImmutableID value of a user account is used to map an Azure AD user object to an on-prem user object. ImmutableID does have a relationship with on-prem user accounts' ObjectGUID. We can use this to identify cloud-only users. If it is a cloud-only user, the ImmutableID value should be null:
Get-AzureADUser -All $true | where-Object {$_.ImmutableId -eq $null}
The preceding command returns a list of all the cloud-only accounts. We can export the required attribute values to CSV by using the following:
Get-AzureADUser -All $true | where-Object {$_.ImmutableId -eq $null} | select DisplayName,UserPrincipalName | Export-CSV -Path .cloudaccount.csv
Another important thing related to accounts is licences. If we are going to use Azure AD's premium features, we need to have relevant licenses assigned. By default, a user only has Azure AD free version features.
To view licenses associated with a user account, we can use the following command:
Get-AzureADUserLicenseDetail -ObjectId [email protected] | fl
The preceding command will return the licenses associated with the user [email protected].
We also can view the subscribed SKUs using the following command:
Get-AzureADSubscribedSku | fl
The preceding command lists all the details about licenses that are associated with the tenant. However, we only need to know how many licenses have been used and how many licenses are available. We can do this using the following command:
Get-AzureADSubscribedSku | select SkuPartNumber,ConsumedUnits -ExpandProperty PrepaidUnits
In the preceding example, the SkuPartNumber value represents the license part number. The value of the enabled field represents the number of purchased licenses. ConsumedUnits represents the number of consumed licenses.
Let's move on and see how we can assign a new license to a user.
In my environment, I have a user who synced from on-prem Azure AD who doesn't have a license assigned:
Get-AzureADUserLicenseDetail -ObjectId [email protected] | fl
The following screenshot displays the output of the preceding command:

Figure 17.12: Check Azure AD license assignment
As a first step, let's create objects to use in the license assignment process:
$newlicence = New-Object -TypeName Microsoft.Open.AzureAD.Model.AssignedLicense
$newlicenceadd = New-Object -TypeName Microsoft.Open.AzureAD.Model.AssignedLicenses
Then, we need to find the SkuId of the licenses.
I am going to assign the ENTERPRISEPREMIUM license to the user:
$newlicence.SkuId = (Get-AzureADSubscribedSku | Where-Object -Property SkuPartNumber -Value "ENTERPRISEPREMIUM" -EQ).SkuId
Then, we need to assign the licenses to the object:
$newlicenceadd.AddLicenses = $newlicence
Now, we can go ahead and assign the license to the user:
Set-AzureADUserLicense -ObjectId "[email protected]" -AssignedLicenses $newlicenceadd
The preceding command assigns ENTERPRISEPREMIUM licenses to the user [email protected]:

Figure 17.13: Assign license to user
It is a must to set the UsageLocation value for users who sync from on-prem AD before assigning licenses. We can do this using Set-AzureADUser -ObjectId [email protected] -UsageLocation "US".
We can remove the licenses assigned using the following command:
$licenseB = New-Object -TypeName Microsoft.Open.AzureAD.Model.AssignedLicenses
$licenseB.RemoveLicenses =  (Get-AzureADSubscribedSku | Where-Object {$_.SkuPartNumber -eq 'ENTERPRISEPREMIUM'}).SkuId
Set-AzureADUserLicense -ObjectId "[email protected]" -AssignedLicenses $licenseB
Using the preceding commands, I have created a script to do the following:
- Search for users who synced from on-prem AD
- Of those users, select the users who don't have Azure AD licenses assigned
- Set the
UsageLocationvalue for selected users - Assign Azure AD licenses to selected users
#######Script to Assign Licences to Synced Users from On-Permises AD#############
Import-Module AzureAD
Connect-AzureAD
###Filter Synced Users who doesn't have licence assigned#######
$ADusers = Get-AzureADUser -All $true -Filter 'DirSyncEnabled eq true'
$notlicenced = Get-AzureADUser -All $true | Where-Object {$ADusers.AssignedLicenses -ne $null} | select ObjectId | Out-File -FilePath C:users.txt
#####Set UsageLocation value to sync users#########
(Get-Content "C:users.txt" | select-object -skip 3) | ForEach { Set-AzureADUser -ObjectId $_ -UsageLocation "US" }
#####Set User Licecnes############
$newlicence = New-Object -TypeName Microsoft.Open.AzureAD.Model.AssignedLicense
$newlicenceadd = New-Object -TypeName Microsoft.Open.AzureAD.Model.AssignedLicenses
$newlicence.SkuId = (Get-
AzureADSubscribedSku | Where-Object -Property SkuPartNumber -Value "ENTERPRISEPREMIUM" -EQ).SkuId
$newlicenceadd.AddLicenses = $newlicence
(Get-Content "C:users.txt" | select-object -skip 3) | ForEach { Set-AzureADUserLicense -ObjectId $_ -AssignedLicenses $newlicenceadd }
In a hybrid environment, users are mainly created through on-prem Active Directory, but there are occasions when we need to add cloud-only accounts. This is mainly for cloud management tasks.
We can create a new user by using the following command:
$Userpassword = New-Object -TypeName Microsoft.Open.AzureAD.Model.PasswordProfile
$Userpassword.Password = "London@1234"
New-AzureADUser -DisplayName "Andrew Xavier" -PasswordProfile $Userpassword -UserPrincipalName "[email protected]" -AccountEnabled $true -MailNickName "AndrewXavier"
In the preceding command, -PasswordProfile is used to define the password profile for the new user account. -MailNickName defines the value for the user's mail nickname. In the preceding example, add a new user account, [email protected], with the password London@1234.
We also can create multiple user accounts using CSV files. In the following example, I am using a CSV file to create users. The CSV file contains the following:
UserPrincipalName, DisplayName,MailNickName
[email protected], Dishan Melroy,DishanMel
[email protected],Jack May,JackMay
[email protected],Richard Parker,RichardPar
Then, I can create these new users using the following:
$Userpassword = New-Object -TypeName Microsoft.Open.AzureAD.Model.PasswordProfile
$Userpassword.Password = "London@1234"
Import-Csv -Path C:
ewuser.csv | foreach {New-AzureADUser -UserPrincipalName $_.UserPrincipalName -DisplayName $_.DisplayName -MailNickName $_.MailNickName -PasswordProfile $Userpassword -AccountEnabled $true}
By using the preceding commands, I have created a script to do the following:
- Create new user accounts using a CSV file
- Set
UsageLocationfor new user accounts - Assign
ENTERPRISEPREMIUMlicenses to users
########A Script to create new users and assign Azure AD licences#######
Import-Module AzureAD
Connect-AzureAD
###########Create New Users using CSV ###################
$Userpassword = New-Object -TypeName Microsoft.Open.AzureAD.Model.PasswordProfile
$Userpassword.Password = "London@1234"
Import-Csv -Path C:
ewuser.csv | foreach {New-AzureADUser -UserPrincipalName $_.UserPrincipalName -DisplayName $_.DisplayName -MailNickName $_.MailNickName -PasswordProfile $Userpassword -UsageLocation "US" -AccountEnabled $true} | select ObjectId | Out-File -FilePath C:users.txt
###########Assign Licences#################
$newlicence = New-Object -TypeName Microsoft.Open.AzureAD.Model.AssignedLicense
$newlicenceadd = New-Object -TypeName Microsoft.Open.AzureAD.Model.AssignedLicenses
$newlicence.SkuId = (Get-AzureADSubscribedSku | Where-Object -Property
SkuPartNumber -Value "ENTERPRISEPREMIUM" -EQ).SkuId
$newlicenceadd.AddLicenses = $newlicence
(Get-Content "C:users.txt" | select-object -skip 3) | ForEach { Set-AzureADUserLicense -ObjectId $_ -AssignedLicenses $newlicenceadd }
To remove an Azure AD user, we can use the following:
Remove-AzureADUser -ObjectId "[email protected]"
We can combine it with a user search using the following command:
Get-AzureADUser -Filter "startswith(DisplayName,'Dishan')" | Remove-AzureADUser
The preceding command will search for user accounts that have a DisplayName that starts with Dishan. If there are any, the second part of the command will remove them.
Managing groups
Azure AD groups also work similarly to on-prem AD groups. They can be used to manage permissions in an effective manner. In a hybrid environment, there will be cloud-only groups as well as synced groups from the on-prem AD environment. In this section, we are going to look into group management using the Azure Active Directory PowerShell for Graph module.
Let's start with listing groups. We can search for a group using the following command:
Get-AzureADGroup -SearchString "sg"
In the preceding command, SearchString is used to define the search criteria. The preceding example will list any groups containing sg in the DisplayName field:

Figure 17.14: Search for groups
In the search result, we can see the ObjectId for the group. Once we know the ObjectId, we can see the details of the group using the following command:
Get-AzureADGroup -ObjectId 93291438-be19-472e-a1d6-9b178b7ac619 | fl
In a hybrid environment, there will be security groups that have synced from the on-premises Active Directory. We can filter these groups using the following:
Get-AzureADGroup -Filter 'DirSyncEnabled eq true' | select ObjectId,DisplayName,LastDirSyncTime
In the preceding example, the LastDirSyncTime column displays the last successful sync time of the group.
We can filter cloud-only groups using the following command:
Get-AzureADGroup -All $true | where-Object {$_.OnPremisesSecurityIdentifier -eq $null}
In the preceding command, we are using the OnPremisesSecurityIdentifier attribute to filter the groups. This attribute only has value if it is synced from on-premises AD.
We can view group memberships by using the following:
Get-AzureADGroupMember -ObjectId 2a11d5ee-8383-44d1-9fbd-85cb4dcc2d5a
In the preceding command, we are using ObjectId to uniquely identify the group.
We can add members to the group using the Add-AzureADGroupMember cmdlet:
Add-AzureADGroupMember -ObjectId 2a11d5ee-8383-44d1-9fbd-85cb4dcc2d5a -RefObjectId a6aeced9-909e-4684-8712-d0f242451338
In the preceding command, the ObjectId value represents the group, and the RefObjectId value represents the user.
We can remove a member from the group by using the following command:
Remove-AzureADGroupMember -ObjectId 2a11d5ee-8383-44d1-9fbd-85cb4dcc2d5a -MemberId a6aeced9-909e-4684-8712-d0f242451338
In the preceding command, the ObjectId value represents the group, and the MemberId value represents the user's ObjectId.
We can also combine the Add-AzureADGroupMember cmdlet with the Get-AzureADUser cmdlet to add bulk users to a group.
In the following script, I used the Get-AzureADUser cmdlet to search for users in Marketing Department, and then used Add-AzureADGroupMember to add those users to Sales Group as members:
#######Script to Add Multiple users to Security Group#############
Import-Module AzureAD
Connect-AzureAD
##### Search for users in Marketing Department ##########
Get-AzureADUser -All $true -Filter "Department eq 'Marketing'" | select ObjectId | Out-File -FilePath C:salesusers.txt
#####Add Users to Sales Group#########
(Get-Content "C:salesusers.txt" | select-object -skip 3) | ForEach { Add-AzureADGroupMember -ObjectId f9f51d29-e093-4e57-ad79-2fc5ae3517db -RefObjectId $_ }
In a hybrid environment, security groups are mainly synced from on-prem AD. But there can be requirements for cloud-only groups as well. We can create a cloud-only group by using the following:
New-AzureADGroup -DisplayName "REBELADMIN Sales Team" -MailEnabled $false -MailNickName "salesteam" -SecurityEnabled $true
The following screenshot displays the output of the preceding command:

Figure 17.15: Create a cloud-only group
The preceding command creates a security group called REBELADMIN Sales Team. This group is not a mail-enabled group.
We can remove an Azure AD group using the following command:
Remove-AzureADGroup -ObjectId 7592b555-343d-4f73-a6f1-2270d7cf014f
In the preceding command, the ObjectId value defines the group.
Apart from security groups, Azure AD also has predefined administrative roles, which can be used to assign access permissions to Azure AD and other cloud services. There are more than 35 predefined administrative roles. Each role has its own set of permissions. More details about these roles can be found at https://bit.ly/3r5FMcs.
We can list all the administrative roles using the following:
Get-AzureADDirectoryRoleTemplate
By default, only a few administrative roles are enabled. We can list these roles using the following:
Get-AzureADDirectoryRole
Here, the company administrator directory role represents the Azure AD global administrators.
We can enable the administrative role using the following:
Enable-AzureADDirectoryRole -RoleTemplateId e6d1a23a-da11-4be4-9570-befc86d067a7
In the preceding command, the RoleTemplateId value represents the administrative role.
We can assign the administrative role to a user by using the following command:
Add-AzureADDirectoryRoleMember -ObjectId b63c1671-625a-4a80-8bae-6487423909ca -RefObjectId 581c7265-c8cc-493b-9686-771b2f10a77e
In the preceding command, the ObjectId value represents the administrative role. RefObjectId is the object ID value of the user.
We can list members of the administrative role using the following:
Get-AzureADDirectoryRoleMember -ObjectId 36b9ac02-9dfc-402a-8d44-ba2d8995dc06
In the preceding command, ObjectId represents the administrative role.
We can remove a member from the role using the following command:
Remove-AzureADDirectoryRoleMember -ObjectId 36b9ac02-9dfc-402a-8d44-ba2d8995dc06 -MemberId 165ebcb7-f07d-42d2-a52e-90f44e71e4a1
In the preceding command, MemberId is equal to the user's object ID value.
This marks the end of this section. There are lots of cmdlets that can still be used to manage Azure AD, but here I explained the cmdlets that will be required for day-to-day operations.
Microsoft Graph
Microsoft Graph is like a gateway that allows users to access enormous amounts of data and collect information from:
- Microsoft 365 core services (for example, Office 365, Microsoft Search, OneDrive, SharePoint)
- Identity and Security Services (for example, Azure AD, Defender 365, Endpoint Manager)
- Windows 10 services
Microsoft Graph connects to the above services by using REST APIs and client libraries to retrieve required data.
We can use three methods to interact with Microsoft Graph data:
- The Microsoft Graph API endpoint (https://bit.ly/3DSbZHF) can be used to access data and information collected from various Microsoft services. This data can be processed and present in the way an organization/individual requires. Also, this data can be used to develop rich applications/services.
- Microsoft Graph connectors help to bring third-party application/service data to Microsoft Search so all company data can be searched from one location. Some of these connectors are built by Microsoft and others are built by partners. You can access the connectors gallery by using https://bit.ly/3FMBaft.
- Microsoft Graph Data Connect allows us to access Microsoft Graph data at scale. This gives engineers a granular level of control over Microsoft Graph data. Microsoft Graph Data Connect also provides a unique set of tools that can be used to build intelligent applications.
Based on the requirements, we can use one or more of the above methods to access Microsoft Graph data.
In this section, I am going to demonstrate how we can use Microsoft Graph to access Azure AD data.
Microsoft Graph Explorer
Graph Explorer is a Microsoft-developed tool that allows you to make Microsoft Graph REST API requests. This tool can be accessed using https://bit.ly/3l6EF8m.
The first thing we need to do on the page is to log in. Then we need to grant permissions to Microsoft Graph to access data. To do that, go to the Modify permissions (Preview) tab and give consent to grant relevant permissions.

Figure 17.16: Grant permissions to user
After relevant permissions are in place, we can go ahead and query data using Microsoft Graph Explorer. Let's go ahead and start with a user query.
In this example, I would like to view the account details of the [email protected] user. To do that, I am going to use the GET HTTP method and the https://graph.microsoft.com/v1.0/users/[email protected] query.

Figure 17.17: User query
Then Microsoft Graph responds to the query with the following data:

Figure 17.18: Output of user query
According to the above data, the user has the jobTitle attribute value as Sales Rep. This user has been promoted recently and I need to change the title to Sales Manager. To do that, we need to use the PATCH HTTP method:
PATCH https://graph.microsoft.com/v1.0/users/[email protected]
Before I run the query under the request body, I define the new values I need to apply:
{
    "jobTitle": "Sales Manager"
}

Figure 17.19: Update attribute value
After I run the query successfully, I can see the relevant attribute has a new value.

Figure 17.20: Confirm new attribute value
As the next step, I would like to list my domains under Azure AD. To do that, I can use:
GET https://graph.microsoft.com/v1.0/domains
It returns the details about all the domains under the current subscription. If we need to view data related to a particular domain, we can do it by using:
GET https://graph.microsoft.com/v1.0/domains/rebeladmin.OnMicrosoft.com
In the preceding command, rebeladmin.OnMicrosoft.com is the FQDN.

Figure 17.21: Domain information
As we can see, it provides rich data about the domain. Microsoft Graph Explorer can also be used to create, modify, and delete data by using the HTTP methods POST and DELETE. As an example, if the domain name is not verified, I can force the verification of the domain by using:
POST https://graph.microsoft.com/v1.0/domains/rebeladmin.onmicrosoft.com/verify
Next, I would like to list all the groups in Azure AD. For that, I can use:
GET https://graph.microsoft.com/v1.0/groups
The above command lists down all the groups in the directory with attribute values, but I am more interested in finding out the id and displayName values of the groups.
So, I am going to modify the query and only select id and displayName values:
GET https://graph.microsoft.com/v1.0/groups?$select=id,displayName

Figure 17.22: List groups
But this is still a long list. I want to search for groups that start with the letters sg. To do that, we can use:
GET https://graph.microsoft.com/v1.0/groups?$filter=startswith(displayName, 'sg')&$select=id,displayName
From the group list, I am more interested in the sg-Sales and Marketing. Let's take note of the group id value for future use.

Figure 17.23: List of groups contain "sg"
As the next step, I would like to get a list of members of sg-Sales and Marketing. We can do this by using:
GET https://graph.microsoft.com/v1.0/groups/{eb2f21de-fae1-43cb-8594-8a39cb33de9d}/members?$count=true
In the above command, eb2f21de-fae1-43cb-8594-8a39cb33de9d is the group ID of the sg-Sales and Marketing group.

Figure 17.24: List members of a group
As we can see above, the query has a response with a list of all the users. In response, the @odata.count value represents the number of members in the group.
I have a new user called Megan with the object ID 086ba971-ecc2-49a5-a063-6e2d4fba9e9b. I would like to add this user to the sg-Sales and Marketing group. This task includes two steps.
As the first step, we need to paste the following command in the query window:
POST https://graph.microsoft.com/v1.0/groups/{eb2f21de-fae1-43cb-8594-8a39cb33de9d}/members/$ref
In the above, eb2f21de-fae1-43cb-8594-8a39cb33de9d is the group ID value.
Then, under the Request body section, I use the following command:
{
    "@odata.id": "https://graph.microsoft.com/v1.0/directoryObjects/{086ba971-ecc2-49a5-a063-6e2d4fba9e9b}"
}
This is the reference for the new member object ID. In the above, 086ba971-ecc2-49a5-a063-6e2d4fba9e9b is the object ID of the user Megan.
After that, we can run the query. If it is successful, we should get a No Content - 204 response.
After that, I rerun the command to list down members of sg-Sales and Marketing and now I can see the new user as a member.

Figure 17.25: Add user to a group
We also can delete a member from a group by using the DELETE HTTP method. If we need to remove Megan from the group, we can use:
DELETE https://graph.microsoft.com/v1.0/groups/{eb2f21de-fae1-43cb-8594-8a39cb33de9d}/members/{086ba971-ecc2-49a5-a063-6e2d4fba9e9b}/$ref
In the preceding command, eb2f21de-fae1-43cb-8594-8a39cb33de9d is the object ID of the group and 086ba971-ecc2-49a5-a063-6e2d4fba9e9b is the object ID of the user Megan.
In this section of the chapter, I have used several examples to show how we can use Microsoft Graph with Azure AD. This is a vast topic but I believe, now, you have an idea of how Microsoft Graph works. For more information, please visit https://bit.ly/3HS0MJq.
Summary
PowerShell has become the most powerful script language for Windows systems. PowerShell is very useful for systems management but is also an incredibly powerful tool for managing Active Directory infrastructures. Throughout the book, I have used PowerShell for Active Directory configuration and management.
Furthermore, I have shared different commands and scripts that can be used to manage an Active Directory environment efficiently.
Toward the end of the chapter, you learned how to manage Azure AD using the Azure Active Directory PowerShell for Graph module. We also looked into Microsoft Graph and learned how to use it to manage Azure AD. In the next chapter, we will look at Azure AD closely and learn how to manage identities in a hybrid environment.