
Chapter at a Glance

Before showing you how to track and manage customer data in Microsoft Dynamics CRM, we want to explain where to find the areas referenced in this book and show you how to navigate through the software. You’ll also learn about the resources available for more information on how to work with the software.
Important
The images used in this book reflect the default form and field names in Microsoft Dynamics CRM. Because the software offers extensive customization capabilities, it’s possible that some of the record types or fields have been relabeled in your Microsoft Dynamics CRM environment. If you cannot find the forms or fields referred to in this book, contact your system administrator for assistance.
Important
You must know the location of your Microsoft Dynamics CRM website to work the exercises in this book. Check with your system administrator to verify the web address if you don’t know it.
Most of the time, you will access Microsoft Dynamics CRM through one of its two primary user interfaces: the web client or Microsoft Dynamics CRM for Outlook. The exercises and examples in this chapter use the web client, unless otherwise specified. Chapter 5, explains the system navigation specific to the Microsoft Outlook interface. To help you better understand how to navigate the software, the various components of the web interface are described here.

The following list describes the sections of the user interface:
Ribbon The ribbon includes buttons and tabs that let you quickly access system actions. If you have used the 2007 Microsoft Office system or Office 2010, you will recognize the ribbon because it appears in most of the Office applications as well. The ribbon is unique because the buttons and tabs dynamically update based on what the user is doing within the system. For example, navigating to Contacts will display different ribbon buttons and tabs than when you navigate to Opportunities. The idea behind the ribbon is to display the most common activities to a user relative to where he or she is in the system, which will save clicks.
Grid The grid displays a list of records. Each record set is known as a data view in Microsoft Dynamics CRM. The grid consists of rows and columns of data. At the bottom of the grid, you can find information about the number of records in the view. The grid also includes an index bar that allows you to quickly filter records in the grid based on the starting letter. Microsoft Dynamics CRM applies the ribbon actions against the records selected in the grid. For example, if you select three records in a grid and click a button on the ribbon, Microsoft Dynamics CRM will apply that button’s action to the three records you selected.
Application navigation pane This portion of the user interface provides access to the various types of Microsoft Dynamics CRM data. Simply click a hyperlink in the application navigation pane to view that set of records.
Application areas Each application area provides a logical grouping of Microsoft Dynamics CRM records. The default application areas are Workplace, Sales, Marketing, Service, Settings, and Resource Center. If you click one of these buttons, Microsoft Dynamics CRM will update the application navigation pane to display the records grouped within that section.
Get Started pane The Get Started pane displays help information about how to work with Microsoft Dynamics CRM. The help information consists of different types of content such as videos, hyperlinks to help pages, or links that launch system actions. The Get Started pane content dynamically updates with different help information depending on the type of records you are viewing.
Tip
You can collapse and expand the Get Started pane by clicking the arrow located directly beneath the pane. You can also turn off the Get Started pane for all records by updating your personal options. For more information, see Setting Personal Options later in this chapter.
View selector The view selector allows you to select different views of data.
Quick Find The Quick Find functionality allows you to enter text to quickly search for specific records.
Chart This area of the user interface displays charts and graphs. The data that appears in the chart is specific to the currently selected view. For example, viewing a top-customers chart with the Open Opportunities view selected will show the chart with all of the open opportunities. Viewing a top-customers chart with the My Open Opportunities view selected will show the chart only with the opportunities that you own. The actual appearance of the chart might vary, depending on your data.
Tip
As with the Get Started pane, the chart can be collapsed and expanded by clicking the arrow located in the upper-right corner of the Chart area.
When you open a record in Microsoft Dynamics CRM, you’ll see additional parts of the user interface.

Ribbon Just like the ribbon in the main user interface, the ribbon on each individual record includes buttons and tabs related to that record type.
Entity navigation pane Similar to the application navigation pane, the entity navigation pane displays different types of Microsoft Dynamics CRM records. However, the entity navigation pane displays only those records that are linked to the open record. For example, clicking the Contacts link in the entity navigation pane of an account record will display only those contacts that have the open account record listed as their parent customer. In addition to showing related records, you can click the text links located under Information in the navigation pane to jump to specific sections of the form.
Body The body displays the data related to the open record. The fields on the entity form are sometimes referred to as attributes.
Header The record header includes data about the record, and it always remains visible when the record is open even if you click one of the related entities in the navigation pane.
Footer Just like the header, the footer remains visible at all times when you have the record open. You might want to include certain data fields in the footer so that you can view them at any time when working with a record.
Jump selector If you open a record from a view of data, the jump selector allows you to quickly jump to other records in the view. By clicking the picklist, you can see a list of contacts from the originating view and select one. In addition, you can click the Up or Down arrow to open the previous or next record from the view.
Now that you understand the main components of the Microsoft Dynamics CRM user interface, you’re ready to start working with data records. Microsoft Dynamics CRM uses a view to display a list of data records in a grid. You will spend a lot of time working with views, so it’s important to understand the utilities that Microsoft Dynamics CRM offers to work with views of data.
Each view can contain an unlimited number of data records. Microsoft Dynamics CRM splits the view data into multiple pages of records, so you might need to click the page arrows located in the lower-right corner of the grid to access the additional records contained in your view. If the page arrows are disabled, your view does not contain multiple pages of records.
Tip
Even though Microsoft Dynamics CRM splits the view into multiple pages, you can view the total count of records in the view by looking in the lower-left corner of the grid. If your view contains more than 5,000 records, Microsoft Dynamics CRM will simply state that the record count is 5000+.
In this exercise, you will change the data records that appear in the grid by selecting a different view of the data. You might want to change views for various purposes, such as exporting the records from the view into Microsoft Excel for a report or editing multiple records at one time.
Tip
You can change the width of a view column by clicking the column divider and dragging it to the left or right. Resizing the column allows you to see more or less of the record’s data.
Note
SET UP Use the Windows Internet Explorer web browser to navigate to your Microsoft Dynamics CRM website before beginning this exercise.
In the application areas, click the Sales button.
In the application navigation pane, click the Accounts link.
By default, you will see a view of all of the active account records that you own in your system.
Click the arrow in the view selector.
Microsoft Dynamics CRM displays a list of the views available for the account entity.
Select Active Accounts.
Microsoft Dynamics CRM changes the records displayed in the grid to show all of the active accounts in the database.

Within each view, you can sort the records to see them in a particular order. Each view contains a default sort order, but you can change the record order in any grid. When you’re looking at a view, Microsoft Dynamics CRM includes visual indicators to show how it has sorted the records. In the column header, next to one of the column names, you will see a small triangle pointing up or down. This triangle indicates that this column’s data is used to sort the view records. An upward-pointing triangle means that the records are displayed in ascending order (low to high or A to Z); a downward-pointing triangle means that the records are displayed in descending order (high to low or Z to A). In addition to the triangle in the column heading, Microsoft Dynamics CRM shades the column a light blue color in the background to visually indicate that the view is sorting on this column.
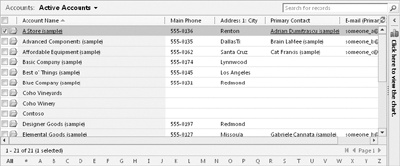
Changing the sort order of a column is very straightforward; all you need to do is click the column heading. Clicking the column heading toggles the sort order between ascending and descending.
You can also sort records by more than one column at a time. In this exercise, you will sort a view by using multiple columns.
Important
Even though you can display columns from related records in a view, you can sort only on columns that are attributes of the primary entity in the view. For example, if you have a contact view that contains columns from the related account records, you can sort the contact view only by clicking the columns that contain contact data; clicking the related account columns will not sort the records. You will not receive an error message when you click the related columns; instead, Microsoft Dynamics CRM will not react at all.
Note
SET UP Use the Internet Explorer web browser to navigate to your Microsoft Dynamics CRM website, if necessary, before beginning this exercise. Open a webpage that contains multiple records in a view.
Click the heading of the column by which you want to sort the records.
Microsoft Dynamics CRM adds the upward-pointing sort arrow and sorts the records in the view in ascending order.
Hold down the Shift key and click the second column heading by which you want to sort the records.
Microsoft Dynamics CRM adds another upward-pointing sort arrow to this column and sorts in ascending sort order, while preserving the first sort column.
While keeping the Shift key down, click the second column heading again.
Microsoft Dynamics CRM toggles the sort order to display the records in descending order.

As you learned earlier in this chapter, you can use the buttons on the ribbon to perform actions on selected records in a view. Microsoft Dynamics CRM offers a few different ways to select records within a view. If you want to select one record, simply click the record row. Alternatively, you can also point to the row you want to select and then select the check box that appears on the far left. Taking either of these actions will cause Microsoft Dynamics CRM to highlight the record with a blue background to indicate which record you selected. If you want to select all of the records, select the check box that appears in the upper-left corner of the view. Microsoft Dynamics CRM will highlight all of the records that appear on the page. Deselecting the check box will deselect all of the records.
Important
When you select the check box to select all of the records, you are only selecting all of the records on the page. You are not selecting all of the records in the view. For example, if your view contains 500 records and your page contains 25 records, selecting the check box will select only the 25 records displayed on the page. Some of the features in the ribbon, such as Export To Excel and Send Direct E-Mail, allow you to select all of the records from the view, but many of the features in the ribbon (such as assigning records and editing records in bulk) apply only to a single page of records. Unfortunately, in these scenarios, you will need to repeat the action on each page of records if your view contains multiple pages of records. Later in this chapter, we will explain how to display up to 250 records per page in a view (instead of the default of 25 records per page). Displaying more records per page decreases the number of times you need to repeat an action on a set of records.
If you want to select more than one record in a view (but not all of them), you can do so by pressing the Ctrl and Shift keys. This technique should be familiar to users of Office, because other applications such as Excel and Outlook also allow users to select multiple items by holding down the Ctrl or Shift key while clicking the desired records.
As you work with the records in a view, you might find that the view does not refresh the data set as you expect. This might happen when you’re working with different sets of records in multiple Internet Explorer windows or if a different user is editing the records in your view.
In this exercise, you will manually refresh the data that appears in a view, and then select multiple records in the view.
Note
SET UP Use the Internet Explorer web browser to navigate to your Microsoft Dynamics CRM website, if necessary, before beginning this exercise. Open a webpage that contains multiple records in a view.
 In the upper-right corner of the view,
click the Refresh button. Microsoft
Dynamics CRM refreshes the data in the view.
In the upper-right corner of the view,
click the Refresh button. Microsoft
Dynamics CRM refreshes the data in the view.Click a record in the view. Microsoft Dynamics CRM highlights the row, indicating that the record is selected.
To add one record to your selection, hold down the Ctrl key and select another record.
Microsoft Dynamics CRM highlights this new record as well, indicating that you’ve selected it.
To include multiple records in a selection, click one record, and then hold down the Shift key and select another record.
Microsoft Dynamics CRM selects and highlights the two records you clicked and all of the records in between.
With the appropriate records selected, you can apply the desired action to the records.
As you work with various records in a view, you might want to update the data in multiple records at one time. Microsoft Dynamics CRM allows you to select multiple records in a view and edit them with one form so that you don’t have to modify each record individually. This feature can provide a significant time savings if you need to modify a large number of records. Although the edit multiple records feature is very convenient, it does contain a few notable restrictions:
If a particular field contains programming script behind the scenes (as configured by your system administrator), you cannot edit the data in that field while editing multiple records.
You cannot use the edit multiple records feature to remove values from a field. You can only modify or add data to a field.
You cannot use the edit multiple records feature to edit certain fields in Microsoft Dynamics CRM, such as the Parent Account field of the account record or the Parent Customer field of a contact record.
The edit multiple records feature updates only the selected records on the page; you cannot use it to update all of the records in the view if the records span multiple pages.
If a data field is read-only on the form, you cannot edit it with the multiple record edit tool.
Tip
Even though you cannot edit the owner of a record by using the edit multiple records feature, you can easily change the owner of multiple records at one time by using the Assign feature located on the ribbon.
In this exercise, you will update the State/Province field for multiple contacts.
Note
SET UP Use the Internet Explorer web browser to navigate to your Microsoft Dynamics CRM website, if necessary, before beginning this exercise. Open a view of Contacts that contains more than one record.
While holding down the Ctrl key, click two or more of the contact records.
Microsoft Dynamics CRM highlights the records you click to indicate that they are selected.
The Edit Multiple Records dialog box appears. This dialog box is very similar to the contact form, with the same layout and fields.
Locate the State/Province field, and type Illinois in the field.
Click the Save button.
Microsoft Dynamics CRM updates the State/Province field of the selected records and closes the Edit Multiple Records dialog box.

Even with the sorting features in views, sometimes it can be time consuming to manually look for a particular record, especially if the view contains a large number of records. To help address this concern, Microsoft Dynamics CRM includes a Quick Find feature that allows you to search for records by using keywords or wildcard characters. You can find the Quick Find search box above the grid and to the right of the view selector. To use it, enter a search phrase and press Enter on the keyboard or click the button with the magnifying glass to start the search. Even though Quick Find is simple to use, there are a few tips and tricks that will help you find records more efficiently.
Your system administrator can configure Microsoft Dynamics CRM to search for matching records across multiple columns. For example, you could search for particular contacts by name, phone number, or email address. You can even include custom data fields as part of the search criteria.
When you enter search text, Microsoft Dynamics CRM will search for the value as it is entered. By default, it will not search for partial records. For example, if you search for a phone number by entering 555-1212 and the contact’s phone number is (312) 555-1212, Microsoft Dynamics CRM will not consider that a match. It will return only those records that have 555-1212 as the start of their phone number.
Of course, there will be times when you don’t know the exact value you’re searching for. In these cases, you can enter an asterisk (*) as a wildcard character in your Quick Find search. In the previous example, if you did not know the exact phone number, you could search for *555-1212 and Microsoft Dynamics CRM would find the (312) 555-1212 matching record, plus any other records that ended with 555-1212.
Tip
You can enter the wildcard character anywhere in your search criteria: at the beginning, in the middle, or at the end. If you can’t find the record you’re looking for, be sure to try different combinations with the asterisk wildcard. Note that the Quick Find feature is not case sensitive in its searches.
If you start a Quick Find search when you’re working with a specific view, such as My Active Contacts, you might expect that Microsoft Dynamics CRM would search for matching records only within the My Active Contacts view. However, Quick Find always searches for matching records across all active records for that entity. Quick Find ignores inactive records.
Tip
To filter records within a specific view, you can click the letters that appear at the bottom of the view (also referred to as the index bar). Clicking a letter will update the view to show only those records whose entry in the current sort column starts with the selected letter. For example, if you’re looking at the My Active Contacts view with the records sorted by City and you click B in the index bar, Microsoft Dynamics CRM will show you only those records in which the city starts with the letter B. If you then click the Full Name column to sort by that field and click the letter C in the index bar, Microsoft Dynamics CRM will update the My Active Contacts view to show only those records in which the Full Name entry starts with the letter C.
In this exercise, you will use the Quick Find feature to search for records in Microsoft Dynamics CRM.

For each type of record, your system administrator can specify the default view that you see when you navigate to a list of those records. However, Microsoft Dynamics CRM also allows each user to specify his or her own personal default view independent of the system administrator’s settings. You might find that using this feature saves you dozens of mouse clicks per day.
Important
The default view loads first for each web browsing session; however, Microsoft Dynamics CRM also keeps track of your most recently visited view within a web session and displays that first for convenience.
In this exercise, you will set a new default personal view.
Note
SET UP Use the Internet Explorer web browser to navigate to your Microsoft Dynamics CRM website, if necessary, before beginning this exercise.
Navigate to the Accounts view. The default view for Accounts is My Active Accounts, so you will see that first. Let’s assume that you want to change the default view (just for you) to Active Accounts.
Click the view selector and select Active Accounts.
On the ribbon, click the View tab.
 Click the Set as
Default View button.
Click the Set as
Default View button.You have now set this view as your personal default for Accounts. The next time you log on to Microsoft Dynamics CRM and navigate to Accounts, you will see the Active Accounts first.
Let’s see how the default view works within a single web browsing session. Click the view selector and select Inactive Accounts.
In the application navigation pane, click Contacts. Now let’s navigate back to Accounts to see which view appears first.
In the application navigation pane, click Accounts.
You will see the Inactive Accounts view first, even though the Active Accounts view is your personal default. This is because Microsoft Dynamics CRM displays the last view you accessed within the web browsing session by default.
Now close the Internet Explorer window, open a new window, and access Microsoft Dynamics CRM again.
Navigate to the Accounts views, and you will see the Active Accounts view first (your default personal view).
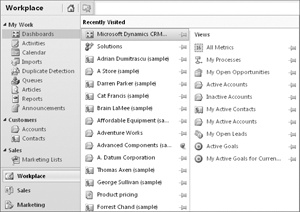
As you spend the day working in Microsoft Dynamics CRM, you will probably find that you frequently use the same records or views again and again. Fortunately, Microsoft Dynamics CRM includes a recently visited feature that allows you to quickly access records and views. This will save you time and clicks.
As you would expect, the recently visited section keeps track of the various records and views you have worked with recently. In addition, as with the other Office applications that include this type of recently used functionality, you can pin specific views or records so that they always remain in your recently visited list.
In this exercise, you will access the recently visited list and pin a view for future quick access.
Note
SET UP Use the Internet Explorer web browser to navigate to your Microsoft Dynamics CRM website, if necessary, before beginning this exercise.
 Click the recently visited button, which
always appears in the upper-left corner of the application window,
directly under the ribbon.
Click the recently visited button, which
always appears in the upper-left corner of the application window,
directly under the ribbon.A new menu appears, and you will see two lists of records and views. The left column lists your recently visited records, and the right column lists your recently visited views. Both columns also include an icon of the record or view type so that you can visually determine which type of entity the record or view corresponds to.
 Click one of the gray pin icons to
permanently pin that record or view. After you click the pin, the
pin icon will update by turning green and changing to look like it
is standing upright. That pinned record or view will always remain
in your recently visited list.
Click one of the gray pin icons to
permanently pin that record or view. After you click the pin, the
pin icon will update by turning green and changing to look like it
is standing upright. That pinned record or view will always remain
in your recently visited list.To load the record or view from the recently visited list, simply click its name. To unpin a record or view, follow the same steps and click the green pin icon to unpin the record or view from your recently visited list.
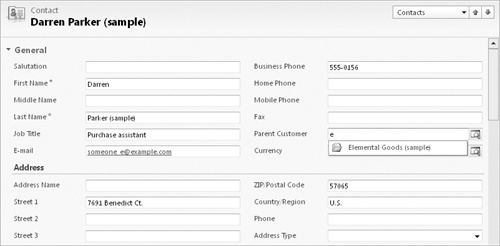
One of the main benefits of any customer relationship management system is that the software allows you to create relationships between records in your database. These relationships allow you to understand the different types of data about your customers, vendors, and partners, and how they interact with one another. The Microsoft Dynamics CRM user interface displays the link between two records by using a lookup. The default contact form includes two lookups: one for the Parent Customer and one for the default currency.

You can visually determine that a field is a lookup because:
Clicking the hyperlinked text in the field will launch a new window displaying the linked record. Unlike the other fields on the form, in which you simply enter data into the field, lookup fields require you to select a record to link to. You can link records in the lookup field by using one of three techniques:
Use the Look Up Records dialog box To use this technique, click the lookup icon. Microsoft Dynamics CRM will then launch the Look Up Records dialog box, which you can use to search for and select a specific record.
Use automatic resolution To use this technique, simply start typing the name of the linked record in the lookup field. After you enter all (or a portion) of the linked record’s name, click a different form field or press the Tab key. Microsoft Dynamics CRM will then try to automatically resolve your entry to an existing record.
Select recently used As you start typing in a lookup field, you might notice that a list of records automatically appears under the lookup field. This list of records is known as the most recently used list. To choose one of these records, simply click the one you want.
Tip
The automatic resolution feature in lookups can provide a significant time savings when you work with many different records.
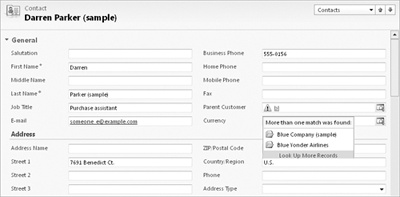
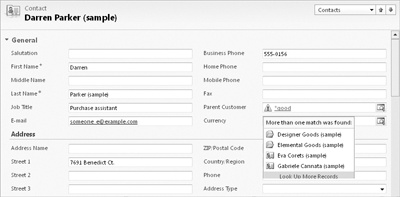
Microsoft Dynamics CRM will try to match records in the lookup by using the find fields of the entity. The record name is typically included as a find field, but your administrator might configure additional find fields that you can use with automatic resolution. If Microsoft Dynamics CRM finds just one matching record during the automatic resolution, it will populate the lookup field with a link to that record. If more than one match is found, the lookup field will display a yellow match icon and color the text you entered as red. Click the yellow match icon to view the potential matches, and then select the record you want. Microsoft Dynamics CRM will then use that value for the lookup field.
![]() If Microsoft Dynamics CRM does not find any
potential matches, it will color the text red and display a red circle
with a white X.
If Microsoft Dynamics CRM does not find any
potential matches, it will color the text red and display a red circle
with a white X.
If you want to remove a value from a lookup field, you can select the white portion of the field (without clicking the hyperlinked text) and then press the Backspace key or Delete key.
In this exercise, you will use the most recently used list to populate a lookup value.
Note
SET UP Log on to the Microsoft Dynamics CRM website through the web client before beginning this exercise. Make sure that you have the Microsoft Dynamics CRM sample data loaded.
Navigate to a contact view and open any contact record.
In the Parent Customer field, click the white space and start typing an account name. For this exercise, type good and press the Tab key. You will see that Microsoft Dynamics CRM did not find any matching records, and therefore it displays the red circle with the white X.
In the same Parent Customer field, click the white space and type *good. This time you added the asterisk wildcard in front of your entry. As you learned in the Quick Find section earlier in this chapter, the asterisk wildcard expands the search to include anything that has the text good in it. In our first example (without the wildcard), Microsoft Dynamics CRM only searches for matching records that begin with the text good, and it didn’t find any matches.
With the wildcard included in the search, Microsoft Dynamics CRM will display the yellow match icon. Click this icon to see the list of records that matched your *good entry. You will see that four possible matches are listed: two accounts and two contacts. Even though the contact records don’t appear to have the text good in their name, they appear as a possible match because these contacts are linked to the accounts that do have the text *good in their name.
Select Elemental Goods (sample). When you do so, Microsoft Dynamics CRM automatically adds this record to your most recently used list. Now you will access that list from a lookup field, but first you will need to clear out the existing value.
In the Parent Customer field, click the white space and press the Delete key. This will blank out the Parent Customer field.
Now click in the Parent Customer field and type e. Microsoft Dynamics CRM will display the most recently used list directly beneath the lookup field.
To select a record from this list, click it with your mouse. Alternatively, you can use the down arrow on your keyboard to select the record you want and then press Tab.
Microsoft Dynamics CRM allows you to set personal options to modify the user interface. You can access your personal options by clicking the File tab in the ribbon and then clicking Options to open the Set Personal Options dialog box. Although we won’t review all of the personal options available, we do want to review a few common configuration options.

On the General tab, you can specify the following:
Default home page By changing this selection, you can determine which page Microsoft Dynamics CRM will start on after you log on with the web client. Select the pane and tab you use most frequently.
Show Get Started panes on all lists If you want to turn off the Get Started panes throughout the entire system, deselect this check box.
Records per page As we mentioned earlier, you might want to change the number of records that appear on a page. By displaying more records on a page, you can apply actions to a larger data set. However, you should be aware that users with a large number of records per page might experience slower performance as the page loads, so use caution with this setting.
Time zone Be sure to select the correct time zone to match the time zone of your computer. If this time zone setting does not match the time zone on your computer, you might find that appointments synchronized to Outlook are shifted by a few hours.
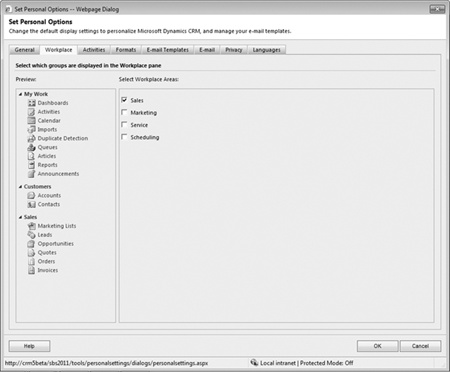
On the Workplace tab, you can select which application areas to display in the navigation pane. This setting will appear only to you as an individual user; it will not apply to all users in the system. Therefore, feel free to set up the Workplace area in whatever manner is most comfortable for you. In this exercise, you will modify your Workplace pane to include new areas of the user interface.
Tip
The Set Personal Options dialog box in Microsoft Dynamics CRM for Outlook provides additional configuration options when compared with the dialog box in the web client. For more information about the personal options in Outlook, see Chapter 5.
Note
SET UP Log on to the Microsoft Dynamics CRM website through the web client before beginning this exercise.
On the ribbon, click the File tab.
Click Options.
Click the Workplace tab.
Select the check box to the left of Sales.
Microsoft Dynamics CRM updates the preview on the left side of the dialog box to include the Sales area.
Click OK.
Click Workplace in the application areas.
Microsoft Dynamics CRM now includes the Sales area that you just added in the application navigation pane.
Microsoft Dynamics CRM includes a Resource Center that provides additional information about the software. To access the Resource Center, simply click Resource Center in the application navigation pane. The Resource Center contains dynamic content hosted on the Microsoft servers, and Microsoft provides continual updates to this content. You will need an Internet connection to access content from the Resource Center.

In addition to articles about using the software, the Resource Center contains links to other Microsoft Dynamics CRM resources such as downloads, support information, online communities, and documentation.
![]() Even though most users indicate that Microsoft
Dynamics CRM is intuitive and easy to learn, you might have questions
about the software. Fortunately, Microsoft Dynamics CRM includes help
guides for end users as well as for administrators. To access help,
you can click the Help button that is always located in the upper-right
corner of the screen.
Even though most users indicate that Microsoft
Dynamics CRM is intuitive and easy to learn, you might have questions
about the software. Fortunately, Microsoft Dynamics CRM includes help
guides for end users as well as for administrators. To access help,
you can click the Help button that is always located in the upper-right
corner of the screen.
Alternatively, you can access the help information by clicking the File tab on the ribbon and then clicking Help on the submenu.
Microsoft Dynamics CRM Help is context sensitive, so the software can show you the portion of the help content most relevant to the page you’re currently viewing. For example, if you’re viewing a lead record and you click the Help On This Page option, Microsoft Dynamics CRM will automatically direct you to the Help topic titled “Work with Leads.”
To sort records in a view, click the column heading to toggle the records in ascending or descending order. To sort by more than one column, hold down the Shift key and click a second column header.
To select records in a view, use the Ctrl or Shift key to select multiple records. Selecting the check box will select all of the records on the page, but not all of the records in the view.
You can modify multiple records at once, but you can only edit records one page at a time.
The Quick Find feature allows you to search for records in a view. You can use the asterisk (*) as a wildcard character in your searches. You can also use the wildcard character in lookup fields.
You can access recently viewed records and views through the recently visited menu, and you can pin views and records that you want to keep on the recently visited list.
Lookups link records in the user interface. You can use the automatic resolution feature by typing text directly into the lookup field. You can also select records from the most recently used list with lookup fields.
You can modify your personal options to specify your preferences, including the start page that will be displayed when Microsoft Dynamics CRM first loads or the number of records displayed on each page.
The Resource Center and the Help section include additional information about using the Microsoft Dynamics CRM software.