
Chapter at a Glance

In Chapter 8, you learned how to use Microsoft Dynamics CRM to plan and prepare for a marketing campaign. Proper planning and setup of your campaign helps ensure successful execution and tracking. In addition to helping you prepare for a marketing campaign, Microsoft Dynamics CRM simplifies the execution of your marketing campaign by using campaign activities and campaign responses. This chapter introduces the concepts of campaign execution and tracking to help you successfully complete a marketing campaign.
A marketing campaign typically includes one or more communications to your target marketing list. For instance, assume that your marketing manager wants to send an email message that introduces a new product to all of the members in a marketing list. You would like your sales team to follow up on the email message with a phone call seven days later. When recipients of the communication respond to the campaign, you would like to record the responses and take additional actions that will vary depending on the character of each response. In Microsoft Dynamics CRM, campaign communications are recorded as campaign activities and member responses are recorded as campaign responses.
In this chapter, you will learn how to set up and distribute campaign activities. Additionally, you will learn how to record campaign responses and how to convert them to other record types. Finally, you will learn how to view the results of a marketing campaign to understand its effectiveness.
Note
Practice Files The exercises in this chapter require only records created in earlier chapters; none are supplied with the book’s practice files. For more information about practice files, see Using the Practice Files at the beginning of this book.
Important
The images used in this book reflect the default form and field names in Microsoft Dynamics CRM. Because the software offers extensive customization capabilities, it’s possible that some of the record types or fields have been relabeled in your Microsoft Dynamics CRM environment. If you cannot find the forms, fields, or security roles referred to in this book, contact your system administrator for assistance.
Important
You must know the location of your Microsoft Dynamics CRM website to work the exercises in this book. Check with your system administrator to verify the web address if you don’t know it.
In the example introduced at the beginning of this chapter, we discussed a simple campaign with two communication points: an email message followed by a phone call. Microsoft Dynamics CRM allows you to set up these communication points as campaign activities. You can record information about a campaign activity for tracking and analysis across one or many campaigns. The following table describes the fields that are most often tracked for a campaign activity.
Field | Description |
|---|---|
Channel | The communication method for the activity |
Type | A way to categorize the activity |
Subject | A high-level description of the activity |
Owner | The user who has been assigned to the activity |
Outsource Vendors | Any accounts or contacts related to the activity from an execution standpoint (not targets of the campaign) |
Scheduled Start | The target start date for the activity |
Scheduled End | The target end date for the activity |
Actual Start | The actual start date for the activity |
Actual End | The actual end date for the activity |
Budget Allocated | The amount of budget allocated for the activity |
Actual Cost | The actual cost of the activity |
Priority | Prioritization of the activity |
No. of Days | An anti-spam setting that lets you prevent too-frequent communication from a campaign |
In this exercise, you will create two campaign activities to be distributed to your team to support your marketing campaign.
Note
SET UP Use the Windows Internet Explorer web browser to navigate to your Microsoft Dynamics CRM website before beginning this exercise. You need the New Product Advertising campaign you created in Chapter 8. If you cannot locate the New Product Advertising campaign in your system, select a different campaign for this exercise.
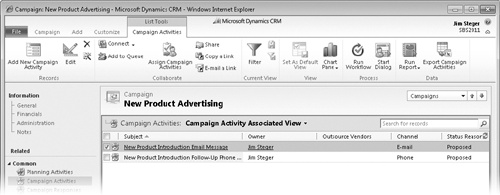
Open the New Product Advertising campaign.
In the entity navigation pane, click Campaign Activities.
A list of any campaign activities associated with this campaign appears.
 On the ribbon, click the Add New Campaign Activity button.
The Campaign Activity form appears. You will notice that the Owner field defaults to your name, the Parent Campaign field is populated with the New Product Advertising campaign, and the type field defaults to Research.
In the Subject field, enter New Product Introduction Email Message.
In the Channel field, select E-mail.
This selection affects how an activity will be distributed. By selecting E-Mail, you are choosing to send an email message to the recipients.
 On the form ribbon, click the Save and Close button to create the campaign activity.
On the ribbon on the Campaign Activities screen, click the Add New Campaign Activity button.
In the New Campaign Activity form, enter New Product Introduction Follow-Up Phone Call in the Subject field.
In the Channel field, select Phone.
Click Save and Close.
Two campaign activities now appear in the list.


Tip
The channels available for the campaign activity directly relate to the activity types in Microsoft Dynamics CRM. The only exception is the Other channel, which exists to handle custom campaign activities that do not align with the native activity types. A campaign activity designated as Other serves as a record of the activity for scheduling and budgeting purposes only, and cannot be distributed to list members.
Note
See Also The Letter, Fax, and E-mail channels let you leverage the Microsoft Dynamics CRM mail merge feature. For more information about mail merge, see Using Mail Merge to Generate a Word Document That Includes List Member Information in Chapter 7.
In Chapter 8, you associated marketing lists to your campaign. As you might expect, when you create a campaign activity, the marketing lists associated with the campaign are automatically associated with the activity. As things change over the course of the campaign, you might decide that you do not want to distribute a campaign activity to all marketing lists. For example, suppose you have different activity templates for different industries, so that you can emphasize different benefits of your new product to different audiences. In this case, you could create specific campaign activities for each industry. Or consider the case in which you need to add another marketing list after a campaign activity has been set up. If you have additional marketing lists you would like to add to the campaign, you can automatically add the list to all pending campaign activities, or you can manually add the list to specific campaign activities, if you don’t want to associate the list to all open activities.
In this exercise, you will add and remove marketing lists from a campaign activity.
Note
SET UP Use the Internet Explorer web browser to navigate to your Microsoft Dynamics CRM website, if necessary, before beginning this exercise. You need the New Product Advertising campaign you created in Chapter 8. If you cannot locate the New Product Advertising campaign in your system, select a different campaign for this exercise.
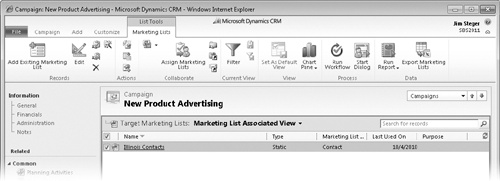
In the Marketing area, click Campaigns.
Open the New Product Advertising campaign.
In the entity navigation pane, click Target Marketing Lists.
 On the ribbon, click the Add Existing Marketing List button.
In the Look Up Records dialog box, select a marketing list. If no marketing lists exist, create a new one. Click OK.
Tip
If you need a refresher on creating a marketing list, see Creating a Static Marketing List in Chapter 7.
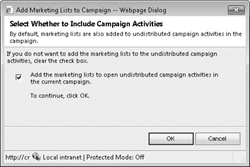
The Select Whether To Include Campaign Activities dialog box opens.
In the dialog box, clear the check box and click OK to indicate that you do not want to associate the marketing list to the open campaign activities.
In the entity navigation pane, click Campaign Activities.
Open the New Product Introduction Email Message campaign activity.
In the entity navigation pane, click Target Marketing Lists.
Select the new marketing list that you added to the campaign, and then click OK.
The additional marketing list has now been added to the campaign activity. When you distribute this campaign activity, the additional marketing list members will also be included in the activity.


When you have created and associated the appropriate marketing lists with your campaign activities, you have taken the necessary steps to prepare for the execution of the activity. Then, when you are ready to execute the campaign activity, you will distribute the activity. This action will create Microsoft Dynamics CRM activity records that will exist under the account, contact, or lead records specified in the target marketing lists.
Tip
Most distributed campaign activities are distributed as open activities that need to be completed. The only exceptions to this rule are email campaign activities, because you can choose to automatically send an email when you distribute the email campaign activity.
In this exercise, you will distribute the email and phone call campaign activities you created earlier in this chapter.
Note
SET UP Use the Internet Explorer web browser to navigate to your Microsoft Dynamics CRM website, if necessary, before beginning this exercise. You need the New Product Advertising campaign you created in Chapter 8. If you cannot locate the New Product Advertising campaign in your system, select a different campaign for this exercise.
In the Marketing area, click Campaigns.
Open the New Product Advertising campaign.
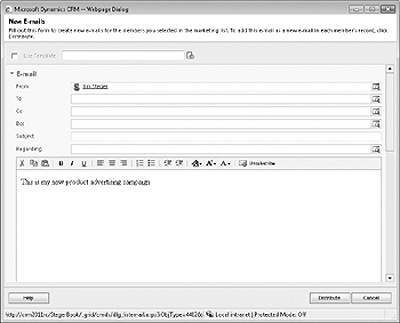
Open the New Product Introduction Email Message campaign activity.
 Click the Distribute
Campaign Activity button. The New
E-mails window opens.
Click the Distribute
Campaign Activity button. The New
E-mails window opens.The body text defaults to the text from the Offer field of the parent campaign. Enter a subject and update the body for your email message. Then click Distribute.
The Distribute E-Mail Messages To Target Marketing Lists dialog box appears. In this dialog box, you can select who will own the activity by choosing the record owners, yourself, another user, a team, or a queue. You can also specify whether the email message should automatically be sent and the corresponding activity marked as closed when the activity is distributed.
Leave the Mark e-mail messages to be sent and close corresponding e-mail activities check box selected, and click OK. The email messages are now sent.
In the campaign activity, click Save and Close.
Open the New Product Introduction Follow-Up Phone Call campaign activity.
On the form ribbon, click the Distribute Campaign Activity button.
Enter a subject and a description, and change the due date to one week in the future.
Click Distribute.
The Distribute Phone Calls To Target Marketing Lists dialog box appears.
Under Phone Calls Owner, select The owners of the records in the target marketing lists, and then click OK.
You have successfully distributed your campaign activities. The New Product Introduction email message has been sent, and the New Product Introduction Follow-Up Phone Call activity has been created. Owners of the marketing list member records will see the activities in their activity lists with the due date you entered.


Microsoft Dynamics CRM allows you to create multi-step marketing campaigns and allows you to record campaign activities in many channels.
When you have distributed the activities, you can view the activities you created (both the successes and the failures) in the entity navigation pane of the campaign activity.
After your campaign activities have been distributed and your target marketing list members have received the communication, you can record the responses you receive, both positive and negative. By tracking responses, you can take additional action to pursue the customer or prospect. For positive responses, you might schedule a follow-up phone call or other activity. For negative responses, you might remove members from a certain marketing list. Recording both positive and negative responses provides marketing managers with an overall understanding of the total response rate along with the positive response rate. There are several ways that you can record campaign responses in Microsoft Dynamics CRM. You can:
Manually create a campaign response record.
Close a campaign activity as a response.
Automatically create a campaign response for email replies.
Import campaign responses.
Note
See Also For more information about importing campaign responses and other record types, refer to Chapter 18.
In this exercise, you will manually create a campaign response.
Note
SET UP Use the Internet Explorer web browser to navigate to your Microsoft Dynamics CRM website, if necessary, before beginning this exercise. You need the New Product Advertising campaign you created in Chapter 8. If you cannot locate the New Product Advertising campaign in your system, select a different campaign for this exercise.
In the Marketing area, click Campaigns.
Open the New Product Advertising campaign.
In the entity navigation pane, click Campaign Responses.
 Click the Add New
Campaign Response button.
Click the Add New
Campaign Response button.The Campaign Response activity form appears. Many fields are available for capture in a campaign response, including the response code, who the response was received from, and other details about the response.
 Enter a subject, select an existing
customer, and then click the Save
button.
Enter a subject, select an existing
customer, and then click the Save
button.

You might have noticed that one of the fields in the campaign response form, Originating Activity, lets you associate the campaign response with the original campaign activity. Microsoft Dynamics CRM also lets you create the campaign response from the original campaign activity, so you can track the effectiveness of each campaign activity in addition to understanding the effectiveness of the campaign overall. You can also convert campaign responses to other entities, as you will see in the next section.
In this exercise, you will promote a campaign activity to a campaign response.
Note
SET UP Use the Internet Explorer web browser to navigate to your Microsoft Dynamics CRM website, if necessary, before beginning this exercise. You need the New Product Advertising campaign you created in Chapter 8. If you cannot locate the New Product Advertising campaign in your system, select a different campaign for this exercise.
In the Marketing area, click Campaigns.
Open the New Product Advertising campaign.
Open the New Product Introduction Follow-Up Phone Call activity.
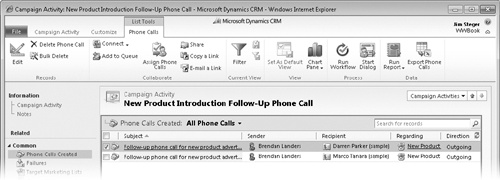
In the entity navigation pane, click Phone Calls Created.
Open one of the phone call activities in the list.
 On the ribbon, in the Convert Activity group, click the Promote to Response button.
The Campaign Response form appears. Notice that many of the fields are populated based on the campaign activity you used for the conversion.
Update the subject and any other field, and then click the Save button.


When you receive a positive response from a target marketing list member, you will probably want to pursue the customer or prospect further. Microsoft Dynamics CRM lets you close the campaign response and convert it into one of several different record types. The following table describes the types of record conversion you can choose.
In this exercise, you will convert a campaign response into a new lead.
Note
SET UP Use the Internet Explorer web browser to navigate to your Microsoft Dynamics CRM website, if necessary, before beginning this exercise. You need the New Product Advertising campaign you created in Chapter 8. If you cannot locate the New Product Advertising campaign in your system, select a different campaign for this exercise.
In the Marketing area, click Campaigns.
Open the New Product Advertising campaign.
In the entity navigation pane, click Campaign Responses.
A list of all responses associated with the campaign appears.
Open any open Campaign Response record.
 On the form ribbon, click the Convert Campaign Response button.
Leave the Create New lead option selected, and click OK.
This action closes the campaign response and opens a new Lead form with the Topic populated from the campaign response.


You have successfully converted the campaign response to a lead record. From here, you can follow your normal sales processes to further pursue the record. If the lead record already existed when you chose to convert the lead, you would have been presented with the standard lead conversion dialog box. If you chose to create a new record for a customer, the specified record would be created with information populated from the campaign response (as when you converted the lead). Alternatively, you could select to close the response with a status of Completed or Canceled, without creating new records.
While the campaign is being executed, you’ll want to have visibility into the campaign activities and understand the results of the campaign. The speed with which activities have been closed, the activities that are still open, and the number of responses received are all very important data points. You might want to take additional actions based on these data points. For example, you could create an additional campaign activity for target members who have not responded, or you could follow up with the marketing team to ensure that the activities are taking place. Microsoft Dynamics CRM provides you with several reports you can use to view the results of marketing campaigns.
In this exercise, you will view the overall results of a marketing campaign by using the default campaign reports.
Note
SET UP Use the Internet Explorer web browser to navigate to your Microsoft Dynamics CRM website, if necessary, before beginning this exercise. You need the New Product Advertising campaign you created in Chapter 8. If you cannot locate the New Product Advertising campaign in your system, select a different campaign for this exercise.
In the Marketing area, click Campaigns.
Open the New Product Advertising campaign.
 On the ribbon, in the Data group, click the Run Report button and select Campaign Performance from the menu.
The Campaign Performance report is run. This report includes a view that combines information across the campaign record, including the target marketing lists, sales literature, related campaigns, planning tasks, campaign activities, campaign responses, and campaign finance.
Tip
The data in the following examples will reflect the campaign you have created and will vary depending on the size of the marketing lists selected. Therefore, you will likely see different data than the example provided.
In this example, four campaign activities have been created and three campaign responses have been received. The response rate is 50 percent.


In addition to viewing the results of a marketing campaign, you might want to view specific information about the status of campaign activities. The Campaign Activity Status report provides information related to the status of campaign activities.
In this exercise, you will view the status of a campaign activity by using the Campaign Activity Status report.
Note
SET UP Use the Internet Explorer web browser to navigate to your Microsoft Dynamics CRM website, if necessary, before beginning this exercise. You need the New Product Advertising campaign you created in Chapter 8. If you cannot locate the New Product Advertising campaign in your system, select a different campaign for this exercise.
In the Marketing area, click Campaigns.
Open the New Product Advertising campaign.
In the entity navigation pane, click Campaign Activities.
Select the New Product Introduction Follow-Up Phone Call activity without opening the record.
On the ribbon, in the Data group, click the Run Report button, and then click Campaign Activity Status.
The Select Records dialog box appears. This dialog box lets you specify whether to run the report for all campaign activities or only for those that were selected when the Run Report button was clicked.
Click The selected records, and then click Run Report.
The Campaign Activity Status report appears. Here you can see information about the campaign activity, including the status of the distributed campaign activities and assignment by activity owner.
If you want to see the records that make up the charts in the report, you can click the Show All link or click the chart directly to see a list of the specific records.


Note
See Also Chapter 16, discusses in detail the additional reporting capabilities available in Microsoft Dynamics CRM with Advanced Find and system views. Chapter 15, provides more information about the additional reporting capabilities of the Report Wizard.
Campaign activities allow you to track the campaign-specific communications related to a marketing campaign.
You can assign specific marketing lists to a campaign activity. Not all campaign marketing lists need to be used in a campaign activity.
When you distribute campaign activities, the activities are created and assigned to the chosen users or teams to be completed.
You can choose to send email campaign activities immediately when they are distributed.
You can record a campaign response in several ways. In addition to manually creating a campaign response, you can record a response by converting a campaign activity, you can allow email responses to automatically create campaign activities, or you can import campaign responses by using the Import Data Wizard.
Campaign responses can be converted to other Microsoft Dynamics CRM record types, such as leads, accounts, contacts, opportunities, quotes, or orders.
Microsoft Dynamics CRM includes several reports that let you view the results of marketing campaigns and campaign activities. Two examples are the Campaign Performance report and the Campaign Activity Status report.