
Chapter at a Glance

In Chapter 7, you learned how to use marketing lists to group your customers and prospects into lists. However, marketing lists make up just a small piece of a marketing strategy. After you’ve defined your customer or prospect groups, you can use marketing campaigns in Microsoft Dynamics CRM to communicate with each group and track the responses.
Note
See Also Chapter 9, discusses how to execute a campaign and track the results with campaign activities and responses, and covers several reports to measure campaign performance, compare campaigns, and track campaign activities.
A marketing campaign is a series of activities intended to increase awareness of your company, products, or services. As any marketer knows, a properly executed marketing campaign requires coordination of many parties, literature, and tasks. Microsoft Dynamics CRM provides a convenient way to manage marketing campaigns and their associated activities, tasks, and information.
For instance, suppose you want to launch a new customer loyalty program. This program will reward customers for repeat purchases of your product and entitle them to special discounts and promotions. To initiate the campaign, you plan to send a welcome letter and follow-up email to all qualifying customers, informing them of the program. Some of your activities might include:
Determining the anticipated costs and expected results of the campaign.
Creating and approving the copy for the welcome letter and email message.
Defining customers to be included in the loyalty program.
Coordinating the graphics and delivery of the letters and email messages with vendors or your IT staff.
Actually sending the campaign-related content to your customers.
Tracking the responses for follow-up activities and analysis.
In this chapter, you will learn how to create a campaign and then associate planning activities, customer lists, products, and sales literature to it. In addition, you will create campaign templates that can be reused in future campaigns. Finally, you will learn how to use the Quick Campaign Wizard in Microsoft Dynamics CRM to quickly create campaign activities for a selected set of leads, contacts, or accounts.
Important
The images used in this book reflect the default form and field names in Microsoft Dynamics CRM. Because the software offers extensive customization capabilities, it’s possible that some of the record types or fields have been relabeled in your Microsoft Dynamics CRM environment. If you cannot find the forms, fields, or security roles referred to in this book, contact your system administrator for assistance.
Important
You must know the location of your Microsoft Dynamics CRM website to work the exercises in this book. Check with your system administrator to verify the web address if you don’t know it.
Microsoft Dynamics CRM allows you to track marketing or outreach program information on a campaign record. You can track the offer, type, schedule, and financial information about the campaign. For instance, you might have a campaign that coordinates the advertising activities planned for the launch of a new product.
By default, the fields described in the following table are tracked on campaigns and campaign templates in Microsoft Dynamics CRM.
In this exercise, you will create the campaign record that will be used to coordinate the advertising activities of your new product launch.
Note
SET UP Use the Windows Internet Explorer web browser to navigate to your Microsoft Dynamics CRM website before beginning this exercise.

For each campaign, you can track the to-do list of activities that need to be completed to execute the campaign. These activities might include:
With Microsoft Dynamics CRM, you can manage these activities by using the planning activities area of a campaign. Planning activities are Microsoft Dynamics CRM activities that are associated with a campaign.
In this exercise, you will create a planning activity task to approve the offer for the new product advertising campaign created in the previous section.
Note
SET UP Use the Internet Explorer web browser to navigate to your Microsoft Dynamics CRM website, if necessary, before beginning this exercise.
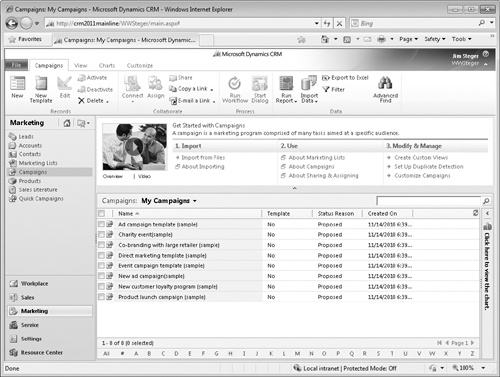
In the Marketing area, click Campaigns.
Open the New Product Advertising campaign you created in the previous exercise, if it is not already open.
 On the ribbon, click the Add New Activity button, and then click Task on the submenu.
In the Subject field, enter Approve Offer. In the Due field, enter a date two weeks from today. In the Duration and Priority fields, leave the default values of 30 minutes and Normal selected.
 Click the Save and
Close button to create the planning task.
Click the Save and
Close button to create the planning task.


Note
See Also For more information about working with activities, see Chapter 4.
You can use marketing lists to group accounts, contacts, and leads in Microsoft Dynamics CRM and then associate one or more of the lists with each campaign.
Marketing lists link your customers or prospects to your campaign, which is critical when working with and distributing campaign activities. Campaign activities are special activities—such as letters, faxes, and phone calls—within Microsoft Dynamics CRM that are created and associated with campaigns. Campaign activities contain campaign-specific information and must be distributed to create the individual activities for users to perform.
Note
See Also For more information about working with campaign activities, see Chapter 9.
In this exercise, you will add the Illinois Contacts marketing list from Chapter 7 to the New Product Advertising campaign.
Note
SET UP Use the Internet Explorer web browser to navigate to your Microsoft Dynamics CRM website, if necessary, before beginning this exercise. You need the Illinois Contacts marketing list you created in Chapter 7. If you cannot locate the Illinois Contacts marketing list in your system, select a different marketing list for this exercise. You must have at least one marketing list available to associate with the campaign.
In the Marketing area, click Campaigns.
Open the New Product Advertising campaign record you created in the previous exercise, if it is not already open.
In the entity navigation pane, click Target Marketing Lists.
 On the ribbon, click the Add Existing Marketing List button.
The Look Up Records dialog box opens. The Look For field is automatically set to Marketing List.
Look for the Illinois Contacts list created in Chapter 7, or select another marketing list to add to your campaign. After you select your marketing lists, click the Add button.
Tip
You can create a new marketing list directly from the Look Up Records dialog box by clicking the New button. To view additional details about a selected available record, click the Properties button.
Note
See Also For more information about creating marketing lists, see Chapter 7.
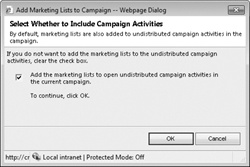
When you have finished selecting the marketing lists you want to add to your campaign, click OK.
You will be prompted to specify whether you want to add the marketing lists to undistributed campaign activities. If you want to add the members of these lists to your campaign activities, leave the check box selected.
Click OK to add the selected marketing lists to the campaign and the campaign’s open undistributed campaign activities.

Campaigns can be used to promote your organization’s products or services or to create awareness of a new program or outreach effort. For campaigns involving products or services, you can specify the target products or services within the campaign.
Tip
Products and services are configured by using the Product Catalog feature of Microsoft Dynamics CRM, which is located in the Settings area. Consult with your system administrator to properly set up a product or service.
In addition to tracking products and services, you can also relate relevant sales and marketing literature to a campaign. These documents might include presentations, product and pricing sheets, marketing literature, and company manuals. Microsoft Dynamics CRM uses the Sales Literature functionality to store one or more documents for use with marketing campaigns and products.
In this exercise, you will attach a product and sales literature about the product to your campaign.
Note
SET UP Use the Internet Explorer web browser to navigate to your Microsoft Dynamics CRM website, if necessary, and have at least one product created before beginning this exercise.
In the Marketing area, click Campaigns.
Open the New Product Advertising campaign record you created earlier in this chapter, if it is not already open.
 On the ribbon, click the Add Existing Product button.
The Look Up Records dialog box opens, with the Look For field automatically set to Product.
Select one or more products to associate with your campaign, and then click OK.
The Target Products window opens, showing the product you selected.
In the entity navigation pane, click Sales Literature.
 On the ribbon, click the Add Existing Sales Literature button.
The Look Up Records dialog box opens, with the Look For field automatically set to Sales Literature.
Click New to create a new sales literature record.
In the Title field, enter Product Pricing, and choose a subject from the Subject field. Then, in the Type field, choose Price Sheets.
Click the Save and Close button.
The Product Pricing sales literature record now appears in the Look Up Records dialog box and is listed in the Selected Records area.
Click OK to associate the Product Pricing sales literature record with your campaign.


You can relate your marketing campaign to other campaigns for reporting and tracking purposes. For instance, assume you have a global branding campaign. The initial branding campaign is comprised of multiple child campaigns, such as a direct mail campaign, an email campaign, and radio and television spots. In Microsoft Dynamics CRM, you can create a campaign record for each and relate all of them to a parent campaign. This allows you to track results for each campaign channel and aggregate multiple campaigns to measure the effectiveness of the entire branding effort.
In this exercise, you will create a related campaign to track co-branding efforts with a partner retailer as part of your new product advertising campaign.
Tip
When you relate two campaigns, Microsoft Dynamics CRM creates a one-way relationship. For instance, suppose you have campaigns A and B. With campaign B as the active campaign, you relate campaign A to campaign B. When you open campaign A, you will not see a relationship to campaign B, but you will see campaign A listed as a related campaign in campaign B.
Note
SET UP Use the Internet Explorer web browser to navigate to your Microsoft Dynamics CRM website, if necessary, before beginning this exercise.
In the Marketing area, click Campaigns.
Open the New Product Advertising campaign you created earlier in this chapter, if it is not already open.
In the entity navigation pane, click Related Campaigns.
 On the ribbon, click the Add Existing Campaign button.
The Look Up Records dialog box opens, with the Look For field automatically set to Campaign.
Click the New button to create a new campaign.
In the New Campaign form, in the Name field, enter Co-branding with the large retailer ‘More Bikes!’.
Click Save and Close to create the new campaign.
Back in the Look Up Records dialog box, select the new Co-branding with the large retailer ‘More Bikes!’ campaign, and click OK to relate it to the parent campaign.
The related campaign is displayed in the Related Campaigns area of the parent campaign.

Suppose you are the marketing manager for your company’s monthly product catalog. Most of the planning activities for the catalog are the same each month. Rather than leaving you to recreate all of the common information for your campaign each month, Microsoft Dynamics CRM lets you create a campaign template that can be used as the starting point for your new campaign.
The campaign template stores core details and related information about the campaign and can be used to quickly launch a similar campaign. In Microsoft Dynamics CRM, campaign templates work just like campaigns.
In this exercise, you will create a new campaign template.
Marketing campaigns can be very involved, and for complex campaigns, it can take considerable effort to enter the correct information in Microsoft Dynamics CRM. Campaign templates provide a common starting point for future campaigns and can save you time and duplication of effort when you are creating campaigns. Microsoft Dynamics CRM also provides two actions, Copy As Campaign and Copy As Template, to quickly duplicate information from an existing campaign or template. The copy action replicates all of the planning activities, campaign activities, marketing lists, products, and sales literature to your new campaign or template.
The Copy As Campaign and Copy As Template actions work similarly and can be used from either a campaign or campaign template. The key difference is the resulting output. When you use Copy As Campaign, the output will be a campaign ready for use. The Copy As Template action will produce a campaign template that can be used to create a campaign in the future. The following table can help you decide which copy action is appropriate.
In this exercise, you will create a new campaign from the campaign template created in the previous section.
Note
SET UP Use the Internet Explorer web browser to navigate to your Microsoft Dynamics CRM website, if necessary, before beginning this exercise.
As you have seen, you can plan and track your marketing efforts with campaigns in Microsoft Dynamics CRM. But sometimes you might want to simply distribute a campaign activity (such as a letter, phone call, or email) to an ad-hoc list without the extra overhead and tracking of a full campaign. A quick campaign is a simplified version of a campaign in Microsoft Dynamics CRM that allows you to distribute a single campaign activity to a group of accounts, contacts, leads, or marketing lists.
In this exercise, you will create a quick campaign to track follow-up tasks for a group of leads.
Note
SET UP Use the Internet Explorer web browser to navigate to your Microsoft Dynamics CRM website, if necessary, and have multiple lead records already created and available before beginning this exercise.
In the Marketing area, click Leads.
Select a few lead records.
 Click the Add ribbon tab, then click the Quick Campaign button.
Choose For Selected Records from the submenu.
The first step of the Create Quick Campaign Wizard describes the steps you are about to take. Click Next to continue.
The next step asks you to enter a name for the quick campaign. In the Name field, enter Our First Lead Quick Campaign, and then click Next.
Now you will need to choose an activity type and user to whom the resulting activities should be assigned. If you choose to use an email activity, you also have the option of automatically sending and closing the email activity. In the Activity Type box, select Phone Call, and for the Assign these activities to option, choose Me.
Click Next. The next step allows you to enter the content for the activity chosen in the previous step. Because you chose Phone Call, you will see the Phone Call form displayed. In the Subject and Description fields, enter Follow-up call on leads. In the Due field, chose the date you want the activity to be completed.
Click Next. The final step summarizes the choices made in the previous steps. If everything is correct, click Create to complete the quick campaign.
After completion, you can view your new quick campaign by clicking Quick Campaigns in the Marketing area.
Double-click the Our First Lead Quick Campaign record to see your quick campaign details, including the phone call activities created.


Campaigns allow you to track and communicate the schedules, costs, planning activities, lists, and responses related to your marketing and outreach efforts.
Planning activities are common Microsoft Dynamics CRM activities in a campaign or quick campaign.
Marketing lists associated with a campaign provide the names of customers targeted for campaign activities.
You can track related products and sales literature to campaigns.
You can copy a campaign and all of its related information to a campaign template or another campaign.
You can quickly distribute campaign activities to ad-hoc lists of accounts, leads, contacts, or marketing lists by using the Quick Campaign Wizard.