Chapter 5. Designing for SharePoint storage requirements
In this chapter, you will learn about:
Initial optimization and configuration of SQL Server for SharePoint 2013.
Overview of SharePoint Server 2013 databases and their roles.
How to plan for capacity and database system requirements.
The new Shredded Storage functionality in SharePoint 2013.
Enabling business intelligence (BI) capabilities within the SharePoint Server 2013 platform.
At its very core, Microsoft SharePoint 2013 is a set of database-driven web applications and services. As such, the database layer is arguably the most important layer of the SharePoint 2013 architecture. Therefore, to produce a highly efficient and performance-based SharePoint 2013 environment, it is critical that the SharePoint architects and administrators understand how to best configure the database layer to provide this functionality. SharePoint 2013 can only utilize Microsoft SQL Server 2008 R2 SP1 and SQL Server 2012 for the database engine supporting the web applications and service applications. Additionally, if business intelligence (BI) capabilities are required in the SharePoint Server 2013 environment, only SQL Server 2012 with SP1 is currently supported.
It is assumed in this chapter that you are working with a full-farm, not a stand-alone, implementation of SharePoint 2013, whether it is a single- or multi-server farm. The stand-alone installation, which unfortunately is the default installation scenario, of SharePoint 2013 installs SQL Server 2008 R2 SP1 Express edition. However, User Profile synchronization does not work with the Express edition. If you intend to use User Profile synchronization with SharePoint Server 2013, you must choose a farm installation, rather than a stand-alone installation. Additionally, SQL Server 2008 R2 SP1 Express edition databases cannot be larger than 10 GB.
This chapter covers the database requirements for a SharePoint 2013 environment. You will be provided the necessary information to initially optimize the configuration of the database engine for SharePoint 2013. You will then be introduced to the individual databases and their role within a SharePoint 2013 deployment. Of course, planning for the capacity and performance of the databases will be discussed, iterating through each of the databases available in a SharePoint Server 2013 environment. You will then be introduced to providing the powerful BI functionality that is unique to SharePoint Server 2013.
Database engine requirements for SharePoint 2013
Currently, SharePoint 2013 only supports the following two versions of SQL Server for use as the database engine:
64-bit version of SQL Server 2008 R2 with SP1+ (Standard, Enterprise, or Datacenter edition)
64-bit version of SQL Server 2012 (Standard, Business Intelligence, or Enterprise edition)
High Availability (HA) and/or Disaster Recovery (DR) requirements of the SharePoint 2013 implementation will restrict the edition selection for the SharePoint 2013 database engine.
Supported HA/DR options for SharePoint 2013 using the SQL Server 2008 R2 SP1+ database engine include:
Failover clustering. Enterprise or Datacenter edition only.
Database mirroring. Standard, Enterprise, or Datacenter edition for synchronous mirroring; Enterprise, or Datacenter edition only for asynchronous (also referred to as high-performance) mirroring.
Log shipping. Standard, Enterprise, or Datacenter edition, but primarily used for DR environments.
Supported HA/DR options for SharePoint 2013 using the SQL Server 2012 database engine include:
AlwaysOn Failover Cluster Instances. Standard and Business Intelligence editions support a two-node maximum; Enterprise edition supports an operating system maximum.
AlwaysOn Availability Groups. Enterprise edition only.
Database mirroring (Deprecated). Standard and Business Intelligence only support Safety Full mirroring mode; Enterprise edition supports all mirroring modes.
Log shipping. Standard, Business Intelligence, or Enterprise editions, but primarily used for DR environments.
You should be aware in your planning that database mirroring, although supported in SQL Server 2008 R2 and in the SharePoint 2013 platform, is deprecated in SQL Server 2012. This may provide incentive to utilize SQL Server 2012 and its AlwaysOn capabilities if you’re implementing a new environment or upgrading an existing SharePoint environment.
It also should be noted now, though, that for integrated SQL Server BI capabilities in SharePoint Server 2013 (which will be discussed later in this chapter), only SQL Server 2012 with SP1 (Business Intelligence edition or Enterprise edition) is supported. This may move you to decide at implementation time to utilize the database engine of SQL Server 2012 to consolidate and, therefore, simplify the management and administration of the database components to a single version, if possible.
Overview of HA options
As a quick overview, you need to understand the basics of the HA options for the SQL Server database engine. The implementation and design will be covered in more detail in Chapter 10.
Failover clustering
Failover clustering provides HA support for an entire instance of SQL Server. A failover cluster is a combination of one or more nodes, or servers, with two or more shared disks. Applications are each installed into a Microsoft Cluster Service (MSCS) cluster group, known as a resource group. At any time, each resource group is owned by only one node in the cluster. The application service has a virtual name that is independent of the node names, and is referred to as the failover cluster instance name. An application can connect to the failover cluster instance by referencing the failover cluster instance name. The application does not have to know which node hosts the failover cluster instance.
A SQL Server failover cluster instance appears on the network as a single computer, but has functionality that provides failover from one node to another if the current node becomes unavailable. For example, during a nondisk hardware failure, operating system failure, or planned operating system upgrade, you can configure an instance of SQL Server on one node of a failover cluster to fail over to any other node in the disk group.
A failover cluster does not protect against disk failure. You can use failover clustering to reduce system downtime and provide higher application availability.
Database mirroring
Database mirroring is a solution to increase database availability by supporting almost instantaneous failover. Database mirroring can be used to maintain a single standby database, or mirror database, for a corresponding production database that is referred to as the principal database.
Log shipping
Like AlwaysOn Availability Groups and database mirroring, log shipping operates at the database level. You can use log shipping to maintain one or more warm standby databases (referred to as secondary databases) for a single production database that is referred to as the primary database.
AlwaysOn Failover Cluster Instances
As part of the SQL Server 2012 AlwaysOn offering, AlwaysOn Failover Cluster Instances uses Windows Server Failover Clustering (WSFC) functionality to provide local HA through redundancy at the server-instance level—a failover cluster instance (FCI). An FCI is a single instance of SQL Server that is installed across WSFC nodes and, possibly, across multiple subnets. On the network, an FCI appears to be an instance of SQL Server running on a single computer, but the FCI provides failover from one WSFC node to another if the current node becomes unavailable.
AlwaysOn Availability Groups
AlwaysOn Availability Groups is an enterprise-level HA/DR solution introduced in SQL Server 2012 to enable you to maximize availability for one or more user databases. AlwaysOn Availability Groups requires that the SQL Server instances reside on WSFC nodes. An AlwaysOn FCI can use AlwaysOn Availability Groups to provide remote DR at the database level.
Initial optimization and configuration of SQL Server for SharePoint 2013
It is easy to overlook SQL Server optimizations when configuring the database layer for a SharePoint 2013 environment. However, arguably the database platform is the most critical, for no amount of configuration and/or optimization on the web front ends and application servers can compensate for a poorly performing database layer. As such, careful consideration should be taken when configuring the database layer. Due to the complexity and interoperability of the web applications and service applications, sometimes the configuration and optimization would go against normal database-driven web application development other than SharePoint.
For most SharePoint 2013 implementations, a default installation of SQL Server is not recommended when installing to support a SharePoint 2013 environment. Specifically, there are two settings that should be changed to provide SharePoint 2013 with a proper database engine layer; the default server collation and the max degree of parallelism (MDOP).
SQL Server collation
The Microsoft Knowledge Base (KB) article “Supportability regarding SQL collation for SharePoint Databases and TempDB” (http://support.microsoft.com/kb/2008668), states:
We do not support changing the default collation (Latin1_General_CI_AS_KS_WS) for SharePoint databases to any other collations (CI, AS, KS, WS).
We support any CI collation for the SQL instance (for master, tempdb databases). However we recommend using Latin1_General_CI_AS_KS_WS as the instance default collation (master, tempdb databases).
The ability to change this option is found on the Collation tab of the Server Configuration page of SQL Server Setup, as shown in Figure 5-1.

Additionally, changing the default collation (Latin1_General_CI_AS_KS_WS) for a SharePoint database is not supported. The recommendation is to use Latin1_General_CI_AS_KS_WS as the instance (or server) default collation, although any CI collation for the SQL database engine instance is supported. If the SQL Server instance is dedicated to the SharePoint 2013 implementation, it may be easiest to set the database engine instance collation level to Latin1_General_CI_AS_KS_WS at install, as shown in Figure 5-2.

SQL Server MDOP
SharePoint 2013 requires a farm installation to have SQL Server configured for a MDOP value of 1. The default value is 0. In fact, if not configured to 1, the SharePoint 2013 installation and configuration when using Windows PowerShell rather than the SharePoint 2013 Products Configuration Wizard (Psconfigui.exe), will fail at the create configuration database step. When an instance of SQL Server runs on a computer that has more than one microprocessor or CPU, it detects the best degree of parallelism (that is, the number of processors employed to run a single statement) for each parallel plan execution. You can use the MDOP option to limit the number of processors to use in parallel plan execution. SQL Server considers parallel execution plans for queries, index data definition language (DDL) operations, and static and keyset-driven cursor populations. It should be noted that SharePoint 2013 will provide a warning and prevent an install if the MDOP is not set to 1 prior to configuration of the farm.
Follow these steps to configure the MDOP option using SQL Server Management Studio:
In Object Explorer, right-click a server and select Properties.
Click the Advanced node.
In the Max Degree Of Parallelism box, select the maximum number of processors, which for SharePoint 2013 will be 1, to use in parallel plan execution, as shown in Figure 5-3.

Follow these steps to configure the Max Degree Of Parallelism option using Transact-SQL:
Connect to the database engine.
On the Standard bar in SQL Server Management Studio, click New Query.
Copy the Transact-SQL code from Figure 5-4 into the query window and click Execute. The Transact-SQL code uses the sp_configure stored procedure to configure the Max Degree Of Parallelism option to 1.

Additional SQL Server considerations
Some additional considerations should be acknowledged to ensure high performance of the database layer of SharePoint 2013. Although these considerations are not required, they should be considered important general guidelines in maintaining the health of the SharePoint 2013 databases.
Dedicated SQL Server
Probably the most important and the most disregarded rule of thumb is to use a dedicated server running SQL Server for SharePoint 2013. To ensure optimal performance for farm operations, it is recommend that you install SQL Server 2008 R2 with SP1 or SQL Server 2012 on a dedicated server that does not run other farm roles and does not host databases for other applications.
Autocreate statistics
You do not want to enable autocreate statistics on a server that hosts SQL Server for SharePoint 2013. Enabling autocreate statistics is not supported for SharePoint Server. SharePoint Server configures the required settings during provisioning and upgrade. Manually enabling autocreate statistics on a SharePoint database can significantly change the execution plan of a query. The SharePoint databases either use a stored procedure that maintains the statistics (proc_UpdateStatistics) or rely on SQL Server to do this.
SQL aliases
Another consideration is to use SQL Server client aliases on SharePoint 2013 servers to reference your SQL Server instance(s). The main reason to use SQL aliases is to help SharePoint find its databases through a consistent name. Regardless of the name of the SQL instance, by using SQL aliases, SharePoint is always expecting its database(s) to be on the same alias name. This allows administrators to move SharePoint databases to new hardware, and then change alias settings and have SharePoint find the new hardware with minimal downtime. A second advantage to using aliases is that you can now use descriptive, friendly names, such as SP_Content_Alias, for the server that is hosting your SharePoint content databases.
Configuring a SQL Server client alias
There are essentially three methods of configuring SQL Server client aliases. The method that you choose should be driven by primarily infrastructure and organizational information technology governance. For instance, if the SharePoint 2013 implementation team members are restricted from logging on directly to the servers running SQL Server, it is possible that they would want remote administration capabilities available from the SharePoint servers. In this situation, installing the full set of management tools would be an option. The SharePoint 2013 implementation team could then use the SQL Server Configuration Manager to create and configure the SQL Server client aliases. It is also recommended to create both 64-bit and 32-bit matching aliases in the event that you would want to utilize the SQL client alias to connect to the database instance with a client application such as SQL Server Management Studio or other 32-bit-based client application. If scripting the implementation of the SharePoint 2013 environment with Windows PowerShell, you may want to use scripts to create the SQL Server client aliases directly in the system registry. Of course, the most common method is to use the operating system provided SQL Client Configuration Utility, Cliconfg.exe. The 64-bit version is found in the default location of C:WindowsSysWOW64 directory, while the 32-bit version of the utility is found in the default location of C:WindowsSystem32. Each of these three methods is described in this section.
SQL Client Configuration Utility (Cliconfg.exe)
To configure a SQL Server client alias via SQL Client Configuration Utility, follow these steps for both the 64-bit and 32-bit version of the utility:
Run C:WindowsSysWOW64Cliconfg.exe for 64-bit or C:WindowsSystem32Cliconfg.exe for 32-bit SQL Server client aliases.
Click the Alias tab and then click Add, as shown in Figure 5-5.
In the Add Network Library Configuration window, type the SQL Alias you want in the Server Alias text box. Select TCP/IP as the Network library, and enter the actual server name in the respective text box of the Connection Parameters section, as shown in Figure 5-6. It is possible to select to either dynamically determine the port or specify a static, preferably nonstandard port.
Click OK in the Add Network Library Configuration window and OK in the SQL Server Client Network Utility window.


SQL Server Configuration Manager configuration of SQL Server client aliases
To configure a SQL Server client alias via SQL Server Configuration Manager, follow these steps:
Verify that the user account that is performing this procedure is a member of either the sysadmin or the serveradmin fixed server role.
Run Setup for SQL Server on the target computer, and install the following client components:
Connectivity Components
Management Tools
Open SQL Server Configuration Manager.
In the navigation pane, click SQL Native Client Configuration.
In the main window, under Items, right-click Aliases and select New Alias.
In the Alias New -dialog box, in Alias Name, enter a name for the alias.
In Port No, enter the port number for the database instance. Make sure that the protocol is set to TCP/IP.
In Server, enter the name of the computer that is running SQL Server.
Click Apply, and then click OK.
Verification: You can test the SQL Server client alias by using SQL Server Management Studio (SSMS), which is available when you install SQL Server client components.
If you use SSMS to verify, you will need to also create an identical alias in the SQL Native Client Configuration (32bit) | Aliases node, as SSMS is a 32-bit application.
Open SSMS.
When you are prompted to enter a server name, enter the name of the alias that you created, and then click Connect. If the connection is successful, SSMS is populated with objects that correspond to the remote database.
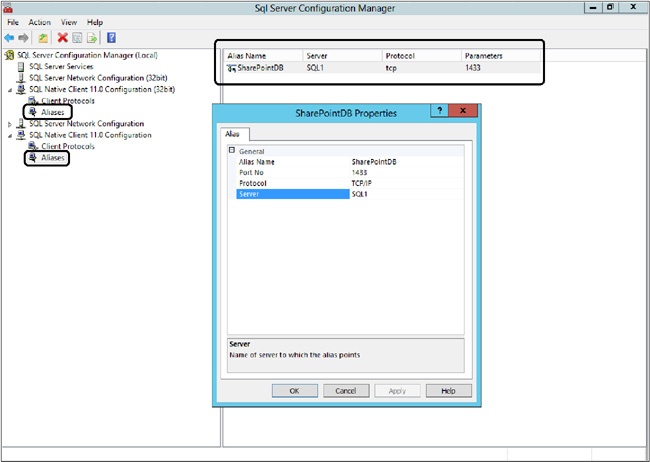
After you have completed steps 1–12 you should have an alias created within the SQL Configuration Manager similar to Figure 5-7.
Windows PowerShell configuration of SQL Server client aliases
Optionally, you can use Windows PowerShell to create the SQL client alias after the installation of both the SharePoint 2013 prerequisites and the SharePoint 2013 binary files (install), but prior to creation of the farm:
# SQL Alias name to create
$alias = "SharePointDB"
# Server Name of SQL Server
$server = "SQL1"
# Registry locations for the SQL Aliases
$x86 = "HKLM:SoftwareMicrosoftMSSQLServerClientConnectTo"
$x64 = "HKLM:SoftwareWow6432NodeMicrosoftMSSQLServerClientConnectTo"
# Check if the ConnectTo key already exists, and create it if it doesn't.
if ((test-path -path $x86) ne $True)
{
    New-Item $x86
}
if ((test-path -path $x64) ne $True)
{
    New-Item $x64
}
# Additional information for creating Registry entry value
$tcpAliasValue = "DBMSSOCN," + $server
# Creation of TCP Aliases registry entries
New-ItemProperty -Path $x86 Name $alias PropertyType String Value $tcpAliasValue
New-ItemProperty -Path $x64 Name $alias PropertyType String Value $tcpAliasValue
Drive Assignments
Depending on the primary purpose of the supported SharePoint 2013 sites, design storage for optimal throughput and manageability by separating and prioritizing your data among the drives of the database server. Ideally, you should place the tempdb database, content databases, usage database, search databases, and transaction logs on separate physical hard disks or Logical Unit Numbers (LUNs) if using a storage area network (SAN) solution.
If the primary purpose of the sites is collaboration-or update-heavy, the storage distribution should adhere to the following prioritized list, with the first items being on the fastest drives:
System tempdb data files and transaction logs
Content database transaction logs
Search databases, except for the Search Administration database
Content database data files
If the primary purpose or requirements of the SharePoint 2013 sites are read-centric (such as a records center or portal site), then prioritize the storage distribution on the fastest drives as follows:
System tempdb data files and transaction logs
Content database transaction data files
Search databases, except for the Search Administration database
Content database transaction logs
Note that the tempdb SQL Server System database is always the highest priority. As such, as noted previously, it is recommended to utilize dedicated disks for the tempdb files. You should also consider using RAID 10 for the tempdb files. Performance will normally be increased if database data and transaction logs are separated across different disks. If they do share disks due to space, put files that have different usage patterns on the same disk to minimize concurrent access requests. Additionally, if possible, use multiple data files on dedicated disks for heavy-use content databases. Of course, you should proactively monitor and make adjustments as needed to keep content databases below 200 GB or your designated threshold based on information discussed later in the chapter, rather than restrict the database size. Restricting the database size can cause serious, unexpected system issues and related downtime when the capacity defined by a restriction is exceeded.
Proactively managing the growth of data and log files
If at all possible during initial installation and configuration, increase all data files and log files to their expected final size, or schedule times when you will increase the sizes. Consider any changes that would affect database size and make the size change prior to the system change. Autogrowth is enabled by default. However, it is recommended to change the default autogrowth value for new databases from 1 MB to a much larger fixed number. It is not recommended to use a percentage factor for the autogrowth value. As a general rule, the bigger the database, or the bigger it is expected to be, that should drive larger autogrowth increments in the data and log files for the given database. Rather than using autogrowth as a management feature, consider it a risk contingency for unexpected growth. As a good practice, you should maintain at least 25 percent available space across all database data and log drives to accommodate the growth and peak usage patterns for temporary database objects.
Continuously monitoring SQL Server storage and performance
As SQL Server is mission critical to the SharePoint 2013 platform, it is strongly recommended that you continuously monitor the SQL Server storage and performance to ensure that each database is able to deliver the load required of it. Additionally, monitoring over time provides information for future growth and service scenarios. However, ensure that you not only monitor specific SQL Server resources, but also the systems that support the computer running SQL Server, such as the server CPU, memory, cache/hit ratio, and especially the I/O subsystem (disk). Although you can manually monitor the performance counters on the SQL Server system, if an enterprise monitoring solution, such as Microsoft System Center Operations Manager (SCOM) or similar system, is in place, use it to proactively monitor and alert you of issues prior to them resulting in system downtime.
Using backup compression to speed up backups and reduce file sizes
A significant boost to SharePoint 2013 backup operations can be the use of SQL Server backup compression. It is available in SQL Server 2008 R2 SP1 Standard, Enterprise, and Datacenter editions and SQL Server 2012 Standard, Business Intelligence, and Enterprise editions. If you set the compression option in your backup script or configure SQL Server to compress by default, you can significantly reduce the size of your database backups and/or shipped logs.
Overview of SharePoint Server 2013 databases and their roles
The backbone of SharePoint is heavily dependent on SQL Server databases. To maximize efficiency, SharePoint uses many databases to help distribute the workload of the multiple services and corresponding service applications, as well as the user web applications. This section will cover the various databases found within SharePoint Foundation 2013 and SharePoint Server 2013. In the following sections, each available database within the SharePoint platform will be explained and include information on purpose, sizing, scaling, and what to expect with read/write characteristics.
SharePoint Foundation 2013 databases
SharePoint Foundation is the base model of SharePoint 2013, so it does not have all the databases that are associated with SharePoint Server 2013. However, the databases found in SharePoint Foundation 2013 will be found in SharePoint Server 2013.
Configuration database
The configuration database is the “brain” of the SharePoint 2013 farm. It is responsible for maintaining data about the entire farm, including all database, Internet Information Services (IIS) websites, web applications, and solutions. It must be collocated with the SharePoint 2013 Central Administration content database. Typically, it is recommended to initially allocate 2 GB for the configuration database. Over time, it may grow beyond the initial size, but fairly slowly—approximately 40 MB for each 50,000 site collections. Additionally, growth can increase with farm solutions, as they are stored here, and other items, such as administrative Microsoft InfoPath forms. There can be only one configuration database per SharePoint 2013 farm, so it can only be scaled up. The configuration database is read-intensive. The default recovery model is initially set to Full, but it is recommended to be switched to the simple recovery model to restrict the growth of the log file, if possible.
Central Administration content database
The SharePoint 2013 Central Administration content database is similar to any other content database except, of course, that it is the content database of the administration web application. Technically, it should be considered a configuration database. Initially, it is recommended to size the Central Administration content database to at least 1 GB, but platform usage scenarios may grow the database, especially if using integrated SQL Server 2012 SP1 BI functionality in the farm, specifically PowerPivot. Also, because of this characteristic, the read/write characteristics could vary. Similar to the configuration database, the Central Administration database must be scaled up, as only one Central Administration content database is supported per farm. The default recovery model is Full.
If SQL Server 2012 SP1 PowerPivot for SharePoint 2013 is installed, the Central Administration content database also stores the Microsoft Excel worksheets and the PowerPivot data files used in the PowerPivot Management Dashboard. Therefore, if you use PowerPivot for SharePoint 2013 and use the default settings that keep the usage data collection and data refresh history for 365 days, the Central Administration content database will grow over the year.
Content database
The SharePoint 2013 content databases store all content for the user web applications. By default, if no other content databases are added to the web application, all site collections will reside in the original, initial content database created at the time of web application creation. However, administrators can add additional content databases to distribute site collections across different content databases. However, keep in mind, a single site collection cannot span multiple content databases. The content includes documents, files, list data, audit logs, as well as user information. Content database sizing and limits varies significantly, based on two primary factors: usage scenario and the SQL Server storage (disk) subsystem input/output operations per second (IOPS). Microsoft still strongly recommends limiting the size of the content databases to 200 GB, but under certain combinations of usage scenarios and storage system IOPS, sets no explicit limit of what it will support. To surpass the secondary 4 TB supportable limit, the SharePoint 2013 site on the content database must be based on the Document Center or Records Center site template, as well as refrain from using alerts, workflows, link fix-ups, or item-level security on any SharePoint Server 2013 objects in the content database. For scaling, content databases supporting a single site collection must scale up, as a site collection cannot span multiple content databases. However, multiple content databases per web application is supported. The default recovery model for the content database is Full.
One quick note about Remote BLOB Storage (RBS) and database sizing, as there is a significant amount of bad information on the Internet regarding RBS and SharePoint 2013. If you are using RBS, the total volume of the combination of both the RBS storage subsystem and the metadata in the content database must not exceed the 200 GB limit (http://technet.microsoft.com/en-us/library/cc262787.aspx).
App Management database
The App Management service application utilizes the App Management database to store the licenses and permissions downloaded from the SharePoint Store or App Catalog. You should scale-up when the database reaches 10 GB. It is only write-heavy during app installation and license renewal. The default recovery model is initially set to Full.
Business Data Connectivity database
The Business Data Connectivity database simply stores connections, external content types, and related objects. As such, the database size is directly proportional to the number of connections to external data. It can only be scaled up within the service application, as only one Business Data Connectivity database is supported per Business Data Connectivity service application. It is read-heavy and has an initial default recovery of Full.
Search service application databases
The SharePoint 2013 Search service application now has four databases to support the new Search service application architecture. Because search is such a critical component of any SharePoint 2013 environment, and with many new areas of functionality dependent on the SharePoint 2013 Search service application, it is important to have a good understanding of each of the databases, their roles, and their performance characteristics in supporting the SharePoint 2013 environment.
Search Administration database
The Search Administration database stores configuration data for the Search service application, including topology, crawl rules, query rules, search schemas at farm, site, and web levels, managed property mappings, content sources, and crawl schedules. Additionally, it stores the Analytics settings for the SharePoint 2013 Search service application. Unlike the previous version’s Search Administration database, it no longer stores access control lists (ACLs). Although it is possible to deploy multiple Search Admin components for fault tolerance, there is only one active component, and thus only one Search Administration database, so the database supports only scale-up. It has an equal read/write ratio, and sizing depends on number of search configuration objects contained in the service application. The default recovery model of the Search Administration database is Simple.
Analytics Reporting database
The SharePoint 2013 Search service application Analytics Reporting database stores the results of usage analysis, as well as Search reports. The reports include item reports, such as number of views for an item over time and unique users viewing an item over time, and site-level reports for tenants, site collections, and websites. The data in the site-level reports are aggregated to monthly views every 14 days by default. Typically, the Analytics Reporting database is write-heavy during the default nightly analytics update. It can be scaled both up and out, with the utilization of splitting the database when the database becomes larger than 200 GB. The default recovery model for the Analytics Reporting database is Simple.
Crawl database
The SharePoint 2013 Search service application Crawl database is used by the crawl component and stores information about the crawled items and crawl history tracking, such as the last crawl time, last crawl ID, and the type of update during the last crawl. It should be noted in SharePoint 2013 Search, the crawl and index components are separate, unlike the previous SharePoint Server 2010 Search service application. However, this separation is similar to FAST Search Server for SharePoint 2010 crawl and index components. Each crawl component or server role communicates with all Crawl databases. Additionally, the same host can be distributed across multiple crawl databases. The Crawl database is read-heavy and can be scaled out by creating additional Crawl databases. A new Crawl database should be created for every 20 million items crawled. The default recovery model is Simple.
Link database
The SharePoint 2013 Search service application Link database stores links extracted by the Search service application’s Content Processing Component (CPC), as well as information about the number of times that users click a result from the search results. It is write-intensive during content processing. The Link database grows approximately 1 GB per 1 million documents processed and approximately 1 GB per 1 million queries. It should be scaled out with additional Link database(s) for every 60 million documents crawled. You should also add an additional Link database per 100 million expected queries per year. The default recovery model for the Crawl database is Simple.
Secure Store database
The Secure Store database supports the SharePoint 2013 Secure Store service application and stores and maps credentials, such as account names, passwords, and now certificates. It is relatively small, depending on the number of target applications, fields per target application, and number of users stored in each target application defined within the Secure Store service application. If auditing, which is recommended, is turned on, the number of read and write operations against a given target application can affect the database sizing. It has an equal read/write ratio. This database should be scaled up. The default recovery model is Full.
Usage (and Health Data Collection) database
The Usage database is used by the SharePoint 2013 Usage and Health Data Collection service application to store health monitoring and usage data temporarily. It also can be used for reporting and diagnostics. Interestingly, it is the only SharePoint 2013 database to support schema modifications. You can expect the database to be extremely large, depending on several factors, including retention factor, number of items enabled for logging and external monitoring, the number of web applications in the farm, the number of active users, and features enabled in the SharePoint 2013 environment. Unfortunately, this database must only scale up, as only one Usage database in one Usage and Health Data Collection service application is supported per SharePoint 2013 farm. The default recovery model of the Usage database is Simple.
Subscription Settings database
The Subscription Settings database supports the SharePoint 2013 Microsoft SharePoint Foundation Subscription Settings service application, storing features and settings for hosted customers. Unlike the previous version of SharePoint, which used the service application and database only to support multitenancy, the new SharePoint App platform requires the implementation and configuration of the Microsoft SharePoint Foundation Subscription Settings service application. It is relatively small in size and primarily read-intensive. The default recovery model is Full.
SharePoint Server 2013 databases
The following databases are those associated with SharePoint Server 2013, rather than the core SharePoint Foundation 2013 databases. They are available only in their respective edition of SharePoint Server 2013, Standard or Enterprise.
Profile database
The Profile database is one of three databases supporting the User Profile service application. It stores all user profiles, audiences, and activities. It also stores memberships in distribution lists and sites. The primary growth factors include the number of users and the use of news feeds, which grow with user activities. The default setting retains the last two weeks of activities. It is a primarily read-intensive database. Because there is only one Profile database per SharePoint 2013 User Profile service application, the database can only be scaled up. The default recovery model is Simple.
Synchronization database
The User Profile service application Synchronization database stores configuration and staging data for use when the User Profile Synchronization Service is synchronizing user profile data with any number of services. It is important to note that if the new Active Directory Import synchronization connection is used, the Synchronization database still exists but will remain empty. The Synchronization database maintains an equal read/write ratio, while growth is determined by the number of users and systems being synchronized by the User Profile Synchronization service. Because each User Profile service application supports only one Synchronization database, scaling is done via scale-up. The default recovery model is Simple.
Social database
The Social database stores ratings, tags, and comments created by users, along with their respective URLs. Keep in mind, however, that some social information, such as ratings models and settings, is now contained in the content databases, which is a change from the Social database in the previous version. Sizing and growth of the Social database varies greatly and depends primarily on number of tags, ratings, and notes that have been created and used in the environment. Like the other User Profile service application databases, there is only one Social database per service application. Therefore, you would scale up this database. The default recovery model is Simple.
Word Automation database
The Word Automation Services service application uses the Word Automation database to store information about pending and completed document conversions and updates. It is a small database and read-intensive, reading once per conversion item. This database also scales up and has a default recovery model of Full.
Managed Metadata database
Supporting the Managed Metadata service application, the Managed Metadata database stores managed metadata, syndicated content types, and a hierarchical structure for items that are used for tagging content and building site collections. The primary initial sizing and growth factor is based on the amount of metadata and syndicated content types, but considered to be small to medium. It can be scaled up. It is read-intensive and has a default recovery model of Full.
Machine Translation Services database
The Machine Translation service application is a new service application in SharePoint 2013 providing automatic machine translation of files and sites. When a request is sent to the service, either synchronously or asynchronously, it is processed and forwarded to a cloud-hosted machine translation service, where the work is performed and returned. The Machine Translation Services database is small and read-intensive. The default recovery model is Full.
State Service database
The State Service database stores temporary state information for InfoPath Forms Services, Microsoft Exchange Server, the Chart Web Part, and Microsoft Visio Services. It is read-intensive and scales up. Sizing and growth factors are solely dependent on the usage of features within the SharePoint 2013 farm that store data in the State Service database. The State Service database has a default recovery model of Full.
PowerPivot database
The PowerPivot database supports the SQL Server PowerPivot service application. As will be detailed later in the chapter, it requires SQL Server 2012 SP1 SQL Server Analysis Services (SSAS) and SQL Server 2012 SP1 Business Intelligence or Enterprise edition to be installed. The PowerPivot for SharePoint SSAS instance does not need to exist on the servers running SharePoint 2013. When SQL Server 2012 SP1 PowerPivot for SharePoint 2013 is used within the farm, the PowerPivot database stores data refresh schedules, and PowerPivot usage data then is copied from the usage data collection database. Additionally, SQL Server 2012 SP1 PowerPivot for SharePoint 2013 stores more data in the Central Administration Content database and Content databases, as mentioned previously. It is a small, read-intensive database, with typically insignificant growth and a default recovery model of Full.
PerformancePoint Services database
The PerformancePoint Services database stores temporary objects and persisted user comments and settings to support the functionality of the PerformancePoint Services service application. It is a small, read-intensive database that should be scaled up per service application instance. It has a default recovery model of Full.
Access Services 2013
The new Access Services feature is a completely new service application available in SharePoint 2013. There is still the ability to use Access Services 2010, hosted in its own backward-compatible service application within SharePoint 2013, but it is not recommended. Although there isn’t a dedicated database for the Access Services 2013 service application per se, it does require SQL Server 2012 to store the user-created Microsoft Access 2013 databases. It is recommended to have a dedicated, separate SQL Server 2012 database engine instance for storing the user-created Access 2013 databases. In addition, it is important to remember to consider the Access 2013 App databases in disaster recovery plans because the content databases only contain links to the Access 2013 App, where the user-created functionality is in its own database.
SharePoint 2013 Integrated Reporting Services databases
When integrating SSRS with SharePoint 2013, there are additional databases needed to provide the functionality of Reporting Services to the SharePoint 2013 farm.
Report Server Catalog
The SSRS Report Server Catalog database stores all report metadata such as report definitions, report history, report snapshots, and report scheduling information. However, report documents are stored in the SharePoint 2013 content databases. The Report Server Catalog database must be located on the same database server as the Report Server TempDB database. It is small, read-heavy, and should only be scaled up. The Report Server Catalog database has a default recovery model set to Full.
Report Server TempDB
The SSRS 2012 for SharePoint 2013 service application uses the Reporting Server TempDB to store all the temporary snapshots currently executing in the environment. It must be located on the same database server instance as the Report Server Catalog database. The sizing and growth can vary greatly, depending on the number and use of cached report snapshots and their caching settings. It is read-intensive and can only be scaled up. It has a default recovery model of Full.
Report Server Alerting
The Report Server Alerting database of the SSRS 2012 for SharePoint 2013 service application is used for storing information about the Data Alerts and run-time data necessary to produce Data Alerts for Reporting Services reports. Data from reports is processed in the database based on the rules in the Reporting Services Alert Definitions. It must also be on the same database server as the Report Server Catalog database and can vary in size depending on the use of Data Alerts within the Reporting Services service application. If used, it will have an equal read/write ratio that is intensive. The recommended scaling method is scaled up to optimize the file I/O and memory consumption. The default recovery model is Full.
SQL Server 2008 R2 (SP1) and SQL Server 2012 system databases
Of the four SQL Server system databases (master, model, msdb, and tempdb), the only significant one to mention supporting a SharePoint 2013 implementation is the tempdb system database. The tempdb database stores temporary objects, such as temporary tables and temporary stored procedures. It is re-created every time that the SQL Server service is started. Due to the heavy use of both reading and writing by the SharePoint 2013 system, it should be located on a fast storage subsystem or disk, separated from other databases. If you use multiple files to reduce the storage contention, it may provide better performance and scalability. The general recommendation or guideline is to create one data file for each CPU core on the server and then adjust for performance from that point. The size is medium or up to 100 GB, depending on the SQL Server database engine activities. Large index rebuilds and/or large sorting operations can cause significant growth. The tempdb should only be scaled up. The default recovery model of the tempdb database is Simple.
SharePoint 2013 database capacity planning
In planning the database tier of SharePoint 2013, usually and hopefully, you will be working with dedicated database administrators. If not, you will be responsible for the performance of the database tier. To optimize performance in the planning of the database tier, the primary concepts are storage capacity and I/O planning. The storage for most SharePoint administrators is straightforward. However, usually the I/O requirements planning knowledge is little to none. As such, we will discuss these two primary factors in moderate depth and provide calculation formulas to assist you in SQL Server database capacity planning for supporting a SharePoint 2013 environment.
SQL Server storage and IOPS
For any SQL Server deployment, not just in supporting SharePoint 2013, it is critical to achieve the highest possible I/O from the storage subsystem, whether the subsystem is a combination of local disk(s) or enterprise SANs. The primary measure of a storage subsystem is usually measured in input/output operations per second (IOPS). Typically, the more disks or arrays of disks and faster disks provide significant increase in IOPS for the storage subsystem. Other factors, such as CPU and memory, can influence, but not compensate for, a poor or slow I/O subsystem. Prior to any production deployment of a SharePoint 2013 farm, it is recommended to benchmark the I/O subsystem. Microsoft provides a free download to analyze the I/O subsystem, called SQLIO (http://go.microsoft.com/fwlink/p/?LinkID=105586t). As mentioned previously, because knowledge of I/O subsystem optimization is typically shallow for SharePoint administrators and architects, you will be presented with a walkthrough of SQLIO near the end of this chapter. Additional in-depth information on analyzing I/O characteristics, as well as sizing storage systems for SQL Server database applications, can be found in a white paper available on the SQL Server Customer Advisory Team (CAT) team site (http://sqlcat.com/sqlcat/b/whitepapers/archive/2010/05/10/analyzing-i-o-characteristics-and-sizing-storage-systems-for-sql-server-database-applications.aspx).
The basis for every SharePoint 2013 deployment should be configuration, content, and IOPS. The configuration database and Central Administration content databases are small. It is recommended to initially allocate 2 GB and 1 GB, respectively, for the databases. The transaction log for the configuration, however, can be large. Therefore, either change the recovery model for the configuration database from Full to Simple or ensure the backup and truncation of the configuration database transaction logs. Other factors, such as mirroring, could limit your options. For example, database mirroring requires a full recovery model. IOPS requirements for the SharePoint 2013 configuration and Central Administration databases are minimal.
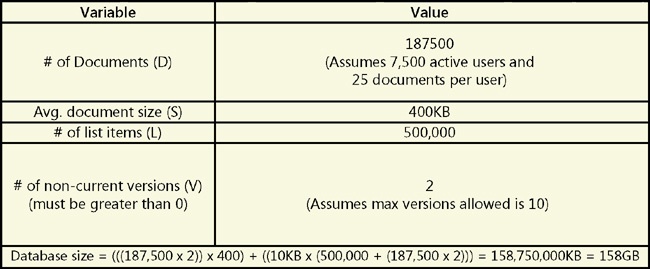
In estimating content database storage, you will use a formula based on the expected number of documents (D), the average size of documents (S), the number of list items (L), and the approximate average number of noncurrent versions of all documents (V). Additionally, you will use a 10 KB value, which is a rough estimate of the amount of metadata required by the SharePoint platform. If metadata is significant in your environment, you may want to increase this value in your calculation. The formula is represented by
Content database size = ((D × V) × S) + (10 KB × (L + (V × D)))
For example, given the data shown in Figure 5-8, the content database size estimation would be 158 GB.
When estimating the IOPS requirement, the planned usage scenario(s) of the SharePoint 2013 platform is the primary factor that influences IOPS needs. Microsoft provides several usage–performance and capacity test results and recommendations for SharePoint 2013 (http://technet.microsoft.com/en-us/library/ff608068.aspx). Ideally, you will find your usage scenario(s) with details. As an option, choose the scenario(s) that most closely resemble your use case requirements.
As an example, to achieve the maximum supported content database server size for all usage scenarios of 4 TB, the disk subsystem IOPS performance must be at least 0.25 IOPS per gigabyte, and optimally at 2 IOPS per gigabyte. In other words, for optimal performance of a 4 TB content database size, the disk subsystem supporting the database would need to be 8,000 IOPS, or a minimum of 1,000 IOPS. As a point of reference, a single 15,000-rpm SAS drive typically performs at 175 to 210 IOPS! As a final note on IOPS, do not simply trust vendor specifications of storage subsystems or drives. Test your system prior to deployment, hopefully using the example at the end of this chapter to baseline your storage subsystem.
The storage architecture selection for the database tier can also be critical in ensuring maximum performance of the environment, whether you are using Direct Attached Storage (DAS), SAN, and Network Attached Storage (NAS). NAS is only supported when using RBS with content database storage, although it should really be avoided for almost all scenarios. All storage subsystems and/or architectures require a 1-ms ping response and must return the first byte of data within 20 ms. Additionally, each possible storage architecture disk type (for example, SCSI, SATA, SAS, FC, IDE, or SSD) and/or RAID use and type will have an impact on IOPS performance. As a rule of thumb, it is generally recommended to use RAID 10 or other solution that provides similar performance and characteristics.
Enabling SQL Server BI within SharePoint 2013
One of the most compelling features, especially for an intranet scenario, is enabling self-service SQL Server BI capabilities within the SharePoint 2013 platform. First, it should be noted that although the database engine of a SharePoint 2013 farm can be on SQL Server 2008 R2 SP1+ or SQL Server 2012, only SQL Server 2012 SP1 is supported for the SQL Server BI functionality within the SharePoint 2013 platform. Most environments will be multiserver, multitier implementations.
First, our scope of SQL Server 2012 SP1 BI for SharePoint 2013 components includes SQL Server 2012 SP1 PowerPivot (Analysis Services in SharePoint mode) and integrated SQL Server 2012 SP1 Reporting Services for SharePoint 2013. However, the Excel Services application is a prerequisite for PowerPivot and PowerView in SQL Server 2012 SP1 Reporting Services for SharePoint 2013. Assuming that you have a minimum three-server SharePoint Server 2013 Enterprise edition farm, including a Web Front End (WFE), and Application (APP) server, and a Database (SQL) server, the recommended architecture would be to place all the service applications (Excel Services, PowerPivot, and Reporting Services) on the APP server tier. SQL Server 2012 SP1 Analysis Services in SharePoint mode would be installed on the SQL server tier. It could, of course, be placed on a dedicated server. However, the steps are similar in installation and configuration if a dedicated server is used. It is important to note that the Reporting Services add-in is required to be on every server in the SharePoint 2013 farm. Additionally, a new install or add-in, spPowerPivot.msi, is recommended to be installed on all servers in the SharePoint 2013 farm.
The high-level steps to install PowerPivot for SharePoint 2013 and Reporting Services in SharePoint mode are as follows:
Install and configure the Excel Services Application on the APP server.
Install Analysis Service in SharePoint mode on the SQL server. You should grant the SharePoint farm and the services account server administrator rights in the Analysis Services instance. As shown in Figure 5-9, the first step is to select Perform A New Installation Of SQL Server 2012.
In the Setup Role window, select SQL Server PowerPivot For SharePoint (see Figure 5-10), and then click Next.
Verify that the instance name in the Instance Confirmation window is POWERPIVOT, as shown in Figure 5-11.
In the Server Configuration window, add the SQL Server Analysis Services service account, as shown in Figure 5-12.
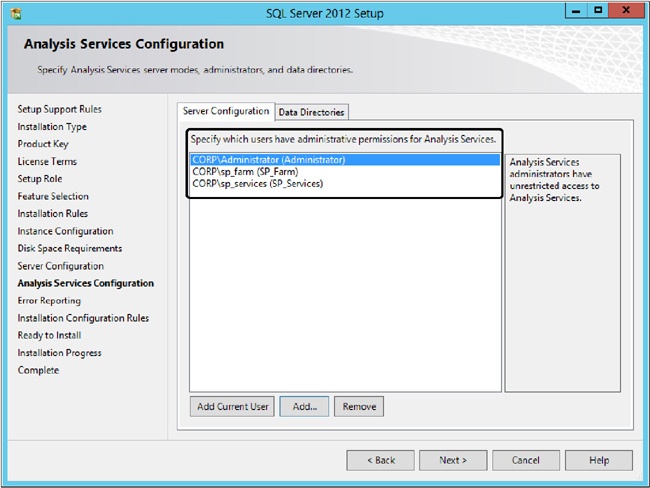
In the Analysis Services Configuration window, add the other administrative accounts that will be using Analysis Services, as shown in Figure 5-13.
Install the spPowerPivot.msi file, found at http://www.microsoft.com/en-us/download/details.aspx?id=35577, on the servers running SharePoint Server 2013, which are APP and WEB servers in this example. Figure 5-14 shows the features selected during the installation of spPowerPivot.msi.
You will begin the process of registering the Analysis Services instance with the Excel Services application in SharePoint 2013 Central Administration by configuring the Data Model Settings of the Excel Services application, as shown in Figure 5-15.
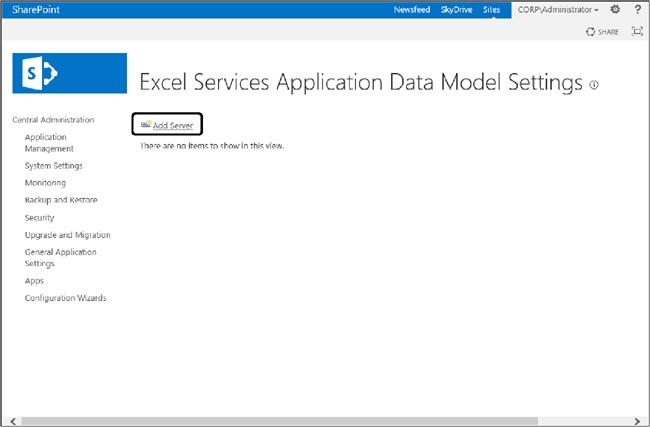
After clicking Data Model Settings, the Excel Services Application Data Model Settings page will open. Click Add Server to add the server running the SSAS, as shown in Figure 5-16.
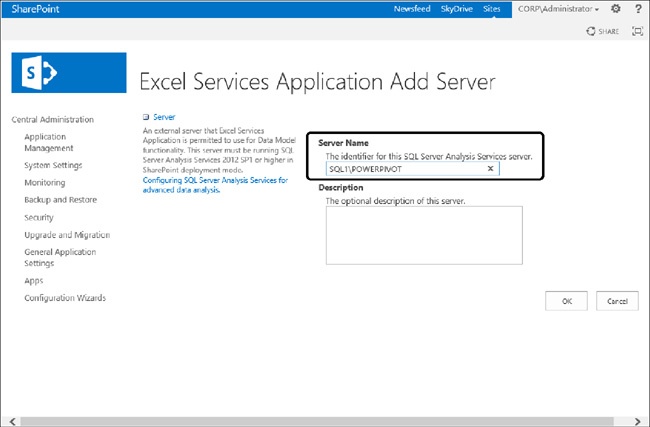
Clicking the Add Server link will open the Excel Service Application Add Server page (shown in Figure 5-17), where you will supply the server and instance of the SQL Server 2012 SP1 PowerPivot instance.
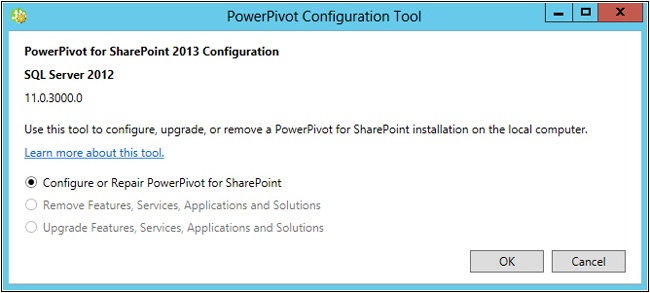
From the Start menu of the SharePoint server, run the PowerPivot for SharePoint 2013 configuration as the account that was used to install the instance of SharePoint 2013, as shown in Figure 5-18.
In the Run As Different User dialog box, enter the user name and password combination for your SharePoint 2013 install account. Next, the PowerPivot Configuration Tool window will open. If this is your first installation of PowerPivot for SharePoint on this server, select Configure Or Repair PowerPivot For SharePoint and click OK, as shown in Figure 5-19.
The next window that opens is where you will put in your PowerPivot for SharePoint configuration settings. After the settings have been entered, click Validate before proceeding, as shown in Figure 5-20.
As shown in Figure 5-21, after the PowerPivot for SharePoint settings have been validated, if you click the Script tab, you have the ability to view and/or save the configuration settings as a Windows PowerShell script.
Now that SQL Server 2012 PowerPivot for SharePoint has been installed and configured within the SharePoint 2013 farm, you will proceed to install and configure SSRS 2012 for SharePoint 2013 in Integrated mode. For the following steps, it is assumed that you are installing SQL Server 2012 SP1 Reporting Services on the APP server and the SQL Server 2012 SP1 Reporting Services add-in on all other SharePoint servers—in this case WFE. Prior to doing the next steps, ensure that you have the media for SQL Server 2012 SP1 available to both the APP and WFE servers.
To install Reporting Services in SharePoint mode and the Reporting Services add-in on the SharePoint APP server, you will need to start a new SQL Server 2012 SP1 installation and install a new SQL Server feature, as shown in Figure 5-22. (The procedure for entering the product key and accepting the end user license agreement (EULA) is skipped in these steps.)
After clicking Next, select Reporting Services - SharePoint and Reporting Services Add-in For SharePoint Products from the Share Features section of the Feature Selection window, as shown in Figure 5-23.
For this example, the Reporting Services add-in will be installed on the remaining SharePoint 2013 web server by adding the feature in the same manner as step 14. However, on the web server, only the Reporting Services add-in will be installed, as shown in Figure 5-24.
Configure the SSRS service application by going into Central Administration and adding a new SSRS service application, as shown in Figure 5-25.
When the Create SQL Server Reporting Services Service Application modal dialog box opens, add the configuration information required to create the service application, as shown in Figure 5-26.
After provisioning the SSRS service application, you’ll need to run a script on the server running SQL Server that is hosting the database engine for SSRS that is created for you. To do this, click the Download Script button shown in Figure 5-27.
Activate the Power View Integration site collection feature in site collections where you will use Power View, as shown in Figure 5-28.
Figure 5-28. Activate the Power View Integration site collection feature in the desired site collection(s).You can now create a site and test the BI functionality.


As a last note, you may want to consider enabling Kerberos and delegation throughout the farm and external data sources so that users’ credentials can be passed and used for authentication to the external systems that are acting as the data sources for the BI functionality. Setting up Kerberos in a SharePoint Server 2013 environment is beyond the scope of this chapter.
Shredded Storage in SharePoint 2013
New to SharePoint 2013 is the concept and functionality of Shredded Storage. Shredded Storage is an improvement in the storage management of Binary Large Objects (BLOBS). Specifically, Shredded Storage improves data I/O and reduces the utilization of computing when making incremental changes to a file in SharePoint 2013. The Shredded Storage functionality occurs between the servers running SharePoint 2013 and the SQL Server database engine supporting the SharePoint 2013 farm. It is important to note that it is distinct, but it complements the Cobalt protocol functionality between the Microsoft Office clients and SharePoint servers introduced in the previous SharePoint 2010 and Office 2010 platform. In a new SharePoint 2013 implementation, Shredded Storage is enabled by default and cannot be disabled.
In the previous version of SharePoint, the file was completely loaded to the web server, where the merge operation occurred and then was completely written back to the SQL Server database. Shredded Storage improves this process by breaking the file (BLOB) into smaller, separate BLOBs, which are stored in a new database table named DocStreams. Each BLOB in the DocStreams table contains an identifier that aligns with the source BLOB when merged. When the client updates a file, only the smaller BLOB(s) associated with the updated data are updated. This update occurs on the SQL server rather than in the web server layer. This optimization can result in increased performance of file operations of SharePoint 2013 by approximately two times compared with SharePoint 2010.
FileWriteChunkSize is a new property in SharePoint 2013 similar to the FileReadChunkSize property introduced in SharePoint 2010 and associated with the BLOB cache enabled on SharePoint 2010 servers. The FileWriteChunkSize property can allow the control the size of the smaller, “shredded” BLOBs. It can be modified by a SharePoint 2013 farm administrator but should be done only after thorough testing in a nonproduction environment.
The most noticeable increase in decreased storage capacity with Shredded Storage in SharePoint 2013 is in the utilization of versioning within a document library. However, it is still recommended to utilize the “classic” storage capacity estimation process for determining initial SQL Server storage in supporting SharePoint 2013.
Putting it all together
Now that you have an understanding of SQL Server optimization techniques and how SharePoint uses the SQL Server databases, you should be able to go off and use the information from the previous sections to optimize your SQL Server environment. Optimizing SQL Server is great, and you can tweak your server settings until you have optimized every aspect of your SQL Server configuration; but what if you have a slow back channel to your hard drives? Do you know the latency and throughput that you are getting from your SharePoint box through to your SQL Server storage? Your throughput, latency, and drive read/write speeds are important to know before you set up your environment to make sure that your entire SQL Server environment is going to be working correctly.
You should have a baseline for your farm’s information before and after you make changes, such as page load times, before adding a new Web Part or branding. You should also know your baseline numbers for disk drive performance before you set up your SharePoint farm. Knowing that your infrastructure is solid and can perform under heavy utilization is very important because you do not want a slowdown in the performance of SharePoint because of latency issues to your SAN. And probably the most important reason for you to have baseline numbers is so that the next time your network administrator claims to have tweaked the iSCSI network, you can know for sure. Another reason to understand your disk subsystem is to be able to explain and prove to your bosses what happens behind the scenes when they want to change the max file upload size to 1,500 MB. The default maximum file size is 250 MB, and the file size limit is configurable to expand up to 2,047 MB (2 GB); knowing the effects that changing the default maximum file size will have on your environment is very important before you make those kinds of changes.
Introducing SQLIO
To help determine your key metrics for your disk drive I/O performance, Microsoft has a free utility called SQLIO. It is a command-line tool that is not very user friendly—and don’t let the name fool you, as it really has nothing to do with SQL. While it does not deal with SQL Server directly, it will allow you to determine the I/O capacity of your SQL Server hard drives. This disk subsystem benchmark tool will test your IOPS by moving files from Point A (SQL Server or SharePoint Server) to Point B (Disk Subsystem) of a specific size for a specific amount of time. Both file size and length are determined through settings, as well as the number of threads and number of requests. Keep in mind that your disk subsystem does not have to be a separate storage device; it could be your local drive array (hopefully RAID 10). Having insight into your local drive array is just as critical as knowledge of your SAN because things can go wrong internally just as easily as with your external devices.
You can download SQLIO from http://tinyurl.com/PCfromDC-SQLIO.
Testing your SQL Server internal drives
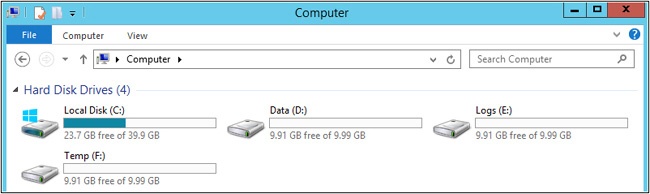
For this example, the initial test environment is going to be using three local drives for testing, as shown in Figure 5-29.
After downloading and installing SQLIO onto your server running SQL Server, go to the install location and open the Param.txt file. The default location of this file is C:Program Files (x86)SQLIOParam.txt. After you open the file, there are some settings that will need to be changed (see Figure 5-30). The Testfile.dat file needs to be created in the drive location that you wish to test. In the SQLIO folder, there is also a Readme.txt document that has a lot of useful information about SQLIO, as well as a file called Using SQLIO.rtf, and both should be read.

You will want to change the settings to match your desired testing drive locations. This initial test is going to be testing the D:, E:, and F: drives with a 1 GB file, so the Param.txt file has been modified, as shown in Figure 5-31.

At this point, you will create the Testfile.dat files in the root of the drives and review the output file. You will need to open a command prompt as an administrator and go to the SQLIO folder. Once you have reached the SQLIO folder, run the following command from the command prompt:
C:Program Files (x86)SQLIO> sqlio -kW -t1 -s120 -dD -o1 -frandom -b64 -BH -LS -Fparam.txt >
c:outfile.txt
Figure 5-32 shows what the variables within the command mean.

Running this command will create a text file of the output from SQLIO called Outfile.txt and put it in the root of the C: drive. This output file (shown in Figure 5-33) provides the cumulative data for the three drives that are being tested.

The desired outcome of testing your SQL Server drives, however, is to test each individual drive. This way, you have the ability to determine which is the fastest drive and put the TempDB on that drive. As you can see from the parameter information in Figure 5-34, the 1,024-MB Testfile.dat files have been created for each drive, which will be used to conduct the following test. To get the results of testing one drive, you will need to run the following command to test the D: drive, as shown in Figure 5-34:
C:Program Files (x86)SQLIO> sqlio -kW -t2 -s120 -dD -o1 -frandom -b64 -BH -LS Testfile.dat >
c:outfile-D.txt
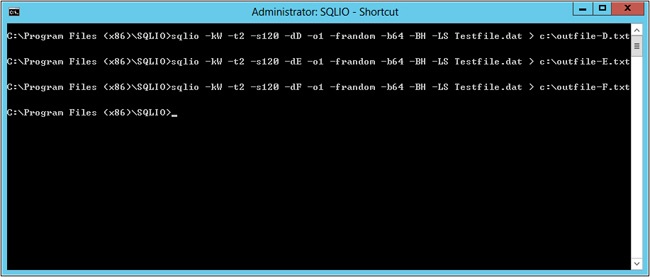
A similar test will be run on the E: drive (as shown in Figure 5-33) with the following command:
C:Program Files (x86)SQLIO> sqlio -kW -t2 -s120 -dE -o1 -frandom -b64 -BH -LS Testfile.dat >
   c:outfile-E.txt
And finally, a similar test will be run on the F: drive (also shown in Figure 5-33) with the following command:
C:Program Files (x86)SQLIO> sqlio -kW -t2 -s120 -dF -o1 -frandom -b64 -BH -LS Testfile.dat >
   c:outfile-F.txt
The output of the D:, E:, and F: drives is shown in Figure 5-35.

In this configuration of SQLIO, the fastest drive is the F: drive because it has the highest number of IOs/sec and the highest throughput in MB/sec. There is a direct correlation between IOPS and throughput. You will never have a high throughput if your IOPS value is low.
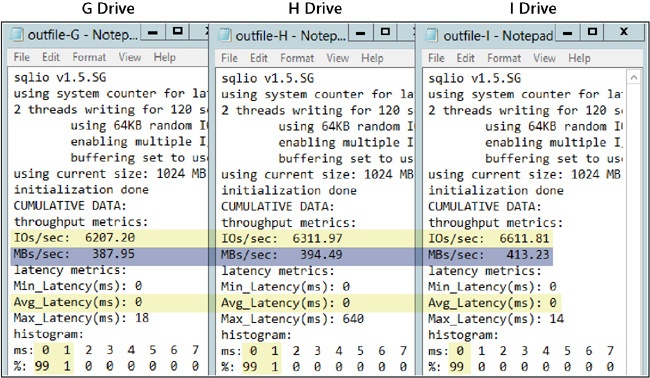
Testing your iSCSI network drives
SQLIO really shines when it comes to testing your iSCSI network because SQLIO does such a good job of tracking latency. Ideally, your average latency for your testing should not be above 20 ms, and even if you are having latency results that are at 0 ms and 40 ms to average you out to 20 ms, you do have a problem somewhere in your chain. For this test, the drive configuration has three SAN drives (shown in Figure 5-36) on the server running SQL Server.

At this point, there are two ways to create the Testfile.dat file in the new drives. You can either modify the Param.txt file to include the new drives and rerun the script above, or you copy/paste the Testfile.dat file from an existing location into the new SAN drives.
Now that the Testfile.dat files have been put into the SAN drives, run the following commands to test the drives and create the output files:
C:Program Files (x86)SQLIO> sqlio -kW -t2 -s120 -dG -o1 -frandom -b64 -BH -LS Testfile.dat >
   c:outfile-G.txt
C:Program Files (x86)SQLIO> sqlio -kW -t2 -s120 -dH -o1 -frandom -b64 -BH -LS Testfile.dat >
   c:outfile-H.txt
C:Program Files (x86)SQLIO> sqlio -kW -t2 -s120 -dI -o1 -frandom -b64 -BH -LS Testfile.dat >
   c:outfile-I.txt
The output files from this test, shown in Figure 5-37, will be drastically different compared to the results from testing the local SQL Server drives, shown in Figure 5-35.
Testing your SQL Server drives from SharePoint
To test the latency between your SharePoint environment and your SQL Server disk subsystem, shared storage will need to be enabled on the storage drives on your server running SQL Server; basically all the drives except for the operating system. Once there is a share name established for each drive, go to the server running SharePoint and create mapped drives to the new shares. After creating your mapped drives, install SQLIO on the SharePoint box, and then run the same commands you ran previously (if the mapped drives match):
C:Program Files (x86)SQLIO> sqlio -kW -t2 -s120 -dD -o1 -frandom -b64 -BH -LS Testfile.dat >
   c:outfile-D.txt
C:Program Files (x86)SQLIO> sqlio -kW -t2 -s120 -dE -o1 -frandom -b64 -BH -LS Testfile.dat >
   c:outfile-E.txt
C:Program Files (x86)SQLIO> sqlio -kW -t2 -s120 -dF -o1 -frandom -b64 -BH -LS Testfile.dat >
   c:outfile-F.txt
C:Program Files (x86)SQLIO> sqlio -kW -t2 -s120 -dG -o1 -frandom -b64 -BH -LS Testfile.dat >
   c:outfile-G.txt
C:Program Files (x86)SQLIO> sqlio -kW -t2 -s120 -dH -o1 -frandom -b64 -BH -LS Testfile.dat >
   c:outfile-H.txt
C:Program Files (x86)SQLIO> sqlio -kW -t2 -s120 -dI -o1 -frandom -b64 -BH -LS Testfile.dat >
   c:outfile-I.txt
The output files from this test, shown in Figure 5-38, will be drastically different from running this test directly from SQL Server, which were shown in Figure 5-35. Notice that for every added piece of equipment, IOPS reduces, and there is also a reduction in throughput.

Stress testing your SQL Server drives
You have now completed a single test run using only a single set of parameters on your SQL Server drives. To really stress-test your drives, you will want to create a batch file that has different settings for use with the same Testfile.dat file. There is an excellent article at http://sqlserverpedia.com/wiki/SAN_Performance_Tuning_with_SQLIO with instructions on not only how to create and run such a script, but also how to import the results into your server running SQL Server.
Disk subsystem performance information
Analyzing your disk performance is not easy, and it takes a lot of patience and experience to really understand how everything works and how to optimize your drives. If you would like more information about disk subsystem performance analysis, you can download a white paper from Microsoft called “Disk Subsystem Performance Analysis for Windows,” at http://msdn.microsoft.com/en-us/windows/hardware/gg463405.aspx. While the paper is a bit old, it still has a lot of useful information.
After reading through this chapter, you should now have a better understanding of how important SQL Server tuning and optimization is for your SharePoint environment. SQL Server will run just fine out of the box without any tweaking, but it comes at the cost of SharePoint not running optimally either. Tuning your server running SQL Server before SharePoint is installed, as well as maintaining a vigilant watch over your SQL Server environment after SharePoint has been up and running, will help keep your SharePoint farm running as fast as possible.