Chapter 7. Designing for platform security
In this chapter, you will learn about:
Microsoft SharePoint deployments are managed at the farm level. With the product growing in popularity, it may be necessary for system administrators to be able to track SharePoint installations or prevent them from being added to the corporate intranet. In this chapter, you will learn how to apply those features so that it is easier to know when new farms are created.
When you went through the requirements gathering phase, you no doubt had requirements that were directly related to platform security. In this chapter, you will gain an understanding of what it takes to protect not only the SharePoint web interface, but the communications from the information worker all the way back to the database. But is this enough? What exactly is platform security, anyway?
A reasonable definition for platform security would be a security model that is used to protect all aspects of a particular system; in the case of SharePoint, this not only includes the features that are available through the web interface but also the data at rest. You will learn about how to plan for and configure Microsoft SQL Server Transparent Data Encryption (TDE) to protect the data at rest.
Once you have an understanding of how to track installations and protect the data leaving the clients all the way to where it rests in the database, it will be time to examine techniques for limiting which accounts have access to various parts of the system and learning the tradeoffs you make for incorporating least privileges in a SharePoint environment. This will then take you inside Central Administration, where you will focus on the various accounts used by the system, general security options, and information policy.
Security is always a hot topic when it comes to SharePoint, and rightfully so; organizations place their trusted business documents into the system, and it is important for them to feel that the system is safe and secure. With the growing concerns of security, and with regulations helping to keep data private, platform security is undoubtedly one of the most important concepts that you can implement into your SharePoint 2013 farms. In the final section of the chapter, you will review a scenario that will help put many of the concepts in place so that you can assure the stakeholders that their information is safe.
Preventing, tracking, and reporting on SharePoint installations
Installing SharePoint 2013 on a computer that uses a client operating system is not supported; this was not the case with the 2010 product. With Microsoft SharePoint Foundation being freely available, it was not uncommon for rogue SharePoint farms to take root and grow. SharePoint is installed and managed at the farm level, and one SharePoint deployment has no information about another farm that may exist in the same enterprise. Because there is no enterprise-wide way to know where SharePoint farms are being created, you may need to prevent (or at least track) where new farms are being created. In this section, you will not only learn how to perform both of these operations, but also how to review where SharePoint is installed once these options have been implemented.
Preventing SharePoint installations
You can prevent users from installing SharePoint by using Group Policy in Active Directory services. To do so, update the following key on all of the servers:
HKLMSoftwarePoliciesMicrosoftShared ToolsWeb Server Extensions15.0 SharePointDWORD
DisableInstall
To block installations, set DWORD DisableInstall=00000001.
You can use Windows PowerShell to add the registry value to the Group Policy on the server hosting the Active Directory services (see Example 7-1).
Set-GPRegistryValue -Name "Default Domain Policy" -Key "HKLMSoftwarePolicies
MicrosoftShared ToolsWeb Server Extensions15.0SharePoint" -ValueName
"DisableInstall" -Type DWORD -Value 1
Once the keys are set to disable, you will see a Setup Errors message, as shown in Figure 7-1.

If you had a group policy to block SharePoint 2010 (14.0), you will need to create a new one for version 15.0. The installation process doesn’t check the status of the previous version. Because this is a Group Policy Object (GPO) setting, it is possible to circumvent the process by modifying the registry and changing the value to zero or deleting it altogether. So trying to control installations solely by blocking them may not offer a complete solution, but it will stop people who do not understand how the feature works.
Tracking SharePoint installations
SharePoint has the ability to work in conjunction with Active Directory Service Connection Points to identify SharePoint products used in an organization. As with the blocking of installations, the tracking of installations doesn’t offer a complete solution either. Once configured, SharePoint installs that are done with the SharePoint Products Configuration Wizard will have a marker injected into the service connection point; however, installations using Windows PowerShell will not do this by default. So relying on this feature to keep track of every SharePoint farm will be unreliable. With that being said, these markers can be added via Windows PowerShell, after the fact, or be added to the installation scripts.
To create a service connection point container to track installations, follow these steps:
On the domain controller, open ADSI Edit.
On the Action menu, click Connect To and connect to the domain in which you are tracking installations.
Expand the domain name and then click CN=System.
Right-click in the white area, click New, and then click Object.
In the dialog box, click Container and then click Next.
In the value box, type Microsoft SharePoint Products as the container name and click Next.
Click Finished.
Right-click the Microsoft SharePoint Products container that you just created and click Properties.
On the Security tab, click Add.
Add all Authenticated Users or Everyone and give them write permission to the container. If a particular individual doesn’t have write access, that person will still install SharePoint, but the marker will not be created.
On the group that you just entered, click Advanced.
In the Permission entries box, select the name or group you just added and click Edit.
In the Permission Entry for Microsoft SharePoint Products dialog box, select the Allow check box for Create serviceConnectionPoint Objects (as shown in Figure 7-2), and click OK.

Once the service connection point has been created and the permissions have been set, all installations using the SharePoint Product Configuration Wizard will be automatically tracked. In order to track installations using Windows PowerShell, you can use the Set-SPFarmConfig cmdlet, as shown in Example 7-2.
Set-SPFarmConfig -ServiceConnectionPointBindingInformation
StringwithBindingInformationa
You can modify the string value of the -ServiceConnectionPointBindingInformation with a more meaningful value, such as Get-SPTopologyServiceApplication | select URI. This will return the Uniform Resource Identifier (URI) of the farm topology service (in this case, https://contoso-sp1:32844/Topology/topology.svc). Or you can simply use the host parameter of the URI. You can use the same cmdlet and parameters to update the connection string at any time.
If you are responsible for maintaining the Windows PowerShell scripts within your organization, you can simply add the Set-SPFarmConfig cmdlet to the end of your farm installation script, and installations using those scripts will be tracked.
The tracking information can be deleted using the -ServiceConnectionPointDelete parameter on the Set-SPFarmConfig cmdlet.
Reporting SharePoint installations
Once the service connection points are configured correctly, you can either review the markers created in Active Directory Domain Services (AD DS) by reviewing the Microsoft SharePoint Products container or by using the Windows PowerShell script shown in Example 7-3—that will list all SharePoint farms with Active Directory markers.
$containerPath = 'LDAP://CN=Microsoft SharePoint Products,CN=System,DC=contoso,D
                  C=local'
$entry = New-Object DirectoryServices.DirectoryEntry $containerPath
$searcher = New-Object DirectoryServices.DirectorySearcher
$searcher.SearchRoot = $entry
$searcher.Filter = "(objectClass=serviceConnectionPoint)"
$searcher.FindAll() |  % { New-Object PSObject -Property $_.Properties } | select
servicebindinginformation, whencreated, whenchanged
Encrypting communications
As you learned in Chapter 6, there are a number of situations that require encryption, whether they be between the client and server or between the various servers that make up your SharePoint farm. There are many places in SharePoint that transmit credentials in clear text, and you should use Transport Layer Security (TLS) to encrypt the credentials—Secure Sockets Layer (SSL) is the most common way to implement this. When creating or modifying information about a Managed Account, if the Central Administration site is not encrypted, you will see the following message:
Warning: this page is not encrypted for secure communication. User names, passwords, and any other information will be sent in clear text.
An example of this has been provided in Figure 7-3. Central Administration is often overlooked when considering platform security, and it is undoubtedly the most important web application to secure. Many organizations remote into the server that hosts the web application to make modifications, but you must remember that it can be accessed from any computer within the domain, just like any other web application.

You will learn more about encrypting your SharePoint sites using SSL as you progress through this chapter.
Certification Authorities (CAs)
You will need to obtain a certificate from a certification authority (CA) in order to secure server communications. For production systems that have a public reach (Internet), this is best done through a public CA; these cost money, however, so for internal (intranet) web applications, you may find it best to use a Domain CA, which is a role under Active Directory Certificate Services. This will allow you to create internal certificates as needed.
There are several types of certificates that are worth mentioning at this point: standard SSL and wildcard SSL certificates. Standard SSL is valid for a particular named domain or subdomain and is very specific. Wildcard SSL certificates can be used for all subdomains and subdirectories of a particular domain, giving you more flexibility, and is often cheaper than buying many public standard SSL certificates. To generate the wildcard SSL, you need to use *.domain.com in the common name. It is worth noting that many organizations believe that wildcard certificates introduce security risks, so you should verify if they are allowed in your organization. This chapter will use a Domain CA for all SSL examples, and a walkthrough of securing Central Administration communications will be demonstrated in the Putting it all together section at the end of the chapter. A third option, which we do not cover, is the use of UCC Certificates; these will allow for multiple domains.
Communication between the client and server
Communications that are passed without encryption can be compromised with tools such as WireShark. In order to protect your environment, you should consider using SSL for each web application in your farm. In order to do this, you must first obtain your certificate from either a public CA or use a Domain CA. For the sake of this example, team.contoso.local will be used and will use a Domain CA.
The first step is to visit Microsoft Internet Information Services (IIS), click the server node in the left pane, and double-click Server Certificates in the center pane. This will show you all the certificates in the center pane and provide new actions in the right pane. From here, you need to select Create Domain Certificate and fill in the certificate form, as shown in Figure 7-4.

If the certificate process is successful, you will now have a certificate that you can use with your SharePoint web applications. Whether you are creating a new SharePoint web application or converting one, the overall steps are the same. To convert an existing site to use SSL, you may find it easiest to re-create the SharePoint web application. This does not only require keeping the content database but also the Web.config file in case there are any configuration changes to your existing web application. When deleting the web application, make sure you only delete the IIS web application.
Create a new SharePoint web application. The key values will be the Port, Host Header, and the use of SSL, as shown in Figure 7-5. If your Central Administration site is not encrypted, you will see a warning across the top of the form that the credentials will be sent in clear text.

Once the web application has been created, you will find that it is inaccessible. This is because the site needs the certificate associated with its HTTPS binding. This is illustrated in Figure 7-6.

If you plan to have a number of sites that use port 443 with multiple certificates, you will need to check the box for Require Server Name Indication; this allows multiple secure websites to be served using the same IP address. Because you will undoubtedly be securing all of your SharePoint sites in conjunction with Central Administration, you will want to check this every time.
After you have associated the certificate with the IIS binding, your site should work as expected over HTTPS. If you would like to associate the certificate using Windows PowerShell, review Example 7-4.
$siteName = "SharePoint - team.contoso.local443"
$certName = "Team Sites"
# Get the site using the site name and remove the existing binding
Get-WebBinding -Name $siteName | Remove-WebBinding
# Get the certificate using the Cert Name
$cert = get-childitem cert:LocalMachinemy | where-Object {$_.FriendlyName -like $certName}
# Update the binding
$cert | New-Item -Path "IIS:SslBindings!443!team.contoso.local"Server-to-server communication
Now that you have mastered encrypting the data between the client and the SharePoint server processing the web requests, it is time to focus on the communications between the servers running SharePoint and the servers running SQL Server. SSL and Internet Protocol security (IPsec) can be used to protect communication between servers by encrypting traffic. The choice of which method to use will depend on the specific communication channels you are securing and the benefits and tradeoffs that are appropriate for your organization.
SharePoint server communications
Many organizations like to close any ports that are not in use, and if the security team is unaware of SharePoint server communications, it can hinder the ability of SharePoint to operate correctly. The following list of ports outlines the critical ones that must be planned for:
Standard web traffic is generally over the default ports of TCP 80, TCP 443 (SSL).
Ports used by the search index component: TCP 16500-16519 (intra-farm only).
Ports required for the AppFabric Caching Service: TCP 22233-22236.
Ports required for Windows Communication Foundation communication: TCP 808.
Ports required for communication between web servers and service applications (the default is HTTP):
HTTP binding: TCP 32843.
HTTPS binding: TCP 32844.
Net.tcp binding: TCP 32845 (custom service applications).
Ports required for synchronizing profiles between SharePoint 2013 and AD DS on the server that runs the Forefront Identity Management agent:
TCP 5725.
TCP&UDP 389 (LDAP service)
TCP&UDP 88 (Kerberos)
TCP&UDP 53 (DNS)
UDP 464 (Kerberos Change Password)
Default ports for SQL Server communication: TCP 1433, UDP 1434. If these ports are blocked on the computer running SQL Server (recommended) and databases are installed on a named instance, configure a SQL Server client alias for connecting to the named instance.
SharePoint Foundation User Code Service (for sandbox solutions): TCP 32846. This port must be open for outbound connections on all web servers. This port must be open for inbound connections on web servers or application servers where this service is turned on.
Simple Mail Transfer Protocol (SMTP) for email integration: TCP 25.
Workflow Manager:
HTTP binding: TCP 12291.
HTTPS binding: TCP 12290.
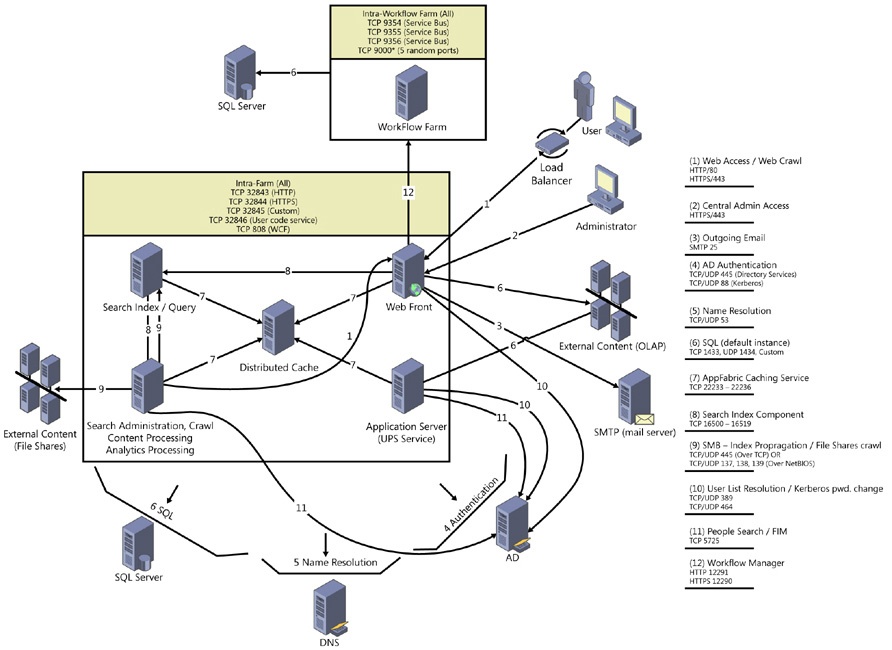
Marek Samaj recently published a blog post that contained an illustrated overview of the SharePoint 2013 farm communications (see Figure 7-7).
SSL and SQL Server
Enabling SSL encryption increases the security of the data transmitted across networks between instances of SQL Server and other applications. This sounds like something you would want to do all the time, right? It might be, but keep in mind that that enabling encryption will slow performance. When all of the traffic is encrypted using SSL, the following additional processes are required:
At connection time, an extra network round trip is required.
Packets sent from the application must be encrypted by the client and decrypted by the instance of SQL Server.
Packets sent from the instance of SQL Server must be encrypted by the server and decrypted by the application.
With this in mind, you will probably not find a noticeable impact by implementing SSL, but load testing should be done to ensure that you are getting the metrics that you expect. For more information, see Chapter 11.
To configure a SQL Server instance to use SSL, start the SQL Server Configuration Manager. You can get there by opening the Microsoft Management Console (MMC) (type MMC in the Run dialog box). On the Console menu, click Add/Remove Snap-in. Click Add | Certificates | Add. Then select the Computer Account | Local Computer. Click Finished.
Once you have the Certificates snap-in ready, select the Personal folder in the left pane and expand the arrow in the right pane to show All Tasks, as shown in Figure 7-8. Then select the option to Request New Certificate.

The next screen of the Certificate Enrollment process has you select a certificate enrollment policy. It should be defaulted to Active Directory Enrollment Policy, so you can click Next. This screen will be followed by a dialog box that allows you to request various certificates. You will want to select Computer | Enroll. You should be greeted with a successful message. You can then review the Personal Certificates and see a newly issued certificate, as shown in Figure 7-9.

Now open the SQL Server Configuration Manager. You will see a list of services in the left pane. Expand the SQL Server Network Configuration, and then right-click Protocols For MSSQLSERVER (also in the left pane) | Properties. You should see a properties window open, as shown in Figure 7-10.

The next two steps are to change the Force Encryption property to Yes and then select the newly created certificate on the Certificates tab. With the Force Encryption flag now set to Yes, all server/client communication is encrypted, and clients that cannot support encryption are denied access. Encryption can still happen if the flag is set to No, but it is not required. You will be configuring the application side in a few moments, but first you will need to assign the appropriate permissions to the newly created certificate. This can be done by clicking the More Actions menu associated with the server in the right pane. The certificate in this example would be Contoso-SQL.contoso.local. Click the All Tasks menu, followed by the Managed Private Keys menu item. You will then add the service account that the SQL Server instance is running under and give Read permission to the certificate, as shown in Figure 7-11.

You will then need to restart the SQL Server service. If you fail to give the SQL Server service account Read permissions for the certificate, your SQL Server instance will fail to restart. You can now refresh the pages in SharePoint, and everything should be working as expected.
IPsec IKEv2
IPsec protects the communication channel between two servers and can restrict which computers can communicate with each other. Not only can IPsec be used to encrypt traffic to and from the SQL Server instances, as SSL does, it can also be used to encrypt traffic between the SharePoint servers. IPsec allows you to restrict communication to specific protocols and TCP/UDP ports. In order for a SharePoint farm to be a good candidate for IPsec, all servers will need to be contained on one physical local area network (LAN) to improve IPsec performance, and the servers should be assigned static IP addresses.
With the release of Windows Server 2012, Internet Key Exchange version 2 (IKEv2) support has been extended and now supports end-to-end transport mode connections and interoperability with other operating systems that use IKEv2 for end-to-end security. These options can coexist with existing policies that deploy AuthIP/IKEv1 and certificate authentication. IKEv2 does not have a user interface and is only configurable through Windows PowerShell. IKEv2 was available in Windows Server 2008 R2 as a virtual private network (VPN) tunneling protocol that supported automatic VPN reconnection.
The first step in the process is to establish a connection security rule that uses IKEv2 for communication between two computers (Contoso-SP1 and Contoso-SQL) that are joined to the contoso.local domain. You can do this by using the code in Example 7-5. You will need to already have a public key infrastructure (PKI) in place for computer authentication.
# Create a Security Group for the computers that will get the policy
$pathname = (Get-ADDomain).distinguishedname
New-ADGroup -name "IPsec client and servers" `
-SamAccountName "IPsec SharePoint" -GroupCategory security `
-GroupScope Global -path $pathname
# Add test computers to the Security Group
$computer = Get-ADComputer -LDAPFilter "(name=Contoso-SP1)"
Add-ADGroupMember -Identity "IPsec SharePoint" -Members $computer
$computer = Get-ADComputer -LDAPFilter "(name=Contoso-SQL)"
Add-ADGroupMember -Identity "IPsec SharePoint" -Members $computer
Important
In order to use the Group Policy cmdlets on a server not hosting this role, you will need to install the GPO module and execute the import-module GroupPolicy.
# Create and link the GPO to the domain
$gpo = New-gpo IPsecRequireInRequestOut
$gpo | new-gplink -target "dc=contoso,dc=local" -LinkEnabled Yes

# Set permissions to security group for the GPO
$gpo | Set-GPPermissions -TargetName "IPsec SharePoint" `
-TargetType Group -PermissionLevel GpoApply -Replace
$gpo | Set-GPPermissions -TargetName "Authenticated Users" `
-TargetType Group -PermissionLevel None -Replace
Important
These cmdlets are new for Windows Server 2012.
#Set up the certificate for authentication
$gponame = "contoso.localIPsecRequireInRequestOut"
$certprop = New-NetIPsecAuthProposal -machine -cert `
-Authority "DC=local, DC=contoso, CN=contoso-dc"
$myauth = New-NetIPsecPhase1AuthSet -DisplayName "IKEv2SPPhase1AuthSet" `
-proposal $certprop –PolicyStore GPO:$gponame

#Create the IKEv2 Connection Security rule
New-NetIPsecRule  -DisplayName "SharePoint IKEv2 Rule" `
-RemoteAddress any -Phase1AuthSet $myauth.InstanceID `
-InboundSecurity Require -OutboundSecurity Request `
-KeyModule IKEv2 -PolicyStore GPO:$gponame
The script creates a security group called IPsecSharePoint and adds contoso-sql and contoso-sp1 as members. It will then create a GPO called IPsecRequiredInRequestOut and links it to the contoso.local domain. The script then sets the permissions to the GPO so that they apply only to the computers in IPsecSharePoint and not to Authenticated Users. The script finishes by creating the IKEv2 connection security rule called SharePoint IKEv2 Rule.
You can now verify the configuration by examining the left pane of the Windows Firewall With Advanced Security snap-in. Click Connection Security Rules, and verify that there is an enabled connection security rule with the specified name, as shown in Figure 7-12. It is important to remember that the script configures this rule through a GPO, so it will not be readily available.

Planning for and configuring SQL Server Transparent Data Encryption
To this point, you have learned how to encrypt network traffic between the servers in the farm and between the clients who use them. While this does offer a great deal of protection, the data in the farm can still be misused or stolen simply by restoring a copy of the database and attaching it to a SharePoint web application. One way to ensure that your data is not compromised is to encrypt it at rest with TDE.
Important
While TDE does encrypt the data at rest, the data is still available to SQL administrators through the use of SQL Queries or Windows PowerShell.
TDE performs real-time I/O encryption and decryption of both the data and the logs. The encryption uses a database encryption key (DEK), which is stored in the database boot record for availability during recovery. The DEK is a symmetric key secured by using a certificate store in the master database of the server or an asymmetric key protected by an EKM module. It is important to note that TDE does not provide encryption across communication channels, so use the previous section for that task. The encryption of the data is done at the page level. Pages are encrypted prior to the write and decrypted when read into memory; therefore, TDE will not increase the size of the database.
The TDE architecture comprises several different layers. The Windows Operating System Level Data Protection API (DPAPI) encrypts the Service Master Key. The Service Master Key is created at the instance level at the time of SQL Server setup. The Service Master Key encrypts the Database Master Key for the Master database. The Master Key of the Master database then creates a certificate in the Master database. The certificate is used to encrypt the database Encryption Key in the User database. And finally, the entire User database is secured by the DEK of the user database by using TDE. This is outlined in Figure 7-13.

The primary steps to use TDE are:
Create a Master Key.
Create or obtain a certificate protect by the master key.
Create a DEK and protect it by the certificate.
Set the database to use encryption.
The SQL Server query in Example 7-6 performs each of these steps on the Contoso_Content_Team database using the Passw0rd1 password.
USE master;
GO
-- Create DMK
CREATE MASTER KEY ENCRYPTION BY PASSWORD = 'Passw0rd1';
GO
-- Create DEK Certificate
CREATE CERTIFICATE TDECert WITH SUBJECT = 'SQL Server TDE Certificate'
GO
-- Backup the TDE Certificate
BACKUP CERTIFICATE TDECert TO FILE = 'C:CertsSQLTDECert.bak'
WITH PRIVATE KEY(
FILE = 'C:cert_privatekey.bak',
ENCRYPTION BY PASSWORD = 'Passw0rd1'
)
GO
-- Create the DEK encrypted w/ server certificate
USE Contoso_Content_Team
CREATE DATABASE ENCRYPTION KEY
WITH
ALGORITHM = AES_256
ENCRYPTION BY SERVER CERTIFICATE TDECert
GO
ALTER DATABASE Contoso_Content_Team SET ENCRYPTION ON
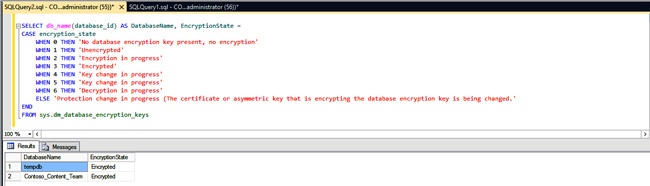
GOThe processes to turn on TDE may take a while, so it is best to do it during a long maintenance window. To review the status of the encryption, execute the SQL Server query shown in Figure 7-14. You should see a similar result once the process is completed.
Installing SharePoint using least privileges
Least privileges is a practice that gives the user or service account only the permissions they need to do their job and no more. Whether or not SharePoint 2013 fully supports a least privilege configuration is probably debatable, but there are certainly steps that you can take to limit the permissions that the user and service accounts have to only their job roles. The practice of least privileges and server hardening came from the early days of Novell and Windows NT 4, when the software was installed under the system account and everything worked. With the complexity of how current software products work, there are many moving parts and the ability to only give the appropriate access may get lost in the complexity of the software. If you were to research how to make your SharePoint installations fit into the least privileges bucket, you will unfortunately find conflicting thoughts and ideas. The problem is that what one person considers least privileged may actually put the product outside various support limits. This section will give you general guidance on what components should be considered and then let you take away what you need to create the appropriate solution for your organization. There is poor guidance everywhere and it is up to you to pick out what is most appropriate for your situation.
Application pools
As was the case in SharePoint 2010, the new product has a supportable limit of application pools that are allowed per web server. As of this time, it is currently limited to 10. The maximum number is determined by the hardware capabilities and is largely dependent upon the amount of memory allocated to the web servers. A highly active application pool can use 10 GB of RAM or more. So why is this important to understand in a conversation about least privileges? There are some SharePoint farms that have been built with an account for each service application and each SharePoint web application. While it may appear on the surface that the designer is following a least privilege design, he or she is actually consuming far too many resources. Every account that you use to configure a service account or application pool is taking away from the allowed number of application pools that are supported in your farm. You can go over 10 and the farm may work just fine. You will certainly need to have more RAM than the minimum requirements. To keep the application pools within friendly limits, consider using something similar to the recommendations in Table 7-1. Your organization may have security requirements that require more, but this should work for the vast majority of the organizations out there and will give you better use of the RAM on your servers.
Application Pool | Account | Responsibilities |
SharePoint Web Services Default | spServices | Hosts the SharePoint Service applications |
SharePoint Web Content Default | spContent | Hosts the SharePoint content web applications |
SharePoint Central Administration v4 | spFarm | Hosts the Central Administration web application |
SecurityTokenServiceApplicationPool | spFarm | Hosts the STS |
SharePoint Secure Store | spSSS | Hosts the Secure Store Service |
Expressed using a GUID for the name. | spFarm | Hosts the Topology Service |
Note
To review the latest software boundaries and limits for SharePoint 2013, read the Microsoft TechNet article located at http://technet.microsoft.com/en-us/library/cc262787.aspx.
User accounts
Designing your farm for least privileges happens before you install SharePoint and SQL Server. Some of the choices you make here can have huge impacts on the security of your farm. There is a running joke in the SharePoint Master community that in order to get SharePoint to work the way it is designed, you simply need to use a domain administrator account as the farm account. Unfortunately, there are farms out there that have been installed this way, and when the domain administrator password is changed, everything in SharePoint breaks. Your understanding of this content is the only way to get the farm back online. To be clear, you do not need to use the same account names here. This isn’t a lesson on standards. It is only a general guide on mapping roles and responsibilities to Active Directory Users objects. The recommended user accounts by role can be seen in Table 7-2.
Account | Purpose | Requirements |
sqlInstall | Account used to install SQL Server | Local server administrator on the servers running SQL Server during the time of install. |
sqlService | Account used for:
| Permissions to external resources for backup and restore. |
spInstall | Account used to perform:
| Local server administrator where Setup is run during the installation process. SQL Server logon for the computer that runs SQL Server. Member of the SQL Roles:
|
spFarm | Account used to perform:
| Permissions are automatically granted for the server farm account that is joined to the farm; the account is automatically added as a SQL Server logon for the computer that runs SQL Server. The account is added to the following:
This account should not be used for farm administration! Never log on to the farm with this account. |
spAdmin | Account used to configure and manage the server farm | Primary account for administration. Will need SharePoint_Shell_Access if Windows PowerShell Administration is needed. Local Administrator on servers running SharePoint. |
spContent | Acts as the application pool identity for SharePoint Web Content | Automatically give the rights that it needs on the content databases: spDataAccess. |
spServices | Acts as the application pool identity for SharePoint Service Applications | Automatically give the rights that it needs on the content databases: spDataAccess. |
spC2WTs | The identity the C2WTs runs under | Local administrator rights on the server running the C2WTs and local security policies for: Act as part of the operating system, Impersonate a client after authentication, Log on as a service. |
spUPS | The identity that is used during the User Profile Synchronization process | Active Directory Permission: Replication Directory Changes. |
The default content access account; used to crawl data for Search | Read Access to content to be searched. | |
spSSS | Acts as the application pool identity for the Secure Store Service | Automatically give the rights it needs on the content databases: spDataAccess. |
spSuperUser | Account used for caching | Account has full access to Publishing web applications. |
spSuperReader | Account used for caching | Account has full read access to Publishing web applications. |
spUnattend | Account used for external data access | Access to external data. |
Some of the accounts listed in Table 7-2 may not be needed in every farm. The Claims to Windows Token Services (C2WTs), introduced in Chapter 6, is typically only needed in business intelligence scenarios. None of the accounts listed in the table should be mapped to the DOMAINAdministrator account. While this account may have access to SharePoint, it should not be a common credential. The level of access given to the person using this account exceeds any permissions needed in SharePoint. It is also worth noting that some organizations will want to have policies against the use of generic administration (spAdmin) accounts for auditing purposes.
The SharePoint Install account (spInstall) receives machine-level permissions that include:
Membership in the WSS_ADMIN_WPG Windows security group
Membership in the IIS_WPG role
After you run the configuration wizards, database permissions include:
db_owner on the SharePoint server farm configuration database
db_owner on the SharePoint Central Administration content database
The SharePoint Farm account (spFarm), which is also referred to as the database access account, is used as the application pool identity for Central Administration and as the process account for the SharePoint Foundation 2013 Timer service. The account must be a domain user. While this account receives the permissions that it needs automatically, after you run the SharePoint Configuration Wizard, it is granted machine-level permissions that include the following:
Membership in the WSS_ADMIN_WPG Windows security group for the SharePoint Foundation 2013 Timer service
Membership in WSS_RESTRICTED_WPG for the Central Administration and Timer service application pools
Membership in WSS_WPG for the Central Administration application pool
After you run the configuration wizards, SQL Server and database permissions include the following:
dbcreator fixed server role
securityadmin fixed server role
db_owner for all SharePoint databases except the Farm_Config, in which it receives SP_DataAccess
The account is also given membership in the WSS_CONTENT_APPLICATION_POOLS role for the SharePoint server farm configuration database and membership in the WSS_CONTENT_APPLICATION_POOLS role for the SharePoint_Admin content database.
The SharePoint Services account (spServices) is an application pool account that is used for application pool identity. The application pool account requires the following permission configuration settings:
The following machine-level permission is configured automatically:
The application pool account is a member of WSS_WPG.
The following SQL Server and database permissions for this account are configured automatically:
The application pool accounts for Web applications are assigned to the SP_DATA_ACCESS role for the content databases.
This account is assigned to the WSS_CONTENT_APPLICATION_POOLS role associated with the farm configuration database.
This account is assigned to the WSS_CONTENT_APPLICATION_POOLS role associated with the SharePoint_Admin content database.
The Default Content Access account (spCrawl) is used within the search service application to crawl content, unless a different authentication method is specified by a crawl rule for a URL or URL pattern. This account requires the following permission configuration settings:
The default content access account must be a domain user account that has read access to external or secure content sources that you want to crawl by using this account.
For SharePoint Server sites that are not part of the server farm, you have to grant this account full read permissions explicitly to the web applications that host the sites. This is most commonly a cross-farm or federated scenario.
This account must not be a member of the Farm Administrators group.
The Unattended Service account (spUnattend) is used by several services to connect to external data sources that require a user name and password that are based on operating systems other than Windows for authentication. If this account is not configured, these services will not attempt to connect to these types of data sources. Although account credentials are used to connect to data sources of operating systems other than Windows, if the account is not a member of the domain, the services cannot access them. This account must be a domain user account. Examples of where this account may be used are with the Secure Store Service and PerformancePoint or with Microsoft Excel services.
SharePoint Managed Accounts
You should already have an understanding of how managed accounts work in SharePoint, so this section will serve as a brief reminder and highlight the accounts that should be managed accounts versus those that should not be.
You can register or delete SharePoint Managed Accounts either through Central Administration or Windows PowerShell (*-SPManagedAccount). The thing to remember is that password management for SharePoint Managed Accounts should happen inside SharePoint and not through AD DS. The SharePoint Managed Account box shows the interface for password management (see Figure 7-15). Keep in mind that this is yet another area in the product that will send credentials in clear text, so you should have Central Administration running over SSL.
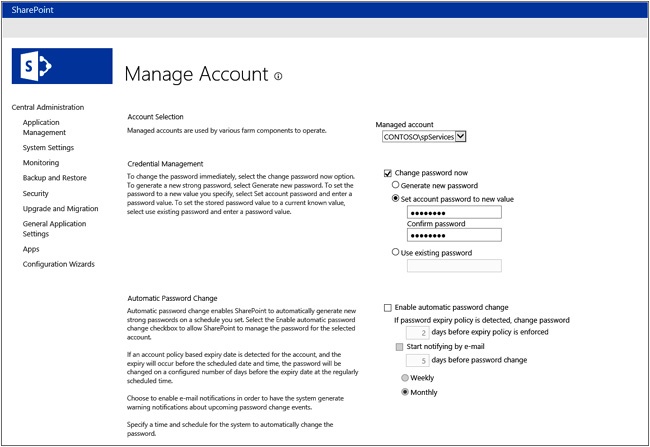
The Managed Account screen allows for either manual or automatic password management. The SharePoint Farm account (spFarm) will be added automatically to SharePoint as a managed account. You then are responsible for creating new managed accounts when you need them. This is typically for the Services (spServices) or Web Content (spContent) application pool accounts. The Default Content Access account (spCrawl) and the User Profile Synchronization account (spUPS) do not work as managed accounts. If the passwords are changed, you have to go to those areas manually to update those credentials. Any of the accounts that will be assigned to services using Configure Service Accounts will also need to be a managed account. An example of this would be the Claims to Windows Token Service account (spC2WTs).
Some organizations have strict requirements that enforce password changes; an example of this would be to require password changes every 90 days. This can cause a great deal of issues in SharePoint if it is not planned properly. Whether or not policies like this should be enforced is a debate that will not happen here. Some experts have argued that automatically changing your passwords regularly after a certain number of days puts your system at more risk than using strong passwords would. In fact, once an account is configured as a managed account, the password is not required to be known. These passwords can contain a long string of characters that are difficult for anyone to remember. Make sure that your administrators know that managed accounts are to be modified in SharePoint and not Active Directory.
Understanding roles and group permissions
The accounts that you choose to operate your SharePoint farm with are assigned various roles and permissions. While these happen automatically, it is important to know their place in your security model. You will first learn about the various database roles and the improvements that Microsoft has made as far as giving accounts only the permissions they need. This section will then conclude with the group permissions that get assigned to the SharePoint accounts.
Roles
SharePoint 2013 has introduced a number of changes in the SharePoint database roles, which include WSS_CONTENT_APPLICATION_POOLS, WSS_SHELL_ACCESS, SP_READ_ONLY, and SP_DATA_ACCESS.
The WSS_CONTENT_APPLICATION_POOLS database role applies to the application pool account for each web application that is registered in the SharePoint farm. The role allows web applications to query and update the site map and have read-only access to other items in the configuration database. The role is assigned during the setup process and is applied to the SharePoint_Config and SharePoint_AdminContent databases. Members of the role will have execute permission for a subset of the stored procedures for the database. The role also provides select permission to the Versions table in the SharePoint_AdminContent database. You will also find that the State Service database takes advantage of this role.
The WSS_SHELL_ACCESS database role replaces the need to add an administrator account as a db_owner on the SharePoint configuration database. By default, the setup account (spInstall) is assigned to the WSS_SHELL_ACCESS role, which allows the account execute permission for all stored procedures for the database. In addition, members of this role have the read and write permissions on all the database tables. You can use Windows PowerShell cmdlets (*-SPShellAdmin) to manage users in this role.
The SP_READ_ONLY database role replaces the need to use sp_dboption, which has been removed from SQL Server 2012, for setting a database in read-only mode. It should be used when only read access is required for data such as usage and telemetry data. The role will give its members SELECT capabilities on all stored procedures, functions, and SharePoint tables and EXECUTE capabilities on user-defined types where the schema is dbo.
The SP_DATA_ACCESS database role is the default role for database access and should be used for all object-model-level access to the database. SharePoint automatically adds an application pool account to this role during the upgrade or new deployments. The SP_DATA_ACCESS role replaces db_owner, but you will find that it has not yet been implemented across the board. Some of the databases that have implemented this role include the App, State Service, Usage Services, and the SharePoint Configuration and Admin databases.
Group permissions
During the installation process, SharePoint creates a number of groups that are important to the operation of the product. These groups include WSS_ADMIN_WPG, WSS_WPG, and WSS_RESTRICTED_WPG.
The WSS_ADMIN_WPG group has read and write access to local resources. The application pool accounts for the Central Administration and Timer service (spFarm) are in this role. The group is given full control over the directories that are vital to SharePoint, including all the SharePoint root, %windir%System32driversetcHOSTS, and the IIS location of the Wss folder. You should monitor WSS_ADMIN_WPG with SCOM. The Remove-SPShellAdmin cmdlet will attempt to remove the account if it is not needed elsewhere.
The WSS_WPG group has read access to the local resources, and its members include all the application pools and service accounts. The group does have write access to the SharePoint log location but has only read access to the rest of the SharePoint root infrastructure.
The WSS_RESTRICTED_WPG can read the encrypted farm administration credential registry entry and is used only for the encryption and decryption of passwords that are stored in the configuration database. The group has full control over the registry entry that is used to store secrets in the configuration database. If the key is altered, service provisioning and other features will fail.
Putting it all together
Throughout this chapter, you have been presented a great deal of information on platform security. You have seen examples on preventing, tracking, and reporting on SharePoint installations in the enterprise. You then gained an understanding of how SharePoint communicates and learned the importance of using SSL in your SharePoint environment. Because SSL encrypts only communications and not the data at rest, the chapter then gave a working example on how to use SQL Server TDE to encrypt the data inside SQL Server. Finally, you were presented with the user accounts that would be needed to install SharePoint in a least privilege format, and then you examined the roles and group permissions that those accounts get associated with. One of the pieces of the puzzle that has not been made extremely clear yet is Central Administration over SSL. In a number of areas, the chapter highlighted many areas that would send the credentials in clear text, and you have undoubtedly seen the red warning messages throughout the product, as shown in Figure 7-16.

You have now been given the requirement to ensure that all Central Administration communications are encrypted. Because the farm is already built, your task is to convert the previously created website to use SSL. Whether you are converting an existing web application or creating a new one, the same general steps will apply. You can accomplish your task by doing the following:
Ensure that there is a Domain Naming Service (DNS) entry for ca.contoso.local.
Create an SSL certificate for the URL (ca.contoso.local).
Configure the Alternate Access Mappings (AAMs) for Central Administration.
Change the associated port.
Configure the IIS bindings.
The first step is to create a DNS entry for the URL you want to use. Central Administration is installed on a server with a high port, and you will be addressing it with a common name—for this example, it will be ca.contoso.local.
The next step is to create an SSL certificate. As mentioned earlier in the chapter, the best way to provide an SSL certificate to your organization for use over the corporate intranet is to use the Domain CA, as shown in Figure 7-17.

Now that the certificate is created, you will need to change the associated AAM from the server name to the common name, as shown in Figure 7-18.

For your next step, you need to change the associated port to Central Administration. If this was a new farm, you could simply use port 443 instead of the high port assignment. However, because you are converting an existing site in this exercise, you will use the Set-SPCentralAdministion cmdlet and set the port to 443, as shown in Example 7-7.
The common name used to create the certificate will be used for the IIS bindings. This can be done either using the UI or with Windows PowerShell. For the sake of this demonstration, the UI will be used as shown in Figure 7-19.
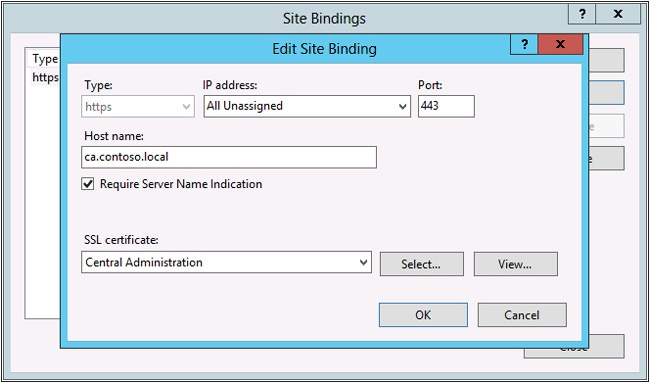
Once you have completed the site bindings, you are ready to review Central Administration over SSL. If you navigate to the screens that gave you clear text warnings, you will find that the warnings have been removed from the screens (as shown in Figure 7-20).
