Chapter 8. Upgrading your SharePoint 2010 environment
In this chapter, you will learn about:
Determining which options are available for upgrade.
Documenting your current Microsoft SharePoint Server 2010 environment.
Minimizing and monitoring the upgrade process.
Validating and troubleshooting upgrades.
Microsoft SharePoint 2013 has finally been released to manufacturing, and you want to bring your organization into the latest and greatest technology available. There are three ways to get the new product: new installations of SharePoint 2013, migrating content from a previous version of SharePoint to SharePoint 2013 (usually with a third-party tool), and upgrading from Microsoft SharePoint Server 2010 to SharePoint 2013. The latter two options will leave an organization at an important crossroad. Environments that lacked governance or structure may not be a strong candidate for the upgrade process and might use the migration process to help clean up and restructure themselves. It is difficult to upgrade an environment successfully when the previous one lacked any processes or rules. One of the greatest features of SharePoint is that it is highly customizable; on the flip side, one of the negative aspects of SharePoint is that it is highly customizable. If customizations aren’t governed, understood, and documented, then they can turn a simple upgrade into an absolute nightmare.
One of the benefits of SharePoint 2013 is its architectural similarities with the 2010 product. The service application architecture that was outlined in Chapter 4, is relatively unchanged. While there are a couple of service applications that have been removed and a few others added, the basic architecture is the same. This makes for a much smoother upgrade compared to the Shared Service Provider upgrade from Microsoft Office SharePoint Server 2007 to SharePoint 2010.
One of the topics that will be discussed in more detail is that the upgrade process can only be accomplished from SharePoint 2010 to SharePoint 2013. If you were hoping to move directly from SharePoint Server 2007 to SharePoint 2013, the best approach will be to upgrade to SharePoint 2010, validate the design, and then move to SharePoint 2013. Many of you who find yourselves in this situation might want to consider the migration of content by using a third-party tool.
In this chapter, you will explore the options available in the upgrade cycle and then learn how to get the SharePoint 2010 environment ready for the move to SharePoint 2013. You certainly don’t want to attempt your upgrade for the first time in production (and in fact, this option has been removed), so this chapter will also discuss creating a testing environment to validate the upgrade process and making sure everything is known prior to the actual production upgrade event. In an effort to keep the upgrade process as streamlined as possible, this chapter will explore ways to minimize and monitor the upgrade process, finishing with an overview of validating and troubleshooting your upgrade. Only the simplest environments upgrade without problems, so understanding how to mitigate issues during the testing phase will ensure a successful upgrade.
Introducing upgrades
Every release of SharePoint offers a new set of bells and whistles that makes the product more enticing; the one thing that never seems to get the spotlight is the changes that have been introduced in the upgrade processes. Back with the upgrade from Microsoft SharePoint Portal Server 2003 to SharePoint Server 2007, there were three choices for upgrade: gradual, in-place, and content database attach methods. When the upgrade path went from SharePoint Server 2007 to SharePoint Server 2010, the upgrade options were reduced to only two methods for upgrade: the in-place and content database attach methods. Now, with SharePoint 2013, there is only one method of upgrade available: the database attach upgrade method. This is a far safer approach than applying the new SharePoint parts on top of your production environment. One of the drawbacks of only being able to do a database attach upgrade is the inability to use your production hardware during the transition. However, because the minimum requirements for each version of SharePoint 2013 seem to require a few more resources, moving SharePoint to a virtual space is probably the most cost-effective move anyway.
There are two supported version-upgrade paths to SharePoint 2013:
Microsoft SharePoint Foundation 2010
SharePoint Server 2010
As previously mentioned, organizations that wish to upgrade previous products like SharePoint Server 2007 or Windows SharePoint Services 3.0 must either upgrade to SharePoint 2010 or migrate their content with a third-party tool. In truth, upgrading is a much easier move from SharePoint 2010 to SharePoint 2013 than it may be to move from SharePoint 2007 to SharePoint 2010. One point being that the architectures are similar and features have been provided in the new product to help make the move to SharePoint 2013 easier. One of these features includes the Feature Fallback behavior introduced in Chapter 1. The feature actually allows for SharePoint 2010 artifacts to be deployed to a scaled-down version of the SharePoint 2010 root folder that stands side by side with the SharePoint 2013 root folder. You may have also noticed that when creating a new SharePoint 2013 web application, there is a choice to use the SharePoint 2010 user experience. This is a fantastic way for organizations to adopt the new product without losing their customizations and branding after they have invested a great deal of time and money. Maintaining an environment with the SharePoint 2010 experience will also help user acceptance because users are already familiar with the product, and then the users’ site collections can be upgraded after receiving the proper SharePoint 2013 training. While the deferred site collection may sound like the Visual Upgrade component that was introduced in SharePoint 2010, it is actually far better. The Visual Upgrade in SharePoint 2010 allowed you to keep the user experience for the pages you upgraded, but it was unsupported to use those master pages on sites created in SharePoint 2010. SharePoint 2013 allows organizations to not only keep their previous user experience, but create and maintain other sites as well.
Authentication upgrade
In order to understand how upgrading will affect a particular implementation, it is important to understand the core architecture changes made to the product. As you learned in Chapter 6, when creating a new SharePoint 2013 web application, the option to create a Classic mode application no longer exists in the UI. While Classic mode web applications have been deprecated in the new version, they are still fully supported. A strong push toward using claims is underway; in fact, features like OAuth and S2S will not be available if your SharePoint Server 2010 web application is not migrated to claims-based authentication. You’ll learn about the options for moving from Windows authentication to claims-based authentication later in this chapter. The good news is that if your SharePoint Server 2010 environment is already using claims-based authentication, there will be one less step required before you upgrade!
Database attach upgrade
Database attach upgrade is the only supported method for version-to-version (V2V) upgrades, such as SharePoint Server 2010 to SharePoint 2013. Database attach upgrades are supported for build-to-build (B2B) upgrades so long as the database being attached is from a version of SharePoint 2013 that is less than or equal to the current version of the consuming SharePoint 2013 farm. The length of time that it takes to upgrade a database is not based on the size of the database, but the complexity of the data within the database.
In-place upgrade
In-place upgrades are supported only for B2B upgrades. This would be an instance where you upgrade your environment by installing either a service pack or a cumulative upgrade (if required).
Supported databases
There were a lot of new capabilities added to SharePoint Server 2010 to allow for better management of your service applications. With new capabilities came new databases. In SharePoint 2013, you now have the ability to actually conduct a database attach for some of the service application databases. The supported databases that will upgrade using the database attach method are as follows:
Search Admin database
User Profile Service databases:
Profile database
Social database
Sync database
The Social database and the Sync database are optional. If you do not upgrade these databases, new Social and Sync databases are created for you automatically.
Secure Store database
This will require you to remember your passphrase.
Managed Metadata database
Access databases
This applies to SharePoint 2013 B2B upgrades only, since Access Services did not store the Access files in a SQL Server database in SharePoint Server 2010.
Unsupported databases
Here is a list of databases that are not supported for the database attach upgrade:
Configuration database
The Farm Configuration database is not supported for either V2V or B2B upgrades. It has never been supported for upgrade in any previous version (and most likely will never be supported in future versions).
Search Index database
The Search Index database is unsupported for V2V upgrades. Because search was rebuilt to incorporate FAST, this should not be much of a surprise.
Upgrade implementation improvements
Before getting into the specifics of performing an upgrade, let’s first examine some of the investments Microsoft made in the upgrade arena. Upgrading from SharePoint 2007 to SharePoint 2010 offered few options that helped users evaluate SharePoint 2010. Eventually, users were forced to upgrade to the SharePoint 2010 UI, as it was unsupported to create new sites using the 2007 UI. In this section, you will learn about the upgrade capabilities in SharePoint 2013 that improved this scenario: the deferred site collection, feature fallback behavior, site collection health checks, upgrade evaluation site collections, upgrade throttling, new status bar notifications, and logging features.
Deferred site collection upgrade
There have been major strides taken to give you the ability to upgrade your environment successfully from SharePoint Server 2010 to SharePoint 2013. One of the new features is the deferred site collection upgrade, which replaces the SharePoint Server 2010 Visual upgrade. With the Visual upgrade in SharePoint Server 2010, the upgrade still happened during the database attach, and preserved only the old master pages, CSS files, and HTML files to make the pages look like SharePoint Server 2007. With the deferred site collection upgrade, you can continue to use the UI from SharePoint Server 2010. The master page, CSS, JScript, and SPFeatures will remain in what is now SP14 mode. One major difference between the Visual upgrade and the deferred site collection upgrade is that you can now upgrade per site collection (SPSite) instead of site (SPWeb). Users can now preview their site in the SharePoint 2013 UI before committing to the change. When you attach a SharePoint Server 2010 content database, the site collection will be run as a deferred site collection by default, and you cannot force the upgrade to SharePoint 2013 automatically. However, you can use Windows PowerShell to test, then mount, databases, followed by the upgrading the site collection.
Feature Fallback behavior
In SharePoint 2013, when you attach the content database, the database schema gets updated but the site collection content still runs in SharePoint Server 2010 mode. This gives SharePoint the ability to run SharePoint Server 2010 side by side with SharePoint 2013. SharePoint 2013 has all the required SharePoint Server 2010 files included to enable you to run SharePoint Server 2010 until you are ready to upgrade to the SharePoint 2013 experience. This means that your existing SharePoint Server 2010 customizations should work within SharePoint 2013 after you do your database attach. You can read more about how SharePoint Server 2010 and SharePoint 2013 can run side by side in Chapter 1.
Site Collection Health Check
Another fantastic new feature is the Site Collection Health Check, which allows you to run a “rules-based” health check to look for issues before upgrading your SharePoint Server 2010 site collection to SharePoint 2013. As shown in Figure 8-1, you can access the Health Check from the Site Settings page of the Site Collection. The Health Check will show you issues that will result in upgrade blocking, such as missing features or templates. The Health Check will also look for post-upgrade issues, such as unghosted files. There is a UI for the site collection administrators and there are Windows PowerShell cmdlets for the farm administrators. The Site Collection Health Check automatically runs for V2V upgrades and will prevent upgrades if issues are detected. However, the Site Collection Health Check does not run before B2B upgrades.

Upgrade Evaluation Site collections
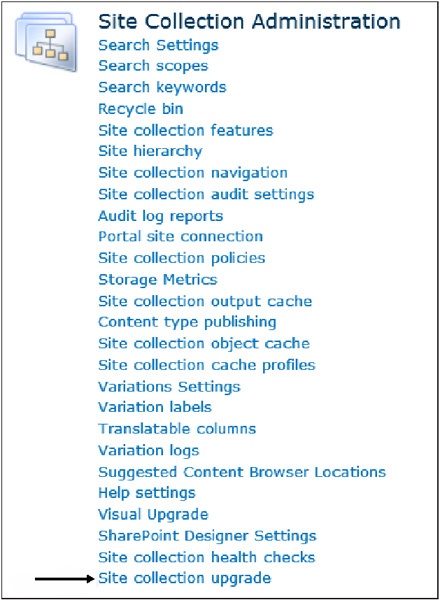
SharePoint 2013 also gives you the ability to preview your SharePoint Server 2010 site collection as a SharePoint 2013 site collection before you finalize your upgrade. In other words, you can use the upgrade evaluation site collection to make a side-by-side copy of your existing SharePoint Server 2010 site collection in SharePoint 2013 mode. This is accomplished by creating and upgrading a temporary copy of your site collection instead of a preview in the existing instance of the site collection. As shown in Figure 8-2, you can access the Site Collection Upgrade link from the Site Setting page of the Site Collection. The reason for previewing a copy of the site collection is because of the complexity of what happens during site collection upgrade. Once a site collection is upgraded, it cannot be rolled back. Therefore, performing a preview would not be possible except in a copy of the site collection.
If you are using an Enterprise version or later of SQL Server, then the evaluation site collection will be created using the SQL Snapshot feature. If you are not using SQL Server Enterprise or higher, your SharePoint Server 2010 site collection will be put into a Read-only mode during the site collection backup process. You should consider emailing your users that the site collection could be in read-only mode for an extended period of time. Fortunately, when the copy and upgrade is complete, the requestor and site collection administrators will receive an upgrade completion email. If you start the creation of your evaluation site collection using Windows PowerShell, the receipt of an email is optional. The creation of the evaluation site collection is run from the Create Upgrade Evaluation Site Collections job timer job, which, by default, is scheduled to run daily between 1:00 A.M. and 1:30 A.M. (This means that if you request a site at 9:00 A.M., SharePoint will not start building your new site for 16 more hours.) Figure 8-3 shows the steps of creating an evaluation site collection using SQL snapshots.

Site collection upgrade throttling
The horsepower required to upgrade a site collection is pretty outstanding. If you take a look at the message for creating an Upgrade Evaluation Site collection, as shown in Figure 8-4, it could take days to upgrade just one content database.

Well, what if you have several content databases and several site collections that need to be upgraded? How is this going to affect your farm? In SharePoint 2013, there is a new feature called Site Collection Upgrade Throttling to help keep your SharePoint 2013 environment running smoothly by preventing an overload scenario while all of the upgrades are happening in the background.
There are several throttle types in SharePoint 2013 that function together to help keep your farm running at peak performance and keep you from inadvertently upgrading all your databases and site collections all at once.
The first throttle is at the web-application level, and limits the number of concurrent site collection upgrades per application pool instance. By default you can upgrade five concurrent site collections per web application. This throttle is controlled by the web application instance property.
The next throttle is at the content-database level. This throttle limits the number of simultaneous site collections that can be upgraded at one time within a single content database. By default, you can upgrade 10 site collections concurrently within one content database. This throttle is controlled by the content database instance property.
The third throttle is at the content level. This throttle prevents self-service upgrades from happening within web applications with sites that have exceeded the default threshold. The default threshold for the site collection is < 10 MB and has fewer than 10 (< 10) subwebs.
If an upgrade is not possible to do without exceeding the limits of the throttle rules, your upgrade will get placed into the upgrade queue and will be processed by the Upgrade Site Collections Timer Job. Fortunately, this timer job is scheduled to run every minute. Throttling will be discussed in more detail later in the chapter.
System Status Bar and notifications
SharePoint now has the System Status Bar at the top of the site page to notify site collection administrators if there is an upgrade available (see Figure 8-5) to move from SharePoint Server 2010 to SharePoint 2013. The status bar can also be used to notify the users if there is an upgrade in progress (see Figure 8-6), if the site is in Read-only mode (see Figure 8-7), or if you are in an evaluation site collection (see Figure 8-8).
Email notifications
Email notifications are now automatically sent out when starting an upgrade using the graphical user interface (GUI). Email will be sent out to the requestor and the site collection administrators. Email notifications about the upgrade will be sent when:
The V2V upgrade has completed successfully.
The V2V upgrade has completed with error(s).
The Upgrade Evaluation Site has been requested.
The Upgrade Evaluation Site has been created, but not upgraded.
The Upgrade Evaluation Site has been created and upgraded.
Logging
SharePoint 2013 logs are now in the Unified Logging Service (ULS) format. That means that column data is tab separated, which will allow easier parsing of the data, as well as the ability to import the logs into Microsoft Excel. Log files are created for upgrades, upgrade errors, and site upgrades. They are created for both V2V and B2B upgrades. Logs are stored as content within the site collection that is being upgraded and is security trimmed for site collection administrators. Even as a site collection administrator, you cannot find the library that holds the documents easily; they are located at ../_catalogs/MaintenanceLogs.
These fantastic new features of SharePoint 2013 will help you get your SharePoint Server 2010 environment upgraded easily, reliably, and successfully.
Overview of upgrade process
For the successful completion of an upgrade, it is not good enough to know what has changed within the upgrade process compared to SharePoint Server 2010. It is best that you understand the sequence in which things happen so you know the proper order when the time comes to document your migration script. This section will go over the stages of a simple SharePoint Server 2010 farm upgrade and then through a bit more challenging Shared Services Farm upgrade.
Upgrade stages and responsibilities
Migrating over an entire SharePoint Server 2010 farm will take various stages of implementation and deployment. Figure 8-9 shows an overview of what is required to migrate existing content, and who is responsible for those actions.

As shown in Figure 8-9, an upgrade involves four major steps:
Create, configure, and verify your SharePoint 2013 environment.
Create and configure the service applications for your SharePoint 2013 farm.
Create web applications for upgrade.
Install, move, and, if required, create customizations.
Place your SharePoint Server 2010 content databases in Read-Only mode (optional, but highly recommended).
Back up your SharePoint Server 2010 content and service application databases.
Restore all of your databases in the appropriate server running SQL Server in your new SharePoint 2013 environment.
Upgrade service application databases.
Upgrade site collections.
For upgrading your SharePoint 2010 My Site site collections, the farm administrator will upgrade the My Site host first, which will allow the users to upgrade their My Site when they are ready. However, the farm administrator can upgrade all the My Sites using Windows PowerShell, which will be explained in the Putting it all together section later in this chapter.
Services upgrade and overview
In the Supported databases section earlier in this chapter, you learned which databases can be attached for upgrade to SharePoint 2013. It is imperative that you create your service applications on your new farm prior to upgrading the SharePoint Server 2010 content databases. Figure 8-10 shows a generalization of how to upgrade the service applications and proxies.

As shown in Figure 8-10, there are four basic steps to upgrade your service applications:
Verify that you have the appropriate permissions and that you are part of the Shell Admin group.
Use Windows PowerShell cmdlet Get-SPShellAdmin.
Copy service application databases to the new farm.
Upgrade the service application.
Use Windows PowerShell cmdlet New-SPMetadataServiceApplication.
Create a service application proxy.
Use Windows PowerShell cmdlet New-SPMetadataServiceApplicationProxy.
There is an example of how to do the service application upgrade in the Putting it all together section later in this chapter.
Shared Services Farm
If you are running a Shared Services Farm, you will have a few extra steps to take when getting your SharePoint Server 2010 farm upgraded:
Create your new SharePoint 2013 services farm.
Upgrade your Search service application.
Upgrade the other cross-farm service applications.
Point service connections to the SharePoint Server 2010 content farm.
Upgrade the SharePoint Server 2010 content farm to SharePoint 2013.
Index the SharePoint 2013 farm.
Point service connections to the SharePoint Server 2013 content farm.
Repurpose SharePoint Server 2010 content and cross-farm servers.
Preparing your upgrade
“By failing to prepare, you are preparing to fail.”
—Benjamin Franklin
The preparation time for a single-server farm will usually be less than a large farm, but the information required to be documented will be the same. Taking the time to gather all the documentation of your existing farm will help you succeed in your SharePoint 2013 creation and upgrade. Unfortunately, in SharePoint Server 2010, you are not offered the luxury of running a command similar to the SharePoint 2007 (post-SP1) PreUpgradeCheck utility. However, you will be able to use Windows PowerShell cmdlets like Test-SPContentDatabase to help get your content ready to upgrade.
Cleaning up your content databases
To see what is happening within your content databases, run the Test-SPContentDatabase cmdlet to make sure that your content databases are going to upgrade successfully. The following script has an array ($databases) of all of the content database names on the “SQL-12” SQL Server ($dbServer) for the web application located at http://projects.contoso.com ($webApp). The script then takes the output information from the Test-SPContentDatabase cmdlet and saves the output as a text file to C:scripts estlogs-Projects ($outFileLocation):
PS C:> Add-PSSnapin Microsoft.SharePoint.PowerShell -EA 0
PS C:> $databases = ("Content_AU","Content_NZ","Content_CA","Content_US","Content_Projects")
PS C:> foreach ($db in $databases)
  {
    $dbServer = "SQL-12"
    $webApp = "http://projects.contoso.com"
    $outFileLocation = "c:	estLogs-Projects" + $db + ".txt"
    Test-SPContentDatabase -name $db -webapplication $webApp -ServerInstance $dbServer
-ShowRowCounts | out-file $outFileLocation
  }
You can download the script from http://sdrv.ms/UWT2tC.
After the script has been run, you can go to the $outFileLocation and review the information about your content databases. It should look similar to Figure 8-11.

You will need to be a bit more concerned if your output looks like Figure 8-12.

Luckily, in the Site Orphan category, Microsoft suggests a remedy to resolve the issue of having a site orphan. You will want to use the Dismount-SPContentDatabase cmdlet followed by a Mount-SPContentDatabase cmdlet, followed by a confirmation of repair by rerunning your Test-SPContentDatabase script.
Cleaning up your environment
When you are preparing to move into a new home, you do not want to pack up and move old, unused junk. The same holds true when it comes time to move from one SharePoint environment to another. The first step is to make sure that the web applications are all still being used. If you have a web application that is not being used, make a note not to move over the associated databases. Once you have determined which web applications that you are going to move across, you will want to determine which site collections are still being used. You will want to back up the unused site collections, have a discussion with the site collection owners, and then delete the site collections. The same stands true for your content. If you have old, outdated content, ask the content owners if they can delete the data, or if you can back it up for them and delete the data afterward. One last thing that you will want to address is code. Are you still using all of the deployed features and solutions? If not, disable them, retract them, and remove them from the farm. To double-check that the solution has been removed cleanly, you will want to go back to the site and verify that the solution gallery is cleaned out as well. You will also want to make sure that you are not trying to upgrade any features or elements that have been deprecated in SharePoint 2013. For example, Web Analytics and SQL Server Search should both be turned off before attempting to upgrade them. For a list of changes from SharePoint Server 2010 to SharePoint 2013, review this page: http://tinyurl.com/PCfromDC-Changes.
Upgrade also offers you the opportunity to consolidate farms. If your organization is running multiple instances of SharePoint, now is a good time to look at upgrading your architecture and possibly taking all your SharePoint farms and consolidating them into one farm.
Documenting your environment
Now that your environment has been cleaned up, it is time to start documenting your environment. You will want to document everything that you want to move over into your SharePoint 2013 environment. Without the ability to run a PreUpgradeCheck, you are going to be creating several documents full of information about your environment. In the next section, you will learn which settings and environment information that is important to capture, and review how to get the information. You can download an existing Microsoft Upgrade worksheet that has been modified to help with your documentation of information from http://sdrv.ms/VqNni7.
Documenting current settings
Document the following settings so that you can build them into your new SharePoint 2013 environment before you attach your content databases:
Alternate access mappings.
Use the Windows PowerShell cmdlet Get-SPAlternateUrl.
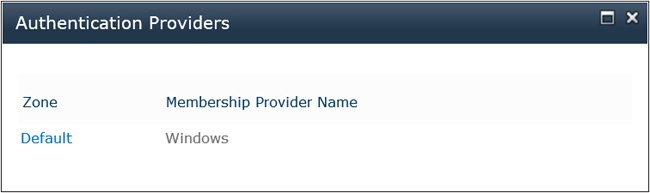
Authentication providers (see Figure 8-13).
Use the Windows PowerShell cmdlet Get-SPAuthenticationProvider.
Authentication modes
Located in Central Administration | Manage Web Applications Authentication Providers
Claims mode
Classic mode
If your authentication mode looks like Figure 8-14, it is very important to note the web application.
Authentication types (see Figure 8-15).
You must use the same names from your SharePoint Server 2010 farm.


Other items that you should document are certificates, such as Server certificates, Trusted Provider certificates, SSL certificates, and all Farm certificates. Don’t forget to document Solutions (Get-SPSolution)—farm-based and sandboxed. Even though sandboxed solutions are housed within the site collection content database and will be moved over automatically when you move the database, it is good to have an inventory to keep track of things.
Make sure that you have documented your incoming and outgoing email settings, managed path information (Get-SPManagedPath), quota template settings, self-service site management settings, Web.config modifications, plus any and all customizations.
Documenting environment settings
The next step in preparing your SharePoint 2013 environment is to gather the following environment information to help make sure that you have moved over all your existing SharePoint Server 2010 content:
Number of sites
Use the Windows PowerShell cmdlet Get-SPWeb (don’t forget to dispose of the web object).
Number of databases
Use the Windows PowerShell cmdlet Get-SPContentDatabase.
Database names
Use the Windows PowerShell cmdlet Get-SPDatabase.
Number of users
Use the Windows PowerShell cmdlet Get-SPUser.
Any customizations
Documenting service settings
Another area to document involves how you managed your farm services. You will want to document the following items:
Service names
Service settings
Database names
Any customizations
This is a good opportunity to take the time to write a Windows PowerShell script that will pull back all the information about your environment and save the data into a .csv file. You should already have some type of script that you should be running on a weekly basis to compare how your farm is changing and to help keep up with the growth and changes of your environment. If you do not wish to create your own script, please feel free to grab the script from my blog, http://tinyurl.com/PCfromDC-FarmInfo, or just download it from http://tinyurl.com/PCfromDC-FarmDownload.
Customizations
It is important to generate a list of all of customizations that were created in your SharePoint Server 2010 environment. This would include all solutions, features, Web Parts, Web Pages, web templates, site definitions, event handlers, master pages, page layouts, themes, and CSS files. Other customizations might include web services, HTTP handlers, and HTTP modules. Now is also a good time to start thinking about how you are going to deal with the customizations. Are you going to keep them, upgrade them, or delete them?
Managing customizations
If you have left your SharePoint Server 2010 environment alone and have not added a single enhancement, then you do not have to worry about upgrading customizations. However, because most of you have been trying to use SharePoint to its fullest potential, the odds are good that there will be customizations to upgrade. If your SharePoint Server 2010 sites have been extensively customized, you will want to determine how you want to handle your customizations before your attempted upgrade to SharePoint 2013. Your approach to upgrading your customizations will vary based on the extent of the customizations, the kind of customizations, the complexity of your SharePoint Server 2010 site, and the other factors that determine a successful upgrade. As previously mentioned in the Documenting your environment section, it is very important that you identify the customizations, evaluate the customizations in your environment, and then determine whether you will upgrade those customizations. There are only three options when it comes to dealing with how to upgrade your customizations:
Keep the customizations; don’t upgrade the sites.
You can continue to run your site in SharePoint Server 2010 mode in your new environment. You should use this approach only temporarily. This should be considered a temporary solution because eventually you will have to upgrade to the next version of SharePoint (vNext).
Replace or redo the customizations.
If you want to take full advantage of the new functionality of SharePoint 2013, or use this upgrade as an opportunity to “start over” with a new look and feel, then you will have to upgrade your customizations. How will the upgrade of your customizations affect the timeline to upgrade your site? Are you going to keep the site in SharePoint Server 2010 mode until the customizations are complete, or remove them and add them back at a later date?
Discard the customizations.
If you do not use the customization any longer, or if the customization is obsolete, it is a good time to delete it.
Replace the customizations by using default functionality, such as replacing global navigation headers for the managed metadata navigation default functionality.
You can reset pages to the default site definitions and remove any Web Parts or features that you no longer wish to support. Remember that you can use SharePoint 2013 Site Collection Health Check to find unghosted pages and you can reset the pages to their default versions to correct the ghosting issues.
After discarding customizations, you should fix any issues that result from removing the customizations before the upgrade.
WSP files
You should have taken notes on the current customizations on your farm in the last section, but are you sure that you have the .wsp files that were used to having when deploying the solutions? Do you use a lot of third-party tools? Do you have a lot of solutions in your farm? Are you 100 percent sure that you have the correct .wsp files to deploy into your new SharePoint 2013 environment? If you cannot find all the farm solution .wsp files, there is a way to export them from your SharePoint Server 2010 environment. Luckily, Shane Young came up with a blog post on how to use Windows PowerShell to export your .wsp files from your farm. I have updated the Windows PowerShell script from his blog, and you can read about it at http://tinyurl.com/PCfromDC-GetWSPs or download it from http://sdrv.ms/PwL6Oz.
Remote BLOB Storage (RBS)
With the introduction of Shredded Storage in SharePoint 2013, the requirement for Remote BLOB Storage (RBS) is no longer needed. While there is always an exception to every rule, if you are using RBS, you should use this upgrade as an opportunity to stop using RBS. If you are using RBS through a third-party vendor, ask them how they recommend you bring your data back into the servers running SQL Server that are hosting your SharePoint 2010 environment. If you created the RBS yourself, there are plenty of blog posts available to help you with disabling RBS.
Third-party products
If you have installed products from third-party vendors, and they supplied you with an .msi file, then you will have to contact the vendor for their suggested upgrade path to SharePoint 2013. Granted that some vendors use the .msi file to deploy the .wsp files, but you really cannot be 100 percent sure what is happening behind the scenes, such as adding licensing information to the registry. One option to make sure that the .msi file did not make any other additions during deployment is by using tools like WinDiff.
Manually deployed code and updates
Running WinDiff will be very useful for those organizations that have allowed changes, features, or files to be deployed manually to their SharePoint Server 2010 farm. This also means that you will have to create a generic SharePoint Server 2010 farm to compare your modified farm against. It is imperative that the SharePoint farm for differencing matches your production version number exactly. You will have to copy each modified file from your SharePoint Server 2010 farm to the appropriate folder in your SharePoint 2013 environment. Manual updates or deployments should not be done on a production environment. You should use this upgrade as a talking point with your developers to try to get their code into a .wsp file or even built to deploy into the App Store.
You can read about how to use the Windiff.exe Utility program at http://tinyurl.com/PCfromDC-WinDiff.
Documenting other services
There are some services that will require a bit of extra work to get them migrated over to your new SharePoint 2013 environment.
InfoPath Forms Service
If you are using administrator-deployed Microsoft InfoPath (.xsn) forms, the forms will need to be extracted from your SharePoint 2010 environment and imported into your new SharePoint 2013 environment, as well as your managed data connection files. Because the InfoPath Forms Service is not created with the Farm Configuration Wizard, it will have to be configured manually by using the Configure InfoPath Forms Services link under the General Application Settings page in Central Administration (shown in Figure 8-16).
You can export your administrator deployed form templates (.xsn files) from your SharePoint 2010 environment by using the Export-SPInfoPathAdministrationFiles cmdlet.

Excel Services
Excel Services can be enabled through the Farm Configuration Wizard, but make sure to re-create all the trusted data connections, configuration settings, user-defined functions (UDFs), and trusted locations.
Microsoft Office Web Apps
As you know, Office Web Apps (OWA) has been moved to its own farm so OWA will not be available after you upgrade your environment to SharePoint 2013. You must deploy at least one OWA server and connect to your SharePoint 2013 environment after your content databases are upgraded. This does not mean that you have to wait for the site collection upgrade to happen, as the OWA farm can be utilized in both SharePoint Server 2010 and SharePoint 2013 modes within the SharePoint 2013 farm. It is important to know that your users will have to choose between the OWA version of Excel and Excel Services when clicking the items in a document library.
User Profile Service
Deploying User Profile Service (UPS) in SharePoint Server 2010 was not a lot of fun; in fact, it was nerve-racking to accomplish. Starting with the SharePoint Server 2010 RTM, UPS seemed to not only have issues with deployment, but it seemed that every time Microsoft pushed out a Cumulative Update (CU), UPS broke and had to be re-created from scratch. It was great to see the progress that was made with Microsoft Forefront Identity Manager (FIM) and UPS over time, even if the FIM version numbers went in the wrong direction. Now, with the advancements of UPS and FIM in SharePoint 2013, you need to look closely at your upgrade strategy for UPS. The answers to the following questions should determine whether you upgrade your current UPS or you start anew:
Have you created any custom properties within UPS?
How long would it take to document and rebuild your custom properties from scratch?
Basically, if you are running UPS out of the box, then do not worry about upgrading UPS from SharePoint Server 2010; just build it out in SharePoint 2013 from scratch. At RTM, the Sync Database upgrade is still having issues, which will cause the UPS Synchronization Service Instance to fail and get stuck on “Starting.” Because this is the upgrade chapter, you will learn how to do the actual upgrade a bit later, in the Putting it all together section, but for now, let’s review how Microsoft says to do the UPS upgrade.
Just like all of the other service application upgrades, the first step is to move and upgrade your Social, Profile, and Sync databases into your server running SQL Server and SharePoint 2013. Once your databases have been restored and upgraded, it is time to start the UPS instance, by going to Central Administration | Application Management | Service Applications | Manage Services On Server and clicking Start.
Once the service is up and running, log off the machine, and then log on as the Farm Service. You are then going to open Windows PowerShell as the administrator, and run the following command to get the application pool identity:
PS C:> $appPool = Get-SPServiceApplicationPool -Identity "SharePoint Web Services Default"
To upgrade the UPS application, you are now going to run the following command:
PS C:> $upa = New-SPProfileServiceApplication -Name "User Profile Service Application"
-ApplicationPool $appPool -ProfileDBName "Upgrade_UPS_Profile_DB" -SocialDBName "Upgrade_UPS_
Social_DB" -ProfileSyncDBName "Upgrade_UPS_Sync_DB"
You will want to use your database names for the Profile, Social, and Sync databases. Remember that the Social and Sync parameters are optional, and they will be created for you automatically if you do not already have them in SQL to upgrade. The databases will be named with parameters provided in the Windows PowerShell script.
Once the UPS has been provisioned, it is time to create the UPS Proxy. To create the proxy, you will run the following command:
PS C:> New-SPProfileServiceApplicationProxy -Name "User Profile Service Application Proxy"
-ServiceApplication $upa -DefaultProxyGroup
Now comes the fun part. Because the user profile synchronization service utilizes FIM through the Sync database, you will have to import the Microsoft Identity Integration Server (MIIS) key from the server running SharePoint Server 2010 where you were running the UPS application. After exporting it from your SharePoint Server 2010 farm (see Figure 8-17), you will have to import it into your SharePoint 2013 server that is running your UPS application. You will need to be a local administrator on both farms to complete the export and import, and it is suggested that you log on as the service account that runs the UPS Service (which should be your farm account).
On your SharePoint Server 2010 UPS server, open the command prompt as administrator, go to %Program Files%Microsoft Office Servers14.0Synchronization ServiceBin, and run miiskmu.exe /e <path>. For example:
C:Program FilesMicrosoft Office Servers14.0Synchronization ServiceBin> miiskmu.exe /e
c:certsexport.bin

Next, you will want to log on to your SharePoint 2013 User Profile Synchronization Server as your farm account, and move the Export.bin file from your server running SharePoint Server 2010 to your server running SharePoint 2013. You will want to have your UPS and User Profile Synchronization Service stopped before importing your .bin file.
To import the MIISKMU key (as shown in Figure 8-18), open the command prompt as dministrator, go to %Program Files%Microsoft Office Servers15.0Synchronization ServiceBin, and run miiskmu.exe /I <path> {0E19E162-827E-4077-82D4-E6ABD531636E}. For example:
C:Program FilesMicrosoft Office Servers15.0Synchronization ServiceBin> miiskmu.exe /i
c:certsexport.bin {0E19E162-827E-4077-82D4-E6ABD531636E}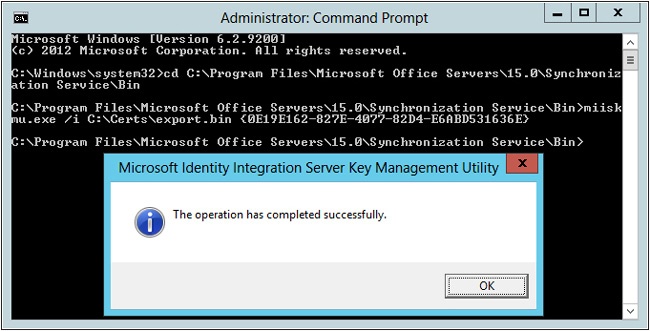
When you are done with importing the certificate, you will need to restart the UPS and the User Profile Synchronization Service. (Remember that you should only start and stop your services through Windows PowerShell or through Central Administration.) While you are in Central Administration, and while you are still logged on as the farm account, now would be a good time to start your User Profile Synchronization Service instance. You will know if you have successfully provisioned everything correctly because your FIM service instances should look like Figure 8-19, and you will not be stuck on “Starting.”

Remember that at RTM, these steps will not work. There is an example of how to do a successful UPS upgrade implementation in the Putting it all together section later in this chapter.
Classic-mode authentication
While documenting your environment, did you run into a web application that was still in Classic mode (see Figure 8-20)?
You will want to change the web application to handle claims-based authentication before upgrading to SharePoint 2013. Now, that does not mean that you have to do it within your SharePoint Server 2010 production environment. You can actually do it within your SharePoint 2013 environment with a new Windows PowerShell cmdlet called Convert-SPWebApplication. You would do this by using Windows PowerShell to create a Classic mode authentication provider (New-SPAuthenticationProvider) and pushing that into your new SharePoint 2013 web application (New-SPWebApplication), then attach your content database, and finally run the Convert-SPWebApplication cmdlet. However, it might be easier to just upgrade your SharePoint Server 2010 environment to Claims mode authentication in your test environment and migrate the content database to your new SharePoint 2013 production environment after converting. Do not convert your SharePoint 2010 production web application on your live production farm! This should be done in your test environment as a step on the way to your new SharePoint 2013 farm.
Language packs
Are the required language packs available for your site collections? You must have the appropriate language packs installed to upgrade any sites based on the localized site definition. If you do not have the correct language pack installed prior to upgrade, the site will be unavailable. You should wait for the appropriate language pack to be released before trying to upgrade those sites that depend on language packs.
Limiting downtime
One of the reasons to upgrade from SharePoint Server 2010 to SharePoint 2013 is to enhance the user experience. You do not want to put a bad taste in your users’ mouths by having their SharePoint Server 2010 farm down for an extended period of time. There are several options to help reduce the amount of downtime that your users will have to endure.
Read-Only mode
To help mitigate downtime and loss of data, you can put your SharePoint Server 2010 content databases into a Read-only mode. This will allow users to be able to access their data but not actually change anything, and still keep the migrated database the same as the SharePoint Server 2010 production content. You will not need to put your content databases into Read-only mode for test upgrades, but only for the final push into your production environment.
Parallel site upgrades
Another method for limiting downtime is to conduct parallel site collection upgrades. Parallel site collection upgrades are achieved by attaching your content databases and upgrading multiple site collections at the same time (see Figure 8-21). There is no maximum number of parallel upgrades that can be run simultaneously, but the number is limited by the server’s hardware. Microsoft keeps you from shooting yourself in the foot by setting the default number of SPSite upgrades that can happen per web server to only five.

You can override the default throttle settings with the following Windows PowerShell script:
PS C:> Add-PSSnapin Microsoft.SharePoint.PowerShell -EA 0
PS C:> $webApp = "http://staff.contoso.com"
PS C:> # Get Current Throttle Settings
PS C:> $wa = Get-SPWebApplication $webApp
PS C:> $wa.SiteUpgradeThrottleSettings
PS C:> # Update Throttle Settings
PS C:> $wa.SiteUpgradeThrottleSettings.AppPoolConcurrentUpgradeSessionLimit=10
PS C:> $wa.SiteUpgradeThrottleSettings.UsageStorageLimit=15
PS C:> $wa.SiteUpgradeThrottleSettings.SubwebCountLimit=15
PS C:> # Verify Throttle Settings
PS C:> $wa.SiteUpgradeThrottleSettings
You also have the ability to override the throttle settings when you do an upgrade to your site through Windows PowerShell by adding the -Unthrottled switch parameter, as follows:
Upgrade-SPSite [-Identity] <SPSitePipeBind> [-AssignmentCollection <SPAssignmentCollection>]
[-Confirm [<SwitchParameter>]] [-Email <SwitchParameter>] [-QueueOnly <SwitchParameter>]
[-Unthrottled <SwitchParameter>] [-VersionUpgrade <SwitchParameter>] [-WhatIf
[<SwitchParameter>]]
Testing your upgrade
Now that you have documented your entire existing SharePoint Server 2010 environment, it is time to start getting your hands dirty with testing. Testing is imperative to a successful production upgrade. Every step should be written down, and each time you do a test upgrade, your test script should be modified. The better you maintain your documentation, the better the chance for success at upgrading to your SharePoint 2013 production environment smoothly.
As with every kind of test, be it a SharePoint upgrade or theoretical physics, you should have goals outlined to determine whether your test was successful. What makes your upgrade successful? Is it 100 percent migration of data, with 75 percent migration of customizations, in less than 48 hours? Your opinion of what makes a successful upgrade might be different than that of your boss, and it will definitely be different than that of your boss’s boss, so documentation and having the ability to justify your success criteria will be very important.
Upgrading your test farm
The following steps should be run again and again until you have met the criteria that determines a successful upgrade. You might find that as you go through your test procedures, you are changing your success criteria, and even your migration procedures. You will want to repeat these steps until you are happy (and your boss, and your boss’s boss, are happy).
Set up your test farm.
This can be physical or virtual. If you are going the virtual route, please keep your SharePoint servers and SQL Server servers separate to mimic your production environment as much as possible.
You will want to use your notes to build out your test environment to match your production environment’s layout.
You will want to use your hosts file to match URLs in your test environment for consistent naming so that you will not conflict with your production environment.
Make sure your test environment is fully functional, and without error, before you upgrade testing.
Move customizations.
From your documentation, find all customizations and move/install them to the appropriate locations on your SharePoint 2013 farm.
Use real data.
Prepare to move over all content and services databases.
Test all your SharePoint 2010 content databases.
Record the amount of time that it actually takes for each step.
Back up the content and services databases from your SharePoint Server 2010 farm.
Record the amount of time that it takes to back up each database, then move it to the appropriate server running SQL Server.
Test your content databases in your test farm.
Record the amount of time that it takes to test each content database.
Upgrade your content and services databases.
Record the amount of time that it takes to upgrade each content and services database.
Review database results and fix issues as necessary.
You will find your logs at %COMMONPROGRAMFILES%Microsoft SharedWeb Server Extensions15LOGS.
Review your sites in SharePoint Server 2010 mode and verify that the site collections still work as expected.
Upgrade site collections and My Sites.
Record the amount of time that the upgrades take to complete.
Review the site upgrade log files located in your ../_catalogs/MaintenanceLogs document library.
After running through the first couple of test upgrades, you should have a good idea of how the upgrade process is going to work, and the estimated amount of downtime. Of course, the more you can do through the use of scripts to make your process more repeatable, the better. Your service application databases need to be installed in a proper order.
Validating your test upgrade
Moving your custom applications and databases is not enough to validate your upgrade. After getting your data and customizations moved into your test environment, you will want to get all your service applications running. You will want to make sure that you can crawl your farm, and that your Web Parts are working and in the correct place. Can you create a new site? Can you create a new page? Visual and behavioral issues will be the most obvious issues to find. You will want to leave the farm up and running for a day or two, then come back and review logs to help find the behind-the-scenes issues that might have arisen during upgrade or installation. You will want to run the same documentation scripts on your SharePoint 2013 environment and compare the output to the SharePoint Server 2010 documentation script output. You will also want to have your production environment available to compare Web Part functionality, branding, and load times (especially once you are in your production environment).
Learning from your deployment
Each time that you complete a test of your upgrade strategy, you should have learned and taken notes on what has failed, what has succeeded, and what was unexpected. You can then take your lessons learned and update your upgrade story to make your next attempt at an errorless upgrade to SharePoint 2013 more likely.
Implementing your upgrade
By now, you should have a solid understanding of how you are going to accomplish your upgrade to SharePoint 2013 and how long your upgrade is going to take. Having documented all your test data, you can finalize a Production Farm Upgrade Plan with a high degree of certainty for success.
Minimizing downtime
Because you want to keep your SharePoint Server 2010 farm and SharePoint 2013 farm with the same data, you will want to put your content databases into Read-only mode (as shown in Figure 8-22). Once the databases are in Read-only mode, you can back them up and start your upgrade process. Remember that once you restore the content databases to the servers running SQL Server in your new SharePoint 2013 farm, the databases will still be in Read-only mode.

Upgrading your production farm
Your upgrade plan for the production farm should already be written out because you should have been able to upgrade your SharePoint 2010 farm repeatedly and successfully in your test environment. All your testing should be completed, and you should have a validated upgrade script to follow.
Set up your test farm.
You will want to use your notes from the creation of your test environment upgrade.
You will also want to verify that everything matches your SharePoint Server 2010 production environment layout.
Make sure your production farm is fully functional, and without error, before you upgrade.
Move your service application databases.
Put the service application databases that you are moving into Read-only mode.
Upgrade and install all your service applications for your SharePoint 2013 farm.
Verify that your services are functioning error free and your data has been moved across correctly.
Create SharePoint 2013 farm web applications, Alternate Access Mappings (AAMs), and other customization settings.
From your documentation, find all customizations and move or install them to the appropriate locations on your SharePoint 2013 farm.
Put your content databases into Read-only mode.
Test, mount, and upgrade your databases.
Review your logs at %COMMONPROGRAMFILES%Microsoft SharedWeb Server Extensions15LOGS.
Review your sites in SharePoint Server 2010 mode, and verify that the site collections still work as expected.
Upgrade My Sites.
Upgrade the site collections if you are responsible for that task.
Fix known issues according to your test scripts.
Review site collection results.
Review your site upgrade log files located in your ../_catalogs/MaintenanceLogs document library.
Monitoring progress
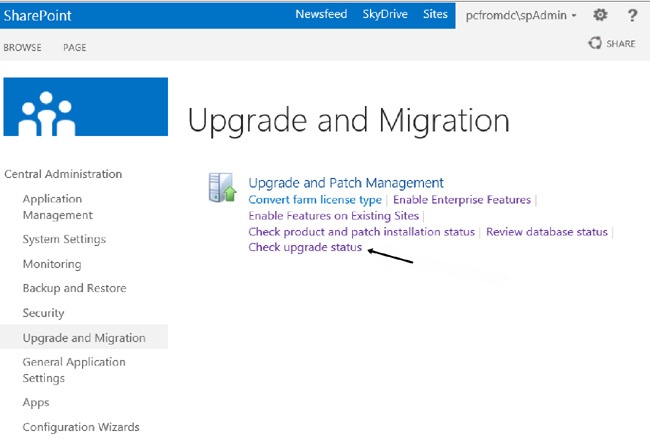
From Central Administration, you can monitor the upgrade process (see Figure 8-23). And just as in your test environment, you will want to audit your upgrade and ULS logs for errors.
Validating your upgrade
Because you have already perfected your upgrade scripts in your test environment, there should not be any surprises when you have finished going through your upgrade script.
Verifying your upgrade
The first thing that you will want to do is to review all logs after each upgrade. You will want to look for errors and warnings and address any issues that will cause problems for your farm later. Also, check the application event logs for errors and warnings. If you are having warnings or errors, then issues still exist. Either fix the issues while within SharePoint 2013 or fix the issue in SharePoint Server 2010 and start the upgrade process again. Remember that there is an ability to resume upgrades after the upgrade fails, but you really want to have your upgrades run smoothly by the time that you have to upgrade into your production environment.
Whether you are upgrading your company’s environment or you are a consultant upgrading someone else’s farm, if you run into issues in the SharePoint 2010 environment, they need to be documented. If the issues move from the SharePoint 2010 environment into the SharePoint Server 2013 environment, you do not want to be blamed as the implementer because the problem existed before the upgrade.
Troubleshooting your upgrade
If you are finding issues, you will want to start solving problems in the following order:
Authentication issues
If you are having user or service accounts that cannot authenticate, then you will not be able to find any of the other issues to fix.
Missing files and customizations
Content-related issues
Remember to document your troubleshooting. Document each error that you find and what you did to find the error, as well as what you did to fix the error.
Putting it all together
Now that you have gone through how to put an upgrade strategy together, let’s put what you have learned into a practical solution.
Scenario
Your chief information officer (CIO) returns from his annual golf outing with other industry-leading CIOs, and upon his return, he informs you and your team that he wants Contoso to be the first company of all his golfing friends to be on SharePoint 2013.
Current farm
Contoso has multiple SharePoint 2010 farms. They have a SharePoint 2010 Foundation farm exposed to the outside world that handles all their projects from around the world, located at http://projects.contoso.com. Contoso chose SharePoint 2010 Foundation to avoid having to pay the external connector fees associated with SharePoint Server 2010. Contoso also has an internal farm, at http://staff.contoso.com, which is a SharePoint 2010 Enterprise environment. To maintain a consistent search experience across both environments, Contoso also has a SharePoint 2010 Enterprise Search farm, at http://search.contoso.com. The existing SharePoint 2010 farms are shown in Figure 8-24.

End goal
The final goal is to give Contoso users the best environment for the price. With the release of SharePoint 2013, there is no longer an external connector fee associated with exposing your environment to the Internet. Understanding that their environment is going to continue to grow, the business-savvy and shareholder-dollar-conscious group at Contoso has decided to keep the Internal farm web applications and Search farm in SharePoint 2013 Enterprise. The new environment should look like Figure 8-25.

By this point in the upgrade process, you should have already notified your users of the imminent upgrade to SharePoint 2013. This also should have started a process of cleaning house of old, nonpertinent data and sites. In the meantime, you should have wrapped up your documentation of your SharePoint Server 2010 environments, disabled and retracted any unused farm solutions, and even taken care of cleaning up unused sandbox solutions.
Now that everyone is busy cleaning up your old environment and your documentation is coming to a close, it is time to start building out Contoso’s test environment.
Test environment
Because your goal is to have as pristine a production environment as possible, it is a good idea to build out a test environment that you can destroy and rebuild as much as needed. Once you are happy with your upgrade and migration story, then it will be time to build out your production environment. Even if you are short on resources, you can create your test environment, get your upgrade scripts perfected, destroy your test environment, and then create your production environment anew.
Because Contoso is running two separate farms in their SharePoint 2013 production environment, you are going to build out your test infrastructure to look like Figure 8-26.

Because we are talking about a test migration environment, it is acceptable to go ahead and put your data, logs, and indexes on the D: drive and everything else on your C: drive. However, your drive layout should mimic your future production environment as much as possible so that you can validate your installation and deployment scripts, as well as your migration scripts.
The first step to creating your migration strategy is to come up with the strategy and write it down someplace that is backed up. The last thing you want is to be 95 percent finished writing your migration story, only to find out that your local hard drive fried in the middle of the night. Because you are a SharePoint person, the odds are good that you will be creating an “Upgrade to 2013” site in your current 2010 environment to help you and your team stay organized and on task.
Test migration strategy
The first thing that you are going to do is create the SharePoint 2010 farm documentation. You are going to run Windows PowerShell and get as much information as possible about the current environment. You are also going to get all of the customizations annotated and create a list of any manual customization as necessary. You are going to take those several pages of notes that you have generated and put them into one master document. You are also going to start to accumulate all the .wsp files that will need to be installed so that you have an inventory of everything that will need to go onto your test environment servers. Do not put anything onto your test environment without having a copy of it in a folder in your “Upgrade to 2013” site, and do not move anything onto your test environment without documenting the move. While this does seem a bit excessive, you will be grateful after the first time you destroy your test environment without losing all your scripts and files.
Part of the migration strategy will be to determine which of the databases you wish to move and which ones you wish to rebuild from scratch. Your current Contoso environment has two (2) UPS instances and two (2) Managed Metadata Service (MMS) instances. To get the full functionality of Enterprise Search, UPS and MMS have to be provisioned on the Search farm. When Search for the SharePoint 2013 farm is created, you will have to re crawl the content of your environments to take advantage of the new features in SharePoint 2013 Search. This means that you will not have to move the Search farm UPS or MMS databases, but only the Search Admin database. The UPS and MMS will be migrated from the internal enterprise farm. Because you are running a Federated Services Search farm, you will create and upgrade Search first, then you will migrate all the content databases.
Building the test farm
You have documented all your install settings, or preferably, you have scripted out the entire installation process, so that when you go to install the production environment, you will have a proven and tested installation procedure. You have also documented everything that needs to be completed after installing the bits for SharePoint 2013 and SQL Server 2012. Remember to keep your scripts in your “Upgrade to 2013” site and update those scripts, and then copy them to your test environment before running them.
Upgrading the Search Service application
The first thing that you want to do is to move your databases from SharePoint Server 2010 to the SharePoint 2013 environment. You can either move just the service application databases, or grab all of the content databases as well. You are going to start by moving your Search Admin and Content databases from your Search farm SQL2008R2 server into your SharePoint 2013 Search farm SQL2012 server. As this is a test migration, there is no need to put any of your databases into Read-only mode. For the migration to production, you would want to put your databases into Read-only mode. After restoring your Search Content and Admin databases to your SQL2012 server, you are going to upgrade the databases (also known as setting the compatibility level) to SQL2012. You are going to run the following query on your server running SQL Server, where Content_Search is the name of the database to be altered:
USE master
GO
ALTER DATABASE Content_Search SET COMPATIBILITY_LEVEL = 110
GO
After upgrading the compatibility levels, you are going to create your service application pool account (“SharePoint Web Services Default” if you’re using Windows PowerShell; otherwise, the Farm Configuration Wizard will create it), and then start the Search Service Instance:
PS C:> # Get then Start Search Instance
PS C:> $searchInstance = Get-SPEnterpriseSearchServiceInstance
PS C:> Start-SPServiceInstance $searchInstance
Once the Search Service is started, you are going to mount the Search Admin database to SharePoint 2013:
PS C:> $searchAppName = "Search Service Application"
PS C:> $searchServiceAppDBName = "Farm_Search_Admin"
PS C:> $databaseserver ="SQL-03"
PS C:> $applicationPool = Get-SPServiceApplicationPool -Identity 'SharePoint Web Services Default'
PS C:> $searchInst = Get-SPEnterpriseSearchServiceInstance -local
PS C:> Restore-SPEnterpriseSearchServiceApplication -Name $searchAppName -applicationpool
$applicationPool '
    -databasename $searchServiceAppDBName '
    -databaseserver $databaseserver '
    -AdminSearchServiceInstance $searchInst
You will now have to create the Search service application proxy. You will do this by running the following script:
PS C:> $searchServerName = "SP-04"
PS C:> $serviceAppName = "Search Service Application"
PS C:> # Start Search Service Instances
PS C:> Write-Host "Starting Search Service Instances..."
PS C:> Start-SPEnterpriseSearchServiceInstance $searchServerName
PS C:> Start-SPEnterpriseSearchQueryAndSiteSettingsServiceInstance $searchServerName
PS C:> # Create the Search Service Proxy
PS C:> Write-Host "Creating Search Service Application and Proxy..."
PS C:> $searchServiceApp = Get-SPEnterpriseSearchServiceApplication
PS C:> $searchProxy = New-SPEnterpriseSearchServiceApplicationProxy -Name "$serviceAppName
Proxy" -SearchApplication $searchServiceApp
Once Search is online, you will want to verify your Upgrade Status to make sure that everything went smoothly. You should also review the upgrade log file, as it too is very important to review, and keep a copy for your records. You should create a library in your “Upgrade to 2013” site to hold your test and production upgrade reports. Figure 8-27 shows an example of a successful Search service application upgrade.

Upgrading the Search Center
To prepare for testing your content database and Search Center, you will start by modifying the hosts file so that you can get to your Search Center URL without creating a conflict with Domain Name System (DNS). You can find your hosts file at C:WindowsSystem32Driversetchosts.
You will be entering the IP address and URL of the Search Center.
Modifying the host file is a quick solution for testing with internal IT while getting ready for upgrade testing. When it is time for user acceptance testing, you will want to make sure that you have different URLs for the different stages of testing, such as http://test.search.contoso.com or http://dev.projects.contoso.com.
Now that you have upgraded Search and updated your hosts file, it is time to upgrade your Search Center. If your Search Center is heavily customized, you will probably want to upgrade your content database. If you are using the out-of-the-box Search Center, then you will want to build your Search Center site from scratch, especially with the deprecation of Search Scopes. Search Scopes have been deprecated, but they are still usable from the upgrade (however, they are not modifiable). Because the Contoso Search Center is heavily customized, you will be upgrading the SharePoint Server 2010 Search Center. The first step will be to create a web application to hold your SharePoint Server 2010 Search Center content database. You will need to run the Test-SPContentDatabase cmdlet and fix any issues that were found with the Search Center. After fixing all pertinent issues returned, you will run the Mount-SPContentDatabase cmdlet, followed by checking the Upgrade Status in Central Administration.
Now you will take a look at your Search Center and make sure that you have traveled to the correct location by verifying that you now have the pink (salmon) System Status Bar on your home page. You will run your Site Collection Health Check and address any issues that have been pointed out.
You can now either request an evaluation site collection or go straight to the upgrade. Once you are happy that your Search Center is working correctly, you will go through getting Search federated to the SharePoint Server 2010 farms.
Federating the Search service
Basically, you will have to create the same trusts for the new SharePoint 2013 farm that you created for the SharePoint Server 2010 farm. You will start by exporting the certificates from both SharePoint Server 2010 farms. You will run the following Windows PowerShell cmdlet on both SharePoint Server 2010 farms and move the certificates to the SharePoint 2013 Search farm, changing the name of the file appropriately:
PS C:> $rootCert = (Get-SPCertificateAuthority).RootCertificate
PS C:> $rootCert.Export("Cert") | Set-Content "C:CertsSP2010-Search.cer" -Encoding byte
PS C:> $stsCert = (Get-SPSecurityTokenServiceConfig).comLoginProvider.SigningCertificate
PS C:> $stsCert.Export("Cert") | Set-Content "C:CertsSP2010-Search-STS.cer" -Encoding byte
After you have accumulated all four certificates, you will have to import them into the new SharePoint 2013 Search farm. You can accomplish this by running the following Windows PowerShell cmdlet on the SharePoint 2013 Search farm:
PS C:> $trustCert = Get-PfxCertificate C:CertsStaffFarmRoot.cer
PS C:> New-SPTrustedRootAuthority "StaffFarmRoot" -Certificate $trustCert
PS C:> $stsCert = Get-PfxCertificate C:CertsStaffFarmSTS.cer
PS C:> New-SPTrustedServiceTokenIssuer "StaffFarmRoot-STS" -Certificate $stsCert
You now need to export your root certificate from our SharePoint 2013 Search farm so that you can import it into your SharePoint Server 2010 farms. You can export your SharePoint 2013 certificate by running the following cmdlet:
PS C:> $rootCert = (Get-SPCertificateAuthority).RootCertificate
PS C:> $rootCert.Export("Cert") | Set-Content "C:CertsSearchFarmRoot-2013.cer" -Encoding byte
You will complete the trust relationship by importing the SharePoint 2013 root certificate to both SharePoint Server 2010 farms. You can accomplish this by running the following cmdlet on each farm:
PS C:> $trustCert = Get-PfxCertificate C:CertsSearchFarmRoot-2013.cer
PS C:> New-SPTrustedRootAuthority "SearchFarmRoot-2013" -Certificate $trustCert
Now that there is a trust between all the farms, and Search is up and running correctly, all that is left to do is change the IP address of the Host A Record for search.contoso.com. This change will allow you to go to the staff.contoso.com URL and search the farm using SharePoint 2013 Search.
Upgrading the remaining service applications
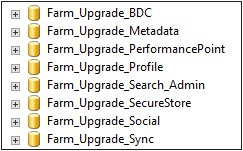
At this point, you will need to start moving the remaining service application databases to the enterprise farm. After you restore the SharePoint Server 2010 databases into the SQL2012 environment, you will upgrade them as well. Figure 8-28 shows a list of the service application databases that will be upgraded.
In the Upgrading the Search Service application section earlier in this chapter, you learned that you can run an Alter Database command to upgrade the SQL version of the database. As shown in Figure 8-29, another way to upgrade the database is to right-click the database | Properties | Options and change the Compatibility Level by selecting SQL Server 2012 (110) from the drop-down menu.

Now that your databases have been restored and upgraded, it is time to create the service applications within SharePoint. After you have created your default service account, you will need to start the service instances by going to Central Administration | Application Management | Service Applications | Manage Services On Server and clicking Start next to the following services:
Business Data Connectivity Service
Managed Metadata Web Service
PerformancePoint Service
Secure Store Service
User Profile Service
Now that all the services have been started, it is time to start creating the service applications and proxies. It is important that you create the applications in the following order:
Secure Store Service Application
PS C:> $sssDBName = "Farm_Upgrade_SecureStore"
PS C:> $sssKey = "Password1"
PS C:> $appPool = Get-SPServiceApplicationPool -Identity "SharePoint Web Services Default"
PS C:> # Upgrade Secure Store Service Application and Create Proxy
PS C:> $sss = New-SPSecureStoreServiceApplication -Name "Farm Secure Store" -ApplicationPool
$appPool -DatabaseName $sssDBName -AuditingEnabled
PS C:> $sssp = New-SPSecureStoreServiceApplicationProxy -Name "Farm Secure Store Proxy"
-ServiceApplication $sss -DefaultProxyGroup
PS C:> # Upgrade Secure Store Key
PS C:> Update-SPSecureStoreApplicationServerKey -Passphrase $sssKey -ServiceApplicationProxy $sssp
Business Data Connectivity Service Application
PS C:> $bdcDBName = "Farm_Upgrade_BDC"
PS C:> $appPool = Get-SPServiceApplicationPool -Identity "SharePoint Web Services Default"
PS C:> # Upgrade Business Data Connectivity Service Application and Create Proxy
PS C:> New-SPBusinessDataCatalogServiceApplication -Name "Farm Business Data Connectivity
Service" -ApplicationPool $appPool -DatabaseName $bdcDBName
Managed Metadata Service Application
PS C:> $mmsDBName = "Farm_Upgrade_Metadata"
PS C:> # Upgrade Managed Metadata Service Application and Create Proxy
PS C:> # Get Application Pool Information
PS C:> Write-Host ("Getting Application Pool Information")
PS C:> $appPool = Get-SPServiceApplicationPool -Identity "SharePoint Web Services Default"
PS C:> $mms = New-SPMetadataServiceApplication -Name "Farm Managed Metadata Service
Application" -ApplicationPool $appPool -DatabaseName $mmsDBName
PS C:> $mmsp = New-SPMetadataServiceApplicationProxy -Name "Farm Managed Metadata Service
Application Proxy" -ServiceApplication $mms -DefaultProxyGroup
PerformancePoint Service Application
PS C:> $ppsDBName = "Farm_Upgrade_PerformancePoint"
PS C:> # Get Application Pool Information
PS C:> Write-Host ("Getting Application Pool Information")
PS C:> $appPool = Get-SPServiceApplicationPool -Identity "SharePoint Web Services Default"
PS C:> $pps = New-SPPerformancePointServiceApplication -Name "Farm PerformancePoint Service
Application" -ApplicationPool $appPool -DatabaseName $ppsDBName
PS C:> $ppsp = New-SPPerformancePointServiceApplicationProxy -Name "Farm PerformancePoint
Service Application Proxy" -ServiceApplication $pps -Default
You can download a copy of the upgrade script from http://sdrv.ms/SCIEq9.
UPS application
You are already aware that at RTM, the Sync database upgrade is not functioning correctly. To get around this problem, you are not going to upgrade the Sync database, only the Profile and Social databases. So when you restore the UPS databases, you are going to let the upgrade process create a new Sync database for you.
To upgrade UPS, you will need to be logged on as the farm account and open SharePoint Management Shell as an administrator. You are going to run the following script to upgrade the Profile and Social databases, create a new Sync database, and then create the UPS proxy:
PS C:> $profileDBName = "Farm_Upgrade_UPS_Profile" # Should be in DB
PS C:> $socialDBName = "Farm_Upgrade_UPS_Social" # Should be in DB
PS C:> $syncDBName = "Farm_Upgrade_UPS_Sync" # Should NOT be in DB
# Get Application Pool Information
PS C:> Write-Host ("Getting Application Pool Information")
PS C:> $appPool = Get-SPServiceApplicationPool -Identity "SharePoint Web Services Default"
PS C:> <# Upgrade User Profile Service Application and Create Proxy
 The SocialDBName and ProfileSyncDBName parameters are optional. If you do not specify these
parameters, new Social and Sync databases are created for you.
#>
PS C:> Write-Host ("Upgrading User Profile Service Application and Create Proxy")
PS C:> $upa = New-SPProfileServiceApplication -Name "Farm User Profile Service Application"
-ApplicationPool $appPool -ProfileDBName $profileDBName -SocialDBName $socialDBName
-ProfileSyncDBName $syncDBName
PS C:> $upap = New-SPProfileServiceApplicationProxy -Name "Farm User Profile Service
Application Proxy" -ServiceApplication $upa -DefaultProxyGroup
After the successful running of the previous script, you will need to go into Central Administration, as the farm account, and start the User Profile Synchronization Service instance.
You can download the script from http://sdrv.ms/Z6xtLr.
Figure 8-30 shows a successful upgrade of the UPS.

Trust but verify
All our service applications that could be upgraded should now be up and running in the Default Application proxy group. You will want to verify that your service applications are in the correct location by running the following script:
PS C:> # Verify Services are in the Default Application Proxy Group
PS C:> $pg = Get-SPServiceApplicationProxyGroup
PS C:> $pg.Proxies
You will also want to review the upgrade documentation and save copies of the log files for reference.
Service application creation
Because you have all your upgraded service applications created and verified, now would be the perfect time to build out the rest of the service applications that you and your organization plan on using. Please remember to test your applications, add documents to libraries, and make sure that your search is actually working. Your service applications should be working correctly before proceeding with your upgrade, as there is no reason to spend time upgrading content if you need to destroy your test farm due to a poor service application installation. It is much safer to start your installation over again than chase bugs and little oddities through out the life of your farm.
Customizations
You should now have the backbone of your SharePoint 2013 farm up and running without error. The next step is to create your web applications, AAMs, and customizations, and deploy any .wsp files and third-party tools that are going to be required for your successful upgrade. Because you are upgrading your My Sites, you will also need to verify your managed paths and Self-Service Site Creation settings. Ideally, this process should be scripted so that when it comes time to build out your next version of your test environment, or when it comes time to create your production environment, things will go smoothly and consistently. To be able to start testing your site customizations and your site collections without interrupting your production environment, you will want to modify the hosts file, as described in the Upgrading the Search Center section earlier in this chapter.
Upgrading the content databases
At this point, you have built out your service applications and your web applications, set your bindings in Internet Information Services (IIS), and modified your hosts file. You are finally ready to test and mount your content databases from your projects farm and from your staff farm into your SharePoint 2013 staff farm. You are going to follow the same procedure that you used to restore your service application databases in the Upgrading the remaining service applications section earlier in this chapter: restore the content databases and then change the compatibility level. You will now want to run the Test-SPContentDatabase cmdlet against the restored databases and address any issues that arise. As with every other phase of testing, documentation is very important. Having output files from your test is very important for keeping a record trail, and they also show the developers that the files that they have not upgraded are holding up your upgrade to SharePoint 2013.
After cleaning up any issues that made their way from your SharePoint Server 2010 environment, you will need to make sure that you have removed the content databases associated with your SharePoint 2013 web applications. To accomplish this, you would go to Central Administration | Application Management | Databases | Manage Content Databases, select your web application’s content database, and then select Remove Content Database.
Next you are going to mount all your content databases using the Mount-SPContentdatabase cmdlet. The following script is used to mount the content databases to the Projects web application:
PS C:> $databases = ("Content_Upgrade_AU","Content_Upgrade_NZ","Content_Upgrade_CA","Content_Upgrade_US","Content_Upgrade_Projects")
PS C:> foreach ($db in $databases)
  {
    $DbServer = "SQL-12"
    $webApp = "http://projects.contoso.com"
    Mount-SPContentDatabase -name $db -webapplication $webApp -DatabaseServer $DbServer
  }
You can download the script from http://sdrv.ms/W3abEp.
After your databases have been mounted, you will want to surf to your site collections and make sure that you can actually bring up your SharePoint Server 2010 sites in your SharePoint 2013 environment. You will also want to go to Central Administration | Check Upgrade Status, get the associated log files, and verify that the upgrade went according to plan.
You will now want to run the same cmdlets and follow the same procedures for the Staff Web Application database upgrades.
Upgrading My Site content
Upgrading My Sites is a bit different from upgrading a site collection database. Because you already have created the My Site web application, you will want to verify that you can actually create a My Site before trying to upgrade.
At this point, you should also have your User Profile Synchronization up and running and have tested your user profile source import. While you are within the Manage Profile Service page, verify your My Site settings by going to Setup My Sites. You will want to pay close attention to the Site Naming Format settings. The way that you come up with your My Site URL must be the same way that you provisioned in SharePoint Server 2010; otherwise, people will never get to their My Site. That means that if you had opted to “resolve conflicts by creating a domain_username” in SharePoint Server 2010, then you will want to change your option button selection to “do not resolve conflicts.” Once you have successfully created your SharePoint 2013 My Site, and UPS is running, you will want to remove the content database from the My Site web application. From within the Manage Profile Service page, you should also review the Manage User Profiles to review the profile of the users to make sure that the personal site information is correct (see Figure 8-31).
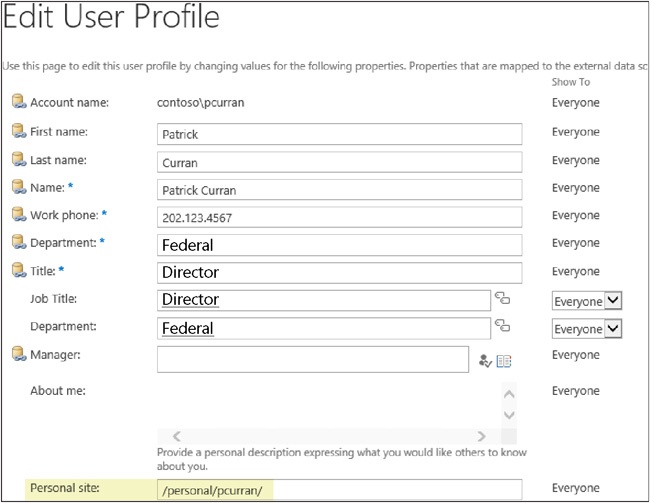
You will now want to run the Test-SPContentDatabase cmdlet, followed by the Mount-SPContentDatabase cmdlet, following the same logic that you used to test and mount the databases for the projects.contoso.com web application from the previous section. Figure 8-32 is an example of what your My Site looks like after you mount your My Site database (looks familiar, right?).

When it is time to start upgrading everyone’s My Site, you will run the Upgrade-SPSite cmdlet for the host site collection first, and then let users decide when they want to upgrade their content to SharePoint 2013.
Upgrade-SPSite http://my.contoso.com -VersionUpgrade -Unthrottled
Once you upgrade the host, your My Site should look like Figure 8-33.
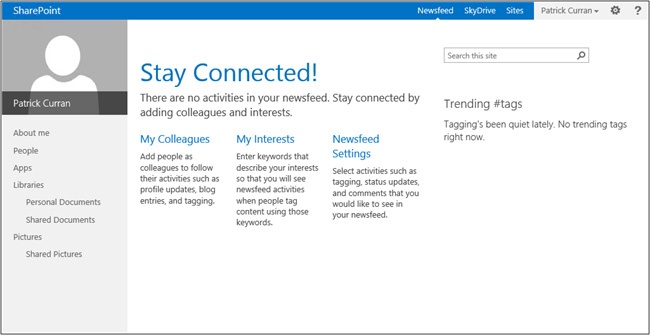
If you click Libraries, you will see a very familiar sight, as well as the pink System Notification bar letting your users know that they can upgrade their My Site, as shown in Figure 8-34.

Farm administrators have the option of running the Upgrade-SPSite cmdlet on any of the My Sites to push the upgrade manually. After the My Site has been upgraded, your users will be welcomed by the new pop-up window shown in Figure 8-35.

Upgrading sites
At this point, it is time to go through your sites and verify that all your sites come up in SharePoint Server 2010 (SP14) mode. You will then run the Site Collection Health Check and fix any outstanding issues. Figure 8-36 shows you an example of the Results page after you run a Site Collection Health Check.
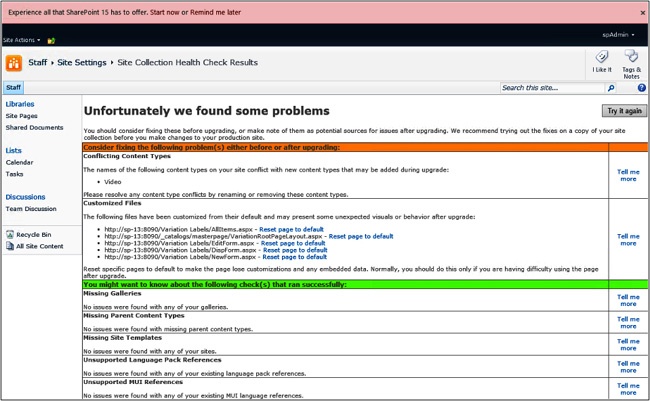
If you run into a 404 error (site not found), verify that you have your hosts file set up correctly.
To get a list of all the site collections (including My Sites) and their compatibility levels, use the Get-SPSite cmdlet. However, to avoid creating a huge memory leak, get your SPSite information by running either of the following Windows PowerShell scripts:
PS C:> $sites = Get-SPSite -Limit All; $sites; $sites.Dispose()
or
PS C:> Start-SPAssignment -Global
PS C:>     Get-SPSite -Limit All
PS C:> Stop-SPAssignment -Global
To resolve the errors, Microsoft has been kind enough to give you guidance on how to fix your issues, and once the issues have been addressed, you will start your site collection upgrade process.
The purpose of your test environment is to get you comfortable with your upgrade story. By the time your upgrade story is completed, you will probably have upgraded your site collection dozens of times in your test environment, getting all the upgrade breaking issues resolved. This thorough testing will allow you skip the use of the new Request Evaluation Site Collection feature in your production environment. Remember that if you request the evaluation site collection, that the timer job goes off once a day and you will want to start the Create Upgrade Evaluation Site Collection job manually for the appropriate web application.
Theoretically, you would really only need to create an evaluation site collection in production to make sure that you are aware of all the headaches that are going to arise before your clients run into issues after the upgrade. This means the only reason that you would not be aware of all the issues for your sites and site collections that lay ahead would be because you skipped the test environment phase.
To upgrade a site collection, you are going to run the Upgrade-SPSite cmdlet, but because this is a test environment, you are going to upgrade them all at once using the following Windows PowerShell script:
PSC:> $databases = ("Content_Upgrade_AU","Content_Upgrade_NZ","Content_Upgrade_CA","Content_Upgrade_US","Content_Upgrade_Projects")
PSC:> foreach ($db in $databases)
  {
    Get-SPSite -ContentDatabase $db -Limit All | Upgrade-SPSite -VersionUpgrade -QueueOnly
  }
The -QueueOnly parameter adds the site collections to the upgrade queue. This will allow the timer job to perform parallel upgrades when it is possible and can save time. The sites are upgraded in the order in which they are added to the queue. Depending on the number of CPU cores and RAM of your test environment, you may want to consider running a script to get your test upgrade accomplished quicker. You should try running both a throttled and an unthrottled site collection upgrade and tracking the upgrade completion times on your environment because putting the site collections into the queue might actually upgrade faster depending on the environment. To upgrade your sites without a throttle enabled, run the following Windows PowerShell script:
PS C:> Get-SPSite -ContentDatabase $db -Limit All | Upgrade-SPSite -VersionUpgrade -
Unthrottled
You can download the script from http://sdrv.ms/RueCa2.
Once you have upgraded your site collections, you should review the upgrade logs. You can either surf to each site collection, go to ../_catalogs/MaintenanceLogs, and review the documents in place, or you can run a script that will grab all the upgrade documents and place them into a local folder for review. You can download that script from http://sdrv.ms/WeE9ph.
Back to Search
Now that your Contoso content is back up and has been successfully upgraded, you need to incorporate your federated Search farm. You are going to use the same steps that you used in incorporating the Search farm back into your SharePoint Server 2010 environment from the Federating the Search service section earlier in this chapter. You are going to exchange certificates to establish a trust between farms and add a sharing permission to the publishing farm for the Discovery and Load Balancer application (for Consuming Farm ID). You will then publish the Search Service application from the Search farm and put the published URL in the consuming farm.
Finally!
You have verified that everything works locally on your test environment, and the Contoso users would be able to work within your new SharePoint 2013 environment if you repointed your DNS to your test farm. At this point, there only a couple of steps left. You will want to go to each of your test servers and back up all your documentation, scripts, favorites, and anything else that you might have downloaded or referenced and move that information into your “Upgrade to 2013” site. Once you are satisfied that you have all your data safely backed up, it is time to destroy your test environment and rebuild it from scratch. Once you have the base operating system installed, you will want to try your upgrade script again to validate your success.
Now that you have successfully upgraded your SharePoint Server 2010 environment twice and verified that your upgrade script is correct, you can start your production upgrade. The only difference between the test and production upgrades is that at the end of your production upgrade, you will have to ask your network administrator to point your DNS entries to your new production servers.