Chapter 7
Get the Data: Storing and Retrieving Data and Configuring your Applications
So far, we've covered a number of topics, all designed to introduce how to create iOS-based mobile applications running on iOS-based mobile devices, using the iOS SDK and supporting languages and tools. However, while we have walked through how to build an application, one key thing has been missing: the application's ability to hold what is known as state.
State can be thought of as the equivalent to a human's memory. If we didn't have a memory, doing the simplest of tasks would require us to discover how to do it every time. Since we do have a memory and can remember how to perform a particular action, doing it again is far easier, faster, and arguably enjoyable—skiing is a good example.
Computers have memory in the form of volatile memory (RAM), which is lost when you switch off the computer, and a mobile device is no different. But if you want to persist state between application instances—that is, you want the application to remember where it left off—you're going to need to store state somewhere else, like a hard disk.
In this chapter, we'll look at how you can store information as data either on your mobile device or other sources, and how you can use this data to configure your application. Specifically we'll take a look at the following:
- An overview of the options for storing data
- Guidance on how to store information
- Guidance on how to retrieve information
- How to use data to configure your application between instances
What Are Our Options for Storing Data?
You may want to store various types of data, such as dynamic data that is entered by the application user, or parameterized data that the user does not influence but may want some flexibility in configuring (kind of like the Registry in Microsoft Windows). The following options are available for storing data:
- Filesystem storage
- Property lists
- Internet storage
- Database storage
Let's look at each of these options in turn.
Using the Sandbox to Provide Filesystem-Based Storage
InChapter 4, we touched on the concept of the application's sandbox. Recall that one of its primary purposes is to provide security mechanisms for both your application and your device. Let's revisit the sandbox briefly, focusing on how it can help you store data.
When your application is installed on a mobile device, by default, it establishes a number of folders that have constraints on how they are used. The Apple developer documentation provides some guidance on these folders, and it is important to understand the guidelines before you proceed to use any of these folders. The folders, their typical purpose, and relevant notes are listed in Table 7-1.


Even when using the simulator you can see these folders. Using Finder, you can navigate to this folder, as it exists on the simulator, by going to LibraryApplication SupportiPhone Simulator4.3.2 (or whatever version of the simulator you are using) and look in the Applications folder. You will see folders with the application IDs we touched on in Chapter 4, with the structure shown in Table 7-1.
NOTE: The folder names may change depending on what your application has specified it will use. Also, different SDKs will have their own folder roots.
You can use the folders listed in Table 7-1 to store persistent data (or state) for your application, although you will need to take into account the constraints highlighted. Given it is a filesystem, you will need to store the data in one or more files, and your application must be able to interpret them.
Although adding a simple file to act as your data store may seem like the easiest approach, the job of storing and retrieving the data you want from it may actually make your application's data-handling code more complex than it needs to be. Therefore, it's worth checking out the other options before you decide to use a simple file for all your application's data storage needs. For example, you may want to investigate using the embedded database approach discussed later in this chapter if your data storage and retrieval needs are not that simple and require more than one file.
Managing the Data Within Your Application
The first hurdle is that you need to store the data in the application itself. You could use a lot of individual variables, but that wouldn't be particularly elegant, and the result would be very messy code when it comes to reading and writing the data to storage. Fortunately, the iOS SDK, much like the .NET Framework, makes provisions for simplifying this task. After all, working with data in your application is commonplace, and therefore expected in most modern programming languages and frameworks. Several mechanisms are available for storing data within your application.
Chapter 4 introduced the concepts of serialization and deserialization. The iOS SDK—and the .NET Framework, for that matter—provides the ability for objects to be serializable. This means that the object's structure and the data, or state information, it holds within it can be persisted (or written) to a storage medium that will survive the application being terminated and the mobile device being switched off. When the application is restarted, you can deserialize this data from your storage medium back into an object instance that has exactly the same structure and data as it did when it was serialized, therefore persisting state.
In Objective-C, it is possible to serialize any object, converting it into a series of bytes that can be written to storage. However, Objective-C also provides what are called collection classes, which enable you to store multiple objects and then serialize the whole collection—and in doing so, serializing all the data within it.
In .NET—specifically, C#—you mark an object as [serializable], which means it can be converted into binary, Simple Object Access Protocol (SOAP), or XML within .NET. The .NET Framework separates the representation of the data from mechanisms for transporting it, such as by tagging your class in .NET with the [serializable()] attribute and ensuring your class derives from the ISerializable class. You can then use the appropriate method for writing your class to the destination. This may be a file using the System.IO namespace, or you may be using formatters such as System.Runtime.Serialization.Formatters.Binary to write to a binary stream.
The default serializable objects in Objective-C are shown in Table 7-2 with commentary.
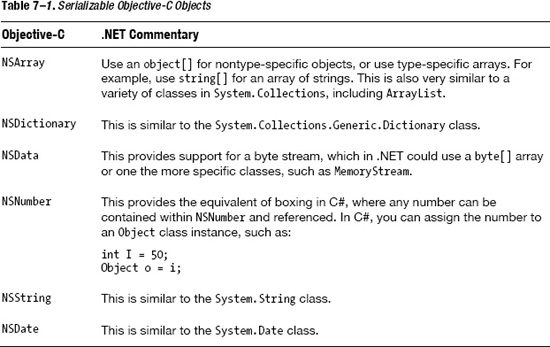
To bring this to life, let's look at a working example that allows us to use one of these types to create an array of values that we can use to hold our data, and then we'll serialize this array as a property list.
First, let's set up a dynamic array using the NSMutableMutable class:
NSMutableArray *highscores = [[NSMutableArray alloc] init];

// High score 1

[highscores addObject:@"Mark"];

[highscores addObject:@"200"];

// High score 2

[highscores addObject:@"Rachel"];

[highscores addObject:@"300"];

// .. others could be added
At this point.wecan write this to the persistent storage of our choice (as we'll do next), and then finally release the array with the following command:
[highscores release];
Using Property Lists As Storage
Earlier in the book we touched on property lists within iOS and their existence in the filesystem as files with the .plist extension, known as plist files. Property lists offer a way to persist application data. Within Objective-C, the NSArray and NSDictionary collection classes provide a method that serializes their content to plist files. These collection classes also provide an easy mechanism to store and retrieve values from plist files.
Using the NSMutableArray we just setup (or indeed, any serializable collection), we can then use the writeToFile method to serialize this string to a plist file for later reading and interpretation. Simply execute the method with the destination of your file, as in this example:
[myArray writeToFile:@”/some/file/location/output.plist” atomically:YES];
If you execute an application with this snippet of code inplace and then examine the file produced, you'll find it looks like this:
<?xml version="1.0" encoding="UTF-8"?>

<!DOCTYPE plist PUBLIC "-//Apple//DTD PLIST 1.0//EN" "httpfhighscor://www.apple.com/DTDs/PropertyList-1.0.dtd">

<plist version="1.0">

<array>

        <string>Mark</string>

        <string>200</string>

        <string>Rachel</string>

        <string>300</string>

</array>

</plist>
Notice that it is serialized as an XML file, against the property list schema and using strings.
This file can then be read back into an array for manipulation or use using the initWithContentsOfFile method. The following deserializes the file we just created into a new NSMutableArray with the same values:
NSMutableArray *highscores = [[NSMutableArray alloc] initWithContentsOfFile:

 @"/some/file/location/output.plist"];
Using the Internet to Store Data
For persisting data, we've looked at property lists and using methods available as part of some of the serializableObjective-C types. However, what if you want to use the Internet in some form to serialize your data?What if you want to store this information in some kind of central location, rather than locally on the device?
The first and most obvious solution is to still use the property list method, except that the path to the file is the fully qualified URL of a file that exists on some internal-based storage—one of the many digital-storage platforms, such as Dropbox and DigitalVault.
But there is an alternative. The serializable collections such as NSMutableArray have a method called writeToURL, which instead of taking an NSString argument takes an NSUrl argument. However, if when writing to a file your argument is a file:// reference, then there is no real difference to the behavior of these methods. Therefore the following:
[myArray writeToURL: @"file://www.mamone.org/highscore.plist" atomically:YES];
is exactly the same asthis:
NSURL *url = [NSURL URLWithString:@"http://www.mamone.org/highscore.plist"];

[myArray writeToURL:url atomically:YES];
Using the iOS-Embedded Database
Our previous examples, while perfectly adequate, have been restricted to creating data using objects that are serializable to either locally held or Internet-based filesystems. You may want to persist data using a more comprehensive mechanism, especially if you want to manipulate the data without needing to resort to complex file or object manipulation in code, which would be a by-product of storing data using a simple filesystem-based storage mechanism. In these cases, you can use the iPhone's embedded database, which is called SQLite.
SQLite is an embedded relational database management system (RDBMS), which is similar in many ways to the more traditional server-based database servers you may be familiar with, such as Oracle and Microsoft SQL Server, in that you can use the Structured Query Language (SQL) to access and manipulate the data held within the database. However, there is no application you need to run. You simply use the API code provided within your application to invoke the SQLite functionality provided as part of the iOS.
Let's take a look at how you might use the SQLite capability within your mobile iOS device to access database functionality.
NOTE: If you're not familiar with the SQL language, many resources are available on this topic. For example, see Beginning SQL Server 2008 for Developers and other titles from Apress.
Before we get started, you need to add support to your application for SQLite by referencing the library with the supporting library code, and then including the relevant header file. So, first add the library called libsqlite3.dylib to your project using the Build Phases tab of your project summary and choosing the + button. The dialog box should look similar to that shown in Figure 7–1.
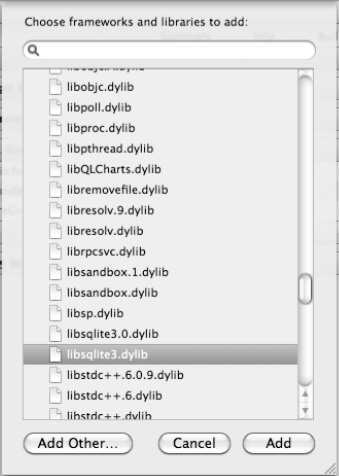
Figure 7–1. Adding the SQLite library to the build phase of a project
Then you'll need to include a reference to the supporting header file with the following #import directive in the source code file containing your SQLite code:
#import "/usr/include/sqlite3.h"
What are the iOS SDK Options?
Using the SQLite API isn't the only option for accessing the iOS device database. Core Data is a framework that is confusingly described as a “Schema-driven object graph management and persistence framework.” This essentially means that not only does the Core Data API manage where data is stored, how it is stored, and how management of that data for performance reasons is handled, but it also allows developers to create and use a relational databaseunder SQL-less conditions. It allows you to interact with SQLite in Objective-C and not need to worry about connections or managing the database schema. Most of these features will be familiar to ADO.NET developers as a .NET Framework that abstracts access to the database.
However, we won't cover both SQLite and Core Data in this chapter. My goal is to take you through the principles with a working example using the SQLite API. This will provide a good foundation for you to apply this knowledge to whichever approach you take: SQLite or Core Data.
I recommend that you explore Core Data using the online resources available, specifically the Core Data Programming Guide at http://developer.apple.com/library/mac/#documentation/Cocoa/Conceptual/CoreData/cdProgrammingGuide.html.
Creating or Opening Your Database
SQLite is written in portable C, not Objective-C. Therefore, we'll need to write in the C language and use conversion between types where necessary.
Let's start by opening the database using the sqlite_open() method, and using the provided constants to look for success (SQLITE_OK) and log an error if it fails. The following code achieves this:
    sqlite3 *db;

    int result = sqlite3_open("/documents/file", &db);

    if (result == SQLITE_OK)

    {


    } else NSLog(@"Failed to open database");
In this example, if the database exists, it will be opened. If it doesn't exist, it will be created.
NOTE: The sqlite_open() method expects a UTF-* string as an argument—that is, an 8-bit encoded string. This isn't the same as an NSString, but you can use the UTF8String method to convert from an NSString to a UTF-8 string.
Note that at some point when trying to open a database—especially when it's not located locally on your machine—you will almost certainly encounter the problem of your database connection timing out. This is usually because of the delay (or latency) involved in accessing a resource that is not local, especially when you are connecting over the Internet. Therefore you should always intercept any error messages and deal with them as appropriate. For example, you might want to retry if the request has timed out.
Creating a Table in the Database
With our database open and ready for use, the next step is to create a table in which we will store our data. The SQL command CREATE TABLE can be used with the optional condition to create the table only it if doesn't already exist. The following code executes the CREATE TABLE command and creates a table with two columns called NAME and SCORE, both of type text.
       char *errMsg;

       const char *sql = "CREATE TABLE IF NOT EXISTS HIGHSCORE (NAME TEXT, SCORE TEXT)";

       if (sqlite3_exec(db, sql, NULL, NULL, &errMsg) == SQLITE_OK)

       {

         // code to write here

       } else NSLog(@"Failed to create table");
Now the table will be created (if it didn't already exist), and we can begin to populate it with data from our array.
Writing Data to the Database
To write data to the database, you have two options:
- Construct an
INSERTSQL statement from your string and traverse the array you have created. - Bind your variables to your SQL statement, which has each of the parameters replaced with a
?symbol. This approach has the added advantage of ensuring that the data you insert matches the format of the data expected in the table.
So, first we need to loop through our array extracting the values held within it. This is simply done in our example by using a loop and an integer-based index, which starts at 0 (the first element) and continues while it is less than the count of all items in the array, determined by the count attribute.
int count = [highscore count];

int idx = 0;

while (idx < count)

{

        // loop through the array, increasing idx

}
Extending this to cycle through the array, accessing its elements and using the SQL binding feature to replace the ? parameter indicators with values from the array and then finalizing the statement, has the effect of writing the row to the database. Here is the extended code:
sqlite3 *db;

int result = sqlite3_open("/documents/file", &db);

if (result == SQLITE_OK)

{

    int count=[highscore count];

    int idx = 0;

    char *insert_sql = "INSERT INTO HIGHSCORE VALUES(?, ?);";

    sqlite3_stmt *stmt;

    while (idx < count)

    {

        // Prepare our statement for binding

        if (sqlite3_prepare_v2(db, insert_sql, -1, &stmt, nil) == SQLITE_OK) {

            // Bind the name

            sqlite3_bind_text(stmt, 1, [[highscore objectAtIndex: idx++] UTF8String],

-1, NULL);   // NAME

            // Bind the score

            sqlite3_bind_text(stmt, 2, [[highscore objectAtIndex: idx++] UTF8String],

-1, NULL);   // SCORE

            // Step and finalize the write

            sqlite3_step(stmt);

            sqlite3_finalize(stmt);

        }

    }

} else NSLog(@"Failed to open database");
In this example, we prepare the SQL statement with the parameters using the sqlite3_prepare() statement. Then while within the loop, we use the sqlite3_bind_text() method to mind a variable's value—in this instance, the array index to the parameter in the SQL statement referenced by its index position, starting at 0.
After each pair of array entriescompletes, we finalize the statement, which writes the row to the database. We continue until all array entries have been covered.
Reading Data from the Database
To check that our code works, we can now use a simple SQL SELECT statement to read back the rows we've just written to our database. For simplicity, we will use the NSLog() method to write the data to the debug output view within Xcode.
Just as in the previous example, we need to prepare a SQL statement and execute it, using the sqlite3_step() method to cycle through the rows until no more are found, and using the NSLog() method to output each row's data. This is shown in the following example:
// READ FROM TABLE

sqlite3_stmt *readstmt;

const char *readSQL = "SELECT NAME, SCORE FROM HIGHSCORE";

sqlite3_prepare_v2(db, readSQL, -1, &readstmt, NULL);

while (sqlite3_step(readstmt) == SQLITE_ROW)

{

        NSString *name = [[NSString alloc] initWithUTF8String:(const char

*)sqlite3_column_text(readstmt,0)];

        NSString *score = [[NSString alloc] initWithUTF8String:(const char

*)sqlite3_column_text(readstmt,1)];

        NSLog (@"NAME: %@ SCORE: %@", name, score );

}
If you execute the complete set of code and examine the output in the debug window of your Xcode application, it should resemble something similar to the following (excluding all of the other debug output associated with the running application):
2011-08-15 22:19:05.251 DataStorage[953:207] NAME: Mark SCORE: 200

2011-08-15 22:19:05.253 DataStorage[953:207] NAME: Rachel SCORE: 300
This example should have given you some insight into using the embedded database as a more comprehensive way of persisting data to a database represented as a local file.
Connecting to Other Databases
We've explored the use of the embedded database found in the iOS, SQLite, but what if you have a different database and it's held remotely? For example, what if you want to access a remote MySQL or Microsoft SQL Server database from your device? You have several options:
- You can use a third-party client for your database. For example, Flipper (found at
http://www.driventree.com/flipper) is a MySQL client for the iPhone that allows you to connect to MySQL databases. - If you have a Microsoft SQL Server database, you might want to access it by using a database-agnostic API, such as an Open Database Connectivity (ODBC) driver.
- You can access the database by sourcing a similar local client API, or exposing a services layer from SQL Server and using an XML-based API over HTTP, like SOAP.
Creating the High-Score Example
So far, we've looked at persisting our application's data using a number of different techniques. Now let's explore how we can put this to use in our example application, the Lunar Lander game we started in Chapter 5. The one thing that jumps out in a game like ours is the need to persist our scores in a high score table, providing the players with another competitive dimension to the game. So, we'll apply our data persistence knowledge and look at creating an internal high-score structure that is available to be displayed on the start screen and persists between application instances.
Creating a Persistent High-Score Class
Our high-score feature is pretty straightforward. It will hold five entries, each with the name of the person who attained the high score and the score itself. We could carry on as in the previous example, and use standard Objective-C object types like NSString. This would have the advantage of being written to a plist file, but would incur complexity in how we interpret the file. Instead, we'll use a custom object that inherits from NSObject to store the actual high-score entries.
To build on our Objective-C foundation, let's create a class that holds an individual high-score entry with properties that reference its values. This will then be contained within an NSMutableArray, which we will use to write the storage of our local high score to the local device using SQL Server. However, this does present a problem when trying to serialize the object to a plist file, as the writeToFile method doesn't support serializing custom objects. In our example, we'll look at how to solve this problem.
First, let's create our high-score entry class, called HighScoreEntry. Listing 7-1 shows the code for the header file.
Listing 7-1. HighScoreEntry Class Header
// HighScoreEntry class

//

@interface HighScoreEntry : NSObject {

    NSString * name;

    int score;

}

-(id)initWithParameters:(NSString*)aName:(int)Score;

@property (readwrite, retain) NSString* name;

@property (readwrite) int score;


@end
NOTE: Remember that the readwrite attribute of a property means you can both access the property's value and set the property's value. Additionally, retain ensures that a strong reference is created, meaning as a resource, it will not be released until you explicitly release it.
This is pretty straightforward, and with the material we've covered, it should be familiar. The code simply implements a class that contains a string and an integer using the class member names of name and score, respectively. We have two properties of the same name that will reference these class member variables, and we've implemented an initialization method that takes two parameters of type NSString and int, which are used to initialize the class. Listing 7-2 shows the source code for its implementation.
Listing 7–2. HighScoreEntry Class Implementation
// HighScoreEntry class

//

@implementation HighScoreEntry


-(id)initWithParameters:(NSString*)aName:(int)aScore

{

    self = [super init];

    if (self)

    {

        name = [aName copy];

        score = aScore;

    }

    return self;

}


@synthesize name;

@synthesize score;


@end
Again, this is pretty straightforward. Our implementation provides the initWithParameters method to initialize the class member variables with values passed, and, of course, we synthesize our two properties.
Now let's take a look at the actual collection. We'll call this our HighScore class. Again, we'll start with the source code for the header file, as shown in Listing 7-3.
Listing 7–3. HighScore Class Header
// HighScore class

//

@interface HighScore : NSObject {

    NSMutableArray *scores;

}

-(void)addHighScoreEntry:(HighScoreEntry *)score;

-(void)persist;

@end
This contains a single member variable for our scores, held in a member variable of the same name and using the NSMutableArray type to allow flexibility. We also declare two class methods: one that will add a high-score entry to the list called addHighScoreEntry, and the other to persist the high score to storage—in our case, a local database. The implementation for the class is a little more complex, as shown in Listing 7-4.
Listing 7–4. HighScore Class Implementation
// HighScore class

//

@implementation HighScore

-(void)addHighScoreEntry:(HighScoreEntry *)score

{

    if (scores == nil)

        scores = [[NSMutableArray alloc] init];


    [scores addObject:(score)];

}


-(void)persist

{

    // Open our database

    sqlite3 *db;

    int result = sqlite3_open("mydb.sqlite3", &db);

    if (result == SQLITE_OK)

    {

        // CREATE TABLE

        char *errMsg;

        const char *sql = "CREATE TABLE IF NOT EXISTS HIGHSCORE (NAME TEXT, SCORE

INTEGER)";

        if (sqlite3_exec(db, sql, NULL, NULL, &errMsg) == SQLITE_OK)

        {

            // WRITE ARRAY TO TABLE

            int idx = 0;

            char *insert_sql = "INSERT INTO HIGHSCORE VALUES(?, ?);";

            sqlite3_stmt *stmt;

            while (idx < [scores count])

            {

                // Prepare our statement for binding

                if (sqlite3_prepare_v2(db, insert_sql, -1, &stmt, nil) == SQLITE_OK) {

                    // Get entry

                    HighScoreEntry *hse = [scores objectAtIndex:(idx)];


                    // Bind the name

                    sqlite3_bind_text(stmt, 1, [hse.name UTF8String], -1, NULL);   //

NAME

                    // Bind the score

                    sqlite3_bind_int(stmt, 2, hse.score);   // SCORE

                    // Step and finalize the write

                    sqlite3_step(stmt);

                    sqlite3_finalize(stmt);

                    // Next item

                    idx++;

                }

            }

            // READ FROM TABLE

            sqlite3_stmt *readstmt;

            const char *readSQL = "SELECT NAME, SCORE FROM HIGHSCORE ORDER BY SCORE";

            sqlite3_prepare_v2(db, readSQL, -1, &readstmt, NULL);

            while (sqlite3_step(readstmt) == SQLITE_ROW)

            {

                NSString *name = [[NSString alloc] initWithUTF8String:(const char

*)sqlite3_column_text(readstmt,0)];

                NSString *score = [[NSString alloc] initWithUTF8String:(const char

*)sqlite3_column_text(readstmt,1)];

                NSLog (@"NAME: %@ SCORE: %@", name, score );


            }

        } else NSLog(@"Failed to create table");


    } else NSLog(@"Failed to open database");

}

@end
First, let's consider the addHighScoreEntry method, which should be pretty self-explanatory. If the scores array is null, we create it. We then add the object passed to the array using its addObject method.
The persist method, although lengthy, should again be familiar. We walked through the code earlier. However, I will point out some of the key differences:
- Using an integer for the score: In our table, we now use an integer type rather than a string to store the actual score value.
- Counting array count: When looping around the array, we use the
countattribute ofNSMutableArrayto return how many objects are in the array, and when we reach the maximum, we exit the loop. - Extracting an object: We extract the high-score entry object from the class using its index, and we can then use this to reference the object's values through the properties provided—specifically,
nameandscore. - Binding: We bind the name as text and the score as an integer to the parameters in our SQL statement. This is virtually identical to our previous example, except we are using the
sqlite3_bind_intmethod for our integer. - Moving along the array: As we are looping through the array's members, we must remember to increase the index that not only selects the next object in the list, but is also used when determining whether to exit the loop.
Also notice that the same code exists to reread the data and output it to the log file, which, in the case of Xcode 4, is the debug window. This obviously isn't required for the actual implementation and is left in only for testing purposes. For clarity, here's the code that does this:
// READ FROM TABLE

sqlite3_stmt *readstmt;

const char *readSQL = "SELECT NAME, SCORE FROM HIGHSCORE";

sqlite3_prepare_v2(db, readSQL, -1, &readstmt, NULL);

while (sqlite3_step(readstmt) == SQLITE_ROW)

{

        NSString *name = [[NSString alloc] initWithUTF8String:(const char

*)sqlite3_column_text(readstmt,0)];

        NSString *score = [[NSString alloc] initWithUTF8String:(const char

*)sqlite3_column_text(readstmt,1)];

NSLog (@"NAME: %@ SCORE: %@", name, score );

}
Testing the High-Score Class
Doesn't our class look lovely? Well, at least it's better than holding a sequence of strings that you then need to interpret. Now let's see if it works.
The code in Listing 7-5 represents a test harness to execute our high-score code and see if it works. Where you place it in your project is pretty much up to you, but you would see something like this in the initialization of your game—for example, to preload the default high scores if none exist in a table.
Listing 7-5. Test Harness for the High-Score Code
// Initialize our high score

HighScore *hs = [[HighScore alloc]init];

// Create 5 default entries

HighScoreEntry *e1 = [[HighScoreEntry alloc]initWithParameters:@"Mark":900];

    [hs addHighScoreEntry:(e1)];


HighScoreEntry *e2 = [[HighScoreEntry alloc]initWithParameters:@"Rachel":700];

    [hs addHighScoreEntry:(e2)];


HighScoreEntry *e3 = [[HighScoreEntry alloc]initWithParameters:@"Oliver":500];

    [hs addHighScoreEntry:(e3)];


HighScoreEntry *e4 = [[HighScoreEntry alloc]initWithParameters:@"Harry":300];

    [hs addHighScoreEntry:(e4)];


HighScoreEntry *e5 = [[HighScoreEntry alloc]initWithParameters:@"Tanya":100];

    [hs addHighScoreEntry:(e5)];


// Persist our initial high score to the database

[hs persist];
If you execute the code in Listing 7-5 with the debug code that rereads the data after persisting it, you should see debug output similar to the following:
2011-08-17 19:59:37.237 DataStorage[676:207] NAME: Mark SCORE: 900

2011-08-17 19:59:37.237 DataStorage[676:207] NAME: Rachel SCORE: 700

2011-08-17 19:59:37.238 DataStorage[676:207] NAME: Oliver SCORE: 500

2011-08-17 19:59:37.238 DataStorage[676:207] NAME: Harry SCORE: 300

2011-08-17 19:59:37.239 DataStorage[676:207] NAME: Tanya SCORE: 100
In your game, you would hold the instance variable for the high scores with a class that has suitable visibility, and you would initialize it with the default values only if the table didn't exist. You would also want to release the high-score class variable at a suitable point when your application terminates.
But what about reading the high-score data if your application isn't being run for the first time? This requires a few changes. First, when persisting the data, we need to clear the table's contents so the table is ready to receive the new data. This is easily done by adding the following code between the table being created (if it needs to be created) and before we start writing any content:
// DELETE from the table

const char *sqldelete = "DELETE FROM HIGHSCORE";

sqlite3_exec(db, sqldelete, NULL, NULL, &errMsg);
We can also use the code we wrote to read the table and dump it to the log file to help us implement a method that reads the data from the table to initialize the high score. We'll call this method readHighScores, and its implementation is shown in Listing 7-6.
Listing 7-6. Reading the High-Score Data from the Table
#import "MainViewController.h"

#import "HighScore.h"


// readHighScores method

-(void)readHighScores

{

    // Open our database

    sqlite3 *db;

    int result = sqlite3_open("mydb.sqlite3", &db);

    if (result == SQLITE_OK)

    {

        // We've opened the database, so let's clear our array

        [scores removeAllObjects];


        // READ FROM TABLE

        sqlite3_stmt *readstmt;

        const char *readSQL = "SELECT NAME, SCORE FROM HIGHSCORE";

        sqlite3_prepare_v2(db, readSQL, -1, &readstmt, NULL);

        while (sqlite3_step(readstmt) == SQLITE_ROW)

        {

            NSString *name = [[NSString alloc] initWithUTF8String:(const char

 *)sqlite3_column_text(readstmt,0)];

            int score = (const int)sqlite3_column_int(readstmt,1);

            HighScoreEntry *e = [[HighScoreEntry alloc]initWithParameters:name:score];

            [self addHighScoreEntry:(e)];

            [e release];

        }

    } else NSLog(@"Failed to open database");

}
This should be pretty easy to follow, as it uses a lot of the code we've used previously. We use a SELECT statement to read the data from the table and cycle through the data while rows of data still exist. In doing so, we then extract the data—in this case, the name as text (converting to UTF-8 to comply with the NSString class) and the score as an integer. We then use these as parameters in creating a HighScoreEntry class instance, which is added to our high-scores array and then released.
Completing the Class
Almost complete, our class can now be initialized with a default high-score table. We can persist this to a local database on our iOS mobile device using SQLite, and we can reread this data back into our high-score display. The presentation of this high score is left to you, but you might consider using a Table view, something we'll touch on in Chapter 10, as we'll be looking at impressive user interface transformations there.
At the moment, there is nothing to limit your number of high-score entries. This is by design, as you can decide what a suitable limit is and use the knowledge gained so far to create a method that implements that constraint when it adds a high-score entry. Also, you will want to sort your high scores, typically in order of score, with the highest first, assuming a bigger score is better.
As this chapter's focus is on persistence, not sorting arrays, we won't go over the complete implementation. But to help you get started, I will provide some pointers on how to approach sorting.
First, to sort an NSMutableArray that contains custom objects (that is, a class that inherits from NSObject), you use the sortArrayUsingSelector method, which performs the sort, but asks that you provide as a parameter the method to use as the comparator, called the selector.
Next, you to need to implement your own comparator that can make sense of the objects in your array. In our case, we would compare the score member variable and sort with the highest first. The beginning of such a method is shown here for you to experiment with and complete.
(NSComparisonResult)compare(HighScoreEntry* otherObject

{

  return ( // DO YOUR COMPARISON HERE between self and otherObject)

}
Comparing the Serialization Example with .NET
In this chapter, we've taken a look at the options for basic data persistence using Objective-C and the iOS SDK, and even looked at some of the persistency properties of .NET. But how would this example compare with a .NET implementation?
Well, the use of a custom class to hold the high-score names and scores would still be valid in .NET. We would use a very similar mechanism, with the exception of syntax differences, and hold the name as a String and the score as an int. We could even have the same method names and approach.
NSMutableArray could be implemented in .NET as an ArrayList, allowing you to Insert() or Remove() items using methods. It also has a Sort() method, similar to our sortArrayUsingSelector method, which takes a comparator as an argument.
Finally, serializing could be done using a similar method to our example, cycling through the entries and writing to some persistency storage, such as a database using an ODBC driver or a similar database API. Alternatively, you could use the XMLSerializer class to serialize the class using a StreamWriter if you wanted to write to a file. Consider the C# example in Listing 7-7, which assumes we have a HighScoreClass that behaves as in our example, but also defines the [Serializable()] attribute surrounding those members we want to serialize.
Listing 7-7. Serializing a Class in C#
// Create our High Score class (note that this won't compile, as we've excluded

// the definition of this for brevity)

HighScoreClass hs = new HighScoreClass()

// Create a new XmlSerializer instance with the type of our high score class

XmlSerializer so = new XmlSerializer(typeof(HighScoreClass));


// Create a new file stream to write the serialized object to

TextWriter WriteFileStream = new StreamWriter(@"C:output.xml");

so.Serialize(WriteFileStream, hs);


// Clean up

WriteFileStream.Close();
The example in Listing 7-7 is very similar to our earlierplistexample usingObjective-C, in that it serializes a class's content to an XML file. This is the most common method within the .NET Framework for serializing a class. The use of embedded SQL statements executed against the database is also very similar in .NET.
Summary
In this chapter, we've taken a tour of the options for persisting data to storage other than the mobile device's memory, which is volatile; that is, when the device is switched off or the application is closed, the memory and any data associated with it is lost.
We've looked at the techniques for persisting data to a file, to a database, and to the Internet. We've also explored the features provided by the iOS to help with this, such as the application's sandbox. We then took a look at the language and SDK support for storing data and writing it to different storage types, including to a plist file and to the embedded database.
We concluded by implementing a couple of simple classes to test the theory, providing support for a table of high scores that could be persisted to storage for our Lunar Lander game. Now between application instances, we can retain a list of the highest scores, thus increasing the competitive enjoyment of our game.