Chapter 8
Extend Your Apps: Extending Your iOS Application with Libraries
The ability to extend your application's functionality beyond that provided through the iOS itself and the iOS SDK is fairly typical of most operating systems. The Microsoft Windows operating system was built with the ability to extend its functionality through the provision of both static and dynamically linked libraries. And this isn't limited to the Windows operating system. Unix, Linux, and many other operating systems offer the same abilities, and Apple's iOS is no different.
Building on some of the examples of using other options discussed in Chapter 3, this chapter provides some guidance on how to build your own libraries and how to use other libraries that complement the iOS operating system. Specifically, we'll look at the following:
- An overview of how libraries work and the different types of libraries
- How libraries are used by the iOS
- How you can use libraries within your applications
- Third-party libraries and their benefits
Overview of Libraries
We'll start by providing some context around the different types of libraries, their purpose, and how they work within the context of the iOS. We'll discuss what a library is, what types exist, and why you may use one rather than the other–or both!
What Is a Library?
A library is a set of routines and variables that may exist locally, or remotely, to realize a prescribed set of functionality—at least in the computer-science sense (just in case you were thinking of a place to go to read books!). These routines and variables are realized in code, irrespective of the programming language used. The way you reference them and the way they are used may differ, and this is what identifies the different types of libraries.
What Types of Libraries Exist?
The types of libraries can essentially be categorized as follows, regardless of whether they are local or remote.
- Static library
- Dynamic library
Let's look at these in turn.
Static Library
Astatic library is a collection of routines and variables that are held in a single file and are referenced within your code. An associated header file provides the method signatures and sometimes variables. At compiletime, your library is referenced, which enables the code that implements the required functionality to be included in your executable. This is usually handled by a program called the linker, which is why they are sometimes called statically linked libraries.
On iOS devices, static libraries have an extension of .a. On Windows, the extension is typically .lib.
Dynamic Library
Adynamic library, as its name suggests, is dynamic in the way it works. The library is still referenced through the use of a header file, but it isn't included into the executable during compilation; it is referenced at runtime. This means that the library is loaded on first use, or before, to resolve the call and execute the referenced functionality.
On iOS, dynamic libraries have an extension of .dynlib. On Windows, they have an extension of .dll.
Use of dynamic libraries has the added advantages of making your executables smaller and allowing common functionality to be more efficiently shared. However, it does introduce some penalties, some of which caused big problems in the early days for Microsoft Windows. These problems were related to version control of different libraries with the same methods but whose implementation was different. In Windows, this was called DLL hell.
While the iPhone and the iPad are quite capable of producing and using dynamic libraries, the Apple Developer Agreement specifically prohibits the use of dynamic libraries other than those provided by the system or official SDKs. This is why the embedded SQLite library is supported. However, if you try to create your own and submit your application to the App Store, it will be rejected.
Why has Apple done this? This has been the source of much debate for many years. Indeed, the Developer Agreement was only recently updated to list some of the restrictions around interpreted code, but it is still quite rigid, and I highly recommend you read it carefully. We'll talk more about the Apple Developer Agreement later in the chapter. For now, either use system-provided dynamic libraries or stick to static libraries, especially if you want your application to be approved upon submission to the App Store.
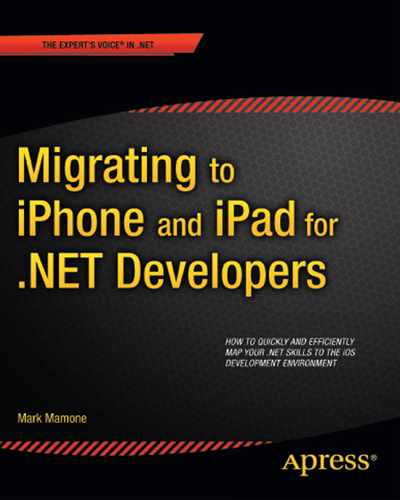
Comparing iOS Libraries with .NET Equivalents
Before we move on to creating your own libraries and taking advantage of third-party options, let's take a look at some of the more common iOS libraries. Not surprisingly, the iOS SDK, like most SDKs, provides a set of libraries as part of its installation. I won't list all the iOS libraries, as you'll quickly find that iOSframeworks are a suite of libraries, with associated header files and supporting documentation. Instead, I'll note several particularly useful libraries available as part of the iOS SDK but not published as iOSframeworks. Table 8-1 lists those libraries, along with brief descriptions and comments about how they compare with .NET.
Many more libraries than those listed in Table 8-1 are available, but with the iOS frameworks and those listed, you should have most of the capability required. Then you always have the option of using third-party libraries or your own custom libraries to extend your application's capability further.
Creating Your Own Static Libraries
You can create your own static libraries for iOS. In this section, we'll cover how to create one using Xcode 4, and then we'll look at creating a comparable library, or assembly, in .NET.
Creating a Static Library with Xcode 4
Xcode 4 makes it easy to create your own static libraries. Start by choosing the Cocoa Touch Static Library template from the Framework & Library iOS category, as shown in Figure 8–1, and then click Next.

Figure 8–1. Selecting a static library template
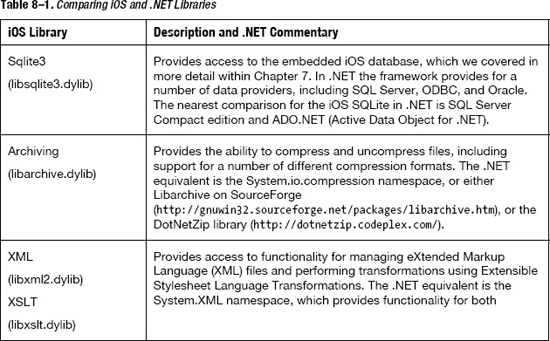
On the following screen, choose the product name for your project, as shown in Figure 8–2. At this point, you may want to introduce a version number in your file name to help manage different versions of the same library, or you could be really clever and start to use the snapshot feature and source code control within Xcode (see http://developer.apple.com/library/mac/#documentation/ToolsLanguages/Conceptual/Xcode4UserGuide/SCM/SCM.html). Once you've decided on the file name, hit the Nextbutton again.
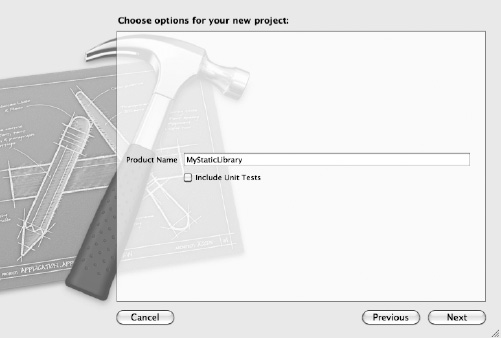
Figure 8–2. Choosing your static library's product name
Finally, choose the location for your project (see Figure 8–3), and then click Create.
Figure 8–3. Choosing your project location
This will create your project structure in a manner similar to the other projects we've built, except the number of predefined files created is reduced. This is because the functionality is for you to define. This framework will simply create an empty static library under the name defined in your Products structure—MyStaticLibrary.a in this example.
Now we need to add some functionality to our library. You could go ahead and create classes and constants for your library. But to keep things simple for our example, let's just add the files we created to support our high-score functionality in Chapter 7 to create our static library.
In Xcode, choose File ![]()
Add Files and navigate to where you stored your high-score source code. In our example, the header code is in a file called HighScore.h, and the implementation is in HighScore.m.
Highlight the two files and select the “Copy items into destination group's folder (if needed)” checkbox, as shown in Figure 8–4. Then click the Add button.
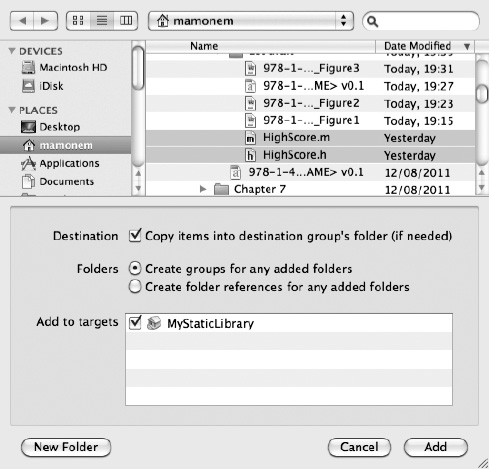
Figure 8–4. Adding files to the static library project
This will add the files to your static library and create a static library with this functionality contained within it. To locate the library produced, assuming you have not changed the default target destination, you can select the library under the Products folder and choose File ![]()
Show in Finder. The Xcode default is to place it in the /Library/Developer/Xcode/DerivedData folder, and then in subfolders beneath that per project, as shown in Figure 8–5.
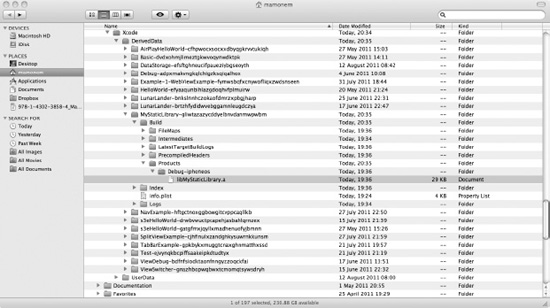
Figure 8–5. Locating your static library
NOTE: In our example, you'll notice the folder name is Debug-iphoneos. This is deliberate to highlight the fact that when building a static library, it defaults to the iPhone operating system, which has an ARM-based CPU. You will need to ensure you change your build settings to compile for the iPhone simulator theme; otherwise, it won't compile, as the simulator runs on the i386 CPU. You can tell if you have it right because the director will change to Debug-iphonesimulator, and it is from here that you should reference your static library.
Let's test the library by creating a very simple application. For my test, I created a utility application. Once you've created a test application, select the top-level project entry in the Build Phases tab, as shown in Figure 8–6.
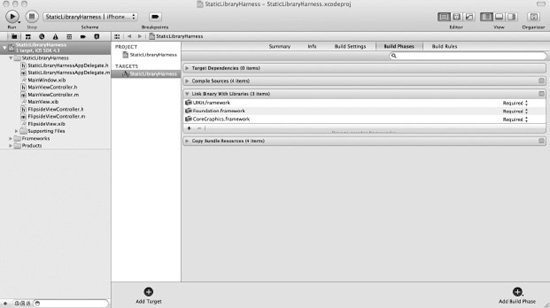
Figure 8–6. Configuring the build phases of your project
Under the expanded Link Binary with Libraries selection, you will notice that three libraries are already referenced by default: UIKit.framework, Foundation.framework, and CoreGraphic.framework. Choosing the + icon will display a dialog box allowing you to choose another library. As shown in Figure 8–7, you can select from the default iOS SDK list or click Add Other.

Figure 8–7. Adding a library to your build phase
Choose Add Other, and you'll see a dialog box that allows you to navigate to the location of the library you wish to include. As shown in Figure 8–8, navigate to the library built by the previous static library project.

Figure 8–8. Choosing the library to add
Select the library and choose Open. This will add the library to the list of libraries linked with the build of your application, as shown in Figure 8–9.

Figure 8–9. List of libraries to be linked to your project build
Now we can complete the project in order to test our library. First, add the HighScore.h header file to your project. Next, we can add some test harness code. For this, copy the code we used in the previous example and place it in the viewDidLoad event method of our main view controller (in MainViewController.m). This means when the application is started and the view loaded, our test harness code will execute. You'll need to uncomment the event code and ensure it looks similar to that shown in Listing 8-1.
Listing 8-1. Test Harness Code
// Implement viewDidLoad to do additional setup after loading the view, typically from

a nib.

- (void)viewDidLoad

{

    [super viewDidLoad];

    HighScore *hs = [[HighScore alloc]init];


    HighScoreEntry *e1 = [[HighScoreEntry alloc]initWithParameters:@"Mark":900];

    [hs addHighScoreEntry:(e1)];


    HighScoreEntry *e2 = [[HighScoreEntry alloc]initWithParameters:@"Rachel":700];

    [hs addHighScoreEntry:(e2)];


    HighScoreEntry *e3 = [[HighScoreEntry alloc]initWithParameters:@"Oliver":500];

    [hs addHighScoreEntry:(e3)];


    HighScoreEntry *e4 = [[HighScoreEntry alloc]initWithParameters:@"Harry":300];

    [hs addHighScoreEntry:(e4)];


    HighScoreEntry *e5 = [[HighScoreEntry alloc]initWithParameters:@"Tanya": ];

    [hs addHighScoreEntry:(e5)];


    [hs persist];


    [hs readHighScores];


    [hs release];


}
Don't forget to also add a reference to the libsqlite3.dylib for our database support, and then build and execute your application. You should see the same output in the debug window as before, because we didn't remove this test code. It should look similar to the following:
2011-08–18 21:29:39.639 StaticLibraryHarness[1034:207] NAME: Mark SCORE: 900

2011-08–18 21:29:39.641 StaticLibraryHarness[1034:207] NAME: Rachel SCORE: 700

2011-08–18 21:29:39.641 StaticLibraryHarness[1034:207] NAME: Oliver SCORE: 500

2011-08–18 21:29:39.642 StaticLibraryHarness[1034:207] NAME: Harry SCORE: 300
You have now created your first static library and referenced it from another application. If your static library contained some “must-have” functionality, simply distributing this library and the header file is all that would be required for another person to use it. It's this mechanism that third-party library makers use to share and deploy their libraries, usually in a provisioning profile.
Creating an Assembly in .NET
Creating an assembly in .NET is straightforward and similar to the method shown for Xcode 4. You can simply start by creating a blank Visual Studio C# solution and adding your library code that defines a class and its functionality within a given namespace, as follows:
Using System;

Using System.Text;

Using System.Windows.Forms;

Namespace TestLibrary

{

        public static class Test

{

        public static void TestMethod()

        {

                MessageBox.Show("You are in my library");

        }

}

}
Building this simple example will result in a .dll file, which is a dynamic library that you can reference in another project, and then call the TestMethod() from a class instance of Test. Make sure you reference the library in your project references.
Note that this is a private assembly and is linked to your application, a bit like a static library. If you wanted this to be shared among many programs (stored in the Global Assembly Cache of your .NET environment), then you would need to do a little more work and make it a strong-named assembly. This allows it to be versioned and authenticated. We won't go into the details here, but here's a hint: look at the command-line utility called sn.exe.
The Apple Developer Agreement
When registering and paying for your subscription to be part of the Apple Developer Program, you will be provided with a copy of the Apple Developer Agreement, a document that describes what is permissible by Apple when using their tools and technologies. The document is protected by a nondisclosure agreement (NDA), which means you are not allowed to know what's in it before you join. And when you have joined, you're not allowed to share its content! However, copies have been leaked to the Internet through Freedom of Information Act requests.
Around the use of libraries more broadly, the Agreement in its more relaxed form (which was put into effect in 2010), defines certain conditions under paragraph 3.3 (Program Requirements for Applications), which describes some restrictions to consider when writing your application. These conditions are as follows:
- Applications made with the iOS SDK can be distributed only through the App Store, essentially meaning that black-market application distribution networks such as Cydia are in breach of the agreement.
- Reverse-engineering is not permitted. Also, enabling others to do reverse-engineering is not permitted.
- Apple may revoke your application's membership from the App Store at any time, even after it has already been approved.
- You may use only document APIs and in the manner prescribed. You must not call any private APIs.
NOTE: It wasn't until much later in 2010 that the requirements summarized here went into effect. Previously, Apple was specific about the languages supported, which meant third-party frameworks such as MonoTouch were in danger of being noncompliant.
If you don't follow these restrictions, you'll be in breach of the Agreement, and Apple may choose to reject any application submitted to Apple's App Store. But as long as the resulting application does not download any code and conforms to API usage, it should be permissible.
We'll talk more about the Apple Developer Agreement in Chapter 9, which covers deployment.
Third-Party Libraries
We've established that Apple finally saw sense and lifted previous restrictions, which means that third-party libraries are more broadly supported. We've also established which kinds of libraries exist and how you can use them under the Apple Developer Agreement.
In Chapter 3, we looked at third-party solutions for writing applications. These third-party frameworks come with a suite of libraries that provide the required functionality, so they are always an option. But what if you want a smaller, more specific library to provide functionality that will extend your application? Well, you'll be pleased to hear that they exist. Indeed, using the information you garnered about writing libraries, you could even publish and make money from your own third-party libraries.
First, we'll look at the two categories of third-party libraries, and then we'll review some of the more useful libraries currently available.
Categories of Third-Party Libraries
Third-party libraries fall into two general categories: commercial and open source.
As its name suggests, a commercial library is one that is owned by an organization that places restrictions on its use and typically charges a fee for obtaining it, using it, or both. For example, in the .NET world, it is common for developers to buy extensions to the .NET library in the form of assemblies that do things like draw fancy graphics or compress files. The same is true of Apple, and many commercial organizations sell libraries for use on the iOS platform. But be sure to check the license agreements associated with any libraries and their use of such licenses.
An open source library is a library whose use is restricted to a degree, for example, under the GNU General Public License (GPL), but it is free to use.
Apple does, however, have its Developer Agreement, and your library must be conformant. It also still reserves the right to refuse or to revoke any application in the App Store. Again, this hasn't won any favors in the community, but as you can see from the App Store, it certainly has not put off people from writing applications with libraries, free or otherwise.
Useful Third-Party Libraries
So we've touched on writing your own library, and consider the different types of libraries you might find on the Internet. Let's take a look at some example third party libraries that exist and provide both a brief synopsis and an Internet URL for you to access them.
NOTE: I do not recommend or imply any warranty on the use of these libraries. If you choose to use them, this is your choice, and I cannot guarantee their functionality, performance, or that they will be accepted by Apple for the App Store.
- ZBar–Barcode Reader: This can be found at
http://zbar.sourceforge.net/iphone/index.htmland is both a Library and Example Application (available from the App Store) that enables you to write software to read a variety of different bar codes using the iPhone's camera and even link them to stores such as Amazon or search engines such as Google. - GData - Google Data: This can be found at
http://code.google.com/p/gdata-objectivec-client/and provides an API as an Objective-C based static library that allows access to a variety of Google-based services and for you to read and write data. For example, Google Analytics, Google Books, Blogger, and Google Docs are all supported. - Three20 – Facebook API: This can be found at
http://three20.info/, and while known as the Facebook API, this isn't strictly accurate. However, it is used by the Facebook Application and many others to provide powerful view controllers, a photo browser, and an Internet-aware table. - iPhone Analyzer: This can be found at
http://sourceforge.net/projects/iphoneanalyzer/and allows you to analyze the contents of your iPhone device in great detail, including plists, databases, and the internal file structure of your device. However, at present iOS 4 is not supported. - Leaves: This can be found at
https://github.com/brow/leavesand is a library for both the iPhone and iPad that provides page-turning functionality likeiBooks. - Core-plot: This can be found at
http://code.google.com/p/core-plot/and provides a plotting framework for the 2D visualization of data on both the iOS and Max OSX.
Looking Elsewhere for Libraries
While I've highlighted some third-party libraries, many more exist in common repositories for not just iPhone- or iPad-based libraries and source code, but also to support other platforms, such as Mac OS X, Windows, and Linux. Here are two popular sites:
- SourceForge: This is a library for sharing free open source software. It supports many different platforms, including mobile iOS devices like the iPhone and iPad. It can be found at
http://sourceforge.net/. - Github: Using the Git repository, GitHub is the home of many libraries, including a lot of useful mobile iOS-based libraries. It can be found at
https://github.com/.
Summary
In this chapter, we've explored the concept of libraries, including iOS-provided libraries, third-party libraries, and your own creations. We looked at the different types of libraries and similarities to the .NET Framework and how to create your own static library, either for use within your application or for distribution.
The different types of third-party libraries were then introduced, and we've provided some examples of both the libraries, as well as popular repositories for libraries and source code for iOS-based devices. Now we clearly didn't list every library available. There are far too many to list, and the number is growing by the day. However, this introduction should help you to explore and discover libraries that suit your needs.
If you wish to write your own libraries, you can share these with others across the Internet. However, as per the Apple Developer Agreement, please do be cognizant of the restrictions applied to any application you write for a mobile device, and be conscious of the powers that Apple has when submitting your application to the App Store.