
Now that you understand what pose estimation is, let's see how you can use it to track planar objects. Let's consider the following planar object:
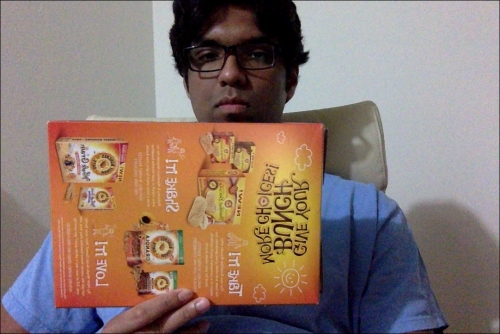
Now if we extract feature points from this image, we will see something like this:


As we can see, the cardboard is tilted in this image. Now if we want to make sure our virtual object is overlaid on top of this surface, we need to gather this planar tilt information. One way to do this is by using the relative positions of those feature points. If we extract the feature points from the preceding image, it will look like this:

As you can see, the feature points got closer horizontally on the far end of the plane as compared to the ones on the near end.

So we can utilize this information to extract the orientation information from the image. If you remember, we discussed perspective transformation in detail when we were discussing geometric transformations as well as panoramic imaging. All we need to do is use those two sets of points and extract the homography matrix. This homography matrix will tell us how the cardboard turned.
Consider the following image:

We start by selecting the region of interest.

We then extract feature points from this region of interest. Since we are tracking planar objects, the algorithm assumes that this region of interest is a plane. That was obvious, but it's better to state it explicitly! So make sure you have a cardboard in your hand when you select this region of interest. Also, it'll be better if the cardboard has a bunch of patterns and distinctive points so that it's easy to detect and track the feature points on it.
Let the tracking begin! We'll move the cardboard around to see what happens:
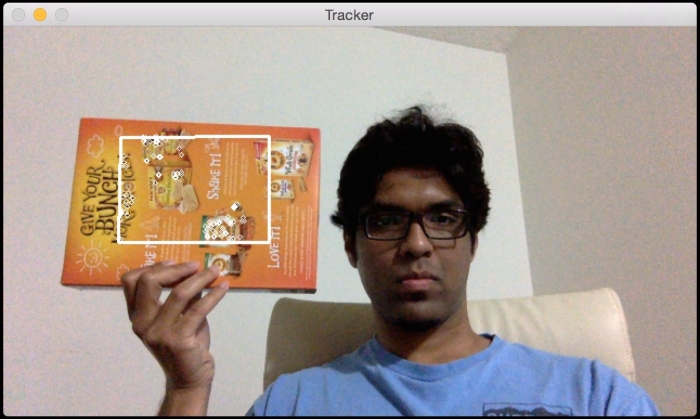
As you can see, the feature points are being tracked inside the region of interest. Let's tilt it and see what happens:

Looks like the feature points are being tracked properly. As we can see, the overlaid rectangle is changing its orientation according to the surface of the cardboard.
Here is the code to do it:
import sys
from collections import namedtuple

import cv2
import numpy as np

class PoseEstimator(object):
    def __init__(self):
        # Use locality sensitive hashing algorithm
        flann_params = dict(algorithm = 6, table_number = 6,
                key_size = 12, multi_probe_level = 1)

        self.min_matches = 10
        self.cur_target = namedtuple('Current', 'image, rect, keypoints, descriptors, data')
        self.tracked_target = namedtuple('Tracked', 'target, points_prev, points_cur, H, quad')

        self.feature_detector = cv2.ORB(nfeatures=1000)
        self.feature_matcher = cv2.FlannBasedMatcher(flann_params, {})
        self.tracking_targets = []

    # Function to add a new target for tracking
    def add_target(self, image, rect, data=None):
        x_start, y_start, x_end, y_end = rect
        keypoints, descriptors = [], []
        for keypoint, descriptor in zip(*self.detect_features(image)):
            x, y = keypoint.pt
            if x_start <= x <= x_end and y_start <= y <= y_end:
                keypoints.append(keypoint)
                descriptors.append(descriptor)

        descriptors = np.array(descriptors, dtype='uint8')
        self.feature_matcher.add([descriptors])
        target = self.cur_target(image=image, rect=rect, keypoints=keypoints,
                    descriptors=descriptors, data=None)
        self.tracking_targets.append(target)

    # To get a list of detected objects
    def track_target(self, frame):
        self.cur_keypoints, self.cur_descriptors = self.detect_features(frame)
        if len(self.cur_keypoints) < self.min_matches:
            return []

        matches = self.feature_matcher.knnMatch(self.cur_descriptors, k=2)
        matches = [match[0] for match in matches if len(match) == 2 and
                    match[0].distance < match[1].distance * 0.75]
        if len(matches) < self.min_matches:
            return []

        matches_using_index = [[] for _ in xrange(len(self.tracking_targets))]
        for match in matches:
            matches_using_index[match.imgIdx].append(match)

        tracked = []
        for image_index, matches in enumerate(matches_using_index):
            if len(matches) < self.min_matches:
                continue

            target = self.tracking_targets[image_index]
            points_prev = [target.keypoints[m.trainIdx].pt for m in matches]
            points_cur = [self.cur_keypoints[m.queryIdx].pt for m in matches]
            points_prev, points_cur = np.float32((points_prev, points_cur))
            H, status = cv2.findHomography(points_prev, points_cur, cv2.RANSAC, 3.0)
            status = status.ravel() != 0
            if status.sum() < self.min_matches:
                continue

            points_prev, points_cur = points_prev[status], points_cur[status]

            x_start, y_start, x_end, y_end = target.rect
            quad = np.float32([[x_start, y_start], [x_end, y_start], [x_end, y_end], [x_start, y_end]])
            quad = cv2.perspectiveTransform(quad.reshape(1, -1, 2), H).reshape(-1, 2)

            track = self.tracked_target(target=target, points_prev=points_prev,
                        points_cur=points_cur, H=H, quad=quad)
            tracked.append(track)

        tracked.sort(key = lambda x: len(x.points_prev), reverse=True)
        return tracked

    # Detect features in the selected ROIs and return the keypoints and descriptors
    def detect_features(self, frame):
        keypoints, descriptors = self.feature_detector.detectAndCompute(frame, None)
        if descriptors is None:
            descriptors = []

        return keypoints, descriptors

    # Function to clear all the existing targets
    def clear_targets(self):
        self.feature_matcher.clear()
        self.tracking_targets = []

class VideoHandler(object):
    def __init__(self):
        self.cap = cv2.VideoCapture(0)
        self.paused = False
        self.frame = None
        self.pose_tracker = PoseEstimator()

        cv2.namedWindow('Tracker')
        self.roi_selector = ROISelector('Tracker', self.on_rect)

    def on_rect(self, rect):
        self.pose_tracker.add_target(self.frame, rect)

    def start(self):
        while True:
            is_running = not self.paused and self.roi_selector.selected_rect is None

            if is_running or self.frame is None:
                ret, frame = self.cap.read()
                scaling_factor = 0.5
                frame = cv2.resize(frame, None, fx=scaling_factor, fy=scaling_factor,
                        interpolation=cv2.INTER_AREA)
                if not ret:
                    break

                self.frame = frame.copy()

            img = self.frame.copy()
            if is_running:
                tracked = self.pose_tracker.track_target(self.frame)
                for item in tracked:
                    cv2.polylines(img, [np.int32(item.quad)], True, (255, 255, 255), 2)
                    for (x, y) in np.int32(item.points_cur):
                        cv2.circle(img, (x, y), 2, (255, 255, 255))

            self.roi_selector.draw_rect(img)
            cv2.imshow('Tracker', img)
            ch = cv2.waitKey(1)
            if ch == ord(' '):
                self.paused = not self.paused
            if ch == ord('c'):
                self.pose_tracker.clear_targets()
            if ch == 27:
                break

class ROISelector(object):
    def __init__(self, win_name, callback_func):
        self.win_name = win_name
        self.callback_func = callback_func
        cv2.setMouseCallback(self.win_name, self.on_mouse_event)
        self.selection_start = None
        self.selected_rect = None

    def on_mouse_event(self, event, x, y, flags, param):
        if event == cv2.EVENT_LBUTTONDOWN:
            self.selection_start = (x, y)

        if self.selection_start:
            if flags & cv2.EVENT_FLAG_LBUTTON:
                x_orig, y_orig = self.selection_start
                x_start, y_start = np.minimum([x_orig, y_orig], [x, y])
                x_end, y_end = np.maximum([x_orig, y_orig], [x, y])
                self.selected_rect = None
                if x_end > x_start and y_end > y_start:
                    self.selected_rect = (x_start, y_start, x_end, y_end)
            else:
                rect = self.selected_rect
                self.selection_start = None
                self.selected_rect = None
                if rect:
                    self.callback_func(rect)

    def draw_rect(self, img):
        if not self.selected_rect:
            return False

        x_start, y_start, x_end, y_end = self.selected_rect
        cv2.rectangle(img, (x_start, y_start), (x_end, y_end), (0, 255, 0), 2)
        return True

if __name__ == '__main__':
VideoHandler().start()To start with, we have a PoseEstimator class that does all the heavy lifting here. We need something to detect the features in the image and something to match the features between successive images. So we use the ORB feature detector and the Flann feature matcher. As we can see, we initialize the class with these parameters in the constructor.
Whenever we select a region of interest, we call the add_target method to add that to our list of tracking targets. This method just extracts the features from that region of interest and stores in one of the class variables. Now that we have a target, we are ready to track it!
The track_target method handles all the tracking. We take the current frame and extract all the keypoints. However, we are not really interested in all the keypoints in the current frame of the video. We just want the keypoints that belong to our target object. So now, our job is to find the closest keypoints in the current frame.
We now have a set of keypoints in the current frame and we have another set of keypoints from our target object in the previous frame. The next step is to extract the homography matrix from these matching points. This homography matrix tells us how to transform the overlaid rectangle so that it's aligned with the cardboard surface. We just need to take this homography matrix and apply it to the overlaid rectangle to obtain the new positions of all its points.