
CHAPTER 14
Receiving
Oracle Receiving is the part of Oracle E-Business Suite concerned with the physical receipt of materials and acknowledging the receipt of services. It includes inspection capability to ensure that material is of appropriate quality before being delivered. You can receive against a supplier shipment, a shipment from another organization, and a shipment returned by a customer.
You are able to stage the inventory in a receiving location or route the receipt directly to central stores, a point of use on the shop floor, the requestor, or the WIP job or schedule awaiting outside processing. You can control at what point shipments are available to be received against and matched to invoices. You can receive unexpected shipments as unordered receipts. Receiving provides transactions to return substandard or late materials to suppliers with Return to Vendor transactions. In Oracle Warehouse Management (OWM), transactions can be received in a forms-based user interface or through RF devices in mobile receiving in WMS.
You can record the Advanced Shipment Notification issued from a supplier updating the expected quantity and time for the delivery.
Managing Inbound Shipments
The total receiving process consists of three main activities:
![]() Receiving The process of recording the arrival of material at your location.
Receiving The process of recording the arrival of material at your location.
![]() Inspection Accepting or rejecting the material.
Inspection Accepting or rejecting the material.
![]() Delivery (Putaway) Delivering the material to its requestor (for expensed items); moving the material to its stocking location, point of use, or intermediate location (for inventory items); or delivering outside processing directly to the WIP job.
Delivery (Putaway) Delivering the material to its requestor (for expensed items); moving the material to its stocking location, point of use, or intermediate location (for inventory items); or delivering outside processing directly to the WIP job.
The combination of activities you require for an item is called its receipt routing. A standard routing requires separate receiving and delivery steps; inspection adds the requirement for an inspection step to the standard process; and a direct routing performs the receipt and delivery in one step. The overall process is illustrated in Figure 14-1.
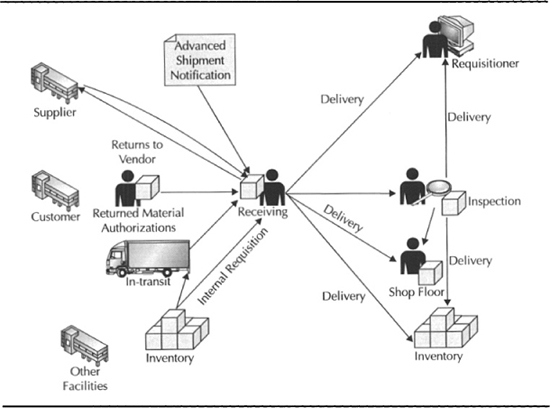
FIGURE 14-1. Overview of Receiving in Oracle Purchasing
Oracle Receiving allows you to control your receiving process with a number of parameters, item and supplier attributes, and profiles. For example, you can use direct receiving for some items and require inspection for others; you can even require inspection for an item from one supplier, but waive inspection for the same item from another supplier. Integration with Oracle Quality lets you execute detailed collection plans as part of the inspection process.
Furthermore, you can set over-receipt and early/late tolerances at several levels and determine if a violation of a tolerance should be treated as an error or a warning, or if it should be simply ignored.
Receipts
If you need to enter quantities received and other shipment information, you will need to invoke the Receipts form. To navigate to the standard receiving forms, click the Find button from the Find Expected Receipts window. You can record receipt header information before being presented with a list of expected receipts. You can confirm the entire receipt by clicking the Express button or click Headers to return to the receipt header. An example of the Receiving Transactions window is shown in Figure 14-2.

FIGURE 14-2. An example of the Receiving Transcation window
Finding Expected Receipts
You find expected receipts in the Receiving form in the Receipts menu. The form has two main tabs: Supplier and Internal, and Customer. Customer—visible only if Order Management is installed—will search for Return Material Authorizations to receive.
Supplier and Internally Sourced Receipts
To search for receipts, choose a source type of Internal, Supplier, or All. Enter the supplier. This is the source inventory organization for internal requisitions. For supplier-sourced shipment, you can enter the purchase order, line number, and shipment number. For internally sourced shipments, you can enter the requisition number and line number. The list of valid values for purchase orders is restricted to those that have at least one approved shipment. The list of valid values for shipments and requisition lines is restricted to those to be delivered to the organization you are currently transacting on behalf of. You can also search based on the supplier’s shipment or ASN number.
Customer Returns
To search for customer returns to receive, enter the Return Material Authorization (RMA) number, customer number, RMA line number, customer item number, and line type. For example, line type might be Return for Rework and Reissue.
Line-Level Restrictions
You can further narrow your search to restrict for item, due date, and shipment.
![]() Item restrictions Are item number, category, description, and supplier item number.
Item restrictions Are item number, category, description, and supplier item number.
![]() Date restrictions Can be to shipments due on the current date or any arbitrary date range. The due date is the promised date, if it exists. If no promise date has been entered, the need-by date is used for purchase orders and the request date is used for RMAs.
Date restrictions Can be to shipments due on the current date or any arbitrary date range. The due date is the promised date, if it exists. If no promise date has been entered, the need-by date is used for purchase orders and the request date is used for RMAs.
![]() Shipment restrictions Are container, truck, and bar code number.
Shipment restrictions Are container, truck, and bar code number.
Receipt Headers
In the Receipt Headers window, you can add to an existing open receipt or enter a receipt number if automatic receipt numbering is not enabled. Otherwise, a receipt number will be generated and the field will not be protected. You may enter a shipment number, packing slip number, waybill/airbill number, bill of lading, the number of containers received, and the person receiving the shipment. This header information is optional; you can also close the Receipt Headers window and proceed directly to the lines.
Receipt Lines
On the Receipts window, you can see order type and number, supplier or source inventory organization with the due date, item description, hazard classification, UN number, destination location, and receipt routing. You may see a plus sign (+) indicating there are multiple distributions for the shipment line. The tabs described in the following sections show many other details of the shipment.
Line Information
Line information includes the quantity and UOM, destination type, (inventory, expense, or shop floor), item and revision if specified, delivery location, and requestor. If the destination type is inventory, the destination subinventory and locator may also be specified. The category of the item and ASN type is displayed. The country of origin for the receipt can be entered here. For example, Neptune may receive a shipment of optical assemblies from Malaysia, but it may receive the next shipment of the same item from Japan.
Line Details
Details of the shipment line include packing slip, supplier lot, and transaction reason. You might enter a transaction reason if you were receiving only part of a shipment because of quality reasons. The supplier lot gives you lot tracability back into the suppliers lot tracking system.
Currency
You can override the exchange rate on an order if you match invoices to receipts. The rate type must be User and you must have the profile PO: Allow Rate Override for User Rate Type set to Yes.
Order Information
Order information for the shipment includes order type, number, release number, order line number, shipment number, supplier, quantity ordered, UOM, due date, and supplier item number.
Outside Processing Information
Outside processing information includes job or schedule, production line, and operation sequence number. For example, Neptune manages the sheet cutting, drilling, and folding of the machine chassis in its machine shop but sends the folded work out to be anodized.
Shipment Information
The shipment information includes all the document references that are needed to track the material while in transit. These include the carrier, a reference to the truck and the container in the truck, bills of lading, freight and waybill, and the barcode label.
Express Receiving
You can select all lines and receive them either to a receiving location or to their final destination. If you have provided source information in the Find window, you can click the Express button from the Expected Receipts window. Purchasing then presents you with a choice of receiving or final destination and selects all the shipment lines. You can deselect them individually, or you can unexpress them all by clicking the renamed Express button. Purchasing will perform the following checks and report the errors to you:
![]() Revision subinventory or locator is required and cannot be defaulted.
Revision subinventory or locator is required and cannot be defaulted.
![]() Lots or serials are required.
Lots or serials are required.
![]() Receipt date tolerances are exceeded, and purchasing options are set to reject.
Receipt date tolerances are exceeded, and purchasing options are set to reject.
![]() Ship-to location is missing for receiving location.
Ship-to location is missing for receiving location.
![]() Delivery location is missing for expense receipts to final destination.
Delivery location is missing for expense receipts to final destination.
![]() Receipt header and purchase order suppliers are different.
Receipt header and purchase order suppliers are different.
Unordered Receipts
Purchasing allows the receiving staff to record the receipt of materials for which an expected receipt cannot easily be located. You can later research these and match them to purchase order shipments and RMAs.
Receiving Unordered Shipments
To receive an unordered shipment, choose Unordered from the Find window in the Receipts form. Purchasing will present you with a receipt header. From there you can navigate to the receipt lines.
NOTE
Make sure that you choose the correct tab when you click the Unordered button. Unordered purchase receipts can later be matched only against purchase receipts, and likewise for unordered RMA receipts.
Matching Unordered Receipts against Expected Shipments
To match unordered receipts against expected shipments, navigate to the Match Unordered Receipts form in the Receiving menu. The form presents a Find window where you can locate unordered receipts based on receipt number, supplier (or customer for RMAs), item, item description, category or supplier item number, receiver location, and transaction dates. Enter your search criteria, and click Find to list the receipts you want to match. The Unordered Receipts window is split into the receipts section on the left and the expected shipments on the right. Enter the order (or RMA number), release, line, and shipment to match against. You can review the receipt and purchase order from the Tools menu.
Receiving Transactions
Purchasing provides a set of transactions to trace materials from the time of receipt to the time of final delivery. Movements within receiving and through inspection are recorded as receiving transactions. A receipt quantity may be split as it is stored and inspected in many locations.
Finding Receipts to Transact
To find receipts to transact, navigate to the Receiving Transactions form in the Receiving menu. Purchasing presents a Find window that is very similar to the Find window in the Receiving form. The main differences are in the tabs in the lower part of the window. There is a tab for Receipt Details that includes the receiver. The transaction Details tab includes Receipt Routing: Direct or Receiving.
When you click the Find button, Purchasing will present a list of receipts. The receipts listing is similar to the Expected Receipts window. You can enter a quantity up to the receipt quantity and transfer it to another location. Purchasing records the parent transaction on possibly many children.
Inspecting Receipts
Purchasing offers two modes for entering quality and inspection information. If Oracle Quality is installed and the value of the profile QA: PO Inspection is set to Oracle Quality, the quality icon will appear in the toolbar and as an entry in the Tools menu. You can invoke it by clicking the Inspect button. Oracle presents a collection plan from Quality. Only collection plans that have been associated with the receiving transaction will be displayed. If mandatory collection plans are used, the quality data must be entered and saved before the transaction can complete.
Delivery
If the receipt does not require inspection, it may be delivered. When you select a line to receive, you may be presented with shortage information for this item. You must enter a transaction quantity. The unit, destination type, and location will be defaulted from the receipt but can be overridden. In the Details tab, you can update the packing slip number, supplier lot number, and a reason code for the transaction.
Reviewing Receiving Transactions
You can review your receiving transactions from the Receiving Transactions Summary form in the Receiving menu. The Find window is similar to the Find windows in the other receiving transactions, except for being able to return headers or transactions as results.
Transaction Header Results
The Transaction Header Results window is a folder form. Any column from the receipt header can be chosen to be displayed in the window, including receipt number, date, supplier and supplier site, shipment number, and ship date. You can review the transactions for any receipt header by clicking the Transactions button.
Transaction Line Results
The Transaction results is also a folder window. You can choose or eliminate any column from the transaction. Transaction type is always displayed. Transaction types will include corrections, returns to vendors, receipts, transfers, and deliveries. Other columns include transaction quantity, UOM, transaction date, item, and destination.
Correcting Receiving Transactions
You can correct any receiving transaction you have recorded by entering the change to the existing transaction, positive or negative, in the Corrections form on the Receiving menu. The form has the same Find window as the Receiving Transactions form.
Returns to Vendor
Purchasing provides a way to return defective material to a supplier. If material has been received and in inspection is noted to be substandard, you can acknowledge that the material has been retuned to the vendor. The same transaction can be used to return returned material to customers. To enter a return, navigate to the Return form in the Receipts menu. The find criteria are similar to the other receiving functions. After you click the Find button, you will be presented with a list of receipts that may be returned. When you enter a return quantity for a purchase order, the open quantity on the line is increased by the return quantity. For returns against the RMA, the RMA received quantity is decreased.
NOTE
There is an RMA number in the transaction details region to record the RMA number issued by your supplier. It is not the RMA number that you issued to your customer.
Managing Shipments
You can define inventory movements between facilities to be direct or through in-transit. Direct movements move directly into inventory in the destination organization. For example, Neptune has defined an organization for the manufacturing facility and another organization for finished goods inventory stored within the same building. In-transit movements create a shipment that is received at the other facility. When a supplier submits an ASN, it also creates a shipment. The shipment can be updated by navigating to the Manage Shipments form in the Receiving menu. Purchasing presents you with the familiar Find window. You can update the expected receipt date, bill of lading number, freight carrier, packing slip, number of containers, and ship-to location.
Receiving Options
You can define many options to control the behavior of receiving for each operating unit. You can specify how early and late a shipment can be and whether the system should prevent the receipt or warn the receiver. You can control the quantity over the ordered quantity that is allowable and again whether the receiver should be warned or prevented from entering the receipt. You can allow or disallow receiving substitute items and unordered items. You can allow receivers to view expected quantities or allow blind receiving. The actions for shipping other than to the requested ship-to are specified here. Document numbering for receipt documents and the account code that stores the value of inventory in receiving is stored here. There are some options that can be set in many places. For example, Days Early Allowed can be set on the item, supplier, and purchasing options. Purchasing will default the Days Early Allowed onto the purchase order from the item first. If no value has been set for the item, it will look at the supplier. If no value has been set for the supplier, it will look to purchasing options.
Summary
In this chapter, you examined how inbound shipment are handled in Oracle Purchasing and Receiving and how to find expected receipts and the sources of those receipts. You also reviewed standard and express methods for receiving; how to handle receipts that are unexpected; how the received quantity is moved within receiving for storage, inspection, and delivery; how to correct receiving transactions; and how to reject material and send it on its way back to the vendor. The options that control the behavior of the receiving transactions were also covered.