
CHAPTER 13
Procurement Management
Oracle Purchasing is the procurement and supply management solution. It has functionality to serve the requisitioner who needs a pencil as well as the procurement manager who is sourcing a component supplier through Request for Quotes (RFQs) and negotiating long-term agreements. The procurement system is also fed from the planning systems that request material for production. It is tightly integrated with Oracle Workflow, routing requisitions and purchase orders up an approval chain. Purchasing has embedded alerting mechanisms that will inform purchasing managers when long-term agreements are coming to an end. Oracle Purchasing includes the flip side of the Release Management product in Supplier Scheduling. It gives access to suppliers through the Internet Supplier Portal and provides ways of reducing manual processing through Pay on Receipt self-billing functionality and procurement card capability. Figure 13-1 gives an overview of the components and the flow through the sourcing and purchasing system.
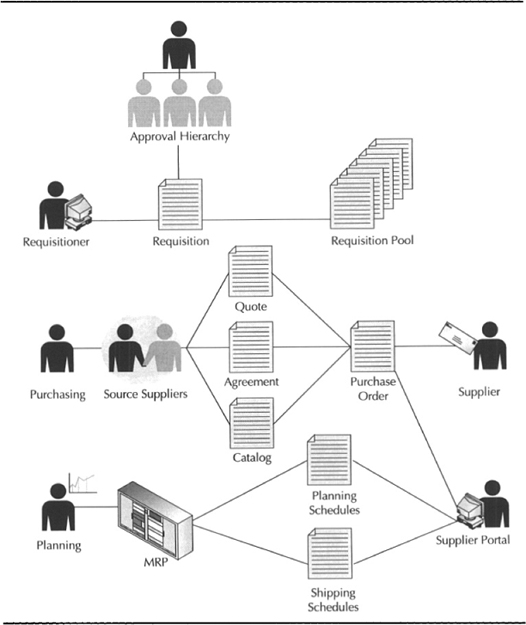
FIGURE 13-1. Purchasing overview
Solutions for Requisitioners
Oracle Purchasing requisition capability allows you to do the following:
![]() Direct the buying activity to professional buyers
Direct the buying activity to professional buyers
![]() Pool the demand into fewer purchase orders, minimizing ordering costs
Pool the demand into fewer purchase orders, minimizing ordering costs
![]() Channel demand into long-term agreements
Channel demand into long-term agreements
![]() Ensure that purchases are approved and funded
Ensure that purchases are approved and funded
Requisitions can be manually created but are also fed from other systems. Master Scheduling/MRP, inventory planning, and outside processing in Work in Process all create requisitions. Requisitions can be sourced from suppliers or could be sourced from inventory. When the requisitions are sourced from inventory. an intrenal sales order is also created to ship the requisitioned item.
Oracle Purchasing has two modes of entering requisitions: forms-based requisitions in the professional forms and Web-based requisitions in Interner Procurement. The Web-based requisitions are built to be usable with zero training by an occasional user.
Internet Requisitions
From a self-service menu or Personal Home Page (PHP), you can choose the Internet Procurement option. The look and feel of the Web pages are the same as Oracle Exchange Marketplace and will be familiar from many consumer-oriented Web sites.
The Oracle Internet Procurement home page is a central location for requisitioning activity, including finding a specific item, browsing through the catalog, shopping at supplier sites, and creating a one-time requisition. The To Do list contains all the workflow notifications that require your attention. You can see the requisitions that you have created. You can navigate through Internet Procurement two ways. You can use the tabs, or you can use the “train tracks.” These are the series of circles in the right-hand column. Figure 13-2 shows a typical Internet Procurement home page.

FIGURE 13-2. Internet Procurement home page
Shopping in Internet Procurement
If you click Shop, you can choose between shopping from your company’s catalog of items that it buys, shopping from a shopping list, shopping from supplier sites, or buying something that is not in a catalog. For example, you may have to buy the services of a waste management company to deal with a chemical spill. This service is unlikely to be any catalog. The administration of catalogs is described in the “Administering Catalogs” section. You can create lists from the catalog that you regularly buy. When shopping through the internal catalog, you can search directly for the item or browse through categories to locate the item. From either the catalog search results or the shopping list, you can select the items and click the Add To Cart button. You will always be able to review the contents of the shopping cart by clicking the global icon at the top right of the browser. When a shopping cart is active, the icon will be displayed in reverse video. When checking out the shopping cart, the train track symbols guide you through the process.
A core feature of the catalog in Internet Procurement is the searching capability using the Intermedia index. Although a full explanation of the Intermedia index is beyond the scope of this book, it gives the capability to very efficiently search a text string. That string could be the item description, the category that the item is classified within, or attributes that describe the item.
Shopping at Supplier Sites
You can set up links to other sites, such as TPN Register. You can select items from their catalog and return the selected items into a shopping basket in Internet Procurement.
Finding Requisition Status
To find the status of requisitions, you can review the Requisitions at a Glance section of the home page, or you can click the Requisition Status tab. The second-level tabs from here are Notifications, Receiving, Requisitions, and Approvals. You can cancel or withdraw the requisitions from the Notifications tab. You can also receive approved requisitions from here.
Reviewing Notifications
Any workflow activity can send a notification to an individual. This may be just a “for your information only” (FYI), such as a batch load finishing, or a process may be awaiting your input (To Do). An FYI notification may be that a particular purchase order had been approved. A To Do notification may be that a batch load has failed and may need to be resubmitted. You can respond to To Do notifications from within this tab.
Receiving
The Receiving tab allows you to notify the system that your ordered items have been received. The payables invoice submitted from the supplier will be matched against this receipt.
![]() Receive You can receive from the list of approved PO lines in the “My Items to Receive” area, or you can click the Receive link on the train track on the left-hand side.
Receive You can receive from the list of approved PO lines in the “My Items to Receive” area, or you can click the Receive link on the train track on the left-hand side.
![]() Return You can notify the system that you are returning received items to the vendor (RTV). The RTV will be let the Payables department know the quantity that should be paid for when the invoice arrives.
Return You can notify the system that you are returning received items to the vendor (RTV). The RTV will be let the Payables department know the quantity that should be paid for when the invoice arrives.
![]() Correct Receipts If you make a mistake in the receiving of the purchase order items, you can correct the receipt quantities by clicking the Correct Receipts link.
Correct Receipts If you make a mistake in the receiving of the purchase order items, you can correct the receipt quantities by clicking the Correct Receipts link.
![]() View Receipts You can view items that you have received in My Receipts at a Glance area, or you can click the View Receipts link on the train track on the left-hand side.
View Receipts You can view items that you have received in My Receipts at a Glance area, or you can click the View Receipts link on the train track on the left-hand side.
Approvals
If there are any requisitions or purchases orders for which your approval is pending, you will see them listed in this tab.
Setting Your Profile
When setting your profile within Internet Procurement, you can specify your preferred date format, the number of rows returned in a page, and the location that goods you order should be delivered to.
Administering Catalogs
Oracle provides a Web-based environment for managing the catalogs. The catalogs can be built from internal information, or suppliers may publish their catalogs to you. Administering the catalogs includes creating the structure or classification scheme for the catalog, deciding how items in the catalog should be described, and loading the content.
Creating the Catalog Structure
The e-Content Manager responsibility, delivered with Internet Procurement, includes a schema editor. The schema is the classification scheme of the catalog. You can modify this classification scheme by adding categories in the schema editor. Oracle also provides a bulk load capability. You can define the catalog structure in a spreadsheet or XML file and upload it. To get the files for upload, you can click the Download Bulkload Resources.
Categories
Categories can come from Oracle Applications Category definitions, they may come from supplier catalogs when they are loaded into Internet Procurement, or they may be added in the schema editors. To be able to process a requisition into Oracle Applications, the catalog category needs to be a category in the Purchasing functional area. The definition of categories is explained in Chapter 3. As you define Genus categories in the catalog, you can associate the Oracle Applications category.
Descriptors
There are two types of descriptors: local and global. Global descriptors describe all items. An example of a global descriptor might be an item number. A local descriptor describes all items within a category. For example, all electrical products must have wattage, voltage, and phase as descriptors. To add a new global descriptor, click the Schema Editor page. Ensure that you have no category selected and click Edit Base Descriptors. You can define the descriptor as numeric or string, and you can control whether the descriptor will be visible when selecting items. To add a local descriptor, click a category to make the descriptors specific to the category.
Table of Contents
The table of contents is how you navigate through the catalog. The table of contents is a list of item categories. These categories are arranged in a hierarchy. Each category in the hierarchy either may contain lower-level categories or cataloged items. Oracle uses the term “Master category” to describe the first level in the hierarchy, “Intermediate category” to describe the categories that you navigate to, and “Genus category” to describe the categories that have items associated with them. To maintain the category hierarchy, click the Table of Contents page. If you click the New Entry button, you will create a new master-level category. If you click the Edit button next to the category, you can add additional categories to it.
Loading Content into the Catalog
You can upload items and their descriptors by using XML files or spreadsheets. If you download a spreadsheet for a specified category, the category descriptors will be included in the downloaded spreadsheet. The files you download also contain examples of how to load items and descriptors. You can choose to load just the catalog items, the items with their associated prices, or prices and discounts.
When you have prepared your catalog content, you can load it by clicking in the Load Items and Price Lists. You can browse the file system to locate the file. The Catalog Authoring home page shows you the status of your most recent jobs. You can review the status of all your jobs by clicking the View Bulk Load Status page.
Building Catalog Content from Oracle Applications
When building the Internet Procurement catalog from internal sources, it includes the following:
![]() Item from the item master
Item from the item master
![]() Requisition templates
Requisition templates
![]() Catalog quotation information
Catalog quotation information
![]() Approved supplier list
Approved supplier list
To load the catalog you need to create a directory to store the extracted files. You must also set the UTL_FILE_DIRECTORY parameter in the ora.init file and the profile option ECE: Output File Path to point to that directory. You set up the extraction parameters in the Define Catalog Server Loader Values form in the Internet Procurement Setup menu under E-Catalog Admin. You need to run two concurrent programs to extract the data and load it into the unified catalog: Catalog Data Extract - Classifications and Catalog Data Extract - Items. Set the parameter Perform Load to Yes to automatically load the catalog with this submission.
Forms-based Requisitions
The professional forms environment also has requisitioning capability. These forms might still be accessible outside of the Purchasing department, but they have capabilities beyond Internet requisitions, such as creating multiple accounting distribution, encumbrance, and outside processing details. These additional capabilities require additional details and options on the forms; the added complexity may be less suitable for an occasional user than the self-service, Internet requisitions.
Finding Requisitions
You can locate existing requisitions using the Find Requisitions form. You can specify search criteria in the requisition header, such as Buyer, Requestor, or Requisition Number; requisition lines such as Internal Item and Revision or Supplier Item; and requisition distributions such as G/L Data, Charge Account, or Budget Account. Search criteria are grouped onto the following tabs: Item, Status, Date Ranges, Deliver To, Sourcing, and Related Documents. You can choose to return a set of headers, lines, or distributions. You can also create a new requisition from any window of the form by clicking the New button. Once a requisition has been approved, it is visible on the summary window, but you can’t open it to change it.
Requisition Preferences
This is a way of setting up defaults for the entry of many requisitions. You can set defaults that will apply for the session. You can override defaulted values at time of entry. You can set defaults for an array of attributes, including Need by Date, G/L Date, Justification, Notes, and Delivery Location.
Entering Requisitions
You can create requisitions from the Requisition Summary form, from the Supplier Item Catalog, and from the Requisitions form. You can enter, edit, and approve requisitions from these forms.
Requisition Headers
The requisition number uniquely identifies the requisition. You can choose to number the requisitions automatically in the Purchasing Options form. You can enter a description for the requisition. You must enter a requisition type. There are two types of requisitions: Purchase Requisitions and Internal Requisitions. The requisition is destined to become either a purchase order or an internal sales order. The internal requisition cycle is explained in the “Internal Requisitions” section. The preparer is defaulted from the user information. The total value of all lines entered in the requisition is expressed in the base currency on the header. Requisition headers are stored in the table PO_REQUISITION_HEADERS_ALL.
Requisition Items
The item information includes a defaulted line number. The line type will be defaulted from the Purchasing options. You can choose a line type. The line types are user-defined, but are all quantity-based, representing the purchase of a quantity of a product; amount-based, representing the purchase of a dollar amount of a service; or outside processing. Outside processing represents value-added services you purchase from a supplier who performs manufacturing operations for you.
If the line type is quantity-based, you may specify a purchasable item, or you may enter a category within the Purchasing category set and identify the product you’re requisitioning in the description field. You must also specify a quantity and unit of measure. For inventory items, you must specify a need-by date. If the item attribute Allow Override Of Item Description is set to Yes, you can override the defaulted description. For quantity-based lines, the price will default to the list price for the item but can be overridden.
If the line type is amount-based, you need only specify the category. For amount-based lines, the unit of measure defaults to your base currency, and price defaults to 1 and cannot be overridden. In this case, the quantity represents the dollar amount of the service you’re buying.
Outside processing line types require an item number (identified as an outside processing item), unit of measure, quantity, and need-by date. They also require additional details, accessible with the Outside Processing button—job number, operation, and resource sequence for which you are purchasing the outside processing service. See Chapter 16 for additional discussion of outside processing.
If you only have one distribution for this requisition, you can enter it here. The charge account entered in your requisition preferences will be defaulted here. The tax code will be defaulted here from tax defaults in the Purchasing options. Details are in the “Purchasing Options” section later in this chapter. You can override the tax code if the profile Tax: Allow Override Of Tax Code is set to Yes. Requisition Lines are stored in the table PO_REQUISITION_LINES_ALL.
Source Details
In the Source Details, you can give instructions to the buyer. For example, as an engineer for Neptune you might be ordering gold-plated connectors and give instructions to the buyer that the plating needs to be at least 50 microns and the connectors must be in use at a top electronics manufacturer. The Buyer and Request for Quote (RFQ) required flags are defaulted from the item. You can override the default here. You can choose a supplier item number, source document, and line number. Source documents are blanket orders and quotations.
Details
The Details tab includes notes to the receiver, the UN number, the hazard classification, and a flag to denote that a requisition is urgent. The transaction nature and hazard classification are defined in PO lookups.
Currency
The Currency tab is where you enter conversion rates and dates, as well as the conversion into base currency. Base currency is the currency of the set of books where the operating unit for the responsibility posts transactions.
Delivery Information
The requisition may be destined for inventory, may be delivered to a point of use on the shop floor, or may be expensed on receipt. For an inventory destination, an inventory organization is required. For a delivery to a point of use, an inventory org and location are required. For a delivery that will be expensed on receipt, a requestor and delivery location are required.
Source Information
The sources that are available are dependent on the profile PO: Legal Requisition Type. It could be supplier, inventory, or both. You can mix supplier-sourced and inventory-sourced requisitions on the same requisition. If you are sourcing from a supplier, you enter the supplier and supplier site here. You can (optionally) enter a contact and phone number. If you are sourcing from inventory, you enter an inventory org and subinventory.
![]() NOTE
NOTE
Even if you are restricted to a single source type, Oracle Purchasing will not allow you to enter an invalid combination of source type and item. For example, if the item has Purchased Item set to No and Internally Ordered Item set to Yes, you will not be able to create a supplier-sourced requisition.
Distributions
If you are charging to more than one account, or wish to specify a budget account to encumber with the requisition value, you will need to invoke the Distributions window. For each line on the requisition, you can specify many of the following:
![]() Charge Accounts Charged when the goods are received
Charge Accounts Charged when the goods are received
![]() Budget Accounts Encumbered when the requisition is approved
Budget Accounts Encumbered when the requisition is approved
![]() Accrual Accounts Credited when the goods are received
Accrual Accounts Credited when the goods are received
![]() Variance Accounts Charged or credited with the difference between the invoice and the purchase order costs
Variance Accounts Charged or credited with the difference between the invoice and the purchase order costs
The accounts are built automatically using rules implemented in workflow. To modify these rules, you should talk to both your financial accountant and your system administrator. You can apportion the charges across the distribution lines automatically using partial quantities of the requisition line. You can also specify the project and task that you would like to charge with this requisition. Distributions are stored in the table PO_REQ_DISTRIBUTIONS_ALL.
Outside Processing Information
An outside processing item is an item that represents the service provided by an outside processor in conversion or processing material that you supply to them. If you have requisitioned an outside processing item, the Outside Processing Information button will become enabled. This button opens the Outside Processing window, where you can identify the job, operation, and resource that requires the outside processing service.
![]() NOTE
NOTE
Outside processing requisitions are typically generated by work in process; see Chapter 16 for further discussion.
Accessing the Supplier Item Catalog
You can search for your required item on the Supplier Item Catalog. You can base your search on the following:
![]() Commodity codes or categories within any other category set
Commodity codes or categories within any other category set
![]() Requisition template
Requisition template
![]() Item number, revision, and description
Item number, revision, and description
![]() Supplier, supplier site, or supplier item number
Supplier, supplier site, or supplier item number
Or attributes on sourcing documents, such as
![]() Deliver to organization and location
Deliver to organization and location
![]() Line type
Line type
You can select from negotiated sources, such as quotes and blanket agreements, prior purchases, sourcing rules, or requisition templates.
See Chapter 3 for details of how to set up category sets and assign items to them. For details on the sources for the documents, review the sections “Requisition Templates” and “Sourcing Rules.” Blanket agreements are explained in the “Purchase Orders” section later in this chapter.
Funds Check
If you have enabled encumbrance accounting, from the Tools menu you can check that this requisition will not commit you to expenditures that will cause you to overspend your budget. Choose Funds Check, and the message window will pop up to show the funds check status.
Tax Summary
From the Tools menu, you can review the Tax Schedule for the requisition. You can see the tax and taxed values for each tax code on the invoice. You can see the tax that will be recoverable (i.e., offsettable against output and sales taxes), and nonrecoverable (i.e., to be treated as an expense). Details on setting up tax for purchasing are laid out in the “Tax Defaulting Hierarchy” section later in this chapter.
Internal Requisitions
Internal requisitions are requisitions that are to be fulfilled from inventory. When a requisition is created, it may be sourced from a supplier, in which case it goes to a requisition pool, or it may be sourced from inventory, in which case an internal sales order will be created to ship it. Internal requisitions can be created because a requisitioner chooses the source type, because Inventory Planning has run and created replenishments from another inventory location, or because MRP has run and the item and facility being planned are replenished from another facility. The internal requisition could be fulfilled from inventory within the same warehouse. For example, Neptune’s QA department keeps its own supply of units to be tested in an expense subinventory replenished from finished goods. It could be fulfilled from a different warehouse. For example, Neptune has three distribution warehouses in the United States that are replenished from the manufacturing warehouse. It could be fulfilled from another operating unit. For example, Neptune has a European distribution center that is owned and run by the European subsidiary incorporated in Holland. The Dutch distribution center is replenished from the Boston distribution center. Figure 13-3 shows the sources of supply and demand represented in the Order Management and Purchasing systems for internal requisitions.
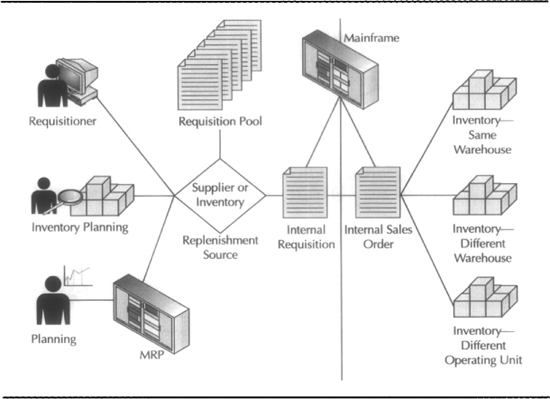
FIGURE 13-3. Sources of demand and supply for internal requisitions
The internal sales order is really a mirror of the internal requisition that is used by the Order Management and Shipping systems. An overview of the flow for internal requisitions is laid out in Figure 13-4.

FIGURE 13-4. Overview of internal requisitions flow
Internal requisitions may originate in other systems. They interface to the purchasing systems through the Requisitions interface. You run the requisitions interface from the Submit form in the Requests menu. Internal requisitions are interfaced into the Order Management interface tables by running Create Internal Sales Orders requests from the Purchasing responsibility. You run the Sales Order import from the Requests menu in the Order Management responsibility. In the Order Management and Shipping systems, you can manage the internal sales order in the same manner as a regular sales order. Movements between warehouses can be direct shipments. A direct shipment is moved into the receiving location in the ship-to warehouse immediately on shipment. A movement may be an in-transit movement. When the shipping warehouse ships the internal sales order, Oracle puts the inventory into in-transit in the table RCV_SHIPMENTS. The shipment is placed into inventory when it is delivered at the receiving warehouse. The shipment may also go through receiving and inspection if the item’s receiving routing requires it in the receiving warehouse.
Requisitioner Setup
The requisitioner must be authorized to create requisitions that are sourced internally through the profile PO: Legal Requisition Type.
Item Setup
The item must be set up to have Internal Orders Allowed set to Yes on the Order Management attributes. The Item must have a Source Type of Inventory on the General Planning attributes. The requisition will be created in the Unit of Issue defined in the Purchasing attributes.
Inventory Setup
Sourcing information is defined at the item, subinventory, and organization levels. The source is evaluated in the following sequence:
![]() Item/Subinventory Defined when you create subinventory items
Item/Subinventory Defined when you create subinventory items
![]() Subinventory Defined in the subinventory sourcing options
Subinventory Defined in the subinventory sourcing options
![]() Item Specified in general planning attributes
Item Specified in general planning attributes
![]() Organization Defined in the organization setup
Organization Defined in the organization setup
How internal requisitions are transacted between organizations is defined in the Shipping Network in MTL_INTERORG_PARAMETERS. You define the shipping network from the Inventory Organization form in the Tools menu. You need to define the following:
![]() Internal Order Required Defines whether transfers between organizations can happen without paperwork being generated.
Internal Order Required Defines whether transfers between organizations can happen without paperwork being generated.
![]() Transfer Type Defines whether the inventory will be moved into in-transit or will be immediately available in the destination warehouse on shipment.
Transfer Type Defines whether the inventory will be moved into in-transit or will be immediately available in the destination warehouse on shipment.
![]() Receipt Routing Defines whether the goods need to be moved through a receiving pipeline, directly delivered into inventory, or inspected when received in the destination organization. Inspection might be needed due to possible damage in-transit or transfer of management responsibility for the inventory on receipt.
Receipt Routing Defines whether the goods need to be moved through a receiving pipeline, directly delivered into inventory, or inspected when received in the destination organization. Inspection might be needed due to possible damage in-transit or transfer of management responsibility for the inventory on receipt.
![]() FOB Point Defines the point at which responsibility for the goods intransit passes to the destination organization. Responsibility may pass on shipment or on delivery.
FOB Point Defines the point at which responsibility for the goods intransit passes to the destination organization. Responsibility may pass on shipment or on delivery.
![]() Transfer Charge Type Defines how the costs are uplifted in the destination organization to reflect carriage costs: percentage or amount.
Transfer Charge Type Defines how the costs are uplifted in the destination organization to reflect carriage costs: percentage or amount.
Strategic Sourcing and Supply-based Management
Oracle Purchasing comes with a set of tools to locate, approve, and manage sources of supply. The overall flow through the strategic sourcing and supply management solution is illustrated in Figure 13-5.

FIGURE 13-5. Strategic sourcing and supply management flow
The process starts with creating requests for quotes. The requests can be addressed to many suppliers.
Supplier Lists
The suppliers can be identified with a supplier list. Neptune has a supplier list for electronic components—one for plastic moldings and one for sheet aluminum casing. To create a supplier list, navigate to the Supplier Lists form in the Supply Base menu.
Requests for Quotations
Items may be defined as requiring a request for quotation. For example, you may want to ensure that every time a requisition for artwork is issued, an RFQ is sent to four different graphic design houses. You may also have a new specification coming in from research and development, for which reliable suppliers, capable of delivering the appropriate quality of material, must be sought. The mechanism Oracle Purchasing provides for sourcing suppliers is an RFQ. To create an RFQ, navigate to the RFQ form in the RFQ and Quote menu. You can also create RFQs from the Autocreate form. The Autocreate form can show a list of requisitions that may require an RFQ. You can select the requisition items you would like added to the RFQ. For more detail about how to create an RFQ using Autocreate, see the “Autocreate” section later in this chapter.
RFQ Headers
You can set the RFQ to be automatically numbered, or you can enter your own numbers by setting the document numbering in Purchasing options. Purchasing supports three types of RFQ:
![]() Catalog Used for items that will be ordered regularly
Catalog Used for items that will be ordered regularly
![]() Standard Used for one-off items or items that are ordered infrequently
Standard Used for one-off items or items that are ordered infrequently
![]() Bid Used to source a specific quantity of an item to be delivered at a certain site on a certain date
Bid Used to source a specific quantity of an item to be delivered at a certain site on a certain date
Oracle prints the due date on the RFQ. The RFQ must be received by the due date. The medium for communication of the RFQ response is specified in the reply via. It can be e-mail, mail, or fax. Oracle Purchasing also provides a close date. If you enter a quote from an RFQ that is closed, Oracle will give you a warning alerting you to the status of the RFQ. The RFQ status can be any of the following:
![]() In Process Or being created.
In Process Or being created.
![]() Active Or ready to print.
Active Or ready to print.
![]() Printed At least one copy.
Printed At least one copy.
![]() Closed When you change the status to closed, the system will delete all follow-up notifications. Change the RFQ to this status when you do not want any more responses to the RFQ.
Closed When you change the status to closed, the system will delete all follow-up notifications. Change the RFQ to this status when you do not want any more responses to the RFQ.
By checking the Approval Required box, quotes can only be created from approved RFQ responses. By default, the user creating the RFQ is assigned as the buyer. The buyer will be notified of any RFQ responses via workflow notifications. The effectivity dates are those required of the quotes.
You can set payment and freight terms and set FOB point by clicking the Terms button.
You can address your RFQ to any number of suppliers by clicking the Suppliers button. This shows you suppliers and the status of their RFQ responses. You can add suppliers directly in this window, or you can add them from a supplier list.
RFQ Lines
You can specify a quantity or amount-based line type for the line. An amount-based line might be to produce the artwork for the badging of the new palmtop product line. The category will be defaulted from the item if entered and cannot be overwritten. If you choose an amount-based line type, you must choose a category. You can let the suppliers know the price you are looking for in the Target Price. If you click the More tab, you can define order quantities that are needed.
You can refine your target prices by defining price breaks. Price breaks are implemented in the same tables that Purchasing uses for defining shipments. You define price breaks by clicking the Price Breaks button. You can specify the quantity, price, effectivity dates, and delivery location. You can also refine the payment and freight terms and specify the lead time if suppliers specify different prices for immediate shipment of small quantities. You can also define tax codes and matching criteria at this level. Match levels can require that a supplier invoice have a corresponding purchase order (two-way match), purchase order and receipt (three-way match), or purchase order receipt and approved inspection (four-way match).
Quotations
Oracle Purchasing allows you to copy from the RFQ and create a quotation. From the Tools menu in the RFQ form, you can copy the following:
![]() Entire RFQ
Entire RFQ
![]() Just the header
Just the header
![]() The header and the lines
The header and the lines
You can choose to include or exclude the RFQ attachments when you create the quote. You must specify the supplier and the supplier site that you have received the quote from. The quote has the same structure as the RFQ. The header will be prepopulated with the RFQ that the quote was created from, but you can overwrite it. There is a quotation number from your own company’s document sequencing as well as the supplier’s quote number. Quotations are of the same three types as the RFQs. The effectivity dates for the quotation are in the header. The quotation is always from one supplier. The supplier information is populated in the header. You will only be able to create a quote if the supplier is one of the suppliers on the RFQ. If you copy an RFQ to a quotation for a supplier that has already quoted against this RFQ, you will receive a warning message but be able to process. You can also create quotations manually and create the reference to the RFQ by hand. You can approve the quotation for use as a sourcing document in the creation of purchase orders by clicking the Approve button. This will start a workflow approval process. Approval hierarchies, security hierarchies, and approval workflows are explained in the section “Approval Groups and Their Assignments.” You can also approve quotations in a dedicated approval form. To approve quotations in this form, navigate to the Approve Quotations form in the RFQs and Quotations menu. You can locate quote lines by item and revision, item category, RFQ and RFQ line, supplier, quotation number, and project. The results are a set of shipments. You can approve the shipments individually, or you can select a single shipment and approve all shipments in the quotation by clicking Approve Entire Quotation.
Sourcing
When reliable sources have been established, you can allow those sources to default onto requisitions and purchase orders as they are created. Figure 13-6 illustrates how sources are determined and how they influence the creation of supply.

FIGURE 13-6. Automatic sourcing flow
Oracle Purchasing allows for an approved supplier list, sourcing rules, and a bill of distribution to define approved sources for an item, item category, or inventory organization.
Defining Suppliers
You define suppliers in the Suppliers form in the Supply Base menu. For a supplier, you can define the following:
![]() General Information Such as name, taxpayer ID, and parent company. You can also specify a customer number for payables receivables netting functionality.
General Information Such as name, taxpayer ID, and parent company. You can also specify a customer number for payables receivables netting functionality.
![]() Classification Information Such as Type (employee for expense payments, distributor for commission payments, etc.) or Standard Industry Classification (SIC Code).
Classification Information Such as Type (employee for expense payments, distributor for commission payments, etc.) or Standard Industry Classification (SIC Code).
![]() Accounting Information Such as Accounts Payable Control and Prepayment accounts.
Accounting Information Such as Accounts Payable Control and Prepayment accounts.
![]() Control Information For matching basis and order limits.
Control Information For matching basis and order limits.
![]() Payment Information Including the payment terms and aging basis.
Payment Information Including the payment terms and aging basis.
![]() Back Account For direct deposit information.
Back Account For direct deposit information.
![]() EDI Information For funds transfer.
EDI Information For funds transfer.
![]() Purchasing Information Including ship-to and bill-to addresses for RTV transactions. You can define the preferred Carrier, the FOB point (the point at which ownership passes), and freight terms (defining who is responsible for freight costs). You can also specify a purchasing hold here and give it a reason. New purchase orders will then be held.
Purchasing Information Including ship-to and bill-to addresses for RTV transactions. You can define the preferred Carrier, the FOB point (the point at which ownership passes), and freight terms (defining who is responsible for freight costs). You can also specify a purchasing hold here and give it a reason. New purchase orders will then be held.
![]() Receiving Information Including receipt routing (which defines whether receipts are to be inspected before delivery), tolerances for early and late delivery, and receipt quantity. You can allow or disallow substitute receipts and unordered receipts. You can allow or disallow or warn when planned shipments are received at other locations.
Receiving Information Including receipt routing (which defines whether receipts are to be inspected before delivery), tolerances for early and late delivery, and receipt quantity. You can allow or disallow substitute receipts and unordered receipts. You can allow or disallow or warn when planned shipments are received at other locations.
Supplier Sites
Many of the terms defined for the supplier can be refined for each supplier site. A supplier site has a name, an alternate name, and an address. Each supplier site can have site uses of the following:
![]() Pay Location to address payments.
Pay Location to address payments.
![]() Purchasing Location to address purchase orders.
Purchasing Location to address purchase orders.
![]() RFQ Only Location to address RFQs.
RFQ Only Location to address RFQs.
![]() Procurement Card Means that the supplier accepts procurement card payments. Procurement cards are like credit cards that are issued to the employee for corporate purchases. The purchase orders are sent to the supplier with a procurement card number. The supplier informs the card issuer of the fulfillment of the order. The credit card issuer then sends the transaction file to Oracle Purchasing for the creation of payables invoices, remittances, and distributions.
Procurement Card Means that the supplier accepts procurement card payments. Procurement cards are like credit cards that are issued to the employee for corporate purchases. The purchase orders are sent to the supplier with a procurement card number. The supplier informs the card issuer of the fulfillment of the order. The credit card issuer then sends the transaction file to Oracle Purchasing for the creation of payables invoices, remittances, and distributions.
You can specify communication methods with the supplier site for phone, fax, and telex. You can also specify contacts; accounting information; matching criteria; and bank account, EDI, and tax information. In the Purchasing information you can specify pay on receipt information.
Managing Supplier Statuses
When an entry is made in an approved supplier list, the entry is assigned a status. The status controls the activities allowable for a supplier through the supplier status. You can create statuses and assign allowable actions by navigating to the Supplier Statuses form in the Supply Base menu.
Sourcing Rules
To define a sourcing rule, navigate to the Sourcing Rules form in the Supply Base menu. Give the sourcing rule a name and description. You can make it apply for all organizations or for a specified organization. You can make planning evaluate it when planning a supply chain. You can copy it from an existing sourcing rule. Sourcing rules can have many effective date ranges. For example, you might switch preferred suppliers of plastic resin during high demand for fuel oil in mid-winter and late spring.
In the Shipping Organizations, you can choose to
![]() Transfer From Another facility’s finished goods (specified by the org code)
Transfer From Another facility’s finished goods (specified by the org code)
![]() Make at Another facility (specified by the org code)
Make at Another facility (specified by the org code)
![]() Buy From A supplier and (optionally) a supplier site
Buy From A supplier and (optionally) a supplier site
You can specify allocation percentages. The allocation must total 100 percent. Oracle Purchasing will request from sources in order of rank. You may have two sources defined for the same shipping org with two different shipping methods and lead times.
You can assign sourcing rules to an item, a category of items, an organization, or an item in an organization, or you may use it globally.
![]() NOTE
NOTE
You can only define sources for an item category if the profile option MRP: Sourcing Rule Category Set has been set.
Planning uses a set of Sourcing Rules and Bills of Distribution (BODs) to choose the source for any given requirement. This set of sourcing rules is called an assignment set. A bill of distribution is similar in nature to a sourcing rule, but specifies sourcing for a number of destination organizations. They are explained fully in Chapter 11. You can assign the sourcing rule to an assignment set by clicking the Assignment Set button, or you can go to the Assignment Set form.
Assignment Sets
As explained in the preceding section, you associate a sourcing rule with an item, category, customer warehouse, and so on through assignment sets. To create an assignment set, navigate to the Assign Sourcing Rules form in the Supply Base menu. Give the assignment set a name and description. When you make the assignment, you make it to an assignment type. For example, you can assign a sourcing rule to the following:
![]() Item For example, resistor RS11452 might come from RS Components.
Item For example, resistor RS11452 might come from RS Components.
![]() Item Category For example, electronic components might come from Philips Components.
Item Category For example, electronic components might come from Philips Components.
![]() Item in Warehouse For example, speakers for the U.S. manufacturing plant might come from Boston Acoustic Research. Speakers for the U.K. assembly plant might come from Celestion.
Item in Warehouse For example, speakers for the U.S. manufacturing plant might come from Boston Acoustic Research. Speakers for the U.K. assembly plant might come from Celestion.
![]() Item Category in Warehouse For example, all monitors in North America will be sourced from Sony. All monitors in Northern Europe will be sourced from Philips.
Item Category in Warehouse For example, all monitors in North America will be sourced from Sony. All monitors in Northern Europe will be sourced from Philips.
![]() Organization For example, everything for the Austin final assembly facility is sourced from the Austin manufacturing facility.
Organization For example, everything for the Austin final assembly facility is sourced from the Austin manufacturing facility.
![]() Global If only one sourcing rule exists.
Global If only one sourcing rule exists.
You can assign the organization, customer, and customer site if sourcing for a customer organization, item, or category depending on the assignment type chosen. You can choose to assign a sourcing rule or a bill of distribution. The assignment set name Purchasing uses is specified in the profile option MRP: Default Sourcing Assignment Set.
Approved Supplier Lists
The orientation of the Approved Supplier List (ASL) is a list of items and commodities that have approved sources from a list of suppliers. You can specify the quotes and blanket orders to source from, or you can set the profile option PO: Automatic Document Sourcing to default the latest approved sourcing document rather than specify one on the ASL.
To create an ASL, navigate to the Approved Supplier Lists form in the Supply Base menu. You can review a list of ASLs from the ASL Summary form. You can specify the manufacturer of the product, the distributor of the product, or a company that both sells and distributes. You must specify the name of the supplier; you can optionally specify the site that you purchase from. You can specify the approval status of this supplier to supply the items. In the Details tab, you can record a Review By Date. If this is a distributor, you can specify the manufacturer they must source from. For example, if Neptune is purchasing handheld multimeters for bench work, they may specify RS Components as the distributor and Fluke as the manufacturer. You can also specify that this ASL applies to your entire enterprise or a single facility. There is, however, always an organization that is responsible for negotiating on behalf of subsidiaries and operating units. This is denoted by the owning organization. You can create sourcing documents, supplier scheduling information, and planning information by clicking the Attributes button.
You must specify the unit of measure that will be used when creating purchase orders and the method of creating releases against blanket orders, which could be any of the following:
![]() Manual release through Autocreate
Manual release through Autocreate
![]() Automatic release in complete status
Automatic release in complete status
![]() Automatic release in incomplete status
Automatic release in incomplete status
You can specify the maximum amount that a supplier can issue a price increase for without generating an exception. You can specify a country of origin to be defaulted onto purchase orders. Country of origin is the country where the majority of the value was added. For example, Neptune imports completed assemblies from Malaysia. The final badging and testing is done in the Austin plant. When Neptune supplies its product to its customers, the country of origin will be Malaysia. You can create a local approved supplier list based on a global one by clicking the Create Local button. A sample ASL is shown in Figure 13-7.

FIGURE 13-7. A sample approved supplier list
Source Documents
Source document types are blanket orders or quotes. You can specify many source documents and lines on those documents. Blanket orders will be used over quotes. The source document may be in an active or inactive status, and items may be sourced from these documents between their effective dates.
Planning Constraints
You can specify order modifiers. These will change the quantities requested by planning by rounding up to a minimum order quantity or a fixed order quantity. You can specify the lead time the requirements should be offset to arrive at the Purchase release date. You can also specify the delivery calendar that the supplier uses to ensure that the materials are scheduled to arrive on a delivery date before the need-by date. You can specify the capacity of the supplier over different date ranges. Tolerance fences record the percentage that demand issued to a supplier can change within the time fence days. For example, you may be able to change the demand placed on a supplier by 50 percent if the supplier has 60 days to react, but you can only change by 5 percent if the supplier has only 2 days to react.
Supplier Scheduling
In the Supplier Scheduling tab, you can enable the supplier for planning and shipping schedules. You can assign a scheduler to this particular item and supplier. You can automatically create shipping and planning schedules by checking the Enable Autoschedule box. You can specify the bucket pattern code for planning and shipping. These are the sequenced time buckets (days, weeks, months, and so on) of declining granularity as the time buckets get further into the future. You can specify the schedule type to use for planning and shipping. This defines whether to include forecast, forecast and orders, or material plans in the schedule. You can enable the authorization of raw material procurement or conversion within a number of days of your demand in the Authorizations section.
AutoCreate
AutoCreate allows you to create different target documents from the requisition pool. You can consolidate requirements onto purchase orders, lowering the ordering and administration costs. AutoCreate can also create an RFQ if the requisition is for an item that must have an RFQ raised. An overview of the AutoCreate function and the different document types that feed it and are created by it, is illustrated in Figure 13-8.

FIGURE 13-8. Automatic creation of documents with Autocreate
Finding Requisitions in the Requisition Pool
To minimize the cost of creating and communicating purchase orders, requisitions are “pooled.” A purchasing agent then gathers requisition lines to consolidate onto a single Purchase Order. You can find requisitions based on a number of criteria, including the following:
![]() Requisition approval status.
Requisition approval status.
![]() Requestor and preparer.
Requestor and preparer.
![]() Requisition number and emergency requisition number (assigned only in self-service requisitioning).
Requisition number and emergency requisition number (assigned only in self-service requisitioning).
![]() Supplier sourcing of sourced or unsourced.
Supplier sourcing of sourced or unsourced.
![]() Suggested sourcing from a supplier or supplier site, document type, and document number.
Suggested sourcing from a supplier or supplier site, document type, and document number.
![]() Assigned to a particular buyer (defaulted as the person logging into Purchasing, unless the value of the profile PO: Allow Buyer Override In AutoCreate Find is set to Yes).
Assigned to a particular buyer (defaulted as the person logging into Purchasing, unless the value of the profile PO: Allow Buyer Override In AutoCreate Find is set to Yes).
![]() To be shipped to a particular delivery location. The working location of the buyer from their assignment in the Human Resources System is used as a default.
To be shipped to a particular delivery location. The working location of the buyer from their assignment in the Human Resources System is used as a default.
![]() Item based on the item number, description, supplier item number, or item category. By default, the category assigned to the buyer will restrict requisitions. The buyer can override the category if the value of the profile PO: Allow Category Override In AutoCreate Find is set to Yes.
Item based on the item number, description, supplier item number, or item category. By default, the category assigned to the buyer will restrict requisitions. The buyer can override the category if the value of the profile PO: Allow Category Override In AutoCreate Find is set to Yes.
![]() Requisition statuses for late, urgent, assigned, and RFQ required.
Requisition statuses for late, urgent, assigned, and RFQ required.
Adding Lines to Target Documents
You can choose to create a new document, or you can add lines to an existing document. You can choose how to group the requisition lines onto the created document. The default is to make a line on the target document for all requisition lines for the same item, revision, and line type. You can also manually assign requisition lines to target document lines by clicking the Manual button. Press CTRL-click a line to select multiple lines at once. Press SHIFT-click to select the top and bottom of a range of lines. An example of the Autocreate form is shown in Figure 13-9.

FIGURE 13-9. Autocreate purchase orders form
Purchase Orders
Purchase orders in Oracle are documents with a header, lines, shipments, and deliveries. An overview of how the purchase order tables are structured is given in Figure 13-10.

FIGURE 13-10. Purchase order structure
This structure is used to implement many types of purchase orders, including the following:
![]() Standard purchase orders These are orders for specific quantities of goods or services to be delivered on a given date or dates.
Standard purchase orders These are orders for specific quantities of goods or services to be delivered on a given date or dates.
![]() Blanket purchase agreements These are agreements set up to cover a long period. They provide some security of supply and price to the customer and some certainty of demand for the supplier. They specify goods and services to be supplied, but no obligation to take delivery and compensate the suppler is established.
Blanket purchase agreements These are agreements set up to cover a long period. They provide some security of supply and price to the customer and some certainty of demand for the supplier. They specify goods and services to be supplied, but no obligation to take delivery and compensate the suppler is established.
![]() Blanket releases These are the purchase orders released against a blanket order. They inherit the terms, conditions, and prices of the blanket order. Delivery schedules are established for the releases. The release establishes obligations to compensate the supplier.
Blanket releases These are the purchase orders released against a blanket order. They inherit the terms, conditions, and prices of the blanket order. Delivery schedules are established for the releases. The release establishes obligations to compensate the supplier.
![]() Contract purchase agreements A contract purchase agreement can establish terms and conditions of supply without specifying the goods or services to be supplied. Purchase orders that specify this agreement will inherit the terms and conditions of the agreement.
Contract purchase agreements A contract purchase agreement can establish terms and conditions of supply without specifying the goods or services to be supplied. Purchase orders that specify this agreement will inherit the terms and conditions of the agreement.
![]() Planned purchase orders A planned purchase order is similar to a blanket order, but requires a tentative delivery schedule.
Planned purchase orders A planned purchase order is similar to a blanket order, but requires a tentative delivery schedule.
![]() Scheduled releases These are purchase orders released against a planned purchase order. They inherit the terms, conditions, and prices from the planned purchase order.
Scheduled releases These are purchase orders released against a planned purchase order. They inherit the terms, conditions, and prices from the planned purchase order.
Major Purchase Order Features
The purchase orders are the core of the purchasing system. To understand the purchase order system, you need to understand features that let the purchase order interact with the rest of the purchasing system and the rest of Oracle Applications. These features are explained in the following sections.
Workflow-Driven Automatic PO and Release Creation
You can let workflow create releases and purchase orders for approved requisitions where sourcing has been defined or can be determined. The workflow for creating purchase documents is called PO Create Documents. It is initiated at the end of the requisition approval workflow if the Attribute Is Automatic Creation Allowed is set to Yes.
Budget Checking
You can reserve funds when you enter a requisition and purchase order. You can choose to encumber a budget at requisition or purchase order. Planned purchase orders can reserve funds and have the encumbrance reversed when a release is generated against the planned purchase order. To use encumbrance accounting, you must enable the budgetary control flag for a set of books. When you enable the budgetary control flag, the system automatically creates encumbrances from requisitions and purchase orders. You define a set of books in the Setup menu in the General Ledger responsibility.
Purchase Order Approvals
Purchase orders can go through their own approval cycle. For example, a new supplier of important components may require the approval of Engineering and Manufacturing before the purchase order can be issued. Approvals are workflow-driven. They can be delivered in the universal work queue, or they can be delivered in e-mail. You can assign approval limits and authorities for commodities and ranges of expenses. Approval limits are explained in the “Approval Groups and Their Assignments” section later in this chapter.
Purchasing Notifications
Purchasing will alert buyers to other conditions requiring action, such as blanket orders nearing expiration date or order quantities not released. You can establish notification conditions that specify the number of days before the condition is met. You set the Notification Controls from the Tools menu on the Purchase Orders form.
Revision Control and Change History
Purchase orders are revision-controlled documents. Changes to certain attributes of the purchase order will cause the purchase order to have to be reapproved. Changes to attributes will cause the revision number to be incremented. A history is kept of the changes and person making the change. Attribute changes at the header, line, shipment, or distribution may cause a document revision. Attributes at the header that cause a document to be revised include (but are not limited to) payment terms, expiration date, buyer, ship-to, and bill-to. Attributes at the line that cause a document to be revised include item, revision, supplier item, quantity, and price. Attributes on the shipment that cause a document to be revised include quantity, promised date, need-by date, and latest acceptance date.
Shipment Schedules
You can request the quantity on a purchase order line to be shipped to many places and at many different times. You can see the quantities ordered, received, invoiced, and cancelled for each line shipment. On creating a shipment, Purchasing will create a distribution or delivery for the shipment. For more information, see the “Distributions” section.
Acceptances
The supplier’s acknowledgement of the purchase order is recorded as a supplier acceptance on the purchase order. You enter and view acceptances from the Tools menu when reviewing a purchase order.
Print Purchase Orders
Purchase orders can be printed or faxed if you have any facsimile software that is compatible with the Commerce Path Fax Command Language. You can choose to print all, new, or changed purchase orders. Purchase orders print with attached text notes; they can also be printed in multiple languages. To print purchase orders, navigate to the Submit Requests form and choose Purchase Order Report.
Copy Purchase Orders
You can copy purchase order documents to other documents from the Tools menu in the Purchase Order form. You can copy from
![]() One standard purchase order to another
One standard purchase order to another
![]() A standard purchase order to a standard or planned purchase order
A standard purchase order to a standard or planned purchase order
![]() A quote to a standard purchase order or blanket purchase order
A quote to a standard purchase order or blanket purchase order
Finding Purchase Orders with Purchase Order Summary
Purchasing has a search capability that allows you to enter search criteria, including supplier, ship-to, deliver to, item, purchase order, and related documents, and to see resulting headers, lines, shipments, or deliveries. To find purchase orders, navigate to the Purchase Order Summary form in the Purchase Orders menu.
Entering Search Criteria
You can search based on order number and release, type, supplier and supplier site, ship-to organization and location, bill-to organization and buyer, line number, type, and shipment. If you are interested in documents for an item, you can search on internal item number, item category, description, and supplier item number. If you’re interested in date information, you can use the dates ordered, approved, promised, needed by, or closed. You can search on approval status, control status, and hold status, as well as whether the order is frozen or firmed. If you have found a document that references a purchase order, you can use related contract, internal, or supplier quote number; line number, paper, or system requisition number; receipt; or invoice number as selection criteria. You can search based on the delivery organization, subinventory, and location, as well as the requestor. You can search based on the actual or budget account or project and task to be charged. You can also create a new purchase order or release from the search criteria.
Viewing Search Results
You can choose to view the headers, lines, shipments, or deliveries resulting from your query. You can choose to review all of the releases for the blankets you have selected.
Headers Search Results
The headers results window is a folder form, meaning that you can customize the columns of the purchase order header that are displayed. You can include any column, including purchase order number, revision number, release number, supplier and supplier site, buyer, and amount. You can open the PO you have selected, and you can move to a line inquiry for the order or orders you have selected. You can create a new PO or a new release of the selected PO.
Lines Search Results
The line results window is also a folder form. You can include any column, including purchase order number, line number, item number and category, line description, and quantity. You can open the PO that the line is on for review, and you can move to a shipment inquiry for the line or lines you have selected. You can create a new PO or a new PO release of the selected line’s purchase order.
Shipments Search Results
The shipments results window is another folder form. You can include any column, including purchase order number, line number, release number, item number, ship-to organization, location, and quantity. You can open the PO that the shipment is on for review and maintenance, and you can move to a distribution inquiry for the shipment or shipments you have selected. You can create a new PO or a new PO release of the selected shipment’s purchase order.
Distribution Search Results
Like the other windows, the distribution results window is also a folder form. You can include any column, including purchase order number, release number, line number, shipment number, distribution number, item number, quantity, amount, and account to be charged. You can open the PO that the shipment is on for review and maintenance. You can create a new PO or a new PO release of the selected distribution’s purchase order.
Entering and Maintaining Purchase Orders
You can create and maintain purchase orders either from the Purchase Summary form by clicking the Open button, or you can navigate to the Purchase Order form in the Purchase Order menu. An example of the Purchase Order form is shown in Figure 13-11.

FIGURE 13-11. Blanket purchase order with price break
Purchase Order Header Information
The purchase order header information includes the purchase order number and revision number, purchase order type, supplier, supplier site and contact at that site, buyer (defaulted to the person creating the purchase order), status, total amount, and (optionally) a description.
Approvals
You can start the validation and approval process by clicking the Approve button. Validation errors will be shown if the purchase order cannot start the valid approval process, due to missing data, for example.
Terms
By clicking the Terms button, you can specify payment and freight terms, the preferred carrier, FOB point, and whether the purchase order is pay on invoice or receipt. You can identify the order as firm, which will suppress “reschedule-in” messages in the planning process. You can declare that an acceptance is required and specify a date by which it must be received. If you mark this order as a supply agreement, you can specify agreement controls. You can specify the effectivity date for the order, the minimum value order that will be released at any one time, and the maximum amount that the prices on the order can be uplifted by.
Tools Menu
There are many useful functions available on the Tools menu when maintaining a purchase order, including the following:
![]() Preferences Sets up defaults for many fields to speed entry
Preferences Sets up defaults for many fields to speed entry
![]() Acceptances Shows the responses from a supplier in acknowledging the order or issuing change orders
Acceptances Shows the responses from a supplier in acknowledging the order or issuing change orders
![]() Action History Shows a list of approval actions
Action History Shows a list of approval actions
![]() Copy Document Allows you to copy from one purchase order document to another of the same type or different type
Copy Document Allows you to copy from one purchase order document to another of the same type or different type
![]() Tax Details Shows the goods, taxable, and tax (both recoverable and nonrecoverable) for each line on the order
Tax Details Shows the goods, taxable, and tax (both recoverable and nonrecoverable) for each line on the order
![]() Tax Summary Shows a summary of the goods, taxable, tax recoverable, and nonrecoverable by tax code
Tax Summary Shows a summary of the goods, taxable, tax recoverable, and nonrecoverable by tax code
![]() Convert Currency Allows you to convert prices to the ordering currency based on the order exchange rate
Convert Currency Allows you to convert prices to the ordering currency based on the order exchange rate
Purchase Order Line Information
From the purchase order lines block, you can define item, price reference, related documents, hazard classification, and notes to suppliers. The lines are displayed in the same window as the header information. The line number is displayed in all tabs.
Items
The item information includes line type (defaulted from the purchasing options), item, revision, category, and description purchase UOM quantity and price. The need-by date is required for MRP/MPS or inventory planned items, and the promised date can also be recorded. You can record the supplier item and the account to be charged for encumbrance. The extended price is displayed. You can attempt to reserve funds by clicking the Reserve check box.
Price References
The price references include list price defaulted from the line type, item, or document specified in the supplier item attributes, and market price from the item definition. It can be overridden here. It is used for the analysis of cost savings. You can allow prices to be different on releases against this PO by checking the Allow Price Override flag. If you check this flag, you can also set a maximum price.
Reference Documents
You can refer to the contract, quotation line number, and type as well as the supplier’s quotation number. These will be automatically populated if you have used copy order to create the document.
More
You can annotate purchase orders with notes to supplier recorded here. You can overwrite the UN number and the hazard class of the material, which are defaulted from the item definition. You can mark that this is a capital expense. If it is a capital expense, the transactions will be moved to Oracle Assets.
Agreements
You can refine the terms agreed for the order as a whole at the line level. You can specify the minimum release quantities and total amount of the agreement, as well as review quantities already released.
Price Breaks
When entering blanket agreements, you can define price breaks by clicking the Price Break button. You can define the price break to be specific to a ship-to location. Enter the price break quantity and amount. The system will display the percentage from the order line price that this represents. You can also input the percentage, and the system will display the amount as you exit the field.
Shipments
If you click the Shipments button in the Purchase Order form, you can split the line into multiple shipments with different dates and locations and see the shipping status of the shipments.
Main
You can see the ship-to organization and locations, quantities, and dates both needed by and promised by the supplier. You can vary the tax code for each shipment if the value for the profile Tax: Allow Override of Tax Code is Yes. If you create a new shipment line, the fields will be defaulted from the previous line, leaving only the quantity to be adjusted.
Receiving and Matching Tolerances
In the More tab, you can see the matching and receiving tolerances. You can specify the percentage of the expected amount within which the receipt will be closed for receiving and billing. You can specify two-, three-, or four-way matching for the shipment. You can specify that the invoice must match the purchase order quantities or receipt quantities. You can choose to accrue the liability on receipt. Items destined for inventory are always accrued on receipt. Expensed receipts may be accrued on receipt or at period end, based on your purchasing options. You can mark the shipment as firm to suppress reschedule-in suggestions by planning.
Receiving Controls
You can review the receiving controls for the shipment by clicking the button of the same name. You can set tolerances for early and late delivery and overshipment, and you can determine whether the system should warn on receipt or prevent entry. You can allow the receipt of substitute items from the supplier. You can set how the receipt should be routed on delivery. It may be delivered directly into inventory, held in the receiving dock before delivery, or sent for inspection.
Distributions
If you click the Distributions button in the Shipments window, you can split the shipment into multiple deliveries with different destinations and Charge Accounts. For example, you might have ordered many copies of a handbook for manufacturing and supply chain applications. The books will be received in one receipt but delivered to six supply chain professionals in the building, each working for a different cost center.
Destination
You can choose a destination type of inventory, expense, or shop floor. The destination is specified as the requestor and their location. For inventory destination types, a subinventory is also required. You can specify any quantity of the shipment to be delivered to this destination. The balance will be created as a new distribution. You can specify the G/L date when the transactions should be reflected in G/L. Recovery rate is the tax recovery rate. You reserve funds by checking the Reserve check box.
Accounting
Under the More tab, you can define the requisition that this order is supplying. If you have used Autocreate to create the purchase order, it will be automatically filled in. The online flag denotes that this is from an online requisition as opposed to a paper requisition system. The accrual, charge, budget, and variance accounts will be built by the Account Generator. You can override accounts here, apart from for outside processing items. The resource is a determinant of the accounts for outside processing items.
Project
You can charge a project or task within a project and specify the expenditure type to be reflected in the project. The quantity can be further allocated between different unit numbers. For example, if Neptune is purchasing specialized optical sensors for auto placement equipment for two different customers, it can record the unit numbers of the Auto Placement equipment.
Outside Processing Information
As covered in requisitions, an outside processing item is an item that represents the service provided by an outside processor in conversion or processing material that you supply to them. If you have ordered an outside processing item, the Outside Processing Information button will become enabled.
Supplier Scheduling
Supplier scheduling allows you to communicate longer-term plans to your suppliers. You can include demand from the Purchasing systems and the Planning systems. You can have sourcing determined by planning and purchasing sourcing. You can communicate using discrete quantities or cumulative quantities ordered since a given date for delivery to a ship-to organization. It also allows you to commit to the raw material costs and conversion costs for your suppliers, as well as the price of the finished goods. You can communicate the schedules using standard X12 and Edifact transactions, printed reports, and supplier self-service transactions. The main flows of the Supplier scheduling system are shown in Figure 13-12.
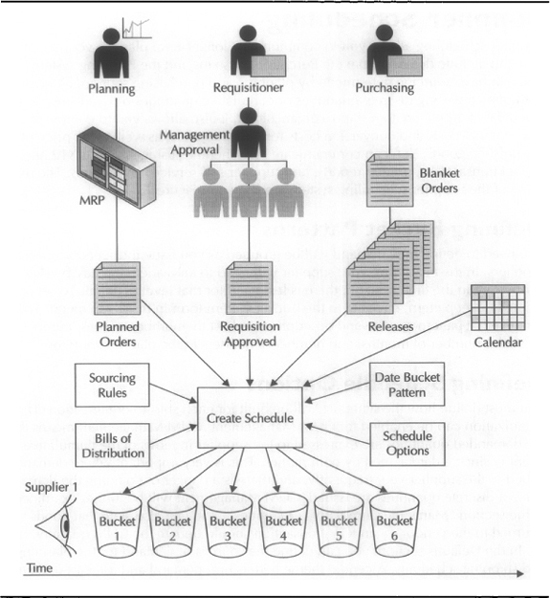
FIGURE 13-12. Supplier scheduling overview
Defining Bucket Patterns
You need to define how demand will be grouped as you issue the schedule to your suppliers. In the near-term, your supplier will need to know demand day-by-day. Further out in the time horizon, there is less need for that level of detail. To set up a time bucket pattern, navigate to the Bucket Pattern form in the Setup menu. You can give the pattern a name and description and list the number of days, number of weeks, number of months, and number of quarters in the planning horizon.
Defining Schedule Options
You must define how the schedule will be built for each ship-to organization. The organization can be enabled for CUM Management. CUM Management means that the demanded quantities are expressed to the supplier in terms of the cumulative quantity since a date agreed by both parties. This is very important where demand is issued to the supplier very frequently, and there is a danger of counting the demand twice if discrete quantities are issued. CUM Management will be further examined in the section “Managing Cumulative Quantities.” You can also state that goods returned to the vendor on an RTV transaction should update the CUM quantity.
In the Defaults section, you can define the sources of demand for the planning and shipping schedules. A central theme here is firm demand and forecast demand. Firm demand is a request for the materials to be delivered. Forecast is guidance on future demand. A typical planning schedule covers between 4 and 24 months. A typical shipping schedule covers between three and four weeks. An overview of the firm and forecast horizon is illustrated in Figure 13-13.

FIGURE 13-13. Firm and forecast entries in the schedule
For the Planning schedule, you can specify it as the following:
![]() Forecasts All Defining blanket releases; approved requisitions; and unimplemented MRP, MPS, and DRP planned orders as forecast. No firm section of the schedule.
Forecasts All Defining blanket releases; approved requisitions; and unimplemented MRP, MPS, and DRP planned orders as forecast. No firm section of the schedule.
![]() Forecast Only Defining approved purchase requisitions and unimplemented MRP, MPS, and DRP planned orders as forecast.
Forecast Only Defining approved purchase requisitions and unimplemented MRP, MPS, and DRP planned orders as forecast.
![]() Material Release Defining approved supply agreement releases as firm; approved purchase requisitions and unimplemented planned orders as forecast.
Material Release Defining approved supply agreement releases as firm; approved purchase requisitions and unimplemented planned orders as forecast.
For the Shipping schedule, you can specify it as the following:
![]() Release Only Defining just releases as firm demand.
Release Only Defining just releases as firm demand.
![]() Release and Forecast Defining approved supply agreement releases as firm; approved purchase requisitions and unimplemented planned orders as forecast.
Release and Forecast Defining approved supply agreement releases as firm; approved purchase requisitions and unimplemented planned orders as forecast.
You can assign a default Material Requirements Plan (MRP), Master Production Schedule Plan (MPS), and Distribution Requirements Plan (DRP) to use to drive the automatic creation of the schedule.
Creating the Schedule
You can build, rebuild, review, confirm, and print schedules using the Find Supplier Schedules form in the Scheduler Scheduling menu. You can revise a previously issued schedule and simulate what a schedule would look like without actually sending it. You can make changes to the underlying blanket releases and then rebuild the schedule. If authorizations are enabled in the ASL, you can view the highest authorized quantities for an item within the schedule. If CUM Management is enabled for the ship-to organization, the authorized quantity will be the cumulative quantity from the start of the CUM period. If CUM Management is not enabled, the authorized quantity is the quantity since the start of the schedule horizon. An example of the Supplier Scheduling Workbench is shown in Figure 13-14.
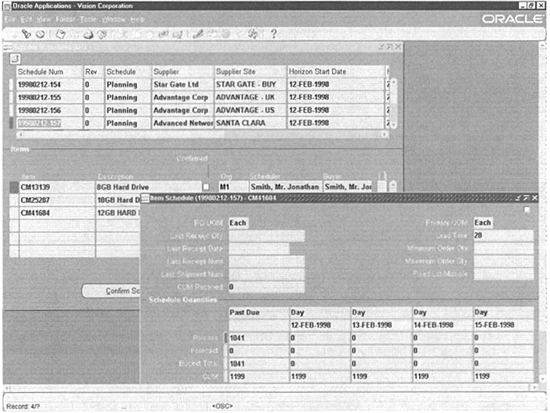
FIGURE 13-14. Supplier Scheduling Workbench
Scheduling Options
To build a new schedule, click the Build radio button at the top of the form and click the New button. You must specify the schedule type you are building, the bucket pattern you are creating it into, and the start of the scheduling horizon. If your schedule type includes forecast data, you must include an MRP, MPS, or DRP schedule name. You can build the schedule for a combination of the following:
![]() Supplier
Supplier
![]() Ship-to organization
Ship-to organization
![]() Category set, item category, item, and description
Category set, item category, item, and description
![]() Buyer, planner, and scheduler
Buyer, planner, and scheduler
Schedules and Schedule Items
In the Supplier Schedules window, you can review the schedule information, including schedule number, revision, type, supplier, supplier site, horizon dates, and ship-to org; and the information about the items on the schedule, including number, description, buyer, planner, and scheduler. You can confirm your schedule by clicking the Confirm check box.
Item Schedules
If you click the Item Schedules button, you will be taken to the window of the same name. You can see the schedule for the item displayed in the date buckets of the pattern used by this schedule. You can see the primary UOM and the order modifiers from the planning system, including minimum, maximum, and fixed lot multiple and lead time offset. You can see the Purchasing UOM, last receipt, and shipment information from the shipping system, as well as the cumulative quantity received. The scheduled quantities are broken down into release quantities, forecast quantities, and cumulative quantity.
Autoschedule
If the attributes in the approved supplier list have a supplier site specified and have Autoschedule set to Yes, you can create the schedules with a concurrent program, Autoschedule. You must set the bucket pattern and schedule type for both planning and shipping.
Managing Cumulative Quantities
Much of the functionality in supplier scheduling rests on the communication of cumulative quantities. You set a counter running over a defined period. Receipts add to the cumulative, and Return to Vendor (RTV) transactions subtract from it. The period might be a model year in the automotive industry or a quarter in the electronics industry.
CUM Periods
To set up a CUM period, navigate to the Find CUM Periods form in the CUM Management menu. Choose CUM Periods from the radio group and click the Find button. You define the CUM Period for a given ship-to organization. You can review and adjust the cumulative quantities for the items shipped to this organization by choosing CUM Period Items from the radio group in the Find window or by clicking the button in the CUM Periods window.
CUM Period Items
From the CUM Period Items window, you can review the item, CUM quantity, and UOM for the CUM period, supplier, and supplier site being reviewed. The High Authorizations section of the window shows the current and highest authorization quantities for each authorization type. Authorization types are the following:
![]() Finished Goods Authorization is to procure and convert material. Liability is for finished product at list price.
Finished Goods Authorization is to procure and convert material. Liability is for finished product at list price.
![]() Labor and Material Authorization is to procure and convert material. Liability is for labor and material cost.
Labor and Material Authorization is to procure and convert material. Liability is for labor and material cost.
![]() Labor Authorization is to convert material.
Labor Authorization is to convert material.
![]() Raw Material Authorization is to procure raw materials. Liability is for material cost.
Raw Material Authorization is to procure raw materials. Liability is for material cost.
You can make adjustments to the CUM quantities and authorizations by clicking the Adjust button.
Communicating the Schedule to Suppliers
You can communicate schedules to your suppliers in a number of ways, including standard EDI transactions, printed reports, and supplier self-service in the Oracle Internet Supplier Portal. The EDI transactions offer a high degree of automation between supplier systems and your own systems but are expensive to set up. You can communicate long-term planning schedules and shorter-term shipping schedules.
EDI Transactions
The X12 transactions that support the supplier scheduling process are the 830 Planning schedule and the 862 Shipping schedule.
Planning Schedules
The planning schedule is of three types: forecast only, forecast with authorizations, and forecast with release. If you use an 830 Forecast with Material Release, you may eliminate the need for a shipping schedule, but the planning schedule becomes the system of record for release information and must be archived.
Shipping Schedules
The shipping schedule is more typically used for near-term requirements. Daily buckets are generally used to gather blanket release and purchase order information.
Reports
You can print both the Planning Schedule report and the Shipping Schedule report by navigating to the Report Submission form. Parameters include schedule number and revision, supplier number range, supplier site, and whether this is a test print or not. A test print allows you to print a schedule that is not confirmed.
Supplier Self-Service
The Oracle Internet Supplier Portal has secure self-service inquiry screens for both planning and shipping schedules. It does not offer the degree of automation of EDI, but it is available to any supplier with access to a Web browser without set-up or training costs.
Internet Supplier Portal
Oracle Purchasing also provides extranet access to key suppliers through the Internet Supplier Portal. This system is available over the public Internet and is designed to be usable by an occasional user. The system is built around the Web applications architecture. You can create a user in Oracle Applications and assign the supplier and supplier site to the user. When the supplier logs on, they are restricted to data for that supplier. The Supplier Portal integrates workflow notifications viewer, enabling cross-enterprise business processes, such as registration and order acknowledgement, to be managed at very low cost. It integrates data from four key supplier facing applications:
![]() Oracle Purchasing
Oracle Purchasing
![]() Oracle Supplier Scheduling
Oracle Supplier Scheduling
![]() Oracle Payables
Oracle Payables
![]() Oracle Inventory
Oracle Inventory
The capabilities cover the same areas as the core purchasing product: Supply-Base Management, Purchasing, Supplier Scheduling, Outside Processing, Receiving, Invoicing, and Inventory.
Supply-based Management
In Internet Supplier Portal, suppliers can update supplier capacity on the ASL, specify supplier/item order modifiers such as minimum order quantity and lot quantity restrictions, define supplier/item lead times, and view RFQs.
Purchasing
In Internet Supplier Portal, suppliers can acknowledge purchase orders by an accept or reject action; change promise dates for delivery; and view purchase orders with related invoices, receipts, revisions, and order history. Suppliers can review blanket purchase orders and associated releases. They can review planning and shipping schedules. They can review outside processing orders, including quality specifications and attachments.
Receiving
Suppliers can review quality plans and record results for shipments. Suppliers can enter Advance Shipment Notifications (ASN) when goods leave their facility, and view the receipts, eliminating the need for proof of delivery tracking. Suppliers can review their open delivery schedules, any overdue receipts, and their on-time delivery performance.
Invoices
Suppliers can enter Advance Shipment and Billing Notifications (ASBN), confirm the receipt of an invoice, and confirm payment has run.
Configuring Oracle Purchasing
To configure Oracle purchasing, you need to define requisitioners; delivery, shipping, and billing locations; approval hierarchies; document routings; and security.
Locations
At the time of going to press, purchasing uses the standard location model provided by the Human Resource Applications. To set up a location, navigate to the Locations form in the Setup menu. You must give the location a name and (optionally) a description. You can provide a contact for the address and a ship-to site if the location is only a delivery address. For example, the mailroom may be a ship-to address for an office delivery location. You can mark the address as a combination of the following:
![]() Ship-to Making it valid as a ship-to on a purchase order. For example, Neptune warehouse 3.
Ship-to Making it valid as a ship-to on a purchase order. For example, Neptune warehouse 3.
![]() Receiving Site Making it valid as a receiving location, for receiving transactions. For example, Receiving Dock 1.
Receiving Site Making it valid as a receiving location, for receiving transactions. For example, Receiving Dock 1.
![]() Bill-to Site Making it valid as a bill-to printed on a purchase order. This is where the supplier will send his invoice. For example, Neptune Payables department.
Bill-to Site Making it valid as a bill-to printed on a purchase order. This is where the supplier will send his invoice. For example, Neptune Payables department.
![]() Internal Site Making it valid as a ship-to location on an internal requisition.
Internal Site Making it valid as a ship-to location on an internal requisition.
Buyers
Employees, once defined in the Human Resources system, can then be defined as buyers to the purchasing system. Only buyers can create purchase orders and use the Autocreate functions. The Define Buyers form is in the Setup menu. Buyers are associated with a purchasing category and ship-to location.
Approval Groups and Their Assignments
Approval Groups are a set of authorities to approve documents. Members of the approval group may be such through the jobs or positions assigned to the approval group. The approval group may be granted approval authority for a given document type over the following:
![]() Range of item categories
Range of item categories
![]() Range of account numbers that the purchases will be charged
Range of account numbers that the purchases will be charged
![]() Document value
Document value
A given approval group may be assigned approval authority or excluded from the approval of many ranges. For example, Neptune records all maintenance activity in the account range 7000-7999. Computer maintenance is in the account range 7800-7899. An approval group of “MRO Non Computer” is responsible for all maintenance, repair, and overhaul procurement except for computer equipment. This approval group is assigned to a job or position hierarchy for the approval of requisitions and purchase order document types. The Approval Group Definition and Approval Group Assignment form is in the Setup menu. Jobs and positions are part of the Human Resource setup. The approval routing of a document may follow the employee supervisor relationship defined when creating employees, or it can follow the position hierarchy. You make this choice in Financial Options.
Adding Notes to Purchasing Documents
Purchasing has the capability to add brief notes to lines in the More tab. These notes must be less than 240 characters. It also takes advantage of the standard attachments capability to add unlimited text. To add and review attachments, click the paper clip icon in the toolbar. These capabilities include the ability to review the catalog of standard content as a template. For example, you may have a standard terms and conditions template. You may attach this as a template and modify it for a specific order. The capabilities include the ability to attach many kinds of documents, including spreadsheets, graphics, or a reference to a URL. You may attach documents to an item and have these documents applied to all requisitions and purchase orders for this item.
Purchasing Documents Attachment Flow
You can attach text to purchasing documents and have the text flow through dependent documents:
![]() Requisition attachments are copied to purchase order lines through AutoCreate.
Requisition attachments are copied to purchase order lines through AutoCreate.
![]() Blanket order attachments can be reviewed from the release headers.
Blanket order attachments can be reviewed from the release headers.
![]() Requisition attachments are copied to corresponding RFQ. You can choose to copy the RFQ attachments to a corresponding quote.
Requisition attachments are copied to corresponding RFQ. You can choose to copy the RFQ attachments to a corresponding quote.
Attachment Usages and Printing Attachments on Documents
You can specify where the attached text will be viewable and printable through the assigned usage:
![]() Supplier Means that the text will be printed on all documents.
Supplier Means that the text will be printed on all documents.
![]() Receiver Means that the text can be attached to RFQs, POs, quotations, receipts, and requisitions, and it will be viewable in the receiving forms and print on the receipt traveler.
Receiver Means that the text can be attached to RFQs, POs, quotations, receipts, and requisitions, and it will be viewable in the receiving forms and print on the receipt traveler.
![]() Approver Means that the text can be attached to a requisition and will be displayed to approvers.
Approver Means that the text can be attached to a requisition and will be displayed to approvers.
![]() Buyer Means that the text can be attached to a requisition and will be displayed to buyers when POs are created.
Buyer Means that the text can be attached to a requisition and will be displayed to buyers when POs are created.
![]() Internal Means that the attachment will be viewable only from the creation form and not printed on documents. The exception is RCV Internal attachments that are visible to receivers and printed on receiving travelers.
Internal Means that the attachment will be viewable only from the creation form and not printed on documents. The exception is RCV Internal attachments that are visible to receivers and printed on receiving travelers.
![]() Payables Means that the attachment is viewable in payables during receipt matching.
Payables Means that the attachment is viewable in payables during receipt matching.
Purchasing Options
There are some options defined for the operating unit that is running purchasing. These include sources of default; how to accrue liabilities; what level of control you institute over purchase orders, invoices, and receipts; and how to create internal sales orders, document numbering, and tax. To define the purchasing options, navigate to Purchasing Options form in the Setup menu. The tabs are defined in the following sections.
Default Options
You can define the exchange rate type that defaults onto the orders. Purchasing helps you ensure that releases are economic by letting you restrict the minimum release amount. You can set price breaks to be per release or cumulative across orders. Prices can be defaulted as fixed, cost plus, indexed, or variable. You can set the default line type. The number of days that buyers will be warned before quotes expire can be set here. You can enforce that RFQs are required for all requisitions. Tolerances can be set within which a shipment will be considered completely received, within which the shipment will be considered closed for invoice matching, and within which the shipment will be considered completely matched.
Accrual Options
You must define whether to accrue expense receipts at period end or on receipt. Inventory must currently be accrued on receipt. You must also define a default expense accrual account.
Control Options
You can specify various controls and level of controls over orders, receipts, and invoices. And you can prevent orders that exceed the requisition price by a certain percentage from being approved. You might want to only order in full lot quantities. You may have defined an item that is less specific than what you actually require from a supplier. For example, if you defined an item for 1/4-inch threaded fasteners, but require a galvanized black fastener, you can overwrite the description of the item on the order line.
Price Tolerance
You can define the maximum percentage that a purchase order may be created for in excess of the requisitioned value. If you choose to enforce the price tolerance, the purchase order can be created, but it will not be able to be approved.
Lot Quantity
Defines whether requisition line quantities should be rounded into fixed-lot quantities or whether recommendations for such rounding should be presented to the user.
Receipt Close
This defines when a shipment from a supplier can no longer be received against—when it is received, passed inspection, or delivered.
Requisition Cancellation
This defines if purchasing should cancel a requisition when canceling a purchase order: always, optionally, or never.
The other option flags are as follows:
![]() Notify If Blanket PO Exists To alert purchasing users to the existence of a blanket PO when creating any purchasing document for an item that is on a blanket.
Notify If Blanket PO Exists To alert purchasing users to the existence of a blanket PO when creating any purchasing document for an item that is on a blanket.
![]() Allow Item Description Update Allows an item description to be updated on a PO line when that line is created. For example, you may define an item for 1/4-inch threaded fasteners and update the description to include the color.
Allow Item Description Update Allows an item description to be updated on a PO line when that line is created. For example, you may define an item for 1/4-inch threaded fasteners and update the description to include the color.
![]() Enforce Buyer Name To allow only the buyer assigned to the category to create purchase orders for requisitions within that category.
Enforce Buyer Name To allow only the buyer assigned to the category to create purchase orders for requisitions within that category.
![]() Enforce Vendor Hold To prevent the approval of an order for a supplier currently on hold.
Enforce Vendor Hold To prevent the approval of an order for a supplier currently on hold.
Document Numbering Options
You can define whether the document numbers for the purchasing document types are assigned and whether documents are identified by a number or an alphanumeric identifier. You can assign the next number in the numbering sequence for all of the purchasing document types.
Tax Defaulting Hierarchy
The tax defaulting hierarchy allows you to assign precedence to each place that a tax code is stored for defaulting onto an order. Places that you can default from are ship-to location, item, supplier site, supplier, and financial options.
Requisition Templates
Requisition templates are a way of guiding the requisitioner to the items and sources for those items without them having to navigate all purchasable items. If stationery supplies generally comprise 20 items, the user will have only the 20 items to choose from, and prices and sources can be predetermined. To create or modify a requisition template, navigate to the Requisition Template form in the Setup Purchasing menu.
When defining the template, you must give the template a name and description. You can (optionally) set an expiration date. The template type limits the use of the template to internal or external requisitions.
Template Lines
Give the template line a number and choose a line type. The line type will determine if the item number is mandatory. If the item is revision-controlled in the destination organization, you can choose a revision. If an item is not mandatory, choose a category and description. You can specify the source type of inventory or supplier, unit, and purchase price.
Line Sourcing Information
For supplier-sourced requisition lines, you can specify the supplier, supplier site, and contact. For inventory-sourced requisitions, you can specify the organization and subinventory.
![]() NOTE
NOTE
You can set the line sourcing even though it may be inconsistent with the sourcing type assigned at the header.
You can name the buyer and the supplier item number for the item. You can set the default for the RFQ required flag for all requisitions that are created from this template.
Document Types
You cannot define new document types, but you can create new subtypes of them. To update an existing subtype, or create a new subtype, navigate to the Document Types form in the Setup Purchasing menu. If you create a subtype of quotation, it is further classified as either a bid (specific order) or catalog (multiple orders).
You can limit the ability of the creator of a document to approve or modify it. You can disallow anyone from changing the approval routing through changing the forward-to, from, or approval hierarchy.
With the security level and access level, you can limit the maintenance and review of documents of this type available to the following:
![]() Only those in the approval hierarchy
Only those in the approval hierarchy
![]() Only members of the Purchasing department
Only members of the Purchasing department
![]() Only the owner of the document
Only the owner of the document
![]() All users
All users
You can forward documents directly to the first person in the approval chain with sufficient authority to approve them, or you can forward them to the next person in the chain through the Forward Method. You can archive documents of the document subtype on approval or printing.
Workflow Settings
You can set an approval workflow for documents of this subtype. You can also set the startup process that will create the document in the workflow system. If the subtype you are defining is a subtype of requisition, you can define a workflow process to manage the Autocreate function.
Line Types
You must define line types by giving them a name and description. You must define whether the value basis of the line is based on the quantity. You can assign a default category, unit of measure, and price to the line type. You can define whether a receipt is required for shipments of this type of line. If you click the Outside Processing check box, only outside processing items can be added to a line of this time.
Periods
If you have enabled encumbrance, when you create transactions in Purchasing you will also create encumbrance entries. These entries are posted to a period balance defined in a G/L calendar. A period is defined by its name, start date end data, fiscal year, and status. Statuses for purchasing periods are the following:
![]() Closed Means that you Can no longer accrue purchases in this period.
Closed Means that you Can no longer accrue purchases in this period.
![]() Future Means that you will be posting to this period in the future.
Future Means that you will be posting to this period in the future.
![]() Never Opened Periods are created in this status by default.
Never Opened Periods are created in this status by default.
![]() Open Means that you can post entries in this period.
Open Means that you can post entries in this period.
![]() Permanently closed Means that you do not intend to open this period in the future, although this status is reversible.
Permanently closed Means that you do not intend to open this period in the future, although this status is reversible.
Purchasing Workflows
Purchasing uses Oracle Workflow extensively for routing documents, automating activities, notifying users that their input is required, detecting out of tolerance conditions, and allowing an expert user access to change the application’s logic in a supportable way.
Constructing Accounts
The name of this workflow in the workflow builder is PO Account Generator. Purchasing uses the account generator functions implemented in workflow to determine the accounting code combinations. Requisitioners and purchasing agents do not need to enter accounting distributions because they can be generated automatically. The workflow functions take segments from the code combinations that are defined for the application’s objects used in the transaction. It uses them to assemble code combination to charge. For example, if a requisition is to be delivered to an expense subinventory, code combinations are associated with both the item and the subinventory that can be used. Segment 1 may be taken from the item, and segment 2 may be taken from the subinventory to construct a valid code combination. Be sure to work with your financial and systems administrator people when making changes.
The system builds accounts for the charge, budget, accrual, and variance account and can use segments from preceding accounts as a default. The following processes can be changed and the other parts of the installation still be supportable by Oracle:
![]() Generate Default Accrual Account
Generate Default Accrual Account
![]() Generate Default Budget Account
Generate Default Budget Account
![]() Generate Default Charge Account
Generate Default Charge Account
![]() Generate Default Variance Account
Generate Default Variance Account
![]() Build Inventory Budget Account
Build Inventory Budget Account
![]() Build Inventory Charge Account
Build Inventory Charge Account
![]() Build Expense Project Accrual Account
Build Expense Project Accrual Account
![]() Build Expense Project Budget Account
Build Expense Project Budget Account
![]() Build Expense Project Charge Account
Build Expense Project Charge Account
![]() Build Expense Project Variance Account
Build Expense Project Variance Account
![]() Build Shop Floor Charge Account
Build Shop Floor Charge Account
![]() Get Charge Account for Variance Account
Get Charge Account for Variance Account
Approving Requisitions
This work item type is displayed in the workflow builder as PO Requisition Approval. The requisition approval process is the one that routes a requisition up either the supervisor or approval hierarchy. When an approval is entered, either the next person in the hierarchy is notified of the pending approval or the prior approver has sufficient authority to approve the requisition. The requisition approval workflow contains the following functions:
![]() Reject Requisition
Reject Requisition
![]() Reserve at the Start
Reserve at the Start
![]() Reserve Before Approve
Reserve Before Approve
![]() Return Requisition to Submitter
Return Requisition to Submitter
![]() Verify Approval Authority
Verify Approval Authority
![]() Verify Approval Authority for Approve Action
Verify Approval Authority for Approve Action
![]() Verify Approval Authority for Approve and Forward Action
Verify Approval Authority for Approve and Forward Action
![]() Verify Requisition
Verify Requisition
![]() Approve Requisition
Approve Requisition
![]() Approval List Routing
Approval List Routing
![]() Main Requisition Approval
Main Requisition Approval
![]() Notify Approver
Notify Approver
![]() Response with Approve Action
Response with Approve Action
![]() Response with Approve and Forward Action
Response with Approve and Forward Action
![]() Response with Forward Action
Response with Forward Action
![]() Response with Reject Action
Response with Reject Action
Approving Purchase Orders
This work item type is displayed in the workflow builder as PO Approval. The purchase order approval process also takes into consideration interaction between the requisitioner and the supplier in its workflow. It is aware of changes in source documents. It is also aware of change order processing on the purchase order. The purchase order approval process contains the following functions:
![]() Do Document Changes Require Reapproval?
Do Document Changes Require Reapproval?
![]() Find Approver
Find Approver
![]() Get All Blanket PO Changes
Get All Blanket PO Changes
![]() Get All Contract PO Changes
Get All Contract PO Changes
![]() Get All Planned PO Changes
Get All Planned PO Changes
![]() Get All Release Changes
Get All Release Changes
![]() Get All Standard PO Changes
Get All Standard PO Changes
![]() Notify Approver
Notify Approver
![]() Print Document
Print Document
![]() Print Document (Change Order)
Print Document (Change Order)
![]() Fax Document Process
Fax Document Process
![]() Fax Document (Change Order)
Fax Document (Change Order)
![]() Approve and Forward PO
Approve and Forward PO
![]() Approve PO
Approve PO
![]() Approve PO (Change Order)
Approve PO (Change Order)
![]() Forward PO
Forward PO
![]() Get All Document Changes
Get All Document Changes
![]() PO Approval Process
PO Approval Process
![]() PO Approval Top Process
PO Approval Top Process
![]() Reject PO
Reject PO
![]() Return PO to Submitter
Return PO to Submitter
![]() Verify Approval Authority
Verify Approval Authority
![]() Verify PO
Verify PO
Managing Change Orders
Whenever the document status becomes Requires Reapproval, it goes through the same workflow process as its approval. The document requires reapproval whenever its revision is incremented or any of its change tolerances are exceeded. Change tolerances are as follows:
![]() Change Order Header Blanket Total Tolerance
Change Order Header Blanket Total Tolerance
![]() Change Order Header Amount Limit Tolerance
Change Order Header Amount Limit Tolerance
![]() Change Order Header Purchase Order Total Tolerance
Change Order Header Purchase Order Total Tolerance
![]() Change Order Line Quantity Tolerance
Change Order Line Quantity Tolerance
![]() Change Order Line Unit Price Tolerance
Change Order Line Unit Price Tolerance
![]() Change Order Line Quantity Committed Tolerance
Change Order Line Quantity Committed Tolerance
![]() Change Order Line Agreed Amount Tolerance
Change Order Line Agreed Amount Tolerance
![]() Change Order Line Price Limit Tolerance
Change Order Line Price Limit Tolerance
![]() Change Order Shipment Price Override Tolerance
Change Order Shipment Price Override Tolerance
![]() Change Order Shipment Quantity Tolerance
Change Order Shipment Quantity Tolerance
![]() Change Order Distribution Quantity Ordered Tolerance
Change Order Distribution Quantity Ordered Tolerance
If the changes are within these tolerances the changes are reapproved automatically. These change tolerances are stored as Work Item Attributes on the PO Approval work item type.
Automatic Purchase Order and Release Creation
This process is displayed in the workflow builder as PO Create Documents. You can automatically create purchase orders or releases at the end of the requisition approval process if the attribute Is Automatic Creation Allowed is set to Yes. You can set the value of this attribute by opening the process in the workflow builder. You can also automatically submit the purchase order for approval by setting the value of the Work Item Attribute Is Automatic Approval Allowed to Yes.
Receipt Notification Requests
This process is displayed in the workflow builder as PO Confirm Receipt. This process tests for shipments that have passed their need-by dates that were routed for direct delivery to the requisitioner. The requisitioner is notified via e-mail, the forms-based notifications viewer, or the Web-based notifications viewer. The user can respond to the notification and update the received amount automatically.
Procurement Process Flows
Purchasing also delivers purchasing best practice business processes that can be navigated. You can access them from the Processes tab in the navigator. Purchasing delivers a procure to pay, sourcing, receiving, and PO creation. You can start the process in the process navigator and invoke the forms and processes that are needed to execute the process. Click the Launch button to start the process. An example of the purchase order create process is illustrated in Figure 13-15.

FIGURE 13-15. Navigating through the PO creation process
Universal Inbox
You can use a number of Web-based user interfaces for the management of notifications. You can see and respond to both To Do and FYI notifications in your notifications viewer. To review your notifications, navigate to the Worklist in the Workflow User menu. You can set up rules for delegation of notification due to absence. To set up notification rules, navigate to the form in the Workflow menu.
Important Item Attributes for Purchasing
To set up the item attributes for purchasing, navigate to the Master Items or Organization Items form in the Items menu. You can define an item to be a Purchased item, and you can separately set its current status to Purchasable. The Purchasable attribute can be status-controlled. You can mandate that an approved supplier must be used to purchase from. The item description can be updated when the purchase document is created if you set the Allow Description Update to Yes. You can mandate that RFQs must be issued when requisitions are raised. The Outside Processing Item flag defines this item as the service provided by an outside processing provider in converting material you supply to them. You can define the item to be taxable or not, and you can define the tax code that applies to it. The default buyer will be defaulted onto requisitions for this item, and a default purchasing unit of measure will be the unit of measure that you raise purchase documents in. The percentage of the shipment quantity—within which the quantity received will be deemed to completely fulfill the shipment line for receiving—is defined in the Receipt Close Tolerance. The percentage of the shipment quantity—within which the quantity received will be deemed to completely fulfill the shipment line for invoice matching—is defined in the Invoice Close Tolerance.
For invoice matching, you can define that the invoice line quantities will be matched against receipt quantities or inspected and approved quantities. You can define the hazard class for the item. You can define a list price for defaulting onto requisitions and a market price from which you can judge the performance of your buyers. You can define the price increase tolerance beyond which price increases on catalog updates will be flagged to buyers.
You can record accounts that may have segments used from them in the account generator processes for encumbrance account and expense account for noninventory items. If the item will be received into the asset register, you may define the asset category that it belongs to.
Importing Requisitions
The main way to get information into the purchasing system is through the requisition import process. Requisition import receives requisitions from Order Management for drop ship orders, Master Scheduling, and MRP for supply requisitions; Inventory for kanban replenishments; and Work In Process for outside processing requirements. You can automatically source the requisitions, create purchase orders and releases, and submit them for approval all in the same run. Set the profile PO: Release During Reqlmport to Yes. Requisition Import calls the Create Document Workflow for the Approved requisitions.
If you are using encumbrance, the status of the imported requisitions is set to pre-approved, and they will not show up as supply until approved.
Submitting Requisition Import
To submit the requisition import process, navigate to the submission form and select Requisition Import. You can specify an import source or leave it blank for all sources.
![]() NOTE
NOTE
Only import sources that are currently in the interface table will be rendered in the LOV.
You can specify a batch number to import, or you can import all batches. You can group requisition lines onto requisitions by buyer, item category, item, location, or supplier. Choose whether to launch the approval workflow for approved requisitions.
Requisition Import Interface Table
The Requisitions interface table is called PO_REQUISITIONS_INTERFACE_ALL. The interface table contains information about the source system, processing status, sourcing, requisition document, suggested vendor, approval, destination and delivery, encumbrance and account information, approval information, and line information. These are all in the single table.
Create Document Workflow Functions
Purchasing wraps a number of functions in wrappers to allows them to be called by workflow for the creation of requisitions. They are implemented in a package called PO_AUTOCREATE_DOC. The workflow activities call the functions within this package. The workflow wrappers themselves call other procedures. To call a function from workflow, it must have the following signature:

Purchasing provides the following functions in the PO Create Document workflow:
![]() Is Automatic Creation Allowed Implemented in the function SHOULD_ REQ_BE_AUTOCREATED
Is Automatic Creation Allowed Implemented in the function SHOULD_ REQ_BE_AUTOCREATED
![]() Launch Process To Verify Req Line Information Implemented in the function IS_SOURCE_DOC_INFO_OK
Launch Process To Verify Req Line Information Implemented in the function IS_SOURCE_DOC_INFO_OK
![]() Is This An Emergency Requisition? Implemented in the function IS_THIS_ EMERGENCY_REQ
Is This An Emergency Requisition? Implemented in the function IS_THIS_ EMERGENCY_REQ
![]() Put All Requisition Lines On A Purchase Order Implemented in the function INSERT_INTO_LINES_INTERFACE
Put All Requisition Lines On A Purchase Order Implemented in the function INSERT_INTO_LINES_INTERFACE
![]() Launch Process To Create/Approve PO or Release Implemented in the function CREATE_DOC
Launch Process To Create/Approve PO or Release Implemented in the function CREATE_DOC
![]() Remove Processed Req Lines From Temp Table Implemented in the function PURGE_ROWS_FROM_TEMP_TABLE
Remove Processed Req Lines From Temp Table Implemented in the function PURGE_ROWS_FROM_TEMP_TABLE
Summary
This chapter reviewed the applications in the purchasing and supply base management space. They cover applications to coordinate requisitions through both Web-based and forms-based interfaces. You also reviewed the applications used to find suppliers for a given product or service. These are the RFQ and Quoting systems. The applications that link suppliers to the items and commodities that they are approved to supply were also covered.
The chapter also covered the different types of purchase orders and how they are created with the Autocreate functions, how planning and purchasing demands are grouped and bucketed into schedules in Supplier Scheduling, and the extranet applications that allow suppliers to interact with your system in Internet Supplier Portal. How to set up and integrate the purchasing with other applications was also covered.