12
Automation
If you work in the video industry, chances are you’re used to deadlines. Whether it’s a rush to get the show on-air, a client sitting over your shoulder in the edit suite, or a replication due date, you’ve got hard deadlines to make. While we can’t extend your FedEx drop-off times, we can get you some of your life back. You can save precious minutes (even hours) by learning to harness the power of Photoshop’s awesome automation tools to meet your next production deadline.
Actions at Your Fingertips
 Customize your keyboard! Photoshop actions can be mapped to the keyboard, giving you up to 60 customizable keys by using the f-keys and modifiers.
The Tools of the Trade
There’s a lot of different ways to speed up your workflow in Photoshop. You have several built-in choices (and even a few third-party choices). Finding the right one requires an understanding of each. Photoshop’s automation tools can be a huge time-saver, and most video pros find they are pretty easy to use. There are four major categories of automation techniques:
Actions. Actions offer the ability to generate extremely complex results. Batch processing allows you to run an action on an entire folder of images.
Droplets. By turning an action into a droplet, you can place the convenience of Photoshop Actions into a drag-and-drop utility on your desktop.
Automate commands. These perform complex production-oriented tasks with minimal effort.
Scripts. You can harness scripts to perform tasks that are more complex than actions. Creating scripts requires programming skill, but Photoshop ships with several useful scripts built in.
Actions
Virtually every command (and better yet, series of commands) can be captured and played back later. Basic actions will play back one command, such as a resize command or image mode change. In fact, these simple actions often can take advantage of your empty function keys on the keyboard. By combining the ![]() key modifiers, a standard keyboard has 48 to 60 customizable keys.
key modifiers, a standard keyboard has 48 to 60 customizable keys.

An Overview of the Actions Palette
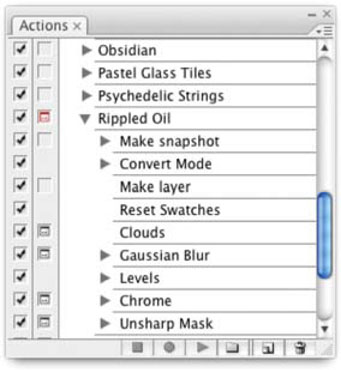
Call up the Actions palette (Window>Actions). Go to the palette’s submenu and make sure that the Button mode is not checked. One of the first things you’ll notice is a familiar interface. This is one tool that is clearly video-influenced: the Stop, Record, and Play buttons function like their video counterparts. The other three buttons appear similar to those found in other palettes. The Folder icon creates sets; a set holds individual actions just as bins hold clips. The Page icon creates a new (empty) action. The Trash icon performs the obvious role of deleting items.
To get started, let’s work with one of Photoshop’s built-in collections. Go to the Actions palette submenu and choose Textures.atn. (This file should have been loaded when you installed Photoshop.) Any actions stored inside of the Presets folder will appear in the submenu’s list (Application Folder>Presets>Photoshop Actions). These texture actions are not specifically designed for video, although you may find them useful for creating texture layers.
The built-in Rusted Metal action can be useful for text effects or backgrounds.

Step 1. Create a new document using one of the video presets (File>New . .).
Step 2. In the Actions palette, open the Textures set by clicking the triangle next to its name to twirl it down.
Step 3. Click on the Obsidian action and press Play. Photoshop quickly creates a realistic texture by combining several built-in filters and image adjustment techniques. Let’s try another.
Step 4. Next, try the Rusted Metal option. Highlight the name and press Play.
Depending on your processor speed, Photoshop should have finished rendering about…now. I hope you are impressed. Flip down the triangles in the Actions palette and look at how elaborate some actions are. You may be thinking that these are somewhat interesting, but surely they will get old quickly.
This is not the case. Modifying actions is simple. The easiest way is to turn Dialog Boxes on. Normally, an action will play all the way through, using the original values assigned to the filters or image adjustments. By clicking in the column next to the action’s name (the empty space next to the checkmark), you can enable dialog boxes for a filter or adjustment. These dialog boxes let you enter variables and influence an action’s outcome.
Step 5. Try this out: turn on Dialog Boxes for the Rippled Oil action. Then press the play button.
Step 6. Click through the first few options about naming layers. Try different values for the Clouds, Chrome, Gaussian Blur, and Unsharp Mask filters.
Enable Dialog Boxes for future variations.
Same action, different outcomes. Turn on the dialog boxes for new results.

By modifying an action, several different outcomes are possible. Flip down the triangle next to an action’s name, and you will see the list of steps. It is possible to turn on only some of the dialog boxes by clicking next to the specific step.
If you are excited by the little you’ve seen so far, keep reading. We have only scratched the surface. Actions open up all sorts of options, both for creative and technical outcomes.
The Best Things Are Free—A sample of Photoshop’s built-in Image Effects Actions.

Using Built-In Actions
Photoshop ships with several built-in actions for various tasks. These actions are meant to solve basic problems as well as serve as a source of inspiration. You’ll find eight different action sets built in; each set contains multiple actions.

Commands. This set adds function key shortcuts for several useful commands. This set is really unnecessary, since Photoshop now allows you to customize menus.
Frames. This set can be used to add border effects to your images. There are several attractive borders included.
Image Effects. These actions can process an image for specialty looks. There are some good actions in here worth trying.
Production. If production means print or Web to you, these are great… but then why would you be reading this book?
Sample Actions. A literal grab bag meant to generate ideas. Have a quick look just to see what is possible.
Text Effects. These are useful for creating some stylized text treatments. Unlike Layer Styles, these are not editable, so you may want to duplicate the text layer before applying the action.
Textures. These actions can be used to creating background layers or textures to overlay on top of a logo or text.
Video Actions. I made these actions just for you… really! I cowrote these actions with Daniel Brown from Adobe Evangelists. They automate several of the techniques we’ve covered in this book. So if things are automated, why learn the “slow” way? My goal is to teach you they why and the how… so use these actions to save time, but still know how they work. Each action contains a Stop command at the top, which explains how the action works. When you have a hold on how the action works, delete the stop so the action runs uninterrupted.
Finding Actions That Help the Video Editor
Entire Web sites and commercial products have been developed that significantly extend Photoshop’s ability as a video tool. The accompanying DVD includes samples of some of these products.
Tools for Television. The Tools for Television Photoshop Toolbox package (http://www.toolsfortelevision.com) builds safe-title documents for every format, resizes square pixel documents, and helps build alpha channels.
ActionFX. One source that has both free and for-sale actions is the diverse Web site ActionFX (http://www.actionfx.com).
Members have access to thousands of Photoshop actions, as well as other add-ons. You’ll find free items to try out before joining. You’ll also find some great samples on the DVD-ROM.

PanosFX. A newer site that is really becoming one to watch is PanosFX (http://www.panosfx.com). This site has some incredible free actions as well as some very affordable and powerful tools for sale. You’ll also find some great samples on the DVD-ROM.

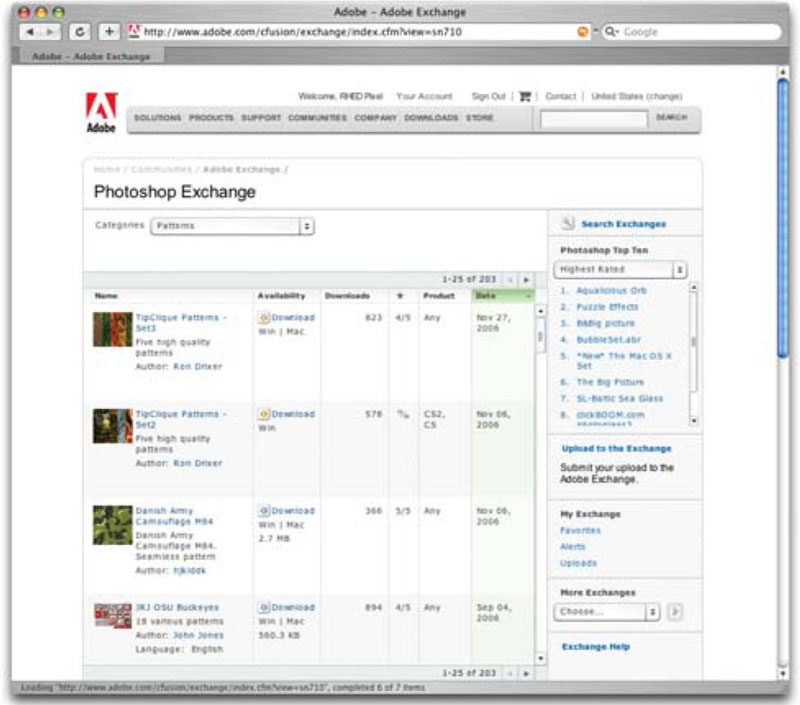
Adobe Exchange. If you’re not in a position to purchase addons to your system, there’s one incredible free resource worth mentioning. With the release of Photoshop 5.5, Adobe launched a website originally called Action Xchange where users could share their actions; see http://www.adobe.com/exchange.
If you download actions from a Web site, they are probably compressed. After you extract or decompress the files, they should have the extension .atn after them, so Photoshop knows that they are actions.
When you successfully download actions (or create your own), you will want to store them in two places. If you install them into your Presets folder (Photoshop Application>Presets>Photoshop Actions), they will be available from the Actions palette submenu. Storing them in your Presets folder is convenient, but if you have to reinstall Photoshop, it will erase the Photoshop Actions and replace them with the defaults. Therefore, back up a copy of your actions to another location so that you can quickly load them in after future upgrades.
Creating and Saving Actions
Throughout this book, I’ve offered several keyboard shortcuts. Many of them will be useful, but I have no doubt that you’ve wished for more. Starting with Photoshop CS, keyboard shortcuts can now be remapped by choosing Edit>Keyboard Shortcuts… or pressing ![]() . Despite this ability, you’ll discover that not all commands are available in the Customize menu.
. Despite this ability, you’ll discover that not all commands are available in the Customize menu.
Wouldn’t it be nice to have a single click for a new DVD menu sized document or create safe-title area button? You can by mapping an action to an f-key. Most keyboard have 12 to 15 function keys and 2 modifier keys, for a total of up to 60 keys that you can customize.

Mapping complex commands to your keyboard involves a few steps. First, you must create a set to hold your actions. Sets hold actions, and there’s no limit to how many actions in a set, or how many sets you can load. For example, you could create a set with 60 actions mapped to the f-keys. You could have another set mapped to the same keys and simply swap it out. The possibilities are endless. Let’s try it out.
Step 1. Open an image.
Step 2. Call up the Actions palette and click on the Create New Set Icon (looks like a Folder icon).
Step 3. Name the set, making sure to add the extension .atn at the end.
Step 4. Click on the new Action icon.
Step 5. Name the action and assign it to F2. If you want, you can also assign a color to the action. Colors help identify actions when you are in the simplified Button mode.
Step 6. Under the Filter menu, choose the De-Interlace filter (Filter>Video>De-Interlace).
Step 7. Click Stop. Congratulations! You’ve just made Photoshop faster and more video-friendly.
Step 8. Now save your work. Click on the action set (not the individual action, the entire set). Go to the Actions palette submenu and choose Save Actions. By default, the Photoshop Actions folder will be chosen. If it isn’t, search for it in your presets folder. Name the set and make sure that the extension .atn is added after the name.
Repeat these steps as needed. Virtually every menu command or button can be recorded (although manual items from the toolbox do not record properly). Actions can be duplicated, modified, and deleted. Explore all of the options in the Actions palette submenu, look at other people’s actions, and experiment by creating your own actions. With a little practice and imagination, you’ll be amazed at what you can accomplish.
Another Action to Record
While layer styles are a great design option in Photoshop, they don’t often travel well. After Effects can only import a limited amount of layer style options, and other video application essentially ignore them altogether. The approach we take in our studio is to save a layered PSD file, then a second layered file with layer styles flattened for import.
Step 1. Make a new empty layer and call it “Flat.”
Step 2. Press ![]() to move the current layer below your styled layer.
to move the current layer below your styled layer.
Step 3. Press ![]() to select the forward layer.
to select the forward layer.
Step 4. Link the selected layer to the layer called flat by clicking the link icon at the bottom of the layers palette.
Step 5. Choose Layer>Merge Layers.
General Tips for Better Actions
The Actions palette provides a video-friendly graphic user interface (GUI) for computer programming. Here’s some general advice to get results quickly.
Video #20 Using Batch Processing Commands
 To learn more about batch processing, watch the video tutorial on the DVD-ROM.
• Brush strokes, cloning, and most manual tools from the toolbox do not work. There are several alternatives, such as using a Gradient Fill layer instead of the Gradient tool.
• To play a single step of an action, double-click on it.
• Button mode lets you launch actions quickly; it’s in the Actions palette’s submenu. You’ll need to disable it to get recording and editing features.
• Set the Playback Options from the Actions palette submenu to play back an action accelerated. Photoshop can process faster than it can redraw the screen.
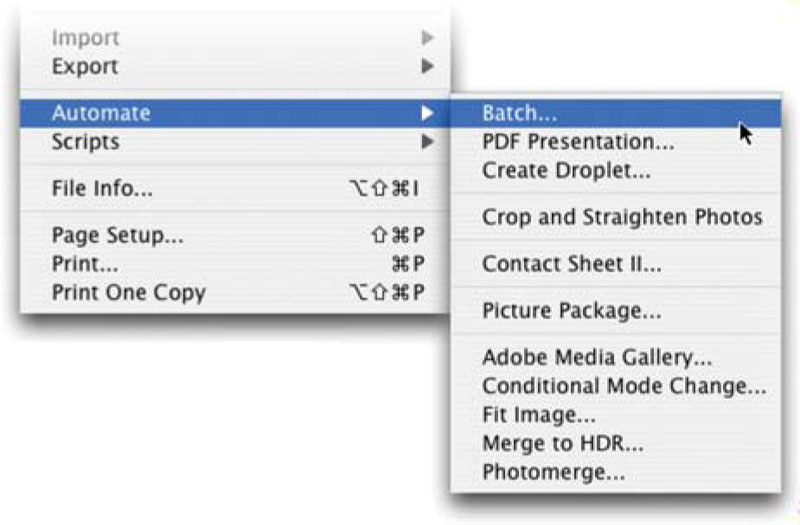
• You can choose File>Automate>Batch to run an action on an entire folder of images.
• You can batch multiple folders at once. Create aliases or shortcuts within one folder that point to the desired folders. Be sure to click the Include All Subfolders option.
• Back up your custom actions to two folders, the default location and a secondary backup. This way, a reinstall or upgrade won’t blow your custom actions away.
• To create an action that will work on all files, you must record some commands with the rulers set to percentage.
• Use File>Automate>Fit Image to resize images for a specific height or width.
• Photoshop will record the names of layers as you select them. This may cause playback issues, because the action will look for specific names.
• Use keyboard shortcuts to select layers and such so that the action won’t look for a specific name for that step.
• You can also arrange layers with shortcuts:
— Move the current layer up the layer stack ![]()
![]()
— Move the current layer down the layer stack ![]()
![]()
— Move the current layer to the top ![]()
![]()
— Move the current layer to the bottom ![]()
![]()
More Options with Actions
Turning on Dialog Boxes allows you to interact more with an action. In fact, it can open up hundreds of new possibilities.
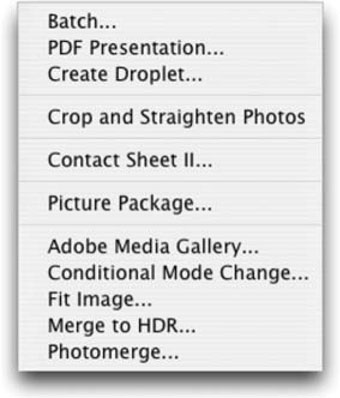
Automate Commands
The Automate menu contains several useful commands that automate complex and repetitive tasks inside of Photoshop. These are worth fully exploiting, as they can shave hours (or even days) off a large project. When first starting, you may want to process a copy of your files to ensure that you do not accidentally overwrite a needed image. After a little bit of practice, this safety precaution can be bypassed.
Batch Processing
Photoshop allows you to run actions on an entire folder of images. This can significantly cut down your production time. You can resize a folder of images, de-interlace a bunch of screen captures, or remove the blue tint from a group of improperly exposed photos. Anything you may need to do to one image, you can do to several.
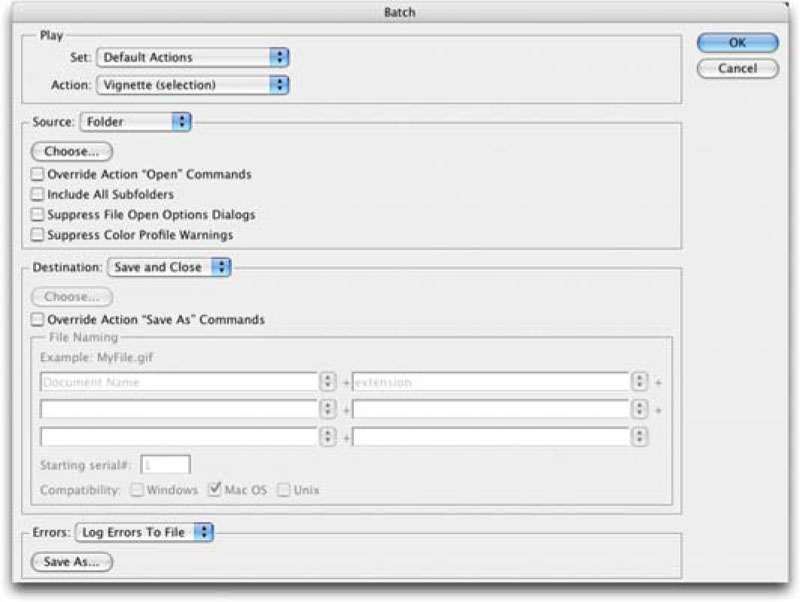
Step 1. To apply an action to a group of images, place those images into one folder.
Step 2. Make sure the action you want to run is loaded in the Actions palette.
Step 3. Choose File>Automate>Batch.
Step 4. Select the desired set and the action.
Step 5. Select the folder to process in the Source area. When you first start out, it’s a good idea to work with a duplicate copy so that you don’t accidentally erase your images.
• Select Override Action “Open” Commands in order to ignore open commands recorded in the original action.
• Select Include All Subfolders to process even nested files in the original folder.
• Select Suppress Color Profile Warnings to ignore any profile warnings.
Step 6. Choose a destination folder for the new images from the Destination menu. Choose None to leave the files open or Save and Close to overwrite the original images.
Step 7. Be sure to choose an error-processing method: Stop for Errors or Log Errors to File. By logging errors to file a large batch won’t stop because of a single error.
Step 8. Click OK.
More Time… Less Work
Batch processing is a great thing for lunch breaks or overnight.
Batch Choices
You have flexible options when specifying the sources for your batch. You can choose to use Opened Files from the Source area to process all open documents. Additionally, you can opt to use the selected images in Adobe Bridge.
File Format Conversion
The Batch command cannot convert between file formats. Fortunately, this can easily be done using the Image Processor script that ships with Photoshop CS2 (or later).
PDF Presentation
Adobe provides a useful Automation command called PDF Presentation that allows you to merge multiple images into a single PDF document. This is a useful way to send a lot of images to a client or as a way to present your work.
PDF to Go (and Fast)
Be sure to check out the PDF Presentation command. It allows you to create self-contained slide shows that run in Adobe Reader (formerly Acrobat Reader). You can specify a folder of images and even set a transition and slide duration.
Step 1. Choose File>Automate>PDF Presentation.
Step 2. In the PDF Presentation dialog box, click the Browse button to select the images you want to include. Navigate to the folder that contains the images you want to use. In this case, navigate to the folder PDF Presentation in the Chapter 12 folder on the DVD and open it. You can now ![]() +click to select multiple files or
+click to select multiple files or ![]() +click (
+click (![]() +click) to select discontiguous files in a list. Additionally, you could also choose Add Open Files option to add files already open in Photoshop.
+click) to select discontiguous files in a list. Additionally, you could also choose Add Open Files option to add files already open in Photoshop.
Step 3. Drag the files into the order you want the pages (or slides) to present. The topmost file is presented first. Simply drag them to reorder the images.

Step 4. In the Output Options area of the PDF Presentation dialog box, you need to choose from the following options:
• Multi-Page Document. This creates a PDF file with each image on an individual page.
• Presentation. This creates a PDF slide show presentation. This can be run as a stand-alone slide show.
Step 5. If the Presentation option is chosen, you can specify the following options:
• Advance Every [5] Seconds. This allows you to specify how long each image is held. The default duration is 5 seconds. Unchecking this option causes the slides to be manually advanced. For this exercise, choose every 5 seconds.
• Loop After Last Page. This tells the presentation to automatically start over after reaching the end. This can be useful if the presentation is to be self-running at a kiosk.
• Transition. You can specify a transition to use between slides. For this presentation, choose Wipe Down.
Step 6. Click Save to create a PDF file. Navigate to the Desktop and name the file Slideshow.pdf.

Step 7. The Save Adobe PDF dialog box opens. This allows you to pick a default compression setup or specify detailed options for the PDF document. Choose Smallest File Size to make the file easier to e-mail. If desired, you can also choose to add Security restrictions to the PDF.

Step 8. Click Save PDF to create the PDF file. A dialog box appears telling you when the PDF presentation is created successfully.
Droplets
If you live in a drag-and-drop world, then droplets are for you. A droplet is a Photoshop action conveniently stored as an icon on your desktop. Files or folders can be dragged on top and batch processed. For example, I have created an action and then a droplet that converts an image to RGB mode while preserving layers. I could use this to ensure that all my graphics were in the proper mode for my edit. The important thing to remember is that you can’t have a droplet without first having the action you want to put in it.
Save your droplets in a convenient location for drag-and-drop.

Video #21 Creating a Droplet
Droplets can make an action easier to use. To see how, watch the video-tutorial on the DVD-ROM.
Step 1. Choose File>Automate>Create Droplet.
Step 2. Click Choose in the Save Droplet In section of the dialog box. Specify a location to save the droplet where you can get to it easily. Many users set the target as the Desktop.
Step 3. Choose the specific set and action from the Set and Action menus. The action you want to use must be currently loaded.

Step 4. Specify Play options for the droplet:
• Override Action “Open” Commands ignores any file names specified in the action.
• Deselect Override Action “Open” Commands if the action is designed to work only on open files or if the action contains Open commands for specific files needed by the action.
Step 5. Decide if you want to include all subfolders to process files in subdirectories of drag-and-drop.
Step 6. Select Suppress Color Profile Warnings to ignore color policy messages. These can cause a batch to hang waiting for your input.
Step 7. Specify a destination for the batch-processed files in the Destination menu:
• None leaves the files open without saving changes (unless the action contains a Save command).
• Save and Close rewrites the files to their current location.
• Folder lets you specify a new location.
Step 8. If Folder is the chosen destination, specify a file-naming convention for the batch-processed files.
Step 9. Specify an error-processing option from the Errors pop-up menu. Log Errors to File is generally best for batching. I use a similar approach in my batch digitizing, because this is when I stand up to stretch my legs a bit.
Web Photo Gallery
Here’s a real-world scenario: Imagine that you’re working on a video that needs some stock photos of the healthcare industry. Your clients provided you with a shot list, but they are across town and can’t approve things until they come in tomorrow. After searching for the right stock photos, you’ve narrowed it down to 25 choices, about three per each shot needed. You could: (a) sit on your hands, (b) e-mail the client a bunch of attachments that are likely too big and will get stuck in their corporate firewall, or (c) just go ahead with your gut (and then redo things later).
Photoshop provides you with a fourth option: one of the hugest time-savers of all, the Web Photo Gallery feature. After a couple of clicks, Photoshop can take an entire folder of images, instantly resize them for the Web, author a preview page complete with thumbnails, and set up the whole site while you take a break. Don’t worry; it’s perfectly safe and leaves your original files and layers intact. Just think of the timesavings. You can e-mail the whole folder to your client or post it to your company’s site with a blind link. (The folder is there, but there is no visual link on your Web site’s home page; customers access it through a text link you send them.)

Storyboards Plus
Use the Web Gallery for dynamic storyboards.
Best of all, Photoshop offers templates for gathering client comments. Be sure to check out the feedback templates, which create elaborate (but easy to use) Web pages. You can use these styles to collect precise client comments on a project’s images. These comments are then e-mailed directly back to you so you can integrate the feedback into your show. Let’s give it a try.
Customize It
Photoshop gives you several templates to choose from for use in the Web Photo Gallery command. If you know HTML, or if you have a Web developer on staff, you can use a customized style for pages that feature your company logo and colors.
Step 1. Choose File>Automate>Web Photo Gallery.
Step 2. Specify the site’s appearance:
• Choose a style from the pop-up menu. For this sample, choose one of the Feedback templates.
• Enter an e-mail or other contact info to be displayed on the page.
• Choose an extension (.htm or .html) for your pages. To determine which one, look at your corporate page. The .htm is more likely these days.
Step 3. Under Folders, specify the image source:
• Choose or Browse to identify the folder that contains the images you need. Don’t worry about making copies first, the originals will not be permanently modified. You can reuse the PDF presentation images to try the Web Gallery out.
• Include All Subdirectories if there are folders inside your targeted folder.
• Specify the destination. You cannot save the images into the same folder they came from, because this would cause an endless loop. Specify a final destination.

Step 4. Modify the banner options with the rest of the site information that you want displayed.
• For Site Name, enter the project’s name.
• For Photographer, enter your client’s name.
• For Contact Info, tell the client whom to call with questions.
• For Date, enter the date that the page was built or modified.
• Specify fonts and font size. Remember, the default Web sizes on Macs and PCs differ. Text that looks just right on a Mac will be significantly bigger on a PC.
Step 5. Choose Large Images from the Options pop-up menu and specify how big the display images should be. A higher-quality JPEG will take up more space and take longer to load. A setting of 6 to 8 is usually sufficient for preview purposes. Be sure to tell Photoshop to display the file name as a caption so that you and your clients are speaking the same language when they call.
Step 6. Next, modify the thumbnails from the Options pop-up menu. Choose a size for the thumbnails, and then specify how many columns and rows that you want on each index page (if the style you choose uses index pages).
Step 7. If you want, modify the colors for the page.
Step 8. You can add a watermark over each image (such as Confidential or For Approval Purposes) by choosing Security from the Options pop-up menu.
When you run the automation, Photoshop will go into autopilot and begin building the site. In the destination folder, you will find an image’s subfolder, a thumbnail subfolder, an htm sub-folder, and an index page. The index page should be opened in a standard browser to view the preview site (or lightbox).
Posting Animations
Looking for a way to post animations on a Web page for clients with very low-bandwidth connections? I have found that the Web Photo Gallery works well for those clients who are stuck on dialup or mobile phones.
Step 1. In After Effects you can change a composition’s setting to be 2 frames per second. This technique can also be used as a way to get an animation’s storyboard approval. You can render out a PICT or TARGA sequence, then post two or three frames from each second to a thumbnail page.
Step 2. Add the Composition to the Render Queue.
Step 3. Specify a target folder and output an image sequence.
Step 4. Return to Photoshop and use the Web Photo Gallery feature.
If you don’t have access to After Effects, many applications can output an image sequence. In fact, QuickTime Pro can convert a .mov file into an image sequence. Just be sure to throw away the frames that you don’t want before creating a gallery.
The Web browser is an easy way to show your clients animations or storyboards, especially if your client has a slower-speed Internet connection or is traveling.

Contact Sheet II
A common practice is to send several photos to a client for review. Earlier we explored a dynamic photo gallery; let’s take a look at a more static option called a contact sheet. Traditionally, it has been a common practice to create a contact sheet from rolls of film. This is done so the photographer or client could select images for printing at full size. This step was done for both convenience and costsavings.
A video pro can harness the practice of contact sheets to save time and money. By pulling multiple images into a PDF document, you can quickly send several photos to a client via e-mail. Let’s give it a try.
Step 1. Choose File>Automate>Contact Sheet II
Step 2. The Contact Sheet II dialog box opens and prompts you to specify which images to use. This can be done by choosing from the Use menu in the Source Images area:
• Current Open Documents. This uses all images that are currently open in Photoshop.
• Folder. Click the Choose button, then navigate to a folder containing images. You can choose to Include All Subfolders to use images within any subfolders. For this example, click Choose and select the folder called Contact Sheet in the Chapter 12 folder on the DVD-ROM.
• Selected Images From Bridge. If you’ve selected images in Bridge before invoking this command, Photoshop will use those for the contact sheet.
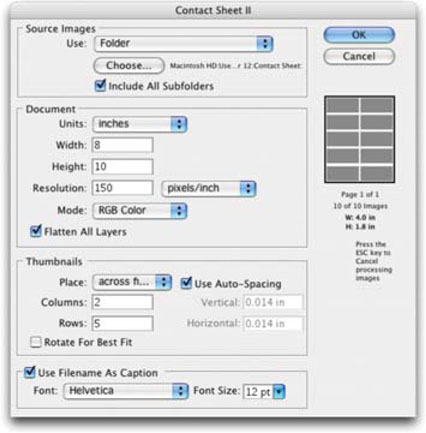
Step 3. In the Document area, specify the dimensions of the paper, a resolution, and a color mode for the contact sheet. For e-mail uses, enter a page size of 8×10 inches and a resolution of 150 ppi, and use the RGB color mode.

Step 4. Choose Flatten All Layers to put all images and text onto a single layer. This will reduce the overall size of the files. If you need the ability to edit photo captions, then leave this box unchecked.
Step 5. In the Thumbnails area, specify options for the thumbnail previews and document layout.
• Place—You can choose to arrange thumbnails across (from left to right, then top to bottom) or down (from top to bottom, then left to right).
• Enter the number of columns and rows you want for each contact sheet. When a page is full, Photoshop will automatically create new contact sheets. As you modify settings, a visual preview of the specified layout updates. For this, the folder contains 10 images, so choose 2 columns and 5 rows to maximize thumbnail size.
• Choose to Use Auto-Spacing so Photoshop will optimize the amount of space between each thumbnail.
• Deselect Rotate For Best Fit so the images appear properly oriented.
Step 6. Choose Use Filename As Caption to label each image with the source file name. This will allow the client to give better feedback.
Step 7. Click OK to run the action.
Step 8. Choose Layer>Flatten Image to merge all layers.
Step 9. When the file is done… Choose Save As and choose to save the file as a Photoshop PDF file for maximum compatibility and easy e-mail use.
Crop and Straighten Photos
Looking to save some time when scanning images? You can often fit more that one image onto a scanner bed at a time. When placing the images, be sure to allow a small space between each photo. You can then use the Crop and Straighten Photos command to separate each image into its own document window. Let’s give it a try.
A Little Space Is Needed
 For best results, keep a minimum of 1/8 inch between the images in your scan. If the Crop And Straighten Photos command fails (which is very rare) then manually crop the images with the Crop tool.
Step 1. Open the file Crop and Straighten.tiff from the Chapter 12 folder on the DVD-ROM. If you prefer to use your own scanner, just scan in a few images simultaneously on your own scanner.

Step 2. Choose File>Automate>Crop and Straighten Photos.
Step 3. Each image should be cropped, straightened, and moved into its own document window.
Video #22 Crop and Straighten
See the Crop and Straighten command in action by watching the video tutorial on the DVD-ROM.
Scripting
Scripting in Photoshop offers a more powerful automation technology than actions. With scripts, you can choose to perform more elaborate tasks than an action can perform. Scripting was first introduced with Photoshop CS, and each version has added greater support. Photoshop ships with built-in scripts that are very useful.
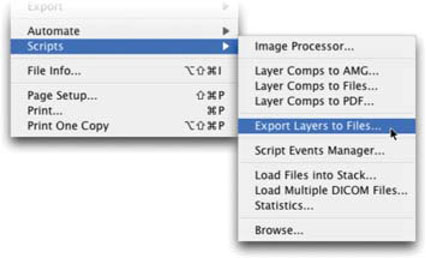
Export Layers to Files
As you work with different video applications, you will find that support for Photoshop layers is not universal. To get past this limitation, Photoshop offers a useful script called Export Layers to Files. Photoshop allows you to convert a layered file into a series of individual files. You can choose to create a PSD, BMP, JPEG, PDF, Targa, or TIFF file for each layer. Layers are named automatically as they are created; however, you have options that you can use for naming. Let’s give it a try.

Sending Layers to Files
Need to import a layered file into a program that doesn’t recognize layers (such as Apple’s LiveType)? Be sure to check out the great script called Export Layers to Files.
Step 1. Open the file Scripts_Demo.psd from the Chapter 12 folder on the DVD-ROM.
Step 2. Choose File>Scripts>Export Layers to Files… to run the script.
Step 3. In the Export Layers to Files dialog box, choose a destination by clicking the Browse button. For this sample, create a new folder on the desktop called Export.
Step 4. Enter a descriptive name into the File Name Prefix text box.
Step 5. Choose a File Type and set any options for the exported file. For our sample, choose PSD and check the Maximize Compatibility box.
Select the Visible Layers Only option if you want to export only layers that are visible.
For video workflow, you can leave the ICC Profile option unchecked
Step 6. Click Run.
Image Processor
The Image Processor command is an extremely useful production tool that will allow you to quickly reformat and size images to meet your workflow. The Image Processor script made its official debut in Photoshop CS2, but you can find also find it online under the name Dr. Brown’s Image Processor.
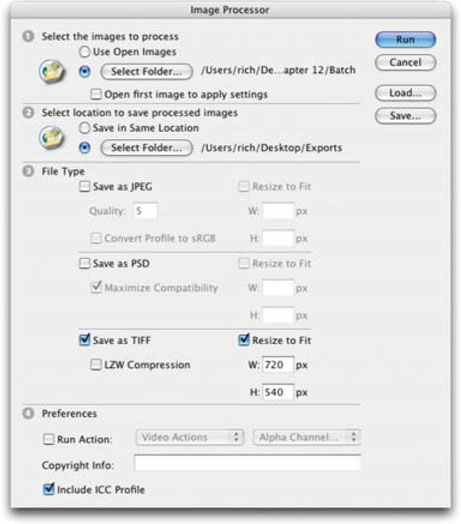
The Image Processor script can be used to convert and process multiple images. It differs from the Batch command in that you don’t need to first create an action. The image processor can be used for any of the following tasks:
• To convert images to JPEG, PSD, or TIFF format. You can also convert files simultaneously to all three formats.
• To process a set of Camera Raw files using the same Camera Raw options.
• To resize images to fit within a specified pixel dimension.
• To embed a color profile into images or convert files to sRGB and save them as JPEG images for the web.
• To include copyright metadata into the processed images.
The Image Processor can be used with PSD, TIFF, JPEG, or camera raw files. Let’s give it a try.
Step 1. Choose>File>Scripts>Image Processor.
Step 2. Select the images that you want to process. You can use the open images or navigate to a folder to select images. Click the Select Folder button and navigate to the folder called Batch in the Chapter 12 folder on the DVD-ROM.
Step 3. Select a location to save the processed images. You can choose the Exports folder you created previously on your Desktop.
Step 4. Select the file types and options you wish to convert to.
• Save As JPEG. This sets the JPEG quality between 0 and 12. You can also choose to resize the image and convert it to sRGB color profile.
• Save As PSD. This sets the PSD options. You can also resize the image and choose to Maximize Compatibility.
• Save As TIFF. This saves images in the TIFF format with LZW compression. You can also resize the image.
• For our example, choose TIFF and choose to resize to 720×540 pixels.
Step 5. You can choose from other processing options.
• Run Action. If an action is loaded into your Actions palette, you can run it on the image during the process.
• Copyright Info. You can add copyright metadata to the image.
• For our example, add the your name to the copyright information.
Step 6. Click Run to process the multiple images.
Video #23 Using the Image Processor
If you need to convert or resize several images, then be sure to check out the Image Processor command. See how it works by watching the video tutorial on the DVD-ROM.
Creating and Using Additional Scripts
Writing scripts is far more challenging than actions. Actions use a GUI with obvious controls (Play, Record, Stop). Scripting, on the other hand, requires you to use a scripting language. Depending on the version of Photoshop that you are using, as well as the operating system, you can use AppleScript, Visual Basic, or JavaScript.
If you’ve successfully tried your hand at writing an After Effects expression, then you may feel at home scripting. To find out (a lot) more about scripting, look inside your Photoshop Application folder. Inside the Scripting Guide folder you’ll find four PDFs to help you learn scripting.
If the thought of computer programming makes you want to shutdown your computer and hide, you can rely on others for scripts. Inside the same Scripting Guide folder, you’ll find sample scripts to try out (although most are gimmicky). There are some truly wonderful examples of scripting available at the Adobe Exchange Web site, http://www.adobe.com/exchange.
You can load scripts by choosing File>Script>Browse. If you’d like a script to permanently appear in the scripts menu, place it into the Scripts folder inside your Presets folder.
Using Adobe Bridge
All Adobe applications support the use of Adobe Bridge, which functions as a robust file browser. Besides sifting through images, it can also be harnessed as an automation tool. Bridge allows you to do simple tasks such as rename items as well as move, copy, and delete files. One of the most useful features is the ability to modify a group of images.

Accessing Bridge
By default, Adobe Bridge is not visible. To enable it you can choose File>Browse to launch Adobe Bridge. You may also want to modify your Photoshop preferences to tell Bridge to launch whenever you open Photoshop. Open your Preferences window by pressing ![]() , then check the box next to Automatically Launch Bridge from the General area.
, then check the box next to Automatically Launch Bridge from the General area.
Bridge for Organization
You can rotate, delete, and move images from within Bridge.
To select a file in Bridge, click on it. To choose multiple files, hold down the ![]() key; for noncontiguous files hold down the
key; for noncontiguous files hold down the ![]() key (
key (![]() key). When you have the desired images selected, press
key). When you have the desired images selected, press ![]() on the keyboard, or double-click.
on the keyboard, or double-click.

Batching Items
There are several items you can batch-process in Bridge. You can choose Tools>Batch Rename and rename a group of images. You can ![]() +click to select a group of images, and then press the
+click to select a group of images, and then press the ![]() key to erase the images. You can also move a group of images from one folder to another. Experienced Photoshop users may tend to overlook Bridge, but it’s worth the effort to learn it because Bridge can save a lot of time.
key to erase the images. You can also move a group of images from one folder to another. Experienced Photoshop users may tend to overlook Bridge, but it’s worth the effort to learn it because Bridge can save a lot of time.
There’s a lot more to Adobe Bridge. Be sure to check out the Help menu within Bridge to see more about the program. If you like what you find, you can dig much deeper and explore Bridge. There are dedicated books all about Bridge; be sure to check out the one by author Terry White, who is recognized as the leading expert.
Hands On | 11
Creating a DVD Slideshow
One of the best things about DVDs is the bonus material, whether it’s a behind the scenes feature, extra interviews, or a look at the storyboards. DVD slideshows are also a mainstay of DVDs because they take up very little space on the disc.
But making slideshows isn’t as easy as you might think. Sure, the authoring side is pretty straightforward; most DVD authoring applications support drag-and-dropping folders of images. But, if those images aren’t sized right, you’ll have problems: strange cropping, bad aliasing, and softening. Just because DVD software can process still photos doesn’t mean it should (after all, the word Photo appears nowhere in the name DVD Studio Pro or Encore DVD).
When it comes to photo slideshows, its Photoshop you’ll want to turn to. But with all that cropping, and resizing, it sounds like you’ve got a lot of work ahead of you… or not. By harnessing the power of actions and automation, Photoshop can get the job done in a jiffy.
You’ll find Exercise 12 on the DVD-ROM.

PROfile: John Mark Seck
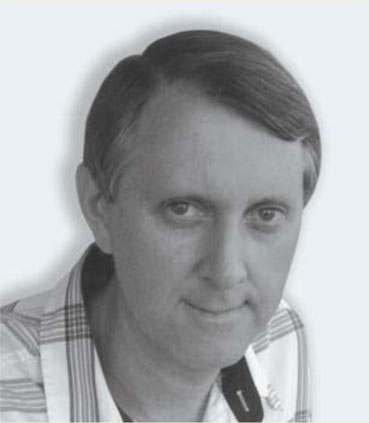
John Mark Seck is the President of BlackCherry Digital Media Inc., a company providing high-end 3D animation, visual fx and motion graphics to film, broadcast and corporate clients. At BlackCherry Photoshop is the Swiss army knife in their arsenal of digital content creation programs.
“Every project we work on uses Photoshop as an integral part of the process,” says Seck. “From texture creation, graphics creation and layout, digital matte painting, keying, roto it just gets used everywhere.”
Seck emphasizes that Photoshop skills are essential for anyone involved in digital content creation today and especially for animation and motion graphics.
“At BlackCherry we’ve made extensive use of Photoshop for our museum exhibit work”, say Seck. “It gives us the ability to retouch, color correct, and make levels adjustments to increase production value.
“The dust and scratches filter is a handy quick fix for retouching a photo. I think many people starting out think this filter will add rather then correct dust and scratches,” said Seck. “Everyone should become good friends with the clone stamp tool and the healing brush when it comes to retouching photos.”
Seck offers additional advice on getting the most out of Photoshop:
• “The layer blending modes are probably my favorite options in Photoshop,” said Seck. “I think when people are starting out they tend to avoid these effects. It doesn't really matter if you understand exactly what each mode is doing. The best thing is to dive in and try out the different looks each mode will achieve.”
• “Actions combined with batch processing is a tremendously powerful combination and a huge timesaver,” said Seck. “If you ever do anything more than once you should have an action for that function.”
• “We tend to use Photoshop layers in conjunction with After Effects and Maya a lot. We layout multi-layered animation and texture elements for import into our animation apps.”
“While technology changes quickly some aspects of production are now very standardized and hence skill sets are more clearly defined. For content creation employers it really means there is a base level of knowledge and skill expected from any potential employee and strong Photoshop skills are at or near top of the list”, say Seck.


Seck further emphasizes the need for diversification in the digital artist. “Develop a variety of skills. These may include editing, graphic design, motion graphics, 3D animation and visual effects. This is a big chunk to chew on, but if you give yourself time, you find they all start to tie together and you develop a very marketable skill set. You have to be flexible, have a broad base of skills but also make sure you have a focus, something you do really well.”
Diversification goes way beyond what software packages you can run however. To get back to content creation as an art form, it’s necessary to reach beyond software “party” lines.
“I would say often these days there is too much emphasis on what software package(s) you know,” said Seck. “While very important software is just a starting point and is the easy part. Design skills and artistic aesthetics are much more elusive. Visit your local art galleries, stay in touch with current trends and be open to new ideas.”