
C H A P T E R 13
Spring Security
As we all know, security is important for any application. This is especially true for web applications, which are exposed to the Internet. Exposure to outside threats is obvious, and dealing with it will be a major part of your effort to develop secure solutions. However, the challenges that confront a developer are not only external threats.
Because security doesn’t add functionality, it is often underemphasized and sometimes even hard to justify in terms of time and resources. It often ends up being forgotten or implemented badly under the pressure of tight deadlines and the demands for fulfilling all functional requirements. Of course, it is a mistake to look at security in terms of “functionality.”
Security should be looked at from the same perspective as writing tests or refactoring code. Testing doesn’t add direct value in terms of new functionality, but it does improve existing functionality and enable future additions or bug fixes to be made without destabilizing your project. The same goes for refactoring. As a good developer, you refactor code on a daily basis, no matter how small the changes, to improve the application’s performance and stability. Security should be considered even more important. Even though you may not be specifically asked for security, you should be aware of the threats to your application and make sure that what you deliver is as secure as possible.
On the other hand, do not forget that the entire “security” process is not entirely in your hands. Security crosses many layers. If you secure your application at application level, but the infrastructure team runs your app on a four-year-old web container without any patches applied, and a comparable operating system, you will probably get unwanted visitors no matter how secure your application is. It is important for organizations to understand the importance of security and everything that affects it.
From the organization’s standpoint, the issue is not only a technical one. Awareness and perception also are very important. With even the slightest anomaly that can be exploited, customers or other users may consider an application insecure. Depending on the level of visibility your application enjoys, discovery of such anomaly (no matter how trivial) might trigger a storm of protest and give the organization bad publicity. This might even be worse than the damage an attacker is able to do with the attack itself!
In this chapter we will show you how to fulfill your duties as an application developer and make your application as secure as possible on the application level. We will do this by introducing you to Spring Security, which is a state-of-the-art, Spring 3.1-ready, security extension. In this chapter we will show you how to secure your application in a couple of hours! We will start off from a basic security configuration that secures your app with a couple lines of XML. Continuing from there, we will show how to use the database as storage for your users and credentials. We will also investigate how you can integrate security with Spring Web Flow. Finally, we’ll discuss the different options for applying authorization checks with Spring MVC in our JSP pages and application controllers.
Introducing Security
Before we start talking about what Spring Security can do for you and how we are going to apply it to secure our application, we first need to provide some introduction to security. It is important that we first set the context in which Spring Security will operate. In the first part of this section, we will give an overview of application security, which is the type of security we are going to handle. Next we will look at some general security principles and terminology that will be important for a good understanding of the remainder of the chapter.
Finally, we give a more detailed summary of the topics we will cover in this chapter, so you’ll know exactly what to expect. To be complete as possible, we will touch on different aspects of Spring Security;
What Is Application Security?
From a high-level view, application security is all about controlling access to your application’s functionality. In our bookstore, for example, every user should be able to view the books we are selling. But not every user should be able to create an order without fulfilling some conditions (such as creating an account and being logged in). If we decided to further extend the bookstore with some CMS-like features, say editing or adding new books to the system, we would then want only a select set of users to be able to make modifications. With application-level security you will be able to specify which resources in your application are restricted, and which are publicly available. For the restricted resources you will be able to make further distinctions; a user who is able to access restricted functionality A would therefore not be allowed to access restricted functionality B.
Depending on your application’s context, this set of rules might vary from very complex to nonexistent. In the first case you could be requiring detailed roles, complicated authentication mechanisms, and so on, while in the latter case you could be building a web site that has only read only content that is public for everyone, and so application security is probably not of your concern.
![]() Note As explained in the introduction to this chapter, security crosses many layers, and not just your application layer. So that’s why the topic here is explicitly “application security.” No matter what level of application security your application demands, the environment surrounding your application needs to be secure. You should not be afraid to ask your network or infrastructure team what they are doing to keep the environment secure where your application will reside. An expression you probably are already familiar with summarize this very nicely: “your security is only as strong as its weakest point.”
Note As explained in the introduction to this chapter, security crosses many layers, and not just your application layer. So that’s why the topic here is explicitly “application security.” No matter what level of application security your application demands, the environment surrounding your application needs to be secure. You should not be afraid to ask your network or infrastructure team what they are doing to keep the environment secure where your application will reside. An expression you probably are already familiar with summarize this very nicely: “your security is only as strong as its weakest point.”
General Security Principles
We will start off covering some general security principles that will become important once you start securing your application:
- Identification: Identifies a user based upon a certain identity; such as a username, token or certificate.
- Authentication: The process of verifying the presented identity. In case of a username it is as simple as checking the supplied password.
- Authorization: The process of identifying the functionality an authenticated user is allowed to use.
If you need to provide application security, you will first have to think about how to identify your users. Identification will allow you to recognize a user who wants access to a protected resource. This is the first process in applying security. Identification can be simple, such as a username. It can also be a token, or even an x.509 certificate issued to a person or organization.
Next you will have to verify the identity that the user provides. This process of verifying the identity is called authentication: checking the identification for its authenticity.
In the case of a username, authenticity might be verified by asking for a password and comparing the entry with the password stored for that user.
Finally, if a user’s identity is authenticated, the user is allowed access to the restricted zone of your application. At that point you might want to make distinctions among your authenticated users. In other words, you want to give certain privileges to authenticated users. Suppose you have a web store. Before ordering something, a user must be authenticated, because you want to know who made which order, you need access to the delivery/contact addresses, or maybe to stored payment credentials like a credit card number. However, it is clear that a normal customer who is authenticated as a user of your application should not be allowed to add or change products. Allowing or disallowing an authenticated user certain functionality is called authorization.
Spring Security will especially concentrate on the authentication and authorization parts. Also note that the method of authentication is in a certain way related to the type of identification your users will have to supply.
What We Will Cover
Spring Security, (formerly known as Acegi Security), has become a very important piece in the puzzle if you want to secure your application. Spring Security will especially help to secure your application by offering authentication and authorization schemes. It will help you provide integration with many authentication systems, such as a simple database, directory services (offering an LDAP interface, for accessing, for example, open LDAP or Active Directory). But it will also help you manage authorization. This chapter will cover how you can instruct Spring Security to take care of both the authentication and the authorization parts.
![]() Note Spring Security has generally seen a low intrusion level. This allows us to add security in the more final stages of our application implementation. Although some refactoring will be required, it will normally be very minimal. This is one of the reasons we kept this chapter as last.
Note Spring Security has generally seen a low intrusion level. This allows us to add security in the more final stages of our application implementation. Although some refactoring will be required, it will normally be very minimal. This is one of the reasons we kept this chapter as last.
We will start by making you familiar with the basic security configuration. We will configure Spring Security so that every request that goes into our application passes the security configuration. We will see that this configuration is based on a filter mechanism through which a request has to pass before it is received by the requested resource. We will also show you how easy it is to define which resources need to be protected and which can still be left publicly available (our login page, resources such as images, and so on).
For the authentication part we will be using username and password. We will use a login form, which will include the typical username and password fields. Besides creating the page (containing the login form) itself, we will see that we only need some XML configuration to let Spring Security handle this. (By contrast, in the previous chapters we coded our own authentication mechanism.) To keep things simple, the authentication will at this point be backed by a basic in-memory data store. Later we will see how can easily change this to a database store.
In applications using Web Flow, it’s likely that a lot of your application controller logic and view selection has been moved into flows. Web Flow has support for securing flows directly. We will see how we can plug Web Flow into the security mechanism so that your application is secure from top to bottom.
After we configure the authentication, we will see how we can further secure the login and order process. Until we do that, all data is transmitted over plain HTTP. We will see that adding transport security is just a matter of configuration.
Next we will also look at localization. Spring Security supports localization of exception messages, which are by default in the English language. We will see what you should configure in order to support other locales.
We will also extend the security by implementing a role-based access model. This will grant rights to your users that you can later use to check authorization when requiring access to a given resource.
Authorization with Spring Security can be applied programmatically, by means of code, or declaratively. The declarative method will allow you to assert authorization using metadata in the form of annotations, expressions, or XML. We will cover how Spring Security’s authorization can be applied in the following elements:
- Views, to be able to show which component is visible or for a given user
- Controllers
- Web Flow flows
- Service layer
We will cover both declarative security (using annotations) and programmatic security and show in detail how to apply them both in your views, application controllers, and flows. Finally we will introduce using the Spring Security Tag libraries in your JSP pages.
![]() Note For your information, Spring Security can also be applied in the same declarative way on your back-end (mostly on the services) as it is for your application controllers. However, Spring Security in the back-end will not be covered in this chapter.
Note For your information, Spring Security can also be applied in the same declarative way on your back-end (mostly on the services) as it is for your application controllers. However, Spring Security in the back-end will not be covered in this chapter.
Preparing the Example Application
We are going to reuse the latest and greatest version of our example, from Chapter 12. This application includes Spring MVC functionality, flows, application controllers, and a service layer. It will be the ideal candidate for applying security.
In the current version, we have already applied a self-invented security mechanism. A user can enter the site and browse books without any restriction. Books can also be added to the shopping cart without restrictions. A user who is not authenticated, however, cannot do a final checkout and cannot view his or her orders. Before this is possible a user has to log in, by means of username and password.
To support this, we have a login form which takes the credentials and compares them to the information stored in our database. Once a user is authenticated, we put a token (the com.apress.prospringmvc.bookstore.domain.Account domain object) on the user’s session to indicate that authentication was successful. (To refresh your memory, you can see this happening in the Chapter 11 section “Implementing Authentication as a Subflow”; Listing 11-39 demonstrates authentication via Spring MVC, and Listing 11-41 shows authentication via Web Flow.) As you will see, we can do all of this just by means of configuration using Spring Security instead of creating the security setup ourselves.
While our self-invented setup helped us to avoid some extra complexity at the time, and it apparently seems to do its job, there are still some serious flaws to be discovered if we look closer.
First, there is no security applied on controllers or flows. For example, let’s go back to the previous example (Chapter 12) where we are still using our home-grown security implementation. Without being authenticated, try to start the orders overview flow directly by typing this URL in your browser to open the page shown in Figure 13-1:
http://localhost:8080/chapter12-bookstore/ordersOverview

Figure 13-1. Directly starting a flow bypasses security.
You can see that we are not logged in, as the Orders overview is not available in the navigation bar. So even though this link is not available for an unauthenticated user, one can simply start it by copy/pasting the name of the flow in the browser’s address bar, and the page will load. Talk about security flaws…
In this particular case no harm is done, and there is no even an exception being thrown. We are in luck; the only thing that happens is an empty order page. The service/repository will try to load the orders from account “null”, which results in an empty list, so nothing is shown. However, it could have turned out otherwise. If we had developed the repository with less care, we might have omitted the criteria “user” when it was null; in that case it would result in retrieving all orders for all customers!
It is clear that this is a serious vulnerability, so we have to make sure that our security is, well, real security and cannot be longer circumvented by simply typing the correct URL in the browser address bar.
Second, there is also no way to make a distinction among authenticated users, and thus there is no way to limit access. Once a user is authenticated, he or she gets access to all restricted functionality, an approach that is in most cases too coarse-grained (most applications support different levels of authorization).
We brought this up just to show you that rolling out your own Security is not something to take lightly. Thankfully, Spring Security will solve these issues for us.
In our first attempt we will try to introduce you to the Spring Security basics and show you how easy it is to set up a basic security scheme that will already look very professional. It will:
- Make sure that no restricted functionality is accessible if the user is not authenticated, no matter what they try.
- So the cheap URL trick will have no longer any effect.
- Even a user who is authenticated will not be able to access pages or flows for which no explicit access rules are defined.
- Use form-based authentication, which will show the user a login page on which credentials can be entered using a username and password field.
- Redirect users to the login page automatically whenever they try to access a secured resource directly, and redirect them back to that resource after authentication was successful.
- Use Spring Security to do the authentication part instead of writing this kind of code ourselves.
We will explain some of the Spring Security architecture and internals as we go along securing the application. Later, in the following sections, we will extend this basic scheme and discuss more about authorization and how to apply it in our application. We will extend the application by adding functionality to add categories and books, which will only be available to a selection of authenticated users.
Securing Our Bookstore
To demonstrate the basic security scheme, we will apply it to our sample application. In this first section, we will show you how to
- Configure Spring Security to act as a giant wrapper for our application, so that every request that comes in passes via Spring Security
- Configure our login page
- Mark certain resources as available only for authenticated users
- Enable auto-redirection when a secured resources is accessed without being authenticated, and then redirect them back once authenticated
- Use Spring Security’s out-of-the-box in-memory data store for users
- Store passwords securely with salted hashes
Adding the Right Dependencies
Before you can use Spring Security you have to declare the correct set of dependencies. Like Web Flow or Spring MVC, Spring Security is a module on which you must declare a specific dependency in order to use it. Conveniently, Spring Security itself is further divided into submodules. This is convenient because your project can depend on the modules it actually needs; no more, no fewer. This helps to keep your dependency tree clean, as no unused modules (which again have dependencies) are pulled into your project. The modules we will be using (and the ones you will probably always use to secure a web application) are listed in Table 13-1.

In the sample project, you will find these modules translated to dependency entries in the build.gradle (see Listing 13-1).
Listing 13-1. Dependencies in gradle
compile "org.springframework.security:spring-security-core:$springSecurityVersion"

compile "org.springframework.security:spring-security-web:$springSecurityVersion"

compile "org.springframework.security:spring-security-config:$springSecurityVersion"

compile "org.springframework.security:spring-security-taglibs:$springSecurityVersion"
Since Spring Security is a core dependency, we used a variable to indicate its version, $springSecurityVersion. The value of this variable can be found in the root Gradle file. (At the time of writing, it is 3.1.0.RELEASE.)
![]() Note You’ve seen that Spring Security is divided into several modules. The modules we are depending on, as can be seen in Listing 13-1, are only a subset of these, since we will not be using every functionality Spring Security has to offer. In case you require other functionality (LDAP, for example) you have to include it as an extra module in your dependency list. A list of these modules can be found in the Spring Security reference under the dependency section1. Here you will see each module listed together with its own dependencies. The dependencies of the module itself are only there as information; they will be pulled in automatically by your build tool/dependency management system from the moment you add a dependency to one of the Spring Security modules.
Note You’ve seen that Spring Security is divided into several modules. The modules we are depending on, as can be seen in Listing 13-1, are only a subset of these, since we will not be using every functionality Spring Security has to offer. In case you require other functionality (LDAP, for example) you have to include it as an extra module in your dependency list. A list of these modules can be found in the Spring Security reference under the dependency section1. Here you will see each module listed together with its own dependencies. The dependencies of the module itself are only there as information; they will be pulled in automatically by your build tool/dependency management system from the moment you add a dependency to one of the Spring Security modules.
__________
1 http://static.springsource.org/spring-security/site/docs/3.1.x/reference/appendixdependencies.html
Enabling Spring Security
Before we can secure anything, we need to enable Spring Security. The core concept is that it will capture every request coming in to our system and decide if the request can go through or not. The mechanism to support this begins with a standard JEE Servlet filter.
Spring Security uses the Spring Core org.springframework.web.filter.DelegatingFilterProxy (which is an implementation of a standard javax.servlet.Filter), which will be configured to intercept every request. This filter will serve as a hook to delegate the captured requests to Spring Security. The configuration of the filter is done the same way as with the Spring MVC dispatcher servlet, in our com.apress.prospringmvc.bookstore.web.BookstoreWebApplicationInitializer. We can make use of the JEE dynamic servlet API to add this filter, as shown in Listing 13-2.
Listing 13-2. Registering the Spring Security Filter in BookstoreWebApplicationInitializer
private void registerSpringSecurityFilterChain(ServletContext servletContext){

    FilterRegistration.Dynamic springSecurityFilterChain =

      servletContext.addFilter(BeanIds.SPRING_SECURITY_FILTER_CHAIN, new

      DelegatingFilterProxy());

    springSecurityFilterChain.addMappingForUrlPatterns(null, false, "/*");

}
The first argument of addFilter is the name we will be giving to the filter. In this case the name of the filter we are adding is springSecurityFilterChain. We didn’t choose a random name, but in fact referred to a Spring class containing these predefined names as constants (so the constant org.springframework.security.config.BeanIds.SPRING_SECURITY_FILTER_CHAIN has the value springSecurityFilterChain). When we cover the Spring side in a moment, we will explain why this filter’s name is of importance. The second argument is the filter instance itself.
Also note that the filter DelegatingFilterProxy is a “catch-all” filter. Looking at the filter pattern “/*” it will capture ANY request (see Figure 13-2)! So there is no request that can go into our application without being captured by this filter.
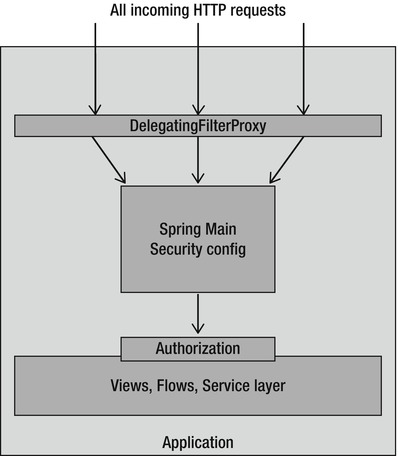
Figure 13-2. Filter catches all requests.
The first parameter of addMappingForUrlPatterns (dispatcherTypes) indicates when the filter should be invoked. The default (when supplying null) is to invoke it for all requests coming from “outside” the Servlet container. You can also specify, for example, that the filter should be invoked when a resource is accessed by an internal include or forward statement. In that case you must supply a java.util.EnumSet with one or more enumerations of type javax.servlet.DispatcherType. Leaving this value as null is sufficient, since your resources are protected from the outside, and even when making includes or forwards you will be checking authorization on your pages using security tags (which we will cover later). However, in some situations it can be desirable to go through the security filter chain again when performing such operations.
The second parameter of the addMappingForUrlPatterns (namely isMatchAfter) declares the order if multiple filters match the same URL pattern (or the same Servlet); its value can be true or false. In that case filters are normally applied in the order they appear in the web.xml or when working via the API (as we do) in the order in which they are added in the code. If you supply true for isMatchAfter, the filter will be invoked last in the chain of filters that match for that given URL pattern (or Servlet). If multiple filters match for that same URL pattern (or Servlet) and also have set this flag to true, the order in which they are defined is used (but they will still match after all other filters). If this flag is set to false, the inverse happens, and the filter will be invoked before invoking other filters that map to the same URL (or Servlet). Since we are in control of all filters we register, we can change the order ourselves simply by altering the order in which we register them. So there is no need to think about this attribute, and we choose a value (false in this case) which we use for every other filter registration. In this case the order in which they are defined will determine the order in which they are invoked.
![]() Note There seems to be an issue with Tomcat (7.0.26 at the time of writing), where this flag seems to be interpreted the other way around. So if you declare a
Note There seems to be an issue with Tomcat (7.0.26 at the time of writing), where this flag seems to be interpreted the other way around. So if you declare a Filter to be isMatchAfter equal to true, it will match before all other filters for the same URL pattern (or Servlet). We have posted a message on the Apache Tomcat development mailing list2 for this.
Now that we have seen how all requests are captured by a filter, we will see how the requests end up in the Spring Security machinery. As the class name of the configured filter (DelegatingFilterProxy) implies, it is clear that it will delegate incoming requests to somewhere. That “somewhere” is the core of Spring Security and is configured in our Spring configuration.
We created a separate spring configuration file for this, called spring-security.xml, located in src/main/resources/spring/. This piece of configuration will configure the “Spring Main Security Configuration” as illustrated in Figure 13-2.
To do this we first need to configure the Spring Security namespace that will contain all the artifacts we need to set up the main configuration (see Listing 13-3).
Listing 13-3. The xml header of the Spring security configuration file
<?xml version="1.0" encoding="UTF-8"?>

<beans xmlns="http://www.springframework.org/schema/beans"

       xmlns:xsi="http://www.w3.org/2001/XMLSchema-instance"

       xmlns:security="http://www.springframework.org/schema/security"

       xsi:schemaLocation="

         http://www.springframework.org/schema/beans

         http://www.springframework.org/schema/beans/spring-beans-3.1.xsd

         http://www.springframework.org/schema/security

         http://www.springframework.org/schema/security/spring-security-

         3.1.xsd">
Every security feature will use the namespace prefix “security.”
![]() Note You can also make the Spring Security namespace the default namespace. Here we have chosen to use the default namespace for the core Spring beans functionality, which is the default in all our other Spring configuration files as well. However, it would also work to switch them in this case, since this is a configuration file dedicated to Spring Security, where you will be using more of the Spring Security elements than from the bean namespace. In that case, you could drop the “security” prefix, as all security elements will be accessible in the default namespace, without any prefix. When there is a lot of security configuration, it can make your XML look less cluttered.
Note You can also make the Spring Security namespace the default namespace. Here we have chosen to use the default namespace for the core Spring beans functionality, which is the default in all our other Spring configuration files as well. However, it would also work to switch them in this case, since this is a configuration file dedicated to Spring Security, where you will be using more of the Spring Security elements than from the bean namespace. In that case, you could drop the “security” prefix, as all security elements will be accessible in the default namespace, without any prefix. When there is a lot of security configuration, it can make your XML look less cluttered.
__________
Next, we need to define the “delegate” to which our DelegatingFilterProxy will delegate. This is done with the <security:http> element, as shown in Listing 13-4.
Listing 13-4: The Spring Security namespaced filter chain configuration
<security:http>

     <security:form-login login-page="/public/authentication/login.htm" default-target-

url="/public/main.htm"/>

</security:http>
What this element does is create a filter chain and registers it in the application context with the default bean ID springSecurityFilterChain. The DelegatingFilterProxy will use the name of the filter to look up this bean, and delegate control to it. If you name the filter someFilter, it will look up the filter chain with bean ID someFilter, which results in no bean being found. Before we continue we need to explain what the Spring Security filter chain is and what it will do for us.
The filter chain is the core component in capturing requests and dealing with what has to be done. Almost everything in the main Spring Security configuration is handled by a filter in the filter chain. You can plug in or remove filters at will, and every filter will have a specific job (see Figure 13-3).

Figure 13-3. Filter delegates to the configured application filter chain
In Listing 13-4, we implicitly configured an element that will send the user to the login.htm (specified by the login-page attribute) page if accessing a secured resource without being authenticated. When the user logs in, the filter will automatically redirect the user back to the requested secured resource. Or, the user might be redirected to main.htm, which renders the home page (defined by the default-target-url attribute) if there was no previously requested secure page but the user logged in directly via the login page. In that case we also send a parameter, indicating that authentication was successful. The main page in question will detect this and show a message that the authentication process succeeded. This element will result in a filter being added to the filter chain to take care of this.
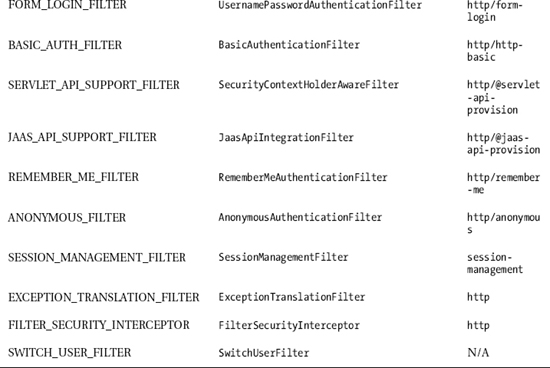
While you will be able to plug in your own custom filters, many existing filters are already at your disposal. It is beyond the scope of this book to discuss them all, but in the Spring Security reference manual3 you will find more information about them.
For your convenience we have included the complete list here in Table 13-2. It will give you an idea of what is already available for you to use. The bean alias will be important to refer to the filter if you defined such. For example, if you add your own custom filters, you will be able to position them in the chain. Custom filters can be defined using the <security:custom-filter /> element, for example <security:custom-filter ref="myCustomFilter"/>. By explicitly referencing these filters you can position them before or after a specific filter. For example, if you want to position myCustomFilter after the FORM_LOGIN_FILTER, you could define it as
<security:custom-filter ref="myCustomFilter" after="FORM_LOGIN_FILTER"/>
The namespace element or attribute is the configuration element that triggers the addition of the filter in the chain. The filters are listed in the table in the order they would be in the chain if you define them.

__________
As it turns out, we already configured a filter in Listing 13-4, by adding:
<security:form-login login-page="/public/authentication/login.htm" default-target-

url="/public/main.htm"/>
If you take a look at the Table 13-2, you will see that the http/form-login configured the UsernamePasswordAuthenticationFilter. This filter will leverage the previously described functionality of redirecting the user to the login page or the index page. As the name implies, it also covers other functionality, as we will discuss later.
Defining Which Resources to Secure
Next we must tell Spring Security which resource should be secured. This is again done by implicitly adding a filter to the filter chain. We don’t declare a new filter, but instead use an existing one provided by Spring Security. We will use an element from the security namespace: <security:intercept-url>. If you look at Table 13-2, you will see that this element (intercept-url) matches the ChannelProcessingFilter and will be a child element of the http element. This is the filter that Spring Security will add automatically to the chain when we specify <security:intercept-url>. The filter will perform the authentication check if the resource you entered in the pattern matches with the resource requested.
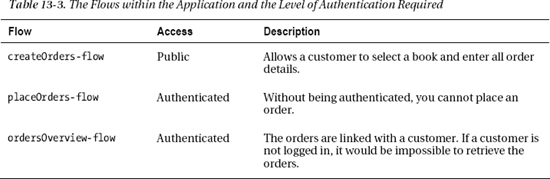
At this point we have a mixture of flows and pages, the latter being controlled directly by a Spring MVC controller. We will list them here for completeness. For each we will indicate whether it should be available publicly or privately (authenticated access only). Let’s start with the flows, in Table 13-3.
Next, in Table 13-4 we will list the URLs for which there is an @RequestMapping in a Spring MVC controller. We again define if they should be available publicly or only after authentication.

To organize the pages that require public or authenticated access, we are going to group them under WEB-INF/view/public and WEB-INF/view/secured.
Configuring Access to Resources
Listing 13-5 shows the preceding access rules converted to our XML configuration and added to the base configuration we already put together in Listing 13-4.
Listing 13-5. Adding the intercept-url rules based on the request URIs we explicitly want to configure
<security:http use-expressions="true" >

    <security:form-login login-page="/public/authentication/login.htm"

    default-target-url="/public/main.htm"

    authentication-failure-url="/public/authentication/login.htm"  />


    <security:intercept-url pattern="/index.jsp" access="permitAll" />


    <security:intercept-url pattern="/public/**" access="permitAll" />

    <security:intercept-url pattern="/secured/**" access="fullyAuthenticated"/>


    <security:intercept-url pattern="/**" access="denyAll" />

</security:http>
This listing should be read from top to bottom. This means that you should specify the more specific rules first, followed by the more general rules. If a resource matches a pattern, either directly or by wildcards specified in the pattern, the level of authentication specified by the access attribute will be required. If that condition is met, access is granted; otherwise it is denied.
First we declared that index.jsp (our welcome) file is accessible for everyone. Next we defined the /secured/** and /public/** matching patterns. By default ant4 style matching patterns are used. Every URL beginning with /secured requires the user to be fully authenticated before access is granted. URLs beginning with /public are able to be accessed by any one. We will discuss the access attribute and where those values are coming from in a minute.
As you recall, our flows are placed together with our pages. To start ordersOverviewflow you need to be fully authenticated, since the path for this flow is secured/ordersOverview. Because of this we do not need to specify extra rules, since access to anything under /secured will be captured by our /secured/** rule.
If you store your flows in a separate location, however, for example under WEB-INF/flows, and you made WEB-INF/flows your base path using the base-path attribute of the <webflow:flow-registry>, you will have to follow the same convention. That is, you will have to put secured flows under flows/secured and public flows under flows/public. If you don’t, for example if you put all flows under /flows, you will have to add separate <security:intercept-url> rules for each flow.
If we request access to the /createOrders-flow we don’t need to be authenticated to get access. If we try to access the /placeOrders-flow, however, we will need to be authenticated first. If we are not authenticated, we are redirected to the login page. After the login succeeds, Spring Security takes us back to the secured resources we asked for in the first place (/placeOrders-flow in this case).
You might also have noticed that we added an attribute in the <security:http> element called use-expressions with value true. We also have to explain where the fullyAuthenticated, permitAll and denyAll values suddenly come from. Before we can do that we have to explain a bit more about how Spring Security works.
Whenever a <security:intercept-url> matches an incoming request URL, Spring Security needs to know which conditions should be checked to grant or deny access. These conditions are checked by a so called org.springframework.security.access.AccessDecisionManager. An AccessDecisionManager has in turn one or more instances of org.springframework.security.access.AccessDecisionVoter. Each voter will evaluate if access is granted, abstained, or denied. This is indicated by the return value of the vote method of the AccessDecisionVoter. This return value is a primitive int, which can be one of the following constants: AccessDecisionVoter.ACCESS_ABSTAIN, AccessDecisionVoter.ACCESS_DENIED, or AccessDecisionVoter.ACCESS_GRANTED
__________
There are three implementations of the AccessDecisionManager interface. We will be using org.springframework.security.access.vote.AffirmativeBased. This AccessDecisionManager will allow access if at least one of its voters returns ACCESS_GRANTED. The other two are org.springframework.security.access.vote.ConsensusBased5 and org.springframework.security.access.vote.UnanimousBased.6 See their respective JavaDoc for more details.
The access-decision-manager-ref attribute of the http element is the way to reference an AccessDecisionManager. However, when defining the use-expressions attribute, an AffirmativeBased AccessDecisionManager will be added for us automatically. So there is no need to configure an AccessDecisionManager ourselves, and thus we can leave the access-decision-manager-ref attribute absent. The AccessDecisionVoter that is used is org.springframework.security.web.access.expression.WebExpressionVoter, which will help resolving the (SpEL) expressions you will be able to use in the access attribute.
At this stage we have configured Spring Security so that it will intercept each request and scan our list of <security:intercept-url> entries. If the request resource matches any of the listed entries, either directly or by wildcard matching, the access attribute is checked to see what has to be done. If the access attribute is permitAll, access is always granted. If the access attribute is fullyAuthenticated, the user must be authenticated to be allowed access. If that is not the case, the user is redirected to the login page automatically. After login, the user will be redirected back to the secured resource.
Finally, if the requested resource does not match any entry, access is denied by default by using the denyAll access attribute. By default this will render the server’s default “403 access denied” page. So accessing a random URL will bring up this page. Even after the user has logged in, accessing a random URL will still trigger the “access denied” page, because there was no previous rule that explicitly granted access. All resources that are not explicitly listed are now by default shielded from any user access.
![]() Tip When configuring access to resources, it is always wise to close up with a deny all rule. If the access requirements for the requested resource aren’t listed, access is simply denied. When the user accesses a resource other than the ones we listed, a “403 access denied” page will be shown on the user’s browser. This makes sure that resources which are not explicitly configured cannot be accessed by accident.
Tip When configuring access to resources, it is always wise to close up with a deny all rule. If the access requirements for the requested resource aren’t listed, access is simply denied. When the user accesses a resource other than the ones we listed, a “403 access denied” page will be shown on the user’s browser. This makes sure that resources which are not explicitly configured cannot be accessed by accident.
![]() Note In the list of resources, we mentioned that access to resources should be public. To do this, we changed the mapping in the resource holder defined in
Note In the list of resources, we mentioned that access to resources should be public. To do this, we changed the mapping in the resource holder defined in WebMvcContextConfiguration. We prefixed the URL with /public in order to make our resources publicly available without requiring authentication:
public void addResourceHandlers(ResourceHandlerRegistry registry) {

registry.addResourceHandler("/public/resources/**/*").

    addResourceLocations("classpath:/META-INF/web-resources/");

}
__________
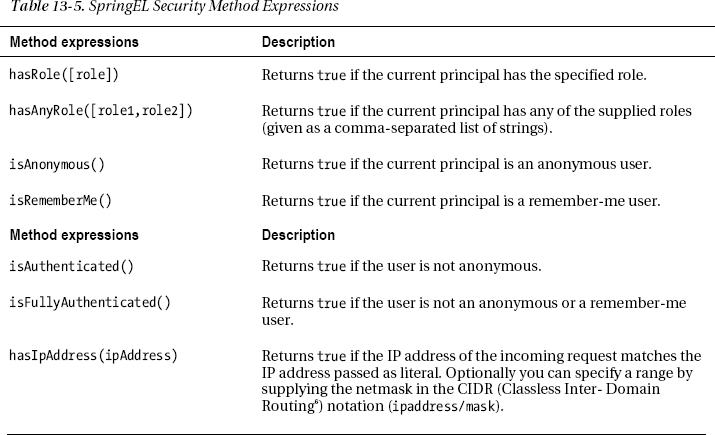
Overview of Expression Methods and Literals
We still need to explain where the permitAll, fullyAuthenticated and denyAll come from. These are all Spring EL expressions that are evaluated with a special Spring Security-aware context. In a normal Spring EL environment, evaluating denyAll would trigger an exception. However, in this scope, extra methods and properties are implicitly available for your expressions.
Although we cannot cover all possibilities here, Table 13-5 provides a quick overview of the methods you can use in the access attribute when using expressions, and Table 13-6 summarizes the properties).
![]() Note These methods can be found in the super class
Note These methods can be found in the super class org.springframework.security.access.expression.SecurityExpressionRoot and its subclass org.springframework.security.web.access.expression.WebSecurityExpressionRoot. You will see that in the super class there are additional methods not covered in Table 13-5. We didn’t include them, because they are aliases; for example, hasAuthority and hasAnyAuthority are aliases for respectively hasRole and hasAnyRole. We also omitted the hasPermission methods, which are specifically for method-based security in combination with post- and pre filtering.
__________
The methods in Table 13-6 can also be accessed as properties. They provide access to a getter method that returns an Object, such as the principal. The principal is just an Object. Most of the time this is an instance of the org.springframework.security.core.UserDetails interface, as we will discuss later. Or they provide a shortcut for a getter method that returns a boolean (those properties start with is rather than get). For example, the method boolean isFullyAuthenticated() can be called directly as the property isFullyAuthenticated. The result is exactly the same as the method syntax, but saves you the effort of typing the parentheses.

Remember that the expressions, whether you are using methods or properties, are Spring EL expressions. You will be able to use logical operators such as and, or etc. For example access="hasRole('ROLE_X') and hasRole('ROLE_Y')
Configuring Authentication
When users are redirected to the login page, the application asks them to enter a username and password combination in order to proceed. Spring Security will receive this information but needs to verify that the user exists and that the password supplied matches for that user.
In order to do this we need some kind of user store to hold the users (and passwords) that are able to access the application. To keep things simple for now, we will use an in-memory data store, which we will fill with users and passwords entirely specified in the configuration. Later we will see how to replace this with a database store.
We need to configure an org.springframework.security.authentication.AuthenticationManager to do this. Spring Security offers a namespacing construct (<security:authentication-manager>) that, unlike the org.springframework.security.access.AccessDecisionManager, will keep the coding required short and easy. Using this construct we don’t have to wire this authentication manager explicitly; it will be auto detected by Spring.
In order for the authentication manager to do its job, it needs a reference to an authentication provider. This is the bridge to the store that contains the user details. In this case we won’t reference an external provider but use the in-memory user-service, which is declared as <security:user-service> and takes a list of <security:user> elements, each representing a user in our system (see Listing 13-6). A user has a username (abbreviated name in this case), a password, and a comma-separated list of authorities. The authorities are of no importance for the moment. Later we will show how we can use them.
Listing 13-6. The authentication manager configuration with in-memory user-data store
<security:authentication-manager>

    <security:authentication-provider>

        <security:user-service >

            <security:user name="jd"

                password="5238377ba2eac049901b54004ee9e03db62c0ab0b48133a4a162ab3aedfc809f"

                authorities="ROLE_CUSTOMER"/>

        </security:user-service>

    </security:authentication-provider>

</security:authentication-manager>
What is important is that this code is not yet complete. As you can see, we have a strange and long password. This is called a one-way hashed password. A one way hash is a cryptographic function that takes plain text as input and generates another, weird-looking, string as output, called a hash (or digest). The general idea is that the hash cannot (without taking decades of computing time) be reverse-engineered to the original plain-text form. In order to compare these passwords, one takes the password as entered by the user, hashes it with the hash function and then compares the output with the hash stored in the data store. If the hashes match, the password is the same.
In this case we used the SHA2 hashing algorithm with an output size of 256-bit (so SHA-256). The only problem is that Spring now expects the user to enter the hash
"5238377ba2eac049901b54004ee9e03db62c0ab0b48133a4a162ab3aedfc809f"
as the password, instead of the readable password. Because Spring does not know that what we stored is actually a hash, it thinks that this long string is the actual password that the user has to enter.
What is left to do is configure Spring to take the real plain-text password by the user, hash it using the selected hashing algorithm, and then compare the output hash with the hash value we supplied in the password field. In Listing 13-7, we do this by specifying the <security:password-encoder>. There is not much to configure. We just say we are using SHA-256 bit (which is actually SHA version 2). There is also a weird sub element, which we will discuss in a minute. With this password encoder, Spring Security knows that our passwords are hashed, and that it should hash the user’s entered password first before comparing the value with the one in our data store.
Listing 13-7. Adding the password encoder
<security:authentication-manager>

    <security:authentication-provider>

        <security:password-encoder hash="sha-256">

            <security:salt-source user-property="username"/>

        </security:password-encoder>

        <security:user-service >

            <security:user name="jd"

                password="5238377ba2eac049901b54004ee9e03db62c0ab0b48133a4a162ab3aedfc809f"

                authorities="ROLE_CUSTOMER"/>

        </security:user-service>

    </security:authentication-provider>

</security:authentication-manager>
![]() Note Why did we make things more complex by introducing a hashed password rather than a plain text one, when we are creating just the basic setup? We did this for a good reason. Never, ever, store a password in plain text. Not even in a temporary (or basic) solution. A wise man once told us “in practice, a temporary solution is the equivalent of a production ready solution that will stay there forever.” Ask yourself; how many times have you developed something temporary that is still out there? Also, when working with Spring Security or Java, there is no good reason not to hash your passwords. With the Apache Commons Codec,7 you can create a hash with a single line of code. Never store plain-text passwords! Also, if someone performs an audit and sees that passwords are in plain text, you will be in trouble. This is the first step of any secure application.
Note Why did we make things more complex by introducing a hashed password rather than a plain text one, when we are creating just the basic setup? We did this for a good reason. Never, ever, store a password in plain text. Not even in a temporary (or basic) solution. A wise man once told us “in practice, a temporary solution is the equivalent of a production ready solution that will stay there forever.” Ask yourself; how many times have you developed something temporary that is still out there? Also, when working with Spring Security or Java, there is no good reason not to hash your passwords. With the Apache Commons Codec,7 you can create a hash with a single line of code. Never store plain-text passwords! Also, if someone performs an audit and sees that passwords are in plain text, you will be in trouble. This is the first step of any secure application.
You might wonder, how did we generate the hash in the first place? We could have written a small Java tool which does that for us, using the Apache Commons Codec:
String hashedPassword =

org.apache.commons.codec.digest.DigestUtils.sha256Hex(plainTextPassword);
Or, we could have Googled an online site to do that. There are also plenty of free tools out there that can generate any kind of hash. Just one note, be careful using online generators, as you will be passing around real passwords. For testing purposes this will do fine, but for real case scenarios, think about writing a tool yourself or downloading a well-known tool8 instead.
The password we hashed is “secret”. If you would verify this you’ll notice that the hashes don’t quite match. In this case we are using a “salted hash” which is nothing more than the password suffixed with extra data that can be found when authenticating the user. For example, it could be the first name of the user. In this case we have chosen the easiest element; the username.
__________
8 http://www.slavasoft.com/hashcalc/ (Windows only - freeware) http://sourceforge.net/projects/hash-calculator/files/hash-calculator/ (Java - open source)
The goal of the salt is to make the digests more unique. If two users use the same password, the same hash will be generated. When using a salt, the hashes will differ, as they are calculated using another suffix (in this case their username).
Having the same hash doesn’t hurt, as they (practically) cannot be reverse engineered. However, you are giving away a free hint: someone looking at the hashes might note that multiple users have the same hash, and thereby implicitly know that they also have the same password. By adding the salt you are taking away that last hint, and you are also making the passwords longer. The longer the password, the more resistant the hash will be against attacks.
Spring calculates the salted hash by using this scheme:
plaint_text_password{salt}
In our case we have to calculate the hash as secret{jd}, where jd is the username of our user. If you now try to regenerate the hash with this input string, you’ll notice that it will match with the hash shown above. We will configure this as shown in Listing 13-8.
Listing 13-8. The password encoder using a property as salt
<security:password-encoder hash="sha-256">

            <security:salt-source user-property="username"/>

</security:password-encoder>
We have now configured the password encoder with a type of hash. Internally, we supplied it with a salt source that has a user-property with the value “username”. Let’s look in more detail at how Spring Security will handle this:
- Before applying the hash function, first resolve our salt. The salt is retrieved from the
UserDetailsobject (which we will introduce later). The property that should be used from thisObjectis indicated by the value of theuser-propertyattribute (“username”). The value from theusernameproperty is retrieved from theUserDetailsObject. That value will be our salt. The salt is then added at the end of the password between braces. So, when our password issecretand the username property of theUserDetailsobject isjd, our password string will now besecret{jd}.- Hash the password string
secret{jd} using SHA 256bit.- Finally, compare the result from the hash function with the one retrieved from the users data store.
Putting It All Together
Before we can test our application, we still have to make some modifications to our pages. In the previous application our pages were adapted for the custom authentication scheme that we created ourselves. In particular, the login and landing page need some modifications to work together with Spring Security.
First we will take care of the login page. Spring Security will perform authentication, based on the username and password that we will supply. We will do this by our login page, which has username and password fields. But Spring needs to know about these items, so we are going see how to handle that. We will also see how we can show error messages that the login might have produced.
Next we will make a small modification to our home page to indicate whether the authentication was successful. Previously, if a user logged in using the login link, he or she could only infer that the login must have succeeded since there was no error. We will enhance this a bit with a message saying that the authentication succeeded.
Finally, we will change the logout so it is handled by Spring Security as well.
Changing the Login Page
As we explained previously, we implicitly configured a filter (UsernamePasswordAuthenticationFilter) that will perform redirection to the login page and landing page. Besides this, this filter will also listen to a preconfigured URL and look for preconfigured request parameters for username and password. These default key values are as follows:
- Username request parameter name:
j_username- Password request parameter name:
j_password- Request URL:
/j_spring_security_check
![]() Note You can change all three of these values on the
Note You can change all three of these values on the <security:form-login> element by specifying the attributes: username-parameter, password-parameter, and login-processing-url. We mention this option because it might be worth considering in your own Spring projects, although we will leave the values at their defaults for the duration of the chapter. The request URL will be in the action of the HTML form. Anyone inspecting your HTML source will know you are using Spring Security. While “security through obscurity” might by itself give a false sense of security, if applied in a well-controlled and secured environment (as we are building here) it is considered a plus, since you are removing one more hint. In this case, it is the version or software product you are using to secure your application.
The login.jsp now looks like Listing 13-9.
Listing 13-9. The WEB-INF/view/public/authentication/login.jsp adapted to integrate with the Spring Security form based login filter.
<%@ taglib prefix="c" uri="http://java.sun.com/jsp/jstl/core"%>

<%@ taglib prefix="spring" uri="http://www.springframework.org/tags"%>

<%@ taglib prefix="form" uri="http://www.springframework.org/tags/form"%>


    <spring:url value="/j_spring_security_check" var="login" />

        <form action="${login}" method="POST">

            <table style="width: 100%">

                <tr>

                    <td>

                        <spring:message code="label.page.login.username" />

                    </td>

                    <td>

                        <input type="text" name="j_username"/>

                    </td>

                    <td>
                        <spring:message code="label.page.login.password" />

                    </td>

                    <td>

                        <input type="password" name="j_password" />

                    </td>

                </tr>

                <tr>

                    <td colspan="4">


                            <c:if test="${not empty param.authenticationNok}">

                                <font color="red">

                                    <spring:message code="label.login.failed"
                      arguments="${SPRING_SECURITY_LAST_EXCEPTION.message}" />

                                </font>

                            </c:if>

                        </td>

                    </tr>

                </table>


                <div align="right" style="margin-bottom: 20px;
                     margin-top: 10px" >

                    <button type="submit" id="login">

                        <spring:message code="label.page.login.login"/>

                    </button>

                </div>

        </form>

</jsp:root>
As you can see, we have made sure the input fields for password and username have the requested name, so that the parameter will be picked up by Spring. We are also submitting our form to the default Spring Security URL for authentication.
What you might also notice is that we added a section to display login errors:
<c:if test="${not empty param.authenticationNok}">

    <font color="red">

        <spring:message code="label.login.failed"

            arguments="${SPRING_SECURITY_LAST_EXCEPTION.message}" />

     </font>

</c:if>
When a user supplies bad credentials, Spring Security makes the exception available on the session with the key SPRING_SECURITY_LAST_EXCEPTION. The only thing we have to do is display it. The message can be localized and can also be changed. We will discuss this further in the “Localization” section of this chapter. To detect that a new login failure occurred, we check for the presence of the parameter authenticationNok.
This parameter is added by us. When Spring Security detects a login failure, it can direct to a specified URL. Doing so you can pass along additional parameters. To do this redirection we need to modify the <security:form-login> as shown in Listing 13-10.
Listing 13-10. Forwarding when authentication fails using a parameter
<security:form-login login-page="/public/authentication/login.htm"

    authentication-failure-url="/public/authentication/login.htm?

                                  authenticationNok=1"

</security:form-login>
On authentication failure we redirect back to the login page, but this time we append the parameter authenticationNok, which will make the message appear. We are supplying a value 1 for the parameter, just to let it have a value so we can easily test if this parameter is present. The value is of no real importance, however. This rounds up the modifications to the login page; now we will move on to the home page.
![]() Note We also removed the
Note We also removed the authentication-flow.xml from the previous example, as login is now handled by Spring Security infrastructure. This also means we changed the anchor in header.jsp to go to /public/authentication/login.htm instead of launching the (no longer existing) authentication flow.
Changing the Home Page
When authentication is successful we redirect to the home page. In this case we want to show a message that authentication was successful. In order to do this, we will add a parameter to the URL specified in the default-target-url attribute (see Listing 13-11).
Listing 13-11. Configuring the default-target-url, with an extra parameter, which Spring Security will redirect the user to after successful authentiction
<security:form-login login-page="/public/authentication/login.htm" default-target-

url="/public/main.htm?authenticationOk=1" authentication-failure-

url="/public/authentication/login.htm?authenticationNok=1"  />
In Listing 13-12 we show the relevant portion of the home page (main.jsp, located in WEB-INF/view/public/), which will display the message to the user when login was successful. The code that displays the message is indicated in bold.
Listing 13-12. Adapting the home page to show the appropriate message when login was successful
<%@ taglib prefix="c" uri="http://java.sun.com/jsp/jstl/core"%>

<%@ taglib prefix="spring" uri="http://www.springframework.org/tags"%>

<%@ taglib prefix="form" uri="http://www.springframework.org/tags/form"%>

<%@ taglib prefix="fn" uri="http://java.sun.com/jsp/jstl/functions"%>

<%@ taglib prefix="sec"

        uri="http://www.springframework.org/security/tags"%>
<sec:authorize access="fullyAuthenticated">

    <c:if test="${not empty param.authenticationOk}">

        <div id="authenticationOk"

            style="color: green; display: block; margin-left: 15px;

            margin-bottom: 10px;">

            <table>

                <tr>

                    <td>

                        <ul style="list-style-type: disc">

                            <li>

                                <h3>

                                   <sec:authentication

                                    property="principal.username"

                                    var="username" scope="request"/>


                                    <spring:message

                                      code="label.page.main.authentication.ok"

                                      arguments="${username}" />

                                </h3>

                            </li>

                        </ul>

                    </td>

                </tr>

            </table>

        </div>

    </c:if>

</sec:authorize>


<script>

    dojo.addOnLoad(function(){

        function fadeIt() {

            if(dojo.byId("authenticationOk")){

                dojo.style("authenticationOk", "opacity", "1");

                var fadeOutArgs = {node: "authenticationOk", duration: 15000};

                dojo.fadeOut(fadeOutArgs).play();

            }

        }

    fadeIt();

    });

</script
If someone were to append this parameter (authenticationOk=1) manually, this would have no side effects, and the message would also not be shown. On the home page there is an authentication check around the code that shows the message using the security tag library (<sec:authorize access="fullyAuthenticated">).
We only check for the authenticationOk parameter if the user is already authenticated. If we then see that this parameter is present, we display a message so the user knows authentication was successful. This authentication strategy ensures that the message is shown only once. If the authenticated user were to return to the welcome page using the “home” link, or any other way, we have ensured that the message is not shown a second time.
We will discuss the Spring Security taglibs in detail later in the “Authorizing Access” section.
Logging Out
The logout functionality was until now implemented in our com.apress.prospringmvc.bookstore.web.controller.AuthenticationController. Let’s repeat the code snippet to refresh our memory.
@RequestMapping(value = "/logout", method = RequestMethod.GET)

public String logout(HttpSession session) {

    session.invalidate();

    return "redirect:/index.htm";

}
When the user clicks the logout link, it will direct to /logout, which will invoke the controller method logout, and call invalidate on the HTTP session. After that the user is redirected to the homepage. Although this is not very complex, it should no longer be part of our application code. Spring Security can take care of this as well. We can safely remove the code in the AuthenticationController.
After that we will configure Spring Security to take over the task. We will do this by configuring the LogoutFilter. In Table 13-2 earlier, we gave an overview of the possible filters; the LogoutFilter is one of them. This filter had the following entry in the table:

This filter can be declared as an element (<security:logout>) within the http element. The code for this configuration is shown in Listing 13-13.
Listing 13-13. Configuring the logout functionality in our src/main/resources/spring/spring-security.xml
<security:logout logout-success-url="/public/main.htm" logout-url="/logout" invalidate-

session="true"/>
The logout-success-url attribute indicates the page to which Spring Security should redirect when the logout was successful. In our case this is the home page. The second attribute, logout-url, indicates the URL where the filter should listen. In our case this is /logout. Whenever a call is made to /logout, the LogoutFilter will be invoked and the user logged out. The last attribute indicates whether the HTTP session should be invalidated as well. If you specify false, only the org.springframework.security.core.context.SecurityContext will be cleared, and no invalidation occurs on the HTTP session. We will cover this class in a minute; for now it is enough to know that from the moment you are authenticated, the authentication information will be accessible via org.springframework.security.core.context.SecurityContext. Optionally you can also indicate to clear the entire HTTP session. While it is not mandatory, it is in nearly all cases the safest to clear the session as well. Invalidating the session is the default behavior if you don’t specify the invalidate-session attribute. We specified it here explicitly so anyone reading our security configuration understands that the session is cleared for sure (not that we doubt the default value is working, but to give a clear indication, not everyone is aware of the defaults).
The logout link itself in our header.jsp remains unaltered, as you can see in Listing 13-14.
Listing 13-14. The logout link in our WEB-INF/templates/header.jsp
<spring:url value="/logout" var="logout" />

<a href="${logout}">

    <spring:message code="nav.logout"/>

</a>
This link now directs to /logout. The only thing missing is that this link should only appear when the user is actually logged in. We will see how to handle this when we introduce the authorization tag. Our logout control is now fully operational.
The Complete Security Configuration
In Listing 13-15 you will find the complete security configuration that we build for this part of the chapter (located in src/main/resources/spring/spring-security.xml). Although we have included a lot of functionality, the configuration part is still pretty digestible, as you will see.
Listing 13-15. A complete overview of the basic security setup
<security:http use-expressions="true" >

    <security:form-login login-page="/public/authentication/login.htm"

        default-target-url="/public/main.htm?authenticationOk=1"

        authentication-failure-url="/public/authentication/login.htm

                                   ?authenticationNok=1"/>


    <security:intercept-url pattern="/index.jsp" access="permitAll" />


    <security:intercept-url pattern="/public/**" access="permitAll" />

    <security:intercept-url pattern="/secured/**"

    access="fullyAuthenticated"/>


    <security:intercept-url pattern="/**" access="denyAll" />

    <security:logout logout-success-url="/public/main.htm"

              logout-url="/logout" invalidate-session="true"/>

</security:http>


<security:authentication-manager>

    <security:authentication-provider>

        <security:password-encoder hash="sha-256">

            <security:salt-source user-property="username"/>

        </security:password-encoder>

    <security:user-service >

        <security:user name="jd"

password="5238377ba2eac049901b54004ee9e03db62c0ab0b48133a4a162ab3aedfc809f"

            authorities="ROLE_CUSTOMER"/>

        </security:user-service>

    </security:authentication-provider>

</security:authentication-manager>
Together with the login and home page modification explained in the previous two sections, this secures our entire application. We are now able to log in via a form login. The authentication is handled securely via Spring Security. All our resources are now secured; some require authentication before a user can access them, and others are publicly accessible. Resources that are not explicitly listed are denied access by default.
Let’s continue and see what else we can do!
Going to the Database
Up until now we have stored our user information in the configuration itself. By making use of the <security:user-service>, Spring Security created an in-memory data store which would be populated with the data we specified there. In our current application, users are actually stored in the database and modeled as instances of org.springframework.security.authentication.dao.Account. It would be better to adapt our configuration so that we can load the user’s account from the existing database tables. As it turns out, this is a very easy step to take.
By defining the <security:authentication-provider> Spring registered a org.springframework.security.authentication.dao.DaoAuthenticationProvider. This class will deal with all low-level plumbing. What is important for us is that this class delegates to a so-called org.springframework.security.core.userdetails.UserDetailsService class, which will be responsible for loading the user information from wherever suitable. In our previous implementation this was loaded from the in-memory data store. Now we will provide our own implementation. This is a very easy interface to implement, as it only has one method:
UserDetails loadUserByUsername(String username) throws UsernameNotFoundException;
![]() Note The UserDetailsService is not responsible for authentication. That is the job of the authentication provider. In our case this will be the
Note The UserDetailsService is not responsible for authentication. That is the job of the authentication provider. In our case this will be the DaoAuthenticationProvider from Spring Security. The goal of the UserDetailsService is to access the data store (database, directory server, or possibly a file) that contains the user information and possibly credentials. It should map this information from that data store’s internal structure to predefined standard object (org.springframework.security.core.userdetails.UserDetails) and return it to the provider so it can continue to do its work.
Basically, the implementation should load the user information from wherever its configuration determines and convert that information to a UserDetails object. As we will see later, a UserDetails object is the main object you will be using when asking for security information. The implementation is shown in Listing 13-16.
Listing 13-16. Implementing a custom UserDetailsService
package com.apress.prospringmvc.bookstore.web.security;


import org.apache.commons.lang3.StringUtils;

import org.springframework.beans.factory.annotation.Autowired;

import org.springframework.security.core.GrantedAuthority;

import org.springframework.security.core.authority.SimpleGrantedAuthority;

import org.springframework.security.core.userdetails.UserDetails;

import org.springframework.security.core.userdetails.UserDetailsService;

import org.springframework.security.core.userdetails.UsernameNotFoundException;

import org.springframework.stereotype.Component;
import com.apress.prospringmvc.bookstore.domain.Account;

import com.apress.prospringmvc.bookstore.domain.Permission;

import com.apress.prospringmvc.bookstore.domain.Role;

import com.apress.prospringmvc.bookstore.service.AccountService;


@Component

public class BookstoreUserDetailsService implements UserDetailsService {


@Autowired

private CustomerService customerService;


    @Override

    public UserDetails loadUserByUsername(String username) throws UsernameNotFoundException {

        return new BookstoreUserDetails(customerService.getCustomer(username));

    }

}
We use our CustomerService to load the Customer and pass it along to our custom UserDetails object. This object is implemented as shown in Listing 13-17.
Listing 13-17. Implementing a custom UserDetails
package com.apress.prospringmvc.bookstore.web.security;


// Imports omitted, see Listing 13-16


public class BookstoreUserDetails implements UserDetails {


    private Customer customer;

    private List<GrantedAuthority> authorities = new

        ArrayList<GrantedAuthority>();


    public BookstoreUserDetails(Customer customer) {

        this.customer = customer;

    }


    //Omitting getter and setter methods for class instance variables

}
There are getters for the username, password and our Customer object. At the moment we return an empty list with for the GrantedAuthority property. We will later see how this will fit into our application. All the other methods are features for the UserDetails, such as account expiry and so on. We won’t be using these features, so true is returned for all of them. Once a user has been authenticated, the information about that user is stored in an implementation of org.springframework.security.core.context.SecurityContext. The org.springframework.security.core.context.SecurityContextHolder class which is a java.lang.ThreadLocal,9 will give access to the SecurityContext. The SecurityContext itself has only a getter (and setter) for an org.springframework.security.core.Authentication Object. This means you will be able to access the Authentication Object anywhere in your web application by calling
__________
On the Authentication object, we are especially interested in the getPrincipal method. This returns details about the user currently authenticated. In the previous section, we introduced you to the UserDetails, well this is what the getPrincipal returns, a UserDetails implementation. In our case it will be the a custom UserDetails, namely our BookstoreUserDetails.
![]() Note If you look at the API, you will see that
Note If you look at the API, you will see that getPrincipal returns Object. So it can also return other types besides a UserDetails implementation. If you define your own custom org.springframework.security.authentication.AuthenticationProvider, you are free to construct your own authentication objects. In that case the return value from getPrincipal can be whatever type you want the principal to be.
Securing Our Flows, the Right Way
The setup we’ve put in place until now still secures our flows as normal request mappings. While this might seem to work, it actually doesn’t. It only works for requests coming from outside to access a flow. If a flow wants to start a subflow, the request is already behind the Security filters and will not be picked up (see Figure 13-4).

Figure 13-4. Securing flows as request URI using the filter chain is not enough. Starting a sub flow from a parent flow would bypass this mechanism.
If you remember from the request mappings, the placeOrders-flow (located in WEB-INF/view/secured/placeOrders/) can only be accessed by authenticated user. The createOrders-flow (located in WEB-INF/view/public/createOrders/) is publicly available. What happens here is that no authentication is triggered when the request comes in to transition to placeOrder (as it is still for createOrders-flow). The placeOrder is a subflow state within createOrders-flow. To refresh our memory you can see the code snippet below from the createOrders-flow which starts the sub flow from the moment the flow transitions to placeOrder:
<subflow-state id="placeOrder" subflow="secured/placeOrders">

    <input name="orderForm"/>


    <output name="orderId"/>

        <transition on="endOrderOk" to="endOrderOk"/>

</subflow-state>
When Web Flow makes the internal state transition to the sub-flow, it will actually execute without redirecting the user to the login page. What we really want is Web Flow integration with Spring Security, so that Spring Security is involved when Web Flow executes flows.
Adding Access Attributes to Your Flows
Here we will see what you have to do in order to invoke Spring Security for Web Flow. When you do so, your inter flow communication will also be secured.
In order to secure your flows, you can add the following element on top of your flow definitions:
<secured attributes="…"/>
The usage of the attributes attribute is the same as the access attribute in the <security:intercept-url> of the spring security configuration. You can use it to place the expressions you want to be valid before this flow can execute.
If you return to the “Configuring Which Resources to Secure” section, you will see that the following two flows required authentication:
placeOrders-flowordersOverview-flow
The third flow, createOrders-flow (located in WEB-INF/view/public/createOrders/), was public and did not require any authentication to be executed. We add the fullyAuthenticated condition to placeOrders-flow.xml(located in WEB-INF/view/secured/placeOrders/) and ordersOverview-flow.xml (located in secured/ordersOverview/), as shown in Listings 13-18 and 13-19.
Listing 13-18. Adding the fullyAuthenticated authorization check as top element in ordersOverview-flow.xml and placeOrders-flow.xml
<flow xmlns="http://www.springframework.org/schema/webflow"

      xmlns:xsi="http://www.w3.org/2001/XMLSchema-instance"

      xsi:schemaLocation="http://www.springframework.org/schema/webflow

                           http://www.springframework.org/schema/webflow/
                           spring-webflow-2.0.xsd">


<secured attributes="fullyAuthenticated" />

...
Listing 13-19. Adding the permitAll check as top element in createOrders-flow.xml
<flow xmlns="http://www.springframework.org/schema/webflow"

        xmlns:xsi="http://www.w3.org/2001/XMLSchema-instance"

        xsi:schemaLocation="http://www.springframework.org/schema/webflow

                           http://www.springframework.org/schema/webflow/
                           spring-webflow-2.0.xsd">


<secured attributes="permitAll" />

...
The <secured> element also has a second attribute, called match. This attribute is of no importance when using SpEL. But without using SpEL you are much more limited. For example, it is not possible to define an “or” or “and” relation. Later on we will introduce the concept of roles, but you should know that you can allow or deny a flow to be executed depending on one or more roles being present. With SpEL you would simply use the and operator if you only want the flow to execute when both roles are present, or the or operator if one suffices. When not using SpEL you must use the match attribute, which will let you switch between any; if one of the roles requested are present, the flow will execute, or all; meaning that all of the roles in the attributes attribute must be present before the flow is executed.
![]() Note The flow security configuration on
Note The flow security configuration on createOrders-flow and ordersOverview-flow is a bit superfluous, since they are both top-level flows. The <security:intercept-url pattern="/public/**" access="permitAll" /> and <security:intercept-url pattern="/secured/**" access="fullyAuthenticated"/> have already checked that we had the proper authentication before letting us even go any further. However, the <secured> element in the flow could be used to perform finer-grained access control or authorization. While the filter configuration could allow the user to go through (the user was authenticated successfully for example) you could still check that access would only be granted if the user has a certain role; for example, <secured attribute="hasRole(ROLE_SOMEROLE)"/>. Roles will be discussed in the “Role-Based Access Control” section.
Configuring the SecurityFlowExecutionListener
The org.springframework.webflow.security.SecurityFlowExecutionListener class will enable the integration between Web Flow and Spring Security. It is required in order for the <security> element we discussed previously to do anything. This class is an implementation of the Web Flow org.springframework.webflow.execution.FlowExecutionListener that we saw in Chapter 12.
Normally this would have been a two-paragraph section, since you ordinarily just define a bean (the SecurityFlowExecutionListener) and bind it to the flow executor using the <webflow:flow-execution-listeners> element in webflow-config.xml. As it turns out, there is currently a problem with the SecurityFlowExecutionListener when using SpEL-enabled security expressions with Spring Security. It might well be that this problem is resolved by the time you read this; and if so then you can continue as normal (simply configuring the SecurityFlowExecutionListener as we will see in Listing 13-21). If the issue10 has not been resolved, however, you have two options:
- Use the
SecurityFlowExecutionListeneras-is, but in that case you cannot use SpEL in your flow<security>elements. You would have to fall back to mainly using roles.- Use our custom
com.apress.prospringmvc.bookstore.web.security.BookstoreSecurityFlowExecutionListener, which should do the trick as a workaround. With this approach you will still be able to use SpEL.
For the sake of consistency we went with the second solution for the examples.
To configure the BookstoreSecurityFlowExecutionListener we open src/main/resources/spring/webflow-config.xml and define a Spring bean, as shown in Listing 13-20.
Listing 13-20: Defining the SecurityFlowExecutionListener
<bean id="securityFlowExecutionListener"

class="com.apress.prospringmvc.bookstore.web.security.BookstoreSecurityFlowExecutionListener

"/>
Next we configure the listener with the flow executor (see Listing 13-21).
Listing 13-21: Integrating the SecurityFlowExecutionListener with the flow executor
<webflow:flow-executor id="flowExecutor" flow-registry="flowRegistry" >

    <webflow:flow-execution-repository max-executions="3" max-execution-snapshots="10" />

    <webflow:flow-execution-listeners>

        <webflow:listener ref="securityFlowExecutionListener"/>

    </webflow:flow-execution-listeners>

</webflow:flow-executor>
That’s it! If you want to configure the default SecurityFlowExecutionListener, it is done in exactly the same way, except that the class of bean securityFlowExecutionListener would be org.springframework.webflow.security.SecurityFlowExecutionListener instead of com.apress.prospringmvc.bookstore.web.security.BookstoreSecurityFlowExecutionListener.
![]() Note We did not add the
Note We did not add the BookstoreSecurityFlowExecutionListener code into this section, since that would take us too far. If you come to a point where you need this, and it isn’t fixed, we suggest you read the issue (see the link in the footnote) and look at the source code at the same time. This will be the best way to understand the fix we applied.
__________
Transport Security
At the moment we still have one major security hole in our security setup. When our users log in they supply username and password credentials, which will be authenticated by Spring Security. These credentials are, however, sent via the browser to the web server using HTTP, which is a plain-text protocol. Anyone capturing data will be able to see the username and password in clear text. To illustrate this we started up Wireshark11 and let it listen on the loopback adapter. Next we performed a login in our application, and Figure 13-5 shows the results.

Figure 13-5. Network capture of an HTTP session showing plain credentials when logging in via the form
This seems very unsecure. To change this behavior we are going to switch to SSL (Secure Socket Layer, which is now called TLS, or Transport Layer Security, its successor, but for consistency we’ll call it SSL), whenever a user logs in. From that point everything will be served using SSL.
Before we proceed, you must prepare your tomcat or tomcat STS instance to add an extra SSL connector. It is beyond the scope of this book to go deeper into the internals of the SSL protocol or the PKI(Public Key Infrastructure), but for this to work you need to supply tomcat with a keystore, which contains a private/public key pair and a certificate for that public key. Normally the certificate part is generated by a third-party Certificate Authority (CA). Fortunately, you can self-sign such a certificate which is ideal for tests or closed production setups.
As a small intermezzo we wanted to share something about self-signed certificates, since there is sometimes a misunderstanding about them. Using PKI with self-signed certificates has exactly the same encryption level as using an official CA signed certificate. So your SSL will not be less safe; the encryption strength, the procedures, and everything that depends on them offers the exact same guarantees.
__________
The difference lies in the trust. With a self-signed certificate your users will have to explicitly accept the certificate, and the browser will give them a warning that the identity cannot be verified. How this is presented is browser dependent, but with Safari they will get the page as shown in Figure 13-6.

Figure 13-6. Browser confirmation for trusting our self signed certificate
In order to trust the certificate for the current session only, you can click “Continue”. If you want to trust the certificate for future sessions, you have to click “Show Certificate”. Doing so will present the dialog box shown in Figure 13-7. If you then check “always trust Bookstore when connecting to localhost” the certificate will be stored.

Figure 13-7. Accepting the self signed certificate
After you click Continue, the certificate will be trusted (for this session only or for future sessions depending if you clicked the checkbox in Figure 13-7) and you will be able to continue over SSL. It is clear that this trusting is only a good idea for internal testing.
With a real CA signed certificate, the CA has asked the certificate holder for credentials before actually issuing the certificate. For example, we would never get a server certificate for google.com from an authorized CA, since we cannot proof that we own the domain or have any authorization over it.
A client’s browser truststore (which contains a list of authorized root CAs) will also not trust our self-signed certificate by default, since it cannot be verified by any of the known and trusted CAs. I will explicitly have to accept its trust.
So for a production website a self-signed certificate would be a bad idea, since users cannot verify that the identity behind the certificate is really what it claims to be (your server); there is no third party that verified the identity and gave any approval. However, if you are sending data among a limited set of users (closed production), and each party trusts the others, it is perfectly viable to send a self-signed certificate to each party. Each party knows that your identity (you gave it personally on a USB stick, or emailed it from your personal account) is the one that is coupled to that certificate (the identity could be a person, server, domain, or whatever). This way, you can easily save the costs of signing your public keys by a CA.
To generate a self-signed certificate we can use a Java tool called keytool. To use it, take the following steps:
- Open a command line prompt and enter the following command (make sure the JDK is available on your path):
keytool -genkey -alias tomcat -keystore keystore.jks- Enter tomcat as the password and again when prompted to re-enter it:
Enter keystore password:

Re-enter new password:- Complete the prompts as follows:
What is your first and last name?

  [Unknown]:  Bookstore

What is the name of your organizational unit?

  [Unknown]:  Bookstore

What is the name of your organization?

  [Unknown]:  Bookstore

What is the name of your City or Locality?

  [Unknown]:  Brussels

What is the name of your State or Province?

  [Unknown]:  Brussels

What is the two-letter country code for this unit?

  [Unknown]:  BE

Is CN=Bookstore, OU=Bookstore, O=Bookstore, L=Brussels, ST=Brussels, C=BE correct?

[no]: yes- Press Enter without typing anything. The prompt will return, and your self-signed key is ready in the keystore.
Enter key password for <tomcat>

        (RETURN if same as keystore password):
Place the keystore under your tomcat home directory /conf, which is spring-insight-instance/conf/ if you are using STS.
Next open the server.xml (spring-insight-instance/conf/server.xml) and configure the SSL connector, as shown in Listing 13-22.If you want a full explanation of the configuration shown here, see the Tomcat howto12, in the section “Edit The Tomcat Configuration File.”
__________
Listing 13-22. Adding an SSL connector to tomcat’s server.xml
<Connector executor="tomcatThreadPool" port="${bio.https.port}"

protocol="org.apache.coyote.http11.Http11Protocol"

connectionTimeout="20000" redirectPort="${bio.https.port}" acceptCount="100"

maxKeepAliveRequests="15"

keystoreFile="${catalina.base}/conf/keystore.jks" keystorePass="tomcat" keyAlias="tomcat"

SSLEnabled="true" scheme="https" secure="true"/>
In this example we are depending on the STS instance. The variables, like ${bio.https.port}, are already predefined. If you are using Tomcat you can replace them with 8443, which will be our default SSL port.
After that you can start Tomcat. Do not forget to clean the server in STS before starting. After modifying anything in the server configuration you have to “clean” in order for the latest files to be copied over (right-click on the server instance in the server view and click Clean).
At this time verify that your server starts and that no errors are thrown. If there is anything wrong with the configuration, Tomcat will show errors almost directly after starting up.
The final thing to do is to tell Spring Security which mappings we would like to use SSL for (see Listing 13-23). We will use SSL for
- Our login page
- The buy books flow
Listing 13-23. Configuring secured transfer for specific request URIs
<security:intercept-url pattern="/index.jsp" access="permitAll" />

<security:intercept-url pattern="/public/authentication/**" access="permitAll" requires-

channel="https" />

<security:intercept-url pattern="/public/createOrders/**" access="permitAll" requires-

channel="https" />


<security:intercept-url pattern="/public/**" access="permitAll" />


<security:intercept-url pattern="/secured/**" access="fullyAuthenticated" requires-

channel="https" />


<security:intercept-url pattern="/**" access="denyAll" />
The requires-channel will automatically change our protocol from HTTP to HTTPS (which is HTTP over SSL). To illustrate this we are going to our home page (see Figure 13-8).

Figure 13-8. Before login, we are still on HTTP.
Next, we click the Login link in the navigation bar, which results in the page shown in Figure 13-9.

Figure 13-9. After clicking on the Login navigation link, we automatically switch to HTTPS.
When we log in now, our credentials are transmitted securely. If we take a look at the certificate, we will see the data we entered when generating it with keytool. We will also see that there is no trust, as it is not generated by a trusted CA stored in our browser’s truststore. Figure 13-10 shows the self-signed certificate we created earlier. It is not trusted by our browser, in this case Safari.
Figure 13-10. Information on the certificate issued by tomcat
![]() Note When you run the sample application for the first time, going to the login page will automatically trigger the switch to SSL. In this case you will get warning of the self-signed certificate as shown in Figure 13-6 and Figure 13-7. So you will first have to accept the self-signed certificate before your browser will proceed over SSL to the login page.
Note When you run the sample application for the first time, going to the login page will automatically trigger the switch to SSL. In this case you will get warning of the self-signed certificate as shown in Figure 13-6 and Figure 13-7. So you will first have to accept the self-signed certificate before your browser will proceed over SSL to the login page.
When we inspect what’s on the wire now, after configuring SSL, we will see that the initial request is a plain HTTP get to the login page. Spring Security will, however, send a redirect (HTTP 302) back to the browser indicating a protocol change. You can see that in the two highlighted lines in Figure 13-11. The first line is the HTTP 302 redirect. The second is the body content of the reply, in which you can see it is requesting our browser to https://localhost.... What follows next is no longer plain HTTP, but SSL. In Wireshark it is marked as TCP. The content of the packets are encrypted, and the password can no longer be intercepted by looking at the packets.

Figure 13-11. All information submitted is now encrypted by SSL
This concludes our discussion of Transport layer security. You have seen how we can switch from HTTP to HTTPS, just by altering the Spring Security configuration.
Localization
Spring Security supports localization of exception messages. If your application is designed for English-speaking users, you don't need to do anything as by default since all Security messages are in English.
If you need to support other locales, you should know that all exception messages can be localized, including messages related to authentication failures and access being denied (authorization failures). Exceptions and logging messages for developers or system deployers (including incorrect attributes, interface contract violations, using incorrect constructors, startup time validation, debug-level logging) are not localized and instead are hard-coded in English within Spring Security's code.
The resource bundle is located under org/springframework/security/ with the base name messages.properties and can be configured in our WebMvcContextConfiguration (see Listing 13-24). We already have an org.springframework.context.MessageSource configured for our local resource bundle (messages.properties); here we will extend the configuration and pass along a second resource bundle, which is identified with the location in package format (org.springframework.security.messages) followed by the basename, which is the name of the file without country or language suffixed and without a “properties” extension.
Listing 13-24. Adding extra bundles for localizing Spring Security messages
@Bean

public MessageSource messageSource() {

    ResourceBundleMessageSource messageSource = new

        ResourceBundleMessageSource();

    messageSource.setBasenames(new String[] { "messages",

        "org.springframework.security.messages" });

    messageSource.setUseCodeAsDefaultMessage(true);

    return messageSource;

}
Spring Security relies on Spring's localization support to look up the appropriate message. In order for this to work, you have to make sure that the locale from the incoming request is stored in Spring’s org.springframework.context.i18n.LocaleContextHolder. Spring MVC’s org.springframework.web.servlet.DispatcherServlet does this for your application automatically, but since Spring Security's filters are invoked before the DispatcherServlet, the LocaleContextHolder needs to be set up to contain the correct locale before Spring Security is invoked. We do this by configuring a Spring javax.servlet.ServletContextListener implementation, namely org.springframework.web.context.request.RequestContextListener. This listener will be called before any filter is invoked.
The RequestContextListener is configured in the BookstoreWebApplicationInitializer, as you can see in Listing 13-25.
Listing 13-25: Code from the BookstoreWebApplicationInitializer configuring the RequestContextListener
@Override

public void onStartup(ServletContext servletContext) throws ServletException {

    registerListener(servletContext);

    registerDispatcherServlet(servletContext);

    // We are using JpaFlowExecutionListener instead, but we enable it for

    // Spring MVC served pages

    registerSpringSecurityFilterChain(servletContext);

    registerOpenEntityManagerInViewFilter(servletContext);

}


private void registerListener(ServletContext servletContext) {

    AnnotationConfigWebApplicationContext rootContext =

        createContext(configurationClasses);

    servletContext.addListener(new ContextLoaderListener(rootContext));

    servletContext.addListener(new RequestContextListener());

}
Role-Based Access Control
Role-based access control (RBAC) is a beneficial access control model for organizations with many users and a high degree of diversity in the functions they are playing in their daily job. RBAC was modeled especially to support this kind of structure. Your role in RBAC is actually comparable with the role you would play in your organization; most likely that will have something to do with development. The permissions are the rights that have been granted to someone with that role.
While this level of detail mostly makes sense only for larger organizations, its basic implementation is not very difficult. As we will see, we can extend our domain model easily to support basic RBAC with a minimum of effort.
But to set the record straight, for something as simple our bookstore this is certainly overkill. Even if it were to become a popular store, the diversity of users will be very low; they will all be doing pretty much the same things. Hence we will not really benefit from an RBAC system. But we will demonstrate it just to show what is possible with Spring Security.
The model we are going to support comes down to the relationships shown in Figure 13-12.

Figure 13-12. The RBAC model
A user (in our domain called “Account”) has one or more roles. A role can have one or more permissions. The roles we define will depend on what’s important for our application. A role can be thought of as a globalization of a set of permissions.
In our bookstore a role might be “customer” or “administrator,” and a permission might be “create order” or “add books.” Permissions are normally finer-grained than roles.
We decided to load both roles and permissions in the Security context. Checking on the role might be meaningful for a coarse-grained check. For example; should this navigation link be shown? This probably depends on the fact that a given user possesses a given role. However, going deeper, it could be that there are two different roles giving access to that same functionality. But within the functionality, only certain operations are allowed, depending on specific permissions. So here it would benefit us to check for the presence of a specific permission. As we will see, with Spring Security we can easily check on both.
For example, suppose that a company has a page that shows various benefits an employee enjoys. This could contain information about the medical plan, the meal vouchers, or group promotions. Accessing this information is allowed for internal employees only; contractors and other types of outside employees don’t benefit from this and should be excluded from accessing this information.
For this reason we could opt to do a coarse-grained check on roles first. This will prevent the contractors from even seeing a link to this information. However, within the page itself we want to differentiate between normal employees, who can only read/query the information, and administrators, who will be able to modify the information. Here we will continue by checking the actual permissions. As employees, we will only have the permission to read the extra benefits, while administrators (also being employees) will have the extra permission to modify the information as well.
This whole story is not so interesting for Spring Security. It just wants to know a list of “strings” that you will use to check presence upon. That this list contains roles, permissions, or aliens, doesn’t really matter. The role and permission division is just for the people administrating the application, so that access can be dealt with flexibly, without having to change the code of the application.
Roles or permissions will be transformed to Spring Security GrantedAuthorities. Our domain model has specific entities to support this. First is the familiar Account entity, which is shown in Listing 13-26. In bold you will see the many-to-many association it has with Order. The Role entity shown in Listing 13-27, along with its many-to-many association with Permission, is indicated in bold. Finally we have the Permission entity shown in Listing 13-28.
Listing 13-26. The Account, which has a many-to-many association with Role
package com.apress.prospringmvc.bookstore.domain;


import java.io.Serializable;


import javax.persistence.CascadeType;

import javax.persistence.Embedded;

import javax.persistence.Entity;

import javax.persistence.GeneratedValue;

import javax.persistence.GenerationType;

import javax.persistence.Id;

import javax.persistence.ManyToMany;

import javax.validation.Valid;


import org.hibernate.validator.constraints.Email;

import org.hibernate.validator.constraints.NotEmpty;


@Entity

public class Account implements Serializable {


    @Id

    @GeneratedValue(strategy = GenerationType.AUTO)

    private Long id;


    private String firstName;

    private String lastName;


    private Date dateOfBirth;


    @Embedded

    @Valid

    private Address address = new Address();


    @NotEmpty

    @Email

    private String emailAddress;

    @NotEmpty

    private String username;

    @NotEmpty

    private String password;


    @ManyToMany(cascade = CascadeType.ALL)

    private List<Role> roles = new ArrayList<Role>();


    //Omitting getter and setter methods for class instance variables

}
Listing 13-27. The Role entity, which has in turn a many-to-many association with Permission
package com.apress.prospringmvc.bookstore.domain;


import java.io.Serializable;

import java.util.ArrayList;

import java.util.List;


import javax.persistence.CascadeType;

import javax.persistence.Entity;

import javax.persistence.GeneratedValue;

import javax.persistence.GenerationType;

import javax.persistence.Id;

import javax.persistence.ManyToMany;

import javax.persistence.Table;

import javax.persistence.UniqueConstraint;


@Entity

@Table(uniqueConstraints = { @UniqueConstraint(columnNames = { "role" }) })

public class Role implements Serializable {


    @Id

    @GeneratedValue(strategy = GenerationType.AUTO)

    private Long id;


    private String role;


    @ManyToMany(cascade = CascadeType.ALL)

    private List<Permission> permissions = new ArrayList<Permission>();


    Role() {

        // For ORM

    }


    public Role(String role) {

        this.role = role;

    }


    //Omitting getter and setter methods for class instance variables

}
Listing 13-28. The Permission entity
package com.apress.prospringmvc.bookstore.domain;


import java.io.Serializable;


import javax.persistence.Entity;

import javax.persistence.GeneratedValue;

import javax.persistence.GenerationType;

import javax.persistence.Id;
import javax.persistence.Table;

import javax.persistence.UniqueConstraint;


@Entity

@Table(uniqueConstraints = { @UniqueConstraint(columnNames = { "permission" }) })

public class Permission implements Serializable {


    @Id

    @GeneratedValue(strategy = GenerationType.AUTO)

    private Long id;


    private String permission;


    Permission() {

        // Form ORM

    }


    public Permission(String permission) {

        this.permission = permission;

    }


    //Omitting getter and setter methods for class instance variables

}
This setup is pretty straightforward. An Account has a number of roles, and each role has a number of permissions. As we’ve stated: an Account can have multiple Roles and a Role can have multiple Permissions.
Finally we need to populate our security principal with these roles and permissions. As you remember, we created a custom implementation of a Spring Security UserDetailsService (com.apress.prospringmvc.bookstore.web.security.BookstoreUserDetailsService). We will extend this now to load the list of granted authorities, as shown in Listing 13-29.
Listing 13-29. Extending the BookstoreUserDetailsService functionality to load the roles and permissions into granted authorities
package com.apress.prospringmvc.bookstore.web.security;


import org.apache.commons.lang3.StringUtils;

import org.springframework.beans.factory.annotation.Autowired;

import org.springframework.security.core.GrantedAuthority;

import org.springframework.security.core.authority.SimpleGrantedAuthority;

import org.springframework.security.core.userdetails.UserDetails;

import org.springframework.security.core.userdetails.UserDetailsService;

import org.springframework.security.core.userdetails.UsernameNotFoundException;

import org.springframework.stereotype.Component;


import com.apress.prospringmvc.bookstore.domain.Account;

import com.apress.prospringmvc.bookstore.domain.Permission;

import com.apress.prospringmvc.bookstore.domain.Role;


@Component

public class BookstoreUserDetailsService implements UserDetailsService {
    @Autowired

    private AccountService accountService;


    @Override

    public UserDetails loadUserByUsername(String username) throws
        UsernameNotFoundException {

        if (StringUtils.isBlank(username)) {

            throw new UsernameNotFoundException("Username was empty");

        }


        Account account = accountService.getAccount(username);


        if (account == null) {

            throw new UsernameNotFoundException("Username not found");

        }


        List<GrantedAuthority> grantedAuthorities = new

            ArrayList<GrantedAuthority>();


        for (Role role : account.getRoles()) {

            grantedAuthorities.add(new

                  SimpleGrantedAuthority(role.getRole()));

            for (Permission permission : role.getPermissions()) {

                grantedAuthorities.add(new

                     SimpleGrantedAuthority(permission.getPermission()));

            }

        }

        return new BookstoreUserDetails(accountService.getAccount(username),

               grantedAuthorities);

    }

}
First we check that the username is not null or blank. If it is, we throw a org.springframework.security.core.userdetails.UsernameNotFoundException. Next we retrieve the Account for the given username. When no matching Account can be found for that username, we again throw a UsernameNotFoundException. Finally we will create a union of all the Roles that are linked to the Account, and all the Permissions linked to each Role and add them to a list of type GrantedAuthority. We wrap each Role or each Permission in a SimpleGrantedAuthority, which is an implementation of the interface GrantedAuthority. The class just takes a String as constructor value and offers a getter for retrieving it later on. You can see this here (we omitted the equals, hashCode and toString implementation for brevity):
package org.springframework.security.core.authority;


import org.springframework.security.core.GrantedAuthority;

import org.springframework.security.core.SpringSecurityCoreVersion;

import org.springframework.util.Assert;


public final class SimpleGrantedAuthority implements GrantedAuthority {
    public SimpleGrantedAuthority(String role) {

        Assert.hasText(role, "A granted authority textual representation is

            required");

        this.role = role;

    }


    public String getAuthority() {

        return role;

    }

}
Our principal (BookstoreUserDetails) is now populated with a list of GrantedAuthority, in which each item represents a role or a permission. In the next section we will see how you can limit access based upon these authorities.
Authorizing Access
So far you have seen how we can secure our application by making all resources accessible for authenticated users only, unless specified otherwise. you saw how we can identify our users by requiring them to enter a username and password on the login page. We also showed how to configure Spring Security so it can authenticate the given credentials. In the previous section we introduced you to RBAC, which led to populating our com.apress.prospringmvc.bookstore.web.security.BookstoreUserDetails roles and permissions coupled to the user’s Account.
Our security setup is now almost ready, as all the bits and pieces are in place. The only thing left to perform is authorization based on the information that we now have in our org.springframework.security.core.context.SecurityContext for an authenticated user. Or better said, we need to indicate which functionality the user is allowed to use based on the roles and permissions coupled to the user’s Account.
In the following sections we will see how we can control authorization in our pages. We will see that Spring Security comes with its own tag library that offers special tags to disable or enable functionality directly in our JSP pages, based on the presence of certain roles or permissions.
Using Tag Libraries in Our Pages
Spring Security comes with a dedicated tag library you can use to conditionally render certain page components. The use case is always the same: determining whether a certain component or part of the page should be shown to the currently logged-in user based upon the set of authorities.
In order to use the tags, we have to declare the corresponding tag library in our pages. We do this by adding an extra JSP declaration:
<%@ taglib prefix="spring" uri="http://www.springframework.org/tags"%>.
In the following sections we will illustrate the most important tags and how you can use them.
The authorize Tag
This tag is used to determine whether its contents should be evaluated or not, based on one or more authorization checks. In our case we will use it in exactly the same way as the flow security attribute, or the access attribute of the intercept URL. Using a SpEL expression we will verify if the current authenticated user has the given role in order to let the content be evaluated.
In the first code snippet we will only show the content when the authenticated user has the role ROLE_AUTHOR. In the second snippet the content will only be shown if the authenticated user has the role PERM_ADD_BOOK.
<sec:authorize access="hasRole('ROLE_AUTHOR')">

…content…

</sec:authorize>
Or
<sec:authorize access="hasRole('PERM_ADD_BOOK')">

…content…

</sec:authorize>
To illustrate the use of this important tag, we created a separate page, manageBooks.jsp (located in WEB-IN/view/secured/manageBooks). This page will allow a user to add new books to the system, and new categories. In order to use this functionality, the user must be authenticated and have the role ADMIN or AUTHOR. However, for the two functions, adding new categories and books, two separate permissions are required. To add books you should have PERM_ADD_BOOKS and to add a new category you should have PERM_ADD_CATEGORIES.
To demonstrate this page we created two new users in our com.apress.prospringmvc.bookstore.domain.support.InitialDataSetup class, as shown in Listing 13-30.
Listing 13-30: Adding additional users to our initial data setup
private Permission permissionAddCategories = new Permission("PERM_ADD_

                                             CATEGORIES");

private Permission permissionAddBooks = new Permission("PERM_ADD_BOOKS");

private Permission permissionCreateOrders = new Permission("PERM_CREATE_

                                             ORDER");


private Role roleCustomer = new Role("ROLE_CUSTOMER");

private Role roleAdmin = new Role("ROLE_ADMIN");

private Role roleAuthor = new Role("ROLE_AUTHOR");


InitialDataSetup.this.johnDoe = new AccountBuilder() {

    {

        address("Brussels", "1000", "Nieuwstraat", "1", "A", "BE");

        email("[email protected]");

        credentials("jd", "secret");

        name("John", "Doe");

        roleWithPermissions(InitialDataSetup.this.roleCustomer,

                            InitialDataSetup.this.permissionCreateOrders);

    }

}.build();
new AccountBuilder() {

    {

        address("Antwerp", "2000", "Meir", "1", "A", "BE");

        email("[email protected]");

        credentials("admin", "secret");

        name("Super", "User");

        roleWithPermissions(InitialDataSetup.this.roleAdmin,

                            InitialDataSetup.this.permissionAddBooks,

                            InitialDataSetup.this.permissionAddCategories);

    }

}.build();


new AccountBuilder() {

    {

        address("Gent", "9000", "Abdijlaan", "1", "A", "BE");

        email("[email protected]");

        credentials("author", "secret");

        name("Some", "Author");

        roleWithPermissions(InitialDataSetup.this.roleAuthor,

                            InitialDataSetup.this.permissionAddBooks);

    }

}.build();
To summarize, we have the user admin with the role ROLE_ADMIN and the permissions PERM_ADD_BOOKS and PERM_ADD_CATEGORIES. Next we have the user author, who has the role ROLE_AUTHOR and the single permission PERM_ADD_BOOKS. The author user is only able to add books to existing categories, but is not allowed to make new ones (only the admin user is).
Next, in Listing 13-31, we add a new link in our navigation menu, and apply the right security settings using the authorize tag. Notice that we allow both ROLE_ADMIN and ROLE_AUTHOR to access the functionality. Users from both roles should be able to manage books, but inside the page we will further restrict access based on their permissions. We will see this next.
Listing 13-31. Using the authorize tag in our navigation bar to display only the Manage Books link to users with role ROLE_ADMIN or ROLE_AUTHOR
<sec:authorize access="hasRole('ROLE_ADMIN') or hasRole('ROLE_AUTHOR') ">

    <li>

        <spring:url value="/secured/manageBooks/manageBooks.htm"

                    var="manageBooks" />

        <a href="${manageBooks}">

            <spring:message code="nav.manageBooks"/>

        </a>

    </li>

</sec:authorize>
It is clear that a normal customer (like our user jd) will not be able to see the Manage Books link at all. Only authors and administrators will.
Next we will modify the manage books functionality in the /WEB-INF/view/secured/manageBooks/manageBooks.jsp page (see Listing 13-32). Here we will further control authorization based on the specific permissions.
Listing 13-32. The finer-grained permission checks
<%@ taglib prefix="c" uri="http://java.sun.com/jsp/jstl/core"%>

<%@ taglib prefix="spring" uri="http://www.springframework.org/tags" %>

<%@ taglib prefix="form" uri="http://www.springframework.org/tags/form" %>

<%@ taglib prefix="fn" uri="http://java.sun.com/jsp/jstl/functions" %>

<%@ taglib prefix="tiles" uri="http://tiles.apache.org/tags-tiles" %>

<%@ taglib prefix="sec" uri="http://www.springframework.org/security/tags" %>


<c:if test="${not empty actionSuccess}">

    <div id="actionSuccess" style="color: green; display:

             block; margin-bottom: 10px;">

        <table>

            <tr>

                <td>

                    <ul style="list-style-type: disc">

                        <li>

                            <h3>

                                <spring:message code="label.page.managebooks.

                                                     ${actionSuccess}.added"/>

                            </h3>

                        </li>

                    </ul>

                </td>

            </tr>

        </table>

    </div>

</c:if>


<sec:authorize access="hasRole('PERM_ADD_CATEGORIES')">

    <spring:url value="/secured/addCategory.htm" var="addCategory"/>

    <form:form  action="${addCategory}" commandName="manageCategoryForm">

        <table style="width: 100%">

            <tr>

                <td width="30%">

                    <spring:message code="label.page.managebooks.

                                          category.add"/>

                </td>

                <td>

                    <input type="text" name="category" path="category"/>

                    <form:errors path="category" cssClass="error"/>

                    <form:errors/>

                </td>

            </tr>

        </table>

        <div align="right" style="margin-bottom: 20px; margin-top: 10px" >

            <button type="submit" id="add">

                <spring:message code="label.page.managebooks.add.category"/>

            </button>

            <button type="reset" id="clear">

                <spring:message code="label.page.managebooks.clear.category"/>
            </button>

        </div>

    </form:form>

</sec:authorize>


<sec:authorize access="hasRole('PERM_ADD_BOOKS')">

    <spring:url value="/secured/addBooks.htm" var="addBook"/>

    <form:form modelAttribute="manageBookForm" action="${addBook}"

               method="POST">

        <table style="width: 100%">

            <tr>

                <td width="30%">

                    <spring:message code="label.page.managebooks.

                                          book.category"/>

                </td>

                <td>

                    <form:select path="category" items="${manageBookForm.

                                 selectableCategories}" itemLabel="name"

                                 itemValue="id"/>

                    <form:errors path="category" cssClass="error"/>

                </td>

            </tr>


            <%--Omitting remainder of the rows for brevity--%>


        </table>

        <div align="right" style="margin-bottom: 20px; margin-top: 10px" >

            <button type="submit" id="add">

                <spring:message code="label.page.managebooks.book.add"/>

            </button>

            <button type="reset" id="clear">

                <spring:message code="label.page.managebooks.book.clear"/>

            </button>

        </div>

    </form:form>

</sec:authorize>


<script>

    dojo.addOnLoad(function(){

        function fadeIt() {

            if(dojo.byId("actionSuccess")){

                dojo.style("actionSuccess", "opacity", "1");

                var fadeOutArgs = {node: "actionSuccess", duration: 15000};

                dojo.fadeOut(fadeOutArgs).play();

            }

        }

    fadeIt();

    });

</script>
The first if block and the last JavaScript block are used to display a message whenever a Category or Book is added successfully. This JavaScript code is the same as we used to show a message when the user has logged or when an order is made. In the latter case the user is redirected to the ordersOverview page and a message pops up up with the username and the order ID of the newly placed order. In all cases the JavaScript will let the displayed message slowly disappear.
The first authorize tag (in bold) ensures that you must have the permission to add categories (PERM_ADD_CATEGORIES). In our case the author will not be able to do this. This “add category” section will not be shown to users with a role that does have the proper authorization; in our case the user author will not see this section.
The second authorize tag requires the permission to add books (PERM_ADD_BOOKS). Both authors and admins will be able to do this. To illustrate this, when we login with user “jd” the menu option to manage books will not even be shown, as you can see in Figure 13-13.

Figure 13-13. Logging in with user “jd” does not display the Manage Books menu option.
When we log in as an author, the menu option Manage Books is shown. When we click on it we will see that we only can add books, as shown in Figure 13-14.

Figure 13-14. Logging in with user “author” displays the Manage Books menu option, but only allows us to add books.
Finally, when we login as admin, the Manage Books link is shown in the navigation bar as well, but now we are allowed to add categories and books, as can be seen in Figure 13-15.

Figure 13-15. Logging in with user “admin” displays the Manage Book menu option and allows us to add books and categories.
Before we wrap up this section, there is one last thing we want to show. In the earlier section “Logging Out,” we said that we still need to make an additional change. The Logout button in the menu should only to be shown when the user has already logged in, and the Login button should be hidden (it should only be shown when the user is not authenticated yet). Now that we have seen the authorize tag, this is just a matter of adding another one in the header.jsp. In Listing 13-33 we show an excerpt from the header.jsp applying this tag around the Logout and Login menu links (shown in bold).
Listing 13-33. Adding the authorization tag for the login and logout link in WEB-INF/templates/header.jsp
<ul>


    <%--Omitting other navigation bar links for brevity--%>


    <sec:authorize access="! authenticated">

        <li>

            <spring:url value="/public/authentication/login.htm" var="login"             />

            <a href="${login}">

                <spring:message code="nav.login"/>

            </a>

        </li>

    </sec:authorize>

    <sec:authorize access="hasRole('ROLE_ADMIN') or hasRole('ROLE_AUTHOR') ">

        <li>

            <spring:url value="/secured/manageBooks/manageBooks.htm"

                        var="manageBooks" />

            <a href="${manageBooks}">

                <spring:message code="nav.manageBooks"/>
            </a>

        </li>

    </sec:authorize>

    <sec:authorize access="fullyAuthenticated">

        <li>

            <spring:url value="/logout" var="logout" />

            <a href="${logout}">

                <spring:message code="nav.logout"/>

            </a>

        </li>

    </sec:authorize>

<ul>
The first authorize tag in bold will only render its contents (the Login link) when we are not authenticated yet. The second authorize tag in bold will only render its content (the Logout link) when we are authorized.
The authentication Tag
This tag allows access to the current org.springframework.security.core.Authentication object stored in the security context. It can render any property of the object directly in the JSP. You can use it, for example, to display information from the principal, which is in our case the BookstoreUserDetails object (see Listing 13-34).
Listing 13-34. The authentication tag rendering the username
<sec:authentication property="principal.username"/>
This will display the username of the user currently logged in.
We applied this code to our homepage, located in WEB-INF/view/public/main.jsp, as can be seen in Listing 13-12 earlier. We have configured Spring Security to forward us to the home page when login was successful. We also added a special parameter (authenticationOk) to indicate that. The home page will display a message that the login was successful, including the username. We have extracted that snippet from Listing 13-12 and repeated it in Listing 13-35 for your convenience. Here we use the var and scope attributes to bind the result (from the property indicated in the property attribute) with the given variable name (username) to the indicated scope (Servlet request scope)
Listing 13-35. The authentication tag storing the username in request scope
<h3>

    <sec:authentication property="principal.username" var="username"

                         scope="request"/>


    <spring:message code="label.page.main.authentication.ok"

                     arguments="${username}" />

</h3>
You can see the result in Figure 13-16, where we logged in as user jd. The JavaScript on the bottom is there to let the message slowly fade away as we have done elsewhere when showing notification messages.
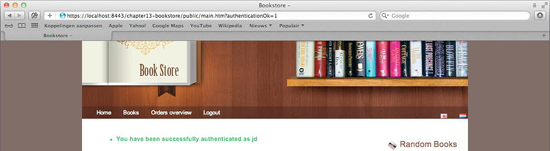
Figure 13-16. The message shown after logging in
Using Annotations in Our Code
Securing your pages using the authorization tag is not sufficient, as we will see. Hiding a link (which is the main task of the authorization tag) won’t do the trick if the user knows or guesses the direct link. In that case the user still will get access (assuming you didn’t place a specific intercept-url for that page with proper authorization checks).
In this section we will see that you can also secure your application controller methods and back-end services using annotations. This way you are sure that if a user escapes the front-end security, the user will be blocked on the next level. Applying security in your back-end services can also be useful if you have different frontend layers using the same back-end.
Until now we have seen three places where we can put specific authorization check points:
- On the requested resource, using
intercept-url- On your flows
- For a more fine grained approach, in the pages themselves using the authorize tag
This leaves us with a gap. With our last example in mind, we added specific permission checks on the manageBooks.jsp page. Only users with the PERM_ADD_BOOKS permission are able to add books, and only users with the PERM_ADD_CATEGORIES are able to add categories. But what would happen if a user with the author role (who cannot add categories) were to simulate an http POST request adding a new category?
This is still a potential weakness in our system. While the authorization tag on the page only hides a component, the controller listening for the request is still there. So anyone who knows the correct URL and the request parameters can still invoke the controller directly.
Besides adding a intercept-url with fine grained authorization control (specifying roles and or permissions) for each of the pages, you can also use method-specific annotations as shown in Listing 13-36.
Listing 13-36. Using method security in the application controller
@RequestMapping("secured/addCategory.htm")

@PreAuthorize("hasRole('PERM_ADD_CATEGORIES')")

public ModelAndView addCategory(
By adding the annotation org.springframework.security.access.prepost.PreAuthorize on the controller request mapping to add books, we implemented an additional check. Try it out for yourself—put the <sec:authorize access="hasRole('PERM_ADD_CATEGORIES')"> in comments in the manageBooks.jsp and log in using the user author. Because the tag is commented out, the component to add categories is shown. If you try to add one, you’ll get the famous “403 access denied” page.
Before Spring Security will process these annotations you need to enable method security. We did this in src/main/resources/spring-security.xml, as you can see in Listing 13-37.
Listing 13-37. Enabling method-level security
<security:global-method-security pre-post-annotations="enabled"/>
Next we will also secure the addBooks method, as we did for the addCategory method, in Listing 13-38.
Listing 13-38. Using method security in the application controller
@RequestMapping("secured/addBooks.htm")

@PreAuthorize("hasRole('PERM_ADD_BOOKS')")

public ModelAndView addBooks(
To make the entire chain secure, you can also add these annotations on your service layer. Once you do this there is no way that someone can bypass your security and invoke a function that is not allowed for the current principal.
To conclude, we want to say a few words about Security exceptions. Normally your users should not run against such exceptions as part of normal navigation throughout your application. We shielded all links in the pages using the authorization tag; so in other words, if a user does not have access to a certain link (or button) it will simply not be shown. However, if a user starts to fiddle with the URLs, it might still be possible to access a forbidden URL. In that case the user will hit the security annotations on your application controllers or back-end, and a 403 access denied message will be shown. If you want customize this behavior, you have two options:
- You can use the JEE Servlet
<error-page>in a web.xml to forward to a certain page upon an<error-code>(in this case 403).- You can use Spring Security
org.springframework.security.web.access.ExceptionTranslationFilter, which can handle bothorg.springframework.security.access.AccessDeniedExceptionandorg.springframework.security.core.AuthenticationException. Its main purpose is to forward the user to a login page if not authenticated yet, or to a predefined error page if the current user lacks sufficient rights. For your convenience this filter was already registered by using the Spring Security namespace configuration (<security:http>). In fact one of thehttpelement’s direct attributes isaccess-denied-page="…", which allow you to specify a page to forward to whenever such a security-related exception occurs. This attribute will directly be given to theExceptionTranslationFilterwhen the entire Spring Security configuration is built.
Summary
Security in general is a very complex and broad domain. However, we have shown you in this chapter that basic security for an average web application does not have to be complex. On the contrary, we have shown with a small bit of XML and a filter configuration how you can make your pages secure, so that only those pages explicitly listed can be accessed.
Later we showed that customization using a custom UserDetailsService is also not very complex, but it allows you to adapt your user store to any existing database structure you might have. Finally, we showed how to perform authorization based upon the permissions granted to a principal in your pages, your flows and controllers.
To conclude, we hope that you learned that with minimal effort your application can be secured. With such a great tool as Spring Security available, there should no longer be a reason not to build in basic security in your applications.
This chapter was written to give you an overview of the possibilities and get you started quickly. Your environment might have specific security requirements. In that case we hope that this chapter has warmed you up to go and read more detailed material about Spring Security and what it can do to suit specific requirements.