
C H A P T E R 12
Advanced Spring Web Flow
Welcome to the final chapter on Spring Web Flow. In the couple previous chapters, we made you familiar with the Web Flow basics, such as how to configure Web Flow, glue it together with Spring MVC, and set up a basic flow. We also explained the different elements, such as action states, model binding, validation, application controllers (and how to call them), expressions, and so forth.
Our approach for the previous chapters was to gradually introduce you to the concepts contained therein and to build on those concepts as the chapters went on. In Chapter 10, we started with a basic high level view of Web Flow, introduced a simple use case, and then built that out as a sample application to illustrate the different aspects of using Web Flow.
In Chapter 11, we extended that by further refactoring and building out the sample application with new Web Flow functionality.
This chapter will continue to build on those topics covered previously; however the topics in this chapter are less coupled. Every topic should be more or less seen as an individual topic that discusses its own Web Flow feature.
We will continue with the sample application as we left it in the previous chapter, and we are going to make modifications to support the features we discuss here. A feature can be something completely new or an extension to something we saw in a previous chapter. We intentionally divided the chapters this way to keep the previous chapter as digestible as possible, but also so that you can start in this chapter with the required Web Flow knowledge to jump right into a given feature.
After reading this final chapter on Web Flow, you should have a thorough understanding of nearly all the most important Web Flow features, including how and when to use them in practice.
Inheritance
In the previous chapter, we introduced you to subflows, which will help you in structuring and reusing your flows. But there is another Web Flow feature that can help you with this structure and reuse: inheritance. Web Flow offers two forms of inheritance:
- Flow inheritance
- State inheritance
In the previous chapter, we also saw there is a special attribute on the flow root element that you can use to declare flow inheritance (the parent attribute). In this chapter, we will demonstrate that functionality. In addition to the flow, inheritance can also be applied to the five different states individually (i.e., the view, action, decision, subflow, and end states). In the following sections, we will discuss each of these modularity features in detail. And again, we will build these examples on top of the sample application constructed in the previous couple of chapters.
Flow Inheritance
You can enable a flow to inherit elements defined by another flow or set of flows. You declare the inheritance by using the parent attribute to mark each flow that has elements you want your flow to inherit from. A common use case is for a parent flow to define global transitions and exception handlers. The flow should be seen as merger between the parent and the current (child) flow. Unlike with Java, you can inherit from multiple parent flows. You simply separate each flow with a comma; the order is of no importance (see Listing 12-1).
Listing 12-1 Flow Inheritance Allows a Flow to Have Multiple Parents
<flow parent="global-initialization-flow, global-actions-flow"/>
![]() Tip Suppose you have several flows that share a lot of common functionality. In that case, you can move the common functionality out of the individual flows and into a parent flow. You can then let each of the individual flows inherit from that parent flow. However, if you define it as such, the parent flow will be a normal flow like any other flow (it needs to have an id, be registered with Web Flow, and so forth). This also means that you will be able to start the parent flow because it is a separate flow. However, doing so doesn’t make sense in this case because the parent flow must always be combined with one of the child flows. It is the child flows that should be started, not the parent flow they have in common. Note that you can declare the parent flow to be
Tip Suppose you have several flows that share a lot of common functionality. In that case, you can move the common functionality out of the individual flows and into a parent flow. You can then let each of the individual flows inherit from that parent flow. However, if you define it as such, the parent flow will be a normal flow like any other flow (it needs to have an id, be registered with Web Flow, and so forth). This also means that you will be able to start the parent flow because it is a separate flow. However, doing so doesn’t make sense in this case because the parent flow must always be combined with one of the child flows. It is the child flows that should be started, not the parent flow they have in common. Note that you can declare the parent flow to be abstract. This will tell Web Flow to disallow starting flow executions (either top level or via subflows) for that flow. However, if extend from such a flow, the child flow can be started normally as a top-level flow or subflow. You can do this by setting the abstract attribute to true on the flow root element.
Web Flow will create a merged flow from the child flow and all its parent flows. The rules for duplicate elements are split into mergeable and non-mergeable elements. Mergeable elements will always attempt to merge together if the elements are similar. Non-mergeable elements in a parent or child flow will always be retained intact in the resulting flow; they will not be modified as part of the merge process.
Mergeable elements are identified as mergeable when the following conditions are met:
- Their key attributes match: If they don’t match, they fall into the non-mergeable category and are taken as-is in the resulting merged flow. The key attribute is an element’s attribute that is identified by Web Flow as the one used for mergeability matches. In other words, when the same element type exists in both the parent and child flows, and the value of this attribute matches, then the element is considered mergeable.
- They are marked as
merge always(see Table 12-1): In that case, the mergeable elements are always merged, no matter what. In that case, there is no key attribute that should match first.
For example, Listing 12-2 shows an invented flow with a single view state that has two transitions. Focusing on the inheritance aspect, it doesn’t matter which view the view state renders, nor is it important to which states each of the transitions transition.
Listing 12-2. A Flow That Has a Single view State with Two Transitions
<flow xmlns="http://www.springframework.org/schema/webflow"

      xmlns:xsi="http://www.w3.org/2001/XMLSchema-instance"

      xsi:schemaLocation="http://www.springframework.org/schema/webflow

        http://www.springframework.org/schema/webflow/spring-webflow-2.0.xsd">


    <view-state id="someViewState" view="someView" >

        <transition on="x" to="someState"/>

        <transition on="y" to="someOtherState"/>

    </view-state>

</flow>
If we were to divide this over two flows, such as a parent and child flow, it would look like what is shown in Listings 12-3 and 12-4.
Listing 12-3. The Parent Flow, which Contains One of the Two Transitions
<flow xmlns="http://www.springframework.org/schema/webflow"

      xmlns:xsi="http://www.w3.org/2001/XMLSchema-instance"

      xsi:schemaLocation="http://www.springframework.org/schema/webflow

        http://www.springframework.org/schema/webflow/spring-webflow-2.0.xsd"

        abstract="true">


    <view-state id="someViewState" view="someView" >

        <transition on="x" to="someState"/>

    </view-state>

</flow>
Listing 12-4 The Child Flow, which Contains the Other Transition and Inherits from the Parent Flow
<flow xmlns="http://www.springframework.org/schema/webflow"

      xmlns:xsi="http://www.w3.org/2001/XMLSchema-instance"

      xsi:schemaLocation="http://www.springframework.org/schema/webflow

        http://www.springframework.org/schema/webflow/spring-webflow-2.0.xsd"

        parent="parent-flow">


    <view-state id="someViewState" view="someView" >

        <transition on="y" to="someOtherState"/>

    </view-state>

</flow>
The parent flow listed in Listing 12-3 cannot be started directly because it is declared to be abstract. The child flow listed in Listing 12-4 can be started directly. Because the child flow inherits from a parent flow, Web Flow will scan for mergeable elements. It will find that, in both the parent and child flows, a view state with the id of someViewState exists. It will now merge the view state, combining all elements inside. This results in a merged flow (see Listing 12-5) that looks like the original flow.
<flow xmlns="http://www.springframework.org/schema/webflow"

      xmlns:xsi="http://www.w3.org/2001/XMLSchema-instance"

      xsi:schemaLocation="http://www.springframework.org/schema/webflow

        http://www.springframework.org/schema/webflow/spring-webflow-2.0.xsd">


    <view-state id="someViewState" view="myView" >

        <transition on="x" to="someState"/>

        <transition on="y" to="someOtherState"/>

    </view-state>

</flow>
This merged flow doesn’t exist physically; rather, it is generated in memory when Web Flow starts and scans your flow definitions. Physically, you only have the parent and child flows. In this case, the view state was a mergeable element because it had the same id, which is the key attribute for a view state on which Web Flow decides to merge the element. If the id value were different, then Web Flow would have taken the element from the parent flow as-is and copied and pasted it into the merged flow.
In Table 12-1, you can see the different elements and their key attributes. If there is an element in both the child and the parent flow that has the same key attribute, then the element will be marked for merging. Otherwise, the element is taken completely as-is into the merged flow. If an element has Always merged as a key attribute, it means that no specific attribute must match, and elements of the same type between parent and child are always merged.


The following are non-mergeable elements: bean-import, evaluate, exception-handler, persistence-context, render, set, and var. As explained before, they become part of the merged flow as-is, and they are copied and pasted as a whole from the parent flow(s) into the merged flow.
Attributes on elements that are not marked as key attributes in Table 12-1, and that are specified on the element in both the parent and the child flows, will be overwritten by the child flow. For example, consider the view attribute of a <view-state> element. When the parent contains a <view-state id="x" view="a"> and the child contains a <view-state id="x" view="b">, then the element is eligible for merging because the view state ids match. So, every sub-element will be inherited from the parent; but in this case, the view attribute is defined both in the parent and child flows with a different value. The resulting merged flow will navigate to view "b" when the flow is rendered.
The same goes for non-mergeable elements that are specified in both parent and child flows with the same identifiers: the child flow values take precedence. For example, the parent flow has the following var element: <var name="x" value="com.apress.prospringmvc.bookstore.ClassX"/>. The child flow has also a var element with the exact same name, but a different value: <var name="x" value="com.apress.prospringmvc.bookstore.ClassY "/>. The general overwrite rule applies, and the variable with the name of x will have as a value an object of type com.apress.prospringmvc.bookstore.ClassY, which is that of the child flow. If we were to remove the <var> element from the child flow, then there would be only one var element with the name of x left (the one in the parent flow). In that case, the variable x will become an object of type ClassX.
![]() Warning Paths to external resources in the parent flow should be absolute. Relative paths will break when the two flows are merged unless the parent and child flow are in the same directory. Once merged, all relative paths in the parent flow will become relative to the child flow. In our samples, this is not much of a problem because we are not dealing with resources directly. Our views are literals, which match up with definition names in the Tiles configuration. However, if you are not using Tiles, and you are referring to the JSPs directly from within your flows, then you could have something like this (imaginary example) of a
Warning Paths to external resources in the parent flow should be absolute. Relative paths will break when the two flows are merged unless the parent and child flow are in the same directory. Once merged, all relative paths in the parent flow will become relative to the child flow. In our samples, this is not much of a problem because we are not dealing with resources directly. Our views are literals, which match up with definition names in the Tiles configuration. However, if you are not using Tiles, and you are referring to the JSPs directly from within your flows, then you could have something like this (imaginary example) of a parent-flow flow that is in WEB-INFviewsparentparent-flow.xml and has a single view state:
<view-state id="someViewState" view="thePage.jsp"/>
In this case, thePage.jsp is in the same location as the flow (WEB-INFviewsparent hePage.jsp). Hence, it is a relative pointer to the resource. If a child flow in another directory (e.g., WEB-INFviewschildchild-flow.xml) were to now inherit from this flow, then the thePage.jsp resource from the view state of someViewState would now try to resolve from the location of the child flow’s WEB-INFviewschild hePage.jsp— which, of course, does not exist. In such a case, you should make the path to the resource absolute by specifying the full path. Instead of specifying view="thePage.jsp" in the parent flow, you should instead specify this path:
State Inheritance
In addition to specifying a parent attribute on the flow element, you can also specify a parent attribute on the individual states. This could be useful if you want more fine-grained control over which elements from the parent flow are actually inherited. This only makes sense if you did not apply inheritance on the flow level; in other words, it makes sense only if you did not specify the parent attribute on the flow element, but instead specified it only on those states for which you want to have inheritance:
- Unlike with flow inheritance, you can only inherit from a single state.
- The parent state you’re inheriting from should be of the same type. For example, a
viewstate cannot inherit from anactionstate. - Basically, the same rules that apply for flow inheritance also apply here. The only difference is that the granularity level is less coarse-grained because you can now indicate which elements need to be inherited. The only notable difference is that the state is always merged with the indicated parent state. With flow inheritance, it matters if the element has the same key attribute, so it can be merged or taken as-is. Since we are specifying the state directly here, it is always merged, no matter what.
- You have to specify the flow in which the state you want to inherit from is defined. The format looks like this:
parent="parent-flow#parent-state"
![]() Note You might wonder what happens if there is a
Note You might wonder what happens if there is a view state with the same name in both parent and child flows and there is state inheritance applied on them. For example, in the child flow, assume there is a view state like this: <view-state id="viewStateX" view="someView" parent="parent#viewStateX">. Meanwhile, the parent also has a view state of viewStateX. As stated before, it doesn’t matter. The states are always merged. In this case, every attribute and element of the viewStateX defined in the parent is merged with the viewStateX in the child. If both the parent and the child provide the same attributes or elements with the same identifier, then the child version is the one that is retained.
Web Flow Configuration Customizations
In the first chapter, we introduced you to the core Web Flow configuration. Next, we will see how we can make some adjustments to this configuration that could be important for your application’s performance and/or how your flows are managed within your application.
We also saw that Web Flow uses SpEL by default, but it doesn’t have to be this way. The second customization we are going to discuss explains how you can change the default expression language to something else.
Execution and Conversation Snapshots
We’ve already configured the org.springframework.webflow.executor.FlowExecutor without any specific options. The out-of-the-box configuration was fine for our basic setup:
<webflow:flow-executor id="flowExecutor"/>
The only notable sub-element used within flow-executor is <webflow:flow-execution-repository>, which lets you customize the internals of the flow executor. It has two interesting attributes: namely, max-execution-snapshots and max-executions. We will illustrate how you define them in Listing 12-6 and then describe them in the next paragraph.
Listing 12-6. Customizing the Flow Registry Configuration
    <webflow:flow-executor id="flowExecutor" flow-registry="flowRegistry" >

        <webflow:flow-execution-repository max-execution-snapshots="30"

                                           max-executions="5"/>

    </webflow:flow-executor>
The max-execution-snapshots and max-executions attributes allow you to fine-tune how far back you can go in “the past.” In the preceding code sample, we have set them to their default values. Thus, specifying 30 for max-execution-snapshots and 5 for max-executions has the same effect as not specifying them at all because these are the default values when no other values are in place. We entered these values in the code snippet to illustrate how to use these attributes, as well as to highlight their default values.
In Chapter 10, we mentioned that each request into a flow execution creates a snapshot of its state before the response is returned (see Chapter 10’s Figure 10-2 and its depiction of the Web Flow state management mechanism). The max-execution-snapshots attribute maps to how many of these snapshots within a flow execution can be stored. If we set this value to 0, then it will not be possible to go to a previous state within a flow execution. In fact, your Back button will look like it doesn’t work. A value of -1 means “unlimited”—you would probably never want to use this value because you want to keep the size of the user’s session within limits.
The max-executions attribute maps to how many concurrent flow executions can be active within a given session. Whenever you start a new flow execution (and you don’t end the previous one explicitly), you can still go back to the previous one—it remains stored together with all it states, depending on the value of the max-execution-snapshots attribute. So, the configuration in Listing 12-3 means that you can go back five previous flow executions; and within each flow, you can browse the last 30 view states. Again, a value of 0 disables this feature completely, while -1 sets the amount to infinite (remember: you probably don’t want to use that value).
For both the max-execution-snapshots and the max-executions attributes, whenever the configured maximum value is reached, Web Flow will respectively remove the oldest snapshot or the oldest execution. So, if we were to set max-executions to 2, then, after starting the third execution, Web Flow would simply clean up and remove the first started execution. The same principle goes for the max-execution-snapshots.
![]() Note These settings are always applicable for a user’s session, but not for the entire application. So, if we set
Note These settings are always applicable for a user’s session, but not for the entire application. So, if we set max-conversations to 5, that would mean that each user (and thus each session) could have a maximum of five conversations active at the same time (if a sixth conversation is started, the oldest is cleaned up and removed by Web Flow).
![]() Caution We are telling you right here and now that you should think about these defaults. You probably want to tweak them to fit your needs, especially if you have lots of
Caution We are telling you right here and now that you should think about these defaults. You probably want to tweak them to fit your needs, especially if you have lots of view states in your flows and you store lots of state in your flows—in such a case, these defaults would start to hog memory very fast (hence, you would probably want to bring these numbers down). For a memory-heavy application (or a memory-poor environment), setting max-execution-snapshots to 5 and max-executions to 1 is a perfectly sound setting. Also, most applications don’t need to be able to go back more than five states or more than one previous flow execution. If you don’t need this state “save/restore” snapshot functionality at all, then set both values to 0 to disable it.
Changing the Expression Parser
In the previous chapter, we saw how we could use the <webflow:flow-builder-services> to customize behavior. A feature we haven’t discussed yet is the expression-parser attribute. This attribute will allow you to plug in another parser that supports other types of expression language.
By default, Web Flow uses SpEL as its expression language. Depending on your background or preferences, you might want to switch the expression language to something else.
Another good reason to change your expression parser might be that you are migrating from Web Flow 1. In the next section, you will see that there is a tool to help you migrate your Web Flow 1 flows to Web Flow 2 syntax. However, this migration will not change your expressions. Setting OGNL as the default expression language could help you in upgrading Web Flow step-by-step.
As it turns out, switching the expression language is just a matter of configuring the correct class in the expression-parser attribute (see Listing 12-7).
Listing 12-7. Changing the Expression Parser
<webflow:flow-builder-services id="flowBuilderServices" view-factory-
creator="mvcViewFactoryCreator" conversion-service="conversionService" validator="validator"
development="true" expression-parser=""/>
In Listing 12-7, we left the expression-parser attribute empty. For example, specifying the following class, org.springframework.webflow.expression.el.WebFlowELExpressionParser, will enable you to use the unified expression language (EL) as it is used, for example, in JSF. If you use the org.springframework.webflow.expression.WebFlowOgnlExpressionParser class instead, then OGNL will be enabled as the expression language (this is the default in Web Flow 1).
Web Flow 1 Migration
This section may not be of interest to you if you didn’t use Web Flow 1, or you’re not involved in a Web Flow 1 project. However, we wanted to make sure that you are aware of the possibilities of migrating, in case you do happen to be a Web Flow 1 user, or in case you come across a project using Web Flow 1 that you want to migrate. Even if it doesn’t apply to you, you can quickly skim this section because it is very short and might be of help in the future.
Although there was a lot of rework in Web Flow 2, conceptually from a user’s point of view, it remains very much like Web Flow 1 (which is a good thing). That said, it does add some new stuff, refactor some quirks, and implement some internal optimizations. Web Flow 2’s flow-definition syntax also very much resembles that of Web Flow 1; however, it is not backward compatible. An <inline-flow> element is an example of this. This feature was simply removed in Web Flow 2, and there is no replacement. Fortunately, Web Flow 2 does offer you a tool that will convert your Web Flow 1 flows, so they can be used in Web Flow 2 (this tool comes bundled with Web Flow 2).
Suppose you have the Web Flow 1 flow shown in Listing 12-8 and that you want to migrate this flow to Web Flow 2, which no longer supports <inline-flow>.
Listing 12-8. A Web Flow 1 Flow to Be Converted to a Web Flow 2 Flow
<?xml version="1.0" encoding="UTF-8"?>

<flow xmlns="http://www.springframework.org/schema/webflow"

      xmlns:xsi="http://www.w3.org/2001/XMLSchema-instance"

      xsi:schemaLocation="

        http://www.springframework.org/schema/webflow

        http://www.springframework.org/schema/webflow/spring-webflow-1.0.xsd">


    <var name="someVar" scope="flow"/>


    <start-state idref="loadDetail"/>


    <action-state id="loadDetail"/>


    <inline-flow id="testInlineFlow">

        <flow/>

    </inline-flow>

</flow>
To run the flow definition updater tool, you will need the following jars on its classpath: the main Web Flow jar, which is named org.springframework.webflow-2.3.0.RELEASE.jar if you downloaded it manually; the Spring core jar, which is named org.springframework.core-3.1.0.RELEASE.jar if you downloaded it manually; and an XSLT processor. When running Java6 or later, the XSLT processor that comes shipped by default as part of the JRE will be sufficient, so you won’t need any additional jar(s). If you do encounter any problems, it is advised that you download Saxon (the home edition). In that case, you just have to put the jar file (saxon9he.jar at the time of writing) in the same directory where you are putting the Spring core and Spring Web Flow jar files.
As described previously, you put the Spring core and Web Flow dependencies together with the flow from Listing 12-8 in a single directory; in this case, that directory is /tmp/convert. If you do a directory listing, it should look like this:
/tmp/convert$ ls -l

org.springframework.core-3.1.1.RELEASE.jar

org.springframework.webflow-2.3.0.RELEASE.jar

web-flow-1-flow.xml
Next, fire up the converter:
java -cp *: org.springframework.webflow.upgrade.WebFlowUpgrader web-flow-1-flow.xml
The output is shown on the console and not stored in a file. You can use your console tooling to pipe the output to a file, if desired. The output generated with the preceding command is an equivalent flow definition converted to Web Flow 2 flow syntax (see Listing 12-9)
Listing 12-9. The Web Flow 2 Converted Flow
<?xml version="1.0" encoding="UTF-8"?>

<flow xmlns="http://www.springframework.org/schema/webflow

      xmlns:xsi=http://www.w3.org/2001/XMLSchema-instance

      xsi:schemaLocation="

         http://www.springframework.org/schema/webflow

         http://www.springframework.org/schema/webflow/spring-webflow-2.0.xsd"

      start-state="loadDetail">


    <var name="someVar"/>

    <action-state id="loadDetail"/>


    <inline-flow>

    <!-- WARNING: inline-flow is no longer supported.  Create a new top level

         flow.

     -->

       <flow xsi:schemaLocation="http://www.springframework.org/schema/webflow

       http://www.springframework.org/schema/webflow/spring-webflow-2.0.xsd">

      </flow>

    </inline-flow>

</flow>
In the preceding snippet, you can see that the <start-state> element has been moved to the top-level flow element as an attribute. The <start-state> element does not exist anymore as a separate element in Web Flow 2. Also, the <inline-flow> element is extracted as a separate flow with a warning that you should add it as a top-level flow.
![]() Note While this tool will help you convert your Web Flow 1 flows, be aware that the definitions around scoping (especially for
Note While this tool will help you convert your Web Flow 1 flows, be aware that the definitions around scoping (especially for flash scope) has been altered in Web Flow 2. Also, the conversion requires changes to other aspects, such as the flow execution listener API (these changes are covered in following sections). A migration from Web Flow 1 to Web Flow 2 is not as easy as just running this tool. You will still need to go through the flows and a portion of your code to check whether additional modifications are required. However, this tool will at least put you on the right track. Finally, depending on how many Web Flow 1 flows you have, and assuming your Web Flow 1 flows are using OGNL (chances are high because that was the default), it might be a good idea to switch your expression language in Web Flow 2 to OGNL, as well. This way, you are at least relieved from having to change every expression in your flows.
Exception Handling
There are three major ways in which you can deal with exception handling while using Web Flow. We have already (indirectly) seen the first of these. In that case, we let the application controller handle the exception. In the com.apress.prospringmvc.bookstore.web.controller.AuthenticationController authenticate method, you can see that we return another event type (of type error) in case the authentication fails after adding a message to the message context (see Listing 12-10).
Listing 12-10. The Authenticate Method of the AuthenticationController
public Event authenticate(AuthenticationForm authenticationForm,

                          MvcExternalContext externalContext,

                          MessageContext messageContext) {

    try {

        authenticate(authenticationForm, ((HttpServletRequest)

        externalContext.getNativeRequest()).getSession());

    } catch (AuthenticationException authenticationException) {

        messageContext.addMessage(new

        MessageBuilder().error().code(LOGIN_FAILED_KEY).build());

        return new EventFactorySupport().error(this);

    }

}
The flow can react to this event type. In the case of an error event, the flow will do something else (e.g., render the same view again, so that error messages are shown) instead of continuing, which would be the case if the event was a successful event. Capturing exceptions in your application controller and steering the outcome using specific events is the preferred way of dealing with exceptions. To some extent, this might be a matter of personal preference; however, when working with an application controller, this approach makes it more visible if the exception handling is also performed inside the method itself, rather than delegating it to the flow.
However, there are two other mechanisms you can use to handle exceptions, both of which involve handling the exceptions within the flow:
- The on exception transition attribute
- A custom exception handler via the
<exception-handler>element
The On Exception Transition
If you work with the on exception transition, you can specify the fully qualified exception class as the attribute’s value. The transition will automatically be triggered if one of the other executions in that state triggers the exception or any of its subclasses. You can only specify on or on-exception for a given transition, not both. For example, in the authentication flow, you could have added an on exception transition like the one in Listing 12-11.
Listing 12-11. A view State with an On Exception Transition
<view-state id="authenticate" view="login" model="authenticationForm">

    <transition on="authenticate" to="authenticationOk">

        <evaluate expression="authenticationController.authenticate

                             (flowScope.authenticationForm,

                              externalContext, messageContext)"/>

     </transition>


     <transition on="previous" to="previous"/>


     <transition on-exception="com.apress.prospringmvc.bookstore.

                               service.AuthenticationException"

                               to="authenticate"/>

</view-state>
When dealing with the exception inside the flow using the on exception transition, we need to rethrow the com.apress.prospringmvc.bookstore.AuthenticationException in the AuthenticationController instead of catching it and returning an error event. In that case, the return value of the method is void.
If no exception occurred, then the execution of the application controller method completes normally, without a result value. This would automatically be translated into a successful event by Web Flow, and the execution would continue as normal. If the AuthenticationException error is thrown, then the on exception transition is executed. In this case, the to attribute transitions to the same view state and renders the same view. This allows us to display the error messages added by the application controller’s authenticate method.
Custom Exception Handler
Flow execution exception handlers can be attached to either a flow or a state using the <exception-handler bean=""> element. When an exception occurs in a flow execution, Spring Web Flow will first try the exception handlers attached to the current state of the flow. If none handles the exception, the exception handlers attached to the flow itself will be tried. If the exception is not handled by any of the available exception handlers, it will be rethrown.
The bean attribute of this element identifies an org.springframework.webflow.engine.FlowExecutionExceptionHandler bean available in the Spring application context (see Listing 12-12). You can attach any number of exception handlers to the flow or any of its states.
Listing 12-12. The FlowExcecutionExceptionHandler Interface
package org.springframework.webflow.engine;


import org.springframework.webflow.engine.support.

       TransitionExecutingFlowExecutionExceptionHandler;

import org.springframework.webflow.execution.FlowExecutionException;


public interface FlowExecutionExceptionHandler {


    public boolean canHandle(FlowExecutionException exception);

    public void handle(FlowExecutionException exception, RequestControlContext

    context);

}
The first method has an org.springframework.webflow.execution.FlowExecutionException as its parameter. Web Flow wraps an exception that was thrown in the flow execution inside a FlowExecutionException. You can access the original thrown exception by calling the getCause method on it. It is also possible that the actual type is one of the different subclasses of a more specific Web Flow exception (e.g., an org.springframework.webflow.execution.ActionExecutionException, which is a subclass of FlowExecutionException). In this canHandle method, you can determine if you want the exception handler to be invoked for the type of exception. If the canHandle method returns true for a given exception type, then the second method, handle, is called to let you handle the exception. However, if you look at the return type of the handle method, you will see that there is more difficulty involved than just handling the exception and returning void.
Where an on exception transition just delegates navigation to Web Flow (i.e., upon a certain exception, it navigates to a given state), a custom exception handler is expected to drive the navigation itself, after dealing with the exception.
If implemented incorrectly, a FlowExecutionExceptionHandler can leave a flow execution in an invalid state, which can render the flow execution unusable or its future use undefined. For example, you define a FlowExecutionExceptionHandler on flow level. When an exception gets thrown at flow session startup (e.g., in an <on-start> element) the exception gets routed to the exception handler. The exception handler must transition the flow to its start state after dealing with the exception. The handler should not simply return—thereby leaving the flow with no current state set—because that would leave the flow execution in an undetermined state. This extra complexity is the tradeoff you have to make when deciding to use the FlowExecutionExceptionHandler over the on exception attribute. The former gives you more control over the exception-handling process, but it also confers more complexity. The latter does everything for you, but you don’t have any programmatic control over the exception-handling process.
![]() Tip When using custom exception handlers, it is advised to use the support class,
Tip When using custom exception handlers, it is advised to use the support class, org.springframework.webflow.engine.support.TransitionExecutingFlowExecutionExceptionHandler. When using this support class, you can be sure that navigation is handled as it should be after handling the exception. This class can be configured with a map of exceptions to handle and a matching target state that should be executed after dealing with the exception. By default, this class also exposes the exception on flash scope. You can override the handle method to perform custom exception handling. In that case, it is advised that you call super.handle at the end of the method, so that the exception is still exposed on flash scope, and the transition to the target state is executed.
You configure a TransitionExecutingFlowExecutionExceptionHandler with one or more mappings that consist of an exception class as the key and a target state id as the value. These two values become the exception mapping. Whenever an exception is thrown within the scope of the handler, the TransitionExecutingFlowExecutionExceptionHandler will check whether it has a mapping for the given exception by comparing the exception class of the thrown exception with those in its initially configured mapping. If a mapping exists, the exposeException() method is called, and finally, the flow will transition to the target state you indicated with that particular mapping.
When looking up exceptions, the TransitionExecutingFlowExecutionExceptionHandler will not only consider the FlowExecutionException (or any of it subclasses), but also its cause chain. An exception from the cause chain will also match with a mapping for one of its superclasses. For example, a FlowExecutionException instance wrapping a java.io.FileNotFoundException will match with a mapping for java.io.IOException because that is a superclass of FileNotFoundException.
A TransitionExecutingFlowExecutionExceptionHandler can be configured as a normal Spring bean, as shown in Listing 12-13.
Listing 12-13 Configuring a TransitionExecutingFlowExecutionExceptionHandler
@Bean

public TransitionExecutingFlowExecutionExceptionHandler

                                           ioFlowExecutionExceptionHandler() {

    TransitionExecutingFlowExecutionExceptionHandler

    handler = new TransitionExecutingFlowExecutionExceptionHandler();


    handler.add(IOException.class, "targetState");

    return handler;

}
The ioFlowExecutionExceptionHandler can then be configured as the bean attribute of the <exception-handler> element:
<exception-handler attribute="ioFlowExecutionExceptionHandler"/>
We have seen that Web Flow gives us three ways of dealing with exceptions:
- Inside the application controller. We do so by catching the exception and adding the appropriate message to the
Messagecontext. - Inside the flow by specifying the on exception attribute of a transition.
- Inside the flow by specifying an
<exception-handler>element that uses aFlowExecutionExceptionHandler. This element can either be declared in a fine-grained manner inside one of the five states, or in a coarse-grained manner for the entire flow (in that case, the<exception-handler>element is a direct sibling of the flow element).
The question is this: when is it most appropriate to use each of these techniques? When working with application controllers in combination with your flow, the first approach is probably the most natural. It gives you direct control over the exception-handling process, and it remains coupled to the code.
However, if you execute services or facades directly from within your flow (not using any application controller), then you can only react to exceptions using flow functionality. In that case, using the second approach (i.e., using the on exception attribute) would be the preferred way to deal with application exceptions.
The last approach, using a FlowExecutionExceptionHandler, is more applicable for overall exception behavior. For example, assume you want to log whenever an exception arises. You could handle that by declaring a FlowExecutionExceptionHandler on flow level.
Explicit Form Binding
In Chapter 11, we saw that when a model is specified, the request parameters submitted with the form are bound to the model. This happens automatically when you specify a model, and you don’t explicitly turn off binding for a given transition.
After binding, the model gets validated when it contains validation methods or a custom validator exists, as we have seen in the validation section of the preceding chapter.
Sometimes, this automatic binding can be too coarse-grained. If you want more control over the request parameters that get bound, you can specify a binder, as shown in Listing 12-14. For example, suppose that not every property on your model is used on your page. You could have properties that are private to the application and are never rendered on the view (e.g., helper methods for exploiting the model). Because Web Flow automatically tries to map every request parameter, a user could abuse this by submitting a value for these properties (by manipulating the request URL and parameters). Chances are pretty small that this will be exploited because the user must to know the name of the property, and this property’s name is used nowhere in these pages. But still, it could be a potential hole in your security. If you have a model that contains “application private” properties that should never be populated with request parameters, then you can use a binder that explicitly lists only those properties that are allowed to be bound with incoming request parameters.
Listing 12-14 Specifying a Per-Property Based Binding
<view-state id="authenticate" view="login" model="authenticationForm">

    <binder>

        <binding property="username" required="true"/>

        <binding property="password" required="true"/>

    </binder>


    <transition on="authenticate" to="authenticationOk" >

        <evaluate expression="authenticationController.authenticate(

             flowScope.authenticationForm, externalContext, messageContext)"/>

</transition>


    <transition on="previous" to="previous" bind="false"/>

</view-state>
In the preceding code, we explicitly bound the username and password from the request parameters to the model. We also marked them as required; when the value is absent, an error message will be added. We will discuss how these messages are localized in a moment.
There is also a third attribute: converter. You can use this to point to a named converter. This works with the older Spring Web Flow conversion mechanism, but it should no longer be used.
In Chapter 11, we explained that we create converters from the org.springframework.core.convert.converter package and not from the org.springframework.binding.convert.converter package. The Spring core conversion service does not support named converters. Hence, using a named converter would mean that you need to explicitly register it with the Web Flow custom conversion service, but it cannot be used as such (via naming) in Spring MVC. This way of working is discouraged.
The preferred approach is to create an org.springframework.core.convert.converter.Converter, and then register it as a Spring bean and with an org.springframework.format.support.FormattingConversionServiceFactoryBean for Spring Web Flow. This will cause the right converter to be chosen automatically.
Finally, notice that we specified bind="false" on the previous transition. The previous transition is triggered via a normal submit button in the form. The only difference is the event id. Without explicitly disabling binding, we can require that the username and password be filled in to go back.
![]() Caution You might recall from Chapter 11 that we had a Previous button in the sample application, as well. In that example, we tackled this issue programmatically by checking the state in the model validation method:
Caution You might recall from Chapter 11 that we had a Previous button in the sample application, as well. In that example, we tackled this issue programmatically by checking the state in the model validation method:
if (context.getUserEvent().equals("next")) {

…
In this case, the better solution is to indicate that binding="false". If you rename a transition in your flow, the code in the model will break. So, for simple cases, it is better to set the flow binding attribute to false. Nevertheless, the programmatic solution might be convenient in some cases where certain validations need to be conditionally performed, depending on the state.
We marked both username and password as required, but how are they localized to an error message? In order for the required message to show up, we must declare the message keys. Web Flow follows a predefined structure in trying to find the key that belongs to a field that is missing:
required<fieldname>.required<modelname>.<fieldname>.required
In our message bundle (messages_xx.properties), we used the third option:
authenticationForm.password.required=Password is required

authenticationForm.username.required=Username is required
Another possibility is to use required and a place holder. The first placeholder contains the field name:
required= {0}: is required
Finally, you need to declare a standard <form:errors> in your JSP with the path of the field to show the error for the different fields:
<form:errors cssClass="error" path="password"/>

<form:errors cssClass="error" path="password"/>
![]() Note In addition to the
Note In addition to the required error type, there are also others you can use, such as typeMismatch. When an adequate type conversion cannot be executed, an error of this type is added. You can find other error types by looking at implementations of org.springframework.binding.mapping.MappingResult. The implementation’s getCode() method returns the error type. The following error types exist and might be raised: required, propertyNotFound, evaluationException, and typeMismatch. You can define messages for these errors in the same manner as just discussed.
Web Flow AJAX Support
Web Flow has support for AJAX on both the server and client sides. The server side supports selective partial rendering via the <render> element, on which one or more fragments can be specified that need to be rendered.
On the client side, there is a JavaScript library available that will automatically interpret the partial responses and execute the partial page refreshes.
The JavaScript part is based on the Dojo framework and is branded Spring JS (Spring JavaScript). It is packaged as part of Web Flow, but as a separate artifact. This means you have to put a separate dependency in your build system to obtain this dependency because it does not come directly with the main Web Flow dependency. In our sample project, build.gradle, we explicitly defined this dependency (see Listing 12-15).
Listing 12-15 Defining the Extra Dependency via Gradle on Spring JS
compile "org.springframework.webflow:spring-js:$springSwfVersion"
This dependency contains the AJAX ViewResolver and the AJAX Tiles view. You will also get JS resources as a transient dependency. This dependency contains the JavaScript dependencies. The convention is to put them under META-INF/web-resources (see Figure 12-1).

Figure 12-1. The directory structure of the Spring JS resources, which shows a central web-resources folder under which all artifacts are packaged
The same convention is followed in our sample application. This relaxes the number of places where resources can be found, and it lets us get away with a single resource handler definition in our Spring MVC configuration, com.apress.prospringmvc.bookstore.web.config.WebMvcContextConfiguration:
public void addResourceHandlers(ResourceHandlerRegistry registry) {

  registry.addResourceHandler("/resources/**/*")

          .addResourceLocations("classpath:/META-INF/web-resources/");

}
Before we can use that AJAX functionality, we need to set up different elements. This section will summarize those elements, providing an overview of what we will need to address for the sample application to support AJAX partial rendering:
- We need to enable the special AJAX
ViewResolverwith the AJAX Tiles view. ThisViewResolverhas special support built-in for detecting AJAX requests. - We need to rework a page, so that we can rerender a part of it via an AJAX call. We also need to adjust the
tiles-config.xmlwith the separate fragment that we will rerender. - We need to adjust the flow with the
<render>element and specify the fragment to render. - Finally, we need to use the Spring JS in our page to start an AJAX request and let it partially refresh the part of that page that matches the fragment.
Configuring Web Flow for AJAX
Let’s begin by replacing the standard UrlBasedViewResolver with the AJAX decorated org.springframework.js.ajax.AjaxUrlBasedViewResolver in the WebMvcContextConfiguration class (see Listing 12-16). The org.springframework.web.servlet.view.tiles2.TilesView is also replaced with the org.springframework.webflow.mvc.view.FlowAjaxTilesView.
Listing 12-16 Configuring the AjaxUrlBasedViewResolver for Ajax support in WebMvcContextConfiguration
@Bean

public ViewResolver tilesViewResolver() {

    UrlBasedViewResolver urlBasedViewResolver = new AjaxUrlBasedViewResolver();

    urlBasedViewResolver.setOrder(1);

    urlBasedViewResolver.setViewClass(FlowAjaxTilesView.class);

    return urlBasedViewResolver;

}
In the preceding example, we simply replace the existing view resolver with the Ajax decorated one. When a non-AJAX view is detected, the behavior is the same as for a normal URL-based view resolver.
Preparing the View
Now that we have configured Web Flow for AJAX, we will change our view by partially rerendering a part using an AJAX call (as opposed to triggering a complete page refresh). In this section, we’ll see what modifications we have to make to support this.
We will also have to modify the Tiles configuration, but we’ll tackle that in a separate section to keep things separated and to make them easier to understand.
We will start in our selectBooks.jsp view, where there is a form that allows us to add books to the order. Once the books are added, they are immediately shown in the table below the selected book. This will be a good candidate for partial rendering, as seen this in Figure 12-2. We added three different books to the table: Effective Java, Refactoring: Improving the Design of Existing Code, and Practical API Design: Confessions of a Java Framework Architect.
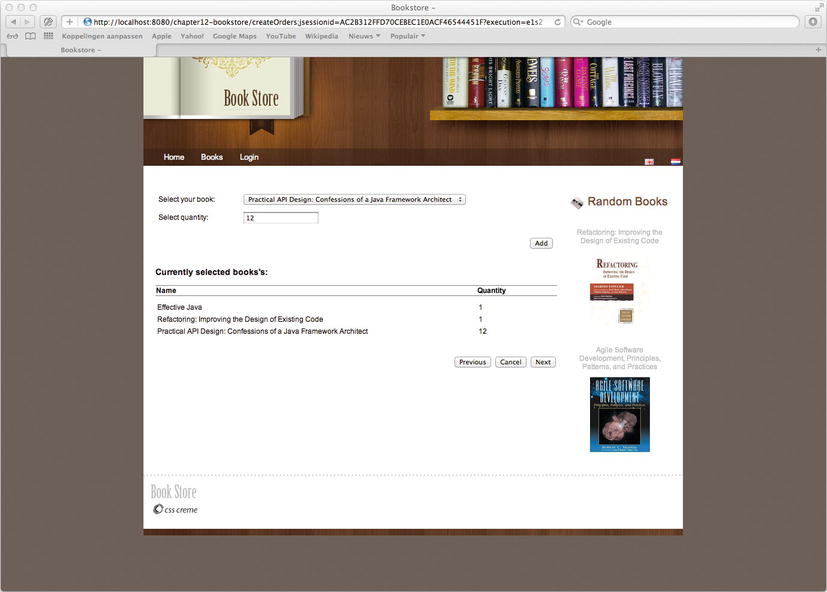
What we will do is extract the table part from the selectBooks.jsp view and put it in a separate view named showSelectedBooks.jsp, which is located at WEB-INF/view/createOrders/showSelectedBooks.jsp (see Listing 12-17).
Listing 12-17 The showSelectedBooks.jsp view
<%@ taglib prefix="c" uri="http://java.sun.com/jsp/jstl/core"%>

<%@ taglib prefix="spring" uri="http://www.springframework.org/tags"%>

<%@ taglib prefix="form" uri="http://www.springframework.org/tags/form"%>

<%@ taglib prefix="fn" uri="http://java.sun.com/jsp/jstl/functions"%>


<div id="selectedBooks" style="margin-top: 10px; margin-bottom: 10px;">

    <table style="width: 100%;" rules="groups">

        <thead>

            <tr>

                <th width="80%" align="left">

                    <spring:message code="label.page.books.book.name"/>

                </th>
                <th width="20%" align="left">

                    <spring:message code="label.page.books.book.quantity"/>

                </th>

            </tr>

        </thead>

        <tbody>

            <tr height="10px" />

                <c:forEach items="${orderForm.books}" var="book">

                    <tr>

                        <td>${book.key.title}</td>

                        <td>${book.value}</td>

                    </tr>

                </c:forEach>

            <tr height="20px" />

        </tbody>

    </table>

</div>
![]() Note We should point out that we explicitly named the top-level
Note We should point out that we explicitly named the top-level <div> element with an id attribute. In our case, we named it selectedBooks. In the following sections, we will see that it is used to identify the part of the page that should be replaced by the incoming AJAX response. The AJAX response will contain the rendered partial showSelectedBooks.jsp, as shown in Listing 12-17. By inspecting the first element, Spring JS knows which piece of HTML to replace on the actual page. In this case, it will look up the <div> with id selectedBooks and replace it with the version that came in via the AJAX response.
Next, in the selectBooks.jsp view, we are going to add a Tiles placeholder to insert the content from showSelectBooks.jsp (see Listing 12-18). To this point, we are still just playing with Tiles, and we have not done anything special that is Web Flow AJAX related. Thus far, this example could be a normal refactoring where we want to extract a part into a separate view (e.g., for readability, easier maintenance, or reuse).
Listing 12-18 The Tiles attribute in createOrders/selectBooks.jsp
<h3>

    <spring:message code="label.page.books.selected.books"/>

</h3>

<tiles:insertAttribute name="selectedBooks"/>
Where the <tiles:insertAttribute> is now located, we previously had the JSP code that has been moved to showSelectedBooks.jsp. Before Tiles will replace this with the real content, we must tell it about this new attribute.
We also explicitly gave the form an id attribute of selectBookForm; we will need this later when applying AJAX. For the sake of convenience, we’ll provide the modified WEB-INF/view/createOrders/selectBooks.jsp page in Listing 12-19, with these changes applied.
Listing 12-19: The selectBooks.jsp after our modifications
<%@ taglib prefix="c" uri="http://java.sun.com/jsp/jstl/core"%>

<%@ taglib prefix="spring" uri="http://www.springframework.org/tags" %>

<%@ taglib prefix="form" uri="http://www.springframework.org/tags/form" %>

<%@ taglib prefix="fn" uri="http://java.sun.com/jsp/jstl/functions" %>

<%@ taglib prefix="tiles" uri="http://tiles.apache.org/tags-tiles" %>


<form:form id="selectBookForm" modelAttribute="orderForm" action="${flowExecutionUrl}">

    <table style="width: 100%">

        <tr>

            <td colspan="2">

                <form:errors path="books" cssClass="error"/>

            </td>

        </tr>

        <tr style="height: 10px;"/>

            <tr>

                <td>

                    <spring:message code="label.page.books.select.book" />

                </td>

                <td>

                    <form:select path="book" items="${selectableBooks}"

                                 itemLabel="title" itemValue="id"/>

                </td>

            </tr>

            <tr>

                <td>

                    <spring:message code="label.page.books.select.quantity"/>

                </td>

                <td>

                    <form:input path="quantity" />

                    <span style="margin-left: 5px">

                        <form:errors path="quantity" cssClass="error"/>

                    </span>

                </td>

            </tr>

            <tr height="10px"/>

            <tr align="right">

            <td colspan="2">

                <button type="submit" id="add" name="_eventId_add">

                    <spring:message code="label.page.books.add.book"/>

                </button>

            </td>

        </tr>

    </table>


    <p/>

    <h3>

        <spring:message code="label.page.books.selected.books"/>

    </h3>
    <tiles:insertAttribute name="selectedBooks"/>


    <div align="right" style="margin-bottom: 20px;" >

        <button type="submit" id="previous" name="_eventId_previous">

            <spring:message code="button.previous"/>

        </button>

        <button type="submit" id="previous" name="_eventId_cancel">

            <spring:message code="button.cancel"/>

        </button>

        <button type="submit" id="next" name="_eventId_next">

            <spring:message code="button.next"/>

        </button>

    </div>

</form:form>
Configuring Tiles
For the selectBooks view, we simply used the configuration shown in Listing 12-20.
Listing 12-20 The current Tiles configuration for selectBooks.jsp
<definition name="selectBooks" extends="fullTemplate">

    <put-attribute name="content"

           value="/WEB-INF/view/createOrders/selectBooks.jsp"/>

</definition>
This snippet tells Tiles that it should render the full template, replacing the content of the Tiles placeholder with the selectBooks.jsp view. What we want now is to extend this because selectBooks is also a template at this point.
Let’s begin by creating a new template that identifies selectBooks as a template. This template will be included in the original selectBooks definition. To illustrate this, we will give it an internal name: show.selected.books. As you can see in Listing 12-21, this has the selectBooks view as a template, and instructs it to replace the selectedBooks Tiles placeholder with the newly created view, /WEB-INF/view/createOrders/showSelectedBooks.jsp.
Listing 12-21 The new Tiles definition for the showSelectedBooks.jsp with selectBooks.jsp as a template
<definition name="show.selected.books"

template="/WEB-INF/view/createOrders/selectBooks.jsp">

    <put-attribute name="selectedBooks"

     value="/WEB-INF/view/createOrders/showSelectedBooks.jsp"/>

</definition>
Finally, we need to link this template with the content attribute of the main template. This is actually the same as the original configuration we had; but instead of pointing to the actual view, we point to the definition we just created: show.selected.books (see Listing 12-22).
Listing 12-22. The adapted selectBooks Tiles definition using the previously defined show.selected.books as content
<definition name="selectBooks" extends="fullTemplate">

    <put-attribute name="content" value="show.selected.books"/>

</definition>
Figure 12-3 shows our new layered design. Until now, we’ve had the main template (fullTemplate), which filled its content directly with a page (e.g., WEB-INF/view/createOrders/selectBooks.jsp). However, in that page, we’ve also included a Tiles placeholder. With the configuration we’ve just created, we can also make a second template that renders selectBooks.jsp, but replaces its content attribute with the showSelectedBooks.jsp page.

Figure 12-3. The selectBooks page as it will be finally rendered, including all compositions
Let’s summarize what we’ve done so far: these two Tiles definitions together form our new configuration. If The selectBooks view is rendered, the template fullTemplate will be used, and the tiles content placeholder will be replaced with show.select.books. The latter refers to another Tiles definition which in turn renders /WEB-INF/view/createOrders/selectBooks.jsp and replaces the Tiles selectedBooks placeholder with the /WEB-INF/view/createOrders/showSelectedBooks.jsp view.
![]() Note The
Note The show.selected.books definition is part of a composition, and we will never render this directly because we will still need to include it in a definition that extends from the fullTemplate (in our case, the selectBooks definition). If we were to render show.selected.books directly, we would see the selectBooks.jsp page with the included showSelectedBooks.jsp; however, we would still be missing the header and footer because these have not yet been inserted into the main template. Since the top-level definition we are rendering is still called selectBooks (we just changed its internal composition), nothing must be changed in our controllers or flows, and the view name remains unaltered. By the way, there is also a shorter notation for defining this composition that uses an inline form. This will yield the same result, but is syntactically a bit more elegant. We will illustrate this when we refactor the Tiles configuration in the “Flow Managed Persistence Context” section later in this chapter.
With this code in place, we can already test the refactored application. It should yield the exact same results that it did before we changed the composition by moving the “show selected books” result table into a different view; in other words, the merged view that is being rendered should be same as the view rendered before.
Adjusting the Flow
As discussed previously, we have to indicate which parts need to be rerendered explicitly. We can do this with the <render> element, which takes a fragments attribute (see Listing 12-23). This attribute will point to the Tiles attribute to render. We can also specify multiple fragments by separating them with a comma, and we are also allowed to use expressions (that must evaluate to Tiles attribute names, just as their literal equivalents do).
If we take the createOrders-flow, we can add the render element in the add transition. The render element only makes sense for transitions that rerender the same view, so we can mark the Tiles attribute, selectedBooks, for rendering. This means that the <put-attribute name="selectedBooks" value="/WEB-INF/view/showSelectedBooks.jsp"/> will be rerendered when the partial render is triggered.
Listing 12-23 Rendering fragments in the createOders/createOrders-flow.xml
<view-state id="selectBooks" view="selectBooks" model="orderForm" >

    <on-render>

        <evaluate expression="orderController.

                  initializeSelectableBooks(orderForm)"

                  result="flashScope.selectableBooks" />

    </on-render>


    <transition on="add" >

        <evaluate expression="orderController.addBook(flowScope.orderForm)" />

        <render fragments="selectedBooks"/>

    </transition>


    <transition on="next" to="selectDeliveryOptions" />


    <transition on="reset" to="selectBooks">

        <evaluate expression="orderForm.resetSelectedBooks()" />

    </transition>


    <transition on="previous" to="selectCategory" />


    <transition on="cancel" to="end" />


</view-state>
Adding AJAX to the View with Spring JS and JQuery
Finally, we need to physically invoke an asynchronous call from our browser. Doing this will request a partial page update, causing that specific piece of our DOM to be updated. Unfortunately, the XMLHttpRequest API (the browser API leveraging asynchronous support) is a bit problematic to use because of the nonstandard support for this feature over different browsers.
Fortunately, we have been blessed by some very good JavaScript frameworks that hide all those dirty details for us as application developers. We will discuss two options. The first uses Spring JS, which we already have because we are depending on it. The second relies on JQuery, which we will need to download a separate library for. Let’s begin by demonstrating how to implement the client-side AJAX using Spring JS.
Using Spring JS
In this example, we will use Spring JS to make an AJAX call when a user pushes the Add button (see Listing 12-24). The Add button is a normal HTML submit button, and it will remain untouched.
Listing 12-24 The submit button that remains unchanged
<button type="submit" id="add" name="_eventId_add">

    <spring:message code="label.page.books.add.book"/>

</button>
A central concept in Spring JS is the notion of applying decorations to existing DOM nodes. This technique is used to progressively enhance a web page so that it will still be functional in a browser that has JavaScript disabled or simply has problems with JavaScript itself. The addDecoration method is used to apply these decorations, and we will use this method to add an Ajax decoration to the already existing submit button with the id of add.
In order to be able to use the AJAX libraries, we have to include references to them in our pages. Because we are using templates, this is pretty easy; these references are simply added in the HTML head section of our template. We can see this in the sample application when opening template.jsp (see Listing 12-25).
Listing 12-25: The extra JavaScript imports required to enable Ajax
<spring:url value="/resources/dojo/dojo.js" var="dojo"/>

<script type="text/javascript" src="${dojo}"></script>

<spring:url value="/resources/spring/Spring.js" var="springJs"/>

<script type="text/javascript" src="${springJs}"></script>

<spring:url value="/resources/spring/Spring-Dojo.js" var="springDojo"/>

<script type="text/javascript" src="${springDojo}"></script>
![]() Note The script element is assumed to be non-empty. If you close such an element with the (normally syntax equivalent) “/>”, the scripts are not loaded. That’s why they are explicitly closed with
Note The script element is assumed to be non-empty. If you close such an element with the (normally syntax equivalent) “/>”, the scripts are not loaded. That’s why they are explicitly closed with </script>. This has nothing to do with Spring JS; rather, it is an HTML peculiarity.
Next, we have to decorate the button with the AJAX handler. We can do this by adding the script in Listing 12-26 to the selectBooks view, which is added at the bottom of WEB-INF/view/createOders/selectBooks.jsp.
Listing 12-26 The JavaScript decoration, which will enable AJAX on the add button
<script type="text/javascript">

    dojo.addOnLoad(function() {

        Spring.addDecoration(new Spring.AjaxEventDecoration({

        elementId : "add",

        event : "onclick",

        formId: "selectBookForm"

        }));

    });

</script>
Several key things are worth noting about the preceding listing:
- The
elementIdis the id of the HTML element to which the decoration should be applied. In our case, it is the submit button with the id ofadd. - The event is the trigger event of the HTML element, which invokes the decoration. In our case, it is add button’s
onclickevent. - The
formIdmust match the form that contains all the information that is required to be submitted along with the Ajax request. We added this id to theformelement in Listing 12-19. - The
dojo.addOnLoad()method will make sure the decoration is added after all elements are loaded. This method may not be required for this type of decoration, but it is considered a best practice to use it unless you have good reasons not to. By the way, it does not matter where you place the<script>element. We chose to put it at the bottom, but it could have appeared anywhere in the file.
The decoration will submit the form, causing all input to be transmitted to the server. Because of the AJAX decoration, this happens in an asynchronous fashion. It will take the name from the button as the event id to be triggered (which is also transmitted with the parameters). The request is actually a normal form submission. Figure 12-4 shows what you’ll see if you inspect the request with Firebug.

Figure 12-4. Firebug’s capture of the request and showing of the request parameters
On the server side, the request is identified as an AJAX request by the AjaxUrlBasedViewResolver. When the flow resumes, it finds out that we wanted to execute the add transition, based upon the event id in the request parameters. It also knows that there is a render element specified in the flow definition. With this information, it has enough to continue selecting the view part that should be rendered.
![]() Note if you look carefully at Figure 12-4, you will see that there is an
Note if you look carefully at Figure 12-4, you will see that there is an ajaxSource POST parameter listed in bold under the Parameters column (it is the second parameter). This is noteworthy because there is no such component defined in our view. This parameter is added by Spring JS. It allows Web Flow to identify the request as an AJAX request. You can see that in org.springframework.js.ajax.SpringJavascriptAjaxHandler:
protected boolean isAjaxRequestInternal(HttpServletRequest request, HttpServletResponse

response) {

String acceptHeader = request.getHeader("Accept");

String ajaxParam = request.getParameter(AJAX_SOURCE_PARAM);

if (AJAX_ACCEPT_CONTENT_TYPE.equals(acceptHeader) || StringUtils.hasText(ajaxParam)) {

    return true;

} else {

    return false;

    }

}
The response received by the browser once Web Flow has finished executing the request is a partial response that contains data only from the showSelectBook view. We can use Firebug to verify that this is indeed the case (see Figure 12-5).

Figure 12-5. Firebug capturing the partially rendered response
As you can see, the result contains only a portion of the entire page; namely, just the part defined in the showSelectedBooks.jsp. The JavaScript that receives the partial view update will now try to match an element with the same type and id as in the update (that is why we explicitly named the id of the <div> element selectBooks). It will then replace that content with the received update.
That’s it! If you now click the Add button, you’ll notice that the browser no longer performs an ordinary form submission or page refresh. For example, in Safari you will no longer see the submit form progress bar in the browser’s status bar, which pops up when you click the add button. Now the view update that occurs when pushing the add button will give a smoother impression because only the table containing the selected books is updated, not the entire page.
Using JQuery
Instead of using Spring JS, the client part can also easily be replaced by other JavaScript libraries. For example, you might be more familiar with JQuery (or ProtoType or another library). These libraries will yield the same effect, as long as the mandatory extra request parameters _eventId_xxx and ajaxSource are present. These parameters were automatically added by Spring JS, but they need to be added manually when using other JavaScript libraries.
For example, if you replace the Spring JS script with the JQuery script in Listing 12-27, you will see that this also works without any problem. To create that script, we need to download the latest version of JQuery (version 1.7.1 at the time of writing) and add it to the HTML head section.
Listing 12-27 The extra JQuery imports in WEB-INF/templates/header.jsp
<spring:url value="/resources/jquery/jquery-1.7.1.min.js" var="jquery" />

<script type="text/javascript" src="${jquery}"></script>
Next, we can replace the Spring JS with a JQuery equivalent in WEB-INF/view/createOrders/selectBooks.jsp, as shown in Listing 12-28.
Listing 12-28 The Spring JS JavaScript replaced by JQuery
<script type="text/javascript">
$(function () {
var submit = $('#add'),
submit.click(function() {
var form = $('#selectBookForm'),
var event = submit.attr('name'),
var data = form.serialize()+ '&' + event + '=' + event +
'&ajaxSource=' + submit.attr('id'),
$.ajax({
type: "POST",
dataType: 'text',
url: form.attr( 'action' ),
data: data,
success : function(result) {
$('#selectedBooks').replaceWith(result);
}
});
return false;
}):
});
</script>
As you can see, the JQuery alternative requires more code. We could probably make it a bit shorter, but Spring JS has the advantage of being optimized specifically for this job. However, if you’re used to JQuery, you might find this to be a better alternative.
The script builds every step manually. We start by adding a click event listener to the add button, which is our submit button for adding new books. The event listener is bound when everything is loaded.
You can also see that, when we compose the request data in the data variable, we serialize the form for adding all input elements, and we manually add the parameters ajaxSource and _eventId_xxx.
![]() Note
Note $(#xxx) is a JQuery selector that finds objects in the DOM based on their id. $(function () {}) is a shorthand for $(document).ready(function(){}). It has the same function as dojo.addOnLoad(function(){}.
Next, we assemble the request, and we identify the submit button and the form. We serialize the form, and we manually append the required parameters. These parameters are based on the name and id of the submit button. The URL to submit to is taken from the form, as well. With this URL, we can now perform the POST Ajax call, and the URL and parameters are the same as those sent out by the Spring JS. As a response, we get the partially rendered view back from the server. The only thing left to do is replace the entire target object with the HTML response content.
It must be said: when using JQuery, you should also take care that you handle errors that come back from the server. When working with the Spring JS, you get automatic support for error detection: errors are nicely shown in a popup window. Also, it is possible to show the rendered content directly in a popup window.
Flow Execution Listeners
When executing a flow, Web Flow will go through different steps before it actually performs a transition or executes a method on your application controller. For example, we have already seen that the flow execution is paused after the view has been rendered and sent back to the client. Likewise, when a new request comes in for an existing flow execution, the flow execution needs to be resumed. Pausing and resuming a flow execution are just two of the steps that Web Flow will be performing, but there are many more. We say that these steps are part of the Web Flow lifecycle, which consists of the (noteworthy) steps that Web Flow goes through when executing a request. Web Flow will allow us to configure an implementation of an org.springframework.webflow.execution.FlowExecutionListener that will receive callbacks when any of those special lifecycle steps take place.
Getting a callback from these lifecycle steps is typically useful only for more infrastructure-related code (e.g., crosscutting concerns). For example, you could use the FlowExecutionListener to apply special security checks. Or, you could use it to log access. The functionality offered by a FlowExecutionListener looks a lot like that offered by Aspects in that sense that it is transparent to the actual target, regardless of whether any of those callbacks happened.
The FlowExecutionListener is in no way a replacement for Aspects, which remain more powerful. However, Aspects are also more complex. You should evaluate whether the flow execution listener approach is sufficient to do the job you want to do. If not, you can still revert to AOP.
In the following sections, we will cover how we can write our custom FlowExecutionListener. Finally, we will walk through all of the methods in the FlowExecutionListener and give a detailed explanation about each of them.
Writing Flow Execution Listeners
Writing a flow execution listener is as simple as implementing the FlowExecutionListener interface. This interface defines a lot of callback methods that will be invoked when certain things happen in the course of a flow execution life cycle. Spring Web Flow also provides an org.springframework.webflow.execution.FlowExecutionListenerAdapter as a convenience class, which implements all of the methods defined by the FlowExecutionListener interface using empty method bodies. You can also subclass FlowExecutionListenerAdapter and override only those methods that you require at a given time.
![]() Note The flow execution listener is by no means using AOP or any byte-code manipulation. It is a hook built into the Web Flow subsystem to give you callbacks for certain events during the flow execution. This is comparable to a web container that calls back on a registered
Note The flow execution listener is by no means using AOP or any byte-code manipulation. It is a hook built into the Web Flow subsystem to give you callbacks for certain events during the flow execution. This is comparable to a web container that calls back on a registered HttpSessionListener to inform you about a session creation or destruction.
Flow execution listeners are declared via the flow executor (see Listing 12-29). Their order is important; if more than one flow execution listener is defined, their callback methods will be called in the order in which the listeners are defined in the <webflow:flow-execution-listeners> element. The flow execution listener defined on top is called first; the listener immediately that one is called next; and so forth.
Listing 12-29 Configuring the flow execution listener
<webflow:flow-executor id="flowExecutor" flow-registry="flowRegistry">

    <webflow:flow-execution-listeners>

        <webflow:listener ref="loggerListener" />

        <webflow:listener ref="securityListener" />

    </webflow:flow-execution-listeners>

</webflow:flow-executor>
You can also specify the criteria attribute on the <webflow:listener> with a comma separated list of flow ids. This will enable a given listener only for the given flows. If you leave it empty, the listener is enabled for all flows. This is the equivalent of specifying an asterisk (*), which is the default value for the criteria attribute if you don’t specify it. Flow ids and the asterisks are the only allowed values for this attribute (see Listing 12-30).
Listing 12-30 Configuring the flow execution listener only for a specific flow id
<webflow:flow-executor id="flowExecutor" flow-registry="flowRegistry">

    <webflow:flow-execution-listeners>

        <webflow:listener ref="loggerListener" criteria="myFlowId" />

        <webflow:listener ref="securityListener" />

    </webflow:flow-execution-listeners>

</webflow:flow-executor>
Flow Execution Listener Methods
The FlowExecutionListener interface defines a lot of methods that can inform you when Web Flow is executing (or is about to execute) different steps in processing your flow execution request. For example, you can get callbacks when resuming or pausing an execution, triggering events, executing actions, and so on. Such callback methods become unpleasant when there are too many of them and they are badly documented. They can also be unpleasant to use if you have too few of them, and you cannot use the listener to capture what you need. In this subsection, you will find a complete explanation of each of the callbacks methods, so that you are prepared to make the right choice for a given job.
We don’t suggest trying to remembering all of these; it is better to quickly skim over them, so you know what the possibilities are. When you need such functionality, you can return to this section and verify which callback suits your requirements best. The thing to keep in mind is this: some execution listener methods are very similar, but also sneakily different. You should always make sure you test properly and don’t assume that a given listener method does what you think it will do.
Let's look at the methods defined by the FlowExecutionListener interface. (Note that we left out the return type for better readability, it is always void.) A flow execution listener method cannot return anything; if it changes something, it should do so with the parameters supplied to the callback method in question.
requestSubmitted(RequestContext context)

requestProcessed(RequestContext context)
requestSubmitted is invoked at the beginning, and requestProcessed is invoked at the end of a request entering a flow execution. requestSubmitted is the first method that is called of all the FlowExecutionListener callback methods, while requestProcessed is the last method called. You can use these callbacks if you want to perform something upfront in the processing lifecycle that has an impact over the entire request execution. Note that, when a new flow execution is started, the requestSubmitted callback is called before the flow execution is actually started (there will be no active flow yet at that time). The equivalent is also true with requestProcessed: when a flow execution terminates (because it hits an end state), the flow will already be terminated when requestProcessed is invoked. You can test whether the flow execution is active by using context.getFlowExecutionContext().isActive().
sessionCreating(RequestContext context, FlowDefinition definition)
sessionCreating is called to indicate that a new flow execution is about to be created. An exception may be thrown from this method to veto the creation of a new flow execution by throwing any kind of runtime exception.
sessionStarting(RequestContext context, FlowSession session, MutableAttributeMap input)
sessionStarting is called after a new flow execution is created, but before that new flow execution actually starts. In the case of launching a subflow, the flow execution has not yet been started, so the parent flow execution is still active. The input parameter is the input map that will be passed to the spawning flow, as prepared by the subflow state <input> mapping or as provided externally. The listener is also allowed to manipulate the input. A listener could veto the start of the newly starting flow execution session by throwing any kind of runtime exception.
sessionStarted(RequestContext context, FlowSession session)
sessionStarted is called after the new flow execution has been initialized and started processing. Startup behavior has already been performed (e.g., a flow <on-start> or the <on-entry> of the first state that is executed). This callback is useful if you want to do something every time a flow session has been started and initialized successfully.
eventSignaled(RequestContext context, Event event)
eventSignaled is invoked every time an event is signaled in the flow execution. The event could be an event signaled externally by the user or an event signaled internally (e.g., by an application controller). This method is called prior to the transition actually taking place.
transitionExecuting(RequestContext context, TransitionDefinition transition)
transitionExecuting is called when a transition is matched, but before the transition occurs. It is interesting to compare this method to eventSignaled; in this case, the transition is further along. At this stage, you already know the source and (what will be) the target of the transition, whereas in eventSignaled, you simply know “something” is going to happen.
stateEntering indicates that the flow execution is about to enter a given state. This method will be called after the transition matched, but before the state has been entered (e.g., no entry actions are executed at this point). Note that the listener can veto entering the state by throwing an org.springframework.webflow.execution.EnterStateVetoException.
stateEntered(RequestContext context, StateDefinition previousState, StateDefinition state)
stateEntered informs the listener that the flow has successfully transitioned from one state to the next. All entry logic of the given state has now been executed, and the state is fully initialized.
viewRendering(RequestContext context, View view, StateDefinition viewState)
viewRendering is called when a view selection has already occurred, and the information has been retrieved from the triggered view state. This happens before any render actions are executed.
viewRendered(RequestContext context, View view, StateDefinition viewState);
viewRendered is called after the view has been fully rendered, and it is ready to be sent back to the client.
paused(RequestContext context)
paused will be called after the active flow session has been paused, and the view has been rendered. Note that it will not be called if the flow execution ends (i.e., it passes through an end state). In that case, sessionEnding and sessionEnded will be called instead.
resuming(RequestContext context)
The resuming callback informs the listener that a paused flow execution has been restored and is going to resume.
sessionEnding(RequestContext context, FlowSession session, String outcome, MutableAttributeMap output)
sessionEnding is called when a flow hits an end state and is going to end the flow execution. At the point this callback method is invoked, the flow execution is still active. Possible <on-entry> actions (e.g., those that appeared on the end state) have already executed. If the flow is a subflow and has mapped out anything using the <output> mapping, it is also available via the output parameter. This allows the listener to inspect or manipulate the output returned to the parent flow. The outcome parameter matches the outcome reached by the ending session; this will be the id of the terminating <end-state>.
sessionEnded(RequestContext context, FlowSession session, String outcome, AttributeMap output)
sessionEnded is called after sessionEnding, when the flow execution has completely ended. When this method is invoked, the flow execution is no longer active. If the flow in question was a subflow and it mapped data back to the parent, then the flow output map can no longer be manipulated at this point. Also, if the parent flow has already been reactivated, but is not yet resuming. then session.isRoot() will indicate whether the session ended for a subflow (in that case, isRoot will be false) or for a parent flow (isRoot will be true).
The exceptionThrown callback method will be called whenever an exception occurs during the processing of a request in an active flow execution. If there are flow exception handlers configured, they will be invoked after this method has been called.
Flow Managed Persistence Context
With this section, we come to the last feature of Web Flow that we’ll be covering. This feature allows you to extend a JPA persistence context into your presentation layer, while making it persistent for the duration of an entire flow execution.
While this is a simple feature when seen from the Web Flow side, fully understanding when or why to use it is a bit more complicated. In this section, we will look in detail at what it actually can do for you, explaining and then illustrating how it works by using parts of the sample application.
This feature is not a solely Web Flow or web application-related feature. All the other things we have seen in the Web Flow chapters are related to how we do something in the presentation layer. However, this feature starts all the way back in the backend data access layer (DAL).
As you are aware from Chapter 1, we use an ORM to manage our persistence. To be vendor neutral, we opted to use JPA as the ORM API. Hibernate is used as provider for JPA. In doing this, we could let the application run with other JPA providers, as well (e.g., EclipseLink). You can distinguish this in the Repositories by the imports; we use classes from the javax.persistence package, which is the Java Persistence API part of the Java APIs.
JPA can be used either inside or outside a JEE managed context. We are using it outside a JEE managed context, which requires some manual intervention when it comes down to transaction management and other configuration. Thanks to Spring, we can simulate a managed environment, so that there is in fact little difference from using JPA within a managed environment.
![]() Note While we are running in a managed environment (Tomcat), we actually mean a fully managed/compliant JEE application server with or without the EJB profile. For example, Tomcat only implements a partial web profile of a JEE server, and it cannot be considered to be a managed environment from the JPA point of view. In Tomcat, at least from the JPA point of view, your application would have to deal with the transaction management itself, and JPA would be configured as in a normal SE environment.
Note While we are running in a managed environment (Tomcat), we actually mean a fully managed/compliant JEE application server with or without the EJB profile. For example, Tomcat only implements a partial web profile of a JEE server, and it cannot be considered to be a managed environment from the JPA point of view. In Tomcat, at least from the JPA point of view, your application would have to deal with the transaction management itself, and JPA would be configured as in a normal SE environment.
From Database to View
Let’s begin by explaining how the data access is handled in the sample application to this point. As explained in Chapter 1, we configured Spring to use JPA, and we use Hibernate as the ORM implementation. Our application follows a typical, simple three-layered approach: we have a presentation layer, a business (logic) layer, and a data access layer. Whenever our application controllers need something, they talk to a service. The service uses the domain model and repositories to retrieve data from a relational database.
The objects retrieved from database are called entities. An entity is part of the domain model and reflects data backed by the database. Such an entity is managed by JPA; or more precisely, by a persistence context. One of the features an ORM may offer is lazy loading. This feature allows you to retrieve only a small amount of data and (automatically) fetch additional data when you ask for it. For example, when retrieving an Order, we could lazily load the Customer. If we don’t need the Customer in our processing, no Customer data is loaded. The less data we load, the better.
However, this feature only works when an entity is managed by the persistence context. Normally, the persistence context is closed when the transaction ends. Outside the transaction, the entity becomes detached. Calling a method to load additional data that was not loaded while the transaction was active will result in an exception being thrown (in case of Hibernate, you will see the famous org.hibernate.LazyInitializationException).
However, in our sample application, we have been using the org.springframework.orm.jpa.support.OpenEntityManagerInViewFilter. This means our business transaction is committed (or rolled back), but the persistence context is kept open. This also means that our entities remain managed, and we can still let them load data from our presentation layer (and thus, from within our views). However, we should be careful not to perform changes or create operations in the presentation layer because there is no longer a spanning transaction when using the entities. Each interaction will operate in its own transaction; this is unlike our business logic layer, where the entire service method call happens in one big transaction.
You can see this illustrated in Figure 12-6. We simulate a method call originating from the presentation layer that goes into the business logic layer, starting a transaction on its way. In the business logic layer, we are allowed to make modifications because all modifications we make are covered by the global transaction. The transaction is ended when the result is returned back to the presentation layer, either committing or rolling back the transaction. We can see that the entity is in a managed state in all layers. Outside of the business logic layer, however, there is no more transaction. Nevertheless, the persistence context is kept open for read operations during the render view phase, thanks to the OpenEntityManagerInViewFilter.
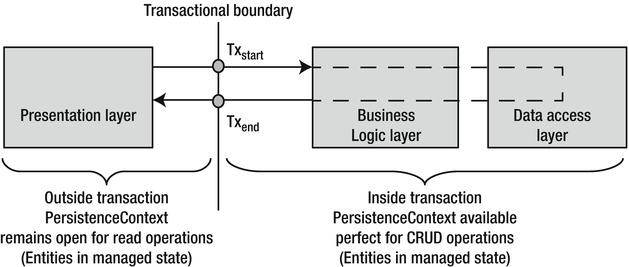
Figure 12-6. The transactional boundary lies on the business services
While this works great, the problem is that, once the view has been rendered, the OpenEntityManagerInViewFilter will close the persistence context before returning the view back to the browser. This means that, if you put an entity on (for example) flow scope, it will become detached. This becomes a problem if you need to load associations using that entity over multiple requests because that will again trigger a LazyInitializationException.
To explain this better, let’s assume we show an order on the user’s screen. In order to do this, we load the Order entity from database using our service. The Order entity is stored on flow scope and retrieved when the view is rendered to show the actual content of an order. Potentially, we also show some information about the account of the user, which requires an extra query to be performed from within the view to retrieve the Account entity. This is all good because everything is happening in the same request—our persistence context is still open, and our entity is still managed. After the view is rendered, the flow session is paused and the view is sent to the browser. But before the view was sent back, the OpenEntityManagerInViewFilter closed the persistence context. Until now, that was just fine because our view was rendered, anyway. However, suppose the order view allows the user to click an order that will show the details of the order (e.g., the products contained by the order). In that case, after the user clicks the detail button, a new request comes in and the flow session is resumed. When the view tries to get the OrderDetail entities from the Order entity (which is retrieved from flow scope), it will receive a LazyInitializationException. This is strange because the OpenEntityManagerInViewFilter opened a new persistence context when the request came in. While that is true, it will not reattach the entities that were detached when the previous request ended.
What this basically means is that, while the persistence context is extended into the presentation layer, it does not survive multiple requests. Once a request has been processed (and the view has been rendered), the persistence context is closed. When entities are stored on a given scope, they will be in a detached state when the next request comes in and tries to work with them.
Prolonging the Persistence Context
Web Flow allows you to prolong the continuity of the persistence context over multiple requests. This is known as the Flow Managed Persistence Context (FMPC) pattern. It is an extension to the Open EntityManager In View Pattern (OEMIV) which we have already been using (it is implemented by the OpenEntityManagerInViewFilter). As we explained in the previous section, the persistence context is opened when the request comes in, but is destroyed after rendering the view. In the OEMIV pattern, the persistence context is not retained across multiple requests; in the FMPC pattern, the persistence context is stored for the next request in the flow session.
The good thing about this pattern is that we can just touch whatever we need in our presentation layer because we still have an active persistence context during the entire execution of our flow.
When using the FMPC pattern, we also no longer need to denote an explicit business transaction. In our flow, there is only one place where we need a transaction, and that is in the last step: when we place the actual order. In the intermediate steps, we just perform read access, which actually requires no transaction; or at most, a read-only transaction if we retrieve different types of entities, and we want to keep a certain amount of consistency.
In Figure 12-7, we can see how Web Flow will ensure that the persistence context is bound and unbound from flow scope before starting or resuming a flow session. This will ensure that we are able to access the database from the different steps in our flow from the presentation layer, even on entities that are retrieved from flow scope.

Figure 12-7. Automatic binding and unbinding of the persistence context by Web Flow
In this approach, the persistence context is opened when the flow session starts and remains open until the session ends. The pattern should be used with read-only operations and ended in a single create/update transaction when the flow ends, as we will illustrate later on.
When you make a call that requires data (e.g., a lazy initialization of a collection or property), a separate transaction is spawned, and the data is retrieved. This means that you don’t need any @Transactional annotation on the services. If you need read consistency, you are allowed to do this; however, you are advised to make the transactions read-only. Any modifications you might make are not flushed until the update transaction is executed at the end of the flow.
Applying Flow Managed Persistence Context
We will rework our createOrders-flow to take advantage of the managed-persistence context. Let’s begin by enabling the prolonged persistence context on a per-flow basis. We’ll do so by using the <persistence-context/> element at the beginning of our createOrders-flow flow.
We need to enable a special flow execution listener (see Listing 12-31). This listener will bind and unbind the persistence context as a flow is starting, ending, pausing, or resuming (at least for each flow for which we’ve enabled the <persistence-context/> element).
Listing 12-31 Registering the flow execution listener that will handle the flow managed-persistence context
<webflow:flow-executor id="flowExecutor" flow-registry="flowRegistry">

    <webflow:flow-execution-repository max-executions="3" max-execution-snapshots="10" />

        <webflow:flow-execution-listeners>

            <webflow:listener ref="jpaFlowExecutionListener"/>

        </webflow:flow-execution-listeners>

   </webflow:flow-executor>


<bean id="jpaFlowExecutionListener"

           class="org.springframework.webflow.persistence.JpaFlowExecutionListener">

    <constructor-arg ref="entityManagerFactory" />

    <constructor-arg ref="transactionManager" />

</bean>
The listener requires access to the javax.persistence.EntityManagerFactory (which will create the javax.persistence.EntityManager, also called the persistence context) and the transaction manager. The transaction manager is used to create a transaction when the flow ends. At that moment, the entity manager is joined with the transaction, so that your modifications can be flushed to the database in an all-succeed or all-fail fashion. You can see this in Listing 12-32, which is taken from the JpaFlowExecutionListener.
Listing 12-32 The JpaFlowExecutionListener, which joins the EntityManager with a transaction when ending the flow session
public void sessionEnding(RequestContext context, FlowSession session,

                          String outcome, MutableAttributeMap output) {

    if (isParentPersistenceContext(session)) {

        return;

    }


    if (isPersistenceContext(session.getDefinition())) {

        final EntityManager em = getEntityManager(session);

        Boolean commitStatus =

            session.getState().getAttributes().getBoolean("commit");


        if (Boolean.TRUE.equals(commitStatus)) {

            transactionTemplate.execute(

                new TransactionCallbackWithoutResult() {

                    protected void doInTransactionWithoutResult(

                                                   TransactionStatus status) {

                        em.joinTransaction();

                }

            });

        }

     unbind(em);

     em.close();

    }

}
The listener will also detect subflows, so that no transaction is executed when a subflow ends. The create/update transaction is only executed when the top-level flow ends.
Next, we need to indicate which end state will trigger the commit (see Listing 12-33).
Listing 12-33 The end state that triggers the commit
<end-state id="endOrderOk"
view="redirect:/ordersOverview.html?orderOk=true&orderId={orderId}" commit="true"/>
There is one thing left to do. Thus far, we’ve used the org.springframework.orm.jpa.support.OpenEntityManagerInViewFilter, which was configured in our com.apress.prospringmvc.bookstore.web.config.BookstoreWebApplicationInitializer. OpenEntityManagerInViewFilter and JpaFlowExecutionListener don’t play nicely together. This makes sense if you think about it because they both try to extend the persistence context; however, only our JpaFlowExecutionListener will extend it a bit longer. Therefore, we need to disable the OpenEntityManagerInViewFilter. In Listing 12-34, you can see that we have put this in comments, so that it will not be loaded. We will now fully depend on the JpaFlowExecutionListener for extending the persistence context.
Listing 12-34 Disabling OpenEntityManagerInViewFilter in BookstoreWebApplicationInitializer
@Override

public void onStartup(ServletContext servletContext) throws ServletException {

    registerListener(servletContext);

    registerDispatcherServlet(servletContext);

    // We are using JpaFlowExecutionListener instead

    //registerOpenEntityManagerInViewFilter(servletContext);

}
That is all we need to do. What is happening now is that, during our flow execution, our entities remain managed. When the flow ends, we indicated that Web Flow should commit. This means that it will start a transaction and let the EntityManager join that transaction, so it can flush the modification operations (i.e., creates, updates, and deletes) to the database. This basically means that the createOrder method on our service does not require an @Transactional annotation anymore because the transaction is now managed by Web Flow.
![]() Note When using disconnected transactions in the same flow (e.g., several read transactions in each step of the flow, followed by a modification transaction at the end), it is advised that we configure optimistic locking. In our case, this is not that important because we are inserting new data. However, this becomes very important if we want to update data that was previously read in a previous step of the flow (and thus belongs to a different transaction) because that data might be updated by the time we perform our modification transaction. Without optimistic locking, we could end up overwriting the changes of other users without knowing it.
Note When using disconnected transactions in the same flow (e.g., several read transactions in each step of the flow, followed by a modification transaction at the end), it is advised that we configure optimistic locking. In our case, this is not that important because we are inserting new data. However, this becomes very important if we want to update data that was previously read in a previous step of the flow (and thus belongs to a different transaction) because that data might be updated by the time we perform our modification transaction. Without optimistic locking, we could end up overwriting the changes of other users without knowing it.
Reworking the Orders Overview
The preceding section illustrated that we can use Web Flow to manage our transaction. and that it can create a committing transaction at the end of a flow that pushes out all changes to the database when the flow ends.
Finally, we want to illustrate that the persistence context is also available in our view for entities that are stored in a scope. Normally this would not be possible because the persistence context would no longer available after a request ended.
The Orders Overview page shows the orders a customer made. We will add an additional popup window that shows the details of the order. In the domain model, we have an Order that has a list of zero or more OrderDetails. At the moment, the orders overview is backed by a Spring MVC controller, and it is not governed by a flow. In Listing 12-35, we will begin building a flow for the orders overview. You can find this code at WEB-INF/view/ordersOverview/ordersOverview-flow.xml.
![]() Note In Listing 12-35, we are building a flow for something that is not really a “flow”; rather, it is just an overview page with a detail. We created a flow purely in terms of the sample application, so we could demonstrate the flow-managed persistence context. In a real-world app, this would probably not benefit from being modeled as a flow.
Note In Listing 12-35, we are building a flow for something that is not really a “flow”; rather, it is just an overview page with a detail. We created a flow purely in terms of the sample application, so we could demonstrate the flow-managed persistence context. In a real-world app, this would probably not benefit from being modeled as a flow.
Listing 12-35 The newly created ordersOverview-flow
<persistence-context/>


<view-state id="ordersOverview" view="ordersOverview">

    <on-render>

        <evaluate expression="orderController.retrieveOrders(

                  externalContext.sessionMap.authenticatedAccount)"

                  result="viewScope.orders" />

    </on-render>

    <transition on="showOrderDetail" to="orderDetail">

        <set name="flashScope.order"

             value="orders[requestParameters.index]">

        </set>

    </transition>

</view-state>


<view-state id="orderDetail" view="orderDetail" popup="true">

    <on-render>

        <render fragments="content"></render>

    </on-render>

</view-state>
The following aspects of the preceding listing are noteworthy:
- We have added the
<persistence-context/>, which will enable the flow-managed persistence context for this flow (we did the same thing for ourcreateOrders-flow). - We also set the selected
Orderonflashscope using a<set>action. The index of the selected order is retrieved from the request parameters:orders[requestParameters.index]. - The first
viewstate renders theordersOverviewview, which renders theordersOverview.jsp. - The second
viewstate renders theorderDetailview, but will only partially render it. Because the popup attribute is set totrue, this will, in conjunction with Spring’s client-side JavaScript, render the content in a popup window.
In Listing 12-36, you can see the orderDetail.jsp, which is just a fragment of a complete page because it will be rendered as a popup.
Listing 12-36 The orderDetail.jsp, which will render the order details
<%@ taglib prefix="c" uri="http://java.sun.com/jsp/jstl/core"%>


<h2>Order detail</h2>

<div style="width: 550px; height: 100px; margin-top: 15px;">

    <table style="width: 100%;">

        <thead>

            <tr>

                <th align="left">Book title</th>

                <th align="left">Book description</th>

                <th width="60px" align="left">Book price</th>

            </tr>

        </thead>

        <tbody>

            <tr height="10px" />

            <c:forEach items="${order.orderDetails}" var="orderDetail" varStatus="status">

                <tr>

                    <td>${orderDetail.book.title}</td>

                    <td>${orderDetail.book.description}</td>

                    <td>${orderDetail.book.price}</td>

                </tr>

            </c:forEach>

            <tr height="20px" />

        </tbody>

    </table>

</div>
The Tiles configuration for this for is straightforward (see Listing 12-37).
Listing 12-37 The Tiles definition for orderDetail.jsp
<definition name="orderDetail" extends="contentOnlyTemplate">

    <put-attribute name="content" value="/WEB-INF/view/ordersOverview/orderDetail.jsp"/>

</definition>
In the preceding listing, we extend from the contentOnlyTemplate because the content will be rendered in a popup, so we don’t need the header and footer, which are part of the fullTemplate.
In the ordersOverview.jsp, we still need to add the link that will make the Ajax call and open the popup window (see Listing 12-38). It is important that this link be nested in a form. We will also submit the index (which we retrieve from the JSTL supplied by a varStatus object) through a hidden field. This will allow us to determine which order we want to see the details from (as we have seen in the flow, it uses the index request parameter to determine the selected Order object in the list).
Listing 12-38 The link in the ordersOverview.jsp that will trigger the order
<c:forEach items="${orders}" var="order" varStatus="status">

    <tr>

        <td>${order.id}</td>

        <td>${fn:length(order.orderDetails)}</td>

        <td><spring:eval expression="order.orderDate" /></td>

        <td>${order.totalOrderPrice}</td>

        <td>

            <form:form id="orderDetailForm_${status.index}"
                       action="${flowExecutionUrl}">

                <input type="hidden" name="index" value="${status.index}" />

                <a name="_eventId_showOrderDetail"
                   id="orderDetailLink_${status.index}" href="#">View</a>

             </form:form>

        </td>

    </tr>

</c:forEach>
We’ll conclude by decorating the link with an Ajax decoration. Because we need both the link and the form— and because there are multiple versions of each—we use dojo to query all links where the id starts with orderDetailLink_. From that, we can parse out the index. With this information, we can also compose the id of the anchor to bind to, as well as the form. We also enable the popup functionality, so Spring JS knows to render the response inside a popup window. All of this is accomplished in Listing 12-39.
![]() Note To enable the form to be shown as a popup window, we enabled the popup attribute on the
Note To enable the form to be shown as a popup window, we enabled the popup attribute on the view state that renders the popup content.
Listing 12-39 The JavaScript that will decorate the button and trigger an AJAX request to display the order details that will be shown in a popup window
dojo.query("[id^='orderDetailLink_']").forEach(function(element) {

    var index = element.id.substr(element.id.lastIndexOf('_')+1,element.id.length);

    Spring.addDecoration(new Spring.AjaxEventDecoration({

        elementId : element.id,

        event : "onclick",

        formId : "orderDetailForm_"+index,

        popup : "true"

    }));

});
With the final modification in place, we can run the application and go to the Orders overview page. We do this by clicking Orders overview in the navigation bar. Figure 12-8 shows the orders for our customer with the user id of jd.
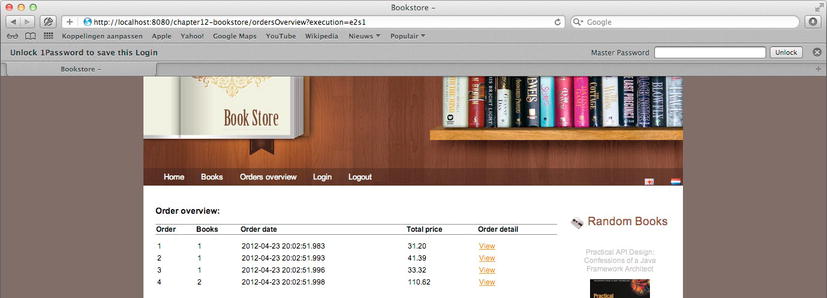
Figure 12-8. The new Orders overview page, which shows the orders and a link to view the details
In the preceding code, the Order entity is stored on view scope. The Book entities of the OrderDetails page (which we will need in the details view) are not yet initialized. Finally, when a user clicks the View link, the details will open in a popup window (see Figure 12-9).

Figure 12-9. Clicking the view link brings up a popup window that shows an order’s details
Web Flow placed the selected Order entity from view scope in flash scope. Next, we instructed Web Flow to render our view state of orderDetail. This view state shows information about the Book entity. In a normal situation, we would now receive a LazyInitializationException because the Book entity still has to be loaded. However, thanks to our flow-managed persistence context, the entities are still managed, and the extra data is loaded. We get the details without any exceptions being thrown.
To illustrate that this is really working, we switched back to the OpenEntityManagerInViewFilter and disabled the JpaFlowExecutionListener. We also disabled the CommonDataHandlerInterceptor in both the WebMvcContextConfiguration and WebflowContextConfiguration. The CommonDataHandlerInterceptor is responsible for loading the random books. When enabled, it will silently load books in our persistence context, and we will not be performing an objective test. Finally, we also have to mark the Book @ManyToOne association in the OrderDetail entity as lazy:
@ManyToOne(optional = false, fetch=FetchType.LAZY)

private Book book;
This is required because JPA (by default) loads many-to-one associations eagerly. If we don’t explicitly tell JPA to load the association lazily, the Book entity will already be loaded when we load the overview page. The overview page indirectly loads the OrderDetail collection because it shows the number of books as part of the order. This is accomplished by calling the size method on the Collection of OrderDetails; therefore, this association must be initialized. This will implicitly trigger loading of the Book entity because it is eagerly fetched when the OrderDetail association is loaded. After making the Book association explicitly lazy, we can click a view link to see the details. As can be seen in Figure 12-9, we get an exception instead.

Figure 12-10. An exception is triggered when loading the book details if you are not using the flow-managed persistence context.
If we scroll further down in the stack trace, we will see that it was actually caused by a LazyInitializationException (see Figure 12-11).
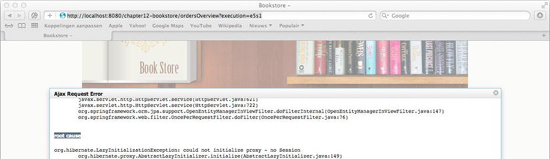
Figure 12-11. The cause of the exception is a LazyInitializationException
Summary
And that concludes the final chapter on Web Flow. We have now covered all the noteworthy features that Web Flow has to offer and even shown you how to use them.
In this chapter, we took a more advanced and in-depth look at some of the functionality that was introduced in the previous couple of chapters. For example, we showed you how to apply flow inheritance by implementing an extension on flow composition and modularity. We also showed how it is possible to perform explicit form binding and to deal with exceptions in the flow (instead of dealing with them in your application controllers.
And then we dove still deeper into executing Web Flow actions. For example, we discussed some powerful new features such as flow execution listeners, handling Ajax requests with Web Flow, and finally, the flow-managed persistence context.
There is one important thing that we did not discuss in these Web Flow chapters: security. Web Flow plugs seamlessly into Spring Security. We decided that it would be better to cover the topic of security in its own, standalone chapter. Our next (and final) chapter will cover Spring security for Spring MVC (this will be our starting point); and along the way, we’ll show you how Web Flow fits into this security setup.