
C H A P T E R 11
Building Applications with Spring Web Flow
In the previous chapter on Spring Web Flow, we introduced you to Web Flow's main features and what it can do for you. We also covered what a basic Web Flow configuration looks like and how it can be integrated with Spring MVC. We saw some basic elements that are part of almost every flow, such as the view state and the evaluate action. And we ended by converting our Bookstore to a basic Web Flow-enabled application.
In this chapter, we will continue to look at more features of Web Flow. For example, we will see all the features required to turn the bookstore in a real-world application. We will be starting from the bookstore as we left it in the previous chapter, which we will be refactoring as we go along. The general approach of this chapter is a mix; we will introduce you to some new features first, explaining them in detail. Next, we will see how these concepts can be applied by refactoring the existing application or using these features to modify the bookstore.
We have chosen this approach, so that the table of contents can continue to be referenced. When working with Web Flow, you probably want to browse back to certain functionality and read about all its details. If we were to mix everything together, this would become difficult. We will tackle the sample in two stages, to make everything more digestible.
Important Web Flow Concepts
Now that you have seen some basic Web Flow coverage, we want to explain some specific new Web Flow concepts and terminology, as well as to expand on some concepts introduced in Chapter 10. Specifically, we will expand the definition of “flow” introduced in the Chapter 10. We will also take a closer look at scopes and how they work, and then introduce and define the implicit objects available for Web Flow expressions.
Flow Definition
In a flow definition, we can have five states, two of which we have already seen: the view state and the end state. The remaining states are the action state, decision state, and the subflow state. We will go over these in more detail in this chapter. However, in this section, we want to give a short introduction to subflows, since we will refer to them before covering them fully in the “Subflows” section. The concept of a subflow is pretty easy. For example, the structure and setup of a subflow is not too different from any other flow; it is defined in its own flow definition XML, and it has its own flow id.
Sometimes a given flow is started from another flow, rather than starting it at the top level by referring to it directly. We call such a flow a subflow. This process creates a parent/child relationship between the two flows. As we will see later, this relationship implies that the two flows can share state using the conversation scope, as well as map data from one flow to the other. It also serves as a modularization technique because it can help you build reusable components.
Another important element—one that drives your flow—is an event. The user signals an event by submitting the contents of a form to the URL that contains the flow id as a path and the flow execution key as one of the parameters. Other parameters can be values of input components, such as text fields, select boxes, check boxes, and so forth. Web Flow will use the flow id and execution key from the submission to resume the flow execution, and it will parse the event from the submitted parameters. Remember that, in our sample, the event is encapsulated in the name of the Submit button using this format: _eventId_event. After parsing the event, Web Flow will use it to invoke the transition, which has a matching on attribute for the event that we submitted. It will then be forwarded to the state indicated by the to attribute of the transition.
A transition takes the flow from one state to another state of that same flow. Before you can go back to a view, you must either transition to another view state (possibly going through other states) or transition to an end state. As we will see, an end state has also an option to specify a view. This view is rendered after the flow execution has terminated.
Different Web Flow Scopes
We already mentioned in the previous chapter that Web Flow adds a lot of different scopes into the picture (five to be exact): conversation, flow, view, flash, and request (see the “Fine-Grained Scoping” section in Chapter 10). Each of them has a well-defined lifecycle.
![]() Note Every object you put on
Note Every object you put on conversation, flow, view or flash scope should implement java.io.Serializable (for the request scope, this is not required). This is the case because Web Flow stores the state of these scopes between requests. The default implementation relies on Java serialization. Also note that this is recursive; every object your object refers to should be serializable, as well. If you do not want to retain certain objects, you can use the Java transient keyword on the field. This way, the field is exempted from being serialized. When the flow state is restored, these fields will resolve to null.
Next, we will explain each of the five scopes in detail, from the shortest life cycle to the longest. Let's start with the request scope.
Request Scope
Figure 11-1 shows two HTTP requests entering the view state: HTTP request 1 and HTTP request 2. While they are shown in the same figure, they should be interpreted sequentially. First, HTTP request 1 enters and gets processed, and the response is returned. Second, HTTP request 2 enters, and the cycle repeats for this request. When the first request enters, request scope 1 is started. It is possible that an event is triggered, and a transition is executed. Whatever is executed has access to that request scope. When the processing is done, request scope 1 is destroyed, and the response for HTTP request 1 returned. When the next request (HTTP request 2) comes in, a new request scope (request scope 2) is created.

Figure 11-1. Illustrating the request scope
![]() Note We want to point out that, from now on, a curly brace indicates the scope available at that moment in a “scope figure.” The creation and cleanup of a certain scope is denoted by the curly brace itself; between the top and bottom of the brace, the scope is available to any execution trying to use it.
Note We want to point out that, from now on, a curly brace indicates the scope available at that moment in a “scope figure.” The creation and cleanup of a certain scope is denoted by the curly brace itself; between the top and bottom of the brace, the scope is available to any execution trying to use it.
The request scope is tied at the level of a single request into the flow execution. Each and every request coming into the flow execution will start with a new and empty request scope.
It is important to realize that the request scope is not linked to a flow execution by itself. Consequently, a parent flow executing a subflow (or vice versa) always sees the same request scope. You can use the request scope to store objects that are only required while processing the current request. Objects that are cheap to create or load can also be put in the request scope because they can be re-created or reloaded every time they are needed.
For example, if you need to load a list of results, you could load them with an <on-render> action (as we will explain later on). The <on-render> is executed right before the view is rendered. The result could then be stored on the request scope for a very brief moment, until the view is rendered using that information and then cleared.
There is a great resemblance between the Servlet request scope and Web Flow request scope. The major difference is that the latter scope is local to Web Flow components. It is an internal artifact used within Web Flow, and it isn't exposed to external components (e.g., Servlets).
![]() Note Including a
Note Including a request scope in Web Flow was a design decision to have an abstraction over the standard Servlet request scope. The designers targeted Web Flow for other platforms, as well (which may not have the notion of a request scope as the Servlet specification does). For you as a developer, there is no real difference apart from the fact that Web Flow's request scope is easier to reach from, for example, expressions inside your flow.
Flash Scope
You can think of the flash scope as a bigger request scope that survives two requests in a Post Redirect Get until the view finally gets rendered. Attributes with flash scope are persisted until the view is rendered and then cleared.
Storing objects in the flash scope is particularly useful for objects that are required in the view, but are not needed anywhere else. A good example of using flash scope is to store messages that are rendered on a view, like errors or warning messages. While an action executes, they can be put on flash scope by your application controller or by validation logic in your flow. The request scope is not sufficient because model validation occurs in the first request of the PRG. As a result, when the view gets rendered, the messages put on request scope will be gone. The flash scope provides an elegant solution for these kinds of use cases.
Figure 11-2 shows this by having a flash scope available that spans request 1 and 2 in transition t1. From the moment the view is rendered, the existing flash scope is cleared. This implies that, if you refresh the view, the messages will be gone, which is typically what you want for things like error and warning messages.
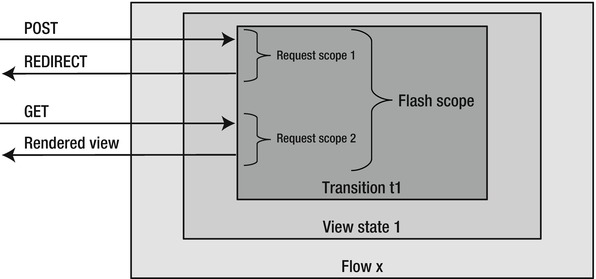
Figure 11-2. Showing the flash scope
Because flash scope is an extended request scope, it is also available to any subflow that is used. For example, when a transition within a view state delegates to a subflow which then renders the view, the flash scope will also be available to the execution that happens within the subflow. However, after the view has been rendered, any subsequent requests to that subflow will operate in their own flash scope.
View Scope
The view scope gets allocated when a view state enters, and it is destroyed when the view state exits. The view scope can only be referenced from within a view state. In Figure 11-3, you can see that, for each new view state, a new view scope is available.
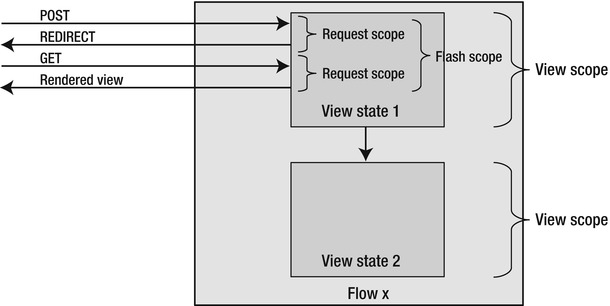
Figure 11-3. Showing the view scope
You could use view scope for storing data that is only required within the given view. For example, when you have a data table with pagination, you could load the results and put them in view scope. Using transitions within the view state (e.g., a next and previous transition), you could scroll through the list each time, showing a certain part of the result set. From the moment the view state is exited (e.g., after selecting a result in the data table), the view scope is destroyed, and the resources are released.
Flow Scope
The scope of the flow scope is a flow session. You can see this in Figure 11-4, where the execution of the parent flow has a flow scope, as does the flow session of the subflow (a subflow runs in the same flow execution as the parent flow but in a different flow session). This means that an attribute placed in a flow scope by a parent flow will not be accessible from the flow scope of a subflow.

You can use the flow scope to store objects that should be available for the entire flow session, but which are only for that session and not other flow sessions started in the same flow execution (i.e., subflows).
Objects in the flow scope are mostly related to the application and the functionality it implements (e.g., domain object instances manipulated by the flow).
Conversation Scope
The conversation scope is scoped at the level of an entire conversation, or execution (see Figure 11-5). The term “conversation” is a bit misleading, but that is merely an implementation detail (especially in Web Flow 2) that is not important in this discussion. Although we are forced to use this term, you can think of conversation scope as a scope that maintains state over the entire flow execution. We think that “execution scope” would have been a better naming. Attributes in the conversation scope are available to every flow session contained within the conversation (or execution). The conversation scope is therefore also available to all subflows.

Figure 11-5. The conversation scope
Just like the flow scope, the conversation scope mostly stores application-related objects. Use the conversation scope if those objects should be available for every flow session (for that flow and/or its subflows), rather than for a single flow session. If your flow does not use subflows, the lifespan of conversation and flow scopes can be considered equal. Note that we are not saying that both scopes “become equal”; they remain two physically separated scopes, so setting something on flow scope will not become visible on conversation scope. But in this case, they will be “logically” equal because they have the same lifespan, and the lifespan is normally the attribute that makes one flow different from another.
Because their lifespan is the same, one could argue that it would be equal either to choose flow or conversation scope. However, by default it makes more sense to opt for flow scope and not conversation scope. This is because subflows could be introduced later on (i.e., when your flow gets extended), and subflows will automatically be able to access the data on the conversation scope. As we will see shortly when introducing subflows, the best practice is to think about which data the subflow needs and only expose the right amount of data.
In Figure 11-5, you can see that, for flow x, the conversation and flow scopes are equal because there is no subflow present. You can also see that there is a new conversation scope (and flow scope) created for flow y. Also, for flow y, there will be a different flow scope created for the subflow. However, the conversation scope remains accessible for both the parent and the subflows. As already explained, the flow scope visible for the subflow is a new one, and the subflow cannot access the flow scope of the parent flow.
![]() Caution Be careful when storing large objects in
Caution Be careful when storing large objects in flow or conversation scope. These scopes have relatively long life spans, which means that the data stored in them needs to be maintained for a long period of time. As an alternative to storing large objects in the flow or conversation scope, consider reloading those objects for every request and storing them in request scope.
Implicit Objects
Just as you have implicit objects in JSPs (scriptlets) and EL, you also have implicit objects defined by Web Flow. An implicit object is a shortcut to certain functionality that is frequently used (e.g., the HTTP request parameters). While you can access the request parameters through the javax.servlet.http.HttpServletRequest, both EL and Web Flow include a “shortcut” that gives direct access to the request parameter map. In EL, this implicit object is called param; in a Web Flow expression, you can use requestParameters.
In addition to data-related implicit objects, there are also references to key framework objects. For example, if you need the javax.servlet.ServletContext in a Web Flow expression, you can reference the implicit variable, externalContext, in the expression. The externalContext variable will indirectly expose the javax.servlet.ServletContext, as well as other context-related information. In this case, the expression would become as follows:
"#{externalContext.nativeContext}"
![]() Note You can also use these implicit objects from EL in your views (JSP). These objects are bound by Web Flow to the Servlet
Note You can also use these implicit objects from EL in your views (JSP). These objects are bound by Web Flow to the Servlet request scope. For example, using something like #{flowExecutionUrl} will resolve to the flowExecutionUrl implicit object that is bound to the Servlet's request scope.
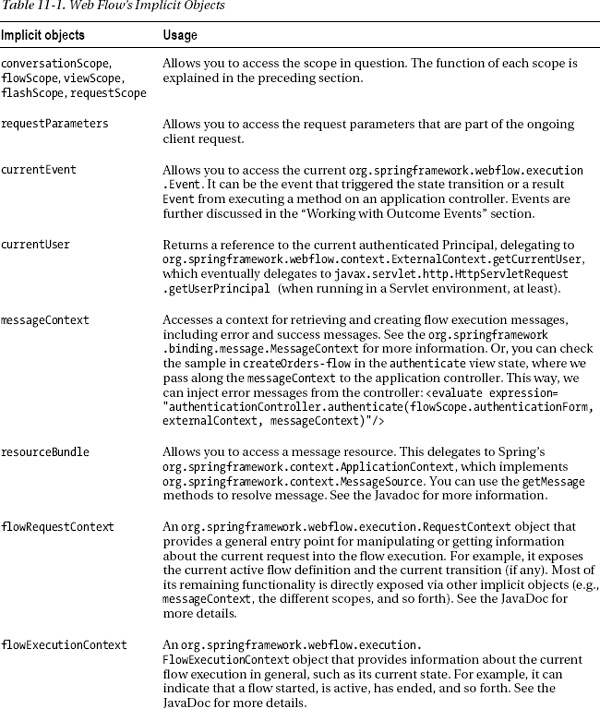
Table 11-1 outlines each implicit object that can be used in Web Flow expressions.

Enhancing the Bookstore
In the previous sections, we covered general Web Flow terminology in some detail. We needed to introduce these concepts prior to diving back into the code. Now that we have covered them, we are going to look at specific Web Flow features. We will do this by illustrating them with code and explaining them along the way.
In the previous chapter, we made our first pass at introducing a basic flow for ordering books. We did this with some basic web flow components that illustrated how easy it is to transform a given use case using Web Flow. Now we will continue adding functionality to and improving our sample application, illustrating and explaining various Web Flow features along the way. For example, the sample application as we left it in the previous chapter is not much of an application, yet. A lot of things are still missing, to name a few:
- There is no validation: It should not be possible to make an order when there is no book selected. The delivery date is also mandatory, and the site should trigger an exception when the user does not specify this date.
- There is no conversion: We mapped a
CategoryandBookin our form as aLongusing the identifier for each of these objects. It would be more elegant if we could map directly to aCategoryorBookfrom our domain.
In the following sections, we will address these and other shortcomings, gradually refactoring our sample application to show how you can use Web Flow to implement some real-world use cases. We will start from the very beginning, by revising our first step in the flow: selecting the book category.
Selecting the Category
To load our list of selectable categories, we used an on start action. This action loaded our categories into flow scope before entering the view state to render the selected category view. As we already explained in the “Different Web Flow Scopes” section, this is not the ideal place to store this information. The selectable categories are only required in the scope of the selected category view. We will see that a better alternative exists.
Also, we mapped the category using its id in our form instead of mapping it as a domain object. The next sections will show how we can change this.
On Start
We will still use the on start to initialize our OrderForm. Remember, the on start is executed automatically when the flow session starts. Even if you have a specific <start-state> attribute defined in your top-level flow element, Web Flow will always execute the actions defined in on-start when starting the flow, executing each action listed sequentially. Since we will not be loading our categories here, we deleted it, so that only the initialization of our form remains (see Listing 11-1).
Listing 11-1. The <on-start> Action that Initializes the Order Form
<on-start>

    <evaluate expression="orderController.initializeForm()"

              result="flowScope.orderForm"/>

</on-start>
The code initializing the form remains unaltered. There is one small detail worth noting: in the previous version of the com.apress.prospringmvc.bookstore.web.controller.OrderForm class, we deliberately kept all elements of the form simple. For example, the selected com.apress.prospringmvc.bookstore.domain.Book and com.apress.prospringmvc.bookstore.domain.Category Objects were not stored themselves, but we only stored their ids, and the order and delivery dates were stored as a java.lang.String type. From now on, we will use the normal data types and leave conversion and formatting to Web Flow and Spring MVC. Thus, we will change the delivery and order date to java.util.Date instead of java.lang.String. This changes our initialization of the OrderForm; and in Listing 11-2, you can see that we are now storing this information as a Date instead of a String.
Listing 11-2. Initializing an Instance of Our OrderForm with a Date Type
public OrderForm initializeForm() {

    OrderForm orderForm = new OrderForm();

    orderForm.setQuantity(1);

    orderForm.setOrderDate(new Date());

    return orderForm;

}
On Render
Now that we've removed the initialization of our categories (Category), we have to find another solution. The solution lies in the use of an on render action and using the request scope. It would be beneficial to load the categories right before our view gets rendered and remove them directly afterwards.
The on render action allows exactly that. Every action specified in the on render is executed right before the view state renders. Remember: When Web Flow uses PRG, the view state renders on the second request. The first request executes our controller and selects the view to render. When the second request comes in (the GET), our on render action executes. We then load the categories and put them on the request scope (see Figure 11-1 in the “Request Scope” section). Our view, which is rendered next, will be able to access the categories and render them (see Listing 11-3).
Listing 11-3. Loading the categories with on render
<view-state id="selectCategory" view="selectCategory" model="orderForm">

    <on-render>

        <evaluate

            expression="orderController.initializeSelectableCategories()"

            result="requestScope.selectableCategories"/>

    </on-render>

    <transition on="next" to="selectBooks" >

        <evaluate expression="orderController.

                              initializeSelectableBooks(flowScope.orderForm)"

                  result="flowScope.selectableBooks" />

    </transition>

    <transition on="cancel" to="end" />

</view-state>
Basically, we moved the evaluate expression from the on start action to the on render action and chose requestScope instead of flowScope.
The existing version of the code for retrieving the categories selects all categories and puts them in a map using the id as the key and the name as the value (see Listing 11-4).
Listing 11-4. The Existing Way of Loading the Categories
public Map<Long, String> initializeSelectableCategories() {

    Map<Long, String> selectableCategories = new HashMap<Long, String>();

    for (Category category : categoryService.findAll()) {

        selectableCategories.put(category.getId(), category.getName());

    }

    return selectableCategories;

}
We will now make this code more natural by simply returning a List holding types of our domain entity Category (see Listing 11-5). Later, we will look at how the conversion takes place.
Listing 11-5. The Category is Currently Loaded As-Is
public List<Category> initializeSelectableCategories() {

    return categoryService.findAll();

}
![]() Note Our
Note Our initialize method is refactored down to a single line of code; a good alternative would have been to simply call categoryService.findAll() directly from our flow.
In our page, we will no longer have a Map, but a list of Category objects. We need to change the <form:select>, so that the name is displayed as a label and the id as a value. We will still need the id (as the select value) to perform the conversion later on (see Listing 11-6).
Listing 11-6. The Form Select with an Extra itemLabel and itemValue
<form:select path="category" items="${selectableCategories}" itemLabel="name" itemValue="id"/>
![]() Note Instances of categories and books are the ideal candidates for caching. However, instead of caching them on any of the Servlet or Web Flow scopes (which end up on the user's session and would duplicate the values for each user), we cache them in the back-end, using the ORM's 2nd level cache. As you will see, there are
Note Instances of categories and books are the ideal candidates for caching. However, instead of caching them on any of the Servlet or Web Flow scopes (which end up on the user's session and would duplicate the values for each user), we cache them in the back-end, using the ORM's 2nd level cache. As you will see, there are @Cacheable and @Cache annotations on both the Book and Category entities. When executing queries on them, we also explicitly cache these queries. The ORM is configured to use Ehcache as cache implementation. This offloads redundant objects from the user's session and keeps them cached in the back-end, usable for the entire application. If you enable Hibernate (our JPA implementation) debugging, you will see that, after a server startup, categories are only fetched from the database once. They won't be fetched again until the next server restart or the cache expires.
Type Conversion
Now we have a list of selectable categories, which are in fact domain entity objects. At binding time, the id of category needs to be converted to a Category because that is the type we specified on our OrderForm object.
Listing 11-7. The Category In The OrderForm Is Now Our Entity Class and No Longer a Long
private Category category;
To enable type conversion, we have to go back to our Web Flow configuration. We already specified a flow builder service. Remember that the flow builder service allows us to customize certain Web Flow behavior. We gave an introduction to the flow builder possibilities in the previous chapter under the “Web Flow Configuration” section. We will now see how we can use the flow builder services to specify a custom conversion service. Listing 11-8 shows our current configuration; this file can be found in src/main/resources/spring/webflow-config.xml.
Listing 11-8. The Current Flow Builder Services Configuration
<webflow:flow-builder-services id="flowBuilderServices" view-factory

-creator="mvcViewFactoryCreator" development="true"/>
The conversion service is a bit a pain to explain because we feel it is rather more complicated than it should be. The conversion service is able to perform type conversion. For example, if your model has a field of type java.lang.Integer, the code that performs the binding from the request parameter to your model has to perform a conversion. Request parameters are always received as String, so someone has to convert java.lang.String into java.lang.Integer. Fortunately, a lot of basic converters are already there, and you might not even notice that a conversion took place.
Until now, Web Flow has had its own type conversion mechanism. Spring MVC uses a very similar, but incompatible, type-conversion system, so a custom converter written for Spring MVC should theoretically be rewritten for Web Flow. Fortunately, there is now an adapter that allows you to plug your Spring MVC-specific converters into Web Flow.
![]() Note Web Flow advises you to use the standard Spring MVC conversion mechanism and that you no longer write converters the “Web Flow way”. You can recognize such converters based on their package. The converter machinery you should be using is the one from the
Note Web Flow advises you to use the standard Spring MVC conversion mechanism and that you no longer write converters the “Web Flow way”. You can recognize such converters based on their package. The converter machinery you should be using is the one from the org.springframework.core.convert package and not the one from the Web Flow org.springframework.binding.convert package. The latter is the one used solely by Web Flow, and it should be considered deprecated for writing new, customized converters.
In our case, we will have to write a converter that is able to convert from a String (representing a numerical value from the select list) to a Category object. Let's begin by configuring the conversion service (see Listing 11-9), which is found in src/main/resources/spring/webflow-config.xml.
Listing 11-9. Defining the Conversion Service
<bean id="conversionService"

 class="org.springframework.binding.convert.service.DefaultConversionService">

    <constructor-arg ref="mvcConversionService"/>

</bean>
This code basically creates a Web Flow DefaultConversionService. The default conversion service registers all default converters, and these are able to convert all primitive types, such as Integer, Long, and so on. However, it also includes types such as java.math.BigDecimal and java.util.Date. The conversion services also give you a hook to register your own converters or register another conversion service as a delegate conversion service. The hook provided to register a delegate is used to pass along the core Spring MVC conversion service. The DefaultConversionService has explicit support for the “new style” of delegate conversion services. Whenever the conversion service is asked to convert a given type, it will look to see whether it can deal with the conversion itself (possibly using existing Web Flow converters). If it cannot, it then checks the converters available in the Spring MVC supplied conversion service.
For the record, the Spring MVC conversion service (org.springframework.format.support.DefaultFormattingConversionService) is configured automatically for us by Spring; it is one of the beans created automatically when using the @EnableWebMvc annotation in WebMvcContextConfiguration. The created Spring bean has the id of mvcConversionService. Next, we can pass on the reference for our conversionService to the flow builder services (see Listing 11-10). You can find this service in src/main/resources/spring/webflow-config.xml. This concludes the integration regarding conversion and formatting between Web Flow and Spring MVC. The two sides are now joined and will act as one big conversion or formatting service.
Listing 11-10. The Flow Builder Services with the Custom Conversion Service
<webflow:flow-builder-services id="flowBuilderServices" view-factory

-creator="mvcViewFactoryCreator" conversion-service="conversionService" development="true"/>
Finally, we still have to register our custom converter. In Chapter 5 (see the “Configuring Type Conversion” section), we introduced the generic com.apress.prospringmvc.bookstore.converter.StringToEntityConverter. We will reuse this converter, which will convert a java.lang.String (representing our id in this case) to a target entity, our Category domain object (see Listing 11-11). You can find this bean in com.apress.prospringmvc.bookstore.web.config.WebMvcContextConfiguration.
Listing 11-11. Defining the Category Converter
@Bean

public StringToEntityConverter categoryConverter() {

    return new StringToEntityConverter(Category.class);

}
As we have already seen, the MVC and Web Flow conversion/formatting services are linked. We will use the Spring core service for adding custom converters, which will then be available to Web Flow. In Listing 11-12, we will add our converter to Spring MVC's org.springframework.format.FormatterRegistry. The addFormatters method is called automatically by Spring, supplying the FormatterRegistry. This is explained in detail in Chapter 5's “Configuring Type Conversion” section.
Listing 11-12. Adding the Converter to the Registry in WebMvcContextConfiguration
@Override

protected void addFormatters(FormatterRegistry registry) {

    registry.addConverter(categoryConverter());

}
![]() Note If you pay close attention, you will notice that we are adding a converter to a
Note If you pay close attention, you will notice that we are adding a converter to a FormatterRegistry. As you will see, formatting is a specialization of conversion. The FormatterRegistry extends the org.springframework.core.convert.converter.ConverterRegistry, so you can add both converters and formatters to the registry. As a reminder, conversion and formatting is a part of core Spring MVC and is explained in detail in Chapter 5 (see the “Converters” and “Formatters” sections).
Type Formatting
A formatter is nothing more than the specialization of an org.springframework.core.convert.converter.Converter. Internally, formatters are transformed to an org.springframework.core.convert.converter.GenericConverter.1 This makes sense if you think about it; a formatter is a one-way converter, where you define the rules for how a certain object is visualized when rendered in the view.
By enabling the conversion service in Web Flow and coupling it to the Spring conversion service, we implicitly enable formatting via the Spring MVC conversion service. Any formatter registered with the service will also be useable by Web Flow.
We will have to customize the formatting of our delivery and order date. We don't have to register a specific converter or formatter because date formatting is available by default. However, we want a specific pattern, so we added the default Spring annotation for formatting dates and time to the definition of the fields in the OrderForm. This will steer the formatting process (see Listing 11-13).
____________
1 You can see this in the addFormatterForFieldType method in the org.springframework.format.support.FormattingConversionService.
Listing 11-13. Formatting the Delivery and Order Date in the OrderForm
@DateTimeFormat(pattern = "MM-dd-yyyy")

private Date deliveryDate;

@DateTimeFormat(pattern = "MM-dd-yyyy")

private Date orderDate;
Selecting Books and Delivery Options
We have to repeat the refactorings we performed in the previous part for our selecting books view state. In the previous chapter, we used an evaluate action in the next transition after transitioning to the selectBooks view state, as shown in Listing 11-14.
Listing 11-14. The Old Way: Initializing Books with an Evaluate Action
<transition on="next" to="selectBooks" >

    <evaluate

    expression="orderController.initializeSelectableBooks(flowScope.orderForm)"

    result="flowScope.selectableBooks" />

</transition>
We will remove the evaluate action just listed and replace it using the same on render mechanism (see Listing 11-15).
Listing 11-15. Using on render to Initialize Our Selectable Books
<view-state id="selectBooks" view="selectBooks" model="orderForm" >

    <on-render>

        <evaluate expression="orderController.

                              initializeSelectableBooks(flowScope.orderForm)"

                  result="flowScope.selectableBooks" />

    </on-render>

    <transition on="previous" to="selectCategory" />

    <transition on="add">

        <evaluate expression="orderController.addBook(flowScope.orderForm)" />

    </transition>

    <transition on="next" to="selectDeliveryOptions" />

    <transition on="reset" to="selectBooks">

        <evaluate expression="orderForm.resetSelectedBooks()" />

    </transition>

    <transition on="cancel" to="end" />

</view-state>
This makes the evaluate action in the on next transition of the previous selectCategory view state obsolete.
Likewise, we changed the select list, selectBooks.jsp, to render the title as item label and the id as item value because the objects stored for the selectable books will now be Book domain entities (see Listing 11-16). You can find the select books file in src/main/webapp/WEB-INF/view/createOrders/selectBooks.jsp.
Listing 11-16. Adding itemLabel and itemValue to the Book Form's Select
<form:select path="book items="${selectableBooks}" itemLabel="title" itemValue="id"/>
Finally, we also need to register a converter for the Book domain entity. This will be the exact same procedure as for the Category. Here we use the generic com.apress.prospringmvc.bookstore.converter.StringToEntityConverter. We just need to register the converter with the correct parameterization in our Spring MVC configuration class (located in com.apress.prospringmvc.bookstore.web.config.WebMvcContextConfiguration.java), as shown in Listing 11-17.
Listing 11-17. Defining the Book Converter
@Bean

public StringToEntityConverter bookConverter() {

    return new StringToEntityConverter(Book.class);

}
Next, we can continue with the specific refactorings for the select book and select delivery options of our application. This involves adding validation, so a user is notified when submitting a form with invalid or missing data. We will see that there are roughly three ways of performing validation: using the JSR 303 annotations, using validator methods in our form (or separate classes) that are recognized by Web Flow, and applying validation in our application controller itself.
Form Validation Using JSR 303 Annotations
You can configure Web Flow to perform JSR 303 validation (i.e., bean validation). For example, if you annotate your model with annotations from javax.constraints.validation (e.g., @Min or @Max), then validation will take place and error messages will be created for that path within your model. For this to work, you have to supply the flow builder services with an org.springframework.validation.beanvalidation.LocalValidatorFactoryBean.
Listing 11-18 defines the factory bean that will enable JSR-303 validation. You can find this bean in src/main/resources/spring/webflow-config.xml.
Listing 11-18. Defining the Bean Validator Factory Bean
<bean id="validator" class="org.springframework.validation.beanvalidation

.LocalValidatorFactoryBean" />
Next, we can complete our flow builder services configuration, as shown in Listing 11-19. You can find this configuration file in src/main/resources/spring/webflow-config.xml.
Listing 11-19. Enabling Bean Validation
<webflow:flow-builder-services id="flowBuilderServices" view-factory-creator=

"mvcViewFactoryCreator" conversion-service="conversionService" validator="validator"

 development="true" />
When this is all set, we can simply apply annotations on our form (see Listing 11-20), which is located in the com.apress.prospringmvc.bookstore.web.controller.OrderForm. For now, we will just use the validation for the quantity field. This is the field that a user can change when adding books to the order. The default value is 1, but the user can also add multiple books to the order directly.
Listing 11-20. Adding Validation Annotations
package com.apress.prospringmvc.bookstore.web.controller;


import javax.validation.constraints.Max;

import javax.validation.constraints.Min;

import javax.validation.constraints.NotNull;


@NotNull

@Min(1)

@Max(999)

private Integer quantity;
We could use bean validation for the other fields, as well. However, there are two reasons why this would be troublesome:
- First, the validation API is good at validating a single field, but we will also have to validate a combination of fields. For example, later on we will have to check that the entered delivery date is after the order date. The validation API has the group feature to validate fields in a group, but it is not possible to indicate a more complex relationship without writing a custom bean validator. Unfortunately, this is not something the bean validation supports out of the box. We will use one of the two other ways of validation (yet to be seen) to do this.
- Second, the problem with this validation setup is that the entire form gets validated as a whole, yet we only use a part of it for each step or our flow. Basically, this means that, when setting the
Categoryon the first page, all of the other validation annotations would be triggered, as well. If we were to put a@NotNullannotation above theBookinstance field, then we would get an error that noBookis selected when we select aCategory. A solution could be to divide the form into multiple smaller forms. But for now, we will validate the other fields in a different way. Also, note that thequantityfield does not suffer from this problem because we initialized its value to1. So, when selecting aCategory, thequantityfield will be validated, but it will be found valid because its value is1. Later, when the user can select the quantity in theselect bookspage, the validator will trigger an error when the user specifies a value that is not allowed.
![]() Note For JSR303 validations, you need the validation API (that contains the
Note For JSR303 validations, you need the validation API (that contains the javax.constraints.validation annotations) on your compile classpath. But at runtime, we also need a provider. Tomcat does not ship with one, so we are using the Hibernate Validator (which is also the RI, Reference Implementation, for JSR 303).2 We just have to put these validations on our classpath—but that's all we have to do because we previously configured Web Flow with the LocalValidatorFactoryBean. To define the dependency, we added it to the project's root gradle file (build.gradle in the samples root directory):
compile "org.hibernate:hibernate-validator:$hibernateValidatorVersion"

compile "javax.validation:validation-api:1.0.0.GA"
Form Validation Using the Web Flow Validator Method and Classes
The second way to perform validation is by implementing a method in the form of a "validateState" method in our model. This type of validation is detected by Web Flow purely by following naming conventions. The word “validate” is mandatory, while “state” is a placeholder that needs to be replaced by the id of state for which the validation should be applied to. Web Flow will execute the validation on post back to the defined state. So the validation is not executed the first time the view state is rendered, but when a postback is made (e.g., when a form is submitted).
In the example in Listing 11-21, the validation is triggered when we make a transition to the selectCategory state. We check that the event that triggered the transition is the next event. If the user were to click the cancel button, then we would not want to perform the validation. The org.springframework.binding.validation.ValidationContext is automatically injected by Web Flow. If we were to add an error code, then the code would be automatically resolved with the registered org.springframework.context.MessageSource (this code can be found inside the com.apress.prospringmvc.bookstore.web.controller.OrderForm).
Listing 11-21. Validating the Category
public void validateSelectCategory(ValidationContext context) {

    if (context.getUserEvent().equals("next")) {

        MessageContext messages = context.getMessageContext();

        if (category == null) {

            messages.addMessage(new

            MessageBuilder().error().source("category")

            .code("error.page.category.required").build());

        }

    }

}
A variation on this is to store the validation logic separately from your model in a validator class (see Listing 11-22). To do so, you have to follow more naming conventions for classname and the validation method. The class should be named modelnameValidator, while the method should be named validateState. In our case the classname would become OrderFormValidator, and the method would be the same one used previously in validateSelectShop. In the case of an external validator, you would also get the model as a parameter to the validate method and, optionally, the Spring MVC Errors object.
____________
Listing 11-22. The Separate Validator Class
@Component

public class OrderModelValidator{

    public void validateSelectShop(OrderForm orderForm, ValidationContext context,

 Errors errors) {
The final requirement is that the bean should be registered as a Spring bean. In an annotation-driven model like this one, you can simply add the @Component above the class definition and make sure the class will be picked up by the component scan.
![]() Note In the sample application, we have opted to store the validation together with the model, so you will not find an external
Note In the sample application, we have opted to store the validation together with the model, so you will not find an external OrderFormValidator. But feel free to experiment and try to move validation logic from the OrderForm to a separate validator.
Form Validation Using the Application Controller
The final validation method performs custom validation inside a controller method that is called by a Web Flow expression (see Listing 11-23). You can see an example of this in the validateDeliveryDate method of the com.apress.prospringmvc.bookstore.web.controller.OrderController, which is called right before finalizing the order on the select delivery options page (see Listing 11-24).
Listing 11-23. Calling the Validation Method on the Application Controller
<view-state id="selectDeliveryOptions" view="selectDeliveryOptions" model="orderForm">

    <transition on="previous" to="selectBooks" />

    <transition on="finish" to="end">

        <evaluate expression="orderController.validateDeliveryDate

            (flowScope.orderForm, messageContext)"/>

        <evaluate expression="orderController.placeOrder(flowScope.orderForm,

              externalContext.sessionMap.authenticatedAccount)"/>

    </transition>


    <transition on="cancel" to="end" />

</view-state>
Listing 11-24. The Validation Method on the OrderController
public Event validateDeliveryDate(OrderForm orderForm, MessageContext

     messageContext) {

    if (orderForm.getDeliveryDate() == null){

        MessageBuilder errorMessageBuilder = new MessageBuilder().error();

        errorMessageBuilder.source("deliveryDate");

            errorMessageBuilder.code("error.page.selectdeliveryoptions.

                deliverydate.required");

        messageContext.addMessage(errorMessageBuilder.build());

        return new EventFactorySupport().error(this);

    }


if (orderForm.getDeliveryDate().before(

        DateUtils.truncate(orderForm.getOrderDate(), Calendar.DAY_OF_MONTH))){

        MessageBuilder errorMessageBuilder = new MessageBuilder().error();

        errorMessageBuilder.source("deliveryDate");

        errorMessageBuilder.code("error.page.selectdeliveryoptions.

                                  deliverydate.in.past");

        messageContext.addMessage(errorMessageBuilder.build());

        return new EventFactorySupport().error(this);

    }

    return new EventFactorySupport().success(this);

}
The evaluate action for validating the delivery date is executed when a user clicks the finish button (triggering the finish transition) after entering the delivery options. The invocation occurs before the invocation to create the actual order. We pass along the form and messageContext (a Web Flow implicit object). Inside this, we use the message context to add a custom message when the validation fails, as you can see in the preceding code snippet.
You might have noticed that this method returns the org.springframework.webflow.execution.Event. This is in contrast to other methods we have called previously when using an evaluate expression. For example, the addBook method in the com.apress.prospringmvc.bookstore.web.controller.OrderController simply returns void.
When executing an expression, the result (if it isn't already an Event) is internally converted to an Event. These objects drive the transition, indicating whether the evaluation succeeded or failed (or any other java.lang.String based outcome). Also, these objects can optionally have objects as attributes associated with them.
When you do not need to trigger outcome conditions, there is no need to use an Event as a return value, and you can return the value as-is (or simply return void). Web Flow will do the conversion to a successful Event for you.
However, in this case we need to differentiate between a validation success and a validation failure. Both will render different results. In the first case, we want to proceed with the order-creation process; in the second case, we want to render the select delivery options page again to show the error message and let the user try again. We signal this explicitly with events. Note that we could have attached a result with the successful Event, which could then be bound using the result attribute of the evaluate action. We will discuss this later in this chapter's “Working with Outcome Events” section.
Showing Validation Messages
Finally, after adding validation messages with one of the three different approaches shown so far, we must still show them to the user. To do this, we can use the Spring MVC standard <form:errors> tag to do one of two things. First, we can render the messages for a specific path in our model. Alternatively, we can render all messages by specifying the wildcard for the path attribute.
It is important to realize that messages generated by all validation methods can be shown in this way. Whether a message is added by bean validation, Web Flow form validation, or using the org.springframework.binding.message.MessageContext in an application controller, a message will end up being shown with the <form:errors> tag. At this point, we are going to refactor all our input components within our pages to be followed with a <form:errors path="<name of the form field>"/>. This will enable us to show the validation message in case the validation fails for that field.
We will demonstrate this with the select delivery options page (see Listing 11-25) that can be found in the src/main/webapp/WEB-INF/view/createOrders/selectDeliveryOptions.jsp page. (The other two pages repeat the exact same process, so we won't bore you by showing those, as well.)
Listing 11-25. Refactoring the Select Delivery Options Page to Show Validation Messages
<form:form modelAttribute="orderForm" action="${flowExecutionUrl}">

    <table style="width: 100%">

        <tr>

            <td>

                <spring:message

code="label.page.selectdeliveryoptions.select.order.date"/>

            </td>

            <td>

                <form:input path="orderDate" disabled="true" />

            </td>

        </tr>

        <tr>

            <td>

                <spring:message

code="label.page.selectdeliveryoptions.select.delivery.date" />

            </td>

            <td>

                <form:input path="deliveryDate" />

                <span style="margin-left: 5px">

                    <form:errors path="deliveryDate" cssClass="error"/>

                </span>

        …
If we were to proceed without selecting a delivery date, the error message would be shown next to the field (see Figure 11-6).

Figure 11-6. Showing the Validation Message When the Delivery Date is Left Blank
The localization part of our custom error message comes from the default resource bundle included in our application. This has been explained in the Spring MVC chapters. For example, the key of the message shown in Figure 11-6 is used in the validateDeliverydate method of the OrderController class. It is used as “error code" to be added to the error message that is created. To refresh our memory, let's look at a snippet from the method that builds the error message:
MessageBuilder errorMessageBuilder = new MessageBuilder().error();

errorMessageBuilder.source("deliveryDate");

errorMessageBuilder.code("error.page.selectdeliveryoptions.deliverydate.required");
The message code in bold is specified in the resource bundle with base name, messages.properties. The resource bundle has the code as the key and the translation (which you can see in Figure 11-6) as its value.
![]() Note The resource bundles are physically located in the shared project bookstore-web-resources. There is one for the English language (
Note The resource bundles are physically located in the shared project bookstore-web-resources. There is one for the English language (messages_en.properties) and one for the Dutch language (messages_nl.properties). You can change the language dynamically by clicking the flags at the right end of the navigation bar.
In the case of bean validation messages, there is a standard resource bundle that is loaded by default. You can override these messages in your own resource bundle. The default resource bundle is part of the validation API's implementation. In our case, this is the RI (i.e., the Hibernate validator). If we were to open the Hibernate validator JAR file, we would see the message bundles (see Figure 11-7).

Figure 11-7. The hibernate validator jar containing the resource bundles
Opening the default message bundle, ValidationMessages.properties, would show the translations shown in Listing 11-26 for the @Min and @Max annotations (which we have used on the quantity property in our com.apress.prospringmvc.bookstore.web.controller.OrderForm).
Listing 11-26. The default validation API messages
javax.validation.constraints.Max.message= must be less than or equal to {value}

javax.validation.constraints.Min.message= must be greater than or equal to {value}
You can override these by specifying your own ValidationMessages.properties (with or without a language/country extension) in your application's classpath.
Overview
Before closing our first refactoring, we want to summarize the different things we have done so far. This will give you a complete code overview of our flow and the involved OrderController and OrderForm.
We started out by loading our categories and books using the <on-render> action. Next, we replaced the book and category references in our form with the real entity object. In order for this to work, we had to create and register two custom converters. Finally, we added validation to our flow, so that it is no longer possible to trigger application errors by not entering values for the mandatory fields. We also showed you that there are three ways for you to implement validation.
Listing 11-27 shows our createOrders-flow thus far; this can be found in src/main/webapp/WEB-INF/view/createOrders/createOrders-flow.xml.
Listing 11-27. The createOrders-flow file After Our First Refactoring
<on-start>

    <evaluate expression="orderController.initializeForm()"

     result="flowScope.orderForm"/>

</on-start>

<view-state id="selectCategory" view="selectCategory" model="orderForm">

    <on-render>

        <evaluate

            expression="orderController.initializeSelectableCategories()"

            result="requestScope.selectableCategories"/>

    </on-render>

    <transition on="next" to="selectBooks"/>

    <transition on="cancel" to="end" />

</view-state>

<view-state id="selectBooks" view="selectBooks" model="orderForm" >

    <on-render>

        <evaluate

           expression="orderController.initializeSelectableBooks

           (flowScope.orderForm)" result="requestScope.selectableBooks" />

    </on-render>

    <transition on="previous" to="selectCategory" />


    <transition on="add" >

        <evaluate expression="orderController.addBook(flowScope.orderForm)" />

    </transition>

    <transition on="next" to="selectDeliveryOptions" />

    <transition on="reset" to="selectBooks">

        <evaluate expression="orderForm.resetSelectedBooks()" />

    </transition>

    <transition on="cancel" to="end" />

</view-state>

<view-state id="selectDeliveryOptions" view="selectDeliveryOptions" model="orderForm">

    <transition on="previous" to="selectBooks" />

    <transition on="finish" to="end">

        <evaluate

         expression="orderController.validateDeliveryDate(flowScope.orderForm,

         messageContext)"/>

        <evaluate expression="orderController.placeOrder(flowScope.orderForm,

         externalContext.sessionMap.authenticatedAccount)"/>

    </transition>

    <transition on="cancel" to="end" />

</view-state>

<end-state id="end" view="redirect:/index.htm"/>
Similarly, Listing 11-28 shows our OrderForm, which can be found in com.apress.prospringmvc.bookstore.web.controller.OrderForm.
Listing 11-28. Our OrderForm after Our First Refactoring
package com.apress.prospringmvc.bookstore.web.controller;


import javax.validation.constraints.Max;

import javax.validation.constraints.Min;

import javax.validation.constraints.NotNull;


import org.springframework.binding.message.MessageBuilder;

import org.springframework.binding.message.MessageContext;

import org.springframework.binding.validation.ValidationContext;

import org.springframework.format.annotation.DateTimeFormat;


import com.apress.prospringmvc.bookstore.domain.Book;

import com.apress.prospringmvc.bookstore.domain.Category;

import com.apress.prospringmvc.bookstore.domain.Order;


public class OrderForm implements Serializable {

    private Map<Book, Integer> books = new HashMap<Book, Integer>();

    private Book book;


    @NotNull

    @Min(1)

    @Max(999)

    private Integer quantity;

    private Category category;

    @DateTimeFormat(pattern = "MM-dd-yyyy")

    private Date deliveryDate;

    @DateTimeFormat(pattern = "MM-dd-yyyy")

    private Date orderDate;

    // ---- Form validation methods triggered by webflow according to

            convention, see reference 5.10. Validating a model

    public void validateSelectCategory(ValidationContext context) {

        if (context.getUserEvent().equals("next")) {

            MessageContext messages = context.getMessageContext();

            if (category == null) {

                messages.addMessage(new

                MessageBuilder().error().source("category")

                .code("error.page.category.required").build());

            }

        }

    }

    public void validateSelectBooks(ValidationContext context) {

        if (context.getUserEvent().equals("next")) {

            MessageContext messages = context.getMessageContext();

            if (books.isEmpty()) {

                messages.addMessage(new

                MessageBuilder().error().source("books")

                .code("error.page.books.required").build());

            }
        }

    }

    public void resetSelectedBooks() {

        books.clear();

    }

…<omitted getters and setters for brevity>…
And Listing 11-29 shows our OrderController, which can be found in com.apress.prospringmvc.bookstore.web.controller.OrderController.
Listing 11-29. Our OrderController After Our First Refactoring
package com.apress.prospringmvc.bookstore.web.controller;


import javax.servlet.http.HttpSession;


import org.apache.commons.lang3.time.DateUtils;

import org.springframework.beans.factory.annotation.Autowired;

import org.springframework.binding.message.MessageBuilder;

import org.springframework.binding.message.MessageContext;

import org.springframework.stereotype.Controller;

import org.springframework.web.bind.annotation.RequestMapping;

import org.springframework.web.servlet.ModelAndView;

import org.springframework.webflow.action.EventFactorySupport;

import org.springframework.webflow.execution.Event;

import org.springframework.webflow.execution.RequestContextHolder;


import com.apress.prospringmvc.bookstore.domain.Account;

import com.apress.prospringmvc.bookstore.domain.Book;

import com.apress.prospringmvc.bookstore.domain.Category;

import com.apress.prospringmvc.bookstore.domain.Order;

import com.apress.prospringmvc.bookstore.domain.support.OrderBuilder;

import com.apress.prospringmvc.bookstore.service.BookstoreService;

import com.apress.prospringmvc.bookstore.service.CategoryService;


@Controller

public class OrderController {


    @Autowired

    private BookstoreService bookstoreService;


    @Autowired

    private CategoryService categoryService;


    @RequestMapping("ordersOverview.htm")

    public ModelAndView retrieveOrders(HttpSession httpSession) {

        List<Order> orders = bookstoreService.findOrdersForAccount((Account)

            httpSession.getAttribute(

            AuthenticationController.AUTHENTICATED_ACCOUNT_KEY));


        ModelAndView mov = new ModelAndView();

        mov.setViewName("ordersOverview");
        mov.getModel().put("orders", orders);


        return mov;

    }


    public OrderForm initializeForm() {

        OrderForm orderForm = new OrderForm();

        orderForm.setQuantity(1);

        orderForm.setOrderDate(new Date());

        return orderForm;

    }


    public List<Category> initializeSelectableCategories() {

        return categoryService.findAll();

    }


    public List<Book> initializeSelectableBooks(OrderForm orderForm) {

        return bookstoreService.findBooksByCategory(orderForm.getCategory());

    }


    public void addBook(OrderForm orderForm) {

        Book book = orderForm.getBook();

        if (orderForm.getBooks().containsKey(book)) {

            orderForm.getBooks().put(book, orderForm.getBooks().get(book) +

            orderForm.getQuantity());

        } else {

            orderForm.getBooks().put(book, orderForm.getQuantity());

        }

    }


    public Long placeOrder(final Account account, final OrderForm orderForm) {

        Order order = new OrderBuilder() {

            {

                addBooks(orderForm.getBooks());

                deliveryDate(orderForm.getDeliveryDate());

                orderDate(orderForm.getOrderDate()).account(account);

            }


        }.build(true);


        return bookstoreService.store(order).getId();

    }


    public Event validateDeliveryDate(OrderForm orderForm, MessageContext

                                                           messageContext) {

        if (orderForm.getDeliveryDate() == null) {

            MessageBuilder errorMessageBuilder = new MessageBuilder().error();

            errorMessageBuilder.source("deliveryDate");

            errorMessageBuilder.code("error.page.selectdeliveryoptions.

                                      deliverydate.required");

            messageContext.addMessage(errorMessageBuilder.build());

            return new EventFactorySupport().error(this);
        }


        if (orderForm.getDeliveryDate().

                before(DateUtils.truncate(orderForm.getOrderDate(),

                Calendar.DAY_OF_MONTH))) {

            MessageBuilder errorMessageBuilder = new MessageBuilder().error();

            errorMessageBuilder.source("deliveryDate");

            errorMessageBuilder.code("error.page.selectdeliveryoptions.

                                      deliverydate.in.past");

            messageContext.addMessage(errorMessageBuilder.build());

            return new EventFactorySupport().error(this);

        }

        return new EventFactorySupport().success(this);

    }

}
Setting Variables and Accessing Scopes
Ok, we've completed our first refactoring. Before going any further we would first like to introduce you to some other Web Flow features. In this section we will cover how you use flow variables and access the different Web Flow scopes using the implicit objects.
A scope is treated as a java.util.Map, so you just pass along a key for reading values out of a scope, as well as a key plus value for setting something on a scope. The expression language makes reading the scope straightforward. For example, here's what you do if you want to read the value with the myKey key from the flow scope and pass this value to an application controller:
expression="myApplicationController.someMethod(flowscope.myKey)"
Setting variables can be done using the <set> element. This element is valid in all five states (which we will cover in the upcoming sections), except one: the decision state. This element can also be used within transitions. The example in Listing 11-30 sets a literal value, someValue, on a flow scope with the myKey key through a flow start action. We could have used other scopes to put the value on (e.g., conversationScope or requestScope); however, not every scope would make a lot of sense or would be allowed. For example, view scope would yield an error because we are not yet in a view state, so no view scope exists. Finally, if we specify a literal value, you are forced to put it between single quotes. The value attribute is expecting an expression by default, meaning that the value of value attribute is automatically interpreted as an expression. (i.e., it is not required that we place them between “#{}”).
Listing 11-30. Setting a Value with a Literal Value on Flow Scope
<on-start>

    <set name="flowScope.myKey" value="'someValue'"/>

</on-start>
In addition to the <set> element, you can also set variables using the expression language in an evaluate action. Listing 11-31 shows how to store the result returned from executing an application controller method on flow scope. The expression contains the logic to be executed (in this case, it executes the someMethod method on the myApplicationController bean), passing the value retrieved from flow scope by using the myKey key as a parameter and storing the result in flow scope under the someMethodResult key.
Listing 11-31. Calling an Application Controller Method with a Parameter and Storing the Result on flow Scope
<evaluate expression="myApplicationController.someMethod(flowScope.myKey)"

results="flowScope.someMethodResult"/>
Flow Variables
A flow may declare one or more instance variables. These variables are allocated when the flow starts, and they are destroyed when the flow ends. The syntax for declaring them looks like this:
<var name="orderForm" class="com.apress.prospringmvc.bookstore.web.OrderForm"/>
The name is the key under which the created instance will be available on flow scope, while the class attribute is the fully qualified class name of the class to be instantiated. Web Flow creates an instance using the default (or parameterless) constructor of the class.
Note that Web Flow will create a Spring-managed bean from the created instance. In doing so, Spring will fully initialize the instantiated class, applying all applicable BeanPostProcessors. The instance will eventually be registered as a Spring bean with the application context. This means that you can use for example @Autowired annotations in the class. During initialization, these dependencies will be injected by Spring.
![]() Note The “Different Web Flow Scopes” section explains that the class you specify in the
Note The “Different Web Flow Scopes” section explains that the class you specify in the class attribute should implement java.io.Serializable because the object created is put on flow scope. This also counts for referenced objects not marked as transient. However, references to objects that hold no state (e.g., services, facades, DAOs, and so on) should be declared as transient. Java's transient keyword excludes these objects from the Java serialization process. Such objects do not need to be serialized because they do not contain any state. If these instances are autowired beans (using @Autowired), then Spring will make sure they are rewired when the flow resumes.
The <var> element is primarily used to create instances of classes before the flow starts, and these classes are used in the scope of that flow execution. You can only use this element on top of the flow definition. In comparison, the <set> element is better suited for setting or moving values between already existing instances. For example, if you want put a given request parameter value on a search criteria object, you could use the <set> element. In the name attribute, you would refer to the key that represents the search criteria object. In the value attribute, you would refer to the requestParameters implicit object, which would then allow you to access the parameter with the desired name (e.g., requestParameters.myParam).
Accessing Scoped Variables from Views
As we have seen, there is an implicit object available for each of the Web Flow scopes that you can use to reference the scope from within expressions inside your flow. As we have already said, Web Flow uses Spring Expression Language (Spring EL). The Spring EL context is modified by Web Flow, so that these implicit objects are made available.
From the moment we enter our view (in our case, a JSP), we will be indirectly using Unified Expression Language (Unified EL). What happens next is that Web Flow will make these implicit objects available via the Servlet request scope. For example, in our JSP we can still use #{flowExecutionUrl}. The Unified EL will scan each Servlet scope and find the flowExecutionUrl key on the Servlet request scope. However, scope-related implicit objects (e.g., flowScope and flashScope) are not available. At this point, you might wonder how you can access information that you put on any of the Web Flow scopes from within your view.
What Web Flow does is put every object from every Web Flow scope directly onto the Servlet request scope before the view is rendered. This means two things:
- You can access any object from any of the Web Flow scopes in your flow directly from the Servlet
requestscope. For example, if you have an object under keyxonflowscope within your flow, you can access that using the expression#{x}in your JSP (as noted previously, the Unified EL scans the different Servlet scopes and will resolve this from the Servletrequestscope). Likewise, if you had a variableyonconversationscope, you would access it the same way because it is also put on Servletrequestscope:#{y}. - You have to be careful with the names of the keys. If you have a value with key
xboth onflowandconversationscope, only one of the two will be present in the Servletrequestscope (one will be overwritten). Normally, this would not present a problem because having the same key on different scopes does not make much sense.
Programmatically Accessing Scopes
In addition to accessing scopes from expressions using implicit objects, we can also access each Web Flow scope using the org.springframework.webflow.execution.RequestContext object in our code. This object has a getter for each scope. Likewise, we can use the org.springframework.webflow.context.ExternalContext object for accessing Servlet scopes. We can obtain a reference to the RequestContext or ExternalContext object by injecting them using an expression. For example, flowRequestContext and externalContext are both implicit objects, referring to the RequestContext and ExternalContext interfaces, respectively.
If we have an evaluate action, we can use an expression like this:
<evaluate expression="myApplicationController.someMethod(flowRequestContext)"/>
The someMethod method accepts the RequestContext as a parameter (see Listing 11-32).
Listing 11-32. Injecting the RequestContext with an Expression
import org.springframework.webflow.execution.RequestContext;


public void someMethod(RequestContext requestContext) {

    requestContext.getConversationScope();

}
There are also two thread-bound holder classes that give you instant access to the RequestContext and ExternalContext:
RequestContextHolder.getRequestContext()—see Listing 11-33ExternalContextHolder.getExternalContext()—see Listing 11-34
Listing 11-33. Accessing the Web Flow Scopes
import org.springframework.webflow.execution.RequestContext;

import org.springframework.webflow.execution.RequestContextHolder;


RequestContext requestContext = RequestContextHolder.getRequestContext();

requestContext.getFlowScope();

requestContext.getFlashScope();

…
Listing 11-34. Accessing the Servlet Scopes
import javax.servlet.http.HttpServletRequest;

import javax.servlet.http.HttpSession;


import org.springframework.webflow.context.ExternalContext;

import org.springframework.webflow.context.ExternalContextHolder;


ExternalContext externalContext = ExternalContextHolder.getExternalContext();


//Shortcut for respectively accessing Servlet session map and request map

externalContext.getSessionMap();

externalContext.getRequestMap();


//We can also retrieve the HttpServletRequestObject itself

HttpServletRequest httpServletRequest

  =(HttpServletRequest)externalContext.getNativeRequest();
Controlling Action Execution
We've already seen three ways of controlling the execution of Web Flow actions: on transition, on start, and on render. However, there are other ways to execute these actions, all of which have some specifics that govern when they execute their contained actions. These conditions are summed up with a detailed overview in the upcoming sections.
Each of these elements can also have three sub-elements; these are described in the “Controlling Action Execution: Sub-elements” section.
<on-start>
The <on-start> element executes one or more actions when the flow starts. The actions contained by this element will only be executed once. When multiple actions are specified, the execution of the next action will depend on the success of the previous action (if one action fails, the next is skipped and an error is thrown). Actions will be executed in the order they are defined in the flow.
There can be only one <on-start> for an entire flow. If a flow has one or more parent flows with <on-start> elements, the content is merged into one <on-start> in the merged flow (we will discuss flow inheritance further in Chapter 12).
This action is useful for executing the overall initialization of the flow execution/session. In our sample, we used it to initialize our form with some defaults.
<on-end>
The <on-end> element is the counterpart of <on-start>, and the same rules apply. The actions defined herein are the last ones executed before the flow ends. If the end state of a flow has an <on-entry> (see below), then that <on-entry> is executed before the <on-end> executes.
If a flow throws an error before reaching the end of the flow, <on-end> is not executed. Do not confuse <on-end> with a Java finally block. There is no guarantee that the <on-end> will be executed. For example, assume a given flow enters a certain view state and renders a view to the user's browser. At this point, the flow execution (i.e., the one living in the web container) is paused. The user can now decide to trigger a new event that continues to converse with that flow execution. However, the user can also decide to navigate to another page (or another flow), leaving the current flow execution as-is. When the maximum number of concurrent executions is reached, Web Flow will start to clean up the oldest flow execution. If our given flow execution is the oldest, it is cleaned up; but in that case, the <on-end> element will not be triggered. It is only triggered when the flow execution ends normally (after hitting an end state).
This element is especially useful in a flow with multiple end states where certain logic needs to be executed when the flow ends. Without this element, the logic needs to be repeated for each end state, but it can now be placed in a single on end. This will ensure that the required logic is executed, no matter which of the different end states terminated the flow.
<on-entry>
The <on-entry> element can be applied on all five states: view, action, decision, subflow, and end state. The action specified by the <on-entry> element is executed every time the state is entered.
However, this is only true when the state is explicitly entered. For example: when you omit the to attribute in a transition (nested in a view state), you remain in the same view state (i.e., the view state will be re-rendered). However, the <on-entry> will not be triggered in that case. There must be an explicit transition to a state in order to execute the <on-entry>.
In other words, you need the to attribute to be specified to trigger <on-entry> (or <on-exit>, as we will see in the next section). The state to which the to attribute refers is of no importance; this holds true whether it is the same state where the transition is defined or another state altogether. For example, in the case of a view state, if a transition returns to the same view state (explicitly specifying the to attribute), then the <on-entry> will be executed again.
If we were to place an <on-entry> in the selectBooks view state of the createOrders-flow (see Listing 11-15), then it would be executed every time we trigger the reset transition. However, it would not be executed when we trigger the add transition because it does not explicitly transition back to the selectBooks view state (it has no to in the transition).
<on-exit>
The <on-exit> element is executed whenever a state is exited. This element can be applied on the following states: view, action, decision, and subflow. However, it cannot be applied on the end state.
The action specified by the <on-exit> is executed every time the state is exited. This also applies when a transition occurs to the same state; in that case, the state is exited and entered again if the to attribute is specified (the same rules apply to the <on-exit> element that apply to the <on-entry> element). Now let's extend the <on-entry> example we gave before. If we were to add an <on-exit> in the selectBooks view state of the createOrders-flow (see Listing 11-15), then executing the reset transition would trigger the <on-exit>. In that case, we would exit the selectBooks view state to enter it again.
<on-render>
The <on-render> element is applicable on only one of the five states: the view state. As discussed in the Chapter 10, Web Flow uses a two-phase approach in processing requests (Post Redirect Get). An expression in a transition is executed in the POST phase. The <on-render> element is executed right before the view is rendered, in the GET phase.
When dealing with large result sets, we can benefit from this behavior by loading them into request scope right before the view renders. We already seen this in action in this chapter, when we covered the first phase of refactoring the sample application (see the “On Render” section earlier in this chapter).
Controlling Action Execution: Sub-elements
Each of the previously described elements supports three sub-elements:
- evaluate
- set
- render!
You're already familiar with the evaluate action. It accepts a (by default SpEL) expression and executes it. Optionally, you can store the result on a scope with a certain key using the result attribute, and you can specify the result type if you require the result to be of a certain type (using the result-type attribute). If so, a conversion is attempted; and if no converter is applicable, a conversion exception is thrown. The expression can return the result object directly or wrap it in an org.springframework.webflow.execution.Event class to indicate different outcome states, as required. We discuss events further in the “Working with Outcome Events” section.
As explained in “Setting Variables and Accessing Scopes” section earlier in this chapter, the <set> element allows you to set something on a given scope. You can specify a name and value, which are respectively the key under which the variable will be known and the value bound to it. The value can be an expression. Optionally, you can require the result to be of a certain type. If the value is not of the required type, a conversion is attempted; and if no converter is applicable, then a conversion exception is thrown.
The render element is somewhat special. It supports a fragments attribute that takes the id of a fragment to be rendered. But what is a fragment? To make use of these features, you need Tiles. When configuring Tiles, you define the parts that fill up your template. A fragment refers to the name of such an attribute or definition. It allows you to partially render a part of the page composition. When a page consists of multiple parts (each identified by a tiles attribute), you can name the part in the fragment that you specifically want to re-render. All the other content of the page remains untouched. This allows for a partial page update in the browser. For this to work, it requires some special configuration on both the server and client sides. Also, it will only work for Ajax requests. When doing a normal request, specifying the <render> action will have no effect. We will further discuss this in the “Web Flow AJAX Support” section in Chapter 12.
Global Transitions
As we have seen, a transition may take the user to another view, or it may simply execute an action and re-render the current view. In the next chapter, we'll also see how a transition may request the rendering of parts of a view called “fragments” when handling an Ajax event. Until now, we have only seen transitions in states. These transitions are local to that specific state. To be able to trigger them, you have to be in that given state.
In addition to transitions defined in a particular state, a flow can also have global transitions. When an event occurs, if Web Flow cannot find any matching transitions in the current state of the flow, it will try to find a matching global transition. Global transitions have to be defined at the end of the flow. See the flow structure figure in Chapter 10 (see Figure 10-1) for its exact location within the flow.
You may find that some transitions are duplicated in several view states. With global transitions, you can now define them in one place. After that, each state will be able to execute that transition as if it were directly part of the given state. The most common example of this is a Cancel button that terminates the flow, but which might be present on each step of the flow.
To define a global transition, just take the transition out and nest it within the <global-transitions> element, as shown in Listing 11-35.
Listing 11-35. Defining a Global Transition
<global-transitions>

     <transition on="cancel" to="endCancel" />

</global-transitions>
Subflows
Subflows give you an alternative way to structure your flows. As it turns out, one of the strong points of Web Flow (which we haven't really discussed until now) is its support for composition and modularity.
Composition allows you to combine different flow definitions to build a more complete definition. To do this, you reuse existing definitions, which saves you code duplication. In the next chapter, which is on advanced Web Flow, you will see this in practice using inheritance.
If you design for modularity, you will be able to treat certain parts of your flow as separate modules. This also promotes reuse, as you will be able to refer to those modules from other parts in your application without having to duplicate code. In this section, we will look at subflows, a Web Flow technique that will help you in accomplishing such reuse.
As is true for any object-oriented language, you need some kind of design. The design will cost you a little extra effort, but this feature will be a (very) important aspect of your project. For example, it will dictate how manageable your application will be in the near future.
Whereas in Java we could write everything in a single class or even in a single method, we all know that this would turn into an unworkable project in less than a day. Therefore, we try to apply good design principles because we know we will benefit from doing so in the long run. It will make our project easier to test and our code easier to read. It will also improve the quality of our code and make it easier to extend without spending weeks of refactoring.
This principle also applies to flows. Flows don't contain real Java code, but they do replace (or accommodate) your application controllers, which are an important part of the logic inside your flows. A good design in your flows makes them easy to read, easy to refactor, and, above all, reusable.
![]() Note Web Flow 1 included a feature called inline flows, which is a flow that is inline with, or embedded inside, another top-level flow. Such a flow does not need to be registered with Web Flow separately (you have to provide the flow id yourself inside the
Note Web Flow 1 included a feature called inline flows, which is a flow that is inline with, or embedded inside, another top-level flow. Such a flow does not need to be registered with Web Flow separately (you have to provide the flow id yourself inside the <inline-flow> flow element). The best way to compare an inline flow is to a private Java nested class (or a private inner class, if you like). Inline flows are no longer supported in Web Flow 2. If you must migrate such flows, the advised action is to simply move them to a top-level flow definition and register them with a flow id in the flow registry. The flow id should be equal to the id attribute of the <inline-flow> element. Or, you can use the flow definition update tool to do this for you. We will explain how to use this tool in the “Web Flow 1 Migration” section in Chapter 12.
A subflow is no different than a normal flow, which we've already covered. It is more like a concept. As we will see in the next section when we continue refactoring our sample application, calling a subflow requires a special state and some consideration about passing along state between the parent flow and the subflow. The flow that includes the subflow is referred to as the parent flow. The subflow is sometimes also referred to as the child flow.
In short: Subflows enable you to move parts of a flow contained in one flow (flow-x) to another top-level flow (flow-y). Next, you can point from flow-x to flow-y using the <subflow-state> element in flow-x; this enables you to execute the parts that you moved to flow-y. This refactoring does not influence the behavior of your flow (or your application altogether), but it has an impact on your flow design.
By doing this, you promote reuse. When you have a piece of flow logic that is required in multiple flows, you can extract that logic, place it in another top-level flow, and then delegate to that flow as a subflow in the other flows.
You can compare this feature to delegation in Java. When you have some logic in different classes that does the same thing, you extract it, put it in a separate class, and call that from within the classes you extracted the logic from. You can apply the same pattern with flows; simply extract the common parts and put them in a separate flow. When changes are required, you only need to make them once, instead of changing them separately in every flow.
As noted previously, it is important to understand that a subflow is no different than a normal flow. In fact, you don't create subflows per se; you just create a normal flow. You cannot determine by looking at a flow whether it is a subflow. A subflow should be registered as a normal flow, and the same rules apply.
In Figure 11-8, both flow-x and flow-y are normal flows. Both can be started like any normal flow. However, flow-y is also included as a subflow in flow-x. So, from the point of flow-x, flow-y is considered a subflow.

Figure 11-8. Flow-x starts as a top-level flow and calls another flow (flow-y), which becomes its subflow.
When you include a subflow in your flow, that flow can itself delegate to a subflow and so forth. There is no hard limit defined for how many levels of subflows can exist.
![]() Note As we have seen, a subflow is defined as a normal top-level flow in its own flow definition XML. We speak about a flow being a subflow from the moment it is included in another flow. However, because it is a normal flow, you can still start it like any other normal top-level flow. However, in most cases you will design a flow specifically for use as a subflow; hence, starting it directly without the context of the parent flow would not make much sense. Nevertheless, there exist scenarios where it might make sense for a given flow to be started as a top-level flow from one part in your application, but also to be included as a subflow in another part.
Note As we have seen, a subflow is defined as a normal top-level flow in its own flow definition XML. We speak about a flow being a subflow from the moment it is included in another flow. However, because it is a normal flow, you can still start it like any other normal top-level flow. However, in most cases you will design a flow specifically for use as a subflow; hence, starting it directly without the context of the parent flow would not make much sense. Nevertheless, there exist scenarios where it might make sense for a given flow to be started as a top-level flow from one part in your application, but also to be included as a subflow in another part.
Further Enhancing the Bookstore
We will continue our refactoring effort with the elements we have discussed in the previous sections. So far, we have not added any security to our application. In the previous chapter, we explained that, once you enter the application, you are automatically logged in. We did this to simplify things. However, we will now replace the login process with a traditional login page. We will also require that the user be logged in prior to making an order. And while we will dedicate a separate upcoming chapter to security (Chapter 13), in this section we'll take a first look at security by creating our own home-grown security mechanism. We will use this to illustrate several aspects of flows, including subflows and the remaining states that have not yet been covered.
Until now, a user was automatically logged in as “jd” when using the application; this happened behind the scenes using the com.apress.prospringmvc.bookstore.web.AuthenticationSessionListener. This is a javax.servlet.http.HttpSessionListener that will authenticate user “jd” programmatically from the moment a new javax.servlet.http.HttpSession is started. You can check out the implementation if you want, but it is of no importance to our explanation here. It was required in the previous sample to be able to add orders to a user (you must be logged in to be able to add an order and view existing orders).
In this chapter's sample, we've removed the listener because we will be implementing our own security mechanism. Let's review the altered flow shown in Figure 11-9. The numbered steps in the diagram are described in Table 11-2.
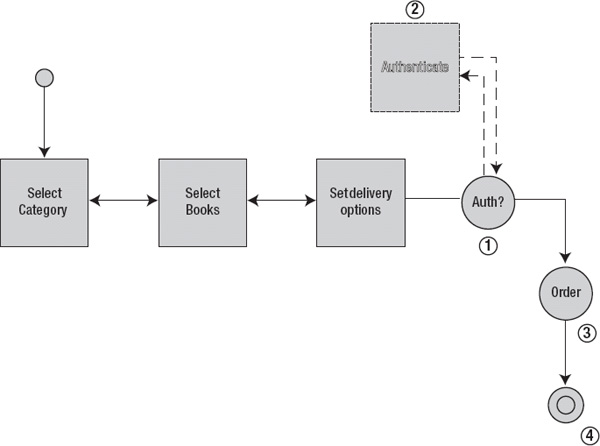
Figure 11-9. The revised flow from our book store application that we will refactor

Implementing Authentication as a Subflow
Our first action is to implement a flow that is able to capture the username and password from a page and verify its authenticity. To do this, we need the following:
- A page and form to capture the username and password; our login page
- An application controller method to verify the username and password and mark our user as authenticated
- A flow which will manage the navigation and act as glue between the login page and our application controller. We will include this flow as a subflow. This flow must be able to
- Render the login page after being started
- Perform the authentication by calling the appropriate method on the application controller
- Indicate that authentication has succeeded. If the authentication failed, we would remain inside the subflow, showing a message and offering the user another chance to enter the correct credentials
- Indicate that we want to go back to the previous page, in case the user decided not to place the order at this time
We'll first start with the flow. Listing 11-36 shows the flow definition. We call our flow the authentication-flow.xml and place it in this directory: src/main/webapp/WEB-INF/view/authentication. We will see in a minute how we can include this flow as a subflow.
Listing 11-36. The authentication-flow
<on-start>

    <evaluate expression="authenticationController.initializeForm()"

        result="flowScope.authenticationForm" />

</on-start>

<view-state id="authenticate" view="login" model="authenticationForm">

    <transition on="authenticate" to="authenticationOk" >

        <evaluate

                expression="authenticationController.authenticate(

                flowScope.authenticationForm, externalContext,

                messageContext)"/>

    </transition>

    <transition on="previous" to="previous" bind="false"/>

</view-state>

<end-state id="previous"/>

<end-state id="authenticationOk"/>
The subflow looks like any other flow. When it starts it will call initializeForm on our AuthenticationController which will put a new instance of the com.apress.prospringmvc.bookstore.web.controller.AuthenticationForm on flow scope. This form will be used to capture the username and password submitted from the login page.
public AuthenticationForm initializeForm() {

    return new AuthenticationForm();

}
Next it will proceed by entering the view state, which eventually renders the login page.
When the authentication transition is executed, it will invoke the authenticate method on our com.apress.prospringmvc.bookstore.web.controller.AuthenticationController. We will discuss this method later on in this section.
Finally there are two end states to let the caller of the sublow differentiate between going back to the previous screen or continuing processing because authentication succeeded. If authentication would fail, we remain inside the subflow, show a message that indicates that the user provided bad credentials and should try to login again after altering them.
Next, we build our login page (login.jsp) in the same folder as our flow; thus, it will be located in src/main/webapp/WEB-INF-view/authentication/login.jsp (see Listing 11-37).
Listing 11-37. The Authentication Page Located in authentication/login.jsp
<spring:url value="/authenticate.htm" var="authenticate" />

<form:form modelAttribute="authenticationForm" action="${flowExecutionUrl !=

           null ? flowExecutionUrl  : 'authenticate.htm'}" method="POST">

    <table style="width: 100%">

        <tr>

            <td>

                <spring:message code="label.page.login.username" />

            </td>

            <td><form:input  path="username" disabled="false" />

                <form:errors cssClass="error" path="username"/>
            </td>

            <td>

                <spring:message code="label.page.login.password" />

            </td>

            <td>

                <form:password showPassword="false" path="password" />

                <form:errors cssClass="error" path="password"/>

            </td>

        </tr>

        <tr>

            <td colspan="4">

                <form:errors cssClass="error"/>

            </td>

        </tr>

    </table>

    <div align="right" style="margin-bottom: 20px; margin-top: 10px" >

        <button type="submit" id="previous" name="_eventId_previous">

            <spring:message code="label.page.login.previous"/>

        </button>

        <button type="submit" id="login" name="_eventId_authenticate">

            <spring:message code="label.page.login.login"/>

        </button>

    </div>

</form:form>
The first thing to notice is the value of the form's action attribute:
${flowExecutionUrl != null ? flowExecutionUrl : 'authenticate.htm'}
We refer to the authentication page from two places in our application. The first reference occurs when clicking directly on the login link in the navigation bar. When clicking the login link in the navigation bar, we navigate to chapter11-bookstore/login.htm, which renders the webapp/view/authentication/login.jsp page (as can be seen in Listing 11-38). In that case, we don't start a flow, but navigate directly to the login page using plain Spring MVC. There is also no need for a flow because, in this scenario, the authentication process only consists of a single page. This is useful if the user wants to login directly from the main page.
Since there is no flow active, the else of our conditional operator is used for the form's action attribute: when clicking the Login button (after filling in username and password), the form will submit to authenticate.htm. In that case the first @RequestMapping will be executed of the AuthenticationController, as shown in Listing 11-38. Executing this application controller method will retrieve the submitted username and password bound to the AuthenticationForm and authenticate the user.
Listing 11-38. Using Spring MVC to Navigate and Perform the Authentication
// ----- Spring MVC logic


    public AuthenticationForm initializeForm() {

        return new AuthenticationForm();

    }


    @RequestMapping("login.htm")

    public ModelAndView authentication() {

        ModelAndView mov = new ModelAndView();
        mov.setViewName("login");

        mov.addObject("authenticationForm", initializeForm());

        return mov;

    }


    @RequestMapping(value = "authenticate.htm", method = RequestMethod.POST)

    public ModelAndView authentication(@ModelAttribute AuthenticationForm

        authenticationForm, Errors errors, ModelAndView mov,

        HttpSession httpSession) {

        try {

            authenticate(authenticationForm, httpSession);

            mov.addObject("authenticationOk", "true");

            mov.addObject("username", authenticationForm.getUsername());

            mov.setViewName("main");

        } catch (AuthenticationException authenticationException) {

            errors.reject(LOGIN_FAILED_KEY);

            mov.setViewName("login");

        }


        return mov;

    }

    @RequestMapping(value = "authenticate.htm", params = "_eventId_previous",

                     method = RequestMethod.POST)

    public ModelAndView previous(ModelAndView mov) {

        mov.setViewName("main");

        return mov;

    }
The second place from which we refer to the authentication page occurs in our authentication-flow, by executing the authenticate transition as we have already seen in Listing 11-36. As we will see in a minute, we include the authentication-flow as a subflow of our createOrders-flow. When the user wants to create an order, but is not yet authenticated, she is redirected to the login page first.
When performing the login being in an active flow, the then of our conditional operator is executed (as shown in Listing 11-37) and the action attribute of the form will redirect back to our authentication-flow using the flowExecutionUrl as a callback URL. To discover whether our authentication page was loaded directly from Spring MVC or from our authentication-flow, we check whether there is a flowExecutionUrl. If there is, then we know it is loaded from within the authentication-flow (so we post back to flowExecutionUrl); else, we know our authentication page was loaded directly from Spring MVC, and we post back to authenticate.htm.
The second thing to notice in Listing 11-38 is that there are the two input fields (username and password) being bound to the authenticationForm. As seen in Listing 11-39, we have <form:form modelAttribute="authenticationForm"…>, which indicates that the form we are using is the authenticationForm. Next, we declare the path within that form for each input text:
<form:input path="username"… >
The authenticationForm is used both from our AuthenticationController for Spring MVC, as well as from our authentication-flow. The latter can be seen in Listing 11-35 in the <view-state>:
<view-state id="authenticate" view="login" model="authenticationForm">
Finally, we also have two buttons: login and previous. The first button starts the authentication process, while the second returns the user to the previous page. When the login button is clicked, the form is simply submitted to the authentication method in case the page was loaded by Spring MVC. The method executed is the one with the annotation, as seen in Listing 11-38:
@RequestMapping(value = "authenticate.htm", method = RequestMethod.POST)
If the previous button is clicked, then the last request mapping in Listing 11-40 is executed:
@RequestMapping(value = "authenticate.htm", params = "_eventId_previous",

                method = RequestMethod.POST)
The distinction is made based on the presence of the _eventId_previous parameter. If present, the last @RequestMapping is invoked (because it has the params = "_eventId_previous" attribute), and the main page is rendered.
If the authentication page was loaded by Web Flow, the eventId present in the name of the button will determine which transition to execute. When the button with name _eventId_authenticate is clicked, then the authenticate transition will execute. If the button with name _eventId_previous is clicked, then the previous transition will execute. Listing 11-39 shows the authentication form located at com.apress.prospringmvc.bookstore.web.AuthenticationForm holds the username and password.
Listing 11-39. The AuthenticationForm
public class AuthenticationForm implements Serializable {

    private String username;

    private String password;


    public String getUsername() {

        return username;

    }

    public void setUsername(String username) {

        this.username = username;

    }

    public String getPassword() {

        return password;

    }

    public void setPassword(String password) {

        this.password = password;

    }

}
Because there is an entry point for Spring MVC to start the authentication process (i.e., the second @RequestMapping method in our AuthenticationController—see Listing 11-38), there is also a separate entry point for our authentication-flow. This method will be executed when the login button is clicked and the authenticate transition is executed. This transition is the first method seen in Listing 11-40. The second method is a shared method that is used from the Spring MVC entry point as the Web Flow entry point.
Listing 11-40. The authenticate Method for Web Flow in our AuthenticationController
// ---- POJO logic

public Event authenticate(AuthenticationForm authenticationForm,

                          MvcExternalContext externalContext,
                          MessageContext messageContext) {

    try {

        authenticate(authenticationForm, ((HttpServletRequest)

        externalContext.getNativeRequest()).getSession());

    } catch (AuthenticationException authenticationException) {

            messageContext.addMessage(new

            MessageBuilder().error().code(LOGIN_FAILED_KEY).build());

            return new EventFactorySupport().error(this);

    }

    return new EventFactorySupport().success(this);

}


// ---- Helpers

private void authenticate(AuthenticationForm authenticationForm, HttpSession

                          httpSession) throws AuthenticationException {

    Account account = accountService.login(authenticationForm.getUsername(),

                       authenticationForm.getPassword());

    httpSession.setAttribute(AUTHENTICATED_ACCOUNT_KEY, account);

}
As everything is set now, we can include our authentication flow as a subflow from our createOrders-flow. We can do that using the <subflow-state> element. Figure 11-10 shows the different attributes and elements that are possible for this element.

Figure 11-10. The different attributes and elements of the subflow state
You'll learn more about many of these elements in various places in this book. General elements such as <on-entry> and <on-exit> are discussed in the “Controlling Action Execution” section; <transition> has the same meaning as when it was introduced for the view state; <exception-handler> will be discussed in depth in Chapter 12; <secured> will be introduced in Chapter 13; input/output will be covered later in this chapter; the parent attribute will be covered in Chapter 12 when we discuss inheritance; and the subflow-attribute-mapper will be covered later in this chapter when we look at subflow input/output mapping.
The subflow state we declared for calling the authentication flow can be seen in Listing 11-41.
Listing 11-41. Declaring the subflow
<subflow-state id="authenticate" subflow="authentication">

    <transition on="authenticationOk" to="placeOrder"/>

    <transition on="previous" to="selectDeliveryOptions"/>

</subflow-state>
The subflow attribute refers to the id of a registered flow. As explained before, a subflow is a normal flow, so the id you specify there would be the id that you would use to launch a flow as a top-level flow within your application.
The transition on attribute of the <subflow-state> element should match one of the end state ids of the subflow. This way, the subflow can tell the parent flow which state to transition to, depending on which end state was executed on the subflow. If the subflow were to end with the end state that had the previous id, then the parent flow (our createOrders-flow) would transition back to selectDeliveryOptions. However, if our subflow were to end with an end state with the authenticationOk id, then we would continue to the placeOrder state.
We still don't have everything we need to be able wire everything together. In our createOrders-flow, we need to decide whether we need to go to the subflow. If our user was already authenticated, then there is no need to execute the subflow. We need a decision state to help us out.
Decision State
A decision state can contain any number of if elements that define an if-then-else structure. The test attribute of the if element defines the condition, while the then and else attributes identify the target state. When the flow enters a decision state, the first matching if is used to transition to the next state. This means that all other if elements will not be processed. The decision state can also delegate the criteria for the decision to Java application code using expressions. You can see the different elements and attributes of the decision state (including their order) in Figure 11-11.

Figure 11-11. Different attributes and elements of the decision state
In our sample, we will use a decision state in the createOrders-flow to check whether the user is authenticated. If the user is not authenticated, then we will proceed to the authentication subflow, which will render the login screen. If the user was previously authenticated, we can immediately proceed with creating the order.
![]() Note Remember that the authentication mechanism is a self-invented, session-based model. Web Flow has security integration with Spring security, as we will see in Chapter 13. There is usually no need to build such a model yourself. However, we opted not to distract you by introducing Spring security because right now we want you to focus on the core Web Flow items being discussed in this chapter. When authenticated, the model simply places a token on the
Note Remember that the authentication mechanism is a self-invented, session-based model. Web Flow has security integration with Spring security, as we will see in Chapter 13. There is usually no need to build such a model yourself. However, we opted not to distract you by introducing Spring security because right now we want you to focus on the core Web Flow items being discussed in this chapter. When authenticated, the model simply places a token on the session scope.
You can see the implementation of the decision state in Listing 11-42.
Listing 11-42. The Login Decision State
<decision-state id="loginCheck">

    <if test="externalContext.sessionMap.contains('authenticatedCustomer') ==

              true" then="placeOrder" else="authenticate"/>

</decision-state>
If multiple if conditions are supplied, then they are evaluated one by one. If none of the conditions evaluates to true, then an org.springframework.webflow.engine.NoMatchingTransitionException is thrown. You can implement a chain of if conditions; however, be aware that any if condition that defines an else clause will, by definition, evaluate to true. This means that none of the remaining if conditions will be evaluated. For this reason, if you have multiple if elements, it only makes sense for the last if element to have an else. If one of the previous ifs had an else, then the subsequent if elements would never be evaluated. This makes sense if you think about it; if an if has also an else condition, either the then or the else is executed. Hence, all if elements that are defined below an if condition are skipped.
Before we show you an overview of what we have done in this chapter, we want to perform one last refactoring—for the create order process. This process is now embedded as an evaluate action of the finish transition. We are going to replace this with an action state.
Action State
An action state executes an action as its activity. Figure 11-12 shows its various attributes and elements. In an XML flow definition, an action state is defined using the <action-state> element, and the action to execute is defined using a nested <evaluate> element. Action states are typically used to interact with back-end services, either directly or via controllers. Action states execute automatically and do not pause the flow execution. A view state pauses the flow execution (the view gets rendered, and the user spends time working with the view), but an action state signals events that leads to transitioning to another state.

Figure 11-12. Different attributes and elements of the action state
In the example that follows, we transition to the end state when an order is successfully made. We could also react to on “error” events and transition to an error page instead.
![]() Note There is no single rule for determining whether you need an action state. You should probably be using an action state if there are multiple outcomes that you could react upon or in cases where processing is more complex (e.g., when executing multiple actions).
Note There is no single rule for determining whether you need an action state. You should probably be using an action state if there are multiple outcomes that you could react upon or in cases where processing is more complex (e.g., when executing multiple actions).
To refactor this, we simply move the evaluation expression to an <action-state> and adjust the transitions accordingly. The code shown in Listing 11-43 becomes the code for the action state shown in Listing 11-44. This code can be found in src/main/webapp/WEB-INF/view/createOrders/createOrders-flow.xml.
Listing 11-43. Refactoring the Evaluate Action to an Action State
<transition on="finish" to="end">

    <evaluate expression="orderController.placeOrder(flowScope.orderForm,

     externalContext.sessionMap.authenticatedAccount)"/>

</transition>
Listing 11-44. The Action State for Placing an Order
<action-state id="placeOrder">

    <evaluate expression="orderController.placeOrder(externalContext.

                          sessionMap.authenticatedAccount,

                          flowScope.orderForm)"

              result="flowScope.orderId"/>

    <transition on="success" to="end"/>

</action-state>
The authenticatedAccount variable is looked up from session scope. It was placed there when the user logged in using the AuthenticationController. You can see this in the last method of Listing 11-40. The OrderForm was created in the beginning of the createOrder-flow in the on start element. It was placed on flow scope. We don't need to specify a scope per se because the expression language will look in all Web Flow scopes automatically (i.e., specifying orderForm without the implicit flowScope object would also be correct and yield the same result).
Working with Outcome Events
As we have seen, we can use our evaluate action to invoke methods on application controllers. When called from action states or decision states, these method return values can be used to drive state transitions. Since transitions are triggered by events, a method return value must first be mapped to an Event object.
For example, in the AuthenticationController's authenticate method, we created so-called events that were returned by the application controller directly:
return new EventFactorySupport().error(this);

return new EventFactorySupport().success(this);
In this case, the action's result event becomes the primary basis for the transition decision. When combined with a controller or POJO action, this allows you to call a method in application code that returns a single value that can be used as the basis for a routing decision.
If you do not return an org.springframework.webflow.execution.Event, Web Flow will automatically adapt the method return value to an appropriate result event according to a set of rules. The rules are simple and identified in Table 11-3.

In our action state, the placeOrder() method returned an object of type Long. This resulted in Web Flow creating an event with the success id—hence, our transition of on="success".
Whenever you return a value, whether an explicit event with an attribute or any other object (for which Web Flow creates an Event for you), you can bind that value using the result attribute (see Listing 11-43 for an example) of the evaluation expression. If the id of the event does not match any transition of the action state, then a NoMatchingTransitionException is thrown.
If you however have a evaluate action nested in a transition instead, you can only decide whether the transition is allowed to continue or abort. You can do this by returning a success or error event, either directly or by letting Web Flow map it for you.
If you do not return an explicit success or error event, then Web Flow will map your return value to an Event, as described in Table 11-3. In case of a String, Enum, or Boolean, the value must be success, yes, or true to be interpreted as a success Event. In all other cases, the transition is aborted and the last view state is re-rendered.
![]() Note In the
Note In the AuthenticationController, we have chosen to generate the Event in the application code itself to illustrate how such events can be created. In that particular case (where the outcome is either OK or not OK (i.e., the authentication is either a success or failure), using a Boolean would have definitely been a good choice, as well.
Overview
With all the previous refactorings applied, Listing 11-45 shows what our createOrders-flow now looks like. You can find this file in src/main/webapp/WEB-INF/view/createOrders/createOrders-flow.xml.
Listing 11-45. The createOrders-flow After Our Final Refactoring
<on-start>

    <evaluate expression="orderController.initializeForm()"

        result="flowScope.orderForm" />

</on-start>

<view-state id="selectCategory" view="selectCategory" model="orderForm">

    <on-render>

        <evaluate

          expression="orderController.initializeSelectableCategories()"

          result="requestScope.selectableCategories" />

    </on-render>

    <transition on="next" to="selectBooks" />

    <transition on="cancel" to="end" />

</view-state>

<view-state id="selectBooks" view="selectBooks" model="orderForm">

    <on-render>

        <evaluate expression="orderController.

                  initializeSelectableBooks(flowScope.orderForm)"

                  result="flowScope.selectableBooks" />

    </on-render>

    <transition on="previous" to="selectCategory" />

    <transition on="add">

        <evaluate expression="orderController.addBook(flowScope.orderForm)" />

    </transition>

    <transition on="next" to="selectDeliveryOptions" />

    <transition on="reset" to="selectBooks">

        <evaluate expression="orderForm.resetSelectedBooks()" />

    </transition>

    <transition on="cancel" to="end" />

</view-state>

<view-state id="selectDeliveryOptions" view="selectDeliveryOptions" model="orderForm">

    <transition on="previous" to="selectBooks" />
    <transition on="finish" to="loginCheck">

        <evaluate

         expression="orderController.validateDeliveryDate(flowScope.orderForm,

         messageContext)"/>

    </transition>


    <transition on="cancel" to="end" />

</view-state>

<decision-state id="loginCheck">

    <if test="externalContext.sessionMap.contains('authenticatedAccount')

              == true" then="placeOrder" else="authenticate" />

</decision-state>

<subflow-state id="authenticate" subflow="authentication-flow">

    <transition on="authenticationOk" to="placeOrder" />

    <transition on="previous" to="selectDeliveryOptions" />

</subflow-state>

<action-state id="placeOrder">

    <evaluate expression="orderController.placeOrder(externalContext.sessionMap

.authenticatedAccount, flowScope.orderForm)"

     result="flowScope.orderId"/>

    <transition on="success" to="endOrderOk"/>

</action-state>

<end-state id="end" view="redirect:/index.htm" />
Subflow Input/Output Mapping
As we have seen in the “Different Web Flow Scopes” section, every flow session has its own flow scope. We also illustrated that this is the case for subflows. On scope level, subflows are no different than ordinary flows, and they work in their own flow session—hence, they have their own flow scope. Only conversation scope is shared between multiple flow sessions. So, what should you do if you need to access data from the parent flow when within a subflow? Sure, you could put it on conversation scope, but that has some drawbacks.
A subflow is best seen is a black box with a specific input and output contract. Putting everything on conversation scope merely to make data access easy violates encapsulation and might lead to brittle flow design. A better option would be to bring the data over to the subflow's flow scope—but only the data that the subflow is demanding. Web Flow supplies some special functionality to define an input and output contract for subflows. That way, you exactly know what data it takes as input and what data is gives back.
You can define the input contract of a flow by adding an input mapping to your flow. Input mapping is responsible for mapping all input provided to the flow when it is launched into its flow scope. You can also define the output contract via an output mapping. The output mapping defines the values that are to be expected as a result of executing the flow, and they can be mapped back into to flow scope of the parent flow.
Before we continue, you should understand how Web Flow treats input and output attributes. It dedicates a separate map for input and output. This map is standalone and will merely be created to form the transition between the attributes coming from the parent flow and going to the flow scope of the subflow. When a flow starts, it gathers information to put into the input map. This information might come from the URL or an input from a <subflow-state>. You can access the input map with the <input> element in the starting subflow.
Here flow-x exposes an attribute with name of varX to the subflow, flow-y. It does that by specifying the input element in the subflow state. This enables Web Flow to fetch the key, varX, from the flow scope of flow-x and then place the key/value on the input map. When flow-y starts, it will look in the input map for a varX attribute and place it on the flow scope of flow-y.
In Figure 11-13, you also see that the input map is populated with values coming from the URL. That is the second option you have. In addition to passing values using the <input> element of a <subflow-state>, Web Flow reads your URL and puts any request parameter available in the input map. The reason for this behavior is that it allows you to easily use a flow as a standalone flow and as a subflow.

Figure 11-13. Subflow input/output mapping
![]() Note The output mapping mirrors the input mapping, the same principles and rules apply. However, instead of two
Note The output mapping mirrors the input mapping, the same principles and rules apply. However, instead of two <input> elements we now have two <output> elements. One in the <subflow-state> of the parent flow and one in the subflow itself. There is also an output map, which maps values from the subflow back to the parent flow (as you can see in Figure 11-13).
In addition to using the <input> and <output> elements, you can also specify a custom subflow-attribute-mapper. This is an attribute of the <subflow-state> element. It enables custom mapping using a Java class rather than performing the mapping inside the flow. This attribute takes a bean reference to an implementation of the org.springframework.webflow.engine.SubflowAttributeMapper interface. This class has two methods:
public MutableAttributeMap createSubflowInput(RequestContext context);

public void mapSubflowOutput(AttributeMap output, RequestContext context);
When using this approach, you can specify the mapping yourself inside your custom implementation of a SubflowAttributeMapper. This is pretty exotic; normally, the standard input and output elements should be sufficient to map whatever you need. However, if you need some resource access while mapping data, this will help you accomplish that because you will have full control over the mapping process.
Creating the Order Process as a Subflow
So far, we've created a subflow for performing the authentication. Next, we will further refactor the createOrders-flow and extract the part that actually places the order into a subflow. Remember that we previously refactored this to an action state in the createOrders-flow (see Listing 11-46).
Listing 11-46. Recapping the Action State for Placing an Order
<action-state id="placeOrder">

    <evaluate

      expression="orderController.placeOrder(

      externalContext.sessionMap.authenticatedAccount, flowScope.orderForm)"

      result="flowScope.orderId"/>

    <transition on="success" to="endOrderOk"/>

</action-state>
Next, we are going to move the action state into a subflow called the placeOrders-flow.xml. This flow will be placed in this directory: src/main/webapp/WEB-INF/view/placeOrders/. In order for the action state to work in the subflow, we need to pass along our order form. The order form is stored on flow scope of the parent flow; and, as we have already seen, the subflow will have its own flow scope. Thus, we need to map the order form from the parent's flow scope to the subflow's flow scope. The account is not required to be mapped because we put the account on the Servlet session scope. This scope is reachable from our entire flow (and even beyond Web Flow such as in Servlets or JSPs because it is a JEE scope). We will also need to send back the order id to the parent flow once the subflow completes. Our subflow will look like Listing 11-47; this code can be found in placeOrders/placeOrders-flow.xml.
Listing 11-47. Creating the Flow
<input name="orderForm" required="true"

        type="com.apress.prospringmvc.bookstore.web.OrderForm"/>


<action-state id="placeOrder">

    <evaluate expression="orderController.placeOrder(externalContext

.sessionMap.authenticatedAccount, orderForm)"

      result="flowScope.orderId"/>
    <transition on="success" to="endOrderOk"/>

</action-state>


<end-state id="endOrderOk">

    <output name="orderId" />

</end-state>
First, we map the orderForm from the input map to the flow scope of the subflow. We also declare the input to be mandatory and declare it to be of a specific type. Both the required and type attributes are optional. The type is just an extra check to ensure that the input is of the correct type. When the input is not of the indicated type, a type conversion will be attempted. If that fails, an exception is raised. If a mandatory input is absent, an exception (FlowInputMappingException) is raised when the subflow is started.
In the end state, we use the output element to map the result (in this case, the id of the order) back to the parent flow. If you have multiple end states and all of them output the same result back to the parent flow, then you can also remove the output element from each of the end states and put the output element below the latest end state. This way, you don't have to repeat the output element for each end state. The output is then mapped, no matter which end state terminated the subflow. Listing 11-48 shows how to declare a single output element that maps the declared variable to the parent flow when any of the end states terminate the subflow.
Listing 11-48. Declaring a Single Output Element
<end-state id="endstateOne"/>

<end-state id="endstateTwo"/>

<output name="varX"/>
Finally, Listing 11-49 shows the subflow-state in our parent flow; this will declare which subflow to execute and is indicated by the subflow attribute. The value is the id by which the flow we want to run as a subflow is mapped in Web Flow. This is nothing new—we covered this previously in the “Implementing Authentication as a Subflow” section.
Listing 11-49. The subflow-state in the Parent Flow
<subflow-state id="placeOrder" subflow="placeOrders">

    <input name="orderForm"/>

    <output name="orderId"/>


    <transition on="endOrderOk" to="endOrderOk"/>

</subflow-state>
Inside the subflow state, we can see the input mapping. This is the value we will be making available to the subflow. Here, we refer to the orderForm variable.
The output mapping is the inverse of the input mapping; in other words, this is the value returned by the subflow that we will be binding to a variable within our parent flow. For the output mapping, we chose the variable name, orderId, which will be put on flow scope by default. The output value (the order id) will be used by our end state, which will use it to pass on the target URL that will be rendered when the flow ends (we will discuss the end state in the next section). The transition is also nothing new—we covered this in the “Implementing Authentication as a Subflow” section. When the subflow terminates, it will trigger this transition because the on attribute matches the end state id of the subflow and brings us to the end state of the parent flow.
![]() Caution You cannot specify a scope in either the input or output element. For example, specifying
Caution You cannot specify a scope in either the input or output element. For example, specifying input name="flowScope.orderForm" will yield an exception. By default, the values you refer to in the input element are resolved from flow scope, and values are put back on flow scope with the name you specify in the output element. It is arguable whether this is a valid limitation. The fact is, flow scope is the only logical scope to use for input/output mapping because the conversation, flash, and request scopes are shared with the subflow. Note that view scope is not shared, but it clears anyway, as soon as your flow leaves the view state.
![]() Note It might seem bizarre that an element (
Note It might seem bizarre that an element (<input>) occurs in both the <subflow-state> and the subflow itself. The best way to understand this is that, in the <subflow-state> element, you define which keys from a given value/expression you want to map to the input map. In the <input> element of the flow started as a subflow, the <input> element says which keys from the input map you want to put into the flow scope of the subflow (the same story goes for the <output> element, which maps to an output map).
End State
An end state terminates the active flow session. Figure 11-14 shows the attributes and elements for this state.

Figure 11-14. Different attributes and elements of the end state
Listing 11-50 shows an example of an end state terminating the active flow session. You can find this code in the src/main/webapp/WEB-INF/view/createOrders/createOrders-flow.xml. If the terminated flow session is the root flow session of the ongoing flow execution, then the entire flow execution will end. When the session is a subflow session, then processing will resume in the parent flow.
Listing 11-50. An End State Terminating the Active Flow Session
<end-state id="endOrderOk" view="redirect:/ordersOverview.htm?orderOk=
true&orderId={orderId}"/>
<end-state id="end" view="redirect:/index.htm"/>
![]() Note In Listing 11-50, we are using an XML entity (
Note In Listing 11-50, we are using an XML entity (&) to escape the & character. This is mandatory because several characters (e.g. " < > and &) are not allowed directly in XML because they have a special meaning and therefore need to be escaped.
A flow can have any number of end states. And it is not uncommon for a flow to have no end states, such as when you have a repetitive process like searching (where you typically have a Search Again button). Having multiple end states is also common—one for each logical outcome of the flow. As shown in the sample code, we have an end state in case the user wants to cancel the order flow. If this happens, we redirect the user to the home page. We also have an end state that redirects the user to the order overview page once an order has been successfully created.
An end state can optionally reference a view. Such a view can be used to confirm that flow processing ended successfully; this is typically called a confirmation view. The view referenced by an end state will only be rendered when that end state terminates the entire flow execution. If the end state ends a subflow session, view selection becomes the responsibility of the resuming parent flow.
In the “Subflows” section, we also saw that an end state can have an output element. This allows the end state to map data back to the parent flow. You can see this in action in Listing 11-47.
![]() Caution We have seen that Web Flow uses PRG. However, the end state is a bit of an exception. When an end state is triggered, Web Flow will terminate the flow execution after handling the first request in the PRG idiom (the POST request). It will also render and send back the view after processing the first request—however, it will not send a redirect, as it normally does. If a normal redirect is issued, the second request in the PRG idiom (the GET) triggers a flow execution restart because the flow execution was already terminated after handling the first request (again, the POST). This means that, if you refresh the page after hitting an end state, you will be restarting the flow. To avoid this, it is better to let the end state redirect to a stable (possibly external) URL. The sample code accomplishes this with some
Caution We have seen that Web Flow uses PRG. However, the end state is a bit of an exception. When an end state is triggered, Web Flow will terminate the flow execution after handling the first request in the PRG idiom (the POST request). It will also render and send back the view after processing the first request—however, it will not send a redirect, as it normally does. If a normal redirect is issued, the second request in the PRG idiom (the GET) triggers a flow execution restart because the flow execution was already terminated after handling the first request (again, the POST). This means that, if you refresh the page after hitting an end state, you will be restarting the flow. To avoid this, it is better to let the end state redirect to a stable (possibly external) URL. The sample code accomplishes this with some redirect syntax. For an external redirect, outside of the application's context, you could use the externalRedirect attribute. In this case, there will be no more incoming requests to the flow execution because the newly rendered URL has nothing more to do with the flow.
Summary
After finishing this chapter, you should have a solid understanding about most Web Flow features and how to apply them. You should be able to start using Web Flow in your own applications, referring back to this chapter and Chapter 10 whenever you are in doubt or need to refresh your memory on the specifics of Web Flow's behavior.
In this chapter, we showed how you can solve real-world use cases using Web Flow. These use cases included conversion, formatting, and validation. Along the way, you learned in detail how you can choose among the different types of validation. This chapter also addressed subflows, which allow you to build more maintainable and reusable flows. For example, we covered all of the different scopes, as well as how to use them. We also reviewed all of the action states and covered how to use them in our use sample application.
You are now ready to proceed to the next and final Web Flow chapter, where you will explore some of the more advanced functionality that Web Flow has to offer.