
C H A P T E R 6
Implementing Controllers — Advanced
In this chapter, we are going to take a look at some of the more advanced parts of Spring MVC, and then see how we can tap into the framework itself to extend it to suit our needs.
We’ll begin by examining scoped beans and how we can use them to our advantage. Next, we’ll explore how we can add generic functionality (so-called crosscutting concerns) to our application. For this, we are going to take a look at interceptors, including how to create them and how to wire them into our application.
No matter how robust or well-thought out our application is, there is going to be a time when our application doesn’t behave as expected (e.g., maybe someone will trip over the wire to our database server), and this will result in exceptions in our application. In general, we want to prevent the user from seeing the often cryptic stack traces; and for this, we are going to explore the exception-handling facilities in Spring MVC.
After we cover all these topics, we are going to dive into the internals of Spring @MVC and explore a couple of APIs we can extend; we’ll then use these extended APIs to augment the functionality of the framework.
Using Scoped Beans
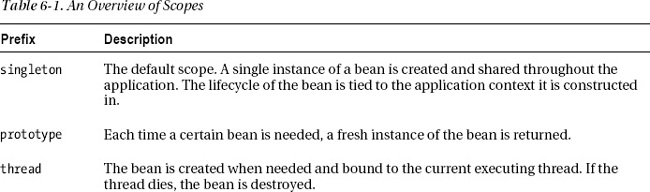
In Chapter 2, we noted the different scopes for beans that are supported by the Spring Framework. Table 6-1 lists them again. In this section, we are going to use scopes to our advantage. Specifically, we will walk through a practical example that leverages a scoped bean to create an online shopping cart (com.apress.prospringmvc.bookstore.domain.Cart).

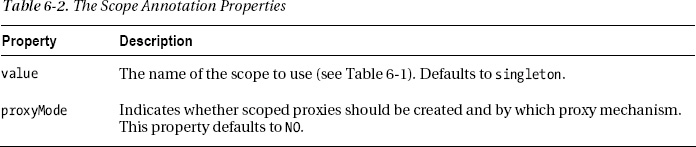
We’ve already worked with the singleton scope—that is the default for bean creation in the Spring Framework. The org.springframework.context.annotation.Scope annotation is used to specify the scope of a bean; its properties are listed in Table 6-2.
This annotation can be used as a type-level or method-level annotation. When you use Scope as a type-level annotation, all beans of this type will have the scope specified by the annotation. When you use it as a method-level annotation, beans created by this annotated method will have the scope specified by the annotation. You must put it on a method annotated with the org.springframework.context.annotation.Bean annotation.
Adding Something to the Cart
In this section, we are going to take the first step in actually enabling site visitors to buy books from our bookstore. Specifically, we are going to implement logic that lets us add books to our shopping cart. For this, we first need to define a session-scoped Cart bean.
Listing 6-1 shows how to define a bean (our shopping cart) with session scope. This bean can be injected into other beans, just like any other bean in the framework. Spring will handle the complexity of managing the lifecycle of the bean. The lifecycle of the bean depends on the scope of the bean (see Table 6-1). For example, a singleton-scoped bean (the default) is tied to the lifecycle of the application context, whereas a session-scoped bean is tied to the lifecycle of the javax.servlet.http.HttpSession object.
Listing 6-1. Cart Session Scoped Bean
package com.apress.prospringmvc.bookstore.web.config;


//Other imports omitted


import org.springframework.context.annotation.Scope;

import org.springframework.context.annotation.ScopedProxyMode;

import com.apress.prospringmvc.bookstore.domain.Cart;


@Configuration

@EnableWebMvc

@ComponentScan(basePackages = { "com.apress.prospringmvc.bookstore.web" })

public class WebMvcContextConfiguration extends WebMvcConfigurerAdapter {


    //Other methods omitted

    @Bean

    @Scope(value = "session", proxyMode = ScopedProxyMode.TARGET_CLASS)

    public Cart cart() {

        return new Cart();

    }


}
In this case, we have a bean declaration with the annotation, and we are using session scope. We want to use class-based proxies (com.apress.prospringmvc.bookstore.domain.Cart doesn’t implement an interface, so we need class-based proxies). We can now simply have this bean injected into other beans and use it like any other bean. Let’s create a controller that uses this bean, the com.apress.prospringmvc.bookstore.web.controller.CartController (see Listing 6-2).
![]() Note To be able to use class-based proxies, Spring requires an additional library called CGLIB.1
Note To be able to use class-based proxies, Spring requires an additional library called CGLIB.1
________________
Listing 6-2. The CartController Bean
package com.apress.prospringmvc.bookstore.web.controller;


import org.slf4j.Logger;

import org.slf4j.LoggerFactory;

import org.springframework.beans.factory.annotation.Autowired;

import org.springframework.stereotype.Controller;

import org.springframework.web.bind.annotation.PathVariable;

import org.springframework.web.bind.annotation.RequestHeader;

import org.springframework.web.bind.annotation.RequestMapping;


import com.apress.prospringmvc.bookstore.domain.Book;

import com.apress.prospringmvc.bookstore.domain.Cart;

import com.apress.prospringmvc.bookstore.service.BookstoreService;


@Controller

public class CartController {


    private Logger logger = LoggerFactory.getLogger(CartController.class);


    @Autowired

    private Cart cart;


    @Autowired

    private BookstoreService bookstoreService;


    @RequestMapping("/cart/add/{bookId}")

    public String addToCart(@PathVariable("bookId") long bookId,

                            @RequestHeader("referer") String referer) {

        Book book = this.bookstoreService.findBook(bookId);

        this.cart.addBook(book);

        this.logger.info("Cart: {}", this.cart);

        return "redirect:" + referer;

    }


}
In this case, we simply autowire the session-scoped bean cart, just as we would for any other bean. The addToCart method contains the logic for adding a book to the cart. After the book has been added, we redirect to the page from which we came (the referer request header).
This controller is mapped to the URL, /cart/add/{bookId}; however, currently nothing is going to invoke our controller because we have nothing pointing to that URL. Let’s modify our book search page and add a link, so that we can add a book to our shopping cart (see Listing 6-3). The parts highlighted with bold show the changes.
Listing 6-3. The Book Search Page with an Add to Cart Link
<%@ taglib prefix="c" uri="http://java.sun.com/jsp/jstl/core"%>

<%@ taglib prefix="spring" uri="http://www.springframework.org/tags" %>

<%@ taglib prefix="form" uri="http://www.springframework.org/tags/form" %>


// Search Form Omitted


<c:if test="${not empty bookList}">

    <table>

        <tr>

            <th><spring:message code="book.title"/></th>

            <th><spring:message code="book.description"/></th>

            <th><spring:message code="book.price" /></th>

            <th></th>

        </tr>

        <c:forEach items="${bookList}" var="book">

            <tr>

                <td>

                    <a href="<c:url value="/book/detail/${book.id}"/>">

                       ${book.title}

                    </a>

                </td>

                <td>${book.description}</td>

                <td>${book.price}</td>

                <td>

                    <a href="<c:url value="/cart/add/${book.id}"/>">

                        <spring:message code="book.addtocart"/>

                    </a>

                </td>

            </tr>

        </c:forEach>

    </table>

</c:if>
After redeploying our application, we should have an Add to Cart link on the Books page (see Figure 6-1). If we click that link, we should stay on the Books page. We did add something to our shopping cart, however. If we switch to our logging output (see Figure 6-2), we can see that there is actually something in the shopping cart.

Figure 6-1. A book search with an Add to Cart link

Figure 6-2. Cart logging that shows the books added to the cart
Implementing the Checkout
To finalize the ordering process, we will give our customers an opportunity to check out their cart. This will create an actual com.apress.prospringmvc.bookstore.domain.Order object and entry in the database. The checkout is a combination of a lot of things we covered in the previous chapter and the previous section. The controller is the com.apress.prospringmvc.bookstore.web.controller.CheckoutController (see Listing 6-4), and it contains a lot of logic. The checkout.jsp file is the JSP that contains our screen; it can be found in /WEB-INF/views/cart.
Listing 6-4. The CheckoutController
package com.apress.prospringmvc.bookstore.web.controller;


//Other imports omitted

import com.apress.prospringmvc.bookstore.validation.OrderValidator;


@Controller

@SessionAttributes(types = { Order.class })

@RequestMapping("/cart/checkout")

public class CheckoutController {


    private final Logger logger;

    logger  = LoggerFactory.getLogger(CheckoutController.class);


    @Autowired

    private Cart cart;


    @Autowired

    private BookstoreService bookstoreService;


    @ModelAttribute("countries")

    public Map<String, String> countries(Locale currentLocale) {

        Map<String, String> countries = new TreeMap<String, String>();

        for (Locale locale : Locale.getAvailableLocales()) {

            countries.put(

                       locale.getCountry(),

                       locale.getDisplayCountry(currentLocale));

        }

        return countries;

    }


    @RequestMapping(method = RequestMethod.GET)

    public void show(HttpSession session, Model model) {

        Account account = (Account)

        session.getAttribute(LoginController.ACCOUNT_ATTRIBUTE);

        Order order = this.bookstoreService.createOrder(this.cart, account);

        model.addAttribute(order);

    }


    @RequestMapping(method = RequestMethod.POST, params = "order")

    public String checkout(SessionStatus status,
                           @Validated @ModelAttribute Order order,

                           BindingResult errors) {

        if (errors.hasErrors()) {

            return "cart/checkout";

        } else {

            this.bookstoreService.store(order);

            status.setComplete(); //remove order from session

            this.cart.clear(); // clear the cart

            return "redirect:/index.htm";

        }

    }


    @RequestMapping(method = RequestMethod.POST, params = "update")

    public String update(@ModelAttribute Order order) {

        order.updateOrderDetails();

        return "cart/checkout";

    }


    @InitBinder

    public void initBinder(WebDataBinder binder) {

        binder.setValidator(new OrderValidator());

    }


}
The first method called on the controller when we click checkout is the show method, it takes our cart and uses the Account stored in the session to create an order and add that to the model. The order is stored in the session in between requests; this due to the use of SessionAttributes. When this is done, the checkout page is rendered (see Figure 6-3).

When the form is filled in, the customer can do two things: he can press the Order button or the Update button. When the Update button is pressed, the update method is called. This submits the form and then updates the order (and recalculates the total price). When the Order button is pressed, the order is submitted and then validated by the com.apress.prospringmvc.bookstore.validation.OrderValidator. In any errors occur, the page is redisplayed and error messages are shown to the customer. The interesting part occurs when there are no errors. First, the order is stored in the database. When we are finished with the order, we need to remove it from the session, which we accomplish by calling the setComplete method on the org.springframework.web.bind.support.SessionStatus object (see the Chapter 5 section, “Supported Method Argument Types”). Finally, before redirecting to the index page again, we need to clear the shopping cart. We do this so that the customer can add new books to the cart. Because we cannot simply replace the session-scoped object, we need to call a method to clear it. If we were to replace the cart with a fresh instance we would basically destroy the scoped proxy object.
Crosscutting Concerns
When developing an enterprise application, we are often faced or challenged with crosscutting concerns. These are concerns that affect many objects and actions. Examples of crosscutting concerns include transaction management and security, but also actions such as exposing generic data for each incoming web request.
In general, these concerns are hard to implement in our codebase by using traditional object-oriented approaches. If we were to implement them in traditional ways, it would lead to code duplication and hard-to-maintain code. For our general objects, we can use aspect-oriented programming (AOP) to address these crosscutting concerns; however when it comes to applying it to requests, we need a slightly different approach.
Spring MVC gives us two ways of implementing crosscutting concerns. The first approach uses interceptors to implement generic logic, while the second relies on exception handling. In this section, we are going to take a look at both techniques of applying crosscutting concerns in our web application.
Interceptors
Interceptors are to request handlers what filters are to servlets. According to the servlet specification,2 a filter is a reusable piece of code that can transform the content of HTTP requests, responses, and header information. Filters modify or adapt the requests for a resource, and modify or adapt responses from a resource. Examples of filtering include authentication, auditing, and encryption.
Filters and interceptors both implement common functionality (crosscutting concerns) to apply to all (or a selection) of incoming HTTP requests. Filters are more powerful than interceptors because they can replace (or wrap) the incoming request/response, whereas this cannot be done by an interceptor. The interceptor, on the other hand, has more lifecycle methods than the filter (see Table 6-3).

Spring MVC has two different interceptor strategies:
org.springframework.web.servlet.HandlerInterceptor(see Listing 6-5)org.springframework.web.context.request.WebRequestInterceptor(see Listing 6-6)
________________
2 See Servlet Specification 3.0, chapter 6.
Listing 6-5. The HandlerInterceptor Interface
package org.springframework.web.servlet;


import javax.servlet.http.HttpServletRequest;

import javax.servlet.http.HttpServletResponse;


public interface HandlerInterceptor {


  boolean preHandle(HttpServletRequest request,

                    HttpServletResponse response,

                    Object handler) throws Exception;


  void postHandle(HttpServletRequest request, HttpServletResponse response,

                  Object handler, ModelAndView modelAndView) throws Exception;


  void afterCompletion(HttpServletRequest request,

                       HttpServletResponse response,

                       Object handler,

                       Exception ex) throws Exception;

}
Listing 6-6. The WebRequestInterceptor Interface
package org.springframework.web.context.request;


import org.springframework.ui.ModelMap;


public interface WebRequestInterceptor {


  void preHandle(WebRequest request) throws Exception;


  void postHandle(WebRequest request, ModelMap model) throws Exception;


  void afterCompletion(WebRequest request, Exception ex) throws Exception;

}
As is often the case within the Spring Framework, both strategies are expressed as interfaces for which we could provide an implementation. The main difference between the strategies is that the WebRequestInterceptor is independent from the underlying technology. It can be used in a JSF or Servlet environment without changing the implementation. The HandlerInterceptor is only usable in a Servlet environment. An advantage of the HandlerInterceptor is that we can use it to prevent the handler from being called. We do this by returning false from the preHandle method.
Configuring Interceptors
To use an interceptor, we need to configure it in our configuration. Configuring an interceptor consists of two steps:
- We need to configure the interceptor itself.
- We need to connect it to our handlers.
Connecting an interceptor to our handlers can be done in two ways. It is possible to use both approaches together, but we don’t recommend this. First, we can explicitly add the interceptors to our handler mappings in our configuration. Second, we can use the org.springframework.web.servlet
.config.annotation.InterceptorRegistry to add interceptors.
In general, it is preferable to use the InterceptorRegistry to add the interceptors, simply because that is a very convenient way to add them. It is also very easy to limit which URLs the interceptors are matched to (as we will explain in the section about the InterceptorRegistry.)
Explicitly Configuring a HandlerMapping with Interceptors
To register the interceptors with the handler mapping, we first need to get the handler mappings involved. To do this, we need to either explicitly add them or extend the Spring base classes to get a reference to them (see Listing 6-7). Next, we simply add all interceptors to the instances. When using multiple handler mappings, this can be quite cumbersome, especially if we want to apply the interceptor only to certain URLs.
Listing 6-7. A Sample of Explicit HandlerMapping Configuration with Interceptors
package com.apress.prospringmvc.bookstore.web.config;


import org.springframework.context.annotation.ComponentScan;

import org.springframework.context.annotation.Configuration;

import org.springframework.web.servlet.config.annotation.EnableWebMvc;

import org.springframework.web.servlet.config.annotation.WebMvcConfigurationSupport;

import org.springframework.web.servlet.mvc.method.annotation.RequestMappingHandlerMapping;


@Configuration

@EnableWebMvc

@ComponentScan(basePackages = { "com.apress.prospringmvc.bookstore.web" })

public class WebMvcContextConfiguration extends WebMvcConfigurationSupport {


    @Override

    public RequestMappingHandlerMapping requestMappingHandlerMapping() {

        RequestMappingHandlerMapping handlerMapping;

        handlerMapping = super.requestMappingHandlerMapping();

        handlerMapping.setInterceptors(getAllInterceptors());

        return handlerMapping

    }

}
Using the InterceptorRegistry
A more powerful and flexible way to register interceptors is to use the org.springframework.web.servlet.config.annotation.InterceptorRegistry. The interceptors added to this registry are added to all configured handler mappings. Additionally, mapping to certain URLs is very easy to accomplish with this approach. To get access to the registry, we need to implement the org.springframework.web.servlet.config.annotation.WebMvcConfigurer interface on the configuration class that configures our web resources. This interface has several callback methods that are called during the configuration of Spring @MVC.
![]() Tip The framework provides an
Tip The framework provides an org.springframework.web.servlet.config.annotation.WebMvcConfigurerAdapter that we can extend. This saves us from implementing all methods from the org.springframework.web.servlet.config.annotation.WebMvcConfigurer interface.
We could also extend the org.springframework.web.servlet.config.annotation.WebMvcConfigurationSupport, so that we can simply add to the default configuration. We could then omit the org.springframework.web.servlet.config.annotation.EnableWebMvc annotation.
The InterceptorRegistry has two methods (one for each interceptor type) that we can use to add interceptors (see Listing 6-8). Both methods return an instance of org.springframework.web.servlet.config.annotation.InterceptorRegistration that we can use to fine-tune the mapping of the interceptor. We can use ant-style path patterns3 to configure a fine-grained mapping for the registered interceptor. If we don’t supply a pattern, the interceptor will be applied to all incoming requests.
Listing 6-8. The InterceptorRegistry Interface
package org.springframework.web.servlet.config.annotation;


import java.util.ArrayList;

import java.util.List;


import org.springframework.web.context.request.WebRequestInterceptor;

import org.springframework.web.servlet.HandlerInterceptor;

import org.springframework.web.servlet.handler.WebRequestHandlerInterceptorAdapter;


public class InterceptorRegistry {


    public InterceptorRegistration addInterceptor(

                HandlerInterceptor interceptor) { .. }


    public InterceptorRegistration addWebRequestInterceptor(

                WebRequestInterceptor interceptor) { .. }

}
________________
3 See Chapter 3 for information about ant-style expressions.
Listing 6-9 shows our current configuration. At this point, we have configured an interceptor to change the locale, and this interceptor is being applied to all incoming requests (we didn’t specify a URL pattern to match against). Next, we configure the interceptor and use the addInterceptor method to add it to the registry. The framework will take care of the additional details for registering the interceptors with the configured handler mappings.
Listing 6-9. Using the InterceptorRegistry to Add Interceptors
package com.apress.prospringmvc.bookstore.web.config;


//Other imports omitted


import org.springframework.web.servlet.HandlerInterceptor;

import org.springframework.web.servlet.config.annotation.InterceptorRegistry;


@Configuration

@EnableWebMvc

@ComponentScan(basePackages = { "com.apress.prospringmvc.bookstore.web" })

public class WebMvcContextConfiguration extends WebMvcConfigurerAdapter {


    @Override

    public void addInterceptors(InterceptorRegistry registry) {

        registry.addInterceptor(localeChangeInterceptor());

    }


    @Bean

    public HandlerInterceptor localeChangeInterceptor() {

        LocaleChangeInterceptor localeChangeInterceptor;

        localeChangeInterceptor = new LocaleChangeInterceptor();

        localeChangeInterceptor.setParamName("lang");

        return localeChangeInterceptor;

    }

    //… Other methods omitted


}
Listing 6-10 shows a snippet of code in which we change the mapping from all URLs to only URLs starting with /customer.
Listing 6-10. Limiting an Interceptor to Certain URLs
package com.apress.prospringmvc.bookstore.web.config;

//Imports omitted

@Configuration

@EnableWebMvc

@ComponentScan(basePackages = { "com.apress.prospringmvc.bookstore.web" })

public class WebMvcContextConfiguration extends WebMvcConfigurerAdapter {


    @Override

    public void addInterceptors(InterceptorRegistry registry) {

        InterceptorRegistration registration;

        registration = registry.addInterceptor(localeChangeInterceptor());

        registation.addPathPatterns("/customers/**");

    }

    //Other methods omitted

}
Implementing an Interceptor
Thus far, we have covered different types of interceptors and how to register them, so that they can be used. Now let’s implement interceptors for our store. We are going to implement two different interceptors. The first will add some commonly used data to our model, so that we can show it to the user. The second will address a security need: we want the account and checkout page to be accessible only by registered users.
Implement a WebRequestInterceptor
In this section, we are going to implement an org.springframework.web.context.request.WebRequestInterceptor. If we look at our web page in Figure 6-4, we can see a section called Random Books. This section on our web page has remained empty thus far. Now we are going to create an interceptor that will add some random books to the model. For this, we are going to implement the postHandle method (see Listing 6-11).
![]() Note In a real web shop, we would probably call this section “New Books” or “Suggested Books.”
Note In a real web shop, we would probably call this section “New Books” or “Suggested Books.”
Figure 6-4. The welcome page without random books listed
Listing 6-11. The CommonDataInterceptor
package com.apress.prospringmvc.bookstore.web.interceptor;


import org.springframework.beans.factory.annotation.Autowired;

import org.springframework.ui.ModelMap;

import org.springframework.web.context.request.WebRequest;

import org.springframework.web.context.request.WebRequestInterceptor;


import com.apress.prospringmvc.bookstore.service.BookstoreService;


public class CommonDataInterceptor implements WebRequestInterceptor {


    @Autowired

    private BookstoreService bookstoreService;


    @Override

    public void preHandle(WebRequest request) throws Exception {

    }


    @Override

    public void postHandle(WebRequest request, ModelMap model)

    throws Exception {

        if (model != null) {

            model.addAttribute("randomBooks", this.bookstoreService.findRandomBooks());

        }

    }


    @Override

    public void afterCompletion(WebRequest request, Exception ex)
    throws Exception {

    }


}
The postHandle method adds some random books to the model, but only when this model is available. This is why our code includes a null check. The model can be null when we are going to do AJAX or write the response ourselves.
To have our interceptor applied to incoming request, we need to register it. The interceptor needs to be called for every incoming request, so it doesn’t require much additional configuration (see the highlighted line in Listing 6-12).
Listing 6-12. The CommondDataInterceptor Configuration
package com.apress.prospringmvc.bookstore.web.config;


import org.springframework.web.context.request.WebRequestInterceptor;

import org.springframework.web.servlet.config.annotation.InterceptorRegistry;

com.apress.prospringmvc.bookstore.web.interceptor.CommonDataInterceptor;


// Other imports omitted


@Configuration

@EnableWebMvc

@ComponentScan(basePackages = { "com.apress.prospringmvc.bookstore.web" })

public class WebMvcContextConfiguration extends WebMvcConfigurerAdapter {


    @Override

    public void addInterceptors(InterceptorRegistry registry) {

        registry.addInterceptor(localeChangeInterceptor());

        registry.addWebRequestInterceptor(commonDataInterceptor());

    }


    @Bean

    public WebRequestInterceptor commonDataInterceptor() {

        return new CommonDataInterceptor();

    }

    // Other methods omitted

}
Now when we redeploy our application and access a page, we should see random books displayed in the Random Books section on our page (see Figure 6-5). (The logic used in our template for selecting the random books is shown in Listing 6-13.)

Figure 6-5. The welcome page with titles in the Random Books section
Listing 6-13. The Random Books Section from the Template
<div class="right_box">


<div class="title">

  <span class="title_icon">

    <img src="<c:url value="/resources/images/bullet4.gif"/>" alt="" title="" />

  </span>

  <spring:message code="main.title.randombooks"/>

</div>

<c:forEach items="${randomBooks}" var="book">

  <div class="new_prod_box">

    <c:url value="/book/detail/${book.id}" var="bookUrl" />

    <a href="${bookUrl}">${book.title}</a>

    <div class="new_prod_img">

      <c:url value="/resources/images/books/${book.isbn}/book_front_cover.png"

 var="bookImage"/>

      <a href="${bookUrl}">
        <img src="${bookImage}" alt="${book.title}" title="${book.title}"

 class="thumb" border="0" width="100px"/>

      </a>

    </div>

  </div>

</c:forEach>

</div>
Implementing a HandlerInterceptor
Currently, our account pages aren’t secure. For example, someone could simply change the id in the URL to see the content of another account. Let’s use the interceptor approach to apply security to our pages. We are going to create an interceptor that checks whether we are already logged in (our account is available in the HTTP session). If not, it will throw a com.apress.prospringmvc.bookstore.service.AuthenticationException (see Listing 6-14). We will also store the original URL in a session attribute; that way, we can redirect the user to the URL he wants to visit after he logs in.
Listing 6-14. The SecurityHandlerInterceptor
package com.apress.prospringmvc.bookstore.web.interceptor;

// javax.servlet imports omitted

import org.springframework.web.servlet.HandlerInterceptor;

import org.springframework.web.servlet.handler.HandlerInterceptorAdapter;

import org.springframework.web.util.WebUtils;


import com.apress.prospringmvc.bookstore.domain.Account;

import com.apress.prospringmvc.bookstore.service.AuthenticationException;

import com.apress.prospringmvc.bookstore.web.controller.LoginController;


public class SecurityHandlerInterceptor extends HandlerInterceptorAdapter {


    @Override

    public boolean preHandle(HttpServletRequest request,

                             HttpServletResponse response,

                             Object handler) throws Exception {

        Account account= (Account) WebUtils.getSessionAttribute(

                                request, LoginController.ACCOUNT_ATTRIBUTE);

        if (account == null) {

            //Retrieve and store the original URL.

            String url = request.getRequestURL().toString();

            WebUtils.setSessionAttribute(

                         request, LoginController.REQUESTED_URL, url);

            throw new AuthenticationException(

                 "Authentication required.", "authentication.required");

        }

        return true;

    }


}
For this interceptor, our configuration is a bit more complex because we want to map it to certain URLs (see the highlighted part in Listing 6-15).
Listing 6-15. SecurityHandlerInterceptor Configuration
package com.apress.prospringmvc.bookstore.web.config;


import com.apress.prospringmvc.bookstore.web.interceptor.SecurityHandlerInterceptor;


//Other imports omitted


@Configuration

@EnableWebMvc

@ComponentScan(basePackages = { "com.apress.prospringmvc.bookstore.web" })

public class WebMvcContextConfiguration extends WebMvcConfigurerAdapter {


    @Override

    public void addInterceptors(InterceptorRegistry registry) {

        registry.addInterceptor(localeChangeInterceptor());

        registry.addWebRequestInterceptor(commonDataInterceptor());

        registry.addInterceptor(new SecurityHandlerInterceptor()).

                   addPathPatterns("/customer/account*", "/cart/checkout");

    }


    // Other methods omitted

}
Finally, we also need to make a modification to our com.apress.prospringmvc.bookstore.web.controller.AccountController. Currently, we expect an id as part of the URL. However, instead of retrieving the account from the database, we are going to restore it from the session. Listing 6-16 shows the necessary modifications.
Listing 6-16. The AccountController
package com.apress.prospringmvc.bookstore.web.controller;


// Imports omitted


@Controller

@RequestMapping("/customer/account")

@SessionAttributes(types = Account.class)

public class AccountController {


    //Fields and other methods omitted


    @RequestMapping(method = RequestMethod.GET)

    public String index(Model model, HttpSession session) {

        Account account = (Account) session.getAttribute(LoginController.ACCOUNT_ATTRIBUTE);

        model.addAttribute(account);

        model.addAttribute("orders", this.orderRepository.findByAccount(account));

        return "customer/account";

    }
    @RequestMapping(method = { RequestMethod.POST, RequestMethod.PUT })

    public String update(@ModelAttribute Account account) {

        this.accountRepository.save(account);

        return "redirect:/customer/account";

    }

}
When we redeploy our application and click Account in the menu bar, we will be greeted with an error page (see Figure 6-6). We use the default exception-handling mechanism to send an error code back to the client, so that the browser can act upon it. In the next section, we are going to cover exception handling in more detail.

Figure 6-6. A 403 error page after clicking a secured link
While we have protected our resources, it would be nicer if we could show the login page to the user with a message that she needs to log in to see the requested page. This is what we are going to do in the next section.
Exception Handling
As mentioned in Chapter 4, when an exception occurs during request processing, Spring will try to handle the exception. To give us a generic way of handling exceptions, Spring uses yet another strategy that can be utilized by implementing the org.springframework.web.servlet.HandlerExceptionResolver interface.
The org.springframework.web.servlet.HandlerExceptionResolver provides a callback method for the dispatcher servlet (see Listing 6-17). This method is called when an exception occurs during the request processing workflow. The method can return an org.springframework.web.servlet.ModelAndView, or it can choose to handle the Exception itself.
Listing 6-17. The HandlerExceptionResolver Interface
package org.springframeowork.web.servlet;


import javax.servlet.http.HttpServletRequest;

import javax.servlet.http.HttpServletResponse;


public interface HandlerExceptionResolver {


  ModelAndView resolveException(HttpServletRequest request,

                                HttpServletResponse response,

                                Object handler,

                                Exception ex);

}
By default, the dispatcher servlet looks for all beans in the application context of the type org.springframework.web.servlet.HandlerExceptionResolver (see the “Configuring the DispatcherServlet” section in Chapter 4). When multiple resolvers are detected, the dispatcher servlet will consult each of them until a viewname is returned or the response is written. If the exception cannot be handled, then the exception is rethrown, so that the servlet container can handle it. The servlet container will use the error-pages configuration from its configuration or simply propagate the exception to the user. (In most cases, you will get an error 500 with a stacktrace on screen.)
Spring MVC comes with several implementations of the org.springframework.web.servlet.HandlerExceptionResolver interface, as we can see in Figure 6-6. Note that each of these implementations works differently. Table 6-4 gives a short overview on how the different implementations work.

Figure 6-7. The HandlerExceptionResolver hierarchy

As the class diagram in Figure 6-7 illustrates, all usable implementations for resolving exceptions extend the org.springframework.web.servlet.handler.AbstractHandlerExceptionResolver. This is a convenient superclass that provides common features and configuration options to all implementations. Table 6-5 lists and briefly describes its common properties.

The DefaultHandlerExceptionResolver
The DefaultHandlerExceptionResolver implementation will always return an empty ModelAndView and sends an HTTP response code to the client. In Table 6-6, we can see the exception to the HTTP response code and description mapping.

ResponseStatusExceptionResolver
The ResponseStatusExceptionResolver checks if the thrown exception is annotated with an org.springframework.web.bind.annotation.ResponseStatus annotation (see Listing 6-18). If that is the case, it will handle the exception, send the HTTP response code from the annotation to the client, and then return an empty ModelAndView indicating the exception was handled. If that annotation isn’t present, it simply returns null to indicate that the exception wasn’t handled.
Listing 6-18. Handling an AuthenticationException
package com.apress.prospringmvc.bookstore.service;


import org.springframework.http.HttpStatus;

import org.springframework.web.bind.annotation.ResponseStatus;


@ResponseStatus(value = HttpStatus.FORBIDDEN)

public class AuthenticationException extends Exception {


    private String code;
    public AuthenticationException(String message, String code) {

        super(message);

        this.code = code;

    }


    public String getCode() {

        return this.code;

    }

}
When we throw this exception, the org.springframework.web.servlet.mvc.annotation.ResponseStatusExceptionResolver will detect that it has been annotated with the org.springframework.web.servlet.bind.annotation.ResponseStatus. This annotation has two properties we can use to specify information (see Table 6-7).

![]() Note This is the mechanism we use to have the framework handle our
Note This is the mechanism we use to have the framework handle our com.apress.prospringmvc.bookstore.service.AuthenticationException.
SimpleMappingExceptionResolver
The SimpleMappingExceptionResolver can be configured to translate certain exceptions to a view. For example, we can map (partial) exception class names to a view. We say partial here because matching is done based on the name of the class and not on its concrete type. The matching is done with a simple substring mechanism; as such, wildcards (ant-style regular expressions) aren’t supported.
Listing 6-19 shows the configuration for a SimpleMappingExceptionResolver. It is configured to map an AuthenticationException to the view with the name login. We also set a HTTP response code to send with the login view.
Listing 6-19. A SimpleMappingExceptionResolver Configuration
package com.apress.prospringmvc.bookstore.web.config;


import org.springframework.web.servlet.HandlerExceptionResolver;

import org.springframework.web.servlet.handler.SimpleMappingExceptionResolver;


// Imports omitted
@Configuration

@EnableWebMvc

@ComponentScan(basePackages = { "com.apress.prospringmvc.bookstore.web" })

public class WebMvcContextConfiguration extends WebMvcConfigurerAdapter {


    @Override

    public void configureHandlerExceptionResolvers(

                    List<HandlerExceptionResolver> exceptionResolvers) {

        exceptionResolvers.add(simpleMappingExceptionResolver());

    }


    @Bean

    public SimpleMappingExceptionResolver simpleMappingExceptionResolver() {

        SimpleMappingExceptionResolver exceptionResolver;

        exceptionResolver = new SimpleMappingExceptionResolver();

        Properties mappings = new Properties();

        mappings.setProperty("AuthenticationException", "login");


        Properties statusCodes = new Properties();

        mappings.setProperty(

                    "login",

                    String.valueOf(HttpServletResponse.SC_UNAUTHORIZED));


        exceptionResolver.setExceptionMappings(mappings);

        exceptionResolver.setStatusCodes(statusCodes);

        return exceptionResolver;

    }

    // Other methods omitted

}
The matching is done based on the class name, rather than the concrete type. If the class name of the exception thrown matches the specified pattern, then the corresponding view name will be used. The pattern doesn’t support wildcards; it is merely a substring that matches the class name. We need to choose the pattern carefully. For instance, Exception will match almost all exceptions thrown (because most exceptions have Exception as part of their class name). Similarly, DataAccessException will more or less match all of Spring’s exceptions for data access.
We need to make one final adjustment; namely, we need to modify our com.apress.prospringmvc.bookstore.web.controller.LoginController. At the moment, there is exception handling inside the controller; however, this can be removed because the AuthenticationException will be handled by our just configured HandlerExceptionResolver (see Listing 6-20 for the improved controller).
Listing 6-20. The Improved Login Controller
package com.apress.prospringmvc.bookstore.web.controller;

// Imports omitted


@Controller

@RequestMapping(value = "/login")

public class LoginController {


    public static final String ACCOUNT_ATTRIBUTE = "account";

    public static final String REQUESTED_URL = "REQUESTED_URL";
    @Autowired

    private AccountService accountService;


    @RequestMapping(method = RequestMethod.GET)

    public void login() {}


    @RequestMapping(method = RequestMethod.POST)

    public String handleLogin(@RequestParam String username,

                              @RequestParam String password,

                              HttpSession session)

    throws AuthenticationException {

        Account account = this.accountService.login(username, password);

        session.setAttribute(ACCOUNT_ATTRIBUTE, account);

        String url = (String) session.getAttribute(REQUESTED_URL);

        session.removeAttribute(REQUESTED_URL); // Remove the attribute

        if (StringUtils.hasText(url) && !url.contains("login")) {

            return "redirect:" + url;

        } else {

            return "redirect:/index.htm";

        }

    }


}
If we click Account on the menu bar after redeployment, we will be greeted with a login page (see Figure 6-8).

Figure 6-8. The Login page
ExceptionHandlerExceptionResolver and AnnotationMethodHandlerExceptionResolver
Both the AnnotationMethodHandlerExceptionResolver and ExceptionHandlerExceptionResolver will look in the current controller for methods annotated with org.springframework.web.bind.annotations.ExceptionHandler. This is also a drawback because this pair of exception resolvers only operates on methods in the currently assigned controller. If you use this technique, it isn’t possible to define an exception handler for the whole application.
Exception-handling methods are very much like controller methods (as explained in Chapter 5); they can use the same method parameters and the same return values. An exception-handling method uses the same underlying infrastructure to detect the return types and method-argument types. However, there is one addition to these methods that we can also pass in the thrown exception; namely, we can specify an argument of type Exception (or a subclass).
The method in Listing 6-21 will handle all exceptions thrown in the controller it is defined in. It will cause an error code 500 to be sent back to the client, along with the given reason. This is the most basic exception-handling method we can write. As mentioned previously, we can use multiple parameters in the method signature. This goes for the method arguments, as well as the method return types. (See Tables 5-3 and 5-4 in the preceding chapter for an overview.)
Listing 6-21. A Basic Exception-handling Method Sample
@ExceptionHandler()

@ResponseStatus(

    value=HttpStatus.INTERNAL_SERVER_ERROR,

    reason="Exception while handling request.")

public void handleException() {}
Listing 6-22 shows a more elaborate example. When an org.springframework.dao.DataAccessException occurs, it fills the model with as much information as possible. After that, the view named db-error will be rendered.
Listing 6-22. An Advanced Exception-handling Method Sample
@ExceptionHandler

public ModelAndView handleIOException(DataAccessException ex,

                                      Principal principal,

                                      WebRequest request) {

    ModelAndView mav = new ModelAndView("db-error");

    mav.addObject("username", principal.getName());

    mav.addAllObjects(request.getParameterMap());


    for(Iterator<String> names = request.getHeaderNames(); names.hasNext(); ) {

        String name =  names.next();

        String[] value = request.getHeaderValues(name);

        mav.addObject(name, value);

    }

    return mav;

}
Extending Spring @MVC
In previous chapters, we explained how Spring MVC works and how we can write controllers. However, there might come a time when the support from the framework out-of-the-box isn’t sufficient, and we will want to change or add to the behavior of the framework. In general, the Spring Framework is quite flexible due to the way it is built. It uses a lot of strategies and delegation, and this is also something we can use to extend or modify the behavior of the framework. In this section, we will dive into the internals of request mapping, request handling, and form rendering. Finally, we will cover how to extend these features.
Extending RequestMappingHandlerMapping
To map incoming requests to controller methods, Spring uses a handler mapping. For our use case, we have been using the org.springframework.web.servlet.mvc.method.annotation.RequestMappingHandlerMapping, and we already have mentioned a couple times that it is quite flexible. To match the requests based on methods with the org.springframework.web.bind.annotation.RequestMapping annotation, the handler mapping consults several org.springframework.web.servlet.mvc.condition.RequestCondition implementations (see Figure 6-8).

Figure 6-9. The RequestCondition Class Diagram
As the diagram illustrates, there is an implementation for each of the attributes (i.e., consumes, headers, methods, params, produces, and value; for more details, see Table 5-2) of the org.springframework.web.bind.annotation.RequestMapping annotation. The RequestConditionHolder and RequestMappingInfo are two implementations used internally by the framework.
To create an implementation, we need two things. First, we need an implementation of the interface (see Listing 6-23 for the API). Second, we need to extend the org.springframework.web.servlet.mvc.method.annotation.RequestMappingHandlerMapping. This class contains two callback methods that act as factory methods for our custom request method (see Listing 6-24). The getCustomTypeCondition method is called to create an instance to match the type-level condition, while the getCustomMethodCondition method is used for method-level conditions.
Listing 6-23. The RequestCondition API
package org.springframework.web.servlet.mvc.condition;


import javax.servlet.http.HttpServletRequest;


import org.springframework.web.bind.annotation.RequestMapping;


public interface RequestCondition<T> {


    T combine(T other);


    T getMatchingCondition(HttpServletRequest request);


    int compareTo(T other, HttpServletRequest request);

}
Listing 6-24. The RequestMappingHandlerMapping
package org.springframework.web.servlet.mvc.method.annotation;


import java.lang.reflect.Method;


import org.springframework.core.annotation.AnnotationUtils;

import org.springframework.stereotype.Controller;

import org.springframework.web.bind.annotation.RequestMapping;

import org.springframework.web.servlet.mvc.condition.ConsumesRequestCondition;

import org.springframework.web.servlet.mvc.condition.HeadersRequestCondition;

import org.springframework.web.servlet.mvc.condition.ParamsRequestCondition;

import org.springframework.web.servlet.mvc.condition.PatternsRequestCondition;

import org.springframework.web.servlet.mvc.condition.ProducesRequestCondition;

import org.springframework.web.servlet.mvc.condition.RequestCondition;

import org.springframework.web.servlet.mvc.condition.RequestMethodsRequestCondition;

import org.springframework.web.servlet.mvc.method.RequestMappingInfo;

import org.springframework.web.servlet.mvc.method.RequestMappingInfoHandlerMapping;


public class RequestMappingHandlerMapping

extends RequestMappingInfoHandlerMapping {


    // Other methods omitted.


    protected RequestCondition<?> getCustomMethodCondition(Method method) {

        return null;

    }


    protected RequestCondition<?> getCustomTypeCondition(Class<?> handlerType) {

        return null;

    }

}
Extending the RequestMappingHandlerAdapter
Like the RequestMappingHandlerMapping, the RequestMappingHandlerAdapter uses a couple of different strategies to do its work. To determine what to inject into a method argument, the adapter consults several org.springframework.web.method.support.HandlerMethodArgumentResolver implementations. For the return types, it consults the registered org.springframework.web.method.support.HandlerMethodReturnValueHandler implementations.
HandlerMethodArgumentResolver
The HandlerMethodArgumentResolver is used by the RequestMappingHandlerAdapter to determine what to use for a method argument. There is more or a less an implementation for each of the supported method-argument types or annotations (see the Chapter 5 section, “Supported Method Argument Types”). The API is quite simple, as we can see in Listing 6-25.
Listing 6-25. The HandlerMethodArgumentResolver API
package org.springframework.web.method.support;


import org.springframework.core.MethodParameter;

import org.springframework.web.bind.WebDataBinder;

import org.springframework.web.bind.support.WebDataBinderFactory;

import org.springframework.web.context.request.NativeWebRequest;


public interface HandlerMethodArgumentResolver {


    boolean supportsParameter(MethodParameter parameter);


    Object resolveArgument(MethodParameter parameter,

                           ModelAndViewContainer mavContainer,

                           NativeWebRequest webRequest,

                           WebDataBinderFactory binderFactory)

       throws Exception;


}
The supportsParameter method is called on each registered HandlerMethodArgumentResolver. The one that returns true will be used to detect or create the actual value to use for that method argument. We do this by calling the resolveArgument method.
HandlerMethodReturnValueHandler
The HandlerMethodReturnValueHandler is similar to the HandlerMethodArgumentResolver, but with one important difference. As its name implies, HandlerMethodReturnValueHandler works for method return values. There is an implementation for each of the supported return values or annotations (see the Chapter 5 section, “Supported Return Values”). This API is also quite simple, as we can see in Listing 6-26.
Listing 6-26. The HandlerMethodReturnValueHandler
package org.springframework.web.method.support;


import org.springframework.core.MethodParameter;

import org.springframework.web.context.request.NativeWebRequest;


public interface HandlerMethodReturnValueHandler {


    boolean supportsReturnType(MethodParameter returnType);


    void handleReturnValue(Object returnValue,

                           MethodParameter returnType,

                           ModelAndViewContainer mavContainer,

                           NativeWebRequest webRequest)

    throws Exception;


}
The supportsReturnType method for each registered HandlerMethodReturnValueHandler will be called with the return type of the method. The one that returns true will be used to actually handle the return value. This is accomplished by calling the handleReturnValue method.
Implementing Your Own
We can use the strategies used by the RequestMappingHandlerAdapter to our advantage. For example, we want an easy way to store and retrieve objects in the javax.servlet.http.HttpSession. For this, we first need an annotation to mark a method argument or return type as something we want to retrieve or put in the HttpSession. Listing 6-27 describes the annotation we will use.
Listing 6-27. The SessionAttribute Annotation
package com.apress.prospringmvc.bookstore.web.method.support;


import java.lang.annotation.Documented;

import java.lang.annotation.ElementType;

import java.lang.annotation.Retention;

import java.lang.annotation.RetentionPolicy;

import java.lang.annotation.Target;


@Target({ ElementType.PARAMETER, ElementType.METHOD })

@Retention(RetentionPolicy.RUNTIME)

@Documented

public @interface SessionAttribute {


    String value() default "";


    boolean required() default true;


    boolean exposeAsModelAttribute() default false;
}
However, all by itself adding an annotation isn’t much help because we still need a class that uses that annotation. Because we want to be able to retrieve from and store in the HttpSession, we will create a class that implements both the HandlerMethodReturnValueHandler and HandlerMethodArgumentResolver interfaces (see Listing 6-28).
Listing 6-28. The SessionAttributeProcessor
package com.apress.prospringmvc.bookstore.web.method.support;


import org.springframework.core.MethodParameter;

import org.springframework.web.bind.MissingServletRequestParameterException;

import org.springframework.web.bind.support.WebDataBinderFactory;

import org.springframework.web.context.request.NativeWebRequest;

import org.springframework.web.context.request.WebRequest;

import org.springframework.web.method.support.HandlerMethodArgumentResolver;

import org.springframework.web.method.support.HandlerMethodReturnValueHandler;

import org.springframework.web.method.support.ModelAndViewContainer;


public class SessionAttributeProcessor implements

HandlerMethodReturnValueHandler, HandlerMethodArgumentResolver {


    @Override

    public boolean supportsReturnType(MethodParameter returnType) {

        return returnType.getMethodAnnotation(SessionAttribute.class) != null;

    }


    @Override

    public void handleReturnValue(Object returnValue,

                                  MethodParameter returnType,

                                  ModelAndViewContainer mavContainer,

                                  NativeWebRequest webRequest)

    throws Exception {


        SessionAttribute annotation;

        annotation = returnType.getMethodAnnotation(SessionAttribute.class);

        webRequest.setAttribute(annotation.value(), returnValue,

WebRequest.SCOPE_SESSION);

        exposeModelAttribute(annotation, returnValue, mavContainer);

    }


    @Override

    public boolean supportsParameter(MethodParameter parameter) {

        return parameter.hasParameterAnnotation(SessionAttribute.class);

    }


    private void exposeModelAttribute(SessionAttribute annotation,

                                      Object value,

                                      ModelAndViewContainer mavContainer) {

        if (annotation.exposeAsModelAttribute()) {

            mavContainer.addAttribute(annotation.value(), value);
        }

    }


    @Override

    public Object resolveArgument(MethodParameter parameter,

                                  ModelAndViewContainer mavContainer,

                                  NativeWebRequest webRequest,

                                  WebDataBinderFactory binderFactory)

    throws Exception {


        SessionAttribute annotation;

        annotation = parameter.getParameterAnnotation(SessionAttribute.class);


        Object value = webRequest.getAttribute(

                        annotation.value(), WebRequest.SCOPE_SESSION);

        if (value == null && annotation.required()) {

            throw new MissingServletRequestParameterException(

                        annotation.value(),

                        parameter.getParameterType().getName());

        }

        exposeModelAttribute(annotation, value, mavContainer);

        return value;

    }

}
Before we can use the processor, we need to configure it. For this, we need to modify our configuration class. Specifically, we need to add the processor as a bean and make the environment aware of the bean’s existence (see Listing 6-29).
Listing 6-29. The Modified WebMvcContextConfiguration
package com.apress.prospringmvc.bookstore.web.config;


com.apress.prospringmvc.bookstore.web.method.support.SessionAttributeProcessor;


// Other imports omitted


@Configuration

@EnableWebMvc

@ComponentScan(basePackages = { "com.apress.prospringmvc.bookstore.web" })

public class WebMvcContextConfiguration extends WebMvcConfigurerAdapter {


    @Bean

    public SessionAttributeProcessor sessionAttributeProcessor() {

        return new SessionAttributeProcessor();

    }
    @Override

    public void addArgumentResolvers(

                    List<HandlerMethodArgumentResolver> argumentResolvers) {

        argumentResolvers.add(sessionAttributeProcessor());

    }


    @Override

    public void addReturnValueHandlers(

               List<HandlerMethodReturnValueHandler> returnValueHandlers) {

        returnValueHandlers.add(sessionAttributeProcessor());

    }

    // Other methods omitted

}
Now that we have configured our processor, we are finally ready to use it. Let’s begin by modifying the controllers for accounts, as shown in Listing 6-30. We removed the need for directly accessing the session and the need for adding the account to the model, this is now all handled by the processor. Bold font reflects the changes; it is simply an annotation on a method argument. At this point, we no longer need direct access to the HTTP session.
Listing 6-30. The Modified AccountController
package com.apress.prospringmvc.bookstore.web.controller;


// Imports omitted


@Controller

@RequestMapping("/customer/account")

@SessionAttributes(types = Account.class)

public class AccountController {


    @RequestMapping(method = RequestMethod.GET)

    public String index(

            Model model,

            @SessionAttribute(value =

LoginController.ACCOUNT_ATTRIBUTE, exposeAsModelAttribute = true) Account account) {

        model.addAttribute("orders", this.orderRepository.findByAccount(account));

        return "customer/account";

    }

    // Other methods omitted

}
If we now relaunch the application and click Account (after logging in), we are greeted by our Account page (see Figure 6-10).
Using the RequestDataValueProcessor
The org.springframework.web.servlet.support.RequestDataValueProcessor is an optional component that we can use to inspect or modify request parameter values before they are rendered or before a redirect is issued.
We can use this component as part of a solution4 to provide data integrity, confidentiality, and protection against cross-site request forgery (CSRF).5 We can also use it to automatically add hidden fields to all forms and URLs.
The RequestDataValueProcessor API consists of four methods (see Listing 6-31).
________________
Listing 6-31. The RequestDataValueProcessor API
package org.springframework.web.servlet.support;


import java.util.Map;


import javax.servlet.http.HttpServletRequest;


public interface RequestDataValueProcessor {


    String processAction(HttpServletRequest request, String action);


    String processFormFieldValue(HttpServletRequest request, String name,

                                 String value, String type);


    Map<String, String> getExtraHiddenFields(HttpServletRequest request);


    String processUrl(HttpServletRequest request, String url);

}
We can use this interface to do some interesting things. For example, we might create a checksum over the not editable fields (like id) in the controller (or an interceptor), and then review this checksum to see whether any fields have been tampered with.
The processUrl method is used by the Url tag; and on a redirect, we could use it to encode or add extra parameters to the URL to secure our URLs (for instance, we could add a checksum to check the validity of our parameters).
There is no default instance provided by the framework. Therefore, an implementation needs to be tailored for our application (the HDIV website has a plugin to protect a site from a whole range of vulnerabilities). To configure a RequestDataValueProcessor, we need to add it to the application context and then register it with the name, requestDataValueProcessor. This is the name the framework uses to detect the registered instance.
Summary
In this chapter, we covered some more advanced techniques that we can use to build web applications. For example, we started by looking at scoped beans and how we can use them to our advantage. To that end, we implemented a shopping cart in our sample application.
At times we find ourselves in need of the ability to reuse code or to execute code across a large amount of classes or URLs. These so-called crosscutting concerns can be addressed by using aspect oriented programming; however, in a web application, this isn’t always a good fit. In Spring MVC, we can use interceptors and an advanced exception-handling strategy to address those crosscutting concerns. For example, we can use interceptors to execute a piece of code for a large number of controllers. When configuring these interceptors, we can specify whether to map to all controllers or only to certain controllers based on the URL.
Although we all try to build our applications to be as robust as possible, there is always a chance that things will go wrong. When things do go wrong, we want to be able to handle the problems gracefully. For example, we might want to show the user an error page or login page when we need the user’s credentials. For this, we took an in-depth look at the exception-handling strategies inside Spring MVC.
We followed this by diving deeper into the infrastructure classes of Spring MVC and examined how to extend the framework, if the need arises. We also explained how to expand the request matching by specifying an additional request condition. Next, we explained (and showed) how to write a processor to handle method-argument types and return values for request-handling methods.
Finally, we ended the chapter with a brief introduction to the request data value processor, covering how to use this to protect against CSFR and provide data integrity.