
6
Working with Animations
Animations are part of every mobile app. Smooth animations can make the difference between whether a user feels comfortable using an app or not. Essentially, an animation is just the screen rendering again and again, transitioning from one state to another.
This rendering should happen so quickly that the user doesn’t realize the single states of the animation but perceives it as a smooth animation. To take this one step further, animations not only transform from state A to state B over time, but they also react to user interactions such as scrolling, pressing, or swiping.
Most devices have a screen frame rate of 60 frames per second (fps), and modern devices already have 120 fps (at the time of writing, React Native only supports 60 fps, which you can learn about on GitHub at bit.ly/prn-rn-fps). This means that when running an animation, the screen has to be re-rendered at 60 fps.
This is quite challenging because calculating complex animations and re-rendering the screen are some of the most compute-intense operations. Especially on low-end devices, the computing of the animation can become too slow, and the screen refresh rate drops below 60/120 fps. This then makes the animation and the app feel sluggish and slow.
Essentially, you can group animations into two different types:
- On-screen animations: These animations only apply to a part of the screen. There are a lot of different use cases for this type of animation such as grabbing user attention, giving touch feedback, showing indications of progress or loading, or improving the scrolling experience.
- Full-screen animations: These animations transition the whole screen. Most of the time, this type of animation is used to navigate to another screen.
Since full-screen animations are handled internally by all popular navigation libraries, this chapter will focus on on-screen animations. Full-screen animations have been covered in the Navigating in React Native apps section of Chapter 4, Styling, Storage, and Navigation, Section Navigation.
There are multiple ways to achieve smooth animations in React Native. Depending on the type of project and animations you want to build, you can choose from a wide range of solutions, each with its own advantages and disadvantages. We will discuss the best and most widely used solutions in this chapter.
In this chapter, we will cover the following topics:
- Understanding the architectural challenge of animations in React Native
- Using the internal React Native Animated API
- Creating simple animations with react-native-animatable
- Exploring Reanimated 2 – the most complete animation framework for React Native
- Using Lottie animations in React Native
Info
There have been some interesting developments about using the Skia rendering engine (which powers Chrome, Firefox, Android, and Flutter) to render animations in React Native, but at the time of writing, this approach is not production ready.
Technical requirements
To be able to run the code in this chapter, you have to set up the following things:
- A working React Native environment (bit.ly/prn-setup-rn – React Native CLI Quickstart)
- An iOS/Android simulator or a real device (a real device is preferred)
Understanding the architectural challenge of animations in React Native
The current architecture of React Native is suboptimal when it comes to animations. Think of an animation that scales or moves a title image based on the vertical scroll value of a ScrollView; this animation has to be calculated based on the scroll value of the ScrollView and immediately re-render the image. The following diagram shows what would happen when using the plain React Native architecture:
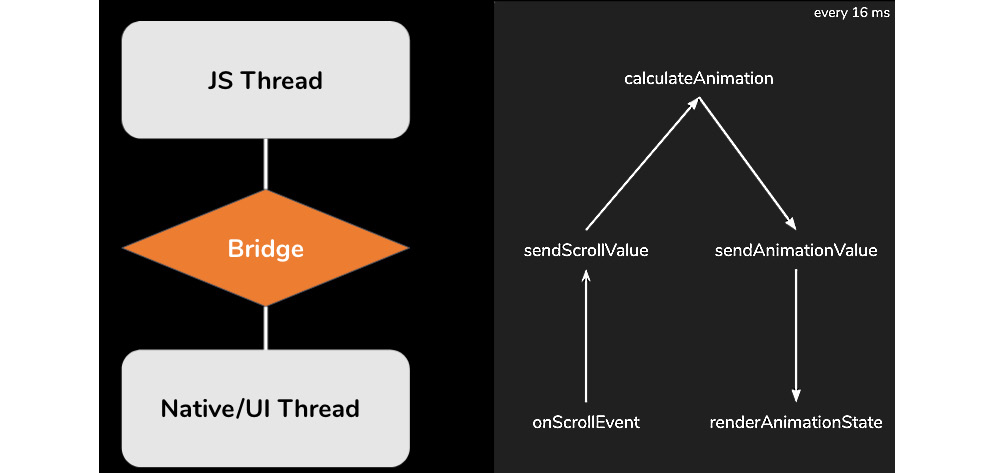
Figure 6.1 – The React Native architecture while animating based on scroll values
Here, you can see the general React Native architecture. The JavaScript thread is where you write your code. Every command will be serialized and sent via the bridge to the native thread. In this thread, the command is deserialized and executed. The same happens with the user input, but it occurs the other way around.
For our animation, this means that the scroll value would have to be serialized, sent via the bridge, deserialized, transferred via a complex calculation to an animation value, serialized, transferred back via the bridge, deserialized, and then rendered. This whole process has to be done every 16 milliseconds (or 60 times a second).
This round-trip leads to multiple problems:
- The serialization/deserialization process consumes unnecessary compute power
- In most cases, the calculation in JavaScript is slower than in native code
- The calculation can block the JavaScript thread and make the app unresponsive
- The round-trip can lead to frame drops and make the animation look sluggish and slow
Because of these problems, it is not a good idea to write animations in your own plain React Native code (for example, by setting a state in a loop). Fortunately, there are multiple production-ready solutions to avoid these problems and achieve high-quality animations.
In the following sections, we will have a look at four different solutions. Every solution has advantages and disadvantages, and which solution should be preferred depends on the project and the use case. Let’s start with the built-in Animated API.
Using the internal Animated API of React Native
React Native comes with a built-in Animated API. This API is quite powerful, and you can achieve a lot of different animation goals with it. In this section, we will have a brief look at how it works and what advantages and limitations the internal Animated API has.
For a complete tutorial, please have a look at the official documentation at bit.ly/prn-animated-api.
To understand how the Animated API works, let’s start with a simple example.
Starting with a simple example
The following code implements a simple fade-in animation, which makes a view appear over the duration of 2 seconds:
import React, { useRef } from "react";
import { Animated, View, Button } from "react-native";
const App = () => {
  const opacityValue = useRef(new Animated.Value(0)).
      current;
  const showView = () => {
    Animated.timing(opacityValue, {
        toValue: 1,
        duration: 2000
        }).start();
    };
  return (
    <>
      <Animated.View
        style={{
          backgroundColor: 'red',
              opacity: opacityValue
        }}
       />
      <Button title="Show View" onPress={showView} />
    </>
  );
}
export default App;
The Animated API is based on animated values. These values are changed over time and are used as part of the application styling. In this example, we initialize opacityValue as an Animated.Value component with the initial value of 0.
As you can see, the JSX code contains an Animated.View component whose style uses opacityValue as the opacity property. When running this code, the Animated.View component is completely hidden at the beginning; this is because the opacity is set to 0. When pressing the Show View button, showView is called, which starts an Animated.timing function.
This Animated.timing function expects an Animated.Value component as the first property and a config object as the second parameter. The Animated.Value component is the value that should be changed during the animation. With the config object, you can define the general conditions of the animation.
In this example, we want to change the Animated.Value component to 1 over the duration of 2 seconds (2,000 ms). Then, the Animated.timing function calculates the different states of the animation and takes care of the rendering of the Animated.View component.
Good to know
Essentially, you can animate every part of your UI. The Animated API exports some components directly, such as Animated.View, Animated.Image, Animated.ScrollView, Animated.Text, and Animated.FlatList. But you can animate any component by using Animated.createAnimatedComponent().
While the Animated API does not completely solve the problem of the React Native architecture, it is an improvement over just setting the state again and again and again, as it greatly reduces the payload that has to be transferred from the JavaScript thread to the native thread, but this transfer has to be done every frame. To prevent this transfer in every frame, you have to use the native driver, as shown in the following subsection.
Using the native driver
When configuring the animation with the config object, you can set a property called useNativeDriver. This is very important and should be done whenever possible.
When using the native driver with useNativeDriver: true, React Native sends everything to the native thread before starting the animation. This means that the animation runs completely on the native thread, which guarantees a smooth-running animation and no frame drops.
Unfortunately, the native driver is currently limited to non-layout properties. So, things such as transform and opacity can be used in an animation with the native driver, whereas all the Flexbox and position properties, such as height, width, top, or left, can’t be used.
Interpolate animated values
In some cases, you don’t want to use the Animated.Value component directly. This is where interpolation comes into play. Interpolation is a simple mapping of input and output ranges. In the following code example, you can see an interpolation, which adds a position change to the simple example from before:
style={{
    opacity: opacityValue,
    transform: [{
      translateY: opacityValue.interpolate({
        inputRange: [0, 1],
        outputRange: [50, 0]
      }),
    }],
  }}
In this code example, we added a transform translateY property to the style object. This property transforms the vertical position of an object. We don’t set a fixed value, nor do we bind opacityValue directly.
We use an interpolate function with a defined inputRange value of [0,1] and a defined outputRange value of [50,0]. Essentially, this means that the translateY value will be 50 when opacityValue (which is our AnimatedValue) is 0 and will be 0 when opacityValue is 1. This results in our AnimatedView moving up 50px to its original position while fading in.
Tip
Try to use interpolation to reduce the number of animated values you have to use in your application. Most of the time, you can use one animated value and just interpolate on it, even in complex animations.
The Animated API interpolate function is quite powerful. You can have multiple values to define the range, extrapolate or clamp beyond the ranges, or specify the easing function of the animation.
Getting to know the advanced options of the Animated API
The Animated API brings a lot of different options, which give you the possibility to create almost every animation you can imagine:
- You can do mathematical operations on animated values such as add(), subtract(), divide(), multiply(), modulo(), and more.
- You can combine animations sequentially using Animated.sequence(), or combine them at the same time using Animated.parallel() (you can even combine these options, too).
- You can also work with delayed animations with Animated.delay() or loop animations with Animated.loop().
- There are also other options to change an Animated.Value component aside from Animated.timing(). One of them is to use Animated.event() to bind the scroll value of a ScrollView to an AnimatedValue.
The following example is very similar to the example in the Understanding the architectural challenge of animations in React Native section of this chapter. The code shows you how to use a scroll value as the driver of an animation:
const App = () => {
  const scrolling = useRef(new Animated.Value(0)).current;
  const interpolatedScale = scrolling.interpolate({
    inputRange: [-300, 0],
    outputRange: [3, 1],
    extrapolate: 'clamp',
  });
  const interpolatedTranslate = scrolling.interpolate({
    inputRange: [0, 300],
    outputRange: [0, -300],
    extrapolate: 'clamp',
  });
  return (
    <>
      <Animated.Image
        source={require('sometitleimage.jpg')}
        style={{
          ...styles.header,
          transform: [
            {translateY: interpolatedTranslate},
            {scaleY: interpolatedScale},
            {scaleX: interpolatedScale}
          ]
        }}
      />
      <Animated.ScrollView
        onScroll={
          Animated.event([{nativeEvent: {contentOffset: {y:
              scrolling,},},}],
              { useNativeDriver: true },
          )
        }
      >
        <View style={styles.headerPlaceholder} />
        <View style={styles.content}>
        </View>
      </Animated.ScrollView>
    </>
  );
}
In this example, the native scroll event of the ScrollView is connected directly to the Animated.Value component. With the useNativeDriver: true property, the native driver is used; this means that the animation, which is driven by the scroll value, runs completely on the native thread.
The preceding example contains two interpolations of the scroll value: the first one scales the image when the ScrollView has been over-scrolled (which means the ScrollView returns negative scroll values), while the second one moves the image up while scrolling.
Again, due to the use of the native driver, all this interpolation is done on the native thread. This makes the Animated API very performant in this use case. You can read more about running animations based on user gestures in Chapter 7, Handling Gestures in React Native.
The Animated API also provides different easing methods alongside complex spring models. For more detailed information, please take a look at the official documentation at bit.ly/prn-animated-api.
As you can see, the Animated API is really powerful, and you can achieve nearly every animation goal with it. So, why are there even other solutions on the market when this very good animation library is built in? Well, the Animated API is far from perfect for every use case.
Understanding the pros and cons of the Animated API
The internal React Native Animated API is a very good solution for simple to mid-complexity animations. These are the most important pros of the Animated API:
- Powerful API: You can build nearly every animation.
- No external library needed: You don’t have to add any dependencies to your project to use the Animated API. This means no additional maintenance effort or larger bundle size.
- Smooth animations with the native driver: When using the native driver, you can be sure that your animation runs at 60 fps.
There are also some cons of the Animated API, which you have to keep in mind when choosing the best animation solution for your project:
- Complex animations become quite confusing: Due to the structure of the Animated API, animations with lots of elements or very high complexity can get very confusing, and the code can become very hard to read and understand.
- The native driver does not support all style properties: When using the Animated API, you should definitely use the native driver. Since this driver does not support position or Flexbox properties, the Animated API is, essentially, limited to non-layout properties.
- Animated.Value only supports numeric and string values: It is not possible to work with objects or arrays as animation values. If the animation value is more complex, multiple Animated.Value components have to be used.
All in all, I would recommend the Animated API for small to medium complexity animations, when you don’t already have other animation libraries in your project. However, let’s look at another option: react-native-animatable.
Creating simple animations with react-native-animatable
There are a lot of animations that are reused in nearly every app. This is what react-native-animatable is all about. This library is built on top of the internal React Native Animated API and provides a very simple declarative and imperative API to use simple, predefined animations.
Starting with a simple example
The following code example describes a simple fade-in animation with react-native-animatable using the declarative method, along with a simple fade-out animation with react-native-animatable using the imperative method:
import React from "react";
import { View, Text, Pressable } from "react-native";
import * as Animatable from 'react-native-animatable';
const App = () => {
  const handleRef = ref => this.view = ref;
  const hideView = () => {
    this.view.fadeOutDown(2000);
  }
  return (
    <>
      <Animatable.View
        style={{
          backgroundColor: 'red'
        }}
        ref={handleRef}
        animation="fadeInUp"
        duration=2000
      />
      <Pressable onPress={hideView}>
        <Text>Hide View</Text>
      </Pressable>
    </>
  );
}
export default App;
In this example, Animatable.View is given one of the predefined Animatable animations as the animation property, and a duration that defines how long the animation runs. That is all you have to do to have an entrance animation.
As stated before, Animatable also supports imperative usage, which means that you can call Animatable functions on Animatable components. In this example, this.view contains a reference to Animatable.View, which makes it possible to call Animatable functions on it.
This is done when pressing the Pressable. Here, hideView is called, which then calls the predefined fadeOutDown Animatable function, which makes the view disappear over 2 seconds (2,000 ms).
Using the native driver
As we learned in the Using the internal Animated API of React Native section, using the native driver is crucial for achieving smooth animations. Since react-native-animatable is based on the Animated API, you should also configure your animations to use the native driver.
With react-native-animatable, this is done by adding useNativeDriver={true} as a property to the component you run the animation on.
Important note
Please check whether the predefined animation you want to use supports the native driver before using it with the native driver.
The react-native-animatable library is not limited to predefined animations. It also supports defining custom animations with a very simple API. Let’s take a look at how this is done.
Working with custom animations
The following example shows you how to create a simple fade-in and move-up animation, just as we did in the previous section:
The custom animations of react-native-animatable map the styles to the keyframes. In this example, we start with the first keyframe (0), and set the opacity value to 0 and the translateY value to 50. With the last keyframe (1), the opacity value should be 1 and the translateY value should be 0. Now this animation can be used as the animation property value of any Animatable component instead of the predefined string values.
Understanding the pros and cons of react-native-animatable
Built on the React Native Animated API, all pros and cons of the Animated API also apply to react-native-animatable. In addition to that, the following pros are worth mentioning:
- Very easy to use: react-native-animatable is by far the easiest library to create and use high-quality animations.
- Declarative approach: The declarative approach creates code that is easy to read and understand.
Since react-native-animatable is a library built on top of the Animated API, this additional layer also brings some cons:
- Additional dependency: You have to add react-native-animatable as an additional dependency to your project. This is especially important because, at the time of writing, the project wasn’t maintained very actively. This means that if anything changes in the underlying Animated API, it can prevent you from upgrading your React Native project.
- Limited API: The predefined animations and the possibilities to create custom animations are limited. If you want to create complex animations, you should use another option.
Essentially, react-native-animatable is a simple library on top of the React Native Animated API. It simplifies working with animations and works best with simple, predefined animations. If you need these simple or standard animations and you are very limited in time to create your animations, react-native-animatable is the best option for you.
If you’d like to create more complex animations, please take a look at the following section.
Exploring Reanimated 2 – the most complete animation solution for React Native
Reanimated is by far the most complete and mature animation solution for React Native. It was an improved reimplementation of the React Native Animated API in the first place, but with version 2, the API changed and the library’s capabilities increased greatly.
This section covers the following topics:
- Getting to know the Reanimated API with a simple example
- Understanding the architecture of Reanimated 2
- Understanding the pros and cons of Reanimated
Let’s get started.
Getting to know the Reanimated API with a simple example
Essentially, the core concept of Reanimated 2 is as simple as the Animated API. There are animation values that can be changed, and these animation values power the animations.
The following code shows an animation that scales in a View component:
import React from "react";
import { Text, Pressable } from "react-native";
import Animated, { useSharedValue, useAnimatedStyle,
    Easing, withTiming } from 'react-native-reanimated';
const App = () => {
    const size = useSharedValue(0);
    const showView = () => {
      size.value = withTiming(100, {
        duration: 2000,
        easing: Easing.out(Easing.exp),
      });
  }
    const animatedStyles = useAnimatedStyle(() => {
      return {
        width: size.value,
        height: size.value,
        backgroundColor: 'red'
      };
  });
  return (
    <>
      <Animated.View style={animatedStyles} />
      <Pressable onPress={showView}>
        <Text>Show View</Text>
      </Pressable>
    </>
  );
}
When looking at this code, we realize three things:
- The structure is quite similar to the Animated API. There is a sharedValue, which is Animated.Value in Animated, and a withTiming function, which is the equivalent to Animated.timing in Animated. The style object for the Animated.View component is created using a useAnimatedStyle function and is then used as a style property.
- There is no useNativeDriver property.
- We are changing width and height values in the animation, so the layout properties get changed, which wasn’t possible with the React Native internal Animated API.
One of the cool things about Reanimated is that you don’t have to care about the native driver. Every animation with Reanimated is processed on the UI thread. Another cool thing is that every style property can be used.
If you compare this to the limitations of the Animated API, you immediately see how much more powerful Reanimated is.
To understand how this is done, let’s take a look at the Reanimated architecture.
Understanding the architecture of Reanimated 2
Reanimated 2 is based on animation worklets. In this context, a worklet is a JavaScript function that runs on the UI thread. Reanimated 2 spawns a second, very minimalistic, JavaScript environment on the UI thread that handles these animation worklets.
This means it runs completely independently from the React Native JavaScript thread and the React Native bridge, which guarantees awesome performance even for complex animations. This worklet context uses the new React Native architecture.
Let’s start with gaining an understanding of how to use worklets.
Starting to work with worklets
Let’s take a look at the example from the Understanding the architectural challenge of animations in React Native section of this chapter. We have an animation that resizes or moves a title image based on the Y scroll value of a ScrollView. The following figure shows what’s happening when implementing this example with Reanimated 2:

Figure 6.2 – Animation based on the scroll value in Reanimated 2
In Reanimated 2, the animation is created as a worklet on the JavaScript thread. But the whole animation worklet is executed in the worklet context on the UI thread. So, every time a new scroll event is received, it doesn’t have to cross the bridge; instead, it’s processed directly in the worklet context, and the new animation state is passed back to the UI thread for rendering.
To achieve this kind of architecture, Reanimated 2 comes with its own Babel plugin. This Babel plugin extracts every function that is annotated as worklet from the react-native code and makes it runnable in this separate worklet context on the UI thread. The following code example shows you how to annotate a function as a worklet:
function myWorklet() {
  'worklet';
  console.log("Hey I'm running on the UI thread");
}
This is a simple JavaScript function that contains the worklet annotation in line 2. Based on this annotation, the Reanimated 2 Babel plugin knows that it has to process this function.
Now, this can be run as a standard function on the JavaScript thread, but it can also be run as a worklet on the UI thread, depending on how it is called. If the function is called like a normal function in the JavaScript code, it runs on the JavaScript thread, and if it is called using the Reanimated 2 runOnUI function, it runs asynchronously on the UI thread.
Of course, it is possible to pass parameters to these worklet functions, no matter where it runs.
Understanding the connection between the JavaScript thread and the worklet context
Understanding this connection is crucial to prevent a lot of errors from happening. Essentially, the JavaScript thread and the worklet context run in completely different environments. This means it is not possible to simply access everything from the JavaScript thread while being in a worklet. The following connections are possible when it comes to worklets:
- The JavaScript thread can start worklets and pass parameters: As mentioned earlier, it is possible to run a function as a worklet when it has been annotated with worklet and is called with runOnUI. This runs the function in the worklet context on the UI thread. Every parameter that is passed is copied to the worklet context on the UI thread.
- Worklets can access constants from the JavaScript thread: Reanimated 2 processes the worklet code and copies the used constants and their values to the worklet context. This means constants can also be used in worklets without having to fear performance drops.
- Worklets can invoke other worklet functions synchronously: Worklets can call other worklets synchronously because they run in the same environment.
- Worklets can call non-worklet functions asynchronously: When functions on the JavaScript thread are called from within a worklet, this call has to be asynchronous because the invoked function runs in another environment.
For more information on worklets, you can take a look at the worklet part of the official documentation at https://bit.ly/prn-reanimated-worklets.
Using shared values
Like in the internal Animated API of React Native, Reanimated 2 works with animation values to drive the animation. These animation values are called Shared Values in Reanimated 2. They are called Shared Values because they can be accessed from both JavaScript environments – the JavaScript thread and the worklet context on the UI thread.
Since these Shared Values are used to drive animations, and these animations run in the worklet context on the UI thread, they are optimized to be updated and read from the worklet context. This means reads and writes of Shared Values from worklets are synchronous, while reads and writes from the JavaScript thread are asynchronous.
You can take a deeper look at Shared Values in the official documentation at https://bit.ly/prn-reanimated-shared-values.
Working with Reanimated 2 Hooks and functions
When working with Reanimated 2, there is no need to create worklets for most use cases. Reanimated 2 provides an excellent set of Hooks and functions that can be used to create, run, change, interrupt, and cancel animations. These Hooks take care of transferring the executions of the animation to the worklet context automatically.
This is what was used in the example at the beginning of this section. In that scenario, we created a Shared Value with the useSharedValue Hook, connected the View’s style with the useAnimatedStyle Hook, and started the animation with the withTiming function.
Of course, you can also handle scroll values with Reanimated 2. The following code example shows you how to connect a ScrollView to a Shared Value, to scale and move an image with an animation driven by user scrolling:
function App() {
  const scrolling = useSharedValue(0);
  const scrollHandler = useAnimatedScrollHandler((event) =>
  {
    scrolling.value = event.contentOffset.y;
  });
  const imgStyle = useAnimatedStyle(() => {
    const interpolatedScale = interpolate(
      scrolling.value,[-300, 0],[3, 1],Extrapolate.CLAMP
    );
    const interpolatedTranslate = interpolate(
      scrolling.value,[0, 300],[0, -300],Extrapolate.CLAMP
    );
    return {
      transform: [
        {translateY: interpolatedTranslate},
        {scaleY: interpolatedScale},
        {scaleX: interpolatedScale}
      ]
    };
  });
  return (
    <>
      <Animated.Image
        source={require('sometitleimage.jpg')}
        style={[styles.header,imgStyle]}
      />
      <Animated.ScrollView
        onScroll={scrollHandler}      >
        <View style={styles.headerPlaceholder} />
        <View style={styles.content} />
      </Animated.ScrollView>
    </>
  );
}
In this example, the ScrollView binds the Y scroll value (content offset) to the animation value using Reanimated’s useAnimatedScrollHandler Hook. This animation value is then interpolated with the interpolate function of Reanimated 2. This is done inside a useAnimatedStyle hook.
This setup makes the animation work, without ever having to send scroll values over the bridge to the JavaScript thread. The whole animation runs inside the worklet context on the UI thread. This makes the animation extremely performant.
Of course, Reanimated 2 offers a wide range of other options. It is possible to use spring-based animations, velocity-based animations, delay or repeat animations, and run animations in sequence, just to name a few.
Since a complete guide on Reanimated 2 would go beyond the scope of this book, please have a look at the official documentation (https://bit.ly/prn-reanimated-docs) and the API reference (https://bit.ly/prn-reanimated-api-reference).
To complete this section, we will have a look at the pros and cons of Reanimated 2.
Understanding the pros and cons of Reanimated
Reanimated 2 is, by far, the most advanced and complete solution for animations in React Native. There are a lot of reasons to use Reanimated 2. Here is a list of the most important ones:
- Easy-to-use API: The Reanimated 2 API with Hooks and functions is easy to learn, read, and understand.
- Awesome performance out of the box: Animations with Reanimated 2 run smoothly and are performant on all devices out of the box.
- Animation of layout properties: All style values can be used in animations. There is no limitation like in the Animated API.
- Interrupting, changing, and canceling animations: Animations with Reanimated 2 can be interrupted, changed, or canceled while they run, without causing frame drops or sluggish behavior.
Reanimated 2 is a very good library, but before using it, you should have a look at the following cons:
- Complicated installation: Since Reanimated 2 deeply intervenes in the architecture of React Native, the installation is quite complicated. You have to make some changes to the native code and add the Reanimated 2 Babel plugin. This is not a big problem because it only has to be done once, but it will take some time. This will change when the new architecture, including the new Fabric renderer, is out.
- Reanimated 2 makes you bundle larger: While the internal Animated API is part of React Native, Reanimated 2 is an external dependency. This means your bundle will grow.
If you have an app with a lot of animations, more complex animations, and/or animated layout properties, I would definitely recommend using Reanimated 2. If you only use basic animations, which can be achieved with the internal Animated API, you don’t need Reanimated and can stick to the Animated API.
While Reanimated 2, the Animated API, and even react-native-animatable have a very similar approach, the next library we will get to know works completely differently. Let’s take a look at Lottie.
Using Lottie animations in React Native
Lottie is a completely different approach to animations in app and web development. It allows you to render and control prebuilt vector animations. The following figure shows the process of how a Lottie animation is created and played:
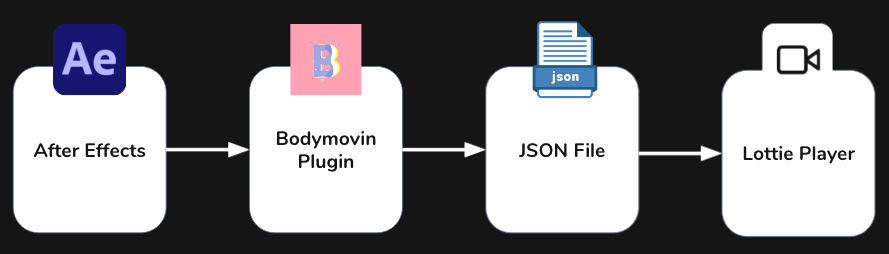
Figure 6.3 – The workflow when animating with Lottie
Essentially, Lottie consists of a player, which in the case of React Native is the lottie-react-native library. This library expects a JSON file of a Lottie animation. This file is created with Adobe After Effects (a professional animation software) and exported to JSON with the Bodymovin plugin.
This process completely changes the way we work with animations in apps. The developer is no longer responsible for creating the animations; they only have to include the JSON file. This can save a huge amount of time when working with very complex animations.
All of this becomes clearer when looking at a simple Lottie animation.
Starting with a simple example
The following code example shows the implementation of a loading animation with Lottie:
import React from 'react';
import { View, StyleSheet } from 'react-native';
import LottieView from 'lottie-react-native';
const App = () => {
    return (
        <View style={styles.center}>
            <LottieView
                source={require('loading-animation.json')}
                style={styles.animation}
                autoPlay/>
        </View>
    );
};
const styles = StyleSheet.create({
    center: {
        flex: 1,
          alignItems: 'center',
            justifyContent: 'center'
    },
    animation: {
        width: 150,
        height: 150
    }
});
export default App;
This is all the code that is needed to include a loading animation, no matter how complex the animation is. LottieView is imported from the lottie-react-native library and is placed where the animation should occur. The Lottie JSON file is passed as source to LottieView, which can be styled via the style property like a regular React Native view.
However, lottie-react-native is not just a simple player. It gives you programmatic control over the animation. You can start and stop the animation, autoplay it when it loads, and loop it so that it starts again after completion. The last one is especially useful for loading animations.
Combining Lottie animations with the React Native Animated API
The best feature of lottie-react-native is that it is possible to bind the progress of an animation to an Animated.Value component of the React Native Animated API. This opens up a lot of different use cases such as Lottie animations running time or spring-based. You can also use easing or create Lottie animations running based on user interaction.
The following code example shows you how to create a Lottie animation driven by an Animated.Value component that is bound to the Y scroll value of a React Native ScrollView:
const App = () => {
  const scrolling = useRef(new Animated.Value(0)).current;
  let interpolatedProgress = scrolling.interpolate({
    inputRange: [-1000, 0, 1000],
    outputRange: [1, 0, 1],
    extrapolate: 'clamp',
  });
  return (
    <View style={styles.container}>
      <Animated.ScrollView
        onScroll={Animated.event(
          [{
            nativeEvent: {
              contentOffset: {
                y: scrolling,
              },
            },
          }],
          { useNativeDriver: true },
        )}
        scrollEventThrottle={16}>
          <LottieView
            source={require('looper.json')}
            style={styles.animation}
            progress={interpolatedProgress}/>
      </Animated.ScrollView>
    </View>
  )
}
In this example, the Y scroll value of the ScrollView is bound to an Animated.Value component in the onScroll function of the ScrollView. Then, the Animated.Value component is interpolated to get an interpolatedProgress between 0 and 1. This interpolatedProgess is passed to LottieView as a progress property.
Lottie also supports animations of the React Native Animated API, that use the native driver. This is very important for performance reasons. For more on this, please read the Using the internal Animated API of React Native section of this chapter.
Finding or creating Lottie animations
While Lottie animations are very easy to include for the developer, someone has to create the Lottie JSON files that contain the animations. There are three ways to get Lottie animation files:
- Find Lottie files on the internet: There are a lot of talented animation artists out there who share their work on the internet. A lot of the files are free, but it is also possible to purchase premium animation content. The best place to start your search for Lottie animations is https://lottiefiles.com/.
- Learn to create animations with After Effects: There are a lot of good beginner tutorials, and even if it seems overwhelming to begin with, After Effects is an awesome software, and it is quite easy to create your first animations with it. If you are interested in learning After Effects, you can start with the tutorial at bit.ly/prn-lottie-tutorial.
- Hire an animation artist: This is, by far, the best solution from my point of view. An experienced animation artist will only need some hours to create a bunch of individual animations for your project. It will save you time and money to work with an animation artist, and it will greatly improve the quality of your app when having individual animations that exactly fit your UI concept. You can find and contact animation artists at https://lottiefiles.com/.
Now that we have a good understanding of how Lottie animations in React Native work, let’s have a look at the pros and cons.
Understanding the pros and cons of Reanimated
Since the Lottie approach is completely different, there are huge pros and cons you should keep in mind when you consider using Lottie as the animation solution for your project.
The following pros stand out when using Lottie:
- Lottie is the easiest solution for developers: When working with lottie-react-native, it just takes a few lines of code to integrate an animation, no matter how complex it is.
- Animations are much smaller than GIFs or Sprites: Another approach when it comes to animated files is GIFs or Sprites. Lottie files are much smaller and consume far less memory than these solutions.
- Programmatic control over the animation progress: Unlike when working with GIFs, you have programmatic control over the animation. You can even bind the animation progress to the animation values of React Native Animated.
However, Lottie also comes with the following cons:
- No full control over the animation: When working with Lottie animations, you are able to control the progress of the animation, but only the progress. You cannot change the paths of the animations based on user interaction like you can when completely scripting the animation.
- The large size of the Lottie library: Lottie for React Native increases the bundle size. Depending on what platform an app is exported to, not only does lottie-react-native has to be included in the app but also the Lottie module for the native platform.
- External dependency: Lottie is an external dependency, and you have to keep in mind that this could slow down your update capabilities for new React Native versions. Since Lottie is not a React Native-only solution but also working on native apps and the web and React Native is a smaller platform compared to the other platforms Lottie is working on, it is kind of a second class citizen. This means it is not guaranteed that lottie-react-native will immediately work with every new React Native version.
Lottie is an awesome option to include high-quality animations in a React Native project. Especially for complex loading animations, micro-animations, or any animation where no complete programmatic control is needed, Lottie is a great solution.
Summary
In this chapter, you learned about the general architectural challenge when it comes to animations in React Native. You understood that there are different solutions to overcome this challenge and create high-quality and performant animations. With Animated, react-native-animatable, Reanimated, and Lottie, we looked at the best and the most widely used animation solutions for React Native’s on-screen animations.
This is important because you will have to use animations in your app to create a high-quality product, and such animation libraries are the only way to create high-quality and performant animations in React Native.
In the next chapter, you will learn how to handle user gestures and also work with more complex user gestures to do different things – for example, to drive animations.