
2
Understanding the Essentials of JavaScript and TypeScript
Since React Native apps are written in JavaScript, it is important to have a very good understanding of this language to build high-quality apps. JavaScript is very easy to learn, but very hard to master, because it allows you to do nearly everything without giving you a hard time. However, just because you can do everything does not mean that you should.
The overall goal of this chapter is to show important underlying concepts for avoiding the most common mistakes, bad patterns, and very expensive don’ts. You will get useful tips, learn best practices, and repeat the most important basics to use JavaScript in your apps.
In this chapter, we will cover the following topics:
- Exploring modern JavaScript
- JavaScript knowledge for React Native development
- Working with asynchronous JavaScript
- Using typed JavaScript
Technical requirements
There are no technical requirements except a browser to run the examples of this chapter. Just go to https://jsfiddle.com/ or https://codesandbox.io/ and type and run your code.
To access the code for this chapter, follow this link to the book’s GitHub repository:
This chapter is not a complete tutorial. If you are not familiar with the JavaScript basics, please have a look at https://javascript.info, which is the JavaScript tutorial I would recommend to start.
Exploring modern JavaScript
When we speak of modern JavaScript, this refers to ECMAScript 2015 (which also is known as ES6) or newer. It contains a lot of useful features, which are not included in older JavaScript versions. Since 2015 there has been an update to the specification released every year.
You can have a look at the features that were implemented in previous releases in the TC39 GitHub repository (https://bit.ly/prn-js-proposals). You can also find a lot of information about upcoming features and release plans there.
Let’s start our journey to understand the most important parts of JavaScript by having a look under the hood. To truly understand modern JavaScript and the tooling around it, we have to take a little look at the basics and the history of the language. JavaScript is a script language, which can run nearly everywhere.
The most common use case clearly is building dynamic frontends for the web browser, but it also runs on the server (Node.js), as part of other software, on microcontrollers, or (most importantly for us) in apps.
Every place where JavaScript runs has to have a JavaScript engine, which is responsible for executing the JavaScript code. In older browsers, the engines were only simple interpreters that transformed the code to executable bytecode at runtime without any optimizations.
Today there is a lot of optimization going on inside the different JS engines, depending on which metrics are important for the engine’s use case. The Chromium V8 engine, for example, introduced just-in-time compilation, which resulted in a huge performance boost while executing JavaScript.
To be able to have a common understanding of what JavaScript is on all those platforms and between all those engines, JavaScript has a standardized specification called ES. This specification is constantly evolving as more and more features (such as improved asynchrony or a cleaner syntax) are introduced to JavaScript.
This constantly evolving feature set is awesome for developers but introduced a big problem. To be able to use the new features of the ES language specification, the JavaScript engine in question has to implement the new features and then the new version of the engine has to be rolled out to all users.
This is a big problem especially when it comes to browsers, since a lot of companies rely on very old browsers for their infrastructure. This would make it impossible for developers to use the new features for years.
This is where transcompilers such as Babel (https://babeljs.io) come into play. These transcompilers convert modern JavaScript into a backward-compatible version, which can be executed by older JavaScript engines. This transcompilation is an important step of the build process in modern web applications as well as in React Native apps.
When writing modern JavaScript applications, it works like this:
- You write your code in modern JavaScript.
- A transcompiler converts your code to pre-ES6 JavaScript.
- A JavaScript engine interprets your code and transforms it into bytecode, which is then executed on the machine.
- Modern JavaScript engines optimize execution with features such as just-in-time compilation.
When it comes to React Native, you can choose from different JavaScript engines with different strengths and weaknesses. You can read more on this in Chapter 8, JavaScript Engines and Hermes.
In this section, you learned what modern JavaScript is and how it works under the hood. Let’s continue with the specific parts of JavaScript required when developing with React Native.
Exploring JavaScript for React Native development
In this section, you will learn some basic JavaScript concepts, all of which are important to truly understand how to work with React Native. Again, this is not a complete tutorial; it includes only the most important things that you have to keep in mind if you don’t want to run into errors that are very hard to debug.
Tip
When you are not sure how JavaScript behaves in a special scenario, just create an isolated example and try it on https://jsfiddle.com/ or https://codesandbox.io/.
Understanding the assigning and passing of objects
Assigning or passing data is one of the most basic operations in any programming language. You do it a lot in every project. When working with JavaScript, there is a difference when working with primitive types (Boolean, number, string, and so on) or with objects (or arrays, which are basically objects).
Primitives are assigned and passed by values, while objects are assigned and passed by references. This means for primitives, a real copy of the value is created and stored, while for objects, only a new reference to the same object is created and stored.
This is important to keep in mind, because when you edit an assigned or passed object, you also edit the initial object.
This will be clearer in the following code example:
function paintRed(vehicle){
     vehicle.color = 'red›;
}
const bus = {
     color: 'blue'
}
paintRed(bus);
console.log(bus.color); // red
The paintRed function does not return anything and we do not write anything in bus after initializing it as a blue bus. So, what happens? The bus object is passed as a reference. This means the vehicle variable in the paintRed function and the bus variable outside of the function reference the same object in storage.
When changing the color of vehicle, we change the color of the object that is also referenced by bus.
This is expected behavior, but you should avoid using it in most cases. In larger projects, code can get very hard to read (and debug) when objects are passed down a lot of functions and are then changed. As Robert C. Martin already wrote in the book Clean Code, functions should have no side effects, which means they should not change values outside of the function’s scope.
If you want to change an object in a function, I recommend using a return value in most cases. This is much easier to understand and read. The following example shows the code from the previous example, but without side effects:
function paintRed(vehicle){
const _vehicle = { ...vehicle }
     _vehicle.color = 'red'
return _vehicle;
}
let bus = {
     color: 'blue'
}
bus = paintRed(bus);
console.log(bus.color); // red
In this code example, it is absolutely clear that bus is a new object, which was created by the paintRed function.
Please keep this in mind when working on your projects. It really can cost you a lot of time when you have to debug a change in your object, but you don’t know where it’s coming from.
Creating real copies of an object
A very common problem that results from the previous point is that you have to clone an object. There are multiple ways to do that, each with different limitations. Three options are shown in the following code example:
const car = {
color: 'red',
       extras: {
            radio: "premium",
            ac: false
       },
       sellingDate: new Date(),
         writeColor: function() {
           console.log('This car is ' + this.color);
}
};
const _car = {...car};
const _car2 = Object.assign({}, car);
const _car3 = JSON.parse(JSON.stringify(car));
car.extras.ac = true;
console.log(_car);
console.log(_car2);
console.log(_car3);
We create an object with different types as properties. This is important, because the different ways to clone the object will not work for all properties. We use a string for color, an object for extras, a date for sellingDate, and a function in writeColor to return a string with the color of the car.
In the next lines, we use three different ways to clone the object. After creating the _car, _car2, and _car3 cloned objects, we change extras in the initial car object. We then log all three objects.
We will now have a detailed look at the different options regarding how to clone objects in JavaScript. These are the following:
- Spread operator and Object.assign
- JSON.stringify and JSON.parse
- Real deepclone
We’ll start with spread operator and Object.assign, which basically work the same way.
Spread operator and Object.assign
The three dots we use to create _car is called a spread operator. It returns all properties of the object. So basically, in line 13 we created a new object and populated it with all properties of car. In line 14, we did a very similar thing; we assigned all properties of car to a new empty object with Object.assign.
In fact, lines 13 and 14 work the same way. They create a shallow clone, which means they clone all property values of the object.
This works great for values, but it doesn’t for complex data types, because, again, objects are assigned by reference. So, these ways of creating a copy of a complex object only clone the references to the data of the properties of the object and don’t create real copies of every property.
In our example, we wouldn’t create a real copy of extras, sellingDate, and writeColor, because the values of the properties in the car object are only references to the objects. This means that by changing _car.extras in line 17, we also change _car2.extras, because it references the same object.
So these ways of cloning objects work fine for objects with just one level. As soon as there is an object with multiple levels, cloning with the spread operator or Object.assign can create serious problems in your application.
Stringify and parse again
A very common pattern to clone objects is to use the built-in JSON.stringify and JSON.parse features of JavaScript. This converts the object to a primitive type (a JSON string) and creates a new object by parsing the string again.
This forces a deepclone, which means even sub-objects are copied by value. The downside of this approach is that it only works for values that have an equivalent in JSON.
So, you will lose all functions, properties that are undefined, and values such as infinity that do not exist in JSON. Other things such as date objects will be simplified as strings, resulting in a lost time zone. So, this solution works great for deep objects with primitive values.
Real deepclone
When you want to create a real deepclone of an object, you have to get creative and write your own function. There are a lot of different approaches when you search the web. I would recommend using a well-tested and maintained library such as Lodash (https://lodash.com/). It offers a simple cloneDeep function, which does the work for you.
You can use all solutions, but you have to keep in mind the limitations of every single approach. You should also have a look at the performance of the different solutions when you use them. In most cases, all cloning methods are fast enough to use, but when you’re experiencing performance issues in your application, you should have a closer look at which method you are using.
Please find a summary in the following table:
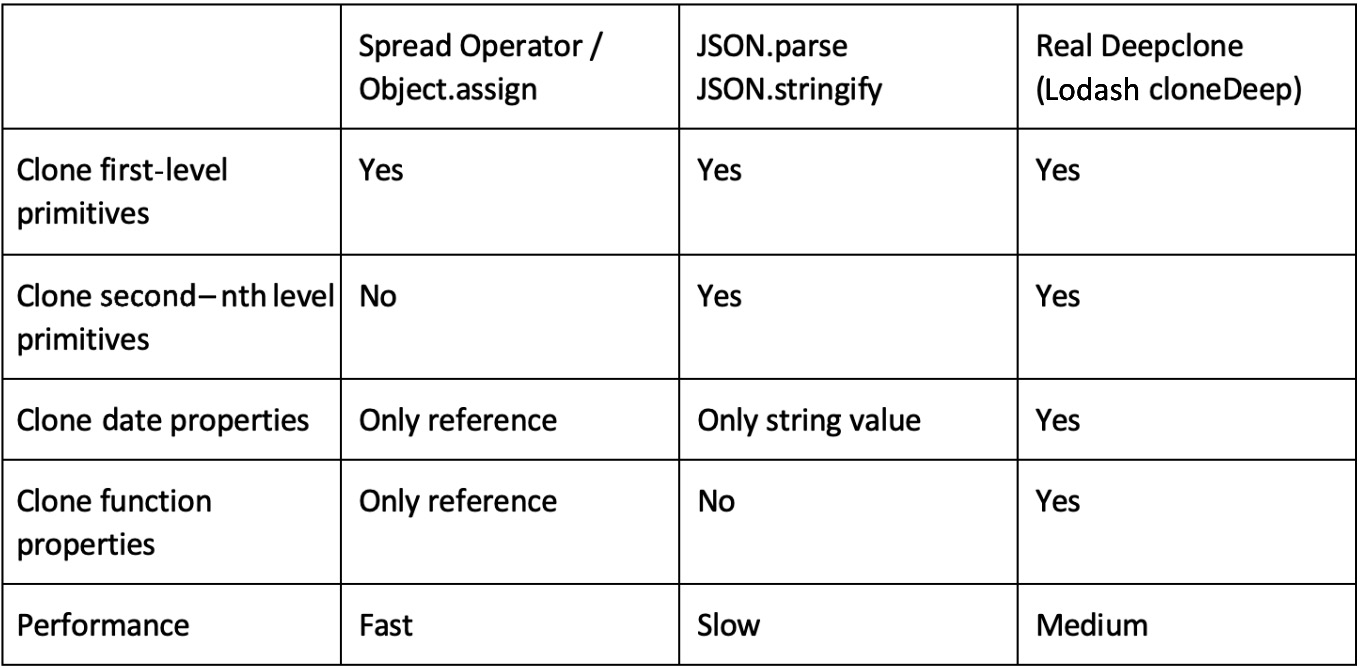
Figure 2.1 – Comparison of JavaScript cloning solutions
Knowing how to clone objects in certain situations is very important, because using the wrong cloning technique can lead to errors that are very hard to debug.
After understanding how to clone objects, let’s have a look at destructuring objects.
Working with destructuring in JavaScript
Another thing you will need to do a lot when working with React Native is destructuring objects and arrays. Destructuring basically means unpacking the properties of objects or the elements of arrays. Especially when working with Hooks, this is something you have to know very well. Let’s start with arrays.
Destructuring arrays
Have a look at the following code example, which shows how an array gets destructured:
let name = ["John", "Doe"];
let [firstName, lastName] = name;
console.log(firstName); // John
console.log(lastName); // Doe
You can see an array with two elements. In the second line, we destructure the name array by assigning name to an array with two variables inside. The first variable gets assigned the first value of the array, and the second variable the second value. This can also be done with more than two values.
Array destructuring is used, for example, every time you work with a useState Hook (more on this in Chapter 3, Hello React Native).
Now that you know how to destructure an array, let’s go on to destructuring objects.
Destructuring objects
The following code example shows how to destructure an object:
let person = {
     firstName: "John",
     lastName: "Doe",
     age: 33
}
let {firstName, age} = person;
console.log(firstName); // John
console.log(age); // 33
Object destructuring works the same way as destructuring arrays. But please note the curly brackets in line 6 of the code example. This is important when destructuring objects instead of arrays. You can get all properties of the object just by using the key in the destructuring, but you don’t have to use all properties. In our example, we only use firstName and age, but not lastName.
When working with destructuring, you can also collect all the elements that weren’t specified during the destructuring. This is done with the spread operator, as described in the following section.
Using the spread operator during destructuring
The spread operator can be used as shown in the following code example:
const person = {
     firstName: 'n',
     lastName: 'Doe',
     age: 33,
     height: 176
}
const {firstName, age, ...rest} = person;
console.log(firstName); // John
console.log(age); // 33
console.log(Object.keys(rest).length); // 2
When destructuring arrays or objects, you can use the spread operator to collect all elements that weren’t included in the destructuring. In the code example, we use firstName and age in the destructuring.
All other properties, in this example lastName and height, are collected in a new object, the rest variable. This is used a lot in React and React Native, for example when passing properties (or props) down to components and destructuring these props.
When you work with React or React Native, especially with functional components and Hooks, destructuring is something that you will use in every component. Basically, it is nothing more than unpacking the properties of an object or elements of an array.
Now that we understand destructuring, let’s move on to another important topic – the this keyword and its scope in JavaScript.
Understanding this in JavaScript
JavaScript has quite a unique behavior when it comes to the this keyword. It does not always refer to the function or scope where it is used. By default, this is bound to the global scope. This can be changed via implicit or explicit binding.
Implicit and explicit binding
Implicit binding means that if a function is called as part of an object, this always refers to the object. Explicit binding means that you can bind this to another context. This is something that was used a lot in React and React Native to bind this in the handlers of class components.
Please have a look at the following code example:
class MyClass extends Component{
       constructor( props ){
              this.handlePress =
                  this.handlePress.bind(this);
       }
handlePress(event){
              console.log(this);
       }
render(){
              return (
                <Pressable type="button"
                     onPress={this.handlePress}>
                     <Text>Button</Text>
                </Pressable >
              );
       }
}
In the preceding code, we bind the this value of the class explicitly to the handlePress function. This is necessary, because if we don’t do it, this would be implicitly bound to the object where it is called, which in this case would be anywhere in the Pressable component. Since we want to have access to the data of our MyClass component in our handlePress function in most cases, this explicit binding is needed.
You can see this kind of code in a lot of applications, because for a long time it was the only method to access class properties from inside a function. This led to a lot of explicit binding statements in constructors, especially in larger class components. Fortunately, today there is a much better solution – arrow functions!
Arrow functions to the rescue
In modern JavaScript, there is another solution that makes this implicit/explicit binding redundant: arrow functions. This is a new syntax to define functions, which is not only shorter than the old way of declaring functions, but it also changes the way that the value of the this keyword is bound. Instead of writing function myFunction(param1){}, you simply write const myFunction = (param1) => {}.
The important thing here is that arrow functions always use the lexical scope of this, which means they won’t rebind this implicitly.
The following example shows how to use arrow functions to make explicit binding statements redundant:
class MyClass extends Component{
handlePress = (event) => {
              console.log(this);
       }
render(){
              return (
                <Pressable type="button"
                     onPress={this.handlePress}>
                     <Text>Button</Text>
                </Pressable >
              );
       }
}
As you can see, we use an arrow function to define handlePress. Because of this, we don’t have to do an explicit binding like in the code example before. We simply can use this inside the handlePress function to access states and props of other properties of our MyClass component. This makes the code easier to write, read, and maintain.
Important note
Please keep in mind that regular functions and arrow functions are not only syntactically different, but they also change the way this is bound.
Understanding the scope of this is crucial to avoid costly errors such as undefined object references. When it comes to app development, these undefined object references can hard-crash your app. So, keep in mind the scope you are referring to when using the this keyword.
These are the most important things you must truly understand when using JavaScript to develop large-scale applications. If you don’t, you will make costly errors.
The next thing that is very important when developing apps with React Native is asynchronous programming.
Working with asynchronous JavaScript
Because of the architecture of React Native (more on this in Chapter 3, Hello React Native) and the typical use cases of apps, understanding asynchronous JavaScript is crucial. A typical example of an asynchronous call is a call to an API.
In a synchronous world, after making the call, the application would be blocked until the answer from the API is received. This is, obviously, unexpected behavior. The application should respond to user interaction while it waits for the response. This means the call to the API has to be done asynchronously.
There are multiple ways of working with asynchronous calls in JavaScript. The first one is callbacks.
Exploring callbacks
Callbacks are the most basic way to work with asynchrony in JavaScript. I would recommend using them as little as possible, because there are better alternatives. But since a lot of libraries rely on callbacks, you have to have a good understanding of them.
A callback is a JavaScript function A that is passed as an argument to another function B. At some point in function B, function A is called. This behavior is called a callback. The following code shows a simple callback example:
const A = (callback) => {
     console.log("function A called");
     callback();
}
const B = () => {
     console.log("function B called");
}
A(B);
// function A called
// function B called
When you look at the code, function A is called. It logs some text and then calls the callback. This callback is the function passed to function A as a property when function A was called – in this example, function B.
So, function B is called at the end of function A. Function B then logs some more text. As a result of this code, you will see two lines of text: first, the one logged by function A, and second, the one logged by function B.
While callbacks can be a little hard to understand, let’s have a look at what’s happening under the hood.
Understanding the implementation
To be able to truly understand callbacks, we’ll have to dig a little into the implementation of a JavaScript engine. JavaScript is single-threaded, so inside of the JavaScript code execution, asynchrony won’t be possible. The following figure shows the important parts of a JavaScript engine and how they work together to achieve asynchrony:

Figure 2.2 – JavaScript engine asynchronous code execution
Your commands will be pushed to the callstack and processed in a last-in, first-out order. To achieve asynchrony, JavaScript engines provide APIs that are called from within your JavaScript code. These APIs execute code on another thread. Most of these APIs expect a callback passed as an argument.
When this code execution on the second thread is finished, this callback will be pushed to the message queue. The message queue is monitored by the event loop. As soon as the callstack is empty and the message queue is not, the event loop takes the first item of the message queue and pushes it on the callstack. Now we are back in our JavaScript context and the JavaScript code execution continues with the given callback.
What’s better than callbacks? Promises!
With ES 2015, promises were introduced. Under the hood, they work quite similar to callbacks, except that there is another queue called a job or microtask queue. This queue works like the message queue but has a higher priority when getting processed by the event loop.
The difference from callbacks is that promises have a much cleaner syntax. While you can pass any number of callbacks to a function, a promise returns a function with exactly one or two arguments – resolve and (optionally) reject. resolve is called when the promise is processed successfully, and reject if there was an error while processing the promise.
The following code shows a generic example of a promise and how it is used:
const myPromise = () => new Promise((resolve) => {
     setTimeout(() => {
          resolve();
          }, 500);
});
console.log('start promise');
myPromise()
.then(() => {
     console.log('promise resolved');
});
// start promise
// -- 500ms delay
// promise resolved
The promise is created with new Promise and then called. Inside the promise, there is a 500 ms delay before the promise is resolved. When the promise is resolved, the function inside .then is called.
One of the simplest examples of this asynchronous behavior using a promise is fetching data from a server. You can use the Fetch API in JavaScript. This API contacts the server and waits for an answer.
As soon as the answer is received, resolve or reject is pushed to the queue and processed by the event loop. The following example shows the code for a simple fetch:
fetch("https://fakerapi.it/api/v1/texts?_quantity=1")
     .then(response => response.json())
     .then(data => {
          console.log(data);
     })
     .catch(error => {
          console.log(error); // handle or report the error
     })
This code example even contains two promises:
- The fetch operation, which returns the server response
- The unwrapping of the JSON data, which is included in the response
If one of the promises is rejected, the catch block is called with some error information.
Tip
You should always catch your errors and promise rejections and handle – or at least report – them. While unhandled promise rejections don’t crash your application in most cases, it indicates that something went wrong. It can be very hard to realize and debug this error without proper error reporting in place. It is always a good idea to use reporting tools such as Sentry or Bugsnag. You can read more on this in Chapter 14, Tips, Tricks, and Best Practices.
Promises also provide some interesting features such as Promises.all and Promises.first, which make it possible to work with multiple promises. If you want to learn more about this, you can have a look at bit.ly/prn-promises.
Improved syntax with async/await
With ES 2017, the async and await keywords were introduced to work with Promises. This is the syntax I recommend you use in your projects because it makes the code easy to read and understand. Instead of chaining .then with a callback function to the promise call, you can simply await the promise.
The only requirement is that the function you write code in is declared as an async function. You can also wrap the call with a try/catch block. This is similar to .catch in the regular promise syntax. The following example shows how to work with async/await property:
const fetchData = async () => {
try {
const response = await fetch(
"https://fakerapi.it/api/v1/texts?_quantity=1");
const data = await response.json();
console.log(data);
} catch (error) {
     console.log(error);
     }
}
fetchData();
We specify fetchData as an async function with the async keyword. Inside the async function, we use try/catch for proper error handling. Inside the try block, we await the fetch call and the unpacking of the JSON body with the await keyword.
Basically, every promise can be used with the async/await syntax. Also, an async function can be handled as a Promise with .then and .catch. Again, this is the syntax I would recommend for use in large-scale projects. Since it is compatible with Promises, you can use a lot of libraries with it out of the box. But when you have to work with a library that relies on promises in its API, you will have to patch it.
Patching callback libraries
When working with React Native, you will find some libraries that work with callbacks in their JavaScript. This is because the transfer between the JavaScript and React Native contexts relies on callbacks in most cases. I would recommend patching these libraries and reworking them to provide a promise API, which you can then use with async/await in your project. This is quite simple and improves the code quality a lot. A very simple example is shown in the following code block:
// libraryFunction(successCallback, errorCallback);
const libraryFunctionPromise = new Promise((resolve, reject) => {
     libraryFunction(resolve, reject);
}
In this code example, we have a library that provides a function that expects a successCallback and an errorCallback. We create a promise, which just calls this function and passes resolve as successCallback and reject as errorCallback. That’s all, now we can work with async/await to call our promise, which then calls the library function for us.
Tip
Try to use async/await syntax over promises wherever possible. This makes your code easier to read and understand.
In this section, you learned how asynchrony is implemented in JavaScript, how callbacks and promises work, and why you should rely on async/await, especially in large-scale projects.
This leads to the last section of this chapter, which is also very important when working on large-scale projects – static type checking in JavaScript.
Using typed JavaScript
JavaScript is a dynamically typed language. This means you can change the type of a variable after its initialization. While this can be very handy for small scripts, it can lead to difficult problems when working on large-scale projects. Debugging such errors, especially in apps with a lot of users, can get really messy.
This is where extensions to JavaScript come into play. There are multiple solutions to extend JavaScript to be a typed language. This not only prevents errors; it also enables better refactoring and code completion as well as pointing out problems directly when writing the code.
This speeds up the development process a lot. I would definitely recommend using typed JavaScript and I want to introduce the two most popular solutions here.
Flow
Created and open sourced by Facebook, Flow is a static type checker that works with normal JavaScript. It was created as a command-line tool that scans your files for type safety and reports errors to the console. Nowadays, all common JavaScript IDEs have Flow support built in or offer it via excellent plugins.
To enable static type checking with Flow, you just have to add the // @flow annotation to the top of your file. This tells the Flow type checker to include the file in the check. Then you can directly add your types behind the declaration of variables and parameters (inline), or you can declare more complex types and use these types to specify the type of a variable when it is declared.
This is shown in the following code block:
type Person = {
     name: string,
     height: number,
     age: number
}
let john: Person = {
     name: "John",
     height: 180,
     age: 35
}
We created a Person type, which is then used to create a person, john. If we had missed one of the properties or had assigned a value with the wrong type, the Flow IDE integration would have given us an error.
Since Flow isn’t a separate language but only a tool on top of JavaScript, we have to transform our files from Flow annotated files back to normal JavaScript files. This basically means, we have to use a transformer to remove all the Flow annotations from our files. Flow provides a Babel plugin for this, which has to be installed for your project to work.
Flow can be configured via a .flowconfig file. Here you can define which files and folders should be checked and which shouldn’t, as well as specifying some options, such as how to deal with imports, but also how many workers Flow can start in parallel to check your code or how much memory Flow is allowed to use.
If you want to have a deeper look at Flow, please visit the website at https://flow.org/.
TypeScript
Another option for typed JavaScript is TypeScript. It is an open source language on top of JavaScript that is developed and maintained by Microsoft. It also has awesome integrations for all common JavaScript IDEs and works very similar to Flow.
Your TypeScript code will be transformed into plain JavaScript via the TypeScript transpiler or Babel, before you are able to execute it in production. Even the syntax of the annotations is nearly the same. The example code in the Flow section would work perfectly fine in TypeScript.
If you want to have a deeper look at TypeScript, please visit the website at www.typescriptlang.org.
In general, I prefer TypeScript over Flow, because it is used much more widely with much larger support from the community. The docs are better and so are the IDE integration and code completion. If you start a new project, I recommend going with TypeScript. But Flow is also a good solution. If you have a working Flow integration in your project, there is no need to migrate to TypeScript at the moment.
Important note
If you work on a large-scale project, I would definitely recommend using Flow or TypeScript. Even if you have some overhead at the beginning, it will save you much more time and money in the end.
Summary
In this chapter, we learned how modern JavaScript works, along with some especially important basics for when working with React Native, and how asynchrony works in JavaScript. You have acquired a basic understanding of the underlying technology, as well as how misuse can lead to costly errors and how to avoid them.
In the next chapter, we will learn about React, how it works internally, and which parts of React it is important to know well when working with React Native.