
11
Creating and Automating Workflows
Automating workflows with modern workflow automation is an absolute must in large-scale projects. It will save you a lot of time, but even more importantly, it will guarantee that you don’t miss anything and your repetitive processes for steps such as checking for code styling and code quality, building your application, or releasing your application just work.
Next, it gives you the confidence that the code you have just written doesn’t only work on your machine because it is cloned and started on a clean machine. Last, it ensure the project isn't dependent on individual people.
In particular, steps such as building and releasing an application can become quite complex in larger-scale projects, so not every member of the project can do it. But with the correct automation setup, all it takes is the push of a button.
When talking about workflow automation, you’ll also often hear the terms continuous integration (CI) and continuous delivery (CD). Both terms describe automated workflows. CI refers to the development phase of a project. This means that every developer integrates the code they create into a shared repository frequently, normally multiple times a day. In every integration, the code is checked automatically (TypeScript/Flow, ESLint, Prettier, and Tests) and the developer gets immediate feedback. DS refers to the deployment or delivery step. It describes the automation of building and delivering the application.
Since CI is possible when building apps, you should use it. CD works for testing builds, but for public production builds, such as mobile apps, it doesn’t work well. Releasing to the public multiple times a day isn’t possible because every release has to be reviewed manually by Apple and Google to be available in the respective app store.
And even if it were possible (which you could achieve using CodePush, as you’ll learn in Chapter 13, Tips and Outlook) I wouldn’t recommend pushing updates too frequently as it will result in every user having to update the app version on every start.
That’s why we will focus on CI for development and building automated workflows for the build and release step, which can either be triggered manually for public production builds or automatically for internal testing builds (CD).
This enables you to deliver your application updates automatically to your test users and ship your app to the public with the push of a button while not annoying your real users with too frequent updates.
Since the best automation tools are worth nothing when the workflows you automate are not good, we’ll also focus on creating an effective development workflow in this chapter.
In this chapter, we will cover the following topics:
- Understanding integration/delivery workflow automation
- Creating a collaborative development workflow
- Creating useful CI pipelines for the development process
- Understanding workflow automation and CD for build and release
Technical requirements
To be able to run the code in this chapter, you must set up the following:
- A working React Native environment (bit.ly/prn-setup-rn – React Native CLI Quickstart)
- While most of this chapter should also work on Windows, I recommend working on a Mac
- An account with GitHub to run the CI pipelines
- An account with Bitrise to run the Bitrise delivery workflows
Understanding integration/delivery workflow automation
The process of integration and delivery workflow automation is pretty simple: you need a repository and an automation tool or build server that can connect to your repository. Then, you must define rules regarding which Git events should send information to the server to trigger certain scripts. The following diagram illustrates this process:

Figure 11.1 – Basic CI setup
A Git event such as commit, pull request, or merge triggers the automation tool. The automation tool starts a clean server with a configuration defined in the automation tool settings. Then, it clones the code from your repository and starts running scripts on it. When it comes to React Native apps, these scripts normally start with installing all the project dependencies and running static type checkers (Flow/TypeScript).
Next, you should run code quality tools such as ESLint and Prettier and check whether the code matches all the requirements. Most of the time, you would also run some tests here (more on this in Chapter 12, Automated Testing of React Native Apps).
You can run every other script here, as well as integrating other cloud tools such as SonarQube (https://bit.ly/prn-sonarcube, an advanced code quality tool) or Snyk (https://bit.ly/prn-snyk, a cloud-based security intelligence tool).
After the scripts have been executed, your automation tool creates a response and sends it back to your repository. This answer then gets shown in your repository and can be used to allow or deny further actions.
Nowadays, basic automation tools are integrated into all popular Git-based source code repository services, including GitHub (GitHub Actions), Bitbucket (Bitbucket Pipelines), and GitLab (GitLab CI/CD). While these tools work fine for React Native CI requirements, building and deploying mobile apps is a very complex process with special requirements.
For example, iOS apps can still only be built on macOS machines. While this step is technically also possible with most of these basic automation tools, I wouldn’t recommend using them for building and deploying.
For this step, there is a special toolkit called fastlane that integrates into special workflow automation tools such as Bitrise, CircleCI, and Travis CI. I recommend using the toolkit as it will save you a lot of hours.
Now that you’ve learned about the theory behind process automation, it’s time to think about what our development process should look like. We need a good process in place before we can automate anything.
Creating a collaborative development workflow
In large-scale projects, one of the most important things is up-to-date information. Typically, in those projects, a lot of people have to be coordinated and multiple project parts have to work together to build a complex product. While information is important, it shouldn’t limit development speed.
So, we have to create a workflow that can be supported with automation to fulfill both requirements. The following diagram shows the important parts of this workflow:

Figure 11.2 – Workflow automation setup
As you can see, four technical parts are needed for the workflow. These are as follows:
- Single Point of Information: All information is centralized here. Normally, this is an issue tracker where every task, bug, or feature request is created as an issue. Examples include Jira, ClickUp, GitLab issues, and GitHub issues.
- Code Management: This is where your source code is stored. It should be able to integrate with your Single Point of Information to transfer information about which issues have already been finished or worked on. Examples include Bitbucket, GitHub code, and GitLab repository.
- Workflow Automation: This is where your application gets tested and built. This tool should also be able to communicate with your Single Point of Information to transfer information about the state of the issues. Examples include Bitbucket Pipelines, GitHub Actions, GitLab CI/CD, CircleCI, and Bitrise.
- Stability Monitoring: After your app has been deployed to your users, you should track information about its stability. Crashes or other problems should be automatically reported to your Single Point of Information. Examples include Bugsnag, Sentry, Rollbar, and Crashlytics. You will learn more about these tools in Chapter 13, Tips and Outlook.
Now, we can start creating our development workflow. The following diagram shows the standard feature branch workflow that I recommend using:
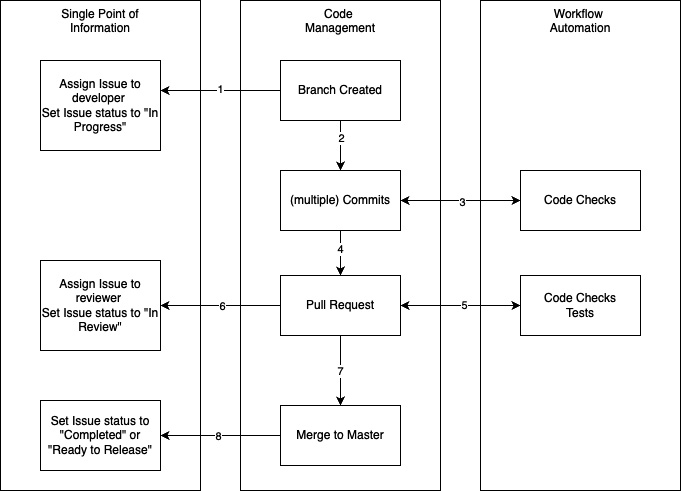
Figure 11.3 – Feature branch workflow
As the workflow’s name suggests, for every feature (which can also be a bug or improvement – here, every single issue is considered a feature) a new branch is created. Then, the following workflow starts:
- When the branch is created, the single point of information must be updated so that it contains information regarding whether the issue has already been worked on and who is working on it.
- Next, the developer makes one or multiple commits to solve the issue.
- Every commit is checked by the workflow automation tool.
- If there are errors, the developer will be notified immediately. When the developer thinks they have solved the issue and finished their work, they create a pull request (sometimes called a merge request).
- This pull request is also checked by the workflow automation, but this time, not only with simple checks but with more extensive ones (for example, E2E tests).
- If everything passes, the single point of information must be updated. The issue gets assigned to another developer for review and the status is changed to reflect the review status.
- If changes are requested, the process falls back to Step 1. If the reviewer is satisfied with the result, they can merge the code to the master or main branch.
- Again, the single point of information has to be updated, to reflect the correct status of the issue.
I like this process a lot because it provides you with a lot of things you need. Some of these are as follows:
- You always know the exact state of the project.
- Most parts of the workflow can be automated to save time. Normally, the developers and reviewers only have to work in the code management tool; everything else is automated.
- It ensures that every code is double-checked by another developer, which increases code quality.
- The reviewer doesn’t have to do checks for basic code quality because that’s done automatically.
Now that we know our process, let’s start writing the automation pipelines.
Creating useful CI pipelines for the development process
Again, we’ll use our example project here. First, we’ll set up a pipeline that can support us during the development process with very simple checks for Step 3 of Figure 11.3. We’ll use GitHub Actions to execute this CI pipeline, but it works very similar with Bitbucket (https://bit.ly/prn-bitbucket-pipelines) and GitLab CI/CD (https://bit.ly/prn-gitlab-cicd).
First, we have to create the scripts we want to use in our pipelines. In our example, we want to run type checking with the TypeScript compiler and static code analysis with ESLint and Prettier to ensure the correct code styling is in place.
For this, we’ll provide the following scripts in the scripts section of our package.json file:
Next, we have to create a workflow file that can be interpreted by GitHub Actions. Since this is a fully integrated workflow automation, as soon as we push this file to our GitHub repository, GitHub Actions starts working.
This is what our first workflow automation pipeline (or CI pipeline) looks like. You have to create it under .github/workflows/<the github actions workflow name>.yml:
name: Check files on push
on: push
jobs:
  run-checks:
    runs-on: ubuntu-latest
    steps:
      - uses: actions/checkout@v2
      - name: install modules
        run: npm install
      - name: run typecheck
        run: npm run typecheck
      - name: run prettier check for code styling
        run: npm run prettier
      - name: run eslint check for code errors
        run: npm run lint
Let’s go through the code line by line. The first line defines the name of the workflow. The second line defines when the workflow should run. In this case, we want to run it on every push to the repository, no matter to which branch or from which author this push comes.
Hint
You can run workflows on different trigger events. You can find the full list in the documentation (https://bit.ly/prn-github-actions-events for the GitHub Actions event list).
Some especially useful events for the development process described in the previous section are push and pull requests. You can also limit these triggers to specific branches.
Next, you can see the jobs section. Here, you define the actual workflow, which contains one or multiple jobs that can run in sequence or parallel. In this case, we defined one job with multiple steps.
The first thing we have to do for our job is define which machine it should run on. Every workflow automation tool has a lot of predefined machine images you can choose from, but you can always provide your own machines to run the automation pipelines. In our example, we’ll use the latest Ubuntu image that is provided by GitHub Actions.
Next, we define the steps of our job. This can either be a predefined action that we use with the uses command or an action that we create by ourselves. In our example, we make use of both options. First, we use a predefined action to check out our code, then we use four self-created actions to install the modules and run our checks.
Hint
When working with workflow automation tools, the time your workflows run for is the metric you will pay for. So, you should always think about how to structure your workflows so that you spend as little time as possible on the automation tool machines.
As soon as we pushed this file to our GitHub repository, the first run of the automated workflow was triggered. In this case, the machine started, cloned the repository, installed the dependency modules, and ran our checks. You can watch the automation running in the GitHub Actions tab.
In the preceding Hint, you learned that optimizing workflows to run as fast as possible is important. So, that’s what we’ll do next. The following diagram shows two ways to optimize our workflow so that we can complete it faster:
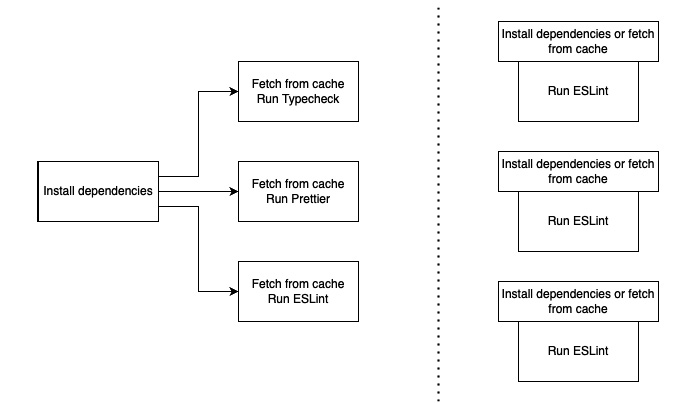
Figure 11.4 – Parallelize workflows
The easiest way to complete things faster is by running them in parallel. GitHub Actions doesn’t allow you to run steps in parallel, but you can run multiple jobs in parallel. You have to investigate your workflow in detail to find out which parts can be parallelized, and which steps are better to run in sequence.
In our example, it wouldn’t make much sense to just create three jobs for the three tasks. This is because the step that takes the most time installs the dependencies and it would be necessary for all three jobs. Fortunately, it is possible to work with caches so that we don’t have to repeat cacheable tasks with any test run.
On the left-hand side of the preceding diagram, you can see the pipeline setup for our example, which installs dependencies first and then runs our three jobs in parallel. All three jobs fetch the dependencies from the cache, which is populated in the install step. On the right-hand side, you can see another setup. In this setup, we have three parallel jobs, running completely independently from each other.
All three jobs try to fetch the dependencies from the cache and install them only if they can’t find them there. Both options are faster in certain scenarios. If you have to install the dependencies, the second setup would take a little longer because the install step will be triggered three times (because the steps start in parallel, and at the time they start, the dependencies are either cached or not for all three jobs).
The first setup only triggers the dependency install once and ensures that it is cached for the other jobs. This first setup will take more time in most scenarios because it requires you to run two jobs in sequence (install + typecheck/Prettier/ESLint).
This is why I recommend going with the second setup, as shown in the following code:
name: Check files on push alternative
on: push
jobs:
  typecheck:
    runs-on: ubuntu-latest
    steps:
      - uses: actions/checkout@v2
      - uses: actions/setup-node@v2
        with:
          node-version: '14'
      - uses: actions/cache@v2
        id: npm-cache
        with:
          path: '**/node_modules'
          key: ${{ runner.os }}-node-${{
               hashFiles('**/package-lock.json') }}
      - name: Install dependencies if not cached
        if: steps.npm-cache.outputs.cache-hit != 'true'
        run: npm install
      - name: run typecheck
        run: npm run typecheck
  prettier:
    runs-on: ubuntu-latest
    steps:
      - uses: actions/checkout@v2
      - uses: actions/setup-node@v2
        with:
          node-version: '14'
      - uses: actions/cache@v2
        id: npm-cache
        with:
          path: '**/node_modules'
          key: ${{ runner.os }}-node-${{
               hashFiles('**/package-lock.json') }}
      - name: Install dependencies if not cached
        if: steps.npm-cache.outputs.cache-hit != 'true'
        run: npm install
      - name: run prettier check for code styling
        run: npm run prettier
  lint:
    runs-on: ubuntu-latest
    steps:
      - uses: actions/checkout@v2
      - uses: actions/setup-node@v2
        with:
          node-version: '14'
      - uses: actions/cache@v2
        id: npm-cache
        with:
          path: '**/node_modules'
          key: ${{ runner.os }}-node-${{
               hashFiles('**/package-lock.json') }}
      - name: Install dependencies if not cached
        if: steps.npm-cache.outputs.cache-hit != 'true'
        run: npm install
      - name: run eslint check for code errors
        run: npm run lint
As you can see, the three jobs are very similar. We check out the project, set the node environment with a specified node version, and check the cache. The key of the cache contains the OS version of the runtime and the hash value of the package-lock.json file, which changes when anything changes with the dependencies (version updates, new libraries, and so on).
Next, we have a conditional install step, which only installs the dependencies when we didn’t hit the cache. This is the case when the name of our cache changes, as described previously, or if the cache expires (which it does after it hasn’t been used for at least 1 week).
Finally, we execute our typecheck/Prettier/ESLint step. While this parallelization seems to be quite complex, it can save you a lot of time when using it at scale. So, you should take some time to set up your workflow automation so that it fits your needs.
All modern code management solutions, such as GitHub, Bitbucket, and GitLab, have a very deep integration of workflow automation tools. This means that as soon as you have configured your workflow automation, you will see the results not only in the workflow automation tool or section but also in your repository. For example, it will show the result of every commit that was tested directly in the commit list.
For more details, you have to visit the workflow automation tool or section – in our case, GitHub Actions – to see the results of the CI pipeline. If everything worked as expected, you will see a green checkmark. If the workflow detected that an error was thrown in any of our checks, we will see a red dot, which notifies us about our failed workflow execution.
The following screenshot shows a list with multiple workflow runs:

Figure 11.5 – Workflow runs inside GitHub Actions
In this example, two runs of our workflow succeeded, while one of them failed. The failed workflow run is always the interesting one because it provides a lot of information about what went wrong.
By clicking on it, you will see information about the logs and execution times so that you can find and fix the error. This is how it looks inside GitHub Actions:

Figure 11.6 – Failed workflow run in GitHub Actions
As you can see, we don’t only see which check fails, but also the detailed logs. In this case, we used the wrong type in the Genre.tsx file, which resulted in a bunch of errors. With this workflow, we didn’t only find the error – we also know the exact file and line number where we have to fix our error.
Note
Working with CI pipelines is all about giving feedback as soon as possible. You should use tools such as Husky (https://bit.ly/prn-husky) to run your pipelines before committing them to your local machine. This not only replaces your workflow automation tool, but it can also be useful to shorten the feedback cycle even more.
Now that you know how to create CI pipelines to support and improve the development process, let’s have a look at building and releasing apps.
Understanding workflow automation and CD for build and release
Before we start creating our pipeline, let’s look at building and releasing apps in general. Android uses Gradle as its build tool and a KeyStore file to verify ownership of an app. If you are not familiar with releasing Android apps, please read this guide first: https://bit.ly/prn-android-release.
On iOS, you have to use Xcode to build, sign, and release your app. If you are not familiar with this process, please read this guide first: https://bit.ly/prn-ios-release.
Fortunately, for both platforms (Android and iOS), the build and deployment processes can be executed via command-line tools. Gradle works as a command-line tool itself and Xcode provides the Xcode command-line tools. This means we can write scripts for the complete process, which we can then invoke with our workflow automation tools.
Unfortunately, these processes are quite complex, so we don’t want to write scripts by ourselves. This is where a toolset called Fastlane comes into play. Fastlane is a specialized automation tool for iOS and Android apps. It provides scripts for signing, building, and deploying code to the Apple App Store and Google Play. You can find more information about Fastlane here: https://bit.ly/prn-fastlane.
The reason why I do not recommend using Fastlane directly is that it has excellent integration with advanced workflow automation tools such as Bitrise and CircleCI. We’ll take a deeper look at Bitrise as an example, but other tools such as CircleCI and Travis CI work very similarly.
Bitrise integrates into your code management solution the same way you saw with GitHub Actions. You can use certain events to trigger workflows. It provides an excellent UI to create these workflows. I like working with it because it is quite easy and saves a lot of time.
You can choose from a huge variety of predefined actions, which mainly focus on iOS and Android apps. Bitrise even provides its own automatic setup for React Native apps. The following diagram shows a typical iOS build and deploy workflow:
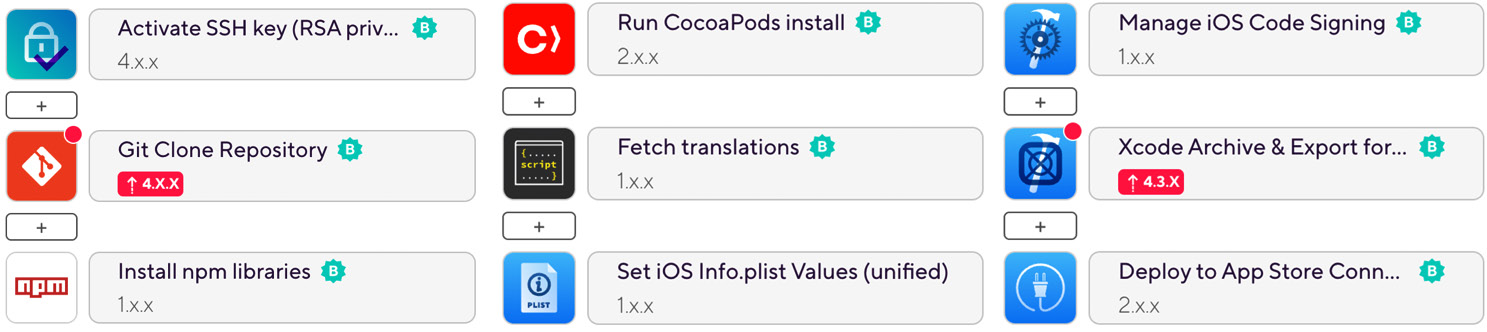
Figure 11.7 – Bitrise iOS build and deploy workflow
The steps are executed column after column. So, we start by activating an SSH key to be able to connect to the repository. Next, the repository gets cloned. After that, the npm dependency modules are installed, as well as the native module via CocoaPods.
As an example, for every other script that can be integrated here, we’ll fetch the most recent translation files for our app UI to be integrated with the app bundle in the next step. Then, we’ll update the version number inside our Info.plist file. Next, the workflow handles the code signing, builds the application, and deploys it to App Store Connect.
The workflow for an Android build looks pretty similar:

Figure 11.8 – Bitrise Android build and deploy workflow
Again, the actions are executed column after column. The first column is the same as in the iOS workflow. The SSH key gets activated, the repository gets cloned, and the npm dependency modules are installed. Next, we have to install all the missing Android SDK tools.
Then, we must change the Android version code and – as we did in iOS – fetch the translations to be bundled with the application. Then, we must build the application and deploy it to Google Play.
Under the hood, Bitrise and other CI tools with graphical workflow editors use the same logic you learned about while setting up the development CI pipeline. The following code is for the .yml file for the iOS workflow:
  ios-release-build:
    steps:
    - activate-ssh-key@4:
        run_if: '{{getenv "SSH_RSA_PRIVATE_KEY" | ne ""}}'
    - git-clone@4: {}
    - npm@1:
        inputs:
        - command: install
    - cocoapods-install@2: {}
    - script@1:
        inputs:
        - content: |-
            cd scripts
            bash getTranslationsCrowdin.sh
    - set-ios-info-plist-unified@1:
        inputs:
        - bundle_version: „$VERSION_NUMBER_IOS"
        - info_plist_file: "$BITRISE_SOURCE_DIR_PLIST"
    - manage-ios-code-signing@1:
    - [email protected]:
        inputs:
        - project_path: "$BITRISE_PROJECT_PATH"
        - distribution_method: app-store
        - export_method: app-store
    - deploy-to-itunesconnect-deliver@2:
As you can see, it has the same structure. It contains multiple steps, which can get additional input as configuration. Like any other workflow automation tool, Bitrise works with environment variables. These variables are stored on the platform and replace the placeholders (here, they start with $) during the execution of the workflow.
Note
You should never add private keys or signing information to your repository. If this happened, everyone who has access to the repository would get access to this private data and would be able to sign releases for your application. It’s much better to store this information in your workflow automation tool because there, nobody can obtain the keys and signing certificates, but all developers with access can still create new releases.
This workflow can either be triggered manually, which I would recommend for public production builds, or automatically, which I would recommend for internal or public testing builds.
Summary
Now, it’s time to wrap up this chapter. First, you learned what the terms workflow automation, continuous integration, and continuous delivery mean and which of them work for app development. Then, you considered a development process you can use in large-scale projects.
Next, you learned how to support this process through workflow automation with simple workflow automation tools such as GitHub Actions. Finally, you learned about specialized workflow automation tools such as Bitrise so that you can build, sign, and deploy your iOS and Android apps.
One topic that is especially important when it comes to workflow automation was left out in this chapter – testing. Automated testing is important during the development phase, as well as before shipping your releases. Therefore, we’ll have a detailed look at automated testing in the next chapter.