
7
Handling Gestures in React Native
One of the most important things that makes good apps stand out against bad apps or mobile websites is good gesture handling. While mobile websites only listen to simple clicks in most cases, apps can and should be controlled with different gestures such as short touches, long touches, swipes, pinching to zoom, or touches with multiple fingers. Using these gestures in a very intuitive way is one of the most important things to consider when developing an app.
But it doesn’t stop with just listening to these gestures – you have to give an immediate response to the user so that they can see (and maybe abort) what they are doing. Some gestures need to trigger or control animations and therefore have to play together very well with the animation solutions we learned about in Chapter 6, Working with Animations.
In React Native, there are multiple ways to handle gestures. From simple built-in components to very complex third-party gesture handling solutions, you have a lot of different options to choose from.
In this chapter, you will learn about the following:
- Using built-in components to respond to user gestures
- Working with the React Native gesture responder system and React Native PanResponder
- Understanding React Native Gesture Handler
Technical requirements
To be able to run the code in this chapter, you have to set up the following things:
- A working React Native environment (bit.ly/prn-setup-rn – React Native CLI Quickstart)
- A real iOS or Android device for testing gestures and multitouch
To access the code for this chapter, follow this link to the book’s GitHub repository:
Using built-in components to respond to user gestures
React Native ships with multiple components that have built-in gesture responder support. Basically, these components are an abstracted use of the gesture responder system, which you will learn about in the next section. The gesture responder system provides support for handling gestures in React Native, as well as support for negotiating which component should handle the user gesture.
The simplest user interaction is a tap with one finger. With different Touchable components, a Pressable component, and a Button component, React Native provides different options for how to recognize the tap and respond to the user interaction.
Using components to respond to simple taps
The simplest components to record user taps are the React Native Touchable components.
Working with Touchable components
React Native provides three different Touchable components on iOS and an extra fourth Touchable component just for Android:
- TouchableOpacity: Provides user feedback automatically by reducing the opacity of the tapped element (and all child elements), letting the underlying view shine through. You can configure the opacity reduction by setting activeOpacity.
- TouchableHighlight: Provides user feedback automatically by reducing the opacity and showing an underlying color, which darkens or lightens the tapped element. You can define the underlying color by setting underlayColor and the opacity reduction by setting activeOpacity.
- TouchableWithoutFeedback: Provides no user feedback. You should only use this if you have a good reason since every element that responds to touches should show visual feedback. One reason could be that you handle the visual feedback somewhere else.
- TouchableNativeFeedback: For Android only. Provides user feedback automatically by triggering the native Android touch effect. On most devices, this is the well-known Android ripple effect, where the component changes the color by growing a circle from the point of touch. You can define the ripple effect by setting the background property.
All four Touchable components provide four methods to listen to user interaction. These methods are called in the order of the following figure:
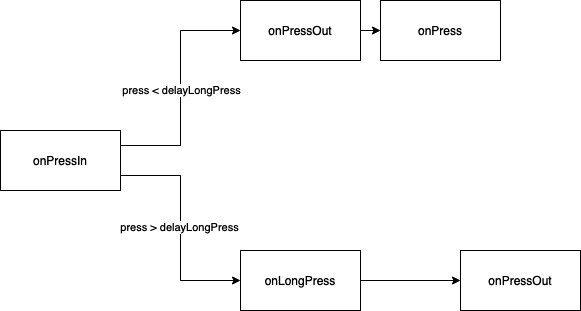
Figure 7.1 – The onPress call order
The important thing to always keep in mind is that onPress is called after onPressOut, while onLongPress is called before onPressOut. Let’s have a look at the methods in more detail:
- onPressIn: The method is called immediately when the user starts tapping the button.
- onPressOut: The method is called when the user releases the tap or when the user moves the finger outside of the component.
- onPress: The method is called when the user completes the tap before a long press delay (defined in delayLongPress) is reached.
- onLongPress: The method is called when the long press delay (defined in delayLongPress) is reached and the tap wasn’t released in the meantime.
With these methods, you can already handle a lot of different use cases and – never forget – give immediate visual feedback to user touches.
While the Touchable components need some own styling, React Native also provides a Button component, which comes with predefined styles.
Working with the Button component
Under the hood, Button uses TouchableOpacity on iOS and TouchableNativeFeedback on Android. Button comes with some predefined styling so that you can use it without styling it on your own. The following code example shows how simple it is to use Button:
You only have to define an onPress method, a button title, and the color of the button. Button then handles the rest such as styling and visual user feedback. Of course, you can use all other methods of the Touchable components, too.
Button and Touchable are quite old components in React Native. Since they work well, you can use them in most cases. But there is also a new implementation for handling user taps.
Working with the Pressable component
Besides the Touchable and Button components, React Native also comes with a Pressable component. This is the latest component and is recommended to be used due to its advanced support for platform-specific visual feedback.
Have a look at the following code example to understand the advantages of Pressable:
<Pressable
  onPress={() => Alert.alert("Button pressed!")}
  style={({ pressed }) => [
    {
      backgroundColor: pressed
        ? '#f7941e'
        : '#ffffff'
    },
    styles.button
  }>
>
  {
    ({ pressed }) => (
      <Text style={styles.buttonText}>
        {pressed ? 'Button pressed!' : 'Press  me!'}
      </Text>
    )
  }
</Pressable>
It provides the same methods as the Touchable components, but it also has ripple support on Android and works with custom styling on iOS. You can provide the style property as a function and listen to the pressed state.
You can also pass a functional component as a child to the Pressable component and use the pressed state there. This means you can change the styling and content of the Pressable component based on whether it is pressed at the moment or not.
Another advantage is that you can define hit and offset areas for the Pressable component:
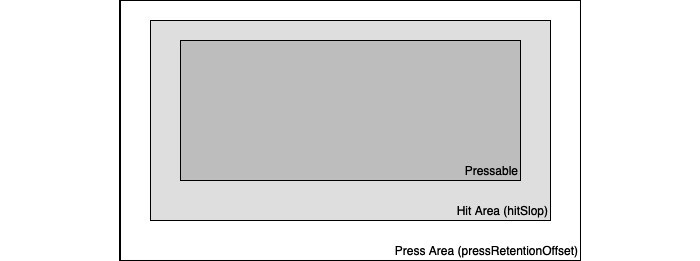
Figure 7.2 – Pressable Hit and Press Areas
In Figure 7.2, you can see the visible Pressable component in the center. If you want the touchable area to be larger than the visible element, you can do this by setting hitSlop. This is a very common thing to do for important buttons or important tappable areas of the screen.
While hitSlop defines the area where the tap starts, pressRetentionOffset defines the additional distance outside of the Pressable component where the tap does not stop. This means when you start a tap inside the Hit Area and move your finger outside of the Hit Area, normally onPressOut is fired and the tap gesture is completed.
But if you have defined an additional Press Area and your gesture stays inside this Press Area, the tap gesture is considered a lasting gesture as long as your finger moves outside this Press Area. hitSlop and pressRetention can either be set as a number value or as a Rect value, which means as an Object with bottom, left, right, and top properties.
Hit Area and Press Area are both great methods to improve the user experience of your app as, for example, they can make it easier for users to press important buttons.
After looking at simple tap handling, let’s continue with scroll gestures.
Working with ScrollView
The simplest method to handle scroll gestures is React Native ScrollView. This component makes the content inside of it scrollable if the content is larger than ScrollView itself. ScrollView detects and handles scroll gestures automatically. It has a lot of options you can configure, so let’s have a look at the most important ones:
- horizontal: Defines whether ScrollView should be horizontal or vertical. The default is vertical.
- decelerationRate: Defines how fast the scrolling will decelerate when the user releases the touch while scrolling.
- snapToInterval or snapToOffsets: With these two methods, you can define intervals or offsets at which ScrollView should stop. This can improve the user experience a lot because the scroll view can, for example, always stop so that the user can see a complete list element.
- scrollEventThrottle for iOS only: Defines how often a scroll event will be triggered while scrolling. This is very important for performance and UX reasons. The best value for UX is 16, which means the scroll event is fired every 16 ms (until RN supports 120 Hz – then, it will become 8 ms).
Based on what you are doing with the scroll event, this can lead to performance problems because the scroll event is sent over the bridge every single time (unless you process it directly via the Animated API, as described in Chapter 6, Working with Animations). So, think about what value you need here and perhaps increase it to prevent performance problems.
Tip
There are a lot more configuration options such as defining over-scroll effects, sticky headers, or bounces. If you want to have a complete overview, please have a look at the documentation (https://bit.ly/prn-scrollview). Since this is not a beginner’s guide, we are focusing on the parts that are important to optimize your application.
Speaking of which, you can of course handle the scroll events by yourself when using the ScrollView component. This gives you a variety of options on how to optimize your UX. ScrollView provides the following methods:
- onScroll: Fires continuously during scrolling. This is a great tool to add awesome user feedback to the scroll gesture by coupling custom animations to the scroll event, as we did in Chapter 6, Working with Animations. But when doing so, you should either work with the Animated API with the native driver to prevent the scroll events from being transferred over the bridge every 16 ms or use scrollEventThrottle to limit the event count.
- onScrollBeginDrag: Fires when the user starts the scrolling gesture.
- onScrollEndDrag: Fires when the user stops the scrolling gesture.
- onMomentumScrollBegin: Fires when ScrollView starts moving.
- onMomentumScrollEnd: Fires when ScrollView stops moving.
With these five methods, you can give your users a lot of different feedback for a scroll gesture. From simply informing the user when they are scrolling to building advanced animations with onScroll, everything is possible.
Notice
ScrollView can become quite slow and memory hungry when it has a very long list of elements as children. This is due to ScrollView rendering all children at once. If you need a more performant version with lazy loading of elements, please have a look at React Native FlatList or SectionList.
After working with the built-in React Native components, it’s time to have a look at handling touches completely by yourself. The first option to do that is to work directly with the React Native gesture responder system.
Working with the gesture responder system and PanResponder
The gesture responder system is the foundation of handling gestures in React Native. All the Touchable components are based on the gesture responder system. With this system, you can not only listen to gestures but you can also specify which component should be the touch responder.
This is very important because there are several scenarios in which you have multiple touch responders on your screen (for example, Slider in a ScrollView). While most of the built-in components negotiate which component should become a touch responder and should handle the user input on their own, you have to think about it yourself when working directly with the gesture responder system.
The gesture responder system provides a simple API and can be used on any component. The first thing you have to do when working with the gesture responder system is to negotiate which component should become the responder to handle the gesture.
Becoming a responder
To become a responder, a component must implement one of these negotiation methods:
- onStartShouldSetResponder: If this method returns true, the component wants to become the responder at the start of a touch event.
- onMoveShouldSetResponder: If this method returns true, the component wants to become the responder of a touch event. This method is called for every touch move event, as long as the component is not the responder.
Important tip
These two methods are called on the deepest node first. This means that the deepest component will become the responder to the touch event when multiple components implement these methods and return true. Please keep that in mind when manually negotiating the responders.
You can prevent a child component from becoming the responder by implementing onStartShouldSetResponderCapture or onMoveShouldSetResponderCapture.
For these responder negotiations, it is important for a component to release control if another component asks for it. The gesture responder system also provides handlers for this:
- onResponderTerminationRequest: If this handler returns true, the component releases the responder when another component wants to become the responder.
- onResponseTerminate: This handler is called when the responder was released. This can be due to onResponderTerminationRequest returning true or due to OS behavior.
When a component tries to become the responder, there are two possible outcomes from the negotiation, which can both be handled with a handler method:
- onResponderGrant: This handler is called when it successfully became the responder and will then listen to touch events. It is best practice to use this method to highlight the component so that the user can see the element that responds to their touches.
- onResponderReject: This handler is called when another component is currently the responder and will not release control.
When your component successfully becomes the responder, you can use handlers to listen to the touch events.
Handling touches
After becoming the responder, there are two handlers you can use to capture the touch events:
- onResponderMove: This handler is called when the user moves their finger on the screen.
- onResponderRelease: This handler is called when the user releases their touch from the device’s screen.
When working with gestures, you normally use onResponderMove and process the position values of the event it returns. When concatenating the positions, you can recreate the path the user draws on the screen. You can then respond to this path in the way you want.
How this works in practice is shown in the following example:
const CIRCLE_SIZE = 50;
export default (props) => {
  const dimensions = useWindowDimensions();
  const touch = useRef(
    new Animated.ValueXY({
      x: dimensions.width / 2 - CIRCLE_SIZE / 2,
      y: dimensions.height / 2 - CIRCLE_SIZE / 2
      })).current;
  return (
    <View style={{ flex: 1 }}
        onStartShouldSetResponder={() => true}
        onResponderMove={(event) => {
          touch.setValue({
            x: event.nativeEvent.pageX, y: event.nativeEvent.pageY
          });
        }}
        onResponderRelease={() => {
          Animated.spring(touch, {
            toValue: {
              x: dimensions.width / 2 - CIRCLE_SIZE / 2,
              y: dimensions.height / 2 - CIRCLE_SIZE / 2
            },
            useNativeDriver: false
          }).start();
        }}
    >
      <Animated.View
        style={{
          position: 'absolute', backgroundColor: 'blue',
              left: touch.x, top: touch.y,
              height: CIRCLE_SIZE, width: CIRCLE_SIZE,
              borderRadius: CIRCLE_SIZE / 2,
        }}
        onStartShouldSetResponder={() => false}
      />
    </View>
  );
};
This example contains two View. The outer View serves as the touch responder, while the inner View is a small circle, which changes position based on where the user moves the finger. The outer View implements the gesture responder system handlers, while the inner View just returns false for onStartShouldSetResponder, to not become the responder.
You also can see how the gesture responder system works with React Native Animated. When onResponerMove is called, we process the touch event and set the pageX and pageY values of the event to an Animated.ValueXY.
This is the value we then use to calculate the position of the inner View. When the user removes the finger from the device, onResponderRelease is called and we use an Animated.spring function to revert the Animated.ValueXY value back to its starting value. This positions the inner View back in the middle of the screen.
The following image shows how the code from the example looks on the screen:

Figure 7.3 – An example of the gesture responder system running on an iPhone
Here, you can see the starting state (the left-hand screen). Then, the user touches the bottom right of the screen and the blue circle follows the touch (mid-screen). After the user releases the touch, the blue circle returns to the center of the screen from the position where the user last touched the screen over a given time period (the right-hand screen shows the circle during the return animation).
Even with this simple example, you can see that the gesture responder system is a very powerful tool. You have full control over the touch events and can combine them with animations very easily. Nevertheless, most of the time, you won’t use the gesture responder system directly. This is because of PanResponder, which is a lightweight layer on top of the gesture responder system.
Using PanResponder
PanResponder basically works exactly as the gesture responder system does. It provides a similar API; however, you just have to replace Responder with PanResponder. For example, onResponderMove becomes onPanResponderMove. The difference is that you don’t just get the raw touch events. PanResponder also provides a state object, which represents the state of the whole gesture. This includes the following properties:
- stateID: A unique identifier of the gesture
- dx: The horizontal distance since the start of the touch gesture
- dy: The vertical distance since the start of the touch gesture
- vx: The current horizontal velocity of the touch gesture
- vy: The current vertical velocity of the touch gesture
This state object can be very useful when it comes to interpreting and processing more complex gestures. Due to this, most libraries and projects use PanResponder instead of working directly with the gesture responder system.
While the gesture responder system and PanResponder are very good options to respond to user touches, they also come with some downsides. First of all, they have the same limitations as the Animated API without the native driver. Since the touch events have to be transferred via the bridge to the JavaScript thread, we always are one frame behind.
This may become better with the JSI, but this has to be proven at this point. Another limitation is that no API allows us to define any interaction between the native gesture handlers. This means there will always be cases, which are not solvable with the gesture responder system API.
Because of these limitations, the team at Software Mansion with the support of Shopify and Expo built a new solution – React Native Gesture Handler.
Understanding React Native Gesture Handler
React Native Gesture Handler is a third-party library that completely replaces the built-in gesture responder system while offering more control and higher performance.
React Native Gesture Handler works best in combination with Reanimated 2 because it was written by the same team and relies on the worklets provided by Reanimated 2.
Information
This book refers to React Native Gesture Handler version 2.0. Version 1 is also used in a lot of projects.
The React Native Gesture Handler 2 API is based on GestureDetectors and Gestures. While it does also support the API from version 1, I would recommend using the new API, as it is easier to read and understand.
Let’s create the draggable circle example from the previous section, but this time we use React Native Gesture Handler and Reanimated 2:
const CIRCLE_SIZE = 50;
export default props => {
  const dimensions = useWindowDimensions();
  const touchX = useSharedValue(dimensions.width/
      2-CIRCLE_SIZE/2);
  const touchY = useSharedValue(dimensions.height/
      2-CIRCLE_SIZE/2);
  const animatedStyles = useAnimatedStyle(() => {
    return {
      left: touchX.value, top: touchY.value,
    };
  });
  const gesture = Gesture.Pan()
   .onUpdate(e => {
    touchX.value = e.translationX+dimensions.width/
        2-CIRCLE_SIZE/2;
    touchY.value = e.translationY+dimensions.height/
        2-CIRCLE_SIZE/2;
   })
   .onEnd(() => {
    touchX.value = withSpring(dimensions.width/
        2-CIRCLE_SIZE/2);
    touchY.value = withSpring(dimensions.height/
        2-CIRCLE_SIZE/2);
   });
  return (
    <GestureDetector gesture={gesture}>
      <Animated.View
        style={[
          {
            position: 'absolute', backgroundColor: 'blue',
                width: CIRCLE_SIZE, height: CIRCLE_SIZE,
                borderRadius: CIRCLE_SIZE / 2
          },
          animatedStyles,
        ]}
      />
    </GestureDetector>
  );
};
In this example, you can see how React Native Gesture Handler works. We create GestureDetector and wrap it with the element representing the target of the touch gesture. Then, we create a Gesture and assign it to GestureDetector. In this example, this is a Pan gesture, which means it recognizes dragging on the screen. Gesture.Pan provides a lot of different handlers. In this example, we use two:
- onUpdate: This handler is called every time any position of the gesture updates
- onEnd: This handler is called when the gesture is released
We use onUpdate to change the value of our Reanimated sharedValue and onEnd to reset the sharedValue to the initial state.
We then use the sharedValue to create animatedStyle, which we assign to our Animated.View, which is our circle.
The outcome on the screen is the same as in the previous section, but we have two important advantages here:
- Better performance: Since we use Reanimated 2 worklets, our values and our calculation don’t have to pass the bridge. The gesture input and the animation are completely calculated on the UI thread.
- More options: When we want to have more complex gesture handling, React Native Gesture Handler gives us a lot more opportunities compared to the built-in gesture responder system. For example, we can define relations between gestures and decide whether only one gesture can become active at a time (Race) or whether multiple gestures can become active at a time (Simultaneous).
In addition to that, React Native Gesture Handler ships with a lot of different gestures, such as Tap, Rotation, Pinch, Fling, or ForceTouch, as well as built-in components such as Button, Swipeable, Touchable, or DrawerLayout, which makes it a very good replacement for the built-in gesture responder system.
If you want to get a deeper understanding of all the possible options you have with React Native Gesture Handler, please have a look at the documentation: bit.ly/prn-gesture-handler.
Summary
In this chapter, we learned about React Native’s built-in components and solutions to handle user gestures. From simple gestures such as single taps to more complex gestures, React Native provides stable solutions to handle gestures. We also had a look at React Native Gesture Handler, which is a great third-party replacement for these built-in solutions.
I would recommend using React Native’s built-in components and solutions for all use cases where you can stick to the standard components. As soon as you start writing your own gesture handling, I would recommend using React Native Gesture Handler.
After Animations and Gesture Handling, we will proceed with another topic, which is very important in terms of performance.
In the next chapter, you will learn what different JavaScript engines are, what options you have in React Native, and what impact the different engines have on performance and other important key metrics.