Chapter 1. Views
This chapter has been revised for Early Release. It reflects iOS 14, Xcode 12, and Swift 5.3. But screenshots have not been retaken; they still show the Xcode 11 / iOS 13 interface.
A view (an object whose class is UIView or a subclass of UIView) knows how to draw itself into a rectangular area of the interface. Your app has a visible interface thanks to views; everything the user sees is ultimately because of a view. Creating and configuring a view can be extremely simple: “Set it and forget it.” You can configure a UIButton in the nib editor; when the app runs, the button appears, and works properly. But you can also manipulate views in powerful ways, in real time. Your code can do some or all of the view’s drawing of itself (Chapter 2); it can make the view appear and disappear, move, resize itself, and display many other physical changes, possibly with animation (Chapter 4).
A view is also a responder (UIView is a subclass of UIResponder). This means that a view is subject to user interactions, such as taps and swipes. Views are the basis not only of the interface that the user sees, but also of the interface that the user touches (Chapter 5). Organizing your views so that the correct view reacts to a given touch allows you to allocate your code neatly and efficiently.
The view hierarchy is the chief mode of view organization. A view can have subviews; a subview has exactly one immediate superview. We may say there is a tree of views. This hierarchy allows views to come and go together. If a view is removed from the interface, its subviews are removed; if a view is hidden (made invisible), its subviews are hidden; if a view is moved, its subviews move with it; and other changes in a view are likewise shared with its subviews. The view hierarchy is also the basis of, though it is not identical to, the responder chain.
A view may come from a nib, or you can create it in code. On balance, neither approach is to be preferred over the other; it depends on your needs and inclinations and on the overall architecture of your app.
Window and Root View
The top of the view hierarchy is a window. It is an instance of UIWindow (or your own subclass thereof), which is a UIView subclass. At launch time, a window is created and displayed; otherwise, the screen would be black. Starting in iOS 13, your app might support multiple windows on an iPad (Chapter 10); if it doesn’t, or if we’re running on an iPhone, your app will have exactly one window (the main window). A visible window forms the background to, and is the ultimate superview of, all your other visible views. Conversely, all visible views are visible by virtue of being subviews, at some depth, of a visible window.
In Cocoa programming, you do not manually or directly populate a window with subviews. Rather, the link between your window and the interface that it contains is the window’s root view controller. A view controller is instantiated, and that instance is assigned to the window’s rootViewController property. That view controller’s main view — its view — henceforth occupies the entirety of the window. It is the window’s sole subview; all other visible views are subviews (at some depth) of the root view controller’s view. (The root view controller itself will be the top of the view controller hierarchy, of which I’ll have much more to say in Chapter 6.)
Window Scene Architecture
Starting in iOS 13, an app’s window is backed by a window scene (UIWindowScene). This is a major architectural change from iOS 12 and before, where window scenes didn’t exist. It will be useful to distinguish two different architectures:
- Window architecture
-
The old architecture, in iOS 12 and before, is window-based. The window is a property of the app delegate. If your app was created in Xcode 10 or before, it uses the old architecture by default.
- Scene architecture
-
The new architecture, in iOS 13 and later, is scene-based. The window is a property of the scene delegate. If your app was created in Xcode 11 or later, it uses the new architecture by default.
An old-architecture app running on iOS 13 or later is given a window scene, but it is unaware of that fact and its behavior is not affected; it still runs under the old architecture. A new-architecture app, on the other hand, cannot run on, or even compile for, iOS 12 or earlier, without alterations to the code.
What determines the architecture? To find out, just create an app in Xcode 11 or later; the app template configures it for the new architecture. The app has a scene delegate, which contains the window property:
class SceneDelegate: UIResponder, UIWindowSceneDelegate {
    var window: UIWindow?
    // ...
}
The app delegate also contains two methods that refer to scenes:
class AppDelegate: UIResponder, UIApplicationDelegate {
    // ...
    func application(_ application: UIApplication,
        configurationForConnecting connectingSceneSession: UISceneSession,
        options: UIScene.ConnectionOptions) -> UISceneConfiguration {
            // ...
    }
    func application(_ application: UIApplication,
        didDiscardSceneSessions sceneSessions: Set<UISceneSession>) {
            // ...
    }
}
In addition, the Info.plist contains an “Application Scene Manifest” entry:
<key>Application Scene Manifest</key>
<dict>
    <!-- ... -->
</dict>
If you want your new-architecture app to be backward-compatible to iOS 12 and before, you must do three things:
-
Copy and paste the
windowproperty declaration into the AppDelegate class. Now both the AppDelegate and the SceneDelegate havewindowproperties. The former is used on iOS 12 and before, while the latter is used on iOS 13 and later. -
In the AppDelegate class, mark any methods that refer to UISceneSession as
@available(iOS 13.0, *). -
In the SceneDelegate class, mark the entire class as
@available(iOS 13.0, *).
The result is that when this app runs in iOS 13 or later, it uses the new architecture and the scene delegate’s window property holds the window, but when it runs in iOS 12 or before, it uses the old architecture and the app delegate’s window property holds the window — and your other code may then need to take account of that in order to be backward compatible. Lifetime delegate messages and notifications (see Appendix A) will be routed differently; for instance, on iOS 12 and before, you’ll get the applicationDidBecomeActive(_:) message in the app delegate, but on iOS 13 and after, you’ll get the sceneDidBecomeActive(_:) message in the scene delegate.
If all of that is too overwhelming and you want your new app to run with the old architecture even on iOS 13 and later, then theoretically you can: delete all code that refers to UISceneSession or SceneDelegate, and delete the “Application Scene Manifest” entry in the Info.plist. You have now reduced your code to look as if it was created in Xcode 10. (I’m not actually recommending that you do that.)
How an App Launches
How does your app, at launch time, come to have its window in the first place, and how does that window come to be populated and displayed? If your app uses a main storyboard, it all happens automatically. But “automatically” does not mean “by magic!” The procedure at launch is straightforward and deterministic, and your code can take a hand in it. It is useful to know how an app launches, not least because, if you misconfigure something and app launch goes wrong, you’ll be able to figure out why.
Your app consists, ultimately, of a single call to the UIApplicationMain function. (Unlike an Objective-C project, a typical Swift project doesn’t make this call explicitly, in code; it is called for you, behind the scenes.) This call creates some of your app’s most important initial instances; if your app uses a main storyboard, those instances include the window and its root view controller.
Exactly how UIApplicationMain proceeds depends on whether your app uses the old or new architecture. They are two quite different launch trajectories. I will describe just the launch trajectory for the new architecture.
Here’s how UIApplicationMain bootstraps your app with window scene support as it launches on iOS 13 and later:
-
UIApplicationMaininstantiates UIApplication and retains this instance, to serve as the shared application instance, which your code can later refer to asUIApplication.shared. It then instantiates the app delegate class; it knows which class that is because it is marked@main. It retains the app delegate instance, ensuring that it will persist for the lifetime of the app, and assigns it as the application instance’sdelegate. -
UIApplicationMaincalls the app delegate’sapplication(_:didFinishLaunchingWithOptions:). -
UIApplicationMaincreates a UISceneSession, a UIWindowScene, and an instance that will serve as the window scene’s delegate. The Info.plist specifies, as a string, what the class of the window scene delegate instance should be (“Delegate Class Name” inside the “Application Scene Manifest” dictionary’s “Scene Configuration”). In the built-in app templates, it is the SceneDelegate class; this is written in the Info.plist as$(PRODUCT_MODULE_NAME).SceneDelegateto take account of Swift “name mangling.” -
UIApplicationMainlooks to see whether your initial scene uses a storyboard. The Info.plist specifies, as a string, the name of its storyboard (“Storyboard Name” inside the “Application Scene Manifest” dictionary’s “Scene Configuration”). If so, it instantiates that storyboard’s initial view controller. -
If the scene uses a storyboard,
UIApplicationMaininstantiates UIWindow and assigns the window instance to the scene delegate’swindowproperty, which retains it. -
If the scene uses a storyboard,
UIApplicationMainassigns the initial view controller instance to the window instance’srootViewControllerproperty, which retains it. The view controller’s view becomes the window’s sole subview. -
UIApplicationMaincauses your app’s interface to appear, by calling the UIWindow instance methodmakeKeyAndVisible. -
The scene delegate’s
scene(_:willConnectTo:options:)is called.
App Without a Storyboard
It is possible to write an app that lacks a main storyboard:
-
Under the old architecture, this means that the Info.plist contains no “Main storyboard file base name” entry.
-
Under the new architecture, it means that there is no “Storyboard Name” entry under “Application Scene Configuration” in the “Application Scene Manifest” dictionary.
Such an app simply does in code everything that UIApplicationMain does automatically if the app has a main storyboard. Under the old architecture, you would do that in the app delegate’s application(_:didFinishLaunchingWithOptions:). Under the new architecture, you do it in the scene delegate’s scene(_:willConnectTo:options:):
func scene(_ scene: UIScene,
    willConnectTo session: UISceneSession,
    options connectionOptions: UIScene.ConnectionOptions) {
        if let windowScene = scene as? UIWindowScene {
            self.window = UIWindow(windowScene: windowScene)
            let vc = // ...
            self.window!.rootViewController = vc
            self.window!.makeKeyAndVisible()
        }
}
}
}
Instantiate UIWindow and assign it as the scene delegate’s
windowproperty. It is crucial to make the connection between the window scene and the window by callinginit(windowScene:).Instantiate a view controller and configure it as needed.
Assign the view controller as the window’s
rootViewControllerproperty.Call
makeKeyAndVisibleon the window, to show it.
A variant that is sometimes useful is an app that has a storyboard but doesn’t let UIApplicationMain see it at launch. That way, we can dictate at launch time which view controller from within that storyboard should be the window’s root view controller. A typical scenario is that our app has something like a login or registration screen that appears at launch if the user has not logged in, but doesn’t appear on subsequent launches once the user has logged in:
func scene(_ scene: UIScene,
    willConnectTo session: UISceneSession,
    options connectionOptions: UIScene.ConnectionOptions) {
        if let windowScene = scene as? UIWindowScene {
            self.window = UIWindow(windowScene: windowScene)
            let userHasLoggedIn : Bool = // ...
            let vc = UIStoryboard(name: "Main", bundle: nil)
                .instantiateViewController(identifier: userHasLoggedIn ?
                    "UserHasLoggedIn" : "LoginScreen") // *
            self.window!.rootViewController = vc
            self.window!.makeKeyAndVisible()
        }
}
Referring to the Window
Once the app is running, there are various ways for your code to refer to the window:
- From a view
-
If a UIView is in the interface, it automatically has a reference to the window that contains it, through its own
windowproperty. Your code will probably be running in a view controller with a main view, soself.view.windowis usually the best way to refer to the window.You can also use a UIView’s
windowproperty as a way of asking whether it is ultimately embedded in the window; if it isn’t, itswindowproperty isnil. A UIView whosewindowproperty isnilcannot be visible to the user. - From the scene delegate
-
The scene delegate instance maintains a reference to the window through its
windowproperty.
- From the application
-
The shared application maintains a reference to the window through its
windowsproperty:let w = UIApplication.shared.windows.first!
Warning
Do not expect that the window you know about is the app’s only window. The runtime can create additional mysterious windows, such as the UITextEffectsWindow and the UIRemoteKeyboardWindow.
Experimenting with Views
In the course of this and subsequent chapters, you may want to experiment with views in a project of your own. If you start your project with the basic App template, it gives you the simplest possible app — a main storyboard containing one scene consisting of one view controller instance along with its main view. As I described in the preceding section, when the app runs, that view controller will become the window’s rootViewController, and its main view will become the window’s root view. If you can get your views to become subviews of that view controller’s main view, they will be present in the app’s interface when it launches.
In the nib editor, you can drag a view from the Library into the main view as a subview, and it will be instantiated in the interface when the app runs. However, my initial examples will all create views and add them to the interface in code. So where should that code go? The simplest place is the view controller’s viewDidLoad method, which is provided as a stub by the project template code; it runs once, before the view appears in the interface for the first time.
The viewDidLoad method can refer to the view controller’s main view by saying self.view. In my code examples, whenever I say self.view, you can assume we’re in a view controller and that self.view is this view controller’s main view:
override func viewDidLoad() {
    super.viewDidLoad() // this is template code
    let v = UIView(frame:CGRect(x:100, y:100, width:50, height:50))
    v.backgroundColor = .red // small red square
    self.view.addSubview(v) // add it to main view
}
Try it! Make a new project from the App template, and make the ViewController class’s viewDidLoad look like that. Run the app. You will actually see the small red square in the running app’s interface.
Subview and Superview
Once upon a time, and not so very long ago, a view owned precisely its own rectangular area. No part of any view that was not a subview of this view could appear inside it, because when this view redrew its rectangle, it would erase the overlapping portion of the other view. No part of any subview of this view could appear outside it, because the view took responsibility for its own rectangle and no more.
Those rules were gradually relaxed, and starting in OS X 10.5, Apple introduced an entirely new architecture for view drawing that lifted those restrictions completely. iOS view drawing is based on this revised architecture. In iOS, some or all of a subview can appear outside its superview, and a view can overlap another view and can be drawn partially or totally in front of it without being its subview.
Figure 1-1 shows three overlapping views. All three views have a background color, so each is completely represented by a colored rectangle. You have no way of knowing, from this visual representation, exactly how the views are related within the view hierarchy. In actual fact, View 1 is a sibling view of View 2 (they are both direct subviews of the root view), and View 3 is a subview of View 2.
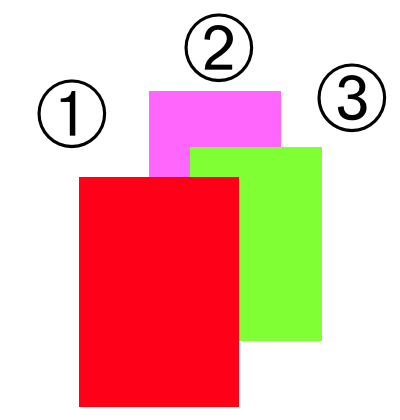
Figure 1-1. Overlapping views
When views are created in the nib, you can examine the view hierarchy in the nib editor’s document outline to learn their actual relationship (Figure 1-2). When views are created in code, you know their hierarchical relationship because you created that hierarchy. But the visible interface doesn’t tell you, because view overlapping is so flexible.

Figure 1-2. A view hierarchy as displayed in the nib editor
Nevertheless, a view’s position within the view hierarchy is extremely significant. For one thing, the view hierarchy dictates the order in which views are drawn. Sibling subviews of the same superview have a definite order; an earlier sibling is drawn before a later sibling, so if they overlap, the earlier one will appear to be behind the later one. Similarly, a superview is drawn before its subviews, so if the subviews overlap their superview, the superview will appear to be behind them.
You can see this illustrated in Figure 1-1. View 3 is a subview of View 2 and is drawn on top of it. View 1 is a sibling of View 2, but it is a later sibling, so it is drawn on top of View 2 and on top of View 3. View 1 cannot appear behind View 3 but in front of View 2, because Views 2 and 3 are subview and superview and are drawn together — both are drawn either before or after View 1, depending on the ordering of the siblings.
This layering order can be governed in the nib editor by arranging the views in the document outline. (If you click in the canvas, you may be able to use the menu items of the Editor → Arrange menu instead — Send to Front, Send to Back, Send Forward, Send Backward.) In code, there are methods for arranging the sibling order of views, which we’ll come to in a moment.
Here are some other effects of the view hierarchy:
-
If a view is removed from or moved within its superview, its subviews go with it.
-
A view’s degree of transparency is inherited by its subviews.
-
A view can optionally limit the drawing of its subviews so that any parts of them outside the view are not shown. This is called clipping and is set with the view’s
clipsToBoundsproperty. -
A superview owns its subviews, in the memory-management sense, much as an array owns its elements; it retains its subviews, and is responsible for releasing a subview when that subview is removed from the collection of this view’s subviews, or when the superview itself goes out of existence.
-
If a view’s size is changed, its subviews can be resized automatically (and I’ll have much more to say about that later in this chapter).
A UIView has a superview property (a UIView) and a subviews property (an array of UIView objects, in back-to-front order), allowing you to trace the view hierarchy in code. There is also a method isDescendant(of:) letting you check whether one view is a subview of another at any depth.
If you need a reference to a particular view, you will probably arrange it beforehand as a property, perhaps through an outlet. Alternatively, a view can have a numeric tag (its tag property), and can then be referred to by sending any view higher up the view hierarchy the viewWithTag(_:) message. Seeing that all tags of interest are unique within their region of the hierarchy is up to you.
Manipulating the view hierarchy in code is easy. This is part of what gives iOS apps their dynamic quality. It is perfectly reasonable for your code to rip an entire hierarchy of views out of the superview and substitute another, right before the user’s very eyes! You can do this directly; you can combine it with animation (Chapter 4); you can govern it through view controllers (Chapter 6).
The method addSubview(_:) makes one view a subview of another; removeFromSuperview takes a subview out of its superview’s view hierarchy. In both cases, if the superview is part of the visible interface, the subview will appear or disappear respectively at that moment; and of course the subview may have subviews of its own that accompany it. Removing a subview from its superview releases it; if you intend to reuse that subview later on, you will need to retain it first by assigning it to a variable.
Events inform a view of these dynamic changes. To respond to these events requires subclassing. Then you’ll be able to override any of these methods:
-
willRemoveSubview(_:),didAddSubview(_:) -
willMove(toSuperview:),didMoveToSuperview -
willMove(toWindow:),didMoveToWindow
When addSubview(_:) is called, the view is placed last among its superview’s subviews, so it is drawn last, meaning that it appears frontmost. That might not be what you want. A view’s subviews are indexed, starting at 0 which is rearmost, and there are methods for inserting a subview at a given index or below (behind) or above (in front of) a specific view; for swapping two sibling views by index; and for moving a subview all the way to the front or back among its siblings:
-
insertSubview(_:at:) -
insertSubview(_:belowSubview:),insertSubview(_:aboveSubview:) -
exchangeSubview(at:withSubviewAt:) -
bringSubviewToFront(_:),sendSubviewToBack(_:)
Oddly, there is no command for removing all of a view’s subviews at once. However, a view’s subviews array is an immutable copy of the internal list of subviews, so it is legal to cycle through it and remove each subview one at a time:
myView.subviews.forEach {$0.removeFromSuperview()}
Color
A view can be assigned a background color through its backgroundColor property. A view distinguished by nothing but its background color is a colored rectangle, and is an excellent medium for experimentation, as in Figure 1-1.
A view whose background color is nil (the default) has a transparent background. If this view does no additional drawing of its own, it will be invisible! Such a view is perfectly reasonable; a view with a transparent background might act as a convenient superview to other views, making them behave together.
A color is a UIColor, which will typically be specified using .red, .blue, .green, and .alpha components, which are CGFloat values between 0 and 1:
v.backgroundColor = UIColor(red: 0, green: 0.1, blue: 0.1, alpha: 1)
There are also numerous named colors, vended as static properties of the UIColor class:
v.backgroundColor = .red
Starting in iOS 13, you may need to be rather more circumspect about the colors you assign to things. The problem is that the user can switch the device between light and dark modes. This can cause a cascade of color changes that can make hard-coded colors look bad. Suppose we give the view controller’s main view a subview with a dark color:
override func viewDidLoad() {
    super.viewDidLoad()
    let v = UIView(frame:CGRect(x:100, y:100, width:50, height:50))
    v.backgroundColor = UIColor(red: 0, green: 0.1, blue: 0.1, alpha: 1)
    self.view.addSubview(v)
}
If we run the project in the simulator, we see a small very dark square against a white background. But now suppose we switch to dark mode. Now the background becomes black, and we don’t see our dark square any longer. The reason is that the view controller’s main view has a dynamic color, which is white in light mode but black in dark mode, and now our dark square is black on black.
One solution is to make our UIColor dynamic. We can do this with the initializer init(dynamicProvider:), giving it as parameter a function that takes a trait collection and returns a color. I’ll explain more about what a trait collection is later in this chapter; right now, all you need to know is that its userInterfaceStyle may or may not be .dark:
v.backgroundColor = UIColor { tc in
    switch tc.userInterfaceStyle {
    case .dark:
        return UIColor(red: 0.3, green: 0.4, blue: 0.4, alpha: 1)
    default:
        return UIColor(red: 0, green: 0.1, blue: 0.1, alpha: 1)
    }
}
We have created our own custom dynamic color, which is different depending what mode we’re in. In dark mode, our view’s color is now a dark gray that is visible against a black background.
Tip
To switch to dark mode in the simulator, choose Features → Toggle Appearance (new in Xcode 12). Alternatively, in Xcode, while running your app in the debugger, click the Environment Overrides button in the debug bar; in the popover that appears, click the first switch, at the upper right.
A more compact way to get a dynamic color is to use one of the many dynamic colors vended as static properties by UIColor in iOS 13. Most of these have names that start with .system, such as .systemYellow; others have semantic names describing their role, such as .label. For details, see Apple’s Human Interface Guidelines.
You can also design a custom named color in the asset catalog. When you create a new color set, the Appearances pop-up menu in the Attributes inspector says Any, Dark, and there are two color swatches, one for dark mode and the other for everything else; select each swatch in turn and design the color in the Attributes inspector.
The result is a custom named color that is also dynamic. Let’s say our color set in the asset catalog is called myDarkColor. Then you could say:
v.backgroundColor = UIColor(named: "myDarkColor")
Custom named colors from the asset catalog also appear in the Library and in the color pop-up menus in the Attributes inspector when you select a view.
Visibility and Opacity
Three properties relate to the visibility and opacity of a view:
isHidden-
A view can be made invisible by setting its
isHiddenproperty totrue, and visible again by setting it tofalse. Hiding a view takes it (and its subviews, of course) out of the visible interface without actually removing it from the view hierarchy. A hidden view does not (normally) receive touch events, so to the user it really is as if the view weren’t there. But it is there, so it can still be manipulated in code. alpha-
A view can be made partially or completely transparent through its
alphaproperty:1.0means opaque,0.0means transparent, and a value may be anywhere between them, inclusive. This property affects both the apparent transparency of the view’s background color and the apparent transparency of its contents. If a view displays an image and has a background color and itsalphais less than1, the background color will seep through the image (and whatever is behind the view will seep through both). Moreover, it affects the apparent transparency of the view’s subviews! If a superview has analphaof0.5, none of its subviews can have an apparent opacity of more than0.5, because whateveralphavalue they have will be drawn relative to0.5. A view that is completely transparent (or very close to it) is like a view whoseisHiddenistrue: it is invisible, along with its subviews, and cannot (normally) be touched.(Just to make matters more complicated, colors have an alpha value as well. A view can have an
alphaof1.0but still have a transparent background because itsbackgroundColorhas an alpha less than1.0.)
isOpaque-
This property is a horse of a different color; changing it has no effect on the view’s appearance. Rather, it is a hint to the drawing system. If a view is completely filled with opaque material and its
alphais1.0, so that the view has no effective transparency, then it can be drawn more efficiently (with less drag on performance) if you inform the drawing system of this fact by setting itsisOpaquetotrue. Otherwise, you should set itsisOpaquetofalse. TheisOpaquevalue is not changed for you when you set a view’sbackgroundColororalpha! Setting it correctly is entirely up to you; the default, perhaps surprisingly, istrue.
Frame
A view’s frame property, a CGRect, is the position of its rectangle within its superview, in the superview’s coordinate system. By default, the superview’s coordinate system will have the origin at its top left, with the x-coordinate growing positively rightward and the y-coordinate growing positively downward.
Setting a view’s frame to a different CGRect value repositions the view, or resizes it, or both. If the view is visible, this change will be visibly reflected in the interface. On the other hand, you can also set a view’s frame when the view is not visible, such as when you create the view in code. In that case, the frame describes where the view will be positioned within its superview when it is given a superview.
UIView’s designated initializer is init(frame:), and you’ll often assign a frame this way, especially because the default frame might otherwise be CGRect.zero, which is rarely what you want. A view with a zero-size frame is effectively invisible (though you might still see its subviews). Forgetting to assign a view a frame when creating it in code, and then wondering why it isn’t appearing when added to a superview, is a common beginner mistake. If a view has a standard size that you want it to adopt, especially in relation to its contents (like a UIButton in relation to its title), an alternative is to call its sizeToFit method.
We are now in a position to generate programmatically the interface displayed in Figure 1-1; we determine the layering order of v1 and v3 (the middle and left views, which are siblings) by the order in which we insert them into the view hierarchy:
let v1 = UIView(frame:CGRect(113, 111, 132, 194))
v1.backgroundColor = UIColor(red: 1, green: 0.4, blue: 1, alpha: 1)
let v2 = UIView(frame:CGRect(41, 56, 132, 194))
v2.backgroundColor = UIColor(red: 0.5, green: 1, blue: 0, alpha: 1)
let v3 = UIView(frame:CGRect(43, 197, 160, 230))
v3.backgroundColor = UIColor(red: 1, green: 0, blue: 0, alpha: 1)
self.view.addSubview(v1)
v1.addSubview(v2)
self.view.addSubview(v3)
Note
That code, and all subsequent code in this book, uses a custom CGRect initializer with no argument labels. Please read the sidebar “Core Graphics Initializers” right now!
When a UIView is instantiated from a nib, its init(frame:) is not called — init(coder:) is called instead. Implementing init(frame:) in a UIView subclass, and then wondering why your code isn’t called when the view is instantiated from a nib, is a common beginner mistake.
Bounds and Center
Suppose we have a superview and a subview, and the subview is to appear inset by 10 points, as in Figure 1-3. So we want to set the subview’s frame. But to what value? CGRect methods like insetBy(dx:dy:) make it easy to derive one rectangle as an inset from another. But what rectangle should we inset from? Not from the superview’s frame; the frame represents a view’s position within its superview, and in that superview’s coordinates. What we’re after is a CGRect describing our superview’s rectangle in its own coordinates, because those are the coordinates in which the subview’s frame is to be expressed. The CGRect that describes a view’s rectangle in its own coordinates is the view’s bounds property.
Figure 1-3. A subview inset from its superview
So, the code to generate Figure 1-3 looks like this:
let v1 = UIView(frame:CGRect(113, 111, 132, 194))
v1.backgroundColor = UIColor(red: 1, green: 0.4, blue: 1, alpha: 1)
let v2 = UIView(frame:v1.bounds.insetBy(dx: 10, dy: 10))
v2.backgroundColor = UIColor(red: 0.5, green: 1, blue: 0, alpha: 1)
self.view.addSubview(v1)
v1.addSubview(v2)
You’ll very often use a view’s bounds in this way. When you need coordinates for positioning content inside a view, whether drawing manually or placing a subview, you’ll refer to the view’s bounds.
If you change a view’s bounds size, you change its frame. The change in the view’s frame takes place around its center, which remains unchanged:
let v1 = UIView(frame:CGRect(113, 111, 132, 194))
v1.backgroundColor = UIColor(red: 1, green: 0.4, blue: 1, alpha: 1)
let v2 = UIView(frame:v1.bounds.insetBy(dx: 10, dy: 10))
v2.backgroundColor = UIColor(red: 0.5, green: 1, blue: 0, alpha: 1)
self.view.addSubview(v1)
v1.addSubview(v2)
v2.bounds.size.height += 20
v2.bounds.size.width += 20
What appears is a single rectangle; the subview completely and exactly covers its superview, its frame being the same as the superview’s bounds. The call to insetBy started with the superview’s bounds and shaved 10 points off the left, right, top, and bottom to set the subview’s frame (Figure 1-3). But then we added 20 points to the subview’s bounds height and width, which added 20 points to the subview’s frame height and width as well (Figure 1-4). The subview’s center didn’t move, so we effectively put the 10 points back onto the left, right, top, and bottom of the subview’s frame.
Figure 1-4. A subview exactly covering its superview
If you change a view’s bounds origin, you move the origin of its internal coordinate system. When you create a UIView, its bounds coordinate system’s zero point (0.0,0.0) is at its top left. Because a subview is positioned in its superview with respect to its superview’s coordinate system, a change in the bounds origin of the superview will change the apparent position of a subview. To illustrate, we start once again with our subview inset evenly within its superview, and then change the bounds origin of the superview:
let v1 = UIView(frame:CGRect(113, 111, 132, 194))
v1.backgroundColor = UIColor(red: 1, green: 0.4, blue: 1, alpha: 1)
let v2 = UIView(frame:v1.bounds.insetBy(dx: 10, dy: 10))
v2.backgroundColor = UIColor(red: 0.5, green: 1, blue: 0, alpha: 1)
self.view.addSubview(v1)
v1.addSubview(v2)
v1.bounds.origin.x += 10
v1.bounds.origin.y += 10
Nothing happens to the superview’s size or position. But the subview has moved up and to the left so that it is flush with its superview’s top-left corner (Figure 1-5). Basically, what we’ve done is to say to the superview, “Instead of calling the point at your upper left (0.0,0.0), call that point (10.0,10.0).” Because the subview’s frame origin is itself at (10.0,10.0), the subview now touches the superview’s top-left corner. The effect of changing a view’s bounds origin may seem directionally backward — we increased the superview’s origin in the positive direction, but the subview moved in the negative direction — but think of it this way: a view’s bounds origin point coincides with its frame’s top left.
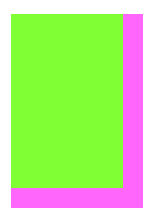
Figure 1-5. The superview’s bounds origin has been shifted
We have seen that changing a view’s bounds size affects its frame size. The converse is also true: changing a view’s frame size affects its bounds size. What is not affected by changing a view’s bounds size is the view’s center.
A view’s center is a single point establishing the positional relationship between the view’s bounds and its superview’s bounds. It represents a subview’s position within its superview, in the superview’s coordinates; in particular, it is the position within the superview of the subview’s own bounds center, the point derived from the bounds like this:
let c = CGPoint(theView.bounds.midX, theView.bounds.midY)
Changing a view’s bounds does not change its center; changing a view’s center does not change its bounds. A view’s bounds and center are orthogonal (independent), and completely describe the view’s size and its position within its superview. The view’s frame is therefore superfluous! In fact, the frame property is merely a convenient expression of the center and bounds values. In most cases, this won’t matter to you; you’ll use the frame property anyway. When you first create a view from scratch, the designated initializer is init(frame:). You can change the frame, and the bounds size and center will change to match. You can change the bounds size or the center, and the frame will change to match. Nevertheless, the proper and most reliable way to position and size a view within its superview is to use its bounds and center, not its frame; there are some situations in which the frame is meaningless (or will at least behave very oddly), but the bounds and center will always work.
We have seen that every view has its own coordinate system, expressed by its bounds, and that a view’s coordinate system has a clear relationship to its superview’s coordinate system, expressed by its center. This is true of every view in a window, so it is possible to convert between the coordinates of any two views in the same window. Convenience methods are supplied to perform this conversion both for a CGPoint and for a CGRect:
-
convert(_:to:) -
convert(_:from:)
The first parameter is either a CGPoint or a CGRect. The second parameter is a UIView; if the second parameter is nil, it is taken to be the window. The recipient is another UIView; the CGPoint or CGRect is being converted between its coordinates and the second view’s coordinates. If v1 is the superview of v2, then to center v2 within v1 you could say:
v2.center = v1.convert(v1.center, from:v1.superview)
A more common approach is to place the subview’s center at the superview’s bounds center, like this:
v2.center = CGPoint(v1.bounds.midX, v1.bounds.midY)
That’s such a common thing to do that I’ve written an extension that provides the center of a CGRect as its center property (see Appendix B), allowing me to talk like this:
v2.center = v1.bounds.center
Observe that the following is not the way to center a subview v2 in a superview v1:
v2.center = v1.center // that won't work!
Trying to center one view within another like that is a common beginner mistake. It can’t succeed, and will have unpredictable results, because the two center values are in different coordinate systems.
When setting a view’s position by setting its center, if the height or width of the view is not an integer (or, on a single-resolution screen, not an even integer), the view can end up misaligned: its point values in one or both dimensions are located between the screen pixels. This can cause the view to be displayed incorrectly; if the view contains text, the text may be blurry. You can detect this situation in the Simulator by checking Debug → Color Misaligned Images. A simple solution is to set the view’s frame to its own integral.
Transform
A view’s transform property alters how the view is drawn, changing the view’s apparent size, location, or orientation, without affecting its actual bounds and center. A transformed view continues to behave correctly: a rotated button is still a button, and can be tapped in its apparent location and orientation. Transforms are useful particularly as temporary visual indicators. You might call attention to a view by applying a transform that scales it up slightly, and then reversing that transform to restore it to its original size, and animating those changes (Chapter 4).
A transform value is a CGAffineTransform, which is a struct representing six of the nine values of a 3×3 transformation matrix (the other three values are constants, so there’s no need to represent them in the struct). You may have forgotten your high-school linear algebra, so you may not recall what a transformation matrix is. For the details, which are quite simple really, see the “Transforms” chapter of Apple’s Quartz 2D Programming Guide in the documentation archive, especially the section called “The Math Behind the Matrices.” But you don’t really need to know those details, because initializers are provided for creating three of the basic types of transform: rotation, scale (size), and translation (location). A fourth basic transform type, skewing or shearing, has no initializer and is rarely used.
By default, a view’s transformation matrix is CGAffineTransform.identity, the identity transform. It has no visible effect, so you’re unaware of it. Any transform that you do apply takes place around the view’s center, which is held constant.
Here’s some code to illustrate use of a transform:
let v1 = UIView(frame:CGRect(113, 111, 132, 194))
v1.backgroundColor = UIColor(red: 1, green: 0.4, blue: 1, alpha: 1)
let v2 = UIView(frame:v1.bounds.insetBy(dx: 10, dy: 10))
v2.backgroundColor = UIColor(red: 0.5, green: 1, blue: 0, alpha: 1)
self.view.addSubview(v1)
v1.addSubview(v2)
v1.transform = CGAffineTransform(rotationAngle: 45 * .pi/180)
print(v1.frame)
The transform property of the view v1 is set to a rotation transform. The result (Figure 1-6) is that the view appears to be rocked 45 degrees clockwise. (I think in degrees, but Core Graphics thinks in radians, so my code has to convert.) Observe that the view’s center property is unaffected, so that the rotation seems to have occurred around the view’s center. Moreover, the view’s bounds property is unaffected; the internal coordinate system is unchanged, so the subview is drawn in the same place relative to its superview.
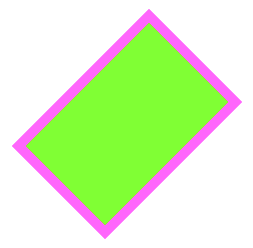
Figure 1-6. A rotation transform
The view’s frame is now useless, as no mere rectangle can describe the region of the superview apparently occupied by the view; the frame’s actual value, roughly (63.7,92.7,230.5,230.5), describes the minimal bounding rectangle surrounding the view’s apparent position. The rule is that if a view’s transform is not the identity transform, you should not set its frame; also, automatic resizing of a subview, discussed later in this chapter, requires that the superview’s transform be the identity transform.
Suppose, instead of a rotation transform, we apply a scale transform, like this:
v1.transform = CGAffineTransform(scaleX:1.8, y:1)
The bounds property of the view v1 is still unaffected, so the subview is still drawn in the same place relative to its superview; this means that the two views seem to have stretched horizontally together (Figure 1-7). No bounds or centers were harmed by the application of this transform!
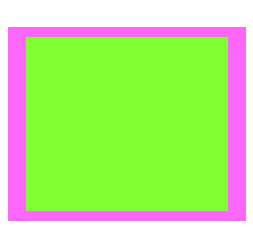
Figure 1-7. A scale transform
Methods are provided for transforming an existing transform. This operation is not commutative; order matters. (That high school math is starting to come back to you now, isn’t it?) If you start with a transform that translates a view to the right and then apply a rotation of 45 degrees, the rotated view appears to the right of its original position; on the other hand, if you start with a transform that rotates a view 45 degrees and then apply a translation to the right, the meaning of “right” has changed, so the rotated view appears 45 degrees down from its original position. To demonstrate the difference, I’ll start with a subview that exactly overlaps its superview:
let v1 = UIView(frame:CGRect(20, 111, 132, 194))
v1.backgroundColor = UIColor(red: 1, green: 0.4, blue: 1, alpha: 1)
let v2 = UIView(frame:v1.bounds)
v2.backgroundColor = UIColor(red: 0.5, green: 1, blue: 0, alpha: 1)
self.view.addSubview(v1)
v1.addSubview(v2)
Then I’ll apply two successive transforms to the subview, leaving the superview to show where the subview was originally. In this example, I translate and then rotate (Figure 1-8):
v2.transform =
    CGAffineTransform(translationX:100, y:0).rotated(by: 45 * .pi/180)
Figure 1-8. Translation, then rotation
In this example, I rotate and then translate (Figure 1-9):
v2.transform =
    CGAffineTransform(rotationAngle: 45 * .pi/180).translatedBy(x: 100, y: 0)

Figure 1-9. Rotation, then translation
The concatenating method concatenates two transform matrices using matrix multiplication. Again, this operation is not commutative. The order is the opposite of the order when chaining transforms. This code gives the same result as the previous example (Figure 1-9):
let r = CGAffineTransform(rotationAngle: 45 * .pi/180)
let t = CGAffineTransform(translationX:100, y:0)
v2.transform = t.concatenating(r) // not r.concatenating(t)
To remove a transform from a combination of transforms, apply its inverse. The inverted method lets you obtain the inverse of a given affine transform. Again, order matters. In this example, I rotate the subview and shift it to its “right,” and then remove the rotation, demonstrating how to translate a view at an angle (Figure 1-10):
let r = CGAffineTransform(rotationAngle: 45 * .pi/180)
let t = CGAffineTransform(translationX:100, y:0)
v2.transform = t.concatenating(r)
v2.transform = r.inverted().concatenating(v2.transform)
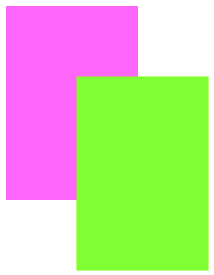
Figure 1-10. Rotation, then translation, then inversion of the rotation
CGPoint, CGSize, and CGRect all have an applying(_:) method that permits you to apply an affine transform to them. With it, you can calculate what the result would be if you were to apply the transform to a view. However, the transform is centered at the origin, so if that isn’t what you want, you have to translate the rotation point to the origin, apply the real transform, and then invert the translation transform. Earlier we rotated a view and printed its frame, like this:
let v1 = UIView(frame:CGRect(113, 111, 132, 194))
v1.transform = CGAffineTransform(rotationAngle: 45 * .pi/180)
print(v1.frame) // 63.7,92.7,230.5,230.5
We can get the same result without actually rotating any views:
let rect = CGRect(113, 111, 132, 194)
let shift = CGAffineTransform(translationX: -rect.midX, y: -rect.midY)
let rotate = v1.transform
let transform = shift.concatenating(rotate).concatenating(shift.inverted())
let rect2 = rect.applying(transform)
print(rect2) // 63.7,92.7,230.5,230.5
Transform3D
Starting in iOS 13, a UIView has a transform3D property. This is actually the underlying layer’s transform property (Chapter 3), but since it is also exposed through the view, I’ll explain it here.
As the name implies, a transform3D takes place in three-dimensional space; its description includes a z-axis, perpendicular to both the x-axis and y-axis. (By default, the positive z-axis points out of the screen, toward the viewer’s face.) The result of such a transformation does not necessarily look three-dimensional; but it operates in three dimensions, quite sufficiently to give a cartoonish but effective sense of reality, especially when performing an animation. We’ve all seen the screen image flip like turning over a piece of paper to reveal what’s on the back; that’s a rotation in three dimensions.
Like a view’s transform, a transform3D takes place by default around the view’s center, which is unaffected. (You can get finer control by dropping down to the level of the layer.) The transform itself is described mathematically by a struct called a CATransform3D. The Core Animation Transforms documentation lists the functions for working with these transforms. They are a lot like the CGAffineTransform functions, except they’ve got a third dimension. A 2D scale transform depends upon two values, the scale on the x-axis and the y-axis; for a 3D scale transform, there’s also a z-axis so you have to supply a third parameter.
The rotation 3D transform is a little more complicated. In addition to the angle, you also have to supply three coordinates describing the vector around which the rotation is to take place. Perhaps you’ve forgotten from your high-school math what a vector is, or perhaps trying to visualize three dimensions boggles your mind, so here’s another way to think of it.
For purposes of discussion, imagine a coordinate system in which the center of the rotation (by default, the view’s center) is at the origin (0.0,0.0,0.0). Now imagine an arrow emanating from that origin; its other end, the pointy end, is described by the three coordinates you provide in that coordinate system. Now imagine a plane that intersects the origin, perpendicular to the arrow. That is the plane in which the rotation will take place; a positive angle is a clockwise rotation, as seen from the side of the plane with the arrow (Figure 1-11). In effect, the three coordinates you supply describe (relative to the origin) where your eye would have to be to see this rotation as an old-fashioned two-dimensional rotation.
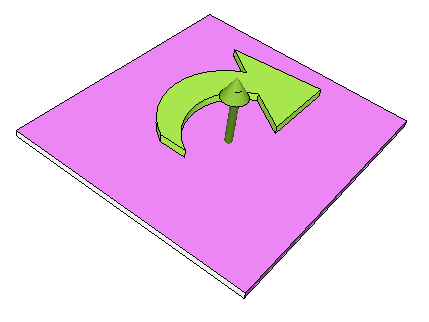
Figure 1-11. An anchor point plus a vector defines a rotation plane
A vector specifies a direction, not a point. It makes no difference on what scale you give the coordinates: (1.0,1.0,1.0) means the same thing as (10.0,10.0,10.0), so you might as well say (1.0,1.0,1.0), sticking to the unit scale; when you do, the vector is said to be normalized.
If the three normalized values are (0.0,0.0,1.0), with all other things being equal, the case is collapsed to a simple CGAffineTransform, because the rotational plane is the screen. If the three normalized values are (0.0,0.0,-1.0), it’s a backward CGAffineTransform, so that a positive angle looks counterclockwise (because we are looking at the “back side” of the rotational plane).
In this example, I’ll flip a UIView around its vertical axis. If this view is a UILabel whose text is "Hello, world", the result is that we see the words “Hello, world” written backward (Figure 1-12):
v.transform3D = CATransform3DMakeRotation(.pi, 0, 1, 0)
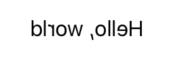
Figure 1-12. A backward label
Window Coordinates and Screen Coordinates
The device screen has no frame, but it has bounds. The window has no superview, but its frame is set automatically to match the screen’s bounds. The window starts out life filling the screen, and generally continues to fill the screen, and so, for the most part, window coordinates are screen coordinates. (I’ll discuss the possible exceptions on an iPad in Chapter 10.)
In iOS 7 and before, the screen’s coordinates were invariant. The transform property lay at the heart of an iOS app’s ability to rotate its interface: the window’s frame and bounds were locked to the screen, and an app’s interface rotated to compensate for a change in device orientation by applying a rotation transform to the root view, so that its origin moved to what the user now saw as the top left of the view.
But iOS 8 introduced a major change: when the app rotates to compensate for the rotation of the device, the screen (and with it, the window) is what rotates. None of the views in the story — neither the window, nor the root view, nor any of its subviews — receives a rotation transform when the app’s interface rotates. Instead, there is a transposition of the dimensions of the screen’s bounds (and a corresponding transposition of the dimensions of the window’s bounds and its root view’s bounds): in portrait orientation, the size is taller than wide, but in landscape orientation, the size is wider than tall.
Therefore, there are actually two sets of screen coordinates. Each is reported through a UICoordinateSpace, a protocol (also adopted by UIView) that provides a bounds property:
- UIScreen’s
coordinateSpaceproperty -
This coordinate space rotates. Its
boundsheight and width are transposed when the app rotates to compensate for a change in the orientation of the device; its bounds origin is at the top left of the app. - UIScreen’s
fixedCoordinateSpaceproperty -
This coordinate space is invariant. Its
boundsorigin stays at the top left of the physical device, remaining always in the same relationship to the device’s hardware buttons regardless of how the device itself is held.
To help you convert between coordinate spaces, UICoordinateSpace provides methods parallel to the coordinate-conversion methods I listed earlier:
-
convert(_:from:) -
convert(_:to:)
The first parameter is either a CGPoint or a CGRect. The second parameter is a UICoordinateSpace, which might be a UIView or the UIScreen; so is the recipient. Suppose we have a UIView v in our interface, and we wish to learn its position in fixed device coordinates. We could do it like this:
let screen = UIScreen.main.fixedCoordinateSpace
let r = v.superview!.convert(v.frame, to: screen)
Imagine that we have a subview of our main view, at the exact top left corner of the main view. When the device and the app are in portrait orientation, the subview’s top left is at (0.0,0.0) both in window coordinates and in screen fixedCoordinateSpace coordinates. When the device is rotated left into landscape orientation, and if the app rotates to compensate, the window rotates, so the subview is still at the top left from the user’s point of view, and is still at the top left in window coordinates. But in screen fixedCoordinateSpace coordinates, the subview’s top left x-coordinate will have a large positive value, because the origin is now at the lower left and its x grows positively upward.
Occasions where you need such information will be rare. Indeed, my experience is that it is rare even to worry about window coordinates. All of your app’s visible action takes place within your root view controller’s main view, and the bounds of that view, which are adjusted for you automatically when the app rotates to compensate for a change in device orientation, are probably the highest coordinate system that will interest you.
Trait Collections
Because of the dynamic nature of the larger environment in which views live, it is useful to have an object describing that environment that propagates down through the hierarchy of view controllers and views, along with a way of alerting each element of that hierarchy that the environment has changed. This is managed through the trait collection.
The trait collection originates in the screen (UIScreen) and works its way down through the window and any view controllers whose view is part of the interface all the way down to every individual subview. All the relevant classes (UIScreen, UIViewController and UIPresentationController, and UIView) implement the UITraitEnvironment protocol, which supplies the traitCollection property and the traitCollectionDidChange method.
The traitCollection is a UITraitCollection, a value class. It is freighted with a considerable number of properties describing the environment. Its displayScale tells you the screen resolution; its userInterfaceIdiom states the general device type, iPhone or iPad; it reports such things as the device’s force touch capability and display gamut; and so on.
Both at app launch time and if any property of the trait collection changes while the app is running, the traitCollectionDidChange(_:) message is propagated down the hierarchy of UITraitEnvironments; the old trait collection (if any) is provided as the parameter, and the new trait collection can be retrieved as self.traitCollection.
Warning
If you implement traitCollectionDidChange(_:), always call super in the first line. Forgetting to do this is a common beginner mistake.
It is also possible to construct a trait collection yourself. Oddly, you can’t set any trait collection properties directly; instead, you form a trait collection through an initializer that determines just one property, and if you want to add further property settings, you have to combine trait collections by calling init(traitsFrom:) with an array of trait collections:
let tcdisp = UITraitCollection(displayScale: UIScreen.main.scale)
let tcphone = UITraitCollection(userInterfaceIdiom: .phone)
let tc1 = UITraitCollection(traitsFrom: [tcdisp, tcphone])
The init(traitsFrom:) array works like inheritance: an ordered intersection is performed. If two trait collections are combined, and they both set the same property, the winner is the trait collection that appears later in the array or further down the inheritance hierarchy. If one sets a property and the other doesn’t, the one that sets the property wins. If you create a trait collection, the value for any unspecified property will be inherited if the trait collection finds itself in the inheritance hierarchy.
To compare trait collections, call containsTraits(in:). This returns true if the value of every specified property of the parameter trait collection matches that of this trait collection.
The trait collection properties that are of chief concern with regard to UIViews in general are the interface style and the size classes, so I’ll talk about those now.
Interface Style
The trait collection’s userInterfaceStyle (a UIUserInterfaceStyle) reports whether the environment is in light mode (.light) or dark mode (.dark). For the significance of these for your app, see the discussion of colors earlier in this chapter. If your colors are dynamic colors, then for the most part everything will happen automatically; the user switches modes, and your colors change in response. However, there are circumstances under which you may be managing some colors manually, and you’ll want to know when the interface style changes so that you can change a color in response.
Let’s say we’re applying a custom named dynamic color from the asset catalog to the border of a view. This is actually done at the level of the view’s layer (Chapter 3), and requires that we take the color’s cgColor property:
self.otherView.layer.borderWidth = 4
self.otherView.layer.borderColor =
    UIColor(named: "myDarkColor")?.cgColor
The problem is that neither a layer nor a color’s cgColor knows anything about the trait collection. So it is up to us to listen for trait collection changes and apply our dynamic color again. We can save ourselves from doing unnecessary work, thanks to the trait collection hasDifferentColorAppearance method:
override func traitCollectionDidChange(_ prevtc: UITraitCollection?) {
    super.traitCollectionDidChange(prevtc)
    if prevtc?.hasDifferentColorAppearance(
        comparedTo: self.traitCollection) ?? true {
            self.otherView.layer.borderColor =
                UIColor(named: "myDarkColor")?.cgColor
    }
}
Observe that we don’t have to know what the userInterfaceStyle actually is; we simply take our dynamic color’s cgColor and apply it, exactly as we did before. How can this be? It’s because the act of accessing the named color from the asset catalog — UIColor(named: "myDarkColor") — takes place in the presence of a global value, UITraitCollection.current. In traitCollectionDidChange and various other places where the runtime is drawing or performing layout, this value is set for us, and so our dynamic color arrives in the correct interface style variant and our derived cgColor is the correct color. In contexts where UITraitCollection.current is not set automatically, you are free to set it manually, ensuring that subsequent operations involving dynamic colors will take place in the correct environment.
The trait collection is also the key to understanding what color a named dynamic color really is. What color is .systemYellow? Well, it depends on the trait collection. So to find out, you have to supply a trait collection. That’s easy, because you can make a trait collection. Now you can call resolvedColor:
let yellow = UIColor.systemYellow
let light = UITraitCollection(userInterfaceStyle: .light)
let dark = UITraitCollection(userInterfaceStyle: .dark)
let yellowLight = yellow.resolvedColor(with: light)
// 1 0.8 0 1
let yellowDark = yellow.resolvedColor(with: dark)
// 1 0.839216 0.0392157 1
In addition to the userInterfaceStyle, the trait collection also has a userInterfaceLevel, which is .base or .elevated. This affects dynamic background colors. Only confined regions in front of the main interface are normally affected. An alert (Chapter 14) has an .elevated interface level, even if the main interface behind the alert does not.
Size Classes
The salient fact about app rotation and the like is not the rotation per se but the change in the app’s dimensional proportions. Consider a subview of the root view, located at the bottom right of the screen when the device is in portrait orientation. If the root view’s bounds width and bounds height are effectively transposed, then that poor old subview will now be outside the bounds height, and therefore off the screen — unless your app responds in some way to this change to reposition it. (Such a response is called layout, a subject that will occupy most of the rest of this chapter.)
The dimensional characteristics of the environment are embodied in a pair of size classes which are vended as trait collection properties:
horizontalSizeClassverticalSizeClass-
A UIUserInterfaceSizeClass value, either
.regularor.compact.
In combination, the size classes have the following meanings when, as will usually be the case, your app’s window occupies the entire screen:
- Both the horizontal and vertical size classes are
.regular -
We’re running on an iPad.
- The horizontal size class is
.compactand the vertical size class is.regular -
We’re running on an iPhone with the app in portrait orientation.
- The horizontal size class is
.regularand the vertical size class is.compact -
We’re running on a “big” iPhone with the app in landscape orientation.
- Both the horizontal and vertical size classes are
.compact -
We’re running on an iPhone (other than a “big” iPhone) with the app in landscape orientation.
Note
The “big” iPhones are currently the iPhone 6/7/8 Plus, iPhone XR, iPhone XS Max, iPhone 11, and iPhone 11 Pro Max.
Clearly, a change in the size classes detected through traitCollectionDidChange is not the way to learn simply that the interface has rotated. Size classes don’t distinguish between an iPad in portrait orientation and an iPad in landscape orientation. They distinguish between the most important extreme situations: if the horizontal size class goes from .regular to .compact, the app is suddenly tall and narrow, and you might want to compensate by changing the interface in some way. In my experience, however, you won’t typically implement traitCollectionDidChange in order to hear about a change in size classes; rather, the size classes are something you’ll consult in response to some other event. (I’ll talk more in Chapter 6 about how to detect actual rotation at the level of the view controller.)
Overriding Trait Collections
Under certain circumstances, it can be useful to isolate part of the UITraitEnvironment hierarchy and lie to it about what the trait collection is. You might like part of the hierarchy to believe that we are on an iPhone in landscape when in fact we are on an iPhone in portrait. (I’ll give an example in Chapter 6.) Or there might be some area of your app that should not respond to a change between light and dark mode.
You cannot insert a trait collection directly into the inheritance hierarchy simply by setting a view’s trait collection; traitCollection isn’t a settable property. However, in a UIViewController you can inject your own trait collection by way of the overrideTraitCollection property (and UIPresentationController has a method that is similar).
For the user interface style, there is a simpler facility available both for a UIViewController and for a UIView: the overrideUserInterfaceStyle property. It isn’t a trait collection; it’s a UIUserInterfaceStyle. The default value is .unspecified, which means that the interface style of the trait collection should just pass on down the hierarchy. But if you set it to .light or .dark, you block inheritance of just the userInterfaceStyle property of the trait collection starting at that point in the hierarchy, substituting your own custom setting.
Layout
We have seen that a subview moves when its superview’s bounds origin is changed. But what happens to a subview when its superview’s size is changed?
Of its own accord, nothing happens. The subview’s bounds and center haven’t changed, and the superview’s bounds origin hasn’t moved, so the subview stays in the same position relative to the top left of its superview. In real life, that usually won’t be what you want. You’ll want subviews to be resized and repositioned when their superview’s size is changed. This is called layout.
Here are some ways in which a superview might be resized dynamically:
-
Your app might compensate for the user rotating the device 90 degrees by rotating itself so that its top moves to the new top of the screen, matching its new orientation — and, as a consequence, transposing the width and height values of its bounds.
-
An iPhone app might launch on screens with different aspect ratios: for instance, the screen of the iPhone SE is relatively shorter than the screen of later iPhone models, and the app’s interface may need to adapt to this difference.
-
A universal app might launch on an iPad or on an iPhone. The app’s interface may need to adapt to the size of the screen on which it finds itself running.
-
A view instantiated from a nib, such as a view controller’s main view or a table view cell, might be resized to fit the interface into which it is placed.
-
A view might respond to a change in its surrounding views. For instance, when a navigation bar is shown or hidden dynamically, the remaining interface might shrink or grow to compensate, filling the available space.
-
The user might alter the width of your app’s window on an iPad, as part of the iPad multitasking interface.
In any of those situations, and others, layout will probably be needed. Subviews of the view whose size has changed will need to shift, change size, redistribute themselves, or compensate in other ways so that the interface still looks good and remains usable.
Layout is performed in three primary ways:
- Manual layout
-
The superview is sent the
layoutSubviewsmessage whenever it is resized; so, to lay out subviews manually, provide your own subclass and overridelayoutSubviews. Clearly this could turn out to be a lot of work, but it means you can do anything you like. - Autoresizing
-
Autoresizing is the oldest way of performing layout automatically. When its superview is resized, a subview will respond in accordance with the rules prescribed by its own
autoresizingMaskproperty value, which describes the resizing relationship between the subview and its superview. - Autolayout
-
Autolayout depends on the constraints of views. A constraint is a full-fledged object with numeric values describing some aspect of the size or position of a view, often in terms of some other view; it is much more sophisticated, descriptive, and powerful than the
autoresizingMask. Multiple constraints can apply to an individual view, and they can describe a relationship between any two views (not just a subview and its superview). Autolayout is implemented behind the scenes inlayoutSubviews; in effect, constraints allow you to write sophisticatedlayoutSubviewsfunctionality without code.
Your layout strategy can involve any combination of those. The need for manual layout is rare, but you can implement it if you need it. Autoresizing is the default. Autolayout is an opt-in alternative to autoresizing. But in real life, it is quite likely that all your views will opt in to autolayout, because it’s so powerful and best suited to help your interface adapt to a great range of screen sizes.
The default layout behavior for a view depends on how it was created:
- In code
-
A view that your code creates and adds to the interface, by default, uses autoresizing, not autolayout. If you want such a view to use autolayout, you must deliberately suppress its use of autoresizing.
- In a nib file
-
All new .storyboard and .xib files opt in to autolayout. Their views are ready for autolayout. But a view in the nib editor can still use autoresizing if you prefer.
Autoresizing
Autoresizing is a matter of conceptually assigning a subview “springs and struts.” A spring can expand and contract; a strut can’t. Springs and struts can be assigned internally or externally, horizontally or vertically. With two internal springs or struts, you specify whether and how the view can be resized; with four external springs or struts, you specify whether and how the view can be repositioned:
-
Imagine a subview that is centered in its superview and is to stay centered, but is to resize itself as the superview is resized. It would have four struts externally and two springs internally.
-
Imagine a subview that is centered in its superview and is to stay centered, and is not to resize itself as the superview is resized. It would have four springs externally and two struts internally.
-
Imagine an OK button that is to stay in the lower right of its superview. It would have two struts internally, two struts externally from its right and bottom, and two springs externally from its top and left.
-
Imagine a text field that is to stay at the top of its superview. It is to widen as the superview widens. It would have three struts externally and a spring from its bottom; internally it would have a vertical strut and a horizontal spring.
In code, a combination of springs and struts is set through a view’s autoresizingMask property, which is a bitmask (UIView.AutoresizingMask) so that you can combine options. The options represent springs; whatever isn’t specified is a strut. The default is the empty set, apparently meaning all struts — but of course it can’t really be all struts, because if the superview is resized, something needs to change, so in reality an empty autoresizingMask is the same as .flexibleRightMargin together with .flexibleBottomMargin (and the view is pinned by struts to the top left).
In debugging, when you log a UIView to the console, its autoresizingMask is reported using the word autoresize and a list of the springs. The external springs are LM, RM, TM, and BM; the internal springs are W and H. autoresize = LM+TM means there are external springs from the left and top; autoresize = W+BM means there’s an internal horizontal spring and a spring from the bottom.
To demonstrate autoresizing, I’ll start with a view and two subviews, one stretched across the top, the other confined to the lower right (Figure 1-13):
let v1 = UIView(frame:CGRect(100, 111, 132, 194))
v1.backgroundColor = UIColor(red: 1, green: 0.4, blue: 1, alpha: 1)
let v2 = UIView(frame:CGRect(0, 0, 132, 10))
v2.backgroundColor = UIColor(red: 0.5, green: 1, blue: 0, alpha: 1)
let v1b = v1.bounds
let v3 = UIView(frame:CGRect(v1b.width-20, v1b.height-20, 20, 20))
v3.backgroundColor = UIColor(red: 1, green: 0, blue: 0, alpha: 1)
self.view.addSubview(v1)
v1.addSubview(v2)
v1.addSubview(v3)
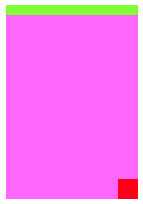
Figure 1-13. Before autoresizing
To that example, I’ll add code applying springs and struts to the two subviews to make them behave like the text field and the OK button I was hypothesizing earlier:
v2.autoresizingMask = .flexibleWidth
v3.autoresizingMask = [.flexibleTopMargin, .flexibleLeftMargin]
Now I’ll resize the superview, bringing autoresizing into play; as you can see (Figure 1-14), the subviews remain pinned in their correct relative positions:
v1.bounds.size.width += 40
v1.bounds.size.height -= 50
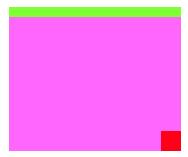
Figure 1-14. After autoresizing
If autoresizing isn’t sophisticated enough to achieve what you want, you have two choices:
-
Combine it with manual layout in
layoutSubviews. Autoresizing happens beforelayoutSubviewsis called, so yourlayoutSubviewscode is free to come marching in and tidy up whatever autoresizing didn’t get quite right. -
Use autolayout. This is actually the same solution, because autolayout is in fact a way of injecting functionality into
layoutSubviews. But using autolayout is a lot easier than writing your ownlayoutSubviewscode!
Autolayout and Constraints
Autolayout is an opt-in technology, at the level of each individual view. You can use autoresizing and autolayout in different areas of the same interface; one sibling view can use autolayout while another sibling view does not, and a superview can use autolayout while some or all of its subviews do not. However, autolayout is implemented through the superview chain, so if a view uses autolayout, then automatically so do all its superviews; and if (as will almost certainly be the case) one of those views is the main view of a view controller, that view controller receives autolayout-related events.
But how does a view opt in to using autolayout? Simply by becoming involved with a constraint. Constraints are your way of telling the autolayout engine that you want it to perform layout on this view, as well as how you want the view laid out.
An autolayout constraint, or simply constraint, is an NSLayoutConstraint instance, and describes either the absolute width or height of a view, or else a relationship between an attribute of one view and an attribute of another view. In the latter case, the attributes don’t have to be the same attribute, and the two views don’t have to be siblings (subviews of the same superview) or parent and child (superview and subview) — the only requirement is that they share a common ancestor (a superview somewhere up the view hierarchy).
Here are the chief properties of an NSLayoutConstraint:
firstItem,firstAttribute,secondItem,secondAttribute-
The two views and their respective attributes (NSLayoutConstraint.Attribute) involved in this constraint. The possible attribute values are:
-
.width,.height -
.top,.bottom -
.left,.right,.leading,.trailing -
.centerX,.centerY -
.firstBaseline,.lastBaseline
If the constraint is describing a view’s absolute height or width, the
secondItemwill beniland thesecondAttributewill be.notAnAttribute..firstBaselineapplies primarily to multiline labels, and is some distance down from the top of the label (Chapter 11);.lastBaselineis some distance up from the bottom of the label.The meanings of the other attributes are intuitively obvious, except that you might wonder what
.leadingand.trailingmean: they are the international equivalent of.leftand.right, automatically reversing their meaning on systems for which your app is localized and whose language is written right-to-left. The entire interface is automatically reversed on such systems — but that will work properly only if you’ve used.leadingand.trailingconstraints throughout the interface. -
multiplier,constant-
These numbers will be applied to the second attribute’s value to determine the first attribute’s value. The second attribute’s value is multiplied by the
multiplier; theconstantis added to that product; and the first attribute is set to the result. Basically, you’re writing an equation a1 = ma2 + c, where a1 and a2 are the two attributes, and m and c are the multiplier and the constant. In the degenerate case where the first attribute’s value is to equal the second attribute’s value, the multiplier will be 1 and the constant will be 0. If you’re describing a view’s width or height absolutely, the multiplier will be 1 and the constant will be the width or height value. relation-
How the two attribute values are to be related to one another, as modified by the
multiplierand theconstant. This is the operator that goes in the spot where I put the equal sign in the equation in the preceding paragraph. Possible values are (NSLayoutConstraint.Relation):-
.equal -
.lessThanOrEqual -
.greaterThanOrEqual
-
priority-
Priority values range from 1000 (required) down to 1, and certain standard behaviors have standard priorities. Constraints can have different priorities, determining the order in which they are applied. Starting in iOS 11, a priority is not a number but a UILayoutPriority struct wrapping the numeric value as its
rawValue.
A constraint belongs to a view. A view can have many constraints: a UIView has a constraints property, along with these instance methods:
-
addConstraint(_:),addConstraints(_:) -
removeConstraint(_:),removeConstraints(_:)
The question then is which view a given constraint should belong to. The answer is: the view that is closest up the view hierarchy from both views involved in the constraint. If possible, it should be one of those views. If the constraint dictates a view’s absolute width, it belongs to that view; if it sets the top of a view in relation to the top of its superview, it belongs to that superview; if it aligns the tops of two sibling views, it belongs to their common superview.
However, you’ll probably never call any of those methods! Instead of adding a constraint to a particular view explicitly, you can activate the constraint. An activated constraint is added to the correct view automatically, relieving you from having to determine what view that would be. A constraint has an isActive property; you can set it to activate or deactivate a single constraint, plus it tells you whether a given constraint is part of the interface at this moment. There is also an NSLayoutConstraint class method activate(_:), which takes an array of constraints, along with deactivate(_:). Deactivating a constraint is like removing a subview: the constraint is removed from its view, and will go out of existence if you haven’t retained it.
NSLayoutConstraint properties are read-only, except for priority, constant, and isActive. If you want to change anything else about an existing constraint, you must remove the constraint and replace it with a new one.
An NSLayoutConstraint also has a writable string identifier property. It can be set to any value you like, and can be useful for debugging or for finding a constraint later — so useful, in fact, that it might be good to have on hand an extension that lets you activate a constraint and set its identifier at the same time:
extension NSLayoutConstraint {
    func activate(withIdentifier id: String) {
        (self.identifier, self.isActive) = (id, true)
    }
}
(I owe that idea to Stack Overflow user Exquisitian; see https://stackoverflow.com/a/57102973/341994.)
Warning
Once you are using explicit constraints to position and size a view, do not set its frame (or bounds and center); use constraints alone. Otherwise, when layoutSubviews is called, the view will jump back to where its constraints position it. (However, you may set a view’s frame from within an implementation of layoutSubviews, and it is perfectly normal to do so.)
Implicit Autoresizing Constraints
The mechanism whereby individual views can opt in to autolayout can suddenly involve other views in autolayout, even though those other views were not using autolayout previously. Therefore, there needs to be a way, when such a view becomes involved in autolayout, to generate constraints for it — constraints that will determine that view’s position and size identically to how its frame and autoresizingMask were determining them. The autolayout engine takes care of this for you: it reads the view’s frame and autoresizingMask settings and translates them into implicit constraints (of class NSAutoresizingMaskLayoutConstraint). The autolayout engine treats a view in this special way only if the view has its translatesAutoresizingMaskIntoConstraints property set to true — which happens to be the default.
To demonstrate, I’ll construct an example in two stages. In the first stage, I add to my interface, in code, a UILabel (“Hello”) that doesn’t use autolayout. I’ll decide that this view’s position is to be somewhere near the top right of the screen. To keep it in position near the top right, its autoresizingMask will be [.flexibleLeftMargin, .flexibleBottomMargin]:
let lab1 = UILabel(frame:CGRect(270,20,42,22))
lab1.autoresizingMask = [.flexibleLeftMargin, .flexibleBottomMargin]
lab1.text = "Hello"
self.view.addSubview(lab1)
If we now rotate the device (or Simulator window), and the app rotates to compensate, the label stays correctly positioned near the top right corner by autoresizing.
Now I’ll add a second label (“Howdy”) that does use autolayout — and in particular, I’ll attach it by a constraint to the first label (the meaning of this code will be made clear in subsequent sections; just accept it for now):
let lab2 = UILabel()
lab2.translatesAutoresizingMaskIntoConstraints = false
lab2.text = "Howdy"
self.view.addSubview(lab2)
NSLayoutConstraint.activate([
    lab2.topAnchor.constraint(
        equalTo: lab1.bottomAnchor, constant: 20),
    lab2.trailingAnchor.constraint(
        equalTo: self.view.trailingAnchor, constant: -20)
])
This causes the first label (“Hello”) to be involved in autolayout.
Therefore, the first label magically acquires four automatically generated implicit constraints of class NSAutoresizingMaskLayoutConstraint, such as to give the label the same size and position, and the same behavior when its superview is resized, that it had when it was configured by its frame and autoresizingMask:
<NSAutoresizingMaskLayoutConstraint H:[UILabel:'Hello']-(63)-|>
<NSAutoresizingMaskLayoutConstraint UILabel:'Hello'.minY == 20>
<NSAutoresizingMaskLayoutConstraint UILabel:'Hello'.width == 42>
<NSAutoresizingMaskLayoutConstraint UILabel:'Hello'.height == 22>
Recall that the original frame was (270,20,42,22). I’m on an iPhone 8 simulator, so the main view width is 375. I’ve simplified and rearranged the output, but what it says is that the label’s right edge is 63 points from the main view’s right (the label’s original x value of 270 plus its width of 42 is 312, and the main view’s width of 375 minus 312 is 63), its top is 20 points from the main view’s top, and it is 42×22 in size.
But within this helpful automatic behavior lurks a trap. Suppose a view has acquired automatically generated implicit constraints, and suppose you then proceed to attach further constraints to this view, explicitly setting its position or size. There will then almost certainly be a conflict between your explicit constraints and the implicit constraints. The solution is to set the view’s translatesAutoresizingMaskIntoConstraints property to false, so that the implicit constraints are not generated, and the view’s only constraints are your explicit constraints.
The trouble is most likely to arise when you create a view in code and then position or size that view with constraints, forgetting that you also need to set its translatesAutoresizingMaskIntoConstraints property to false. If that happens, you’ll get a conflict between constraints. (To be honest, I usually do forget, and am reminded only when I do get a conflict between constraints.)
Creating Constraints in Code
We are now ready to write some code that creates constraints! I’ll start by using the NSLayoutConstraint initializer:
-
init(item:attribute:relatedBy:toItem:attribute:multiplier:constant:)
This initializer sets every property of the constraint, as I described them a moment ago — except the priority, which defaults to .required (1000), and the identifier, both of which can be set later if desired.
I’ll generate the same views and subviews and layout behavior as in
Figures 1-13 and 1-14,
but using constraints. First, I’ll create the views and add them to the interface. Observe that I don’t bother to assign the subviews v2 and v3 explicit frames as I create them, because constraints will take care of positioning them. Also, I remember (for once) to set their translatesAutoresizingMaskIntoConstraints properties to false, so that they won’t sprout additional implicit NSAutoresizingMaskLayoutConstraints:
let v1 = UIView(frame:CGRect(100, 111, 132, 194))
v1.backgroundColor = UIColor(red: 1, green: 0.4, blue: 1, alpha: 1)
let v2 = UIView()
v2.backgroundColor = UIColor(red: 0.5, green: 1, blue: 0, alpha: 1)
let v3 = UIView()
v3.backgroundColor = UIColor(red: 1, green: 0, blue: 0, alpha: 1)
self.view.addSubview(v1)
v1.addSubview(v2)
v1.addSubview(v3)
v2.translatesAutoresizingMaskIntoConstraints = false
v3.translatesAutoresizingMaskIntoConstraints = false
And here come the constraints; I’ll add them to their views manually, just to show how it’s done:
v1.addConstraint(
    NSLayoutConstraint(item: v2,
        attribute: .leading,
        relatedBy: .equal,
        toItem: v1,
        attribute: .leading,
        multiplier: 1, constant: 0)
)
v1.addConstraint(
    NSLayoutConstraint(item: v2,
        attribute: .trailing,
        relatedBy: .equal,
        toItem: v1,
        attribute: .trailing,
        multiplier: 1, constant: 0)
)
v1.addConstraint(
    NSLayoutConstraint(item: v2,
        attribute: .top,
        relatedBy: .equal,
        toItem: v1,
        attribute: .top,
        multiplier: 1, constant: 0)
)
v2.addConstraint(
    NSLayoutConstraint(item: v2,
        attribute: .height,
        relatedBy: .equal,
        toItem: nil,
        attribute: .notAnAttribute,
        multiplier: 1, constant: 10)
)
v3.addConstraint(
    NSLayoutConstraint(item: v3,
        attribute: .width,
        relatedBy: .equal,
        toItem: nil,
        attribute: .notAnAttribute,
        multiplier: 1, constant: 20)
)
v3.addConstraint(
    NSLayoutConstraint(item: v3,
        attribute: .height,
        relatedBy: .equal,
        toItem: nil,
        attribute: .notAnAttribute,
        multiplier: 1, constant: 20)
)
v1.addConstraint(
    NSLayoutConstraint(item: v3,
        attribute: .trailing,
        relatedBy: .equal,
        toItem: v1,
        attribute: .trailing,
        multiplier: 1, constant: 0)
)
v1.addConstraint(
    NSLayoutConstraint(item: v3,
        attribute: .bottom,
        relatedBy: .equal,
        toItem: v1,
        attribute: .bottom,
        multiplier: 1, constant: 0)
)
Now, I know what you’re thinking. You’re thinking: “What are you, nuts? That is a boatload of code!” (Except that you probably used another four-letter word instead of “boat.”) But that’s something of an illusion. I’d argue that what we’re doing here is actually simpler than the code with which we created Figure 1-13 using explicit frames and autoresizing.
After all, we merely create eight constraints in eight simple commands. (I’ve broken each command into multiple lines, but that’s mere formatting.) They’re verbose, but they are the same command repeated with different parameters, so creating them is simple. Moreover, our eight constraints determine the position, size, and layout behavior of our two subviews, so we’re getting a lot of bang for our buck.
Even more telling, these constraints are a far clearer expression of what’s supposed to happen than setting a frame and autoresizingMask. The position of our subviews is described once and for all, both as they will initially appear and as they will appear if their superview is resized. And we don’t have to use arbitrary math. Recall what we had to say before:
let v1b = v1.bounds
let v3 = UIView(frame:CGRect(v1b.width-20, v1b.height-20, 20, 20))
That business of subtracting the view’s height and width from its superview’s bounds height and width in order to position the view is confusing and error-prone. With constraints, we can speak the truth directly; our constraints say, plainly and simply, “v3 is 20 points wide and 20 points high and flush with the bottom-right corner of v1.”
In addition, constraints can express things that autoresizing can’t. Instead of applying an absolute height to v2, we could require that its height be exactly one-tenth of v1’s height, regardless of how v1 is resized. To do that without autolayout, you’d have to implement layoutSubviews and enforce it manually, in code.
Anchor notation
The NSLayoutConstraint(item:...) initializer is rather verbose, though it has the virtue of singularity: one method can create any constraint. There’s another way to do everything I just did, making exactly the same eight constraints and adding them to the same views, using a much more compact notation that takes the opposite approach: it concentrates on brevity but sacrifices singularity. Instead of focusing on the constraint, the compact notation focuses on the attributes to which the constraint relates. These attributes are expressed as anchor properties of a UIView:
-
widthAnchor,heightAnchor -
topAnchor,bottomAnchor -
leftAnchor,rightAnchor,leadingAnchor,trailingAnchor -
centerXAnchor,centerYAnchor -
firstBaselineAnchor,lastBaselineAnchor
The anchor values are instances of NSLayoutAnchor subclasses. The constraint-forming methods are anchor instance methods. There are three possible relations — equal to, greater than or equal to, and less than or equal to — and the relationship might be with a constant or another anchor, yielding six combinations:
- A constant alone
-
These methods are for an absolute width or height constraint:
-
constraint(equalToConstant:) -
constraint(greaterThanOrEqualToConstant:) -
constraint(lessThanOrEqualToConstant:)
-
- Another anchor
-
In a relationship with another anchor, we need both a constant and a multiplier. But for brevity you can omit the
multiplier:, theconstant:, or both. If the constant is omitted, it is0; if the multiplier is omitted, it is1:-
constraint(equalTo:multiplier:constant:) -
constraint(greaterThanOrEqualTo:multiplier:constant:) -
constraint(lessThanOrEqualTo:multiplier:constant:)
-
In iOS 10, a method was added that generates, not a constraint, but a new width or height anchor expressing the distance between two anchors; you can then set a view’s width or height anchor in relation to that distance:
-
anchorWithOffset(to:)
Starting in iOS 11, additional methods create a constraint based on a constant value provided by the runtime. This is helpful for getting the standard spacing between views, and is especially valuable when connecting text baselines vertically, because the system spacing will change according to the text size:
-
constraint(equalToSystemSpacingAfter:multiplier:) -
constraint(greaterThanOrEqualToSystemSpacingAfter:multiplier:) -
constraint(lessThanOrEqualToSystemSpacingAfter:multiplier:) -
constraint(equalToSystemSpacingBelow:multiplier:) -
constraint(greaterThanOrEqualToSystemSpacingBelow:multiplier:) -
constraint(lessThanOrEqualToSystemSpacingBelow:multiplier:)
All of that may sound very elaborate when I describe it, but when you see it in action, you will appreciate immediately the benefit of this compact notation: it’s easy to write (especially thanks to Xcode’s code completion), easy to read, and easy to maintain. Here we generate exactly the same constraints as in the preceding example; I’ll call activate instead of adding each constraint to its view manually:
NSLayoutConstraint.activate([
    v2.leadingAnchor.constraint(equalTo:v1.leadingAnchor),
    v2.trailingAnchor.constraint(equalTo:v1.trailingAnchor),
    v2.topAnchor.constraint(equalTo:v1.topAnchor),
    v2.heightAnchor.constraint(equalToConstant:10),
    v3.widthAnchor.constraint(equalToConstant:20),
    v3.heightAnchor.constraint(equalToConstant:20),
    v3.trailingAnchor.constraint(equalTo:v1.trailingAnchor),
    v3.bottomAnchor.constraint(equalTo:v1.bottomAnchor)
])
That’s eight constraints in eight lines of code.
Visual format notation
Another way to abbreviate your creation of constraints is to use a text-based shorthand called a visual format. This has the advantage of allowing you to describe multiple constraints simultaneously, and is appropriate particularly when you’re arranging a series of views horizontally or vertically. I’ll start with a simple example:
"V:|[v2(10)]"
In that expression, V: means that the vertical dimension is under discussion; the alternative is H:, which is also the default (so you can omit it). A view’s name appears in square brackets, and a pipe (|) signifies the superview, so we’re portraying v2’s
top edge as butting up against its superview’s top edge. Numeric dimensions appear in parentheses, and a numeric dimension accompanying a view’s name sets that dimension of that view, so we’re also setting v2’s height to 10.
To use a visual format, you have to provide a dictionary that maps the string name of each view mentioned by the visual format string to the actual view. The dictionary accompanying the preceding expression might be ["v2":v2].
Here, then, is yet another way of expressing the preceding examples, generating exactly the same eight constraints using four commands instead of eight, thanks to the visual format shorthand:
let d = ["v2":v2,"v3":v3]
NSLayoutConstraint.activate([
    NSLayoutConstraint.constraints(withVisualFormat:
        "H:|[v2]|", metrics: nil, views: d),
    NSLayoutConstraint.constraints(withVisualFormat:
        "V:|[v2(10)]", metrics: nil, views: d),
    NSLayoutConstraint.constraints(withVisualFormat:
        "H:[v3(20)]|", metrics: nil, views: d),
    NSLayoutConstraint.constraints(withVisualFormat:
        "V:[v3(20)]|", metrics: nil, views: d)
].flatMap {$0})
(The constraints(withVisualFormat:...) class method yields an array of constraints, so my literal array is an array of arrays of constraints. But activate(_:) expects an array of constraints, so I flatten my literal array.)
Here are some further things to know when generating constraints with the visual format syntax:
-
The
metrics:parameter is a dictionary with numeric values. This lets you use a name in the visual format string where a numeric value needs to go. -
The
options:parameter, omitted in the preceding example, is a bitmask (NSLayoutConstraint.FormatOptions) chiefly allowing you to specify alignments to be applied to all the views mentioned in the visual format string. -
To specify the distance between two successive views, use hyphens surrounding the numeric value, like this:
"[v1]-20-[v2]". The numeric value may optionally be surrounded by parentheses. -
A numeric value in parentheses may be preceded by an equality or inequality operator, and may be followed by an at sign with a priority. Multiple numeric values, separated by comma, may appear in parentheses together, as in
"[v1(>=20@400,<=30)]".
For formal details of the visual format syntax, see the “Visual Format Syntax” appendix of Apple’s Auto Layout Guide in the documentation archive.
The visual format syntax shows itself to best advantage when multiple views are laid out in relation to one another along the same dimension; in that situation, you can get many constraints generated by a single compact visual format string. However, it hasn’t been updated for recent iOS versions, so there are some important types of constraint that visual format syntax can’t express (such as pinning a view to the safe area, discussed later in this chapter).
Constraints as Objects
The examples so far have involved creating constraints and adding them directly to the interface — and then forgetting about them. But it is frequently useful to form constraints and keep them on hand for future use, typically in a property. A common use case is where you intend, at some future time, to change the interface in some radical way, such as by inserting or removing a view; you’ll probably find it convenient to keep multiple sets of constraints on hand, each set being appropriate to a particular configuration of the interface. It is then trivial to swap constraints out of and into the interface along with views that they affect.
In this example, we create within our main view (self.view) three views, v1, v2, and v3, which are red, yellow, and blue rectangles respectively. For some reason, we will later want to remove the yellow view (v2) dynamically as the app runs, moving the blue view to where the yellow view was; and then, still later, we will want to insert the yellow view once again (Figure 1-15). So we have two alternating view configurations.
To prepare for this, we create two sets of constraints, one describing the positions of v1, v2, and v3 when all three are present, the other describing the positions of v1 and v3 when v2 is absent. For purposes of maintaining these sets of constraints, we have already prepared two properties, constraintsWith and constraintsWithout, initialized as empty arrays of NSLayoutConstraint. We will also need a strong reference to v2, so that it doesn’t vanish when we remove it from the interface:
var v2 : UIView!
var constraintsWith = [NSLayoutConstraint]()
var constraintsWithout = [NSLayoutConstraint]()
Here’s the code for creating the views:
let v1 = UIView()
v1.backgroundColor = .red
v1.translatesAutoresizingMaskIntoConstraints = false
let v2 = UIView()
v2.backgroundColor = .yellow
v2.translatesAutoresizingMaskIntoConstraints = false
let v3 = UIView()
v3.backgroundColor = .blue
v3.translatesAutoresizingMaskIntoConstraints = false
self.view.addSubview(v1)
self.view.addSubview(v2)
self.view.addSubview(v3)
self.v2 = v2 // retain
Now we create the constraints. In what follows, c1, c3, and c4 are in common to both situations (v2 is present or v2 is absent), so we simply activate them once and for all. The remaining constraints we store in two groups, one for each of the two situations:
// construct constraints
let c1 = NSLayoutConstraint.constraints(withVisualFormat:
    "H:|-(20)-[v(100)]", metrics: nil, views: ["v":v1])
let c2 = NSLayoutConstraint.constraints(withVisualFormat:
    "H:|-(20)-[v(100)]", metrics: nil, views: ["v":v2])
let c3 = NSLayoutConstraint.constraints(withVisualFormat:
    "H:|-(20)-[v(100)]", metrics: nil, views: ["v":v3])
let c4 = NSLayoutConstraint.constraints(withVisualFormat:
    "V:|-(100)-[v(20)]", metrics: nil, views: ["v":v1])
let c5with = NSLayoutConstraint.constraints(withVisualFormat:
    "V:[v1]-(20)-[v2(20)]-(20)-[v3(20)]", metrics: nil,
    views: ["v1":v1, "v2":v2, "v3":v3])
let c5without = NSLayoutConstraint.constraints(withVisualFormat:
    "V:[v1]-(20)-[v3(20)]", metrics: nil, views: ["v1":v1, "v3":v3])
// apply common constraints
NSLayoutConstraint.activate([c1, c3, c4].flatMap {$0})
// first set of constraints (for when v2 is present)
self.constraintsWith.append(contentsOf:c2)
self.constraintsWith.append(contentsOf:c5with)
// second set of constraints (for when v2 is absent)
self.constraintsWithout.append(contentsOf:c5without)
Now we’re ready to start alternating between constraintsWith and constraintsWithout. We start with v2 present, so it is constraintsWith that we initially make active:
// apply first set
NSLayoutConstraint.activate(self.constraintsWith)
Figure 1-15. Alternate sets of views and constraints
All that preparation may seem extraordinarily elaborate, but the result is that when the time comes to swap v2 out of or into the interface, it’s trivial to swap the appropriate constraints at the same time:
func doSwap() {
    if self.v2.superview != nil {
        self.v2.removeFromSuperview()
        NSLayoutConstraint.deactivate(self.constraintsWith)
        NSLayoutConstraint.activate(self.constraintsWithout)
    } else {
        self.view.addSubview(v2)
        NSLayoutConstraint.deactivate(self.constraintsWithout)
        NSLayoutConstraint.activate(self.constraintsWith)
    }
}
In that code, I deactivate the old constraints before activating the new ones. Always proceed in that order; activating the new constraints with the old constraints still in force will cause a conflict (as I’ll explain later in this chapter).
Margins and Guides
So far, I’ve been assuming that the anchor points of your constraints represent the literal edges and centers of views. Sometimes, however, you want a view to vend a set of secondary edges, with respect to which other views can be positioned. You might want subviews to keep a minimum distance from the edge of their superview, and the superview should be able to dictate what that minimum distance is. This notion of secondary edges is expressed in two different ways:
- Edge insets
-
A view vends secondary edges as a UIEdgeInsets, a struct consisting of four floats representing inset values starting at the top and proceeding counterclockwise — top, left, bottom, right. This is useful when you need to interface with the secondary edges as numeric values — perhaps to set them or to perform manual layout based on them.
- Layout guides
-
The UILayoutGuide class represents secondary edges as a kind of pseudoview. It has a frame (its
layoutFrame) with respect to the view that vends it, but its important properties are its anchors, which are the same as for a view. This, obviously, is useful for autolayout.
Safe area
An important set of secondary edges (introduced in iOS 11) is the safe area. This is a feature of a UIView, but it is imposed by the UIViewController that manages this view. One reason the safe area is needed is that the top and bottom of the interface are often occupied by a bar (status bar, navigation bar, toolbar, tab bar — see Chapter 13). Your layout of subviews will typically occupy the region between these bars. But that’s not easy, because:
-
A view controller’s main view will typically extend vertically to the edges of the window behind those bars.
-
The bars can come and go dynamically, and can change their heights. By default, in an iPhone app, the status bar will be present when the app is in portrait orientation, but will vanish when the app is in landscape orientation; similarly, a navigation bar is taller when the app is in portrait orientation than when the app is in landscape orientation.
Therefore, you need something else, other than the literal top and bottom of a view controller’s main view, to which to anchor the vertical constraints that position its subviews — something that will move dynamically to reflect the current location of the bars. Otherwise, an interface that looks right under some circumstances will look wrong in others. Consider a view whose top is literally constrained to the top of the view controller’s main view, which is its superview:
let arr = NSLayoutConstraint.constraints(withVisualFormat:
    "V:|-0-[v]", metrics: nil, views: ["v":v])
When the app is in landscape orientation, with the status bar removed by default, this view will be right up against the top of the screen, which is fine. But when the app is in portrait orientation, this view will still be right up against the top of the screen — which might look bad, because the status bar reappears and overlaps it.
To solve this problem, a UIViewController imposes the safe area on its main view, describing the region of the main view that is overlapped by the status bar and other bars. The top of the safe area matches the bottom of the lowest top bar, or the top of the main view if there is no top bar; the bottom of the safe area matches the top of the bottom bar, or the bottom of the main view if there is no bottom bar. The safe area changes as the situation changes — when the top or bottom bar changes its height, or vanishes entirely. On a device without a bezel, such as the iPhone X, the safe area is of even greater importance; its boundaries help keep your views away from the rounded corners of the screen, and prevent them from being interfered with by the sensors and the home indicator, both in portrait and in landscape.
In real life, therefore, you’ll be particularly concerned to position subviews of a view controller’s main view with respect to the main view’s safe area. Your views constrained to the main view’s safe area will avoid being overlapped by bars, and will move to track the edges of the main view’s visible area. But any view — not just the view controller’s main view — can participate in the safe area. When a view performs layout, it imposes the safe area on its own subviews, describing the region of each subview that is overlapped by its own safe area; so every view “knows” where the bars are. (There are some additional complexities that I’m omitting, because for practical purposes you probably won’t encounter them.)
To retrieve a view’s safe area as edge insets, fetch its safeAreaInsets. To retrieve a view’s safe area as a layout guide, fetch its safeAreaLayoutGuide. You can learn that a subclassed view’s safe area has changed by overriding safeAreaInsetsDidChange, or that a view controller’s main view’s safe area has changed by overriding the view controller’s viewSafeAreaInsetsDidChange; in real life, however, using autolayout, you probably won’t need that information — you’ll just allow views pinned to a safe area layout guide to move as the safe area changes.
In this example, v is a view controller’s main view, and v1 is its subview; we construct a constraint between the top of v1 and the top of the main view’s safe area:
let c = v1.topAnchor.constraint(equalTo: v.safeAreaLayoutGuide.topAnchor)
A view controller can inset even further the safe area it imposes on its main view; set its additionalSafeAreaInsets. This, as the name implies, is added to the automatic safe area. It is a UIEdgeInsets. If you set a view controller’s additionalSafeAreaInsets to a UIEdgeInsets with a top of 50, and if the status bar is showing and there is no other top bar, the default safe area top would be 20, so now it’s 70. The additionalSafeAreaInsets is helpful if your main view has material at its edge that must always remain visible.
Margins
A view also has margins of its own. Unlike the safe area, which propagates down the view hierarchy from the view controller, you are free to set an individual view’s margins. The idea is that a subview might be positioned with respect to its superview’s margins, especially through an autolayout constraint. By default, a view has a margin of 8 on all four edges.
A view’s margins are available as a UILayoutGuide through the UIView layoutMarginsGuide property. Here’s a constraint between a subview’s leading edge and its superview’s leading margin:
let c = v.leadingAnchor.constraint(equalTo:
    self.view.layoutMarginsGuide.leadingAnchor)
In visual format syntax, a view pinned to its superview’s edge using a single hyphen, with no explicit distance value, is interpreted as a constraint to the superview’s margin:
let arr = NSLayoutConstraint.constraints(withVisualFormat:
    "H:|-[v]", metrics: nil, views: ["v":v])
The layoutMarginsGuide property is read-only. To allow you to set a view’s margins, a UIView has a layoutMargins property, a writable UIEdgeInsets. Starting in iOS 11, Apple would prefer that you set the directionalLayoutMargins property instead; this has the feature that when your interface is reversed in a right-to-left system language for which your app is localized, its leading and trailing values behave correctly.
It is expressed as an NSDirectionalEdgeInsets struct, whose properties are top, leading, bottom, and trailing.
Optionally, a view’s layout margins can propagate down to its subview, in the following sense: a subview that overlaps its superview’s margin may acquire the amount of overlap as a minimum margin of its own. To switch on this option, set the subview’s preservesSuperviewLayoutMargins to true. Suppose we set the superview’s directionalLayoutMargins to an NSDirectionalEdgeInsets with a leading value of 40. And suppose the subview is pinned 10 points from the superview’s leading edge, so that it overlaps the superview’s leading margin by 30 points. Then, if the subview’s preservesSuperviewLayoutMargins is true, the subview’s leading margin is 30.
By default, a view’s margin values are treated as insets from the safe area. Suppose a view’s top margin is 8. And suppose this view underlaps the entire status bar, acquiring a safe area top of 20. Then its effective top margin value is 28 — meaning that a subview whose top is pinned exactly to this view’s top margin will appear 28 points below this view’s top. If you don’t like that behavior (perhaps because you have code that predates the existence of the safe area), you can switch it off by setting the view’s insetsLayoutMarginsFromSafeArea property to false; now a top margin value of 8 means an effective top margin value of 8.
A view controller also has a systemMinimumLayoutMargins property; it imposes these margins on its main view as a minimum, meaning that you can increase the main view’s margins beyond these limits, but an attempt to decrease a margin below them will fail silently. You can evade that restriction, however, by setting the view controller’s viewRespectsSystemMinimumLayoutMargins property to false. The systemMinimumLayoutMargins default value is a top and bottom margin of 0 and side margins of 16 on a smaller device, with side margins of 20 on a larger device.
A second set of margins, a UIView’s readableContentGuide (a UILayoutGuide), which you cannot change, enforces the idea that a subview consisting of text should not be allowed to grow as wide as an iPad in landscape, because that’s too wide to read easily, especially if the text is small. By constraining such a subview horizontally to its superview’s readableContentGuide, you ensure that that won’t happen.
Custom layout guides
You can add your own custom UILayoutGuide objects to a view, for whatever purpose you like. They constitute a view’s layoutGuides array, and are managed by calling addLayoutGuide(_:) or removeLayoutGuide(_:). Each custom layout guide object must be configured entirely using constraints.
Why would you want to do that? Well, you can constrain a view to a UILayoutGuide, by means of its anchors. Since a UILayoutGuide is configured by constraints, and since other views can be constrained to it, it can participate in autolayout exactly as if it were a subview — but it is not a subview, and therefore it avoids all the overhead and complexity that a UIView would have.
Consider the question of how to distribute views equally within their superview. This is easy to arrange initially, but it is not obvious how to design evenly spaced views that will remain evenly spaced when their superview is resized. The problem is that constraints describe relationships between views, not between constraints; there is no way to constrain the spacing constraints between views to remain equal to one another automatically as the superview is resized.
You can, on the other hand, constrain the heights or widths of views to remain equal to one another. The traditional solution, therefore, is to resort to spacer views with their isHidden set to true. Suppose I have four views of equal heights that are to remain equally distributed vertically. Between them, I interpose three spacer views, also of equal heights. If we pin every view to the view below it, and the first and last view to the top and bottom of the superview,
and hide the spacer views, they become the equal spaces between the visible views.
But spacer views are views; hidden or not, they add overhead with respect to drawing, memory, touch detection, and more. Custom UILayoutGuides solve the problem; they can serve the same purpose as spacer views, but they are not views.
I’ll demonstrate. We have four views that are to remain equally distributed vertically. I constrain the left and right edges of the four views, their heights, and the top of the first view and the bottom of the last view. Now we want to set the vertical position of the two middle views such that they are always equidistant from their vertical neighbors (Figure 1-16).
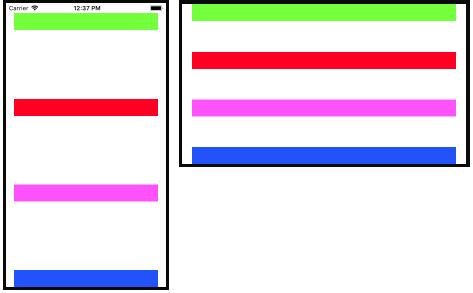
Figure 1-16. Equal distribution
To solve the problem, I introduce three UILayoutGuide objects between my real views. A custom UILayoutGuide object is added to a UIView, so I’ll add mine to the view controller’s main view.
I then involve my three layout guides in the layout. Remember, they must be configured entirely using constraints! The four views are referenced through an array, views:
var guides = [UILayoutGuide]() // one fewer guides than viewslet h = guides[0].heightAnchor for g in guides.dropFirst() { g.heightAnchor.constraint(equalTo:h).isActive = true }
I create the layout guides and add them to the interface.
I constrain the leading edges of the layout guides (arbitrarily, to the leading edge of the main view) and their widths (arbitrarily).
I constrain each layout guide to the bottom of the view above it.
I constrain each layout guide to the top of the view below it.
Finally, our whole purpose is to distribute our views equally, so the heights of our layout guides must be equal to one another.
Tip
In real life, if the problem is equal distribution, you are unlikely to use this technique directly, because you will use a UIStackView instead, and let the UIStackView generate all of that code for you — as I will explain a little later.
Constraint alignment
You can also change the location of your view’s anchors themselves. Constraints are measured by default from a view’s edges, but consider a view that draws, internally, a rectangle with a shadow; you probably want to pin other views to that drawn rectangle, not to the outside of the shadow.
To effect this, you can override your view’s alignmentRectInsets property (or, more elaborately, its alignmentRect(forFrame:) and frame(forAlignmentRect:) methods). When you change a view’s alignmentRectInsets, you are effectively changing where the view’s edges are for purposes of all constraints involving those edges. If a view’s alignment rect has a left inset of 30, then all constraints involving that view’s .leading attribute or leadingAnchor are reckoned from that inset.
By the same token, you may want to be able to align your custom UIView with another view by their baselines. The assumption here is that your view has a subview containing text that itself has a baseline. Your custom view will return that subview in its implementation of forFirstBaselineLayout or forLastBaselineLayout.
Intrinsic Content Size
Certain built-in interface objects, when using autolayout, have an inherent size in one or both dimensions, dependent upon the object type and its content. Here are some examples:
-
A UIButton has a standard height, and its width is determined by the length of its title.
-
A UIImageView adopts the size of the image that it is displaying.
-
A UILabel consisting of a single line of text adopts the size of the text that it is displaying.
This inherent size is the object’s intrinsic content size. The intrinsic content size is used to generate constraints implicitly (of class NSContentSizeLayoutConstraint).
A change in the characteristics or content of a built-in interface object — a button’s title, an image view’s image, a label’s text or font, and so forth — may cause its intrinsic content size to change. This, in turn, may alter your layout. You will want to configure your autolayout constraints so that your interface responds gracefully to such changes.
You do not have to supply explicit constraints configuring a dimension of a view whose intrinsic content size configures that dimension. But you might! And when you do, the tendency of an interface object to size itself to its intrinsic content size must not be allowed to conflict with its obedience to your explicit constraints. Therefore, the constraints generated from a view’s intrinsic content size have a lowered priority, and come into force only if no constraint of a higher priority prevents them. The following methods allow you to access these priorities (the parameter is an NSLayoutConstraint.Axis, either .horizontal or .vertical):
contentHuggingPriority(for:)-
A view’s resistance to growing larger than its intrinsic size in this dimension. In effect, there is an inequality constraint saying that the view’s size in this dimension should be less than or equal to its intrinsic size. The default priority is usually
.defaultLow(250), though some interface classes will default to a higher value if created in a nib. contentCompressionResistancePriority(for:)-
A view’s resistance to shrinking smaller than its intrinsic size in this dimension. In effect, there is an inequality constraint saying that the view’s size in this dimension should be greater than or equal to its intrinsic size. The default priority is usually
.defaultHigh(750).
Those methods are getters; there are corresponding setters, because you might need to change the priorities. Here are visual formats configuring two horizontally adjacent labels (lab1 and lab2) to be pinned to the superview and to one another:
"V:|-20-[lab1]"
"V:|-20-[lab2]"
"H:|-20-[lab1]"
"H:[lab2]-20-|"
"H:[lab1(>=100)]-(>=20)-[lab2(>=100)]"
The inequalities ensure that as the superview becomes narrower or the text of the labels becomes longer, a reasonable amount of text will remain visible in both labels. At the same time, one label will be squeezed down to 100 points width, while the other label will be allowed to grow to fill the remaining horizontal space. The question is: which label is which? You need to answer that question. To do so, it suffices to give the two labels different compression resistance priorities; even a tiny difference will do:
let p = lab2.contentCompressionResistancePriority(for: .horizontal)
lab1.setContentCompressionResistancePriority(p+1, for: .horizontal)
You can supply an intrinsic size in your own custom UIView subclass by overriding intrinsicContentSize. Obviously you should do this only if your view’s size somehow depends on its content. If you need the runtime to ask for your intrinsicContentSize again, because the contents have changed and the view needs to be laid out afresh, it’s up to you to call your view’s invalidateIntrinsicContentSize method.
Self-Sizing Views
So far, I have talked about layout (and autolayout in particular) as a way of solving the problem of what should happen to a superview’s subviews when the superview is resized. However, autolayout also works in the opposite direction. If a superview’s subviews determine their own size, they can also determine the size of the superview.
Consider this simple example. We have a plain vanilla UIView, which has as its sole subview a UIButton. And suppose this UIButton is pinned by constraints from all four edges to its superview, the plain vanilla UIView. Well, as I’ve already said, a UIButton under autolayout has an intrinsic size: its height is standard, and its width is dependent upon its title. So, all other things being equal, the size of the button is determined. Then, all other things being equal, the size of the plain vanilla view is also determined, from the inside out, by the size of the button, its subview. (See Figure 1-17; the inner rectangle with the black border is the button, and the outer rectangle is the plain vanilla UIView.)
Figure 1-17. A self-sizing view
What I mean by “all other things being equal” is simply that you don’t determine the size of the plain vanilla superview in any other way. Let’s say you pin the leading and top edges of the superview to its superview. Now we know the position of the superview. But we do not pin its trailing or bottom edges, and we don’t give it a width or height constraint. You might say: Then the width and height of the superview are unknown! But not so. In this situation, the autolayout engine simply gets the width and height of the superview from the width and height of its subview, the button — because the width and height of the button are known, and there is a complete constraint relationship between the width and height of the button and the width and height of the superview.
I call a view such as our plain vanilla superview a self-sizing view. In effect, it has an intrinsic content size — not literally (we have not configured its instrinsicContentSize), but in the sense that it is, in fact, sized by its content. A self-sizing view’s size does not have to be determined solely by its content; it is fine to give a self-sizing view a width constraint (or pin it on both sides) but allow its height to be determined by its content. If the superview is also pinned to its subview(s) horizontally to determine its width, that could result in a conflict between constraints — but in many cases it won’t. Our plain vanilla superview can have its width determined by a hard-coded width constraint without causing a conflict; its subview is pinned to it horizontally, but its subview is a button whose width is determined by its intrinsic content size at a lower priority than the superview’s width constraint, so the superview’s width wins without a struggle (and the button subview is widened to match).
When a view is self-sizing based on the constraints of its subviews, you can ask it in code to size itself immediately in order to discover what its size would be if the autolayout engine were to perform layout at this moment.
Send the view the systemLayoutSizeFitting(_:) message. The system will attempt to reach or at least approach the size you specify, at a very low priority. This call is relatively slow and expensive, because a temporary autolayout engine has to be created, set to work, and discarded. But sometimes that’s the best way to get the information you need. Mostly likely you’ll specify either UIView.layoutFittingCompressedSize or UIView.layoutFittingExpandedSize, depending on whether what you’re after is the smallest or largest size the view can legally attain.
There are a few situations where the iOS runtime actually does size a view that way (most notably with regard to UITableViewCells and UIBarButtonItems). I’ll show an example in Chapter 7.
Stack Views
A stack view (UIStackView) is a kind of pseudoview whose job is to generate constraints for some or all of its subviews. These are its arranged subviews. In particular, a stack view solves the problem of providing constraints when subviews are to be configured linearly in a horizontal row or a vertical column. In practice, it turns out that many layouts can be expressed as an arrangement, possibly nested, of simple rows and columns of subviews. You are likely to resort to stack views to make your layout easier to construct and maintain.
You can supply a stack view with arranged subviews by calling its initializer init(arrangedSubviews:). The arranged subviews become the stack view’s arrangedSubviews read-only property. You can also manage the arranged subviews with these methods:
-
addArrangedSubview(_:) -
insertArrangedSubview(_:at:) -
removeArrangedSubview(_:)
The arrangedSubviews array is different from, but is a subset of, the stack view’s subviews. It’s fine for the stack view to have subviews that are not arranged (for which you’ll have to provide constraints yourself); on the other hand, if you set a view as an arranged subview and it is not already a subview, the stack view will adopt it as a subview at that moment.
The order of the arrangedSubviews is independent of the order of the subviews; the subviews order, you remember, determines the order in which the subviews are drawn, but the arrangedSubviews order determines how the stack view will position those subviews.
Using its properties, you configure the stack view to tell it how it should arrange its arranged subviews:
axis-
Which way should the arranged subviews be arranged? Your choices are (NSLayoutConstraint.Axis):
-
.horizontal -
.vertical
-
alignment-
This describes how the arranged subviews should be laid out with respect to the other dimension. Your choices are (UIStackView.Alignment):
-
.fill -
.leading(or.top) -
.center -
.trailing(or.bottom) -
.firstBaselineor.lastBaseline(if theaxisis.horizontal)
If the
axisis.vertical, you can still involve the subviews’ baselines in their spacing by setting the stack view’sisBaselineRelativeArrangementtotrue. -
distribution-
How should the arranged subviews be positioned along the
axis? This is why you are here! You’re using a stack view because you want this positioning performed for you. Your choices are (UIStackView.Distribution):.fill-
The arranged subviews can have real size constraints or intrinsic content sizes along the arranged dimension. Using those sizes, the arranged subviews will fill the stack view from end to end. But there must be at least one view without a real size constraint, so that it can be resized to fill the space not taken up by the other views. If more than one view lacks a real size constraint, one of them must have a lowered priority for its content hugging (if stretching) or compression resistance (if squeezing) so that the stack view knows which view to resize.
.fillEqually-
No view may have a real size constraint along the arranged dimension. The arranged subviews will be made the same size in the arranged dimension, so as to fill the stack view.
.fillProportionally-
All arranged subviews must have an intrinsic content size and no real size constraint along the arranged dimension. The views will then fill the stack view, sized according to the ratio of their intrinsic content sizes.
.equalSpacing-
The arranged subviews can have real size constraints or intrinsic content sizes along the arranged dimension. Using those sizes, the arranged subviews will fill the stack view from end to end with equal space between each adjacent pair.
.equalCentering-
The arranged subviews can have real size constraints or intrinsic content sizes along the arranged dimension. Using those sizes, the arranged subviews will fill the stack view from end to end with equal distance between the centers of each adjacent pair.
The stack view’s
spacingproperty determines the spacing (or minimum spacing) between all the views. Starting in iOS 11, you can set the spacing for individual views by callingsetCustomSpacing(_:after:); if you need to turn individual spacing back off for a view, reverting to the overallspacingproperty value, set the custom spacing toUIStackView.spacingUseDefault. To impose the spacing that the system would normally impose, set the spacing toUIStackView.spacingUseSystem. isLayoutMarginsRelativeArrangement-
If
true, the stack view’s internallayoutMarginsare involved in the positioning of its arranged subviews. Iffalse(the default), the stack view’s literal edges are used.
Warning
Do not manually add constraints positioning an arranged subview! Adding those constraints is precisely the job of the stack view. Your constraints will conflict with the constraints created by the stack view. On the other hand, you must constrain the stack view itself; otherwise, the layout engine has no idea what to do. Trying to use a stack view without constraining it is a common beginner mistake.
To illustrate, I’ll rewrite the equal distribution code from earlier in this chapter (Figure 1-16). I have four views, with height constraints. I want to distribute them vertically in my main view. This time, I’ll have a stack view do all the work for me:
// give the stack view arranged subviews
let sv = UIStackView(arrangedSubviews: views)
// configure the stack view
sv.axis = .vertical
sv.alignment = .fill
sv.distribution = .equalSpacing
// constrain the stack view
sv.translatesAutoresizingMaskIntoConstraints = false
self.view.addSubview(sv)
let marg = self.view.layoutMarginsGuide
let safe = self.view.safeAreaLayoutGuide
NSLayoutConstraint.activate([
    sv.topAnchor.constraint(equalTo:safe.topAnchor),
    sv.leadingAnchor.constraint(equalTo:marg.leadingAnchor),
    sv.trailingAnchor.constraint(equalTo:marg.trailingAnchor),
    sv.bottomAnchor.constraint(equalTo:self.view.bottomAnchor),
])
Inspecting the resulting constraints, you can see that the stack view is doing for us effectively just what we did earlier (generating UILayoutGuide objects and using them as spacers). But letting the stack view do it is a lot easier!
Another nice feature of UIStackView is that it responds intelligently to changes. Having configured things with the preceding code, if we were subsequently to make one of our arranged subviews invisible (by setting its isHidden to true), the stack view would respond by distributing the remaining subviews evenly, as if the hidden subview didn’t exist. Similarly, we can change properties of the stack view itself in real time. Such flexibility can be very useful for making whole areas of your interface come and go and rearrange themselves at will.
A stack view, in certain configurations, can behave as a self-sizing view: its size, if not determined in any other way, in one or both dimensions, can be based on its subviews.
Internationalization
Your app’s entire interface and its behavior are reversed when the app runs on a system for which the app is localized and whose language is right-to-left. Wherever you use leading and trailing constraints instead of left and right constraints, or if your constraints are generated by stack views or are constructed using the visual format language, your app’s layout will participate in this reversal more or less automatically.
There may, however, be exceptions. Apple gives the example of a horizontal row of transport controls that mimic the buttons on a CD player: you wouldn’t want the Rewind button and the Fast Forward button to be reversed just because the user’s language reads right-to-left. Therefore, a UIView is endowed with a semanticContentAttribute property stating whether it should be flipped; the default is .unspecified, but a value of .playback or .spatial will prevent flipping, and you can also force an absolute direction with .forceLeftToRight or .forceRightToLeft. This property can also be set in the nib editor (using the Semantic pop-up menu in the Attributes inspector).
Interface directionality is a trait, a trait collection’s layoutDirection; and a UIView has an effectiveUserInterfaceLayoutDirection property that reports the direction that it will use to lay out its contents. You can consult this property if you are constructing a view’s subviews in code.
Tip
You can test your app’s right-to-left behavior easily by changing the scheme’s Run option Application Language to “Right to Left Pseudolanguage.”
Mistakes with Constraints
Creating constraints manually, as I’ve been doing so far in this chapter, is an invitation to make a mistake. Your totality of constraints constitute instructions for view layout, and it is all too easy, as soon as more than one or two views are involved, to generate faulty instructions. You can (and will) make two major kinds of mistake with constraints:
- Conflict
-
You have applied constraints that can’t be satisfied simultaneously. This will be reported in the console (at great length).
- Underdetermination (ambiguity)
-
A view uses autolayout, but you haven’t supplied sufficient information to determine its size and position. This is a far more insidious problem, because nothing bad may seem to happen. If you’re lucky, the view will at least fail to appear, or will appear in an undesirable place, alerting you to the problem.
Only .required constraints (priority 1000) can contribute to a conflict, as the runtime is free to ignore lower-priority constraints that it can’t satisfy. Constraints with different priorities do not conflict with one another. Nonrequired constraints with the same priority can contribute to ambiguity.
Under normal circumstances, layout isn’t performed until your code finishes running — and even then only if needed. Ambiguous layout isn’t ambiguous until layout actually takes place; it is perfectly reasonable to cause an ambiguous layout temporarily, provided you resolve the ambiguity before layoutSubviews is called. On the other hand, a conflicting constraint conflicts the instant it is added. That’s why, when replacing constraints in code, you should deactivate first and activate second, and not the other way round.
To illustrate, let’s start by generating a conflict. In this example, we return to our small red square in the lower right corner of a big magenta square (Figure 1-13) and append a contradictory constraint:
let d = ["v2":v2,"v3":v3]
NSLayoutConstraint.activate([
    NSLayoutConstraint.constraints(withVisualFormat:
        "H:|[v2]|", metrics: nil, views: d),
    NSLayoutConstraint.constraints(withVisualFormat:
        "V:|[v2(10)]", metrics: nil, views: d),
    NSLayoutConstraint.constraints(withVisualFormat:
        "H:[v3(20)]|", metrics: nil, views: d),
    NSLayoutConstraint.constraints(withVisualFormat:
        "V:[v3(20)]|", metrics: nil, views: d),
    NSLayoutConstraint.constraints(withVisualFormat:
        "V:[v3(10)]|", metrics: nil, views: d) // *
].flatMap {$0})
The height of v3 can’t be both 10 and 20. The runtime reports the conflict, and tells you which constraints are causing it:
Unable to simultaneously satisfy constraints. Probably at least one of the
constraints in the following list is one you don't want...

<NSLayoutConstraint:0x60008b6d0 UIView:0x7ff45e803.height == 20 (active)>,
<NSLayoutConstraint:0x60008bae0 UIView:0x7ff45e803.height == 10 (active)>
Tip
Assigning a constraint (or a UILayoutGuide) an identifier string, as I described earlier, can make it easier to determine which constraint is which in a conflict report.
Now we’ll generate an ambiguity. Here, we neglect to give our small red square a height:
let d = ["v2":v2,"v3":v3]
NSLayoutConstraint.activate([
    NSLayoutConstraint.constraints(withVisualFormat:
        "H:|[v2]|", metrics: nil, views: d),
    NSLayoutConstraint.constraints(withVisualFormat:
        "V:|[v2(10)]", metrics: nil, views: d),
    NSLayoutConstraint.constraints(withVisualFormat:
        "H:[v3(20)]|", metrics: nil, views: d)
].flatMap {$0})
No console message alerts us to our mistake. Fortunately, v3 fails to appear in the interface, so we know something’s wrong. If your views fail to appear, suspect ambiguity. In a less fortunate case, the view might appear, but (if we’re lucky) in the wrong place. In a truly unfortunate case, the view might appear in the right place, but not consistently.
Suspecting ambiguity is one thing; tracking it down and proving it is another. Fortunately, the view debugger will report ambiguity instantly (Figure 1-18). With the app running, choose Debug → View Debugging → Capture View Hierarchy, or click the Debug View Hierarchy button in the debug bar. The exclamation mark in the Debug navigator, at the left, is telling us that this view (which does not appear in the canvas) has ambiguous layout; moreover, the Issue navigator, in the Runtime pane, tells us more explicitly, in words: “Height and vertical position are ambiguous for UIView.”
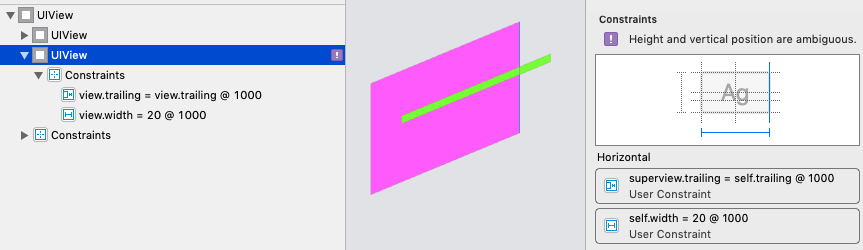
Figure 1-18. View debugging
Another useful trick is to pause in the debugger and conduct the following mystical conversation in the console:
(lldb) e -l objc -- [[UIApplication sharedApplication] windows][0]
(UIWindow *) $1 = ...
(lldb) e -l objc -O -- [$1 _autolayoutTrace]
The result is a graphical tree describing the view hierarchy and calling out any ambiguously laid out views:
•UIView:0x7f9fa36045c0
|   +UIView:0x7f9fa3604930
|   |   *UIView:0x7f9fa3604a90
|   |   *UIView:0x7f9fa3604e20- AMBIGUOUS LAYOUT
            for UIView:.minY{id: 33}, UIView:.Height{id: 34}
UIView also has a hasAmbiguousLayout property. I find it useful to set up a utility method that lets me check a view and all its subviews at any depth for ambiguity; see Appendix B.
To get a full list of the constraints responsible for positioning a particular view within its superview, log the results of calling the UIView instance method constraintsAffectingLayout(for:). The parameter is an axis (NSLayoutConstraint.Axis), either .horizontal or .vertical. These constraints do not necessarily belong to this view (and the output doesn’t tell you what view they do belong to). If a view doesn’t participate in autolayout, the result will be an empty array. Again, a utility method can come in handy; see Appendix B.
Given the notions of conflict and ambiguity, it is easier to understand what priorities are for. Imagine that all constraints have been placed in boxes, where each box is a priority value, in descending order. Now pretend that we are the runtime, performing layout in obedience to these constraints. How do we proceed?
The first box (.required, 1000) contains all the required constraints, so we obey them first. (If they conflict, that’s bad, and we report this in the log.) If there still isn’t enough information to perform unambiguous layout given the required priorities alone, we pull the constraints out of the next box and try to obey them. If we can, consistently with what we’ve already done, fine; if we can’t, or if ambiguity remains, we look in the next box — and so on.
For a box after the first, we don’t care about obeying exactly the constraints it contains; if an ambiguity remains, we can use a lower-priority constraint value to give us something to aim at, resolving the ambiguity, without fully obeying the lower-priority constraint’s desires. An inequality is an ambiguity, because an infinite number of values will satisfy it; a lower-priority equality can tell us what value to prefer, resolving the ambiguity, but there’s no conflict even if we can’t fully achieve that preferred value.
Configuring Layout in the Nib
The focus of the discussion so far has been on configuring layout in code. But that will often be unnecessary; instead, you’ll set up your layout in the nib, using the nib editor. It would not be strictly true to say that you can do absolutely anything in the nib that you could do in code, but the nib editor is certainly a remarkably powerful way of configuring layout (and where it falls short, you can supplement it with code).
In the File inspector when a .storyboard or .xib file is selected, you can make two major choices related to layout, by way of checkboxes. The default is that these checkboxes are checked, and I recommend that you leave them that way:
- Use Trait Variations
-
If checked, various settings in the nib editor, such as the value of a constraint’s
constant, can be made to depend upon the environment’s size classes at runtime; moreover, the modern repertoire of segues, such as popover and detail segues, springs to life. - Use Safe Area Layout Guides
-
If checked, the safe area is present, and you can construct constraints pinned to it. By default, only a view controller’s main view’s safe area can have constraints pinned to it, but you can change that.
What you actually see in the nib editor canvas depends also on the checked menu items in the Editor → Canvas hierarchical menu (or use the Editor Options pop-up menu at the top right of the editor pane). If Layout Rectangles is unchecked, you won’t see the outline of the safe area, though you can still construct constraints to it. If Constraints is unchecked, you won’t see any constraints, though you can still construct them.
Autoresizing in the Nib
When you drag a view from the Library into the canvas, it uses autoresizing by default, and will continue to do so unless you involve it in autolayout by adding a constraint that affects it.
When editing a view that uses autoresizing, you can assign it springs and struts in the Size inspector. A solid line externally represents a strut; a solid line internally represents a spring. A helpful animation shows you the effect on your view’s position and size as its superview is resized.
Starting in Xcode 11, in the nib editor an individual view has a Layout pop-up menu in the Size inspector allowing you specify its behavior with regard to constraints:
- Inferred
-
The default. The view’s
translatesAutoresizingMaskIntoConstraintsistrue, and you can position the view with autoresizing, until the view becomes involved in constraints, at which point itstranslatesAutoresizingMaskIntoConstraintsbecomesfalseand you will have to position and size this view entirely with constraints. New in Xcode 12, the title of this pop-up menu changes to help you; iftranslatesAutoresizingMaskIntoConstraintsistrue, the title is Inferred (Autoresizing Mask), but if it isfalse(because you’ve involved the view in constraints), the title is Inferred (Constraints). - Autoresizing Mask
-
The view’s
translatesAutoresizingMaskIntoConstraintsistrue, and it will staytrue. This view will resist becoming involved in constraints within the nib; it wants to use autoresizing only. You can’t give it a width constraint or a constraint to its superview. You can involve the view in constraints from other views, as long as these would not cause a problem.
You can cause problems yourself by behaving irrationally; if a view starts out as Inferred and you give it constraints, and then you switch it to Autoresizing Mask, you can readily create a conflict at runtime. Don’t do that.
Creating a Constraint
The nib editor provides two primary ways to create a constraint:
- Control-drag
-
Control-drag from one view to another. A HUD (heads-up display) appears, listing constraints that you can create (Figure 1-19). Either view can be in the canvas or in the document outline. To create an internal width or height constraint, Control-drag from a view to itself.
When you Control-drag within the canvas, the direction of the drag is used to winnow the options presented in the HUD: if you Control-drag horizontally within a view in the canvas, the HUD lists Width but not Height.
While viewing the HUD, you might want to toggle the Option key to see some alternatives; this might make the difference between an edge or safe area constraint and a margin-based constraint. Holding the Shift key lets you create multiple constraints simultaneously.
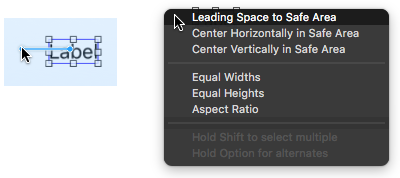
Figure 1-19. Creating a constraint by Control-dragging
- Layout bar buttons
-
Click the Align or Add New Constraints button at the right end of the layout bar below the canvas. These buttons summon little popover dialogs where you can choose multiple constraints to create (possibly for multiple views, if that’s what you’ve selected beforehand) and provide them with numeric values (Figure 1-20). Constraints are not actually added until you click Add Constraints at the bottom!
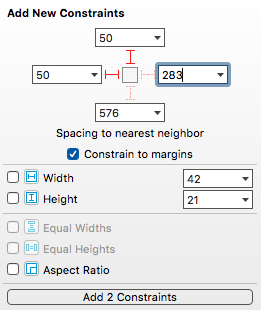
Figure 1-20. Creating constraints from the layout bar
Tip
A constraint that you create in the nib does not have to be perfect immediately upon creation. You will subsequently be able to edit the constraint and configure it further, as I’ll explain in the next section.
If you create constraints and then move or resize a view affected by those constraints, the constraints are not automatically changed. This means that the constraints no longer match the way the view is portrayed; if the constraints were now to position the view, they wouldn’t put it where you’ve put it. The nib editor will alert you to this situation (a Misplaced Views issue), and can readily resolve it for you, but it won’t change anything unless you explicitly ask it to.
There are additional view settings in the Size inspector:
-
To set a view’s layout margins explicitly, change the Layout Margins pop-up menu to Fixed (or better, to Language Directional).
-
To make a view’s layout margins behave as
readableContentGuidemargins, check Follow Readable Width. -
To allow construction of a constraint to the safe area of a view that isn’t a view controller’s main view, check its Safe Area Layout Guide.
Viewing and Editing Constraints
Constraints in the nib are full-fledged objects. They can be selected, edited, and deleted. Moreover, you can create an outlet to a constraint (and there are reasons why you might want to do so).
Constraints in the nib are visible in three places (Figure 1-21):
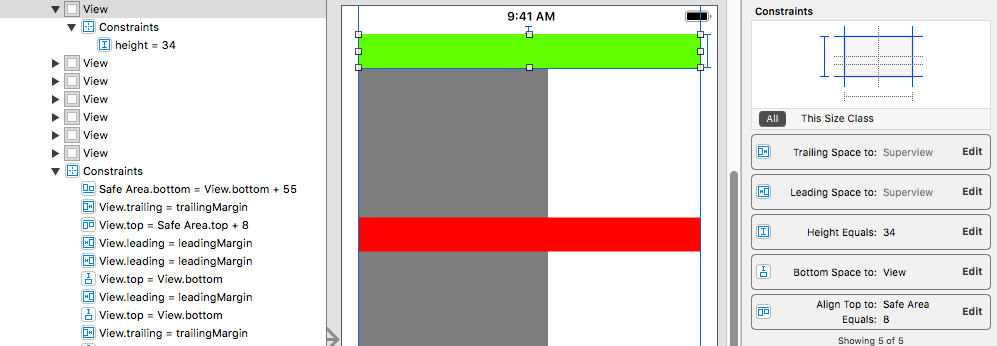
Figure 1-21. A view’s constraints displayed in the nib
- In the document outline
-
Constraints are listed in a special category, “Constraints,” under the view to which they belong. (You’ll have a much easier time distinguishing these constraints if you give your views meaningful labels!)
- In the canvas
-
Constraints appear graphically as dimension lines when you select a view that they affect (unless you uncheck Editor → Canvas → Constraints).
- In the Size inspector
-
When a view affected by constraints is selected, the Size inspector lists those constraints, along with a grid that displays the view’s constraints graphically. Clicking a constraint in the grid filters the constraints listed below it.
When you select a constraint in the document outline or the canvas, or when you double-click a constraint in a view’s Size inspector, you can view and edit that constraint’s values in the Attributes or Size inspector. The inspector gives you access to almost all of a constraint’s features: the anchors involved in the constraint (the First Item and Second Item pop-up menus), the relation between them, the constant and multiplier, and the priority. You can also set the identifier here (useful when debugging, as I mentioned earlier).
The First Item and Second Item pop-up menus may list alternative constraint types; a width constraint may be changed to a height constraint, for example. These pop-up menus may also list alternative objects to constrain to, such as other sibling views, the superview, and the safe area. Also, these pop-up menus may have a “Relative to margin” option, which you can check or uncheck to toggle between an edge-based and a margin-based constraint.
So if you accidentally created the wrong constraint, or if you weren’t quite able to specify the desired constraint at creation time, editing will usually permit you to fix things. When you constrain a subview to the view controller’s main view, the HUD offers no way to constrain to the main view’s edge; your choices are to constrain to the main view’s safe area (the default) or to its margin (if you hold Option). But having constrained the subview to the main view’s safe area, you can then change Safe Area to Superview in the pop-up menu.
For simple editing of a constraint’s constant, relation, priority, and multiplier, double-click the constraint in the canvas to summon a little popover dialog. When a constraint is listed in a view’s Size inspector, double-click it to edit it in its own inspector, or click its Edit button to summon the little popover dialog.
A view’s Size inspector also provides access to its content hugging and content compression resistance priority settings. Beneath these, there’s an Intrinsic Size pop-up menu. The idea here is that your custom view might have an intrinsic size, but the nib editor doesn’t know this, so it will report an ambiguity when you fail to provide (say) a width constraint that you know isn’t actually needed; choose Placeholder to supply an intrinsic size and relieve the nib editor’s worries.
In a constraint’s Attributes or Size inspector, there is a Placeholder checkbox (“Remove at build time”). If you check this checkbox, the constraint you’re editing won’t be instantiated when the nib is loaded: in effect, you are deliberately generating ambiguous layout when the views and constraints are instantiated from the nib. You might do this because you want to simulate your layout in the nib editor, but you intend to provide a different constraint in code; perhaps you weren’t quite able to describe this constraint in the nib, or the constraint depends upon circumstances that won’t be known until runtime.
Warning
Unfortunately, a custom UILayoutGuide can be created and configured only in code. If you want to configure a layout entirely in the nib editor, and if this configuration requires the use of spacer views and cannot be constructed by a UIStackView, you’ll have to use spacer views — you cannot replace them with UILayoutGuide objects, because there are no UILayoutGuide objects in the nib editor.
Problems with Nib Constraints
I’ve already said that generating constraints manually, in code, is error-prone. But it isn’t error-prone in the nib editor! The nib editor knows whether it contains problematic constraints. If a view is affected by any constraints, the Xcode nib editor will permit them to be ambiguous or conflicting, but it will also complain helpfully. You should pay attention to such complaints! The nib editor will bring the situation to your attention in various places:
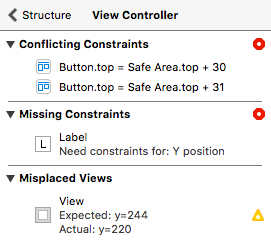
Figure 1-22. Layout issues in the document outline
- In the canvas
-
Constraints drawn in the canvas when you select a view that they affect use color coding to express their status:
- Satisfactory constraints
-
Drawn in blue.
- Problematic constraints
-
Drawn in red.
- Misplacement constraints
-
Drawn in orange; these constraints are valid, but they are inconsistent with the frame you have imposed upon the view. I’ll discuss misplaced views in the next paragraph.
- In the document outline
-
If there are layout issues, the document outline displays a right arrow in a red or orange circle. Click it to see a detailed list of the issues (Figure 1-22). Hover the mouse over a title to see an Info button which you can click to learn more about the nature of this issue. The icons at the right are buttons: click one for a list of things the nib editor is offering to do to fix the issue for you. The chief issues are:
- Conflicting Constraints
-
A conflict between constraints.
- Missing Constraints
-
Ambiguous layout. You can turn off ambiguity checking for a particular view; use the Ambiguity pop-up menu in the view’s Size inspector. This means you can omit a needed constraint and not be notified by the nib editor that there’s a problem. You will need to generate the missing constraint in code, obviously, or you’ll have ambiguous layout in the running app.
- Misplaced Views
-
If you manually change the frame of a view that is affected by constraints (including its intrinsic size), then the canvas may be displaying that view differently from how it would really appear if the current constraints were obeyed. A Misplaced Views situation is also described in the canvas:
-
The constraints in the canvas, drawn in orange, display the numeric difference between their values and the view’s frame.
-
A dotted outline in the canvas may show where the view would be drawn if the existing constraints were obeyed.
-
Having warned you of problems with your layout, the nib editor also provides tools to fix them.
The Update Frames button in the layout bar (or Editor → Update Frames) changes the way the selected views or all views are drawn in the canvas, to show how things would really appear in the running app under the constraints as they stand. Alternatively, if you have resized a view with intrinsic size constraints, such as a button or a label, and you want it to resume the size it would have according to those intrinsic size constraints, select the view and choose Editor → Size to Fit Content.
Warning
Be careful with Update Frames: if constraints are ambiguous, this can cause a view to disappear.
The Resolve Auto Layout Issues button in the layout bar (or the Editor → Resolve Auto Layout Issues hierarchical menu) proposes large-scale moves involving all the constraints affecting either selected views or all views:
- Update Constraint Constants
-
Choose this menu item to change numerically all the existing constraints affecting a view to match the way the canvas is currently drawing the view’s frame.
- Add Missing Constraints
-
Create new constraints so that the view has sufficient constraints to describe its frame unambiguously. The added constraints correspond to the way the canvas is currently drawing the view’s frame. This command may not do what you ultimately want; you should regard it as a starting point. After all, the nib editor can’t read your mind! It doesn’t know whether you think a certain view’s width should be determined by an internal width constraint or by pinning it to the left and right of its superview; and it may generate alignment constraints with other views that you never intended.
- Reset to Suggested Constraints
-
This is as if you chose Clear Constraints followed by Add Missing Constraints: it removes all constraints affecting the view, and replaces them with a complete set of automatically generated constraints describing the way the canvas is currently drawing the view’s frame.
- Clear Constraints
Varying the Screen Size
The purpose of constraints will usually be to design a layout that responds to the possibility of the app launching on devices of different sizes, and perhaps subsequently being rotated. Imagining how this is going to work in real life is not always easy, and you may doubt that you are getting the constraints right as you configure them in the nib editor. Have no fear: Xcode is here to help.
There’s a View As button at the lower left of the canvas. Click it to reveal (if they are not already showing) menus or buttons representing a variety of device types and orientations. Choose one, and the canvas’s main views are resized accordingly. When that happens, the layout dictated by your constraints is obeyed immediately. So you can try out the effect of your constraints under different screen sizes right there in the canvas.
(This feature works only if the view controller’s Simulated Size pop-up menu in the Size inspector says Fixed. If it says Freeform, the view won’t be resized when you click a device type or orientation button.)
Conditional Interface Design
The View As button at the lower left of the canvas states the size classes for the currently chosen device and orientation, using a notation like this: wC hR. The w and h stand for “width” and “height,” corresponding to the trait collection’s .horizontalSizeClass and .verticalSizeClass respectively; the R and C stand for .regular and .compact.
The reason you’re being given this information is that you might want the configuration of your constraints and views in the nib editor to be conditional upon the size classes that are in effect at runtime. You can arrange in the nib editor for your app’s interface to detect the traitCollectionDidChange notification and respond to it:
-
You can design your interface to rearrange itself when an iPhone app rotates to compensate for a change in device orientation.
-
A single .storyboard or .xib file can be used to design the interface of a universal app, even if the iPad interface and the iPhone interface are quite different from one another.
The idea when constructing a conditional interface is that you design first for the most general case. When you’ve done that, and when you want to do something different for a particular size class situation, you’ll describe that difference in the Attributes or Size inspector, or design that difference in the canvas:
- In the Attributes or Size inspector
-
Look for a Plus symbol to the left of a value in the Attributes or Size inspector. This is a value that you can vary conditionally, depending on the environment’s size class at runtime. The Plus symbol is a button! Click it to see a popover from which you can choose a specialized size class combination. When you do, that value now appears twice: once for the general case, and once for the specialized case which is marked using
wC hRnotation. You can now provide different values for those two cases. - In the canvas
-
Click the Vary for Traits button, to the right of the device types buttons (click View As if you don’t see the Vary for Traits button). Two checkboxes appear, allowing you to specify that you want to match the width or height size class (or both) of the current size class. Any designing you now do in the canvas will be applied only to that width or height size class (or both), and the Attributes or Size inspector will be modified as needed.
I’ll illustrate these approaches with a little tutorial. You’ll need to have an example project on hand; make sure it’s a universal app.
Size classes in the inspectors
Suppose we have a button in the canvas, and we want this button to have a yellow background on iPad only. (This is improbable but dramatic.) You can configure this directly in the Attributes inspector:
-
Select the button in the interface.
-
Switch to the Attributes inspector, and locate the Background pop-up menu in the View section of the inspector.
-
Click the Plus button to bring up a popover with pop-up menus for specifying size classes. An iPad has width (horizontal) size class Regular and height (vertical) size class Regular, so change the first two pop-up menus so that they both say Regular. Click Add Variation.
-
A second Background pop-up menu has appeared! It is marked
wR hR. Change it to yellow (or any desired color).
The button now has a colored background on iPad but not on iPhone. To see that this is true, without running the app on different device types, use the View As button and the device buttons at the lower left of the canvas to switch between different screen sizes. When you click an iPad button, the button in the canvas has a yellow background. When you click an iPhone button, the button in the canvas has its default clear background.
Now that you know what the Plus button means, look over the Attributes and Size inspectors. Anything with a Plus button can be varied in accordance with the size class environment. A button’s text can be a different font and size; this makes sense because you might want the text to be larger on an iPad. A button’s Hidden checkbox can be different for different size classes, making the button invisible on some device types. And at the bottom of the Attributes inspector is the Installed checkbox; unchecking this for a particular size class combination causes the button to be entirely absent from the interface.
Size classes in the canvas
Suppose your interface has a button pinned to the top left of its superview. And suppose that, on iPad devices only, you want this button to be pinned to the top right of its superview. (Again, this is improbable but dramatic.) That means the button’s leading constraint will exist only on iPhone devices, to be replaced by a trailing constraint on iPad devices. The constraints are different objects. The way to configure different objects for different size classes is to use the Vary for Traits button:
-
Among the device type buttons, click one of the iPhone buttons (furthest to the right). Configure the button so that it’s pinned by its top and left to the top left of the main view.
-
Among the device type buttons, click one of the iPad buttons (furthest to the left). The size classes are now listed as
wR hR. -
Click Vary for Traits. In the little popover that appears, check both boxes: we want the change we are about to make to apply only when both the width size class and the height size class match our current size class (they should both be
.regular). The entire layout bar becomes blue, to signify that we are operating in a special conditional design mode. -
Make the desired change: Select the button in the interface; select the left constraint; delete the left constraint; slide the button to the right of the interface; Control-drag from the button to the right and create a new trailing constraint. If necessary, click the Update Frames button to make the orange Misplaced Views warning symbol go away.
-
Click Done Varying. The layout bar ceases to be blue.
We’ve created a conditional constraint. To see that this is true, click an iPhone device button and then click an iPad device button. As you do, the button in the interface jumps between the left and right sides of the interface. Its position depends upon the device type!
The inspectors for this button accord with the change we’ve just made. To see that this is true, click the button, select the trailing or leading constraint (depending on the device type), and look in the Attributes or Size inspector. The constraint has two Installed checkboxes, one for the general case and one for wR hR. Only one of these checkboxes is checked; the constraint is present in one case but not the other.
Tip
In the document outline, a constraint or view that is not installed for the current set of size classes is listed with a faded icon.
Xcode View Features
This section summarizes some miscellaneous view-related features of Xcode that are worth knowing about.
View Debugger
To enter the view debugger, choose Debug → View Debugging → Capture View Hierarchy, or click the Debug View Hierarchy button in the debug bar. The result is that your app’s current view hierarchy is analyzed and displayed (Figure 1-23):
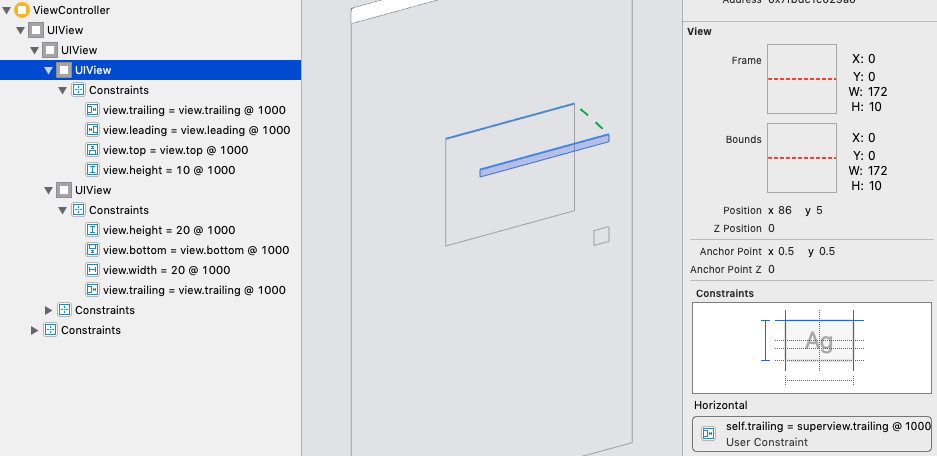
Figure 1-23. View debugging (again)
-
On the left, in the Debug navigator, the views and their constraints are listed hierarchically. (View controllers are also listed as part of the hierarchy.)
-
In the center, in the canvas, the views and their constraints are displayed graphically. The window starts out facing front, much as if you were looking at the screen with the app running; but if you swipe sideways a little in the canvas (or click the Orient to 3D button at the bottom of the canvas, or choose Editor → Orient to 3D), the window rotates and its subviews are displayed in front of it, in layers. You can adjust your perspective in various ways:
-
The slider at the lower left changes the distance between the layers.
-
The double-slider at the lower right lets you eliminate the display of views from the front or back of the layering order (or both).
-
You can Option-double-click a view to focus on it, eliminating its superviews from the display. Double-click outside the view to exit focus mode.
-
You can switch to wireframe mode.
-
You can display constraints for the currently selected view.
-
-
On the right, the Object inspector and the Size inspector tell you details about the currently selected object (view or constraint).
When a view is selected in the Debug navigator or in the canvas, the Size inspector lists its bounds and the constraints that determine those bounds. This, along with the layered graphical display of your views and constraints in the canvas, can help you ferret out the cause of any constraint-related difficulties.
Tip
New in Xcode 12, the view hierarchy displayed in the view debugger can be exported for later examination. Choose File → Export View Hierarchy. Open the resulting file to view it in its own view debugger window in Xcode.
Previewing Your Interface
When you’re displaying the nib editor in Xcode, you’re already seeing the results of your constraints in the current device size. You can change device size using the buttons or menu that appears when you click View As at the lower left. The same interface lets you toggle orientation and switch between light and dark mode.
For an even more realistic display, choose Editor → Preview (or choose Preview from the Editor Options pop-up menu). You’ll see a preview of the currently selected view controller’s view (or, in a .xib file, the top-level view).
At the bottom of each preview, a label tells you what device you’re seeing, and a rotate button lets you toggle its orientation. At the lower left, a Plus button lets you add previews for different devices and device sizes, so you can view your interface on different devices simultaneously. The previews take account of constraints and conditional interface. At the lower right, a language pop-up menu lets you switch your app’s text (buttons and labels) to another language for which you have localized your app, or to an artificial “double-length” language. To remove a previewed device, click to select it and press Delete.
Designable Views and Inspectable Properties
Your custom view can be drawn in the nib editor canvas and preview even if it is configured in code. To take advantage of this feature, you need a UIView subclass declared @IBDesignable.
If an instance of this UIView subclass appears in the nib editor, then its self-configuration methods, such as willMove(toSuperview:), will be compiled and run as the nib editor prepares to portray your view. In addition, your view can implement the special method prepareForInterfaceBuilder to perform visual configurations aimed specifically at how it will be portrayed in the nib editor; in this way, you can portray in the nib editor a feature that your view will adopt later in the life of the app. If your view contains a UILabel that is created and configured empty but will eventually contain text, you could implement prepareForInterfaceBuilder to give the label some sample text to be displayed in the nib editor.
In Figure 1-24, I refactor a familiar example. Our view subclass gives itself a magenta background, along with two subviews, one across the top and the other at the lower right — all designed in code. The nib contains an instance of this view subclass. When the app runs, willMove(toSuperview:) will be called, the code will run, and the subviews will be present. But because willMove(toSuperview:) is also called by the nib editor, the subviews are displayed in the nib editor as well:

Figure 1-24. A designable view
@IBDesignable class MyView: UIView {
    func configure() {
        self.backgroundColor = UIColor(red: 1, green: 0.4, blue: 1, alpha: 1)
        let v2 = UIView()
        v2.backgroundColor = UIColor(red: 0.5, green: 1, blue: 0, alpha: 1)
        let v3 = UIView()
        v3.backgroundColor = UIColor(red: 1, green: 0, blue: 0, alpha: 1)
        v2.translatesAutoresizingMaskIntoConstraints = false
        v3.translatesAutoresizingMaskIntoConstraints = false
        self.addSubview(v2)
        self.addSubview(v3)
        NSLayoutConstraint.activate([
            v2.leftAnchor.constraint(equalTo:self.leftAnchor),
            v2.rightAnchor.constraint(equalTo:self.rightAnchor),
            v2.topAnchor.constraint(equalTo:self.topAnchor),
            v2.heightAnchor.constraint(equalToConstant:20),
            v3.widthAnchor.constraint(equalToConstant:20),
            v3.heightAnchor.constraint(equalTo:v3.widthAnchor),
            v3.rightAnchor.constraint(equalTo:self.rightAnchor),
            v3.bottomAnchor.constraint(equalTo:self.bottomAnchor),
        ])
    }
    override func willMove(toSuperview newSuperview: UIView?) {
        self.configure()
    }
}
Tip
New in Xcode 12, if your @IBDesignable view’s code fails to compile when you display the view in the nib editor, a Build Failed notification appears at the top of the view’s Attributes inspector.
In addition, you can configure a custom view property directly in the nib editor. To do that, your UIView subclass needs a property that’s declared @IBInspectable, and this property’s type needs to be one of a limited list of inspectable property types (I’ll tell you what they are in a moment). If there’s an instance of this UIView subclass in the nib, that property will get a field of its own at the top of the view’s Attributes inspector, where you can set the initial value of that property in the nib editor rather than its having to be set in code. (This feature is actually a convenient equivalent of setting a nib object’s User Defined Runtime Attributes in the Identity inspector.)
The inspectable property types are: Bool, number, String, CGRect, CGPoint, CGSize, NSRange, UIColor, or UIImage. The property won’t be displayed in the Attributes inspector unless its type is declared explicitly. You can assign a default value in code; the Attributes inspector won’t portray this value as the default, but you can tell it to use the default by leaving the field empty (or, if you’ve entered a value, by deleting that value).
Warning
An IBInspectable property’s value, as set in the nib editor, is not applied until after init(coder:) and willMove(toSuperview:) have run. The earliest your code can retrieve this value at runtime is in awakeFromNib.
@IBDesignable and @IBInspectable are unrelated, but the former is aware of the latter. This means you can use an inspectable property to change the nib editor’s display of your interface.
In this example, we use @IBDesignable and @IBInspectable to work around an annoying limitation of the nib editor. A UIView can draw its own border automatically, by setting its layer’s borderWidth (Chapter 3). But this can be configured only in code. There’s nothing in a view’s Attributes inspector that lets you set a layer’s borderWidth, and special layer configurations are not normally portrayed in the canvas. @IBDesignable and @IBInspectable to the rescue:
@IBDesignable class MyButton : UIButton {
    @IBInspectable var borderWidth : Int {
        set {
            self.layer.borderWidth = CGFloat(newValue)
        }
        get {
            return Int(self.layer.borderWidth)
        }
    }
}
The result is that, in the nib editor, our button’s Attributes inspector has a Border Width custom property, and when we change the Border Width property setting, the button is redrawn with that border width (Figure 1-25). Moreover, we are setting this property in the nib, so when the app runs and the nib loads, the button really does have that border width in the running app.

Figure 1-25. A designable view with an inspectable property
Layout Events
This section summarizes three chief UIView events related to layout. These are events that you can receive and respond to by overriding them in your UIView subclass. You might want to do this in situations where layout is complex — when you need to supplement autoresizing or autolayout with manual layout in code, or when your layout configuration needs to change in response to changing conditions. (Closely related to these UIView events are some layout-related events you can receive and respond to in a UIViewController; I’ll discuss them in Chapter 6.)
updateConstraints-
If your interface involves autolayout and constraints, then
updateConstraintsis propagated up the hierarchy, starting at the deepest subview, when the runtime thinks your code might need an opportunity to configure constraints. You might overrideupdateConstraintsbecause you have a UIView subclass capable of altering its own constraints. If you do, you must finish up by callingsuperor the app will crash (with a helpful error message).updateConstraintsis called at launch time, but rarely after that unless you cause it to be called. You should never callupdateConstraintsdirectly. To trigger an immediate call toupdateConstraints, send a view theupdateConstraintsIfNeededmessage. To forceupdateConstraintsto be sent to a particular view, send it thesetNeedsUpdateConstraintsmessage.
traitCollectionDidChange(_:)-
At launch time, and if the environment’s trait collection changes thereafter, the
traitCollectionDidChange(_:)message is propagated down the hierarchy of UITraitEnvironments. The incoming parameter is the old trait collection; to get the new trait collection, ask forself.traitCollection.Earlier in this chapter I showed some code for swapping a view into or out of the interface together with the entire set of constraints laying out that interface. But I left open the matter of the conditions under which we wanted such swapping to occur;
traitCollectionDidChangemight be an appropriate moment, if the idea is to change the interface when the app rotates on an iPhone. layoutSubviews-
The
layoutSubviewsmessage is the moment when layout actually takes place. It is propagated down the hierarchy, starting at the top (typically the root view) and working down to the deepest subview. Layout can be triggered even if the trait collection didn’t change; perhaps a constraint was changed, or the text of a label was changed, or a superview’s size changed.You can override
layoutSubviewsin a UIView subclass in order to take a hand in the layout process. If you’re not using autolayout,layoutSubviewsdoes nothing by default;layoutSubviewsis your opportunity to perform manual layout after autoresizing has taken place. If you are using autolayout, you must callsuperor the app will crash (with a helpful error message).You should never call
layoutSubviewsdirectly; to trigger an immediate call tolayoutSubviews, send a view thelayoutIfNeededmessage (which may cause layout of the entire view tree, not only below but also above this view), or sendsetNeedsLayoutto trigger a call tolayoutSubviewslater on, after your code finishes running, when layout would normally take place.When you’re using autolayout, what happens in
layoutSubviews? The runtime, having examined and resolved all the constraints affecting this view’s subviews, and having worked out values for their center and bounds, now simply assigns center and bounds values to them. In other words,layoutSubviewsperforms manual layout!Knowing this, you might override
layoutSubviewswhen you’re using autolayout, in order to tweak the outcome. A typical structure is: first you callsuper, causing all the subviews to adopt their new frames; then you examine those frames; if you don’t like the outcome, you can change things; and finally you callsuperagain, to get a new layout outcome. As I mentioned earlier, setting a view’s frame (or bounds or center) explicitly inlayoutSubviewsis perfectly fine, even if this view uses autolayout; that, after all, is what the autolayout engine itself is doing. Keep in mind, however, that you must cooperate with the autolayout engine. Do not callsetNeedsUpdateConstraints— that moment has passed — and do not stray beyond the subviews of this view. (Disobeying those rules can cause your app to hang.)