
Determining What Your Project Will Deliver
Projects are conducted to create something useful. Most of the time, someone wants either a new product or service to be developed or an existing one to be improved. It is essential to understand what is needed from the project, what all will be included, and how to make sure it is delivered. In this chapter, we discuss how to collect requirements, define scope, construct work breakdown structures (WBSs), plan for risk, and plan for change.
The purpose of this chapter is to help you:
1. Collect specific and useful requirements so you understand what you need to develop on the project.
2. Create a work breakdown structure (WBS) so you know exactly what will be included and what will not be included.
3. Identify risks, assess them to determine which are major, and prepare response plans for the major risks.
4. Establish change control so you consider possible changes, understand their impact, and enforce decisions on whether to make the changes or not.
A good project manager will keep her paramount objective—satisfying the project’s customers—in mind throughout the life of her project. Yet, that imperative is not always as simple as it sounds. How do we really know what the customers want? A common source of frustration on projects comes from the fact that often the customer isn’t entirely sure what he or she wants. Even when the customer does have a good idea of what he wants, he does not always do an adequate job of conveying his desires to the project manager and team. Without a clear, universal understanding of what the project hopes to accomplish, your team will be in trouble. Your role as the project manager here is to understand the problem to be solved and/or opportunity to be capitalized upon; to set up a method for verifying with your stakeholders that they also understand and agree; and to translate that into quantifiable and provable requirements. These requirements should be stated in terms of capabilities that users will have from the deliverables you create on your project.
As the project manager, you need to lead your team through the process of collecting requirements from the project’s stakeholders. Since you have already worked as a team to create a project charter, you have a couple advantages at this point: everyone should have at least a cursory understanding of what the project is and why it is being undertaken, and you’ve already taken time to identify and rank your stakeholders, so you know whose needs must be met for your project to be successful.
To collect requirements means you will learn from your customer and any other key stakeholders exactly what they need from your project. These requirements could be project requirements that they expect from the project itself, or product requirements which will apply specifically to your deliverables. While collecting requirements is, like so many other project management tools and processes, scalable (and will be more detailed and laborious the larger your project is), it is a critical step that should never be skipped even on the smallest projects. The requirements you gather will form the basis for your work breakdown structure (WBS) which we will discuss later in this chapter. The WBS, in turn, will serve as the foundation for creating your schedule and budget.
Some of the most common requirements gathering tools and techniques are as follow:
• Questionnaires
• Brainstorming sessions
• Meetings and/or interviews with stakeholders
• Focus groups
• Prototyping
Again, depending on the size and scope of your project, you may use one or several of these techniques. You will need to compile the requirements into a database or list that is easily referred to. While asking direct questions of your customers and other stakeholders is a great way to gather requirements, keep in mind that their initial answers may not be specific enough and may require for you to ask follow-up questions. The best requirements will be specific, quantifiable, and easy to measure. In other words, at any step along the project life cycle, you should be able to quickly ascertain whether or not you are meeting the project requirements. For example, requirements for an inventory project may include the following, each of which would have a specific goal and method of measuring defined:
• Well-defined end-user requirements
• Increased inventory accuracy
• Increased inventory turnover
• Reduced inventory holding costs
• Better customer response/flexibility
• Smooth delivery of product to customer
One last point bears mentioning here. While it is your job as a project manager to understand and try to meet your key stakeholders’ expectations, you also need to make sure everyone on your project is being realistic. If a customer or other stakeholder has a completely unrealistic or improbable hope for the project, you need to find a way to delicately bring him or her back to reality. Remember, you will be held accountable for meeting clearly defined and agreed-to expectations. Why would you set yourself up for failure by agreeing to expectations you know are not feasible? While it is decidedly uncomfortable delivering negative news to an important stakeholder, it is greatly preferable to do it now rather than to disappoint someone at the end of a project by not delivering what they were expecting.
On larger, more complex projects, in addition to documenting your project requirements, you may also need to come up with a Requirements Management Plan and a Requirements Traceability Matrix which follows each requirement from project inception to successful completion of the project. A requirements management plan describes how requirements will be gathered and shared so stakeholders can preview them and offer feedback.1 A requirements traceability matrix shows the business need, requirements, and stakeholders. It could also show the priority of each requirement and perhaps how and when it will be measured. Exhibit 4.1 is a requirements traceability matrix.
Requirements Traceability Matrix

Once everyone shares a clear understanding of your project’s requirements, it is time to return to your scope definition. The more time and effort you originally spent on this part of the project charter, the farther along you will be now. Basically what you need to do now is refer back to the original charter and make sure it aligns with your detailed requirements. If it does not, you need to update your original scope statement. Keep in mind, the scope refers to what is included—and what is not included—in your project. Think of the scope as establishing the boundaries of what your project hopes to accomplish and feel free to include in your scope statement a list of things that are not part of your project scope if that helps your stakeholders arrive at a common understanding. Remember that as part of your scope you must also include acceptance criteria that are easily measured.
Sometimes a stakeholder wants you to include features that you believe should not be included. If your project is one in a series, sometimes you can satisfy that stakeholder by honestly saying a particular feature they want will not be in this project but will be considered for the next project.
If your project scope is fixed, the traditional, waterfall project life cycle might be what you would choose to use. If scope is negotiable, an agile project life cycle may make more sense. If you do use agile, all of the requirements will still be collected up front and the project customer will determine for each sprint what part of the requirements backlog is most important and will negotiate with the project manager how much of the backlog will be produced during the upcoming sprint.
Some other things you need to revisit at this point are project constraints and assumptions. A constraint is “a limiting factor that affects the execution of a project,2” while an assumption is “a factor in the planning process that is considered to be true, but is without proof.3”We mentioned these in Chapter 2 and hopefully they found their way into your charter. If so, you should briefly review these as a project team and see if any need updating. If they were not included in your original charter, now is the time to add them to your project scope statement. It may seem that constraints and assumptions are so “obvious” there is no point including them, but that is exactly the kind of thinking that leads to problems.
Keep in mind that if your team members come across a situation they are unfamiliar with, in the absence of a clear mandate they will either do nothing or do what they think needs to be done. Either of these choices can prove problematic. Agreeing ahead of time on some of your constraints and assumptions. (A 40-hour work week? Construction delayed when raining?) can prevent this from occurring. That said, no one can foresee every detail of a project, and a good project manager will foster a culture of open communication and demonstrate a willingness to ask and answer questions throughout the project life cycle. If your team members know you will not belittle or harangue them for asking for clarification when needed, they will feel more comfortable speaking up and will not resort to making their own—sometimes costly—assumptions. A few assumptions and constraints are shown below.
• Marketing initiatives will be successful.
• Public acceptance will be sufficient.
• Enough people will volunteer.
• An office will be donated for Saturday sessions.
• Attendees will understand lessons.
Constraints:
• There may not be enough capital raised.
• The sessions must happen between 15 April and 1 May.
• Sessions cannot last more than two hours.
The WBS is one of the most well-known project management outputs. Its name can be misleading because it does not deal with work itself but rather with project deliverables. The WBS is a way of dividing and subdividing projects down into manageable chunks called work packages. There are a few different ways to represent WBSs, though if you use software such as Microsoft Project, you will ultimately end up with an indented list.
To create the WBS, you should refer to your project scope statement and list of requirements. You should hold a brainstorming session with your entire project team and anyone else who will be performing the project work (this is an excellent time to involve subject matter experts because they will know better than anyone else the various components that make up each deliverable). The process used to create a WBS is called decomposition. As the name implies, it involves breaking down the overall project into organized pieces, then further subdividing those pieces down to a level that is small enough to manage (one rule of thumb is that the lowest level work packages should be able to be completed by one person in one day).
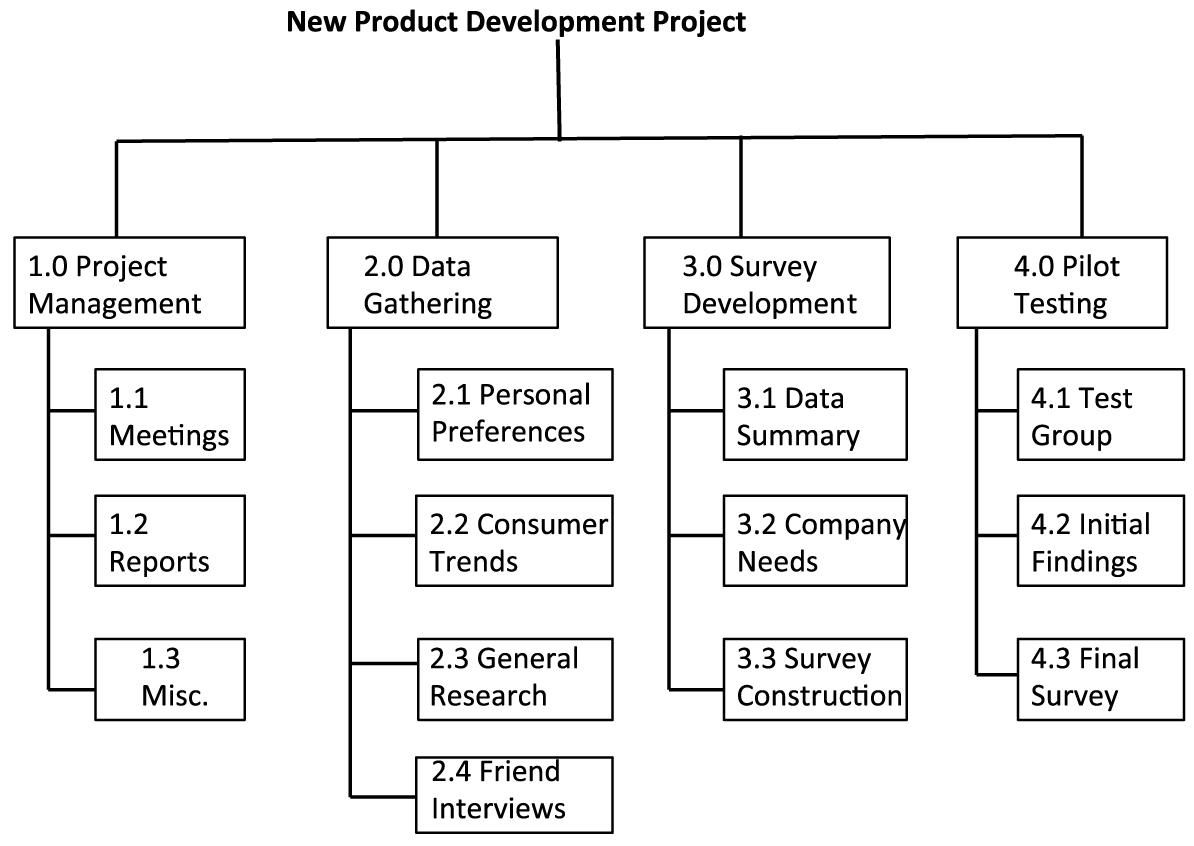
The brainstorming session can be captured in a variety of formats, such as indented outline, organizational chart, and free format. Remember, you are not focusing on activities yet, just deliverables, so use nouns rather than verbs! Different formats are commonly used for creating a WBS. One is an indented outline as shown in Exhibit 4.2. A second is an organization chart format as shown in Exhibit 4.3. The third is free form as shown in Exhibit 4.4. While the indented outline is used as input for a software program such as Microsoft Project, many teams find the other, more visual methods easier to use when there is a great deal of uncertainty about the project initially. Note on all three, the first section is for planning and managing the project. If one forgets all of this work, the project will be behind schedule and over budget before it even begins! Each of these types of format is demonstrated (for the same project).
Indented Outline Format of WBS
New Product Development Project
1.0 Project Management
1.1 Meetings
1.2 Reports
1.3 Misc.
2.0 Data Gathering
2.1 Personal Preferences
2.2 Consumer Trends
2.3 General Research
2.4 Friend Interviews
3.0 Survey Development
3.1 Data Summary
3.2 Company Needs
3.3 Survey Construction
4.0 Pilot Testing
4.1 Test Group
4.2 Initial Findings
4.3 Final Survey
Org Chart format WBS
Free Form Format WBS

For some projects with a high level of uncertainty, some deliverables or subprojects may not yet be understood enough to be planned. In this case, we will use the Agile technique of rolling wave planning, using decomposition where we can, and saving more detailed planning for the time at which more is understood. This is not a way of getting around adequate planning since it will still be planned in advance of the work being performed; rather, it is a way of admitting we do not have all the information at this time and recognizing our limitations by leaving room in our future schedule to revisit the detailed planning.
Since creating the WBS is so important and the more people who help brainstorm, the more complete the decomposition process will be, it is imperative that your team turn out to participate in creating the WBS. Some of your team members may view the work breakdown as unnecessary—especially, if the project involves work they are quite familiar with—and it is your job as project manager to convince them otherwise. Here are a few ways to do that:
• Remind your workers that the WBS will be used to create the project schedule and that they will be held to the schedule they set (so it is in their best interest to be as thorough as possible).
• Get people out of their typical environment if possible by meeting off-site so they are not tempted to sneak away to their desks.
• Bring food!
• If possible, create a template of the WBS to begin with (perhaps providing the first group of subheadings, for example) to give the team a starting point.
If a worker is still averse to participating in the creation of the WBS because she claims to know exactly what needs to be done, feel free to borrow the following reply: “Yes, I realize you know exactly what to do, but if you are ____________________________ (hit by a bus/struck by lightning/out sick), does anyone else know what needs to be done?” In all seriousness, we create a WBS at least as much to give everyone a uniform, high-level view of the work that needs to be accomplished as we do in order to spell out the deliverables needed from any particular workers or department. The WBS also goes a long way toward showing how the various components of a project are interrelated, which will aid us greatly in creating and sticking to a project schedule (Chapter 5).
Prior to creating a baseline schedule, you also need to spend some time brainstorming and planning for risks. In project management terminology, risks are positive or negative events that may happen and, if so, would affect your project. Risks are inherent to every project, and it is not your goal to avoid risks altogether. Positive risks represent opportunities you want to capitalize on, while negative risks are threats you would like to prevent or minimize.
The planning we are about to suggest focuses on preventing or mitigating negative risks. Like many other project management planning processes, planning for risk should begin with a brainstorming session. Your project team, as well as any subject matter experts you include, should begin by identifying any and all potential risks to your project. It may help to consult your project charter and other planning documents you have so far. When we lead this brainstorming session with students or clients, we have participants use a post-it note for each risk identified, no matter how small or far-fetched. (Remember, one rule of a brainstorming session is to include all answers.)
Project risks will fall into one of three categories: known knowns, known unknowns, and unknown unknowns (also called unk unks). Known knowns are comprised of the risks that can be most easily foreseen. This may sound like an oxymoron, since we stated above that uncertainty is inherent to risks. Yet, that degree of uncertainty can vary widely. For instance, a common known known in the construction industry is rain. Although we cannot predict with much accuracy when it will rain over the course of a project that lasts several weeks or months, it is almost certain—at least in most climates—that it will rain at some point. Something less likely but still well within the realm of possibility is a known unknown. Sticking to our construction example, a known unknown may be a blizzard, if you live in a climate where that is possible but infrequent.
Finally, unknown unknowns are the types of risk that, frankly, you don’t even see coming. They involve a previously unforeseen threat such as a supplier going out of business, geopolitical changes that affect your project, death of a key stakeholder, etc. You may be wondering, how can I plan for something I cannot even predict? In short, there isn’t much you can do—especially at this stage of risk identification. However, the very existence of unknown unknowns will be taken into account in Chapter 6 when we get to budgeting for the project. For now, we want you to know about all three categories of risks, but we realize you will only be able to identify and plan for the known knowns and known unknowns.
Once your team has identified as many project risks as they can come up with and listed them, one per post-it note, you will discuss as a team how to rank each risk according to two criteria: probability of the risk happening and impact if it does. If your team did a thorough job in the brainstorming session, you should have identified more risks than it makes sense to address. Therefore, we are going to create risk response plans for only the most likely and/or devastating risks. Create a line graph, with one axis showing probability on a low to high scale, and the other axis depicting impact, again low to high. Draw a diagonal line from the left upper quadrant to the right lower quadrant. Any risks your group rates above this line will require a risk response plan; the risks below the line will be noted but not dealt with at this time. The diagonal line you draw does not need to be right down the middle; you can shift it right/up if your sponsor has a high degree of risk-tolerance or left/down if he or she is risk-averse. You should discuss this tolerance level with your sponsor, and you may need to remind an extremely risk-averse sponsor that it is not our goal to avoid risk entirely (since it would be cost-prohibitive and inefficient to do so).
Next, as a group you take each post-it note risk you identified and agree where on the scale it should be placed. It is important to do this as a group, since different people will have different opinions and viewpoints about how to categorize the various risks. Exhibit 4.5 is an example showing major risks that are above the sponsor’s acceptance line and minor risks below the line.
Risk Assessment

Once each post-it has been added to the graph, you will need to come up with a risk response plan, to lessen the impact or probability of each risk that is above the line of risk-tolerance. These risk response plans do not have to be elaborate, but they do each need one and only one owner. That is the person who will be in charge of implementing the response plan if and when necessary. Exhibit 4.6 shows a response plan for the two major risks shown in Exhibit 4.5. The information in this response plan should be maintained and updated as conditions change. This document is often called a risk register and any additional information you choose to identify and store concerning risks can be added to the risk register.
Risk Response Plan

We are nearing the point at which the actual work of our project will begin. This work will be based on our baseline project schedule, and all the planning documents we have created so far will help to generate this schedule. Once our schedule is agreed to, we will be held accountable for delivering results according to its time, scope, and budget. So, whereas the charter we made during the Initiating process group was a living document and easily changed if agreed to, the project schedule will serve as a point of reference that is not easily adapted. Any changes we make after agreeing to the project schedule run the risk of scope creep, or expanding the parameters of our project without adding time or money. To prevent this, we need to create and stick to a well-defined, documented change control system.
This may sound intimidating, but it can actually be quite simple. The bottom line is that you need a method of documenting changes. Once the project schedule is agreed to, any change needs to begin with a written change request, which will be approved or not by the project manager, sponsor or customer. (Decide in advance with your sponsor or customer which changes are small enough for you to decide unilaterally and which are large enough that she would like to weigh in.) If changes are made, make sure they are communicated to everyone who needs to know them. As the project manager, you are responsible for setting the expectation that even small changes go through the written change request process. An example of a change request form is shown in Exhibit 4.7.
Change Request Template

Now that our deliverables have been broken down into work packages from our WBS and we’ve generated plans for addressing risks and changes, it is time to begin scheduling our project. That is what we’ll be doing in Chapter 5.
In Summary
In order for your project to be successful, you and your team must first reach a deep, common understanding of what your project will accomplish. You do this by collecting requirements from the various stakeholders—with an emphasis on the needs of the key stakeholders, when necessary. You will put the agreed-upon requirements into a WBS that will help you organize and break down the overall project work into smaller deliverables. The lowest level of the WBS is comprised of work packages.
In addition to understanding the work required by the project, you and the rest of your team also need to understand the risks involved. Not all project risks are foreseeable, but you should brainstorm as many threats to your project as possible and invest some time and effort into mitigating or eliminating the greatest risks to your project. Finally, your project team needs a standardized way of requesting, approving, implementing, and communicating changes throughout the life cycle of the project.
Key Questions
1. How do you collect specific and useful requirements so you understand what you need to develop on the project?
2. How do you create a WBS so you know exactly what will be included and what will not be included?
3. How do you identify risks, assess them to determine which are major, and prepare response plans for the major risks?
4. How do you establish change control so you consider possible changes, understand their impact, and enforce decisions on whether to make the changes or not?
Notes
1. James, V., 2015.
2. PMBOK Guide®, p. 533.
3. PMBOK Guide®, p. 529.
References
1. James, V. (2015). Leveraging Business Analysis for Project Success. New York: Business Expert Press.
2. Goodpasture, J. C. (2002). Managing Projects for Value. Vienna, VA: Management Concepts.