
Now that you’re up to speed on the equipment and using the camera, let’s take a closer look at the camera’s different formats so you can best understand when to use which format and why. In this chapter, we’ll go over recording-quality settings and the different resolutions available for shooting. You’ll learn when to use specific aspect ratios. Then, you’ll learn about some special in-camera effects you can do, such as slow motion and time-lapse.
The RED has two recording quality settings: REDCODE 28 and REDCODE 36. REDCODE 28 records at 28 MB/second, and REDCODE 36 records at 36 MB/second. I recommend recording in REDCODE 36 for the maximum possible image quality, though it can be hard to tell the difference between the two resolutions on anything less than a 35mm blowup or a very high-resolution monitor.
I think it’s much wiser to go with the best possible image quality and bank on it rather than save a little space with the lower-quality setting and find yourself in postproduction with an issue and wishing you hadn’t cut corners. The one caveat is that if you’re shooting REDCODE 36 to Compact Flash (CF) cards, you’ll be limited to certain frame rates and resolutions because the data rate exceeds what the card can achieve. Table 7.1 shows the maximum possible frame rate, resolution, and recording quality combinations for each type of media. (The iPhone application iSee4K I mentioned in Chapter 4 can also be a big help in reviewing the different settings.)
Table 7.1. Maximum Frame Rates at Each Resolution for Different Recording Media (Redcode 28)
REDCODE 28 | RED 8GB CF | RED 16GB CF | RED DRIVE | RED RAM |
|---|---|---|---|---|
2K 2:1 | 100 fps | 120 fps | 120 fps | 120 fps |
2K ANA | 120 fps | 120 fps | 120 fps | 120 fps |
2K 16:9 | 100 fps | 100 fps | 100 fps | 100 fps |
3K 2:1 | 50 fps | 60 fps | 60 fps | 60 fps |
3K ANA | 60 fps | 60 fps | 60 fps | 60 fps |
3K 16:9 | 30 fps | 50 fps | 60 fps | 60 fps |
4K 2:1 | 25 fps | 30 fps | 30 fps | 30 fps |
4K ANA | 30 fps | 30 fps | 30 fps | 30 fps |
4K HD | 25 fps | 30 fps | 30 fps | 30 fps |
4K 16:9 | 25 fps | 30 fps | 30 fps | 30 fps |
Table 7.1. continued Maximum Frame Rates at Each Resolution for Different Recording Media (Redcode 36)
REDCODE 36 | RED 8GB CF | RED 16GB CF | RED DRIVE | RED RAM |
|---|---|---|---|---|
2K 2:1 | 75 fps | 100 fps | 120 fps | 120 fps |
2K ANA | 100 fps | 120 fps | 120 fps | 120 fps |
2K 16:9 | 75 fps | 75 fps | 100 fps | 100 fps |
3K 2:1 | 30 fps | 30 fps | 50 fps | 60 fps |
3K ANA | 50 fps | 60 fps | 60 fps | 60 fps |
3K 16:9 | 30 fps | 30 fps | 50 fps | 60 fps |
4K 2:1 | 25 fps | 30 fps | 30 fps | 30 fps |
4K ANA | 25 fps | 30 fps | 30 fps | 30 fps |
4K HD | N/A | 25 fps | 30 fps | 30 fps |
4K 16:9 | N/A | 25 fps | 25 fps | 30 fps |
Tip
I recommend confirming these maximum frame rates with your camera. Some users report they are unable to achieve them on certain CF cards or drives.
To set the recording quality, follow these steps:
Press the SYSTEM button on the back of the camera, and then select PROJECT with the camera’s control stick to see the PROJECT menu (Figure 7.1).
Next go to the CONFIGURE menu, and then select the QUALITY button. You’ll then be able to toggle between the two REDCODE quality settings (Figure 7.2).


Though the RED is touted as a 4K camera, it is capable of shooting 3K and 2K resolutions as well. 4K offers the highest possible image quality, but 3K and 2K also have their uses (Figure 7.3).

When in doubt, shoot 4K. It’s the highest resolution on the camera, uses the largest number of pixels on the sensor, and can be easily reduced to 2K for film as well as to high definition (HD) and standard definition (SD). It’s simple to go down from 4K to whatever resolution you want, but if you shoot a lower resolution and then try to scale it up, you end up with a noticeable degradation in image quality. No matter which resolution you eventually screen your project at, acquiring footage at 4K will give you the best-looking image because of oversampling. Oversampling simply means you capture an image at a higher resolution than you need to display it. When a higher resolution image is reduced, the resulting picture appears more detailed and sharper than one that began at the smaller size. There are more pixels to choose from as the image scales, and thus the image rendition is ultimately more accurate.
The 4K resolution does have a few limitations, and one of the main ones is frame rate. This isn’t an issue if you don’t plan to shoot at high speed (that is, for slow motion). You can still shoot from 1 to 30 frames per second in 4K, so sped-up effects are easily done without changing resolution. But if you’re doing an action sequence or filming pyrotechnics and you want to crank up the frame rate, you’ll be limited in 4K to 30 frames per second. To go higher, you’ll need to gear down to 3K or 2K. The 3K resolution goes up to 60 frames per second, and 2K goes up to 120 fps. You’ll learn about slow motion, or Varispeed as the camera refers to it, later in this chapter in the “Varispeed” section.
The 3K resolution is primarily useful for shooting higher speeds than 4K while preserving reasonably high resolution. On the post end it means you’ll still be spending some time doing down-converts, though not as much as with 4K. Record times are slightly longer than 4K, too: At 3K 16:9 REDCODE36, you have about 16 minutes on a 16 GB CF card.
One question that comes up often among RED users is, if I’m finishing on HD or film, why not shoot a resolution that’s closer to my finishing resolution so postproduction is more efficient? Although it is true you’ll have smaller files and need less conversion time by shooting in 2K, in my opinion the quality trade-offs are too great. The main issue is that you’re shooting a much smaller “slice” of the image sensor, and as a result, your lenses will have a narrower field of view. 2K is the format you want to use primarily for the highest possible frame rates, but other than that I’d stick with 4K.
Some people like to shoot in 2K to save storage space. For example, on a 16 GB CF card, you get about 34 minutes of 2K, 16:9 REDCODE 36 at 24 fps footage, versus about 8 minutes at 4K. So, it’s definitely something to think about if you’re very limited in your available storage. 2K still looks great and is much sharper than most other HD cameras. Make sure you have some fairly wide lenses, because you’ll be dealing with a significantly narrower field of view with 35mm lenses compared to 4K or 3K. See the sidebar “Lens perspectives change with resolution” for more information.
Here’s how to select resolution on the camera:
Start in the PROJECT menu.
Select the RESOLUTION button. You’ll see the 4K, 3K, and 2K options (Figure 7.4).
Select the resolution you want with the joystick. (Notice that you have aspect ratio choices for each resolution—you’ll learn more about that in the next section.)

You learned about aspect ratios in the “Delivery Format” section in Chapter 3. The basic concept is that you should shoot an aspect ratio that is most useful to your intended final output. Your aspect ratio choices with the RED are 2:1, 16:9, HD, and Anamorphic. You select an aspect ratio in the PROJECT menu under RESOLUTION. The 2:1 and 16:9 modes are intended for working with film-destined projects (Figure 7.5). The HD mode is best suited for projects that are intended only for high-definition and standard-definition television. The Anamorphic mode is designed specifically for use with 2:1 anamorphic lenses. So, use this mode only when you’re absolutely certain you have the proper lenses.

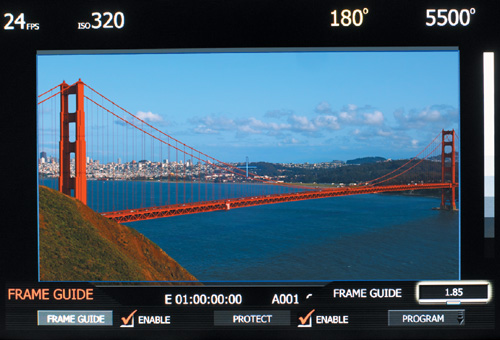
Productions often shoot 2:1 for movies destined for theatrical release, where the image is likely to be further cropped for a different aspect ratio. For example, Simon Duggan, ACS, shot Knowing in 2:1 for an eventual 2.40:1 release. Out of the box, 2:1 footage, played back in an HD timeline, will exhibit a small amount of letterboxing at the top and bottom. The camera has built-in frame guides so you can shoot 2:1 and see where the eventual 16:9, 1.85, or 2.40:1 cropping could be (Figure 7.6). This makes it much easier to compose a shot. You’ll find these options in the FRAME GUIDE section of the MONITOR menu.
The 16:9 format is the native format of HD TV. At 4096 × 2304 (4K), this mode also happens to be the highest possible image resolution you can shoot with the RED at this time. However, the mathematics don’t quite work out because to get from 4096 × 2304 to 1920 × 1080 for HD, you are not dividing by an even number. So, you end up dealing with longer processing, and your proxies will not scale exactly 1:1 when you drop them into an HD edit. And that leads us right into the next format: HD.
The HD resolution is related to working with high-definition TV. This format sacrifices some resolution in the interest of a smoother postproduction workflow for productions destined only for video release. At 4K HD, the resolution is 3840 × 2160, so you’re losing almost 10 percent of your resolution compared to 4096 × 2304 for 4K 16:9. However, a 10 percent loss going from 4K to HD is still a lot of resolution once you’ve downscaled. 3840 × 2160 divides mathematically exactly by 2, which achieves 1920 × 1080—the resolution of HD at 1080p.
As a result, not only are exports from R3D files to other formats in HD faster, but you can also drop half-size proxies right into a 1080p timeline without any letterboxing or scaling required. It also produces better-looking conversions from HD to SD, especially in 16:9. This mode is the one to use if you’re sure you won’t be finishing on film. Confirm that everyone is on the same page from production and postproduction before committing to this format.
The anamorphic mode is specifically designed to work with special anamorphic lenses. Its aspect ratio is 1.2:1, with pixel dimensions of 2764 × 2304 in 4K. It may sound like a lower image resolution than, say, 2:1 4K (at 4096 × 2048), but remember that anamorphic lenses shoot an optically compressed image. When the final output is created from this mode, it will be unsqueezed and appear much closer to the 4K resolution (with an aspect ratio of 2.40:1). We don’t get into anamorphic mode too much in this book, because, to be honest, the lenses are very expensive and not used much. In fact, many movies shot on film these days are shot with standard spherical lenses and cropped to 2.40 in postproduction (for that epic movie feel).
You also need to choose your shooting frame rate, or TIME BASE as it’s called in the camera. The standard frame rates are 24p, 24.00, 25, and 29.97 (with 50 and 59.94 in 2K and 3K). Essentially this is the playback frame rate and the shooting frame rate as well. Unless you’re shooting Varispeed, then it’s only the playback frame rate; you’ll learn more about Varispeed later in this chapter.
The 24p frame rate, or 23.98 as it’s more technically referred to, is generally what you want to use. This is the classic “film look” setting that gives you the most aesthetically cinematic motion (Figure 7.7). At 23.98, you’re also perfectly set up to work with most editing and finishing applications, which have long been designed to work with 23.98 projects.
There’s a school of thought that says you should shoot exactly 24 frames per second to have a perfect 1:1 shooting ratio when you output 24 frames of video to 24 frames of film. In the abstract, this makes sense, but you might find that most existing editorial workflows are best designed for 23.98 rather than 24.00 exactly. Also, a 24-frame project is more difficult to work with for a video-only finish. So, unless everyone in the postproduction department is completely in agreement that you should be shooting 24.00 instead of 23.98, I recommend sticking with 23.98.
If you’re working in a country that uses the PAL TV standard instead of NTSC—such as the United Kingdom, India, mainland China, and Australia—you might want to go with 25 frames per second. The PAL TV system uses 25 frames per second, and as a result, many film-based productions shoot at 25 to make transfers to video more straightforward. As with 24.00, you should consult carefully with your postproduction team to determine whether 25 frames per second is the right choice. It’s fairly easy to convert 25 to 24 or 23.98 in software, so it’s not the end of the world if you change your mind after production. There will be audio sync issues to be ironed out in the changeover, though. So have an agreement with production and post personnel before committing to 25 frames per second.
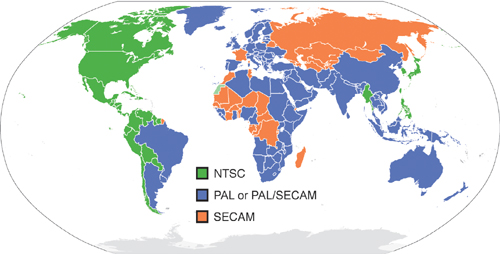
29.97 is the NTSC frame rate, used by countries such as the United States, Mexico, Japan, and Canada (see the map of world TV standards in Figure 7.8). Some people say you should shoot 29.97 for a 1:1 frame rate relationship when creating a project for TV in NTSC regions. If you do this, you won’t have to add any sort of pulldown in your finished version for TV, which means essentially all frames are progressive. Many TV shows shot on film are shot at 29.97 to make things simpler in post.
There’s an aesthetic difference to footage shot at 29.97. I recommend a test for your own eye. The 23.98 to 29.97 workflow is so well established in postproduction these days that it’s unnecessary to shoot 29.97 for a TV finish.
Tip
SECAM’s a third international standard, is in limited use by some countries (such as France, Luxembourg, and some African and Asian countries). It shares the same frame rate as PAL: 25 frames per second. If you’re shooting for SECAM, choose 25 as your time base.
To set up the time base, start in the PROJECT menu, and select the CONFIGURE button, as with the previous project options. Next, select the TIME BASE option. You can then select a frame rate with the joystick (Figure 7.9).

When in doubt, shoot 24p. It’s as close to a universal format as there is. It’s easier to derive HD, film, and Internet conversions from a 24p master than from any other format.
Though much of your work is likely to be at “normal” frame rates such as 24p and 29.97, you also have more creative options with the RED. You can use Varispeed to achieve slow-motion and sped-up frame rate effects along with special time-lapse effects.
You achieve fast- and slow-motion effects in the same way you do with a film camera. You have a base frame rate, at which all footage is played back, and a shooting frame rate. Let’s say your playback frame rate is 23.98 (24p). As long as you shoot at exactly 24p, everything will look normal, and events will occur at the same speeds they did on the set.
However, once you capture footage at a different speed than your playback frame rate, you get variable speed effects. For example, if you capture footage at 120 fps and play back at 24p, everything will appear to move slowly. An event that took 1 second to occur during shooting now takes 5 seconds to play back and appears to be slowed down by a factor of 5.
Conversely, if you shoot fewer frames per second than your playback frame rate, you get sped-up motion. If you shoot at 12 frames per second, then, and play it back at 24 frames, a 1-second action plays back in ½ a second. Action appears sped up by 2 times. In the RED camera, this is referred to as Varispeed.
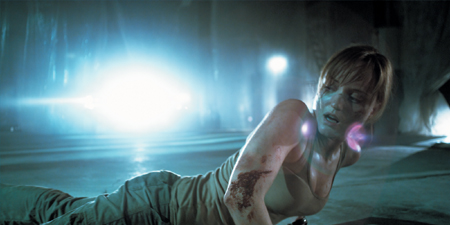
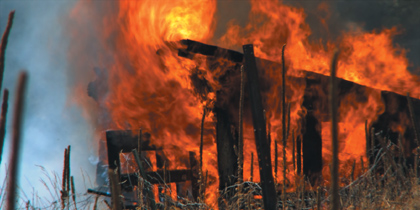
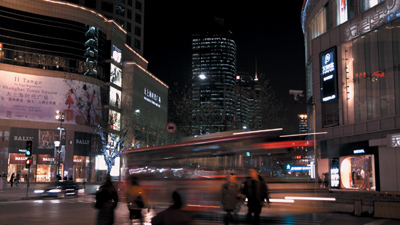
What are some uses for slow and fast motion? Slow motion is typically used for explosions, fire, and glass breaking—basically any sort of motion that normally goes by quickly that you want to accentuate (Figure 7.10). Fast motion has some creative uses as well. For example, if you’re shooting a landscape or other essentially unmoving object at night, switching to fast motion gives you additional exposure because each frame receives light for a longer period of time. Thus, you can get shots with much lower light than you could at standard frame rates. Of course, you want to keep the camera steady to avoid a jumpy shot. You’ll also get streaks and blurs on objects at the slower frame rates, which can be used to creative effect, so experiment. Fast motion can also be used to speed up fights and stunts and, of course, to create comedic effects.
You can also design very creative effects by ramping. Ramping is switching speeds during a shot, say from slow motion to regular speed to fast motion. I present some ways to achieve ramps in the upcoming “Ramping” section.
With the RED, an important consideration is figuring out your resolution; try to shoot at the highest possible resolution you can. If you can live with 60 frames or less, you can use 3K. For faster than 60 fps, you need to switch to 2K. For example, 60 fps played back at 24 fps can look slow enough for many desired shots. But maybe it’s not quite slow enough to capture all the details you need. In that case, you could gear down to 2K and get up to 120 fps. My general advice on frame rate effects, as with most things on a movie set, is to do some tests.
Ramping, or speed changing in the middle of a shot, can be a very cool effect. You’ve seen it in movies such as The Matrix and Gladiator, where action goes from normal speed to slow motion and then back again. You can create a ramp in-camera or in postproduction. The postproduction method is simplest: You simply shoot at the maximum desired speed and then alter the playback speed as desired in postproduction. All editing applications have speed controls, so it’s possible to have single frame accuracy.
The in-camera method is much more challenging because you have to trigger the change in speed very precisely. The advantage to the in-camera method is that you can change the shutter speed during the shoot. Say you have a very dark frame that’s lit up by an explosion. You could get a much wider dynamic range by increasing the exposure for the dark part of the shot and then decreasing for the much brighter explosion.
Here’s how to set up an in-camera ramp:
First go into the VARISPEED menu, and select the RAMP option.
Next, adjust the TRIGGER setting between ON-RECORD and ON-EVENT (Figure 7.11).
If you select ON-RECORD the ramp starts immediately as you begin recording. ON-EVENT will hold the ramp until an external trigger command is received (learn more about triggers in the “Using an external trigger” sidebar). Use ON-RECORD to ramp a continuous action that’s ongoing such as people walking by in a crowd, for example. Use ON-EVENT to capture a specific moment of action such as a car crash or a punch, for example.
Finally, select END RATE. This is where you decide what frame speed to ramp to, either a faster speed than you’ve already picked with the VARISPEED menu’s FRAMERATE option or a slower one (Figure 7.12).


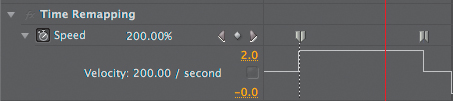
Doing a ramp in postproduction is easier than in-camera because you needn’t worry about perfect timing on the set. Avid, Final Cut Pro, and Premiere Pro have speed controls specifically for this purpose. You take a shot that has been photographed at high speed into a 24 fps timeline (or whichever is your base frame rate) and then define specific frames for which you want the speed of the clip to change.
For example, a shot taken at 48 fps, when sped up to 200 percent, will play at what appears to be a normal speed. You can then set another keyframe later at 100 percent speed, which will look like the clip went from regular motion back to slow motion all in a single shot (Figure 7.13).
Think of clouds billowing like steam and flowers opening magically. That’s time-lapse cinematography, and it has been around since the late 1890s on film cameras. The technique is very simple; you shoot one frame at a time over a given interval, such as one frame per second (or minute or hour). When played back at 24 frames per second, action is greatly sped up (Figure 7.14).

Typically a time-lapse shot is made from a tripod—otherwise movement between frames would be distracting and spoil the effect. For more expressive camera moves, you can combine time-lapse cinematography with a motion-control rig, which uses a computer and servo motors to accurately move a camera across a predefined path over a set period of time. A notable example is the movie Baraka, which features moving dolly shots over great lengths of time as clouds burst by, stars shoot overhead, and people dart by like race cars.
With its 4K resolution and sturdy build, the RED is perfect for time-lapse work. Since there’s no moving piece of film or film gate inside the camera, you don’t have to worry about the frame shifting over time. There are different ways to capture frames in the TIMELAPSE mode. You can either set up the camera to control the entire process or use an external triggering device. I think setting it up with the camera is best because it’s simple. However, there are lots of existing triggers and intervalometer devices that some shooters may be more accustomed to using.
Note
An intervalometer is a mechanical or digital timer that can be set to trigger frame recording on a camera at set intervals. The TIMELAPSE mode on the RED is essentially a digital intervalometer programmed into the camera’s software.
On the TIMELAPSE menu, your options include SPEED, STEP PRINT, INTERVAL, and BURST TYPE. SPEED gives you access to longer shutter speeds (Figure 7.15). Because you’re photographing only a few frames per second, you can use longer shutter times of up to a half second. The slowest shutter will cause moving objects to streak but will also give you a much brighter exposure at night.
STEP PRINT is a term held over from film cameras. It essentially means you repeat each frame up to 10 times. This can help to smooth out motion and make the frames take a little longer to play back (Figure 7.16).

INTERVAL is the heart of the TIMELAPSE mode, where you set the delay between frame captures (Figure 7.17). You can set this between 1 to 1,024 seconds (approximately 17 minutes).

Time-lapse cinematography is a lot of fun, and you can create some amazing shots. The trick is figuring out the best combination of shutter, interval, and step print settings to achieve the effect you want. Experiment with different settings on the same shot. As with anything that takes a lot of time, patience is often rewarded with great results.
The RED can be deceptively complex with its variety of formats, but you’ll probably shoot most projects on just a few of them:
When in doubt, shoot 4K REDCODE 36 24p, because that’s the best quality the camera can achieve and the most flexible to convert to other formats.
For aspect ratio, shoot 2:1 or 16:9 for film-destined projects; or shoot the HD mode for projects designed for the small screen. That should get you through most of the projects you’ll encounter. Try to shoot for the final aspect ratio of your project whenever possible because shot composition changes with different aspect ratios.
If the settings you shoot with aren’t ultimately the same as the finished format of your project, with 4K worth of resolution you can still reformat and down-convert footage to whatever you really need.

CINEMATOGRAPHER, EVERY DAY
Cinematographer Nancy Schreiber, ASC, has brought her considerable skills to bear on many different film and digital camera formats throughout her career. Starting with Super 8mm cameras as a child, Schreiber eventually found her way into the world of independent films armed with ÉCLAIR NPR and AATON 16mm cameras. She quickly moved up to full-fledged high-definition and 35mm features, including Your Friends and Neighbors and The Nines, and has also shot hundreds of music videos and documentaries. In 2004, Schreiber shot one of the first high-profile digital features on the Panasonic DVX100 24p camera, November, starring Courteney Cox. Continuing her reputation for innovation and experimentation, Schreiber shot Every Day (directed by Richard Levine and starring Helen Hunt and Liev Schreiber) on the RED ONE.
“The production company, Ambush Entertainment, had recently completed another movie on the RED and was impressed,” explains Schreiber. “Ambush ordered its own camera, and it arrived in time for Every Day. Taking advantage of tax incentives, we shot for 23 days on location in New York, mostly in Queens with a few days in Brooklyn and Manhattan. I had two days worth of testing, including night exterior and makeup tests. I wanted to see how much, if any, filtration I could use and also determine the ASA of the camera. Technicolor in New York had built up a lot of experience working on Steven Soderbergh’s RED features. I was able to screen the test in their large DI suite and also record out a couple minutes of the test to film. We rented a second camera from Offhollywood Digital, who is incredibly RED-savvy; lenses from ARRI CSC; a 24-inch Sony monitor from Abel Cine Tech for me; and a 17-inch Panasonic for Video Village.”
With an eye toward an eventual output to 35mm film for theatrical release, Schreiber shot Every Day at 4K resolution using REDCODE 36 in the 16:9 aspect ratio. “I have to say the camera is an engineering marvel, and I think it’s amazing that for $17,500 such an impressive camera body exists,” she observes. “It’s also great to be able to use film lenses. Once you mount the matte box and all the accessories, it looks like a film camera, which puts actors at ease. It’s just as big as well, though much lighter. In fact, the camera was so light our Steadicam operator, Jamie Silverstein, had to put an extra battery on to balance it properly. He never had to put the rig down, since it was so light.”
Accustomed to working rapidly on documentaries, indie features, and music videos, Schreiber used a pared-down optics package. “I pretty much used short and long Optimo Zooms on most scenes,” she says. “We couldn’t afford Master Primes, so we used Cooke S4s and also a set of Zeiss Super Speeds for low-light scenes. I rated the camera at ASA 200-250 when I could. There were night scenes when I needed to see the lit-up Manhattan skylight through tinted windows. So, I used Super Speeds [lenses] and would have to rate the camera much higher than 250. The blacks held, but focus was challenging. If only those actors didn’t move!”
The location was set in a loft on two floors of a hotel. “The set was all windows and had a great view of the skyline,” Schreiber recalls. “But there were very few buildings lit up outside, and those that were turned off at midnight. I had to drop my lighting levels down to practically nothing so the buildings would read and work quickly before the city turned off their lights.”
“It’s difficult to shoot night interiors and exteriors on small movies when you’re working in practical locations,” Schreiber adds. “The camera performs best in daylight situations or in a ‘blue-based world’ [i.e., absence of warmer-colored tungsten lights]. HMIs are large and expensive, and if I tried to use small Fresnels with my low-ceilinged locations and gelled them blue, I would have no T-stop [lens exposure aperture] left. I do use Kino fluorescent lights and Litepanel LED lights, which are daylight-balanced but are often too large or nonfocusable for many situations. I found myself using tungsten light more. The images look natural and beautiful, but occasionally I did pick up a bit of noise.”
Besides lighting sensitivity issues, Schreiber also found the camera’s depth of field to be almost too shallow at times. “Maybe it’s the CMOS chip, but you have very little depth of focus at low light levels,” says Schreiber. “I like shallow depth of field, but this goes to an extreme. That makes it very tough on a quick shoot. You need to have an ace focus puller to get your shots.”
Offhollywood handled dailies for Every Day by initially transcoding the incoming R3D files into Avid’s DNxHD format. “Our editor in L.A. was using an early version of RED’s integration with Avid,” says Schreiber. “The editorial dailies were very low resolution, which was a bit of a drag. Part of this was the size of the files, our budget, and the quick turnaround the editorial crew needed, with dailies sent overnight to L.A.
“Fortunately, I had our wonderful RED tech, Eric Camp, download a set of dailies onto a hard drive at DNxHD75 so I could show them to our director, Richard, and assure him everything looked fine. Now we’re color correcting on a large DI screen at PlasterCITY Digital in Los Angeles, and some focus issues have come up that we couldn’t see during editing. If we can’t find replacement takes that are as good for performance, we’ll just have to live with it. Even sharpening plug-ins can only go so far. Otherwise, I’m very happy with the way the movie looks. PlasterCITY and our colorist Milton are so RED-savvy, and I know the actors will also be pleased.”
Comparing RED’s resolution to her previous digital feature shot on the DVX100, Schreiber noted the difference. “I had to suffer through seeing November on a huge screen at Sundance because it wasn’t sharp,” Schreiber says. “It has a look, but it was a DVX100 feature made for a very low budget ($300,000) even though we had an A-list cast, as on Every Day. You can’t really make an image sharper, but you can make it softer through filtration. Cinematographers are always softening skin tones, and we want the freedom to have things sharp when we need them to be. So, the RED is an amazing step up from many digital cameras, but it still needs to improve its resolution.”
When asked about her wish list for RED, Schreiber has some suggestions. “Initially my desire was for more speed,” she says. “I begged RED to make it faster and sacrifice resolution if needed. Now, after going through color correction on a 27-foot screen, I think we need both resolution and speed. Resolution is a problem with most HD and video cameras where you lose a lot of detail in the wide shots that you’d still have on film. It’s going to be tricky in terms of RED keeping their costs down, but I imagine Jim and gang will figure out a way. Generally I think the RED is a remarkable camera that is democratizing filmmaking and is a great tool for certain movies. We DPs like to have a choice and hopefully receive the respect to be consulted on which camera is appropriate for each new venture. Maybe the RED was intended for a niche market, but it’s being used quite broadly now. It has caught on quickly in prime-time TV and Hollywood features, and that’s incredibly amazing.”