

You can edit a RED project with Apple Final Cut Pro in a number of ways, and each has its own strengths. The amount of options can be overwhelming, so in this chapter we’ll focus on the transcode to Apple ProRes workflow via the Log and Transfer window, which is currently favored by Apple. You’ll learn how to ingest your footage properly, send it to Apple Color, work with Cinema Tools, and export using the Share feature in Final Cut Pro. After you have the recommended workflow down pat, we’ll look at some alternative methods that you might find useful for certain types of projects.
Final Cut Pro is optimized for the ProRes compression format. Using this format gives you real-time performance and access to all effects, assuming you meet the minimum system requirements according to Apple.
You need to be aware of a couple of issues when you’re using the recommended workflow. First, there is a waiting period between shooting and editing because transcoding from R3D to ProRes takes time. The amount of time depends mainly on the speed of your system processor and the amount of RAM. I recommend an eight-core 2.26 GHz or faster Mac Pro with at least 4 GB of RAM.
The other issue with transcoding from R3D to ProRes is that once you begin color correction, you’re locked into the color space and gamma, set in the Log and Transfer window. For many productions, this is not that big of a deal, and if you think about working with footage from any other non-RAW camera, that’s the usual way. You can get around this limitation with an easy side trip to Cinema Tools, which you’ll explore later in this chapter in the “Using Cinema Tools” section.
I recommend using Final Cut Pro 7 or later for the best performance. You’ll also need RED’s software, which enables support for Final Cut Pro, Color, and QuickTime. You’ll find the latest version at www.red.com/support.
This workflow will be familiar if you’re used to working with other tapeless formats in Final Cut Pro such as P2 or XDCAM EX. For the best results, keep all of your original RDM folders intact and organized. The general rule of thumb is to copy all files and directories the camera makes and not to remove files, rename files, or rearrange folders. This is especially important if you’re planning to do RAW color correction using Cinema Tools.
Begin the ingest process in Final Cut Pro by choosing File > Log and Transfer, or by pressing Command-Shift-8. The Log and Transfer window appears.
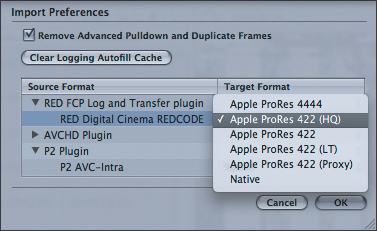
Specify which ProRes format you want to transcode to. Click the small gear icon in the Log and Transfer window, and choose Preferences from the Action menu.
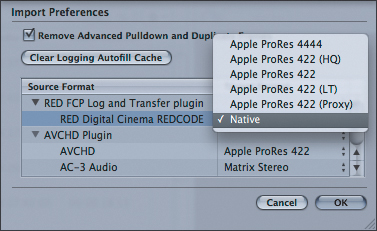
In the Import Preferences dialog, choose the desired transcode format in the Target Format column (next to RED Digital Cinema REDCODE) (Figure 10.1).
As of Final Cut Pro 7, you have a number of ProRes formats to choose from, each with a different level of quality and corresponding bitrate. The quality levels start at ProRes 422 (Proxy) and go up to ProRes 4444 (check with Apple for the exact data rates). If the footage you’re ingesting is intended to be your online or final version, pick one of the higher bitrate flavors such as ProRes 422 (HQ) or 4444. Keep in mind that each level as you go up requires more storage and a faster hard drive for optimum editing performance.
If you’re treating the initial edit as offline and you plan to either re-ingest the footage to a higher-quality format or reconnect to the R3D files via Cinema Tools, choose one of the lower bitrate ProRes formats such as LT or Proxy. Keep in mind that those lower-quality ProRes formats can still look pretty good, especially when going out to standard-definition DVD or the Internet. We’ll use ProRes 422 (HQ) for this example.
Once you’ve selected a ProRes format, drag and drop your RDM folders from the Finder into the Log and Transfer window. After the scanning is complete, all the shots from each folder should appear in the Log and Transfer window (Figure 10.2).
Select the clips you want to ingest, or press Command-A to select them all.
Click the Add Selection to Queue button.
Final Cut Pro will begin to ingest the clips one at a time. This is likely to take a while, depending on how many clips you plan to import and how long they are. Ingested clips will appear in your Project window (Figure 10.3).
Repeat as needed for each reel. When the process is complete, close the Log and Transfer window. All clips are transcoded to ProRes at 2K in Final Cut Pro.


Once you’ve ingested your footage, editing RED footage in Final Cut Pro isn’t too different from editing other types of footage.
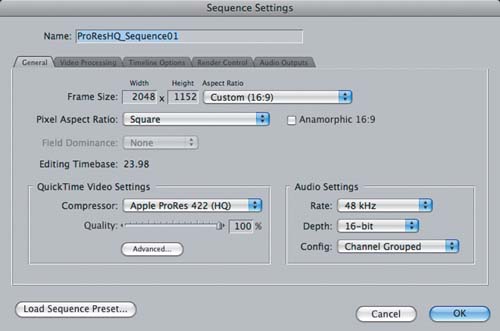
To start editing, create a new sequence by choosing File > New > Sequence, or press Command-N.
Drag a single clip into the new sequence.
When prompted to change the sequence settings to match the clip settings, click Yes. Your resulting sequence settings should look something like Figure 10.4.
The nice aspect of transcoding is you get excellent performance with all your real-time filters and effects via the extensive ProRes support in Final Cut Pro. If you can live without the RAW workflow for color correction, you can use 2K ProRes transcoded files as your master for high-definition and standard-definition projects. If you do need to go RAW, say for extensive visual effects or a 4K film finish, refer to the “Using Cinema Tools” section of this chapter.
Once you’ve completed an edit with Final Cut Pro, you can send it to Apple Color for color grading. Technically, a locked edit is not essential for color correction, but it’s much simpler and avoids redoing work. (For other color-correction applications, refer to Chapter 13.) The color space and gamma latitude of ProRes files are sufficient to finish for high-definition, and this process is easier and quicker than accessing the native RAW metadata.
For a majority of RED projects, especially those destined for DVD, HD, or the Web, you’ll be all set with this method and can begin working in Color right away. For more critical projects, however, you’ll want to access the power of the RED RAW workflow with Cinema Tools.
To go from a transcoded 2K edit in Final Cut Pro into a ProRes color-correction session in Color, the simplest method is the following:
In Final Cut Pro, select the sequence you want to correct in Color by clicking it in the Project window.
Choose File > Send to Color.
Color should start up, and your Timeline should load automatically. If you’ve set up everything properly, your Color project settings should look like Figure 10.5 (your own project settings will vary).
Confirm that your resolution and frame rate match your Final Cut Pro sequence settings. If not, you can manually reenter them. This might, however, indicate an incorrect setting in the original sequence, so go back and re-check your settings.

Tip
For projects destined for DPX and film output, Color works best with simplified Timelines from Final Cut Pro. Stick with standard dissolves, and remove speed and motion effects. You should create those after a Color session, because many of these effects will be discarded when you export directly from Color to the image sequence formats.
If you’re working toward a film finish or 4K output, you’ll want the higher latitude of the original R3D media when you color correct. This gives you access to all original RAW color and exposure data out of the camera. You’ll use Cinema Tools (included as part of Final Cut Studio) to enable Color’s RED metadata control tab using an EDL from Final Cut Pro. (This method requires Final Cut Pro 7 or later.)
Start in Final Cut Pro, and select the sequence you want to color correct.
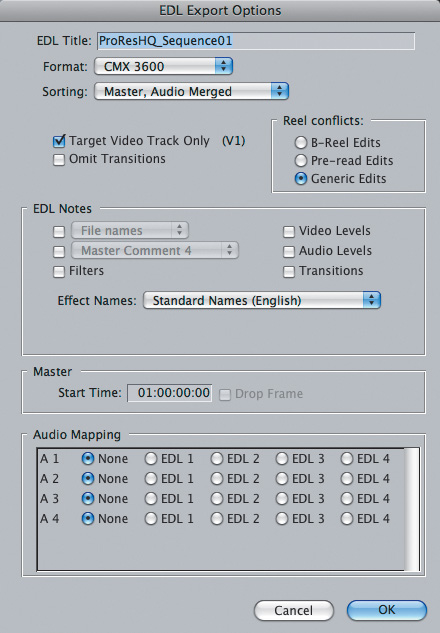
Choose File > Export > EDL.
The EDL Export Options dialog opens.
Choose the CMX 3600 format, and select None for each channel in the Audio Mapping list. (The EDL will automatically be titled according to the current sequence name.)
Color doesn’t import audio, and omitting it will make for a more trouble-free EDL export; just be prepared to realign your audio tracks with the completed color-corrected footage when you send them to Final Cut Pro from Color.
Match what you see in Figure 10.6 for the rest of the settings. Click OK, and save the EDL.
Launch Cinema Tools, and create a new database by choosing Database > New Database. Accept the default settings, because these settings don’t affect RED projects.
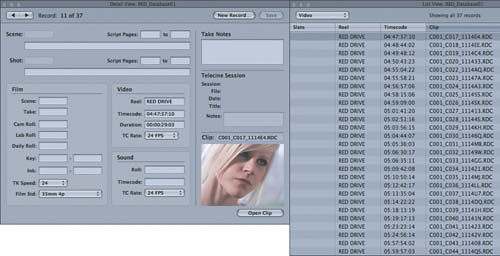
Load all the reels you’ve used in your RED project into Cinema Tools by dragging them from the Finder. This is when keeping things organized and not changing filenames or reel names will make your life a lot easier.
Switch from the default Keycode view to the Video view to see more details about your database (Figure 10.7).
Tip
If you need to move footage around or change reel names, make sure to do this before you ingest into Final Cut Pro or create a Cinema Tools database; otherwise, you may have problems reconnecting the original media to your EDL.
Once you’ve created a Cinema Tools database, the next step is linking it to the EDL you exported from Final Cut Pro. This creates a Color project with your edited sequence that references the original R3D files instead of the transcoded ProRes material.
Launch Color, and open the EDL you saved in Final Cut Pro.
The EDL Import Settings window appears. Confirm that your frame rate and resolutions match your original shooting settings. I’ve chosen the 4K 16:9 preset and set my frame rates to 23.98.
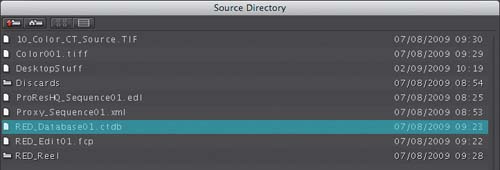
To select your source directory (Figure 10.8), click the Browse button, and search for the Cinema Tools database you saved (it should have a .ctdb file extension).
Click the tab for the Primary In room.
You should now have access to the RED control tab (Figure 10.9). This gives you the ability to alter the RAW metadata, including exposure, color temperature, gamma and color spaces, and more.
Tip
For more training on Color, check out Apple Pro Training Series: Color (Peachpit Press) or my Digital Color Correction DVD from Call Box (www.callboxlive.com).
When you’re done grading in Color, click the tab for the Setup room. Choose an export format on the Project Settings tab. You can export at 4K or down-convert to 2K. I recommend exporting to at least 2K because you can use that to derive most other formats you’ll need.
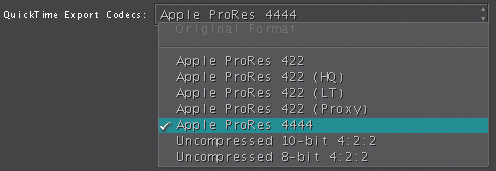
Choose one of the ProRes formats such as ProRes 4444 (Figure 10.10).
Each level up provides more image quality, but also larger files and increased drive speed requirements. A ProRes 4444 file at 4K is not likely to play reliably on most systems because of its very high data rate, but it’s fine as a source master for transcodes to other formats. Run some tests to determine the best combination of quality versus file size on your system. 2K ProRes HQ is usually a solid bet, for example.
Click the User Preferences tab to choose your render proxy setting. Choose Full to render to 4K or Half for 2K.
When you are finished with settings, click the tab for the Render Queue room. Click the Add All button to load your sequence clips into the queue. Then click the Start Render button.

Note
Because you’re actually correcting directly from the R3D files, you can switch between 2K or 4K at any time without having to redo any of your work. Everything automatically scales, including Secondary In room masks.
For a film output, check in with your film recording service. You’ll likely export to ProRes or to DPX files ready for direct recording to film, depending on their requirements. If you want to bring footage back into Final Cut Pro from Color for additional editing, choose File > Send to Final Cut Pro.
Final Cut Pro will automatically reload the new sequence, and you’ll find it in 4K if you’ve corrected in Color with 4K. Otherwise, it will likely be 2K. You can now do additional sound work or export from Final Cut Pro to a variety of formats such as high definition and DVD.
Final Cut Pro 7 offers new export options such as Blu-ray and YouTube. Instead of exporting footage to Compressor or DVD Studio Pro only, you can now use the Share menu in Final Cut Pro following these simple steps:
Select the current sequence in your Project window.
Choose File > Share, and then select your output format (Figure 10.11).
You can quickly and easily make a Blu-ray disc with the default settings.
Remember, you’ll also need a Blu-ray burner to make Blu-ray discs. (Alternately, you can use the AVCHD setting and burn footage to standard DVD-Rs that will play on most Macs and PlayStation 3 in high definition.)

Note
For more information on exporting your project and Blu-ray, refer to Chapter 13.
Now that you have the basic Final Cut Pro workflow down, you should be aware of a couple alternative methods for working with RED footage in Final Cut Pro. Because Final Cut Pro was the first editing application to support RED, it has a variety of options that have been developed and used since RED cameras hit the market. We’ll focus on two of the most well-known workflows: native-wrapped and proxies.
For the native-wrapped method, you create a special kind of QuickTime file that points directly to the R3D file, essentially coming the closest to a native workflow. In theory, this workflow gives you the best of both worlds: you have the ability to edit clips in Final Cut Pro while maintaining a connection to the R3D files for RAW color correction. It does require very high-end system specifications to perform reliably, which is its chief drawback. You also have to wait while footage is converted from R3D to native-wrapped QuickTime in the Log and Transfer window, but not nearly as long as you do with transcoding. I find it works best with a top-of-the-line Mac Pro with 16 GB or more of RAM and a RAID hard drive.
Note
This method is referred to as “native-wrapped” because Final Cut Pro makes a special copy of the R3D file with a set of translation instructions (also known as a wrapper) for QuickTime to directly access the original RED video, audio, and metadata.
The native-wrapped QuickTime workflow is similar in operation to the transcoding workflow:
In Final Cut Pro, open the Log and Transfer window. Click the gear icon to open the Import Preferences dialog. This time, instead of a ProRes codec, select the Native option (Figure 10.12).
You also have some image preprocessing options, which include As Shot, Tungsten, Daylight, and others (Figure 10.13). I recommend keeping this set to As Shot, which preserves your original camera metadata settings. Color space is something you’ll want a lot more control over than a blanket preset, and you’ll get that control later when you go into Color for finishing.
Once you’ve chosen your options, select the clips you want to ingest, and then click the Add Selection to Queue button.
Clips will begin processing and appearing in your Project window. This process is much faster than transcoding to ProRes because the clip is basically receiving some translation data and then being copied.
When all the clips have been ingested, create a new sequence by choosing File > New > Sequence.
Drag a single native-wrapped clip into the new sequence. When prompted to change the sequence settings to match the clip settings, click Yes.
Your native-wrapped sequence settings should look like Figure 10.14. Even though you’re working with REDCODE native files, your sequence codec is ProRes because you cannot directly encode to REDCODE at this time in Final Cut Pro.


The native-wrapped workflow offers the easiest path from an edit in Final Cut Pro to a native-enabled color-correction session in Color. All you need to do is the following:
In Final Cut Pro, choose File > Send to Color.
Your sequence will then appear in Color, ready to take advantage of the RED metadata controls. Because Final Cut Pro’s working resolution is 2K, you’ll need to reset the Color project to 4K if you want to work at the higher resolution.
In Color, click the tab for the Setup room, and then click the Project Settings tab.
Choose the 4K-resolution preset that matches your project’s original settings, such as 4096 × 2304 4K 16:9.
Now you might be asking, “If this is so simple, why don’t I always use the native-wrapped method as my workflow?” As mentioned earlier, there’s a delay while the files are ingested via Log and Transfer, and you need very powerful hardware to get reliable performance in Final Cut Pro. But if you test this workflow and it works well on your system, go for it. It’s the most straightforward of method for getting to a RAW finish.
Because the RED ONE creates QuickTime-compatible proxy files that you can play back in Final Cut Pro, you can actually drop a proxy file into a Final Cut Pro sequence and immediately start to cut. (A proxy is a special translator file that gives all QuickTime-compatible applications, such as Final Cut Pro, access to the original R3D data.)
The drawbacks to using proxies include increased system requirements and instability. You’ll find that a number of Final Cut Pro’s real-time effects and transitions require rendering, and you need to maintain very specific sequence settings, typically starting from 4K 16:9, 2:1, or HD footage. You also need to keep careful track of your RDM folders, because they must remain in the same place for the proxies to keep functioning as you edit.
I’m covering the proxy workflow here because folks are already using it in the field, even though I do not recommend it without extensive testing. Proxies can be useful in certain situations when you need to do a quick edit—as in, immediately. When you get into color correction in Color, the proxy files can point back to the R3D originals, and you’ll be able to access the RAW metadata for color correction.
Note
Proxy is an unsupported workflow because it ignores all kinds of other things under the hood that help maintain stability. So if you go with this workflow, proceed at your own risk.
Unlike the transcode and native-wrapped workflows, you don’t use the Log and Transfer window; however, you’ll need to have Final Cut Pro open. To begin a proxy edit, you’ll use your Finder window.
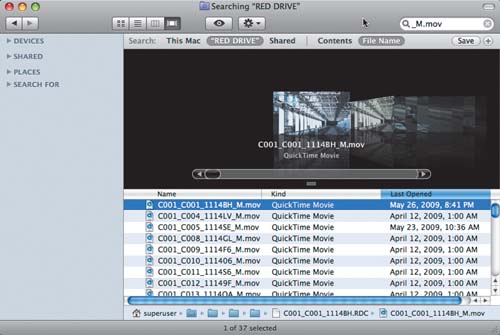
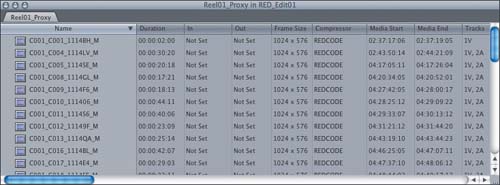
At the Finder, navigate to the top-level directory of one of your RED reels. Find all the files with _M.mov as the filename within the directory (Figure 10.15). This will give you a window with all the medium-sized proxies in the reel.
Select all these files by pressing Command-A. Then drag the files into a bin (the folders you sort footage with) or your Project window in Final Cut Pro. It’s better to use a bin so you can easily keep reels separated and organized (Figure 10.16).
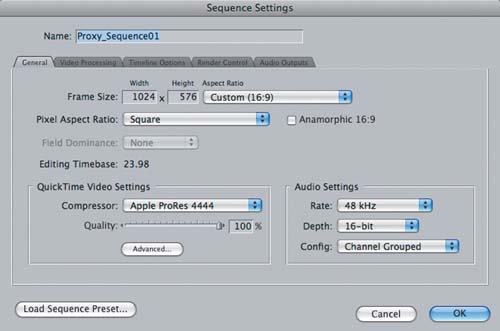
To begin a proxy edit, use the same technique as used in the transcode workflow. Create a new sequence by choosing File > New > Sequence or by pressing Command-N. Drag a single clip into the new sequence. When prompted to change the sequence settings to match the clip settings, click Yes.
Your resulting sequence settings for a medium proxy edit of 16:9 4K-originated footage should look like Figure 10.17.
Tip
Control-click or right-click in the Project window, and choose View as Large Icons. You’ll see an icon preview for each proxy clip.
Note that you’re working at approximately 1K resolution, comparable to standard-definition (1024 × 576 versus 720 × 480 pixels). I don’t recommend making final output at this resolution, but it’s high enough quality for an offline edit. The sequence codec defaults to ProRes 4444, but I suggest throttling this down to ProRes HQ or even ProRes Proxy for better performance.
Once you’ve completed your editorial work with proxy footage, you need to relink that footage with the original R3D files in order to utilize the RAW workflow with Color. This is where things get a little tricky. Again, I emphasize this is an unsupported workflow that isn’t recommended for long-form projects because of its potential instability. Save it for brief projects for which you need to turn something around very quickly.
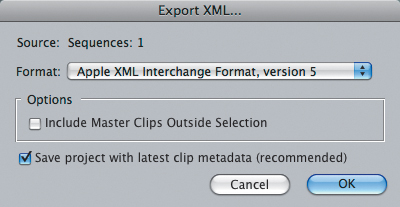
Start in Final Cut Pro by selecting the sequence you want to color correct in the Project window, and choose File > Export > XML. Keep the default XML format version 5, and make sure “Save project with latest clip metadata” is selected. Save the XML file (Figure 10.18) by clicking OK.
Launch Color, and navigate to the XML file you just saved in Final Cut Pro. Click the file to open it.
Assuming your footage hasn’t moved since you brought it into Final Cut Pro as a proxy, it should automatically link to the original R3D media. Confirm this by checking to see whether you have access to the RED control tab in the Primary In room.
Note
You can also use the Clipfinder application mentioned in Chapter 9 to process a proxy XML file out of Final Cut Pro for use with Color, often with more stable results. Check out Clipfinder’s Web site to see how this can be done (www.daun.ch/software).
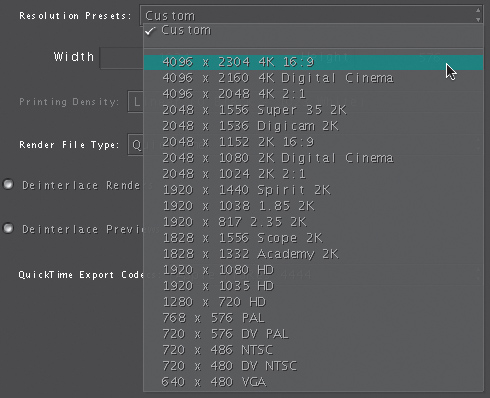
Click the Setup room tab. Check the Project Settings tab, and you’ll notice there’s one problem: The sequence is still at the medium proxy resolution size. In this example, the resolution is 1,024 × 576 for 16:9. Fix that by choosing the 4K 16:9 preset from the Resolution Presets menu (Figure 10.19).
That’s the workflow for migrating a proxy edit into Color and maintaining the connection to the original RED metadata. It’s not the most stable approach, but it can get the job accomplished quickly if you need to do a fast color grade on the set. For more complex projects, stick with the transcode method or native-wrapped method. They require more time for ingesting footage, but you’ll be rewarded with a more stable workflow and quicker editing performance.
As you’ve learned in this chapter, Final Cut Pro offers several methods of working with RED footage. It’s crucial that you test each workflow with your system before selecting one. The transcode to ProRes workflow gives you the best performance within Final Cut Pro, but it requires you to do some careful work to get to a native color correction. The native-wrapped workflow gives you the easiest path to RAW color correction in Color, but it requires higher system specifications for optimal performance in Final Cut Pro. The proxy workflow allows you to start cutting immediately, but it requires a fair amount of diligence to get the maximum benefits in Color and is not recommended because of potential instability. For more guidance, download the latest RED workflow guide for Final Cut Studio from www.red.com/support.

DIRECTOR OF PHOTOGRAPHY, 4K NINJAS
I met director of photography and stills photographer Evin Grant several years ago when we were both testing the new Panasonic DVX100 camera. As the first prosumer 24p DV camera, we realized this was the turning point in what we as indie filmmakertypes could achieve. We’d no longer need to rent high-end HD or film cameras to get that elusive cinematic look. When the RED came along, Grant procured camera serial number 199. He later cofounded the 4K Ninjas, a Los Angeles–based group of RED owner/operators and workflow specialists (including Brook Willard, whose POV interview you’ll also find in this book). In addition to rentals and technician services, 4K Ninjas offers the Road Grader, a Scratch Cine and Final Cut Studio suite rolled into a minivan, for intensive on-location color-correction work. The group has supported hundreds of projects ranging from music videos to commercials to short films and features. Their clients have included Jaguar, Toyota, Nike, Microsoft, and Leonard Cohen.
Grant explains the idea behind 4K Ninjas. “We’re all ‘Ronin’ as it were [hired samurai in feudal Japan]—each independent but functioning as a group to spread the workload and projects around,” he says. “This gives us a brand identity in the community as next-generation camera support. Our service is partially rentals and is partially technicians. We don’t assume that any job has any more or less need. We have six camera ninjas (four of us own cameras) and one for post. We kind of come in and handle the jobs that best suit our talent on a per-job basis.”
Grant offers his current workflow (as of this writing), noting with a grin, “As of two days ago, I shoot at 4K HD in REDCODE 36. After production, I offline edit in Final Cut Pro with the H QuickTime proxies (of course, you have to have a fast enough computer for that). I get high-quality 1080p playback using a BlackMagic Design DeckLink Extreme. When I’m done cutting, I’ll duplicate the sequence and pull out all of the time changes and other sorts of effects to simplify the timeline. I export to Crimson Workflow and then go through REDCINE, where I can do a pretty good basic primary color correction. If it’s something that needs a true secondaries grade, I’ll export to DPX and go to Color. But most projects don’t have the time or energy to do that.”
While on set, Grant keeps one eye on the camera operations and another on constantly downloading footage. “You have to know your timing well,” he observes. “I never let RED-DRIVEs go below 80 percent free because the transfer will start to slow down shooting. I’ll always do a double-simultaneous backup to G-Tech drives and LaCies. The work is equal parts IT, data wrangler, and camera technician.”
When asked what his greatest challenge has been with RED, Grant is quick to respond. “It’s postproduction,” he says. “Post isn’t so much a technical problem as it is an informational one. When I talk to producers, I talk in simple terms: round holes and square pegs, with the pegs being RED footage. The director of photography wants to shoot high end, but the production can’t afford to shoot with a Viper or Sony F23 and a more accepted workflow. Then there’s an editor who is very comfortable on his Avid machine and a post house that doesn’t understand that it’s not uncompressed 4K, but they want to charge for 4K uncompressed storage anyway. You can see how it can become an ugly, gnarled hole. So, I come in and help sort all of that out.”
Another area of concern for Grant is potential infrared (IR) contamination (which you can read more about in the “Filters” section of Chapter 4). “You have to think of regular neutral-density (ND) filters as IR pass filters,” Grant advises. “Most normal ND filters block visible light instead of IR. Once you get to a .9 ND, light rays shift into a visible cyan color as you get IR contamination. At a 1.5 or 1.8 ND, it can be a visible difference as fabrics and polyesters will take on a magenta hue. This isn’t specific to the RED, as all CMOS-based cameras are susceptible. To counter this, I use Formatts, which are ND filters combined with a hot mirror filter. They reflect the visible and IR light in the same amount. You can also try hot mirror filters combined with ND filters and then a polarizer, but in some lighting situations, that can produce triple and double reflections. So, you have to experiment as there really isn’t one solution.”
Grant expresses satisfaction with the 4K Ninjas’ technical achievements while noting that knowledge is still the most important part of the job. “The hardest part for producers is getting past the preconceived notion that RED is an upstart kid,” he says. “Surprisingly, some people are really into the camera for its size. It’s not like a little EX1 or HVX200 that they wouldn’t want on a big-budget commercial spot, but it’s also not a behemoth like the Panavision Genesis or the Sony F23. Once you’ve mounted the body with a lens, follow-focus, batteries, and RED-DRIVE, you’re back up to the size of a Panavision Panaflex Gold 35mm camera from the mid-’80s. Many of the individual qualities can be argued plus or minus, but RED knocked it out of the park with the EVF and the LCD for weight and build quality. For a professional director of photography, the operating experience is at least as important as the final quality of the image.”
Evin Grant’s Web sites are www.evingrant.com and www.4kninjas.net.