
With luck you’ve made it through the rigors of RED production and editing. All your creative work is complete except for two last tasks: color correction (also called grading or finishing) and outputting your project. At this stage, you’ll balance the colors and gamma of footage you shot on the RED ONE, set a creative look, and then export the footage to a distribution format. This could take the form of a standard-definition DVD, film print, Blu-ray disc, HD tape, or Internet file. (You’ll likely export to several different formats.)
Because you started with 4K resolution footage, you can derive just about any common distribution format in very high quality. In this chapter, we’ll look at methods for finishing RED projects on 35mm film, survey desktop color-correction tools—including Apple Color, ASSIMILATE SCRATCH, and IRIDAS SpeedGrade XR—and cover mastering to DVD, Blu-ray, and Web formats.
If you’re planning to finish a RED project onto 35mm film, you’re probably working with a significant budget. I wouldn’t advise printing a project to film unless you’ve already got theatrical distribution lined up. Without distribution, it’s not too likely that you’ll get a movie into wide release in cinemas, with all the big studio content crowding theaters these days. Also, film festivals are happy to project projects from tape. Digital projection from a high-definition tape format such as HDCAM or even a standard-definition format like DigiBeta is more than acceptable to festival judges and audiences. You won’t need a film print unless someone who’s willing to pay for it asks for one.
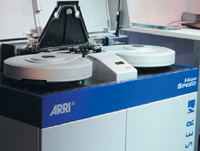
If you need to make a film print from your RED project, the bulk of the work will be handled by a lab, because to date there are no viable options for affordable desktop film printing. You’ll work with a postproduction facility that has the ability to record digital files onto film (Figure 13.1). To get a project ready for a film output, you need to go one of two routes: (1) turn over your edit and source media to a full-service postproduction facility and have them derive all of the necessary digital files to make a film print, or (2) deliver camera-ready digital files of your project, usually as DPX or Cineon files, to a facility with a film recorder.
For the first workflow, the most important consideration is careful coordination with your chosen post facility. Find one that has experience finishing RED projects on film, such as PlasterCITY in Los Angeles or Technicolor in New York. They will need all of your original R3D files and an XML or EDL output of your final edit, which you’ll deliver on one or more hard drives. (This is when all that organizational work discussed throughout this book is going to pay off.)
If you want to do a bit more of the creative work yourself, save a little money, and deliver files ready to be recorded to film, you’ll use a desktop color-correction application that supports RED footage. We’ll look at three such applications in this chapter. You may also want to be able to work with corrected image sequences formats such as DPX files in your editing application. Some editors support these formats directly, such as Adobe Premiere Pro and Avid DS; others require the use of a plugin. To load DPX and Cineon files into Apple Final Cut Pro, for example, you need the Glue Tools plugin (www.gluetools.com).
Desktop color-correction software has brought high-quality grading out of the realm of $500-per-hour finishing suites. In this section, we’ll take a look at Apple Color, ASSIMILATE SCRATCH, and IRIDAS SpeedGrade XR.
Apple Color (www.apple.com/finalcutstudio/color) is one of the better bargains in desktop color correction (Figure 13.2). Once a $25,000 editing application called Final Touch, Apple acquired it in 2006 and bundled it as part of Final Cut Studio (now only $999). Color is not the easiest program to learn, but what you invest in learning, you gain tenfold in power. We’re going to spend a lot more time going over the specific workflow with Color and Final Cut Pro in Chapter 10. Let’s take a brief look at what’s involved in working with the RED camera and Color.

If you’re grading in Color, I recommend Final Cut Pro as your editing application. This is not a requirement, but the two applications are well integrated. You can move projects between them via Send To commands in their respective File menus. Otherwise, from most applications, you can use XML or EDL exports, but the import into Color can be a little more complex.
Color is capable of accessing RED metadata directly via the RED tab (Figure 13.3)—if it receives access to the original R3D files. To do this, you need to send an XML file or edit from Final Cut Pro referencing either proxy files or QuickTime-wrapped R3D files. If you work with transcoded ProRes QuickTime files in Final Cut Pro, you won’t have access to the RED tab without relinking back to the original R3D files in Cinema Tools. We’ll look at this in more detail in Chapter 10.

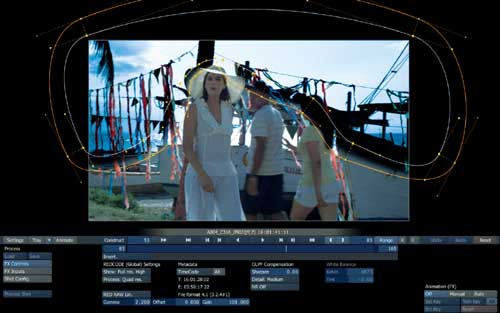
ASSIMILATE SCRATCH (www.assimilateinc.com) is a powerful, real-time color-grading application that has offered native support for R3D files since the early days of RED. The makers of SCRATCH also developed REDCINE, so you may notice some shared DNA and user interface components (Figure 13.4). While I recommend SCRATCH, it’s important to understand that it is an expensive solution, with a base price of $65,000. If you’re grading projects every day or planning to work as a color-correction service bureau, the expense is worthwhile.

Tip
ASSIMILATE also offers SCRATCH CINE, which restricts you to only RED-originated footage, but includes much of SCRATCH’S grading power for a relatively more affordable $17,500.
SCRATCH is a Windows-only solution, so take that into consideration if you’re working with an editing program on the Mac. The good news is that most SCRATCH setups come with integrated hardware, so you can treat a SCRATCH system as a dedicated workstation and send completed projects over Ethernet connections or hard drives. Just be aware of OS-specific requirements such as using a disc format that is compatible on both Mac and Windows, such as Window NT File System (NTFS).
Tip
To read and write to NTFS-formatted hard drives on the Mac OS, get the Paragon NTFS for Mac plugin (www.paragon-software.com/home/ntfs-mac).
The key to SCRATCH’s power is scalability, meaning you gear the program up or down to best suit the power of your hardware. Because the application is capable of working with R3D files natively, there’s never any reason to transcode to other codecs. You simply load in R3D files linked to an EDL of your final edit and then work in the resolution that offers you the best performance on your system. Once you’ve completed all of your color grading work, you export the final edit as DPX frames or whatever format is required for the final outputs. That output then becomes the final version of your project, and essentially you’re done.
The lack of transcoding makes workflows with SCRATCH very simple. In fact, you don’t even need to worry as much about keeping all of the original files and folders from the camera intact. The application doesn’t require the RDM or RDC folders, nor the QuickTime proxies to function; only the R3Ds are necessary (although I recommend the habit of keeping everything organized).
Here are the basic steps:
In SCRATCH, load an EDL into a new CONstruct (timeline).
You will be prompted for the location of R3D files. If any files conflict (for example, have the same name), an alert requests a resolution.
Once you have a project’s footage loaded, SCRATCH gives you the option to select your working resolution. No matter what the viewing resolution is, you are always working from the full 4K RAW files as your source.
The application is intelligent enough to automatically scale any work you do—such as color keying and SCAFFOLDs (masks)—within the frame as you change resolution (Figure 13.5).
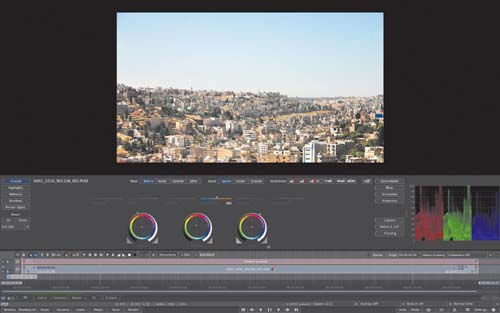
You’ll also have access to all of the built-in color and gamma spaces that the camera is capable of shooting. That means you can quickly toggle back and forth between the settings you shot at (for example, REDSpace) and the finishing space (such as REC709 for high-definition output). Define your desired resolution, gamma, and color settings before outputting your project.
To output the project, open the PLAYER and play your footage out (for example, directly to HDCAM SR tape, as shown in Figure 13.6). Or you can use the PROCESS command from within PLAYER to output your shots to formats such as QuickTime and DPX.

Because all work is resolution independent, you’ll find the SCRATCH workflow is simple and straightforward.
IRIDAS SpeedGrade XR (www.speedgrade.com/xr) offers real-time color correction of RED R3D files. The application also supports a number of other digital motion-picture camera RAW formats, such as ARRI D20, DALSA Origin, and Phantom HD. This can be advantageous if you need to support projects shot on a variety of cameras. IRIDAS’s secret weapon is tapping into the graphics processing unit (GPU) of powerful computer graphics adapters to provide the real-time decoding of RAW formats for instant playback (Figure 13.7).
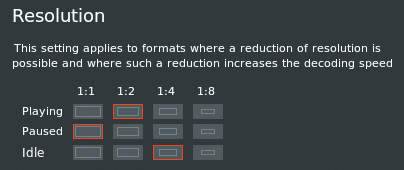
You can customize SpeedGrade XR to play back R3D files at the ideal combination of quality and performance, to tailor the software for your system. You do this through the Dynamic Quality panel, which gives you the option to set separate playback and paused resolution settings. This is great because most of the intensive detail work in color correction is done on single frames while moving frames are used to show how adjustments play out over the course of a shot. For example you could set the resolution to 1:2 quality for playback to get responsive performance, then leave it at 1:1 quality when paused to see the best quality preview of the corrections you’ve made.
To adjust the Dynamic Quality settings in SpeedGrade XR, you can either press the S key or open the Dynamic Quality settings panel (Figure 13.8). You’ll see choices for three different modes in this window: Playing, Paused, and Idle. Playing and Paused function as you’d expect while Idle is intended for the desired resolution when you have SpeedGrade running in the background. Idle mode can be useful if you’re doing edits or effects work in another application and want to view your color-correction work as a reference.
The other important aspect of working with RED in SpeedGrade XR is the global R3D settings control (Figure 13.9). You have the option to either use each incoming clip with its original metadata or set a standard interpretation for all clips. This can be useful, for example, if you’ve shot everything at daylight color temperature and you want to view everything tungsten balanced, or if you want to apply a global change to the ISO settings. You can also select specific gamma and color space settings to override the camera metadata.

SpeedGrade XR is expensive ($19,999 for the software version, $45,399 for an integrated hardware solution), but the results and real-time feedback are worth the expense. SpeedGrade XR is available for Mac and Windows, giving you a bit more of a cross-platform option compared to other grading applications. Of course, when compared to million-dollar dedicated color-correction suites, all these desktop solutions are bargains.
Although the color-grading applications mentioned above are mostly geared to outputting in high definition and on film, they can also derive a RED master version for output to other possible destinations, such as standard-definition DVD and the Internet. The best way to get a good final output is to know from the start of a project which formats you want to deliver.
To make a nice 24p 16:9 DVD, I suggest you shoot in 4K HD or 4K 16:9 and then edit in HD (or higher) resolution. When you’re finally done, you’ll down-convert your entire work to standard-definition 24p, 16:9 (or 25p for PAL). Typically, it’s a good idea to do the final down-conversion after color grading is complete. This way, you have a high-resolution master ready for other format outputs, and all your color grading is in higher precision than standard definition.
Companies such as Sonic and Roxio offer standalone applications for making DVDs, but most editing application bundles include integrated DVD authoring software. Apple Final Cut Studio comes with DVD Studio Pro, which can make standard-definition DVDs—but not Blu-ray discs (Figure 13.10). (You can, however, make simple Blu-ray discs directly from Final Cut Pro as of version 7—more on that in the “Sharing with other formats” section of Chapter 10.) DVD Studio Pro can also make HD-DVDs and record them onto regular DVD-R discs that play on HD-DVD players and Macs. But because HD-DVD is an abandoned format, you’re essentially limited to standard-definition PAL and NTSC discs within DVD Studio Pro as of this writing.

Adobe Premiere Pro’s companion authoring application is Adobe Encore, available individually for $799 or as part of Adobe Creative Suite Production Premium and Adobe Create Suite Master Collection. Encore (Figure 13.11) is capable of authoring standard-definition discs as well as Blu-rays. You need a Blu-ray burner to create Blu-ray discs (more on that in the “Blu-ray” section). Encore can also convert a DVD project to Flash video for export to the Internet, meaning you need to author a project only once for multiple delivery options.

Avid’s DVD authoring software is Avid DVD by Sonic. Avid DVD ($1,300 or $2,400 with Media Composer) is capable of making standard-definition discs as well as Blu-ray. It’s Windows only, so take that into consideration as part of your authoring system setup. Avid DVD is well integrated with Media Composer, enabling the creation of chapter points and thumbnails while editing. Media Composer also provides a one-step Send to DVD command.
Here are some quick tips for making a standard definition DVD. I’m using Final Cut Pro and DVD Studio Pro in this example, but the basic workflow is the same for any authoring program.
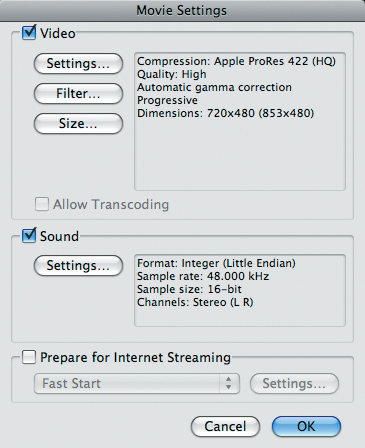
Start with a finished edit (use the final graded version if available) and export a self-contained file as uncompressed or with high-quality compression in standard definition. This will accomplish the down-conversion that’s required and leave only MPEG-2 encoding for the next step. I’m going out to ProRes 422 (HQ) at 720 × 480 23.98 16:9 in this example (Figure 13.12), which is the maximum resolution you can put on an NTSC DVD. In Final Cut Pro, choose File > Export > Using QuickTime Conversion.
The next step is to import the resulting file into your MPEG-2 encoder. Most authoring applications have built-in encoders, but I prefer to do the encoding in Compressor where I have more control. If you use Compressor, you’ll see a Batch window when you launch the program (Figure 13.13).
Click on and drag the preset for standard-definition DVD at High quality from the Settings window into the Batch window.
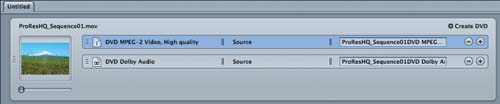
Drag the QuickTime file you created in Final Cut Pro from the Finder into this new batch setting. Then press the Submit button to automatically create an M2V file for the video and an AC3 file for the audio.
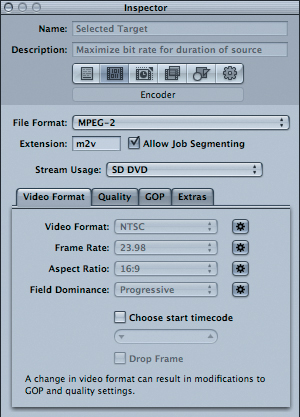
Double-click the DVD video preset to check the format settings in the Inspector. Verify your settings as NTSC Video Format, 23.98 Frame Rate, 16:9 Aspect Ratio, and Progressive Field Dominance (Figure 13.14). Click the Submit button to start encoding.
When encoding is complete, launch DVD Studio Pro to create a basic project.
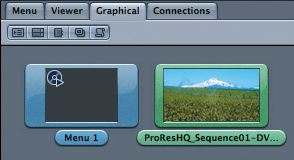
Drag the M2V and AC3 files you made in Compressor directly onto the Track 1 container in the Graphical view (Figure 13.15). This automatically imports the footage and sets the track up for 23.98, 16:9 display.
Control-click on the video track and choose First Play from the pop-up menu.
Press the Simulate button and you should have a DVD playing video (Figure 13.16).
Coming from RED footage, your DVD should look awesome but if it doesn’t go back and re-check your export settings in Final Cut Pro and Compressor. One common mistake is encoding footage first to a web format such as H.264 before going to MPEG-2, which adds re-compression and quality loss.

That’s a simplified look at making a DVD. You can create more complex and fancy projects on disc if you spend time learning authoring. For more help, check out Apple Pro Training Series: DVD Studio Pro (Peachpit Press) or my own training disc, DVD Studio Pro: Special Edition, www.callboxlive.com.
To make a Blu-ray disc, you’ll need a Blu-ray–capable authoring application, such as the ones mentioned in the previous section, and a disc burner. Some good options include Pioneer’s BDR-203 burner (Figure 13.17), which you can find for less than $300 as of this writing, and LG’s GGW-H20, which sells for about $200. These are internal burners meant for desktop machines; for external burners, try the OWC Mercury Pro (around $350) or the LaCie D2 ($450).
Blu-ray discs can be encoded in standard definition as well as high definition at 720p, 1080p, and 1080i resolution. Because you’re coming from a 4K master, I recommend always encoding at 1080p for the best quality. On a 720p display, 1080p footage is automatically down-converted and looks just that much sharper than 720p-encoded footage. Footage that originated in 16:9 or HD aspect ratios on the camera will fit onto a Blu-ray disc perfectly. Footage originated at 2:1 will need to be either cropped or letterboxed to fit into the 16:9 frame of Blu-ray.
The compression bitrate for Blu-ray is lower than REDCODE (approximately 5 MB per second for Blu-ray versus 36 MB per second for REDCODE36). So, do your final compression only once and from as uncompressed a source as possible. Don’t output an edit to H.264 for the Web and then use that file as a source for high definition, for example. If you follow these guidelines, your Blu-ray footage will look as clean and free from compression artifacts as possible.
Part of the appeal of a camera such as the RED ONE is going tapeless, but many distribution outlets still require projects to be delivered on tape. These include video distributors, film festivals, and broadcasters. You’ll need to interface with a tape deck using a video card capable of outputting to HD-SDI, such as a Blackmagic DeckLink or an AJA Kona 3. (Learn more about video cards in Chapter 8 in the “Converter cards” section.)
One of the most universal HD tape formats is Sony’s HDCAM. HDCAM decks can run into the high five figures, so I recommend a rental if you’re doing only occasional laybacks to tape. Also, most postproduction houses equipped with HDCAM offer a transfer service that involves bringing in a digital movie file on hard drive for output to tape. Check with the facility you intend to use for format specifics.
Note
When you export to HD tape or to Blu-ray, you’re going from a RAW color and gamma space to a high-definition color and gamma space. So, be sure to check your color correction with the REC709 settings of your grading application to get a better sense of how your project will look in high definition.
I spoke about some of the specific compression settings and sites for Internet video in the “Delivering for the Internet” section of Chapter 3. As it relates to color grading, you may want to switch the gamma and color spaces of your grading application to RGB so that you have a better sense of what footage looks like on a computer monitor. You’ll probably be making a QuickTime MOV, Windows Media Video WMV, or Flash FLV file and hosting it directly on your own site or sending it to a third-party video-sharing site. Unfortunately, the proprietary compression technologies of these Web sites can compress your gamma and color space in unpredictable ways.
I recommend plenty of testing with your project and the intended Web video codec or site. People who work with Web video often have their secret recipes for getting the best online results. Some tools that can help you make better Web video are Sorenson Squeeze (www.sorensonmedia.com) and On2 Technologies (www.on2.com).
There’s a reason the position of postproduction supervisor has existed for so long in the movie business. Tracking all the creative assets of a movie project and following through on all the technical details needed for the final output formats is a lot of work. So, more than anything else, knowing the specifics about your final destination as you begin a project is very important. Now that you’ve seen where projects can end up, take some time to review Chapter 3 again. Stay organized, and you’ll save a lot of time and money in post by avoiding extra conversions and work you don’t really need to do.
Simon Duggan, ACS, on the set of Knowing in Australia. (Photo courtesy of www.vincethephotographer.com.)
DIRECTOR OF PHOTOGRAPHY, KNOWING
Australian cinematographer Simon Duggan, ACS, made a name for himself shooting commercials beginning in the early 1980s. He went on to win numerous advertising and cinematographers’ guild awards over the years before transitioning to features starting with the 1998 film, The Interview. Rising quickly in profile, Duggan’s resume grew with big-budget features such as I, Robot with Will Smith, Die Hard IV with Bruce Willis, and The Mummy: Tomb of the Dragon Emperor with Brendan Fraser. Duggan also has the distinction of shooting one of the first major Hollywood productions on the RED ONE, the science-fiction/action-adventure Knowing, starring Nicholas Cage and directed by Alex Proyas (The Crow, Dark City).
Duggan and Proyas first started discussing the potential of shooting with the RED in 2007. “Alex mentioned he had seen the results of a RED test shot in Sydney with the Australian Cinematographers Society,” Duggan recalls. “He liked the look of the images, and we both liked the look of the CMOS sensors in our digital still cameras. So, we decided to do some testing of our own with the RED.
“We took the camera out and tested some really unforgiving high-contrast interior/exterior scenes, along with some available-light night exteriors,” Duggan continues. “In general, we both agreed the colors and skin tones felt natural. The RED had its very own look that was closer to film than high-definition video. The dynamic range in the highlights was less than film and more typical of all other digital/video formats, however. I found the workaround in extreme contrast conditions was to expose for the highlights, knowing that I could lift the shadows back up [in postproduction] without creating excess noise.”
The cinematographer and director then sat down to plan the visual aesthetic of Knowing. “Alex wanted a very realistic and yet immediate feel,” remembers Duggan. “Both the 4K quality and lack of grain helped give the look we were after. Our visual effects supervisor, Andrew Jackson from Animal Logic, was also very positive about using the RED. The R3D files could be taken straight into the FX pipeline without having to make selections and negative scans outside of their facility.”
As production moved forward, Duggan was able to adapt his standard film crew to working digitally. “We had a normal complement in the camera department supplemented with two digital imaging technicians (DITs),” he says. “Our on-set DIT was always close to the camera setting looks, carrying out initial logging, and checking R3D files. Our second DIT was nearby in a truck with Mac Pros and LCD monitors. He created color-timed QuickTime proxies based on the on-set grade references we made and then made two backups of every file. One copy would go to editorial, and an additional two backups would be copied to LTO tape—one for Animal Logic and one for [Peter Jackson’s] Park Road Post, which was doing the digital intermediate (DI). Park Road also supplied final quality-control checks before we recycled any hard drives or CompactFlash cards.” (Knowing utilized 150 8 GB CF cards and 26 RED-DRIVEs throughout production.)
Duggan’s optical and lighting equipment package was very similar to his preferred film setup. “The camera was identical to my usual requirement except that the film camera body was replaced with the RED camera body,” Duggan explains. “I lit and exposed with a light meter. I did experiment with the histogram but found it like using any in-camera meter: You end up with exposures based on contrast differences within each shot rather than an exposure that works for the continuity of a whole scene. I used the onboard exposure tools for highlight control and REC 709 gamma and color space for monitoring. I would adjust the color-temperature settings to create a look for each scene. The look for our dailies was being set as we shot, keeping in mind that none of these metadata settings were affecting the RAW capture of the camera’s sensor.”
In general, Duggan had very few issues working with the RED on Knowing. “On one occasion we were caught out when jumping between shooting speeds at 24 fps to over 30 fps,” he recalls. “This changes the image capture size from 4K to 3K, which requires a wider-angle lens to match the field of view from 4K. Most other issues were resolved by restarting the camera. We also found that it is always best to use RED-RAM drives or CF cards, as the RED-DRIVEs are susceptible to vibration. The in-camera fault-detection warnings are very good, and there weren’t any surprises. One added bonus was the in-camera playback, so we would always do a quick focus check after each take.”
Though Duggan was working with an earlier version of the camera (Build 15), he found the greatest technical challenge was locating a postproduction house that could handle the R3D files. “Park Road Post in New Zealand had been doing a lot work with the RED camera the previous year for Peter Jackson’s short film Crossing the Line,” Duggan notes. “I flew down a few times while we were shooting to check how the material was looking on the big screen through their pipeline using a Quantel Pablo system. The results were amazing, and there were no problems with compression patterns or noise, even in the moodiest of scenes.
“The images looked like 70mm film, with a real three-dimensional quality,” Duggan adds. “Grading the final files was very easy with the Pablo, and we had no noise problems pulling up shadow detail or blacks. During the DI, we changed most of the green foliage to an autumnal mix of oranges and pinks with no problems. We were slightly shocked seeing film grain again with the release print, but it looked great, and most people wouldn’t pick it for a digital origination.”
With Knowing successfully released, Duggan is intrigued by the next generation of cameras. “The RED has gone through many improvements since our production,” he observes. “Postproduction workflows have also come a long way. I’m looking forward to testing the new cameras and sensors as they come out.”
Simon Duggan’s Web site is www.simonduggan.com.