
One of the first questions many new RED users have is, “How does the camera compare with what I’ve used already?” That’s a complex issue because the RED is similar to many different cameras and yet unlike any single one. Simply stated, the RED combines the working methods of a 35mm film camera with the convenience and advantages of a digital single-lens reflex (DSLR) camera. It also has more in common with a traditional film camera than standard video or high-definition cameras, except you don’t pay for processing and printing film.
With that in mind, let’s drill a little deeper and compare the RED ONE with other cameras. After that, you’ll see an overview of two workflows you’ll need to master to get the best images out of the RED: the tapeless workflow and the RAW workflow. The bulk of this book is spent fleshing out those two concepts, so pay rapt attention. At the end of this chapter, you’ll learn about metadata and ways you can upgrade your own camera.
To understand what’s special about the RED camera, it’s best to look at how it is different from and similar to other cameras. Film cameras came first historically, followed by video and later by high-definition (HD) and digital cameras. You could say the RED is in a class of its own by being the first digital camera to compare directly with film cameras in terms of resolution and quality.
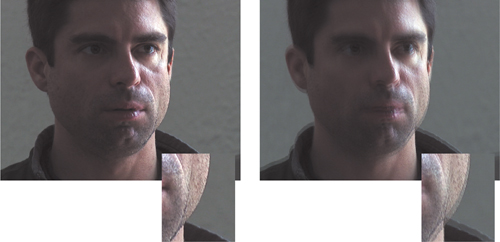
Up until a few years ago, the word video conjured mental associations of footage from news channels, reality television, or perhaps home video. That association is based on the interlaced technology used by most video cameras. In National Television System Committee (NTSC) countries, interlaced refers to a camera that shoots 60 half frames per second and combines (or interlaces) them to create a moving image. Sixty interlaced halves (or 60i) are played back to create 29.97 frames per second in NTSC. The resulting effect has different motion characteristics than film, which is captured as 24 discrete still frames per second to achieve what some folks would call a film look or a cinematic appearance. Because a video camera captures motion differently than film, 60i doesn’t look like film and is consequently not very cinematic, at least on a purely psychological or aesthetic level (Figure 2.1).
To counter this perceived deficiency, creative people shooting on video resorted to all kinds of tricks to attempt to make 60i video look more like 24 frames per second film. This involved the merging of fields into frames with software plug-ins and even special services that charged a hefty hourly sum to attempt the same alchemy via hardware. In the end, the results were never quite right. As a consequence, if you truly wanted something to look cinematic, you needed to shoot on film, which meant much more expense.
That issue was changed forever with the advent of a format for cameras called 24p, which simply means that instead of making 60 half images per second and recording them to tape, a 24p camera photographs 24 complete still images per second and records them to tape. The resulting image is far more similar to film because the motion-capture characteristics are emulated. The primary difference is that instead of the photography being captured as brightness values onto a piece of celluloid film, it’s captured by an electronic image sensor. Initially 24p was only available on very expensive high-definition cameras that, for most filmmakers, were as far, or farther, out of reach than film cameras.
The first truly affordable video camera equipped with 24p was Panasonic’s DVX100, introduced in 2002. For the first time, anyone could shoot with a video camera with results that looked like film without any additional processing. Consequently, this camera became highly popular among indie filmmakers and went on to be used on features, music videos, commercials, and pretty much any video project that wanted to look a little more high-end.
So when we say “video camera,” often we’re talking about a standard-definition 60i camera, which the RED has almost nothing in common with. But if we’re talking about a video camera that shoots 24p, at least in frame rate there’s some shared DNA with the RED. The RED shoots 24p—in addition to several other frame rates for different TV standards and for fast- and slow-motion effects—capturing images digitally with a sensor to CompactFlash (CF) cards and hard drives instead of tape. This requires a special workflow to make sure footage is being managed and saved properly.
The RED has more in common with HD cameras than standard-definition cameras, at least in terms of resolution. Cameras such as Sony’s F-950 and Panavision’s Genesis shoot high-definition at 1920 × 1080 pixels (also called 1080p), usually at 24p, and record to Sony’s HDCAM tape format. Typically these cameras use 2/3-inch CCD chips (more on sensor chips in the sidebar “What’s a CMOS?” in Chapter 4) and produce a reasonably cinematic look, especially when fit with high-end HD lenses. For many filmmakers, the 1080p look of these HD cameras is more than enough to get the job done. In fact, many high-profile TV series and Hollywood features have been shot with HD cameras, such as Get Smart, Superman Returns, 21, and Star Wars Episode III: Revenge of the Sith.
Prosumer HD cameras such as the Panasonic HVX200 and Sony EX1 have given independent moviemakers a little more opportunity to affordably shoot HD. (Prosumer cameras offer certain professional features at a more consumer-friendly price.) These cameras are limited by their image quality compared to the higher-end HD cameras, both with smaller chips and with more compressed video signals. Also, most prosumer HD cameras have permanently affixed lenses of good but not exceptional image quality. It’s difficult to achieve extensive creative effects with a standard fixed zoom lens alone.
The RED differs from most HD cameras in resolution and recording format. At its maximum 4K (4096 × 2304 pixels) resolution, the RED has more than twice the resolution of a 1080p HD camera. This means a sharper picture, and it also means much greater potential to enlarge and reframe shots in postproduction without losing apparent image quality. In fact, 4K generally has to be down-converted to 2K in order to be printed back to 35mm film because most film-recording services are based around a 2K workflow. In short, there are a lot of pixels to play with in a 4K image. Because the initial image is twice as large as the 2K frame, footage down-converted from 4K to 2K looks much sharper than footage that originated at 2K.
Because the RED’s sensor is so much bigger than an HD camera’s, it can approximate the image area of a 35mm frame. That means you can take a lens designed for a 35mm film camera and mount it onto the RED to achieve a very similar shot. You have a similar field of view and also a shallower depth of field—more so than most HD cameras could ever achieve.
Another difference from most other HD cameras is that the RED records to CF cards and hard drives instead of a tape deck. This makes the camera a lot lighter and less mechanically complex; in fact, there are no major moving parts inside the RED ONE. Recording to flash drives also makes the camera body much cheaper, and this is probably the single most important advantage the RED has over most high-end HD cameras: It’s affordable. Moreover, because the recording method is digital, the camera can be updated and improved via software updates rather than costly hardware upgrades (see “Upgrading Your Firmware,” later in this chapter).
Moving on to 35mm film cameras (Figure 2.2), there’s a really important difference to get out of the way first: price. Although renting an ARRI or Panavision 35mm body is not really that much more expensive than renting a RED ONE body, the additional purchase of 35mm stock makes it much more costly. Add the costs of developing, transferring to video for editing, negative cutting, answer and release printing, and so on, and you can see that making 35mm features is primarily the domain of deep-pocketed movie studios. If you actually wanted to own a 35mm camera body, you’d discover that most good ones are several times more expensive than the RED (Panavision doesn’t even offer its cameras for sale—they are rental-only).
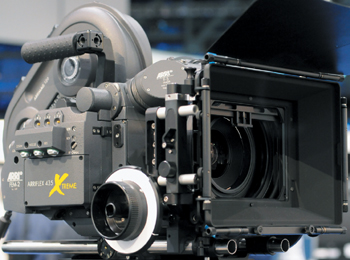
So, with the big price difference aside, the RED is actually designed to be as similar to a film camera as possible while leveraging the strengths and cost savings of digital. In addition to being compatible with standard 35mm lenses, the RED is also usable with a huge variety of film accessories, including matte boxes, filters, audio gear, monitors, and more. This is an important advantage, because it means people who have worked over the years on 35mm film productions can segue to RED shoots without unlearning everything they already know. (We’ll look at recommended equipment in more detail in Chapters 4 and 5.)
A key question on many filmmakers’ minds is, “Can the RED be used to create a motion picture that could be printed back to 35mm film and exhibited theatrically without compromise?” From a resolution and technical standpoint, that answer is a resounding yes. By the time you read this, it will have become increasingly likely that you’ve already seen a movie in a theater that was shot on the RED.
Note
You can see a current list of projects shot on the RED at www.red.com/shot_on_red
Other High-End Digital Cameras
A few other high-end cameras are similar to the RED. One is the Silicon Imaging SI-2K camera (www.siliconimaging.com), which was used to shoot sections of 2009’s Academy Award Best Picture winner, Slumdog Millionaire. The SI-2K (Figure 2.3) maxes out at 2K resolution—half that of the RED’s but still higher than HD. It also uses PL-mount lenses and a CMOS chip like the RED. It even has the same base body price as the RED at $17,500 (though you also need to purchase a $17,000 recording device to go with the body). In my opinion, the SI-2K compares most favorably with the RED all around.

Another camera that’s comparable with the RED is the Vision Research Phantom HD (www.visionresearch.com). The Phantom is a specialty high-speed camera that can shoot uncompressed 2K at up to 1,000 frames per second using a massive array of onboard flash memory. Now, this is very cool, but it’s also very expensive: The body of the Phantom HD alone costs more than $100,000. But that said, as a rental it’s a formidable option. I often set up productions with both the RED and the Phantom. The RED does the bulk of the regular shooting, and the Phantom rolls in as a high-speed B camera to capture stunts, explosions, liquids, and pretty much anything that would look cool in super slow motion.
Finally, I should mention a few other cameras in a similar league to the RED. These are the Dalsa Origin camera (www.dalsa.com), which shoots uncompressed 4K, and the Thomson Viper (www.thomsongrassvalley.com), which shoots up to 1080p. Both of these cameras shoot a great-looking image using cinema lenses. But they are also fairly expensive and use workflows that are not as well-known as the RED’s has become.
Some people coming to the RED may find the tapeless workflow new and challenging. With film- and tape-based cameras, you are shooting to a medium once, which becomes your de facto backup. You can’t shoot film negative twice (unless you’re doing multilayered effects in camera, but that’s another book), and you don’t usually shoot videotape more than once (unless you’re really strapped for cash). With the RED, you work with CF cards and hard drives, which are reusable—you use them again and again while storing your footage on other media, typically other hard drives. (For the full lowdown on managing footage on hard drives and preparing archives, check out Chapter 14.)
The most important takeaway as we consider the tapeless workflow is that with the RED the data itself is your “digital negative”—not the medium on which it’s stored. You need to put in place procedures to assure that you always know where the hard drive or CF card you’re currently shooting on came from. When you’re about to format a new drive for shooting, make extra certain that any footage it contains has been safely transferred to another drive and verified for accuracy. Take notes on the set or work carefully with a digital imaging technician (DIT) to establish a workflow.
The tapeless workflow can be as complex as running a spreadsheet on a laptop for every take (Figure 2.4) or as simple as putting pieces of red gaffer’s tape on hard drives that hold untransferred footage. Whatever you do, devise a clear system that everyone understands. Make sure there’s never that sinking feeling on set that you may have just erased something you don’t have backed up. Take a look at the point-of-view (POV) experiences in this book as well—the interviews with DITs offer lots of tips for assuring everything is running smoothly with the tapeless workflow.
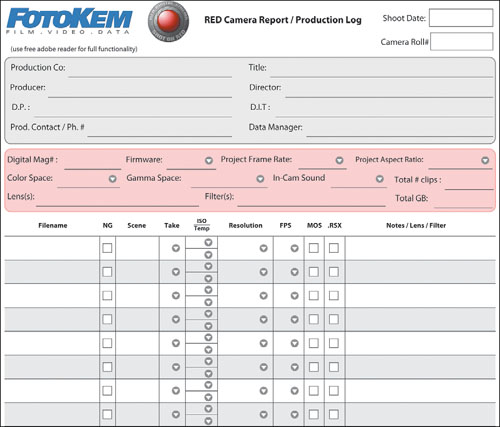
Courtesy of Mike Brodersen, Fotokem, www.fotokem.com/nextlab
Figure 2.4. Fotokem camera report, customized for RED.
Note
You can download a version of this report at the Web site, www.peachpit.com/red.
Managing the Tapeless Workflow
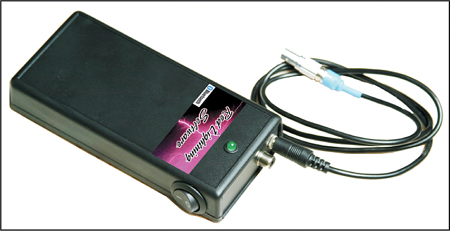
Red Lightning Software (www.hdmonitorpro.com) offers an interesting wireless device that can help keep track of footage. The HD Monitor Pro Bluetooth remote unit (Figure 2.5) connects directly to the RED’s GPIO port and automatically transmits a small proxy clip version of every take you shoot. In effect, you’ll have a complete database of every shot you make before you even start transferring footage. This doesn’t replace the need to carefully manage every hard drive and CF card, but it’s a nice supplement.
Along with the tapeless workflow, the other aspect of working with the RED you need to master is the RAW workflow. What does it mean to be RAW exactly? It means that you are getting “raw” sensor data instead of actual video footage. This differs from most DV and HD cameras, where the image you produce is mostly dependent on how you have the camera set up at the time of image capture. For example, you must select your gamma settings, your color values, and your exposure very carefully, because those are recorded as RGB data when you roll to tape. You can do a lot in color correction during postproduction, but once you go too far in any one direction, you’ll get noise and greatly reduced image quality.
Note
RGB stands for red, green, and blue. In an RGB image, each individual pixel is assigned a specific value as an expression of red, green, and blue values. Put those together, and you have created a color. Put a screen full of RGB pixels together, and you have a picture. Shoot 24 pictures a second, and you have motion...you get the idea.
Shooting RAW in the RED is a completely different way of working, because instead of capturing footage that has a certain look locked in, the camera actually records the “raw” data captured by the sensor. Then, using the RED’s helper applications (details in Chapter 9), you can manipulate exposure, color, and a host of other attributes to a far greater degree than you ever could with non-RAW video. Shooting RAW is much closer to the concept of shooting 35mm film negative, where you have a massive degree of latitude to alter footage in postproduction.
If you’ve ever worked with a DSLR camera that supports the RAW still image format, you’ve gotten a sense of its advantages. High-end still cameras from companies such as Nikon (Figure 2.6) and Canon offer a choice of different formats, typically including JPEG, TIFF (sometimes), and RAW. JPEG and TIFF take up less space than RAW on a memory card, and both look great—but both are relatively limited in how much manipulation can take place after shooting. In essence, the color temperature, gamma, and exposure settings are “baked in” when you press the shutter release. With the RAW format, the file sizes are much larger, but you retain nearly complete control over those attributes as you grade your images in postproduction.

The engineers of the RED camera set out with a mandate to create a motion-picture camera with this very same RAW approach. In fact, the RED shoots only RAW, so whether you realize it or not, you’re always working in RAW when you shoot with this camera. What you see on the monitor as you shoot is only one possible interpretation of the raw data. It’s a look that you can attach to your footage, which will appear on the QuickTime proxy clips that the camera makes (more on proxies later in this chapter), but the raw sensor data remains intact.
You’ll learn more about viewing images on set versus in postproduction in Chapter 6. With RAW, you still need to get a proper focus and exposure and pay attention to color temperature, gamma, and other image qualities. But you’ll always know you have significant creative options preserved for you in postproduction.
In order to deliver on the concept of the RAW workflow, RED devised its own camera codec, called REDCODE RAW, and integrated it into the camera. REDCODE is a wavelet-based codec, which basically means that an image is divided up into very small wave patterns, as opposed to the block patterns of other camera codecs, including digital video (DV). In REDCODE, as the image approaches the limits of its data rate, it becomes softer rather than getting blocky as DV does, so it’s a lot more pleasing to the eye. That said, the data rate of REDCODE—at approximately 28 MB per second for REDCODE 28, and 36 MB per second for REDCODE 36—is sufficiently high and I’ve never seen any compression artifacting (such as pixelation or noise) even in scenes with highly complex motion.
Tip
REDCODE 28 offers a lower data rate for longer recording time, but the difference is small enough you might as well shoot REDCODE 36 for maximum image quality.
Compare REDCODE to some other video formats in Table 2.1, and you’ll see it actually has a relatively high bit rate. That said, REDCODE also has to account for more than twice the resolution of HD codecs while preserving RAW sensor data. So, you can appreciate the engineering feat that RED’s programmers pulled off cramming those huge 4K frames into manageable data sizes.
Table 2.1. Data Transfer Rate by Video Format
Format | Store 1 hour | Transfer rate |
|---|---|---|
REDCODE RAW | Up to 130 GB | 28 or 36 MB/second |
HDV | 12 GB | 3.2 MB/second |
AVC-Intra | Up to 54 GB | 7.25 or 12.5 MB/second |
XDCAM EX | 16 GB | 4.37 MB/second |
DVCPROHD | 45 GB | 12.5 MB/second |
ProRes 422 HQ | 99 GB | 27.5 MB/second |
HDCAM SR | 396 GB | 110 MB/second |
DV | 12 GB | 3.2 MB/second |
DVCPRO50 | 27 GB | 7.25 MB/second |
Uncompressed 8-bit | 72 GB | 20.2 MB/second |
Uncompressed 10-bit | 96 GB | 26.7 MB/second |
ProRes 422 HQ | 29 GB | 8 MB/second |
Table courtesy of www.larryjordan.biz. | ||
Certain codecs are locked to specific data rates, because these are tied to a tape-based camera system. To get more data on a tape, the tape needs to either run faster or be physically larger. With the RED’s software-only encoding, there’s no physical limitation. The data rate is limited only by the processing capability of the camera’s computer and the speed of the memory format to which it’s recording. That means that as memory card and hard drive speeds increase, RED could potentially increase the data rate of REDCODE even more, assuming the onboard computer could handle it.
When you work with the RED, you’ll notice the camera creates a number of files for each shot. Each shot goes in its own separate folder (Figure 2.7) with an RDC file extension. (RDC stands for RED Digital Clip.) In turn, all of those folders filled with RDC files go into a top-level directory with an RDM file extension. (RDM stands for RED digital magazine.) In order to avoid any file-handling errors or trouble importing into your editing software, you should always copy all of these files intact when you are duplicating files.

What’s actually in an RDC folder? First, there’s the R3D file, which holds all the raw sensor and image data. The R3D is by far the largest file because it contains the full 4K image running at 24 frames per second (or more, depending on your settings).
Next, you’ll notice four QuickTime movie files. Those are your proxies. A proxy is simply a lower-quality, smaller version of your R3D file that acts as a translator for QuickTime to access the footage. Proxies make viewing and editing each clip much easier. Now, keep in mind that the QuickTime proxies are not RAW—they have the current gamma and color settings “baked in” that you selected when recording the shot.
You can easily open an R3D file in RED’s included software such as RED Alert! or REDCINE and create a whole new set of proxies with updated color and gamma settings; this leverages the power of the RAW workflow while producing files you can play back in any QuickTime-aware application. (You’ll learn more about that in Chapter 9.) Each QuickTime proxy has a different frame size and corresponding addition to its file name (such as _F for full). They are, in order, as follows:
_F full
_H high
_M medium
_P proxy
The actual resolution for each set of proxies (Figure 2.8) varies with the original shooting format, but in general each format is half the size of the one before it. So, if you shoot 4K, then F is 4K, H is 2K, M is 1K, and P is 1/2K.

Tip
Notice that the proxy files are only a few kilobytes in size. That’s because they are really just QuickTime pointer files back to the R3D files. And that’s why you must copy the entire RDC folder intact. If you just copy the proxy files, they will be blank when you try to open them on another computer without the R3D files.
You might also find an RSX file within the RDC folder. This file contains color-correction data from RED Alert! that appears the moment you open a shot in that application. When this file is in the same folder as the R3D and it’s loaded into RED Alert!, you’ll see all the most recent color- and gamma-correction data you applied to the shot. (See the “RED Alert!” section of Chapter 9 for more details.) Keep in mind this is nondestructive; in other words, you can easily alter this data or remove it entirely, and the R3D file will return to its original camera settings. That’s one of the main benefits of working in RAW: You can change the look of the R3D files to your heart’s content, and you’ll never lose any quality due to recompression—because there isn’t any.
Metadata is a word you’re going to hear a lot of when you work with the RED, but what does it mean? Metadata is data about other data in any media. For the RED, metadata refers to any information about a particular clip that isn’t video or audio. This can include (but is not limited to) camera-specific setup information, project and clip management information, edge code, timecode, date, lens parameters, audio settings, and any video image-processing information. If you record audio with footage, it becomes part of the R3D file and will also play back from the proxies. Table 2.2 lists the RED metadata available from a single shot.
Table 2.2. RED RAW Metadata from a Single Shot
FileName | ReelID | AltReelID | CamReelID | Camera |
|---|---|---|---|---|
C001_C030_11146Q_001.R3D | C001_C030_11146Q | C001C030 | C001 | C |
Reel | Clip | Date | TimeStamp | FrameWidth |
1 | 30 | 20081114 | 50447 | 4096 |
FrameHeight | FPS | Total Frames | TOD TC Start | Edgecode Start |
2304 | 23.976 | 449 | 05:04:44:07 | 01:14:56:07 |
TOD TC End | Edgecode End | ColorSpace | GammaSpace | Kelvin |
05:05:02:23 | 01:15:14:23 | 11 | 14 | 5600 |
Tint | Exposure | Saturation | Contrast | |
0 | 320 | 0 | 1 | 0 |
Brightness | GainRed | GainGreen | GainBlue | Black X |
0 | 0.9 | 1 | 1 | 0 |
Black Y | Toe X | Toe Y | Mid X | Mid Y |
0 | 0.25 | 0.25 | 0.5 | 0.5 |
Knee X | Knee Y | White X | White Y | Shutter (ms) |
0.75 | 0.75 | 1 | 1 | 20.8 |
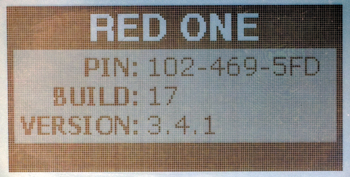
Shutter (1/sec) | Shutter (deg) | Firmware | Audio Channels | File Segments |
48 | 180 | 3.4.1#17 | 2 | 1 |
How much you utilize metadata depends on two things: how important metadata is to you and how much RED metadata the software you’re using actually supports. Some productions hardly use metadata at all; they shoot and go right into editing, discarding most metadata that isn’t directly related to the image. Other productions may rely more heavily on metadata. For example, visual effects artists routinely use all the metadata they can get, especially technical lens data, to help them create realistic 3D animation that properly integrates with 2D footage.
How much metadata you can actually put to use depends on your editing, compositing, or color-correction software. As we explore postproduction in the second half of the book, you’ll learn more details about which software supports which metadata. The RED’s own applications support a lot of the camera’s metadata and use it to good effect for color correction and preparation of footage for editorial (see Chapter 9 for more information).
Tip
Cooke’s S4/i lenses communicate detailed metadata to the RED, including lens setting, focusing distance, aperture, hyperfocal distance, lens type, and focal length. You’ll learn more about these topics in Chapter 4.
One more area of the RED workflow that you may find new and different is the downloadable software upgrades. The RED camera has highly sophisticated internal hardware and circuitry, as well as software called firmware. The firmware handles image capture, compresses images, drives the video displays, and enables user controls (among a lot of other functions).
Every modern HD and video camera uses firmware, and some are more sophisticated than others. Otherwise, they’d have to completely reengineer the camera every time there was a minor fix. What’s special about the RED is you can actually download new versions of the firmware and install them on the camera yourself. These new versions, called builds (Figure 2.9), typically enable new features and fix problems or bugs from earlier versions. Some other cameras must be sent to the manufacturer to have the firmware updated by technicians in order to maintain the camera’s warranty. Downloadable firmware is becoming more popular, especially with digital still cameras.
When a new RED build is available, you can go to RED’s Web site, download the file, copy it to a CompactFlash card, turn off your camera, place the CF card into your camera, and boot up. (New builds are announced on RED’s sites as well as e-mailed to owners who have subscribed to the company’s newsletter.) The new build automatically installs itself and upgrades your camera. The newest build as of this writing is build 20, which ought to give you a good sense of both the amount of work RED has on its plate and its commitment to supporting its users. To download the latest build, visit www.red.com/support.
That’s a quick taste of the RED workflow. The rest of this book builds on the concepts introduced here. You’ll get the most use out of this camera if you can wrap your head around the tapeless and RAW workflows. With tapeless, the main point to keep in mind is you must carefully manage footage and never lose a shot because of sloppy bookkeeping. For RAW, remember that you are seeing only one possible look, controlled by metadata, as you view your monitor during production. Your options are wide open to alter that footage to whatever degree you’d like once you get into postproduction.
CINEMATOGRAPHER, 24
Cinematographer Rodney Charters, ASC, grew up on the coast of New Zealand, where as a young boy he starred in several of his father’s Bolex 16mm movies. Charters made his first short film at the University of Auckland, which played to acclaim at the Sydney Film Festival and earned him a place at the prestigious Royal College of Art in London. His fellow students included director Tony Scott (True Romance, Man on Fire), director Richard Loncraine (Richard III, Wimbledon), and director of photography Stephen Goldblatt, ASC (Lethal Weapon, Charlie Wilson’s War).
After several years of TV work in Toronto and Vancouver, Charters made the move to the United States to shoot the first season of Don Johnson’s Nash Bridges. As a member of the Directors Guild of America, he has also directed several hours of episodic TV. Charters is currently the director of photography (DP) on the highly successful Fox series 24, starring Kiefer Sutherland.
Charters was an early adopter of the RED camera and uses it mostly for personal projects. “Initially, I hadn’t even seen the camera, but post–NAB 2007, my son Robin and I tested the same prototype units that Steven Soderbergh shot Che with,” recalls Charters. “I stayed involved with early camera development, and we even tested shooting 24 with RED, outfitting it with our Panavision lenses and accessories. The lower light sensitivity of the RED and the limited camera supply at the time figured into the decision to hold off on switching over. We routinely shoot with up to eight cameras and often at low, moody, and contrasty light levels.”
To keep his personal RED kit as portable as possible, Charters outfitted a Think Tank Airport Acceleration case to hold the RED body and a small set of Canon still lenses, along with Birger Engineering’s Canon EOS mount. “I started out with just four lenses,” says Charters. “They were all Canon zooms including a 16–35mm, 24–70mm, 70–200mm, and 100–400mm. Since one ARRI Master Prime is worth more than the RED body, I like taking the Canons around without having to spend an exorbitant amount. I also carry a really tiny tripod that barely gets me stable images when there’s no wind. More than anything, it’s to prove the portable workflow for myself.”
Charters uses a fairly straightforward method to move into post on his way to a 1080p finish. “I use REDrushes to extract 1920 × 1080 ProRes clips, bring them into Final Cut Pro, and I’m editing. Sometimes I’ll start cutting immediately with the small proxies. I think you’ll eventually see CPUs continue to get faster and be able to handle the R3D files directly. There are also plenty of third-party developers on the verge of releasing intermediate codecs.”
When Charters returned to his regular duties on 24, he passed his RED onto Robin. “It has become the workhorse for his own evolution as a DP,” Charters proudly remarks. “I can never get my hands on the camera as it’s always out on a job with him.”
As a DP with many years of experience with 35mm film, Charters offers his quallity comparison. “I don’t think there’s a major difference anymore, especially if we’re talking about a 35mm telecine transfer on a Spirit Datacine in 1920 × 1080 HD with 4:2:2 color compared to DPXs extracted from RED R3D files,” notes Charters. “Film still has a wider dynamic range and more latitude, which you can really see in the telecine. RED’s number-one limiting factor is the chip sensitivity, which is not as fast as 500 ASA film. The next generation’s chip will be faster, and then it’s a moot point. I can always bring in brighter lighting fixtures to compensate for the differences in sensitivity, especially given the price of shooting and processing film. On 24, we’re shooting $4 million a year worth of stock, and Kodak loves us! When you throw in that money differential, you can see where a lot more shows will eventually switch over to RED.”
Charters views archiving and asset management as other significant challenges for RED and for digital motion pictures in general. “To store all the assets of a major studio picture shot on film costs around $400/year for an air-conditioned, salt mine vault,” he observes. “The equivalent in digital acquisition would cost around $12,000 to 15,000 per year, because completion guarantors expect you to replicate the data files every six months for safety. Still, I expect there will be major advances in optical storage technology to achieve 100–500TB capacity discs that last for 100 years and can be reread at any time. Digital animation companies like Pixar have always kept their work on LTO-3 and LTO-4 tapes as files, and they’re not complaining about it.”
As a longtime owner and renter of cinema gear, Charters sees a benefit to the RED camera’s compatibility with 35mm accessories. “My focus-puller on 24 uses a Preston Cinema Systems remote unit, which costs about $20,000,” Charters says. “We’re shooting handheld 90 percent of the time with remote focus and Iris (aperture control). Manufacturers like Preston build and price their gear for a very limited number of sales because there are only so many 35mm cameras in use. Five thousand RED bodies hitting the market in the first couple of years should help drive a lot of small, indie manufacturers to create mass-market accessories that are more affordable.
“I have to give the utmost respect to Jim Jannard for opening up a Pandora’s box of new technology innovation,” he continues. “Established vendors like O’Connor were obliged to create new product lines after Jim posted a picture of a RED ONE on one of their new tripod heads and orders went up astronomically. The biggest excitement is in the startup field, where companies are exploding with orders for tools we’ve always craved but were often in the financial realm of fantasy.
“I am standing beside my RED ONE, affectionately named KIWI after my homeland,” adds Charters. “I’ve got a Viewfactor.net Bluetooth remote focus, iris, and zoom control, along with a Canon still lens on a Birger Engineering mount. I have complete wireless, repeatable control of the focus on any of my Canon lenses from up to 50 feet away. All of this costs a small portion of what an ARRI FTZ or a Preston controller would have set me back.”
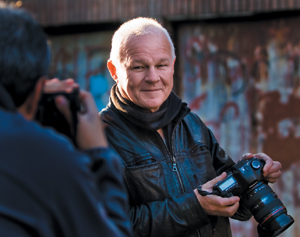
Reflecting on his experiences with the RED (Figure 2.10), Charters sees the camera as an intriguing corollary to his ongoing work with film. “In this industry it’s an unprecedented and historic technological development,” he says. “It’s intoxicating to be somewhere in the world, alone in a forest, and shooting 35mm quality files of whatever you choose to point your camera at. I did 20 years of documentary work in the field, and the best I ever got was 16mm/16:9. Carrying all that film with me was a limitation and a considerable expense. So, to be able to go around the world and shoot four or five hours of material without even blinking in terms of cost is truly amazing. Thanks to Jim for igniting this revolution and keeping it going. Cheers, mate.”
Rodney Charters’s Web site is www.rodneycharters.com.