

Many first-time RED users come from the worlds of videotape or film, where you shoot media once, and it immediately becomes your archive. After film negative is exposed, it goes into a lab vault for long-term storage or for later use in negative cutting for a theatrical release print. Videotape can be reused, but most producers choose to keep their original tapes as backups, since buying more tape is much cheaper than the average cost of a day of production.
With RED, archiving requires more thoughtful preparation and work. The CF media, RED-DRIVEs, and RED-RAM storage systems are (as of this writing) too expensive to employ as archival media. So, they must be recycled once footage is offloaded to other media, such as another hard drive, for editing. Choosing a reliable, long-term archiving solution is therefore critical to preserving footage and preventing the possibility of data loss. The costs of reshooting lost footage far exceed the prices of readily available and proven data-archiving systems. With that in mind, in this chapter you’ll find recommended equipment and workflows for saving footage.
An old film school buddy of mine used to always say, “Pain is temporary—film is forever.” With the RED, you just have to work a little harder to make that a reality. Initially, you transfer footage to external hard drives for editorial usage. Hard drives are excellent for quickly accessing media during postproduction but are not durable enough to reliably sit on the shelf for many years because of technical issues like stiction, which causes hard drive failure (see Note below). You never know when you might need to revisit a project, right? Production footage can easily run into the hundreds of gigabytes, so optical disc-based formats such as DVD-R and Blu-ray don’t offer enough practical capacity.
Note
Stiction is short for static friction, a condition in which a hard drive’s read/write heads become stuck to the disk’s platters with enough strength to keep them from spinning, resulting in hard drive failure. This can happen when a hard drive sits unused for an extended period of time. It’s less likely to happen with tape-based storage, which is why that format is preferred over magnetic hard drives for long-term storage.
Optical disc formats are also physically vulnerable to damage, though arguably less so than magnetic hard drives. Solid-state drives are slowly becoming another option, though they’re currently pretty expensive on a per-gigabyte basis. Digital tape-based systems such as LTO drives (Figure 14.1) offer the best combination of speed, capacity, affordability, and long-term endurance.

Note
LTO stands for Linear Tape-Open and was developed in the late 1990s; capacities range from 100 GB for LTO-1 to 800 GB for LTO-4.
Tape drive transfer speeds are slower than magnetic hard drives, so tape-based archiving is typically run overnight, or after production has completed shooting. The RED-DRIVE and RED-RAM have FireWire and USB 2.0 connectors that you can attach to a laptop and start using to transfer footage immediately. In the field, where you typically need to turn around RED-DRIVEs and CF cards quickly, use fast external FireWire 800 or eSATA drives for initial backups (Figure 14.2).

Note
eSATA stands for External Serial Advanced Technology Attachment. All you really need to know is that it’s a very fast connection for external hard drives.
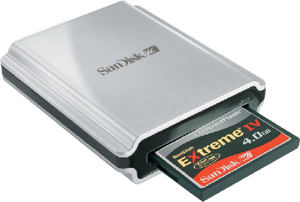
RED CF cards require a card reader. I recommend getting as fast a unit as possible, such as the SanDisk Extreme FireWire Reader (Figure 14.3). The SanDisk costs a bit more than a standard-issue card reader, but if you have FireWire 800 as a connection on your laptop, it’s blazingly fast and can help eliminate bottlenecks when shooting with the RED to CF. If you’re working with a USB 2.0 connection, try the Lexar Pro CF Reader.
For production storage, get the fastest, highest-quality hard drives you can afford. Remember, once you transfer your footage onto a hard drive and put the CF cards or RED-DRIVEs back into circulation, that’s your entire production on a little spinning platter. You may be tempted to build your own drive system with off-the-shelf components, but it’s worth splurging a bit on a complete, integrated solution with a full warranty.
My current favorite hard drive manufacturer is G-Technology. G-Technology offers compact, portable FireWire 400/800, USB 2.0, and eSATA drives in standard and Redundant Array of Independent Disks (RAID) configurations (Figure 14.4). With a couple of G-RAIDs or G-SAFEs attached to your laptop, you’ll be all set. Some other hard drive brands I like are CalDigit and Dulce Systems.

It’s completely feasible to manage RED file transfers by drag-and-drop copying as you would copy to any other media drive on your computer. The only drawback is that you usually don’t get copy verification (at least not by default). If you’re copying footage from a CF card onto a backup hard drive and something goes wrong, you might get an error message, or you might not. An error is pretty rare, but that’s a lot to risk when you have critical footage on the line.
If you want to have a little more security and peace of mind, try one of the following footage-offloading utilities and use copy verification. (Keep in mind that copy verification does slow down the transfer process, so build a little extra time into your workflow.)
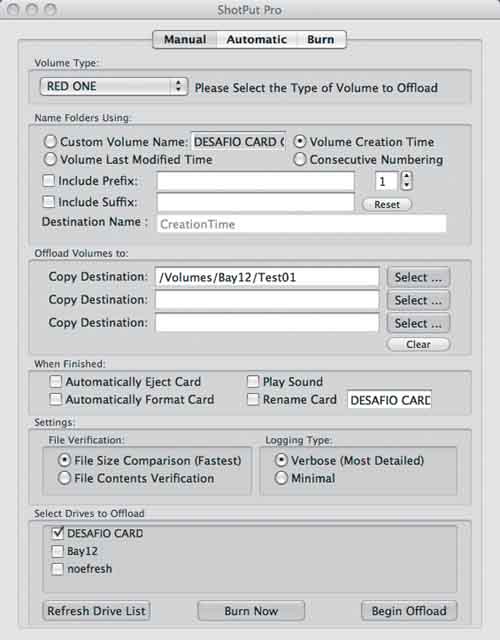
Imagine Products’ (www.imagineproducts.com) Shotput Pro, which goes for $89, is a highly versatile media offloader available for Mac and Windows. In addition to copying RED material, Shotput Pro also supports a variety of other HD and still-camera file formats. This can be very useful if you’re working on a variety of different productions and you want to standardize your archive workflow across every format. Shotput is very easy to use: You simply mount a RED CF card or RED-DRIVE onto your desktop (Figure 14.5), and it automatically makes several backups organized into folders (reels) while copying with verification. It also generates reports and activity logs (Figure 14.6) that outline every copy operation and even makes automatic backups to Blu-ray if you have a burner.

When used properly, Shotput can make field downloading much simpler and more reliable. (Imagine also makes ProxyMill, which automatically derives self-contained QuickTime movies directly from RED proxies.)
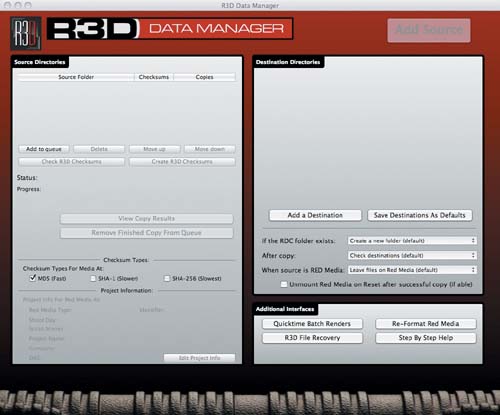
R3D Data Manager ($79 at www.r3ddata.com) is another application designed for RED offloading with versions for Mac and Windows. Like Shotput Pro, Data Manager offers automated copying with verification (Figure 14.7) and activity logging. It’s focused specifically on R3D files and doesn’t support other still or HD formats. So if you only work with RED material, R3D Data Manager may be the right move. Some nice features include the capability to directly format RED CF cards for faster turnarounds, cell phone notification of completed transfers, and direct render to DPX. It’s also a little less expensive than Shotput, so if you don’t need those additional features, you can save a little money.
Many RED owners simply transfer their footage by dragging and dropping and have no issues. If that’s the workflow you’d like to go with, I have an important recommendation: to copy absolutely everything recorded onto the CF card or RED-DRIVE by the camera from the top-level directory on down and keep that directory structure intact (Figure 14.8). Copy every proxy file; every RDC, RSX, and R3D; and any other files or folders on the CF card or RED-DRIVE to your transfer hard drive. Many postproduction applications that are RED-aware require that the full directory structure be intact in order to operate properly.
Make sure each card goes into its own discrete directory as you transfer. The directory naming convention is up to you, but be consistent and pick a logical method that anyone who receives the directory on a hard drive (such as another editor or a post house) will easily understand. You could name each directory according to project name, date, time of day, camera, and card number.
Here’s an example: Commercial_110409_1330_A01.
In this naming convention, that directory is for my “commercial” project, shot on November 4, 2009, and transferred at 1:30 p.m., from A camera, reel 01. Another method is simply to take the first clip name created by the camera on each reel and make that the directory name. So, each directory would look something like REEL_A001_C001_1114BH. This can look a little confusing, but it’s a quick and easy way to be consistent.
Tip
Computers sort numbered files according to two digits, so always enter singledigit numbers as double digits. For example, use 01 instead of 1. Otherwise, the computer won’t sort the directories the way you’d expect, and it can be a little confusing when you’re searching for a specific folder.
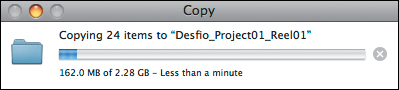
You can also pick a very short and simple name and go by reels, like Commercial_Project01_Reel01. Since you’ll already have the time and date stamp created by the camera in the Finder, this is a pretty easy way to go. Use whatever method makes the most sense to you. And remember, you’ll also need to set up a separate set of folders for sound files if you’ve recorded double-system audio. Just be sure to have a method and use it consistently. Don’t let a pile of untitled folders happen to you.
Tip
Get into the habit of using underscores (_) instead of blank spaces in directory names. Some operating systems and web interfaces choke on filenames with blank spaces, so do yourself the favor of omitting them throughout your workflow. (This is especially true with LTO tapes, where blank spaces can make directories unreadable.)
It might seem premature to discuss archiving before you’ve even had a chance to start editing, but you can do a lot of prep work that will serve you well down the road. You shouldn’t edit directly from the copies you made in the field. If anything goes wrong—such as an accidental file deletion—that clip will be gone forever. If you used one of the offloader applications, you’ll already have a working copy and a backup. If not, you need to work on creating an archiving setup.
In general, you want to edit using the fastest hard drives you can afford. A nice RAID setup (Figure 14.9), depending on the amount of footage you have and what editing workflow you decide to use, is a good call (you can find more details on RAIDs in Chapter 8). In contrast, the drives you might use for initial archives during postproduction need not be that fast. You can easily get away with relatively inexpensive FireWire or USB 2.0 drives that you’ll put on the shelf for the moment. Those drives can later form the basis of your archive should you choose to back up everything from a production.

At this point in postproduction you should start thinking about whether to back up every frame of footage you’ve shot or just preserve the parts of your media you used in the final edit. This depends on the kind of project you’re working on, the likelihood of ever coming back to reedit, and your budget for additional storage.
Are you shooting daily sports or news events that require only a single edit, giving you tons of footage you’ll never need again? Would any of your footage be usable in complete takes to sell as stock footage? Is the footage once-in-a-lifetime/irreplaceable footage? Will you be creating a director’s cut, extended version, or DVD “extras” someday? You need to decide for yourself how important it is to keep every shot. If you can afford a tape drive, you’ll have vast amounts of relatively inexpensive storage. Tape makes the prospect of preserving everything in a project much easier.
If you ultimately conclude that it’s not possible or necessary to save everything, you’ll be well served by at least archiving the final edit itself as discrete media clips. Most editing applications, such as Final Cut Pro, offer a method of media management (Figure 14.10) in which you can export only the media used in the final edit, plus a little extra in the form of handles (extra frames before and after edit points). I recommend at least three seconds worth of handles before and after each clip. That gives you enough to finesse edits a little bit should you need to, while still not taking up a lot of space.

The process becomes a bit more complex in the world of the RED, though, because you might not be editing R3D files natively, so you’ll need to transcode RED footage to another format in order to create a selective archive. For this reason—along with the low cost of storage compared to the cost of going back and completely reshooting something deleted—I recommend archiving both a selective version with just the media used in the edit as well as a complete archive of everything you shoot. You can quickly restore the selective archive if you just need to do a quick touch-up or output to another format. And if you need to do a more complex reedit using a lot of extra footage, you’ll then have the option to take the time and do a complete restore from the full archive.
Over the years, many different digital tape-based storage formats have been introduced. These include Advanced Intelligent Tape (AIT), Digital Linear Tape, (DLT), Digital Audio Tape (DAT), and Linear Tape-Open (LTO).
LTO has emerged as the most popular of the formats for digital footage archiving and is the one I recommend for the RED. LTO is fast, reliable, durable, and relatively affordable.
The two types of LTO most prominently in use today are LTO-3 and LTO-4. The differences in the two iterations include speed, capacity, and cost. Table 14.1 outlines the major differences, including the older LTO and LTO-2 for comparison.
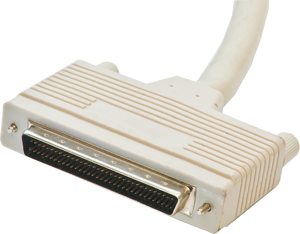
This section spells out some specific LTO drive recommendations. Note that most LTO-3 and LTO-4 drives rely on Small Computer System Interface (SCSI) and Serial Attached SCSI (SAS) connectors, rather than FireWire or USB.
SCSI (Figure 14.11) has been around since the mid-1980s, if you can believe it. It used to be a common interface on desktop computers, but now you usually need to purchase a special interface card in order to use it.
SAS was initially designed as an update to the SCSI format. It offers faster transfer speeds and more devices per bus (although certain flavors of SCSI are now as fast or faster). ATTO Technology and LSI make some of the more reliable SCSI- and SAS-to-PCI adapter cards. Check carefully which kind of SCSI your drive uses, because the connector comes in several iterations. Shop around to determine which drive type offers the best possible compatibility and performance within your budget.
Tip
SAS cables can lose signal quality quickly over long distances, so use the shortest possible cable between your desktop system and tape drive for maximum throughput and data reliability.
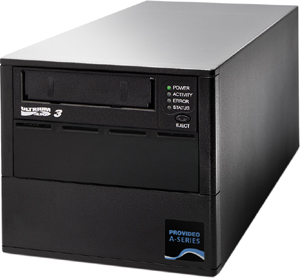
I’ve always liked the Quantum ProVideo A-Series (Figure 14.12). These affordable, LTO-3 drives are optimized for video with direct MXF awareness that provides automatic proxy clips and timecode search capabilities. Unfortunately, this search feature doesn’t extend to R3Ds at the moment, but it’s still a great drive for RED. What’s nice about the Quantum is that it’s a network attached storage (NAS) device that connects to your computer via Gigabit Ethernet. You can access it directly across a network without a SCSI or SAS card. This feature makes the drive more expensive, at about $7,500, but the convenience of Ethernet access deserves a serious look. Quantum also makes LTO-4 drives, though at the time of this writing, none are configured for NAS. The drives are firmware upgradeable just like the RED, and Quantum provides good tech support.
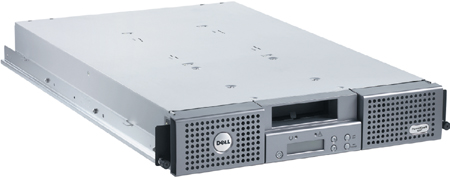
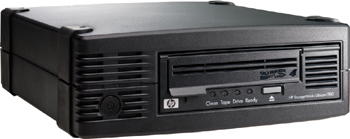
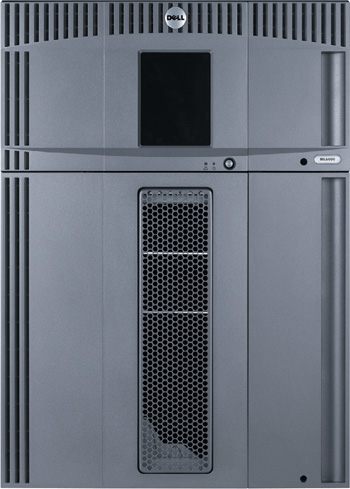
Dell offers its PowerVault series of LTO drives (Figure 14.13), with prices ranging from just less than $2,000 for an LTO-3 entry-level drive to about $3,000 for a high-performance LTO-4 drive. HP also has a selection of LTO-3 and LTO-4 drives that work well for archiving footage. HP’s StorageWorks LTO Ultrium Tape Drives (Figure 14.14) are available in a variety of LTO-3/LTO-4 internal/external and SCSI/SAS configurations at prices similar to Dell’s.
In addition to your drive, you’ll also need LTO tape stock. The 400 GB LTO-3 tapes start at about $50 each, and 800 GB LTO-4 tapes cost about $75 and up, as of this writing. Your major cost is the tape drive itself; once you’ve gotten past that initial investment, the media is relatively inexpensive.
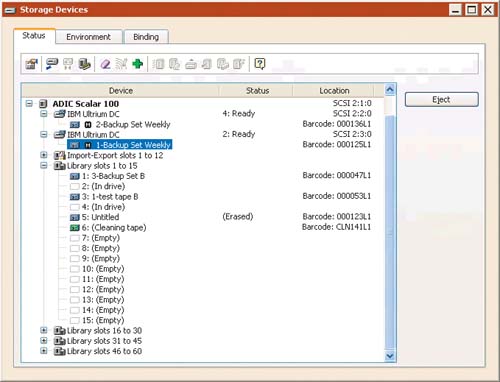
Most tape drive manufacturers sell single drive units as well as tape libraries and autoloaders (Figure 14.15). These are special LTO system configurations that offer the ability to hold many LTO tapes at once and can switch from tape to tape unattended. The advantages of multiple tape drive units are convenience and speed. If you’re working with several productions on a regular basis and need to back up a lot of footage, then libraries and autoloaders can easily justify their higher investment. One unit can sit rack-mounted on a network, configured to automatically manage data across many terabytes of tapes as needed while remaining physically unattended. On the other hand, if you’re working with just one camera or production at a time, a single drive unit should be more than up to the task. It takes a while to copy onto a 400 GB or 800 GB tape, so you have plenty of time to manually swap tapes out as the backup progresses. Also, it’s a good idea to leave a margin of free space on an LTO drive instead of completely filling it up. Each manufacturer recommends a specific amount to reserve in the owner’s manual.
Tape drive systems don’t work like a regular hard drive or server; they are typically not visible on your computer’s desktop as a regular hard drive would be. Tape drives with built-in Web servers allow access via FTP software, but otherwise you need special software to store and retrieve tape footage. In this section, I look at some of the more popular backup applications currently on the market. The nice feature is that tape-based technologies are essentially OS-unaware, so most of these archiving applications are available in both Mac and Windows versions (with some even in Linux).
Retrospect (www.retrospect.com) is one of the older backup applications on the market and benefits from many years of development. It’s available in several versions, depending on the type of access you need. Prices range from $129 for a three-user license up to $1,669 for a multiple-server license with unlimited clients and annual tech support. On the Windows side, Retrospect Professional is designed for a single-user direct connection to the drive setup. Also, server variations enable several users to access the drive as centralized storage. The Retrospect lineup on the Mac side is similar with single-user, workgroup, and server versions. You can easily configure Retrospect to manually back up or restore archives and schedule automatic backups daily, weekly, or as desired (Figure 14.16).
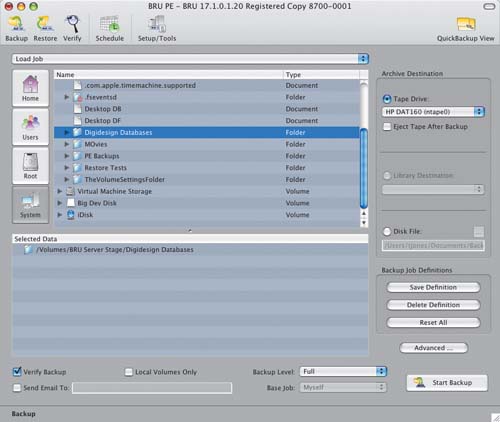
Backup & Recovery Utility (BRU) is a relative newcomer to the archival software field. Interestingly, the $499 program was developed with lots of input from RED owners, so it’s particularly well suited to creating RED archives. BRU Producer’s Edition is specifically aimed at archiving creative assets. It supports archives by session, so you can easily organize all your RED digital magazines on a per-project basis. Producer’s Edition also handles native project files from editing software such as Final Cut Pro and Soundtrack Pro and can automatically create and span multiple copies of each archive. BRU includes broad hardware support for single-tape and library drive units (Figure 14.17). Tolis also offers a budget-priced, single-user LE edition for $129 that offers many of the same features. Demo versions are also available at www.tolisgroup.com.
PresSTORE Archive (www.archiware.com) is designed to be as scalable and intuitive as possible. The software costs about $1,200, depending on the options. Mindful of data integrity needs, PresSTORE automatically logs any errors or issues encountered during backup operation. It also offers a customizable search database capable of generating preview thumbnails and clips of video and audio data (Figure 14.18). As with the other solutions, PresSTORE writes archives to tapes without OS-specific data, enabling any operating system to restore from them. Finally, it can be set up to monitor folders and archive only those files that have changed according to user-definable parameters.

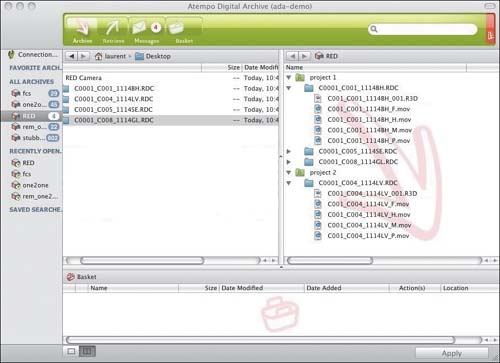
Atempo’s Digital Archive (contact www.atempo.com for current pricing) is a powerful solution that operates as server and client software. At this time, the Mac OS version is client only. This means that to set up an archive, you need at least one server system running Windows, Unix, or Linux. Centralizing storage offers a number of benefits, including consistent, single-administrator control over metadata and indexing (Figure 14.19). Additionally, data flow is constantly monitored to provide optimum performance across the network. Digital Archive can also be integrated directly with Apple’s Final Cut Server for a robust, automated workflow when working with many different projects at once.
That concludes our survey of some of the archiving applications available for your RED footage. The good news is that a wide variety of hardware and software is available to handle this task, which you should consider critical. Before you purchase any tape drive solution, confirm that it has been tested and certified with the backup software you intend to use. Software developers usually maintain updated compatibility matrices of the hardware they support. Used properly, archiving software can mean the difference between spending some extra time restoring and completely losing all of your hard work.
Now that you’ve successfully implemented a long-term data archiving solution, what are you going to actually do with those tapes for the next few years (or decades)? What you’ll do is store them in a cool, dry place out of the light and safe from vibration. You might consider an off-site vaulting service (Figure 14.20). For example, Underground Vaults & Storage (www.undergroundvaults.com), located in rural Kansas, operates a climate-controlled bank vault facility 650 feet below the earth’s surface. The place is encased in a 400-foot-thick rock salt mine with only two vertical access points.

The concept of putting data tapes into a salt mine might seem like overkill, but if you’re working on a big-budget studio feature, it may be a requirement from the completion bond company. You ship your tapes to the storage facility, and they take care of the rest. Vaults with less elaborate facilities than Underground Vaults & Storage are available in movie-production cities such as Los Angeles and New York as well.
Vaulting services have been around for decades for film, tapes, audio recordings, and other important archives and have adapted themselves to the requirements of tape formats like LTO. Of course, there’s no way to guarantee data tapes against force majeure. That said, storing your footage with a vaulting service is about as close as you can get, and archiving is all about considering the worst-case scenario.
Note
Force majeure (French for superior force) is a common contract clause freeing both parties from liability during circumstances beyond their control, such as a war, strike, riot, crime, or “act of God” (flooding, earthquake, volcano, and so on). If any of these events actually happen to your data, losing your RED footage may be the least of your concerns.
As with other aspects of the RED workflow discussed in this book, preparation is everything. Have a detailed plan for archiving footage ready to go before you shoot. Decide on production-wide directory naming conventions and file-handling procedures, and then be consistent with them. Take great care to assure that not only is that footage transferred but also that verified copies are completed. You can manually check or run software with automatic copy verification to confirm copies. Guide your decision making by comparing the costs of archiving equipment and software with the costs of losing data.
You can think of archiving as a value-added service to offer your customers. If there’s one issue that concerns newcomers to the tapeless workflow, it’s how their footage will be preserved in lieu of tapes or film negative and what sort of master archive format they’ll walk away with. You’ll look that much more prepared to your clients if you already have your backup equipment and procedures in place when they inquire about archiving.
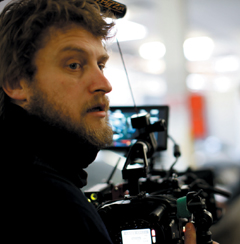
PHOTOGRAPHER
U.K.-based photographer Greg Williams launched his photojournalism career in crisis zones such as Burma, Chechnya, and Sierra Leone in the 1990s. His photo-essays covered hard-hitting topics such as mad cow disease and brain-damage rehabilitation for children. In 1997, Williams started an assignment for the London Sunday Times Magazine covering the British film industry. He subsequently photographed behind-the-scenes and promotional material for more than 150 movies including King Kong, The Talented Mr. Ripley, The Bourne Ultimatum, Casino Royale, and Quantum of Solace.
Williams also shoots advertising, celebrity portraits, and fashion photography. His subjects have appeared on the pages of magazines such as Vogue Italia, Vanity Fair, and Esquire. Always keen to pioneer new techniques, Williams chose to create photos for recent magazine spreads by shooting footage with the RED ONE and extracting stills suitable for printing. His first published RED photo, featuring Quantum of Solace actress Olga Kurylenko, ran in the August 2008 issue of Vogue Italia.

Greg Williams’ RED ONE still of actress Olga Kurylenko for Vogue Italia magazine.
Williams has followed the RED since its public introduction. “I saw a 4K still from Peter Jackson’s short, Crossing the Line, on RED.com,” he recalls. “It was a machine gun being fired in the trenches of World War I. I immediately thought the quality could be printed in a magazine with no worries. I put in a reservation, but there was a long wait before I received my camera, so I was renting at first.”
Williams creates images with the RED ONE for print, short movies, commercials, and what he calls motos (moving photos), a hybrid of motion and still photography. “Motos look like regular stills,” he explains. “Everyone thinks it’s a photo because it has such high resolution, but then it comes to life like the newspapers in Harry Potter. I did that with Megan Fox for the online version of the Esquire cover. She’s completely still, and then suddenly she rubs her leg and reveals her stocking.
“We also did moving posters for Quantum of Solace with Daniel Craig with the RED,” Williams continues. “We ran those on LCD screens at the escalators of the London Underground. It looks like a regular movie poster with a portrait of Craig on it, and then he just turns his head a little. Those were up for the whole release of the movie.”
Williams supplements his RED ONE with a Canon EOS 1Ds Mark III digital still camera. “I use the RED more than 50 percent of the time because I want to be at the forefront of what it can do,” he says. “There’s a massive convergence of photo and film happening right now, and RED is a catalyst for that. A RED still is not as high resolution as one from my Canon, but I don’t need it to be because I already add grain and texture in post. It’s only when I need very sharp, high-resolution glossy images for specific advertisers that I stick with only the Canon. I’m hoping RED’s upcoming EPIC camera will tip the balance with its higher image quality.”
Asked about the production tools he uses in addition to his RED and Canon, Williams details his lens kit. “I recently tried out the RED PRO PRIME lenses and thought they were very good but quite heavy for handheld use,” he says. “I’ve been using ARRI T1.3 Super Speed primes: the 18mm, 25mm, 35mm, 50mm, and 85mm. I’ve never put a zoom on the RED or the Canon. As a photographer, I think zooms make you lazy because you zoom the lens instead of moving to reframe your subject, but I am sure I will use them for movies. I usually compose with the RED PRO 7” LCD screen instead of the electronic viewfinder.”
Williams continues, “I’m also waiting on a Birger Engineering Canon adapter mount and excited to try my lenses with it. I have F1.2 and F1.4 primes, and I don’t think I’m going to mind the breathing people describe when using them with the RED. It would also enable me to share lenses between the RED and the Canon in my travel kit.”
Although many still photographers work with flash strobes, Williams learned lighting by observing movie cinematographers. “Working on movie sets has given me a real advantage,” he notes. “I learned how to shoot with constant lighting and to light the environment rather than the subject. I like to light a room and let a person exist in there. It’s not always important to have a key light hitting an actor in the face to get the best shot. If you look at a lot of movie cinematography, you’ll notice the same thing.”
Running a RED camera constantly as opposed to shooting a frame at a time induces different reactions in Williams’ subjects. “Models thrive on the click of a still camera shutter—they know to give you something new when they hear it,” he observes. “Actors are different, especially the ones I have been lucky enough to shoot on the RED with like Robert De Niro, Jude Law, Daniel Craig, and Clive Owen. The shutter can grate their performance because they’re best at acting, not posing, so I find the RED incredibly useful.”

For postproduction, Williams works with a team to grade his images. “I supply my final work to clients as CMYK proofs ready for print,” he explains. “I edit in RED Alert! with a maxed-out Mac Pro and export selected frames as 4K TIFFs for Photoshop. Then I add sharpening, work with color, and add grain, but I do very little cosmetic retouching. I like my images to look attractive but also realistic.”
Peering into the future, Williams foresees a merger of still and motion imaging, culminating in a major change to the way photos are experienced. “The next step is screen-based magazines that are completely foldable and feel like paper but are Web-connected color screens,” he predicts. “As soon as you’ve got that, there’s no reason for photos to only be still anymore. They might be movies of a few seconds or a few minutes, like a portrait telling you about their life. I think nearly every photographer is going to have to become a filmmaker.
“RED started this collision of still and motion,” Williams adds. “It was inevitable, but Jim Jannard is a daredevil who did it at least three years before anyone else was going to. Who knows how camera makers like Canon or Panavision are going to respond, but it’s going to be interesting. I’m very excited to see what happens next.”
Greg Williams’s Web site is www.gregfoto.com.