

Before we get into all the juicy details of using RED equipment and configuring setups, you need to figure out what your project is and how that will impact working with the camera and shooting footage. You also need to think about what’s going to happen with your project once you enter postproduction.
You should consider attributes such as project length, editorial format, and final delivery format carefully before you shoot your first frame. Defining your completed project in as much detail as possible up front will save you a lot of time and effort when you put everything together later. It will also help guide your on-set workflow and equipment purchasing or rental decisions.
The first question you should ask is, “What’s the anticipated length and style of my project?” Is it a short film, a wildlife documentary, a 30-second commercial spot, a 4-minute music video, a 90-minute concert, a 2-hour narrative feature, or an ongoing reality TV series? Depending on the length of the production, you might start by looking at renting versus buying filmmaking equipment. If you buy a RED ONE camera for a long-form production, you can generally expect to get a reasonable return on the gear if you decide to sell it when the production wraps. This may have changed by the time you’re reading this, so be sure to research the market a bit on your own before making your decision. I explore the different budgets and cost/benefits of renting versus owning in greater depth in Chapter 4.
The style of your project also plays a role in how you approach using the RED camera. Every project requires a slightly different setup. You’re likely to be shooting very long takes for a documentary, for example. If so, consider getting a RED-DRIVE or RED-RAM unit rather than using CompactFlash (CF) cards for extended record times (see Chapter 4 for more details on CF cards). You’ll also want to have a zoom lens in your kit rather than rely totally on prime lenses, because you can’t change the focal length of a prime lens, and you may need to do so during certain shots. Zooms are also great for narrative work, but it all comes down to the quality of image you’re trying to achieve and how much lighting equipment you want to haul around. For shorter, shot-by-shot scenes in a narrative feature, you can probably get by with CF cards alone and have a streamlined, lightweight camera package to run and gun with. You’ll learn more about stripped-down configurations in Chapter 4.
Feature filmmaking is a dream pursuit for many RED owners, and the ability to create a real movie is no longer the exclusive privilege of Hollywood big-budget 35mm filmmakers. You really can make your own high-quality movie for the price of a RED camera purchase or rental (plus accessories, of course, and you also have to pay actors).
The challenge lies in creating a RED movie that will stand up to Hollywood-level expectations in all aspects. On the creative side, that means a great screenplay, solid direction, and well-cast actors. On the technical side, you can stack the deck in your favor. Nothing separates an obvious indie from a big-budget blockbuster quicker than compromised audio so spend time getting the audio right too (see Chapter 5 for more details).
Next, get the best possible set of prime lenses you can afford, especially if a 35mm theatrical release is at all possible. Zooms are useful for quickly changing the framing of a shot without having to move the camera, but they’re also typically less sensitive to light and produce images that are not nearly as sharp (unless you rent the really high-end zooms such as the Optimo, shown in Figure 3.1). You can save money on prime lenses by using zooms, but you lose that advantage by having to rent more lighting to compensate and perhaps by hiring a more experienced camera assistant to pull focus (if you have the budget) and nail the shallower focus on slower zooms.

You may be contemplating adding a B camera (a second shooting camera) to the production. In the proper hands, two cameras can help an indie production capture twice as much material on a tight schedule while providing the editor with more choices to present the best possible version of the story. But many directors find it difficult to efficiently block scenes for two cameras at once. Many directors of photography (DPs) say it’s tough to create an ideal lighting setup for multiple cameras.
Perhaps the most important documentary workflow consideration with regard to RED cameras is the length of takes (Figure 3.2). Documentaries are often based on in-depth interviews with subjects that can require an hour or more to yield story-critical pieces of dialogue. For those long takes, using CF cards doesn’t give you enough recording time, especially at RED’s maximum 4K resolution. For these kinds of documentaries, you’ll almost certainly want to work with a RED-DRIVE (Figure 3.3), which allows a recording time of three hours or more.


Note
Sometimes you’ll work with more than one camera, depending on the kind of documentary you’re making, so consult the “Multiple RED cameras” section later in this chapter if necessary.
As with any magnetic hard drive with moving parts, the RED-DRIVE is more susceptible to physical damage or disruption than a solid-state CF card. In other words, be careful if you want to interview a helicopter pilot in flight or a demolitions expert, for example. In general, the RED-DRIVE is quite tough, but you need to take extra precautions such as bracing the camera and padding the drive to protect against intense vibration or impact. Generally, the standard RED-DRIVE cradle is unfit for high vibration and loud audio situations. This goes double for concerts: even the shock mount for the RED-DRIVE can skip at a concert.
If vibration is going to be a real issue for your documentary, look into the RED-RAM drive, which uses solid-state memory like a CF card to deliver far greater durability and resistance to impact than the RED-DRIVE. By the time you’re reading this, it’s likely that CF cards and the RED-RAM will have increased in capacity while dropping in cost. Whichever option you choose, mapping out not only your recording medium but also an on-set data wrangling strategy will be critical for a documentary project.
In general, episodic television shows work with DPs who have extensive TV production credits. Networks also exercise a lot of control over the content and technical aspects of their programming. So, be very mindful of network delivery specifications as you work, and carefully coordinate with the post-production team. Because most TV shows finish at 1080/24p (see the following sidebar, “The numbers: p’s and i’s of high definition”), you’ll probably wind up with your footage in a high-definition (HD) tape-based workflow (see the “HD” section of Chapter 13 for more tips). The RAW workflow is sometimes considered overkill for television broadcast, at least as of this writing.
Speed is another important consideration for episodic television work. Most TV shows routinely shoot 7–10 pages of script a day in order to complete each episode within a week. The RED ONE camera has many possible configurations and accessories, and all that reconfiguration for different modes can sometimes slow down a TV production’s “need for speed.” Having multiple cameras can help, but sometimes it’s still not enough.
One solution, employed by Arthur Albert, DP on the TV series ER, is to set up several RED packages, each preconfigured for a specific shooting mode. ER carried three different RED packages to enable the production to quickly switch from handheld to dolly to Steadicam without any downtime. With this method, the relatively low price of the RED body can enhance a TV production crew’s ability to move briskly from setup to setup. (Read Albert’s POV Interview after Chapter 6 for more details.)
Reality TV series are completely different from scripted dramas (most of the time). They require an approach more akin to documentary filmmaking, with the RED configured for ENG-style photography. (ENG stands for electronic news gathering and is how documentary or news crews often refer to their camera setups.) A lightweight, handheld RED configuration with a zoom lens and a RED-DRIVE for long takes is usually a safe bet. Reality TV shows are also often composed of multiple formats. The RED might be used to capture the beauty of remote locations or to conduct interviews with reality-series participants, while smaller POV and hidden HD cameras are used to capture candid action. Consult the sections “Documentaries” and “Multiple formats” for more ideas.
Music video production relies heavily on sound, though in a different way than narrative and documentary filmmaking. Most music videos feature at least some portion of the song being sung on-screen by the recording artist (Figure 3.4). Unless it’s a live concert video, the performer lip-syncs to a recording of their song, and no on-set audio is recorded. Careful synchronization of the song’s playback with the RED is critical.

On lower-budget music video shoots, the performer might lip-sync to a CD playing over loudspeakers. Though CDs are digital, they do not guarantee perfect playback sync with SMPTE timecode like professional audio gear does and may drift out of sync over time. This can be corrected in postproduction, but it adds to the workload. If you’re going the CD audio route, go ahead and record audio on set into the RED for an easy additional sync reference.
Note
SMPTE timecode is a set of standards to label individual frames of video or film with a timecode, as defined by the Society of Motion Picture and Television Engineers.
More lavishly budgeted productions use timecode sources such as Digital Audio Tape (DAT) recorders or solid-state recorders, connected to speakers in conjunction with a digital smart slate. This method helps the RED capture perfect sync between singer and song. See Chapter 5 for more details on audio gear recommendations and sync sound setup.
Note
A smart slate is a small device with built-in timecode and a writing surface to help with recording sync sound.
Most music performers are naturally very interested in the finish or “look” of their music videos. Watch any leading music video channel or Web site today, and you’ll see numerous examples of glossy, intensive color correction. You’ll want to offer a music video client the widest possible latitude for post finessing. Finish the project using either the RED RAW workflow or a highly malleable format such as DPX. Be sure to have plenty of fast hard-drive storage for those larger, less compressed files. Refer to Chapter 13 to learn how to set everything up for high-end finishing in either mode.
In the United States, the most expensive commercials traditionally appear during the Super Bowl. Advertising agencies routinely spend millions of dollars not just on purchasing the airtime but on producing the commercials themselves. Those are the ultimate forms of television advertising, but most commercial productions are more manageable and straightforward. Commercial directors are most concerned with presenting the product or service in the most attractive way possible.
In terms of how commercial work affects the RED workflow, it depends on the kind of commercial. For car commercials, food commercials, and other image-oriented commercials, the actors and sets sometimes take a backseat to presenting the product in the best possible light. This means taking extra time on every shot and carefully preparing the angle and lighting for maximum appeal. Bring properly calibrated, high-end HD production monitors both for composing shots and lighting and for presenting setups to the client (because they will often be on the set watching your every move). Working with a food or product stylist is frequently necessary (Figure 3.5). (Certain companies specialize solely in preparing and detailing vehicles for commercial cinematography.)

For consumer product photography, consider close-focus prime and macro-capable lenses. You can use snorkel and periscope lens attachments to capture extremely tight closeups and details. Luckily, commercials have been shot for many years using 35mm equipment, so all the special lenses and accessories you could ever need are readily available for rent and will fit the RED, often without any modification.
Shorts (Figure 3.6) are often made with the least amount of resources but are considerable labors of love for all involved. As a RED owner, taking on a short may mean being less concerned about your day rate and more about an opportunity to network and bring an interesting script to life.

An excellent short may be invited to screen at a prestigious film festival, providing exposure and possibly jump-starting your career in the movie industry. At the very least, you’ll wind up with more material to add to your RED reel. You’ll also discover opportunities to experiment with new techniques and create interesting cinematography. Luckily, short productions are usually quite brief, often taking up no more than a few weekends. So, you’re not likely to starve by taking one on every once in a while.
Depending on the vision and expectations of the director, a zoom lens can be a lifesaver for quick setup changes, where ultimate image quality is less important than getting through a compressed schedule. As with the other narrative forms, getting good sound is important to the success of a short and its elevation above the level of “amateur” quality.
Because short films consist of only a few shooting days, usually with no opportunity or budget to reshoot, you should be especially mindful of data management. Insist on transferring your own footage or working closely with the digital imaging technician (DIT), or whoever from the production has been assigned to assist with footage offloading, in order to assure that every frame is properly backed up. Losing even one take can make a major difference to a short film’s final edit, so be extra vigilant and consider using CF cards instead of a RED-DRIVE.
You’ll be compelled to transfer and check footage in smaller batches, rather than betting a whole day’s production on a single drive. For the offloaded footage hard drive, request that the production purchase a top-of-the-line external FireWire 800 or eSATA drive with RAID capability. Don’t get stuck with a slower drive that’s not intended for video editing, because it will waste time and put the crew’s hard work at risk of data failure.
Finally, although having an understanding and gentle heart is central to working on a short, as a responsible RED owner you must also insist that the production insures your equipment. If you have your own production equipment insurance, make sure to have it extended to the short, and request that the producers cover that expense if necessary. Short projects are something of a gamble and you should plan to risk only your time—not your valuable gear.
Once you determine the length of your project, the next question to consider is that of production mode. Will you be shooting with a single RED camera or going multi-camera? For the latter, make sure all cameras have synced timecode so you aren’t spending half your life in postproduction, manually syncing takes. You’ll learn more about audio and timecode setups in the “Timecode” section of Chapter 5.
Will you be mixing and matching RED footage with material from other cameras? Are those other cameras shooting standard definition or high definition in 1080p, 1080i, or 720p? Or are they shooting 35mm or 16mm film? Will that film be telecined (transferred to video) at 2K, 4K, or 1080p and into what format? This all sounds like a lot to consider now, but keep in mind it’s much easier to get things clarified in preproduction—before serious money starts to be spent.
Concerts, sports, and theater events are routinely shot with multiple cameras to capture every potential angle of interest. TV series and films also often use multiple cameras to capture more footage and shave days off their production schedules. According to DP Rodney Charters, ASC, up to eight cameras are employed to cover a single take on the TV series 24. Once you get into postproduction, multiple angles on every take mean much easier cutting for continuity and a greater variety of creative options to tackle a scene.
Having multiple cameras involved does present challenges, both in production and in post. In production, ideal lighting is often difficult to achieve for more than one camera. For example, a nicely lit close-up may have to be somewhat compromised to make the wide-angle work at the same time, or vice versa. Experienced DPs sometimes dislike working with more than one camera for this reason, but they also understand the financial realities of production, and many have their own methods for achieving a solid image for more than one camera simultaneously.
When working with different cameras on the same shoot, make sure everyone is running the same RED firmware build so you get similar results in your on-set looks and in post. Use one camera as the master camera that all the others will match to. Make sure everyone is shooting the same frame rate, aspect ratio, compression settings, and resolution. Save the master camera’s LOOK parameters to a Secure Digital (SD) card and then have each camera operator load those LOOK settings into their own camera (Figure 3.7). Finally, for the settings that are not included in the LOOK file, bring all the cameras together in a huddle and manually match things up.

Having a nice set of production monitors equipped with waveforms and vectorscopes on set is also a big plus in assuring consistency from camera to camera. The closer you can get each camera to shooting a similar-looking picture, the less time you’ll spend in post-production doing clean-up matching and the more time you’ll have to creatively enhance your imagery. It goes without saying that using lenses of similar optical quality across the group helps maintain a consistent look.
In a multi-camera scenario, every camera may not be a RED. If RED cameras are being mixed with HD and/or film cameras, you most likely won’t be able to match the look 100 percent. Ideally, the other camera formats were specifically chosen to present an aesthetic contrast to your RED footage. In any case, you’ll want to work carefully to either attempt to match the camera’s images as dictated by the DP or accentuate the differences.
Beyond the creative imaging aspects, the single most important technical consideration is audio sync. Typically in a multi-camera environment, sound is recorded separately either to a solid-state or to a DAT recorder. Sometimes the sound is fed to one of the cameras directly. Every other camera either is recording wild sound, typically unsuitable for use, or is running completely silent.
Once you enter postproduction, you must have a reliable method for synchronizing all the angles not only to each other but also to the highest-quality sound you’ve recorded. Professionals use a smart slate to jam sync each camera along with a timecode-capable audio recorder. Doing so allows each camera to receive a common timecode that matches the audio and then allows you to sync sound and picture automatically in postproduction. Coordinate closely with your sound recordist to make sure everything is lining up. Cameras sometimes drift out of sync over time or when batteries are changed, so you should frequently check sync and re-jam all the cameras as the shoot day goes on. Getting all this to work reliably can be quite a challenge (and is tackled in more detail in the “Multi-camera audio” section in Chapter 5).
Another scenario is the multiformat project. Let’s say you want that Oliver Stone Natural Born Killers feeling, with a wild mixture of film and video formats for different textures. Or perhaps you’re doing a feature documentary that gathers newly shot RED footage with archival 16mm, 35mm, and HD and SD video footage. In other words, you’re mixing a bunch of different formats (Figure 3.8), with possibly different frame sizes, together into a single project.
Your most important considerations will be related to postproduction. What is your editing format, and what is your delivery format? If it’s an HD finish, then it’s relatively straightforward. Any footage that’s less than HD resolution needs to be up-converted to HD, and anything that’s more than HD, such as your RED 4K and perhaps some 35mm scanned footage, should be down-converted. These days it’s pretty easy to do a high-definition edit in most non-linear editing (NLE) programs.
So, it makes sense to simply create the whole project at full resolution in your NLE and then export the finished project directly once you’re done (which I explore more in depth in Chapters 8–13). HD up-conversion can be done either within the NLE program, via hardware conversion at a postproduction house, or using a plugin such as Red Giant’s Instant HD (www.redgiantsoftware.com).
Next, you’ll want to pick a common frame rate. In general, more know-how and software exists to conform footage to 1080/24p as a common format, so I suggest picking that for simplicity’s sake. A project that combines a multitude of acquisition formats into a common 1080p/24p sequence edit will have a relatively straightforward path to HD outputs and SD down-converts for tape and DVD.
Note
In a country that uses the PAL system, make sure to choose frame rates that match the local electricity frequency when shooting under electric light. In PAL land, those are the 25, 50, 75, and 100 frame rates.
If your multiformat project is going to 35mm, things get a bit more complicated because in general you will be doing an offline version in your NLE program that will then be exported as an edit decision list (EDL) for creating a 35mm version on film. This is when it will be essential to work directly with a postproduction facility and film lab. For any footage that originated on film, you’ll want to pull and cut that negative. Any footage that started digitally, such as your RED 4K footage and HD and SD video, needs to be printed to negative and cut in with any original film-derived negative. We’ll get into the nitty-gritty of postproduction in Part II of this book.
The good news is that facilities and software exist to make all this possible. The bad news is that it can get expensive. But then again, if you have 35mm theatrical distribution, chances are you’re doing a studio-financed or well-financed indie picture that has the budget. As with all the other scenarios examined in this chapter, the most important points to keep in mind with regard to RED are your shooting formats. Figure out what your final delivery format is likely to be first, and work your way backward. A 1.85 35mm print or a 16:9 1080p 23.98 HD master are both very common—which leads us right into the next section.
The third and perhaps most important question for the RED workflow is, “What’s my expected delivery format?” Will you be outputting the finished project onto 35mm film, HDCAM SR tape, standard-definition DVD, Blu-ray, H.264 QuickTime, DV, YouTube, or something else entirely? Maybe you’re starting off on an indie feature that you’re hoping will go to theaters on film, but you’re not really sure you’ll get distribution. It’s okay if you don’t know everything right now. Here are some different plans of attack and ways to keep your options as open as possible as you move into post.
Let’s begin with what is probably the most common final delivery scenario for RED projects: a high-definition 1080p, 1920 × 1080, 23.98 finish. You’ll probably go out to high-definition tape at some point, most likely HDCAM or D5. You also want to create standard-definition 16:9 NTSC (or PAL) down-conversions for DVD and Digibeta. The good news is that outputting an HD 24p timeline onto a 29.97 NTSC tape is pretty easy with today’s editing applications (see the “Converter cards” section in Chapter 8 for more details).
For an HD finish, one of your most important initial decisions is your production aspect ratio: 2:1, HD, or 16:9. Although 16:9 is the most proper match aspect ratio–wise, it’s worth testing your postproduction performance. The 2:1 aspect ratio typically offers better playback performance in post, and because it was the first format enabled on the camera, it’s somewhat better supported on third-party applications, at least at the time of this writing.
The drawback to 2:1 is you end up having to crop your image to fit a 16:9 frame, and you need to carefully use your frame guides in the viewfinder to see where your 16:9 crop will ultimately be. Make sure you keep any important visual elements framed within those 16:9 guidelines—otherwise you may need to reposition the frame in postproduction. Fortunately, repositioning 4K footage in an HD frame gives you a lot of leeway in terms of resolution and quality, which is another reason why 4K is the best resolution to shoot.
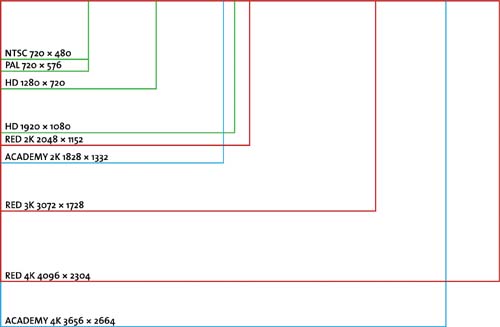
With the addition of the 4K HD mode, you have another option, which is a 3840 × 2160 frame that scales down by 50 percent perfectly to 1920 × 1080. You give up a bit of sensor resolution and field of view to your lenses in exchange for much faster decoding of images and a smoother postproduction workflow. If the HD format performs well with your NLE program and grading system, and you plan to do a 1080p HD 16:9 finish, select 4K HD for the smoothest workflow in postproduction. Otherwise, go 16:9 or 2:1 as your last resort for an HD finish. Table 3.1 shows all the currently available resolutions on the RED camera.
It may look like a lot of choices, but there are really only three resolutions you’ll spend most of your time with: 4K 2:1, 4K 16:9, and 4K HD. The 3K and 2K options are basically windowing off part of the sensor (Figure 3.9), so you’re effectively getting a smaller frame by not using the whole sensor. That also means your optics are being cropped, so you’ll see less image area on wide-angle lenses and telephoto lenses will seem longer.

Now, of course, not too many folks are actually completing projects at 4K resolution at this point. By acquiring in 4K, however, you get the highest possible source quality, and it looks great down-converted to 2K, HD, and SD. In addition to lowered bitrates and longer recording times, the primary utility of the 2K and 3K resolutions are their higher frame rates, which can go up to 120 frames per second (fps) at 2K 2:1 with a RED-DRIVE. That speed makes excellent slow-motion photography possible, and you can easily combine 2K and 4K footage on an HD timeline. Just make sure you’re shooting in the same aspect ratio as your primary production resolution. If for some reason that’s just not possible, make note of the cropping on your electronic viewfinder (EVF) or monitor so you get the framing correct when you convert aspect ratios in post.
From the earliest days of RED’s development, the concept of the camera offering a viable and affordable alternative to 35mm film acquisition has been one of its strongest appeals. The basic idea is that you are capturing digitally to 4K, likely finishing up in post in 2K or 4K, and then exporting your final project to be digitally recorded frame by frame to 35mm film negative. From there it can be exhibited in a conventional film-projecting movie theater. More and more theaters are being equipped with digital projectors, but film projectors are still more prevalent worldwide. So, a film print gives you the maximum possible potential for theatrical distribution.
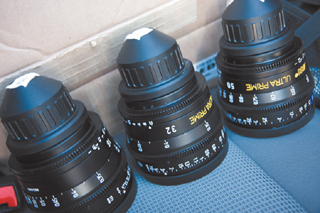
The production workflow for a film finish isn’t quite as critical as the postproduction side, but there are some important considerations. Make sure to shoot in 4K at REDCODE 36 for the highest possible quality when going to 35mm. Film negative will absorb all the resolution you can throw at it, so go for the most the RED can offer. You should also select the highest possible optics, such as Cooke S4s or ARRI Ultra Primes (Figure 3.10).
It’s also important to consider the frame rate: 24 fps goes 1:1 with a film or digital cinema projection (DCP) output. This rate, however, can give you some headaches if you plan to derive your HD and SD masters directly from the digital edit, rather than doing a telecine from the 35mm negative print. Your audio will need to be slightly pulled down to match the 24 fps footage. But that’s not impossible, and most sound editors can handle this.
The 23.98 frame rate gives you a simpler workflow in postproduction and is well known as a source format by most film-out service bureaus, so you shouldn’t have any insurmountable issues there either. The best bet is to closely consult with your audio production and postproduction crew as well as the lab doing your film outputs when making the final call between 23.98 or 24 exact.
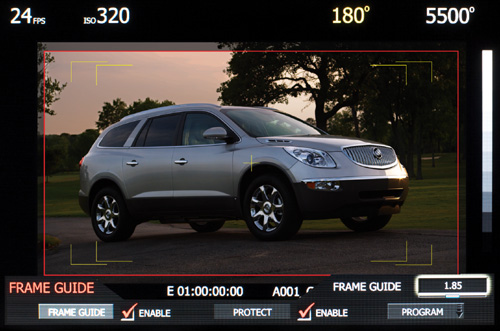
Next, choose your aspect ratio. The two most common 35mm theatrical aspect ratios in the United States are 1.85 and 2.35. The 1.85 ratio is the simplest to derive, because it’s simply a matter of masking off a portion of the frame, so start with 16:9 and make sure to use the viewfinder markings to get a rough concept of where the 1.85 frame will be (Figure 3.11).
Going 2.35 is another option, but there are some different ways to achieve it. The simplest and most common is to shoot 16:9 with conventional 35mm lenses and simply mask the frame off even further to derive the 2.35 frame in postproduction. You’ll be throwing away a good portion of your original frame’s vertical resolution, and you’ll need to pay close attention to the frame guides on your viewfinder and monitor—but you’ll end up with the classic wide-screen image beloved for its epic visual quality.
The other way to derive a 2.35 image is to actually rent 35mm anamorphic lenses and shoot a true anamorphic, optically squeezed image. This is exactly what Steven Soderbergh did on the second half of his Che epic. The 35mm anamorphic lenses require more light to achieve a given exposure. Therefore, in addition to the extra costs of the lenses, you need to beef up your lighting package to compensate. You’ll use the camera’s special ANA mode, which is around 1.20:1 with a 2X optical squeeze. It’s a fair amount of extra work, especially in post, but it’s one way to go if you are striving for the closest possible optical match for 2.35.
Ultimately the workflow for a film finish is more complex in postproduction because you’ll be creating 2K (or possibly 4K) frames for recording directly onto 35mm film. That means you want to preserve as much of the original frame detail as possible, so working in a film recorder-friendly format such as DPX is a must. You’ll see how each of the more popular NLE programs and color correction suites handle a potential film finish workflow in Chapters 10–13. The most important considerations are shooting in the highest possible resolution and bitrates and then picking your aspect ratio—16:9 for a cropped 1.85 or cropped 2.35 finish or 2:1/ANA for an anamorphic 2.35 finish.
The Internet has developed into a showcase for footage from every corner of the globe. Video-sharing sites such as Vimeo and YouTube support HD resolutions at somewhat reduced bitrates, whereas trailer sites such as Apple’s and Yahoo Movie’s QuickTime galleries offer up to 1080p H.264 downloads at relatively high bitrates.
Delivering for the Internet is somewhat easier than a theatrical or high-definition finish because you can work with smaller file sizes and resolutions. For example, let’s say you want to deliver a project at 1080p QuickTime H.264. You could convert all your 4K original R3D files to ProRes 1080p. You might even convert everything to uncompressed 1080p if you are working with an AJA Kona or Blackmagic high-definition output card and a nice RAID setup. Once in a while you might want to return to your original 4K files to zoom into a shot or reframe a shot for creative or technical reasons. Or if you’re working with an NLE program that directly supports R3D, you can simply put the original files into a 1080p timeline and scale and re-crop as you desire.
Your final edit will be exported into a format that will either be uploaded and automatically transcoded into a proprietary format, in the case of sites such as Vimeo and YouTube, or be played out directly from a Web server as a QuickTime .mov, Flash, or Windows .wmv file. This allows you to get your frame exactly as you want it and also set your color correction. Each video-sharing site has its own set of specs to work with, and some allow you to encode directly into their playback format, such as Flash, which gives you more control over how the final image will look.
Keep in mind that every computer monitor is slightly different, and Macs and PCs have a difference in gamma. Macs have a system display gamma of 1.8 (up to OS 10.6), whereas Linux and Windows PCs are set at 2.2. So, something that looks just right on a Mac may end up looking darker on a PC. On both platforms, gamma can be reset specifically to match the other (Figure 3.12), and it’s very easy for your eyes to adjust to either setting. Therefore, be sure to be aware of which gamma your system is using.

Always check the finished output on a variety of computers. Upload the video to a private directory on the Web and then check it out on different computers at a school computer lab, a local Internet café, your friend’s house, the library, the copy shop computer center—you get the idea—to make sure it looks good on a variety of systems.
The key to outputting RED footage for the Internet is keeping your final aspect ratio in mind. In general, a 16:9 aspect ratio is a solid bet for Internet distribution, and as with most other scenarios, sticking with 4K at the highest quality settings is prudent. You never know when a project will go from being a Web series to a broadcast TV show, such as the SciFi Channel’s RED-shot series Sanctuary. Or, perhaps, a commercial will end up playing on both the Web and broadcast TV.
Following are some places where you can see what RED footage looks like encoded for the Web. The footage typically doesn’t look anywhere near as good as the original 4K camera originals, of course, but online codecs are constantly improving in their trade-off between file size and image quality:
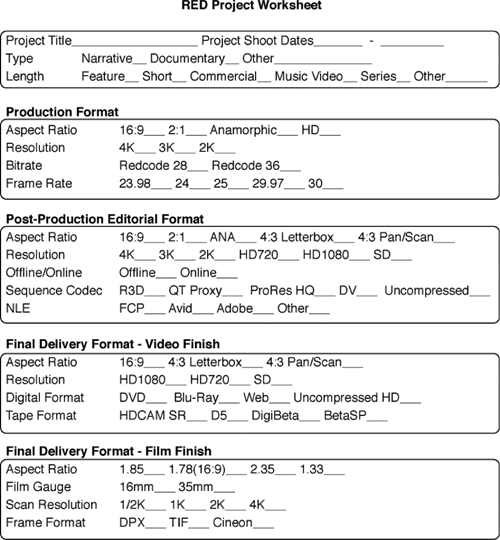
In Figure 3.13 you’ll find a handy project worksheet featuring the most common options you can use to help define your project in terms of its shooting format, editing workflow, and final delivery format. So, follow along with that as we explore the options. There’s a downloadable version on the book’s companion Web site at www.peachpit.com/red you can print, so you don’t have to tear this one out of the book.
Even if you don’t see the exact type of production you have in mind discussed in this chapter, you should find something similar enough to point you in the right direction. The most important concept to keep in mind is knowing as much as possible about the finishing format of your project before you start. Figure out your aspect ratio and your frame and bitrate and then be consistent throughout the shoot. If you don’t have a clue, aim for 1080p as your mastering format, because it’s really the most common format and can be used to derive just about any deliverable you’re likely to need. Be prepared up front, and you’ll save tons of time in post, avoid needless transcodes and format conversions, save yourself money, and ultimately end up with a higher-quality final project.

DIRECTOR, THE BOOK OF ELI
Writer/director Albert Hughes burst onto the international film scene in 1993 with Menace II Society, an intense urban drama he codirected with his fraternal twin brother, Allen. The duo followed up with Dead Presidents starring Larenz Tate, the documentary American Pimp, and From Hell starring Johnny Depp and Heather Graham, along with scores of music videos and other short-form projects. The Hughes brothers often codirect, with Albert focusing on technical aspects and Allen working with the actors.
The team recently wrapped the sci-fi/action feature The Book of Eli, starring Denzel Washington and Gary Oldman. Albert Hughes chose to shoot Eli with the RED ONE after extensive testing both on his own and with director of photography Don Burgess, ASC (Forrest Gump, Spider-Man). “Don’s an old-school, textbook kind of cinematographer, but he also likes to keep current and try out new technologies,” recalls Hughes. “We shot a series of 35mm film and RED side-by-side comparison tests with every possible lighting situation we would need for this project. We did daytime exteriors/interiors, nighttime interiors/exteriors, and makeup tests with men and women. Then we brought in our whole team, including producer Joel Silver (The Matrix, Lethal Weapon), to view the projected results on film and pick out the film-originated footage. Nine out of ten people in the room picked the RED footage as the best, which surpassed even my own hopes.”
The initial impulse to shoot on the RED came out of Hughes’ desire to capture a specific action sequence of Eli with a highly mobile camera. “It was a huge gun battle in a house where Gary Oldman’s character finally catches up with Denzel’s,” says Hughes. “I planned it as one continuous take with the camera going inside and outside through windows and following characters as they take cover in different perspectives. I’d never seen a lightweight camera with a large enough film magazine to cover that long a scene.
“I also wanted to shoot the sequence high-speed to heighten the emotion, which would have burned through film even faster. I’d looked at Panavision’s Genesis, but I didn’t really like some of what I saw there, and I’ve always been more of an ARRI guy anyway. My friend and coworker Charlie Parish introduced me to the RED, and the size of the body looked like the camera I’d always dreamed of having. Of course, I didn’t realize at the time it was a full-blown studio camera once you attached all the accessories and gear, but we made it work.”
Hughes found the camera allowed him to alter his directing style to be looser than he was accustomed to working on film. “We did a lot of long takes,” he says. “When you’re running a series of takes without cutting on film, you feel that expensive stock running through the camera, and you get antsy and nervous. We used 16GB cards on the RED and never had a scene run longer than we had space for. It also takes more time to reload a film camera compared to RED. They were able to swap out and reformat a new card in the time it took hair and makeup to do their touchups before a new take started.”
Though the majority of Eli was shot on the RED, the production switched to film cameras for high-speed shots. “We were doing a high-speed take of Denzel, where he’s wearing a set of silver-rimmed sunglasses, with the RED,” recalls Hughes. “We were getting these staccato, blurry sort of motion artifacts off the rims that didn’t look right. I also noted that with high-speed shots we’d have to switch to 3K or 2K to get the higher frame rates, losing resolution. So Don suggested we switch to film cameras for anything over 30 frames per second. [RED CEO] Jim Jannard happened to be on the set that day with a prototype of the EPIC camera, and he agreed that we were making the right move. The thing with digital is people are looking for all the answers right away, while film has had more than 100 years to get its act right.”
Eli was edited primarily on Avid with some initial sequences cut together by Hughes on his laptop using Final Cut Pro. “For me, the look of what you can do with any editing program is ultimately the same,” says Hughes. “No one is watching a movie in the theater and spotting a great Avid or a great Final Cut Pro edit. And that goes for the image as well, regarding film versus digital. A few years ago, a similar sort of debate was happening over Super 35mm and anamorphic among directors of photography (because of the generational loss involved in making release prints from Super 35 compared to anamorphic). My feeling is that if the audience can’t tell the difference, then it really doesn’t matter. If the image is pristine when I look at my footage, I’m happy.”
When asked what’s next in the movie industry, Hughes believes increased image quality and resolution will be the most important innovations to come. “Everyone seems to be pushing 3D right now, but I think it’s never going to take over as the primary image capture method,” he says. “It’s great for family entertainment and adult action movies, and RED has its own prototypes for 3D in the works. But I just don’t see how people are going to want to shoot their small indie movies and dramas in 3D. So for me, I look at a camera like EPIC as the next big thing. I want to be able to shoot higher frame rates and maintain resolution and also reposition shots vertically, which is easier to do on film right now.”
Hughes continues, “I also want to see the cameras get smaller and less bulky. I look at the film and high-end HD cameras of today, and we still have these huge pieces of equipment compared to my little handheld Sony HDV camera that I can jump around and quickly grab shots with. As they create new cameras and technologies, I’m willing to be the guinea pig. The closer we can get to that firsthand experience, the better for cinema.”