
Sound is a crucial part of any filmmaking endeavor nowadays. As George Lucas once said, “Filmmakers should focus on making sure the soundtracks are really the best they can possibly be, because in terms of an investment, sound is where you get the most bang for your buck.”
Audio is an aspect of moviemaking that everyone is aware of, but not everyone completely understands or appreciates. Some directors concentrate primarily on their images and leave audio as something to be finessed in post. Ask any successful filmmaker how important it is to get good production sound and then complete a professional mix in postproduction. You will likely receive an overwhelming affirmative.
Let’s do a little mental exercise: Imagine you’re seated in a movie theater with a packed house of non-movie-business people. These are folks who know nothing about the RED camera or its technical capabilities; they just like to go to the movies. We’re going to project two different clips for this group. One clip is gorgeous RED 4K footage color-corrected to perfection but with a poorly mixed soundtrack featuring barely audible, scratchy dialogue. The other clip is basic, flat-looking standard-definition DV footage but with a perfect audio mix and natural, well-recorded dialogue.
After the lights come up, I can almost guarantee you the DV footage will be better received, and the RED footage will be criticized by this audience. Good production sound and mixing is expected by today’s audiences. Do a less than stellar job, and poor sound will stick out like a sore thumb, ruining the experience of watching your movie no matter how well it’s shot.
Quality audio is not that easy. You can’t just hang a couple of microphones on your RED camera, ENG-style, and expect professional sound. (Later in this chapter you’ll learn that doing this can be useful as a sync reference, however.) In fact, you need to carefully select not only the equipment you use to record sound but also the personnel who operate it. Having a dedicated, experienced sound recordist/mixer and boom operator is key, if you can afford it; running and gunning both camera and sound all by yourself should be an absolute last resort.
In this chapter, you’ll learn how to follow through on these goals in more detail.
In the film world, it’s a given that sound and picture will be captured separately, because a 35mm camera negative has no provision for sound. Sound is added only for the final release print. Most motion-picture cameras aren’t even equipped to record sound. The film camera captures the picture, and sound is recorded by another piece of gear, typically a Digital Audio Tape (DAT) recorder or a solid-state digital recorder. Occasionally an analog tape recorder such as a Nagra 4.2 (Figure 5.1) is used, though analog is getting pretty rare in the production audio world. Nagra (www.nagraaudio.com) doesn’t even manufacture analog recorders anymore and has replaced the 4.2 with its digital VI recorder (Figure 5.2).


Why not just connect up a mic and mixer, you may be wondering, and use the RED’s onboard audio? For one thing, the ideal camera and microphone placement location don’t always match, and you want some flexibility without having to always run long cables from the mic into the camera. Running a wireless mic into the camera isn’t always going to give you top quality either, because of possible radio interference and noise. The camera’s onboard menus for audio can also be challenging to set levels and mix with, compared to an outboard hardware mixer. Or you may want a higher bitrate or more channels than the RED’s 4-channel 24-bit/48 kHz specs. Most professional sound recordists believe the best option is double-system sound, which means using an external recording device, mixer, and the necessary mics and cables.
With double-system sound in mind, a critical aspect of recording sound and picture separately is maintaining a reliable method of synchronization. The RED offers time-of-day timecode, with an internal clock that continues to tick away accurately when the camera is not actually recording. Whenever you shoot a take, each frame is marked with timecode derived from that exact time of day. Most modern audio recorders designed for film-style production can synchronize with this timecode (see the “Digital Recorders” section later in this chapter). The RED can be jam synced (meaning electronic synchronization of timecode) to an external timecode source with a five-pin LEMO timecode cable connected between the two. You’ll learn more about audio sync later in this chapter.
This section recommends audio gear that will provide the maximum possible sound quality for your production. Some of this equipment can get quite expensive, so consider hiring a sound recordist who has his or her own gear. You can also rent as needed if buying this gear puts you over budget.
A high-quality microphone is a critical piece of your production audio package. One solid, hyper-cardioid or shotgun mic and a boom pole can capture the vast majority of the production dialogue for an entire show. Some good shotgun mics are the Shure SM89 (Figure 5.3) and the Sennheiser MKH-416, MKH-60, and MKH-70. Omni-directional microphones, such as the Shure VP88 (Figure 5.4), are excellent for recording ambience and sound effects, but in general their pickup pattern is too broad for clean dialogue. Avoid stereo mics except for sound effects, because they can make dialogue mixing very difficult in post.

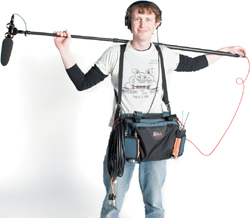
You can use a lavaliere, or lav, mic (a small mic you can clip onto a tie or shirt lapel), combined with a wireless transmitter, in situations where it’s impractical to use a shotgun mic on a boom pole. Take great care in selecting a lav mic, because they can be somewhat limited in their dynamic range and produce a thinner vocal quality compared to a hyper-cardioid. Some nice choices for lav microphones are the Sony ECM88, TRAM TR-50, and Sennhesier MKE2 (Figure 5.5).

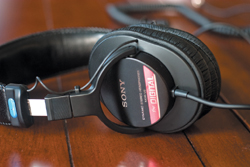
Get yourself a nice set of personal headphones. All the great audio in the world doesn’t do you much good if you can’t listen as you record it. Having your own set of headphones rather than relying on rentals or borrowing from the sound crew is wise. You’ll get used to how they sound from production to production and learn to spot issues. (Besides, you’ll look cool in your official director’s photo with your headphones on.)
Avoid fancy noise-canceling headphones, which are great for listening to music on an airplane but add acoustical artifacts that interfere with accurate live dialogue monitoring. The Sony MDR series headphones (Figure 5.6) have long been a favorite of sound professionals because they’re reasonably flat sounding, inexpensive, compact, and they can take a lot of punishment. Sennheiser, Audio-Technica, and Beyer also make excellent headphones for production use.
Another key to good sound is proper mic placement. That means recording as close as possible to the actors’ mouths without dipping the mic into the frame. Setting up the RED in such a way that the boom operator can see the picture whenever they want can be very helpful. Mount the onboard monitor on a quick-release swivel so you can show the boom operator or mount a secondary monitor at your video playback cart or area. If you really want to go the extra mile, provide the sound recordist with a small monitor for their equipment cart so they can communicate your framing directly with their boom operator.
Get a lightweight carbon-fiber boom pole (or fishpole) that extends out to at least 8 or 9 feet (Figure 5.7). Use a longer one if you’re working in expansive locations or doing a ton of outdoor work on wider lenses. A shock mount that fits the microphone snugly is also essential. A zeppelin (Figure 5.8) protects the mic from impact, light wind, and miscellaneous noise. For very windy locations, a furry wind sock (called a wind jammer) can do an amazing job of damping the mic against big gusts. Rycote (www.rycote.com) makes excellent zeppelins and wind jammers, some of which you can slip on quickly for immediate use.

Digital is the recording format of choice for sound professionals. DAT recorders were the most popular devices for recording, but they have been largely supplanted by solid-state memory devices. These record to CompactFlash cards or built-on hard drives. The advantage of quick access to recorded audio through inexpensive media such as CF and SD cards has assured the rise of solid-state audio recorders.
Zaxcom, Sound Devices, and Aaton make some of the more popular devices. With these recorders you can count on high-quality analog-to-digital (A/D) converters, very low noise/distortion, and audiophile bitrates of up to 24-bit/192 kHz for high-quality recordings with up to 16 separate channels. Any of these devices would pair nicely with the RED for double-system sound.
Zaxcom’s Deva (www.zaxcom.com) was one of the first units specifically designed for hard drive–based digital recording. The Deva 16 features 16 tracks of 24-bit audio at up to a 192 kHz sampling rates with eight hardware faders for precise mixing. With an internal DVD-RAM burner, the Deva offers an end-to-end solution for capturing audio and delivering it ready to go for postproduction.
Sound Devices (www.sounddevices.com) offers a number of different digital audio recorders, from very compact 2-channel units all the way up to 12-track recorders. The 744T is a compact recorder with full timecode support and four channels of 24-bit/192 kHz audio. The 744T can record to its own 40GB internal hard drive as well as CF cards. This is great because CF cards are reasonably inexpensive and can be easily found at electronics and photo stores—heck, probably even at your local grocery store.
Aaton’s Cantar X2 (Figure 5.9) is an elegant recorder with features best suited to a large ensemble cast, where you want to capture several discrete tracks and have maximum control over each. Like the Sound Devices equipment, the Cantar (www.aaton.com) records either to its own internal drive or to removable CF cards. It creates Broadcast Wave Format (.bwf) files at 24-bit/96 kHz with up to eight channels. Aaton has always been at the forefront of audio and video synchronization, going back to its film camera days, and the X2 comes with extensive software support. This includes automatically detecting where the clapper slate has closed, along with timecode stamping and automated sound report generation as a PDF file. The Cantar is expensive, but it looks and sounds top-notch.

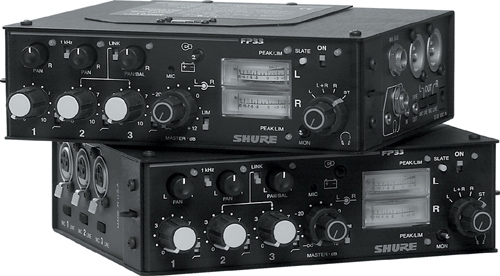
The digital recorders in the preceding section include some form of either hardware or software faders (for volume level adjustment), but sometimes you’ll want to separate the recording device from the mixing controls. For example, let’s say the recordist has the audio recorder on a sound cart far from the set, whereas the boom operator is right next to the actors. The boom operator is in a much better position to be ready for sudden changes in volume level, such as an actor who’s getting worked up in a dramatic scene and is about to yell the next line. If the boom operator has a compact mixer such as a Shure FP33 (Figure 5.10) with volume controls, that can make a big difference in getting more accurate sound levels for your project.
Once you select a double-system recording device, you need to assure synchronization with the RED. This is relatively straightforward on a single camera shoot—you’ll see a more complex multi-camera scenario later in this chapter. As mentioned earlier, you need the special LEMO timecode cable to connect to the RED. In order to jam sync the timecode of your RED to the audio recorder, connect both of them with the timecode cable, and choose the JAM SYNC option (Figure 5.11) in the timecode menu. The RED will reset its timecode to exactly match the incoming timecode of the recorder. The RED always acts as the slave to whatever source you feed it, so make sure the audio recorder is set up for the desired initial timecode first. Setting it to the current time of day on a 24-hour clock is a reasonably safe bet. (Refer to the “Set Clock” section of RED’s Operations Guide for details.)

Choosing the proper timecode base to use is a subject of some debate among sound recordists. Most commonly you’ll be running the RED at 23.98 (or 25 in PAL territories), so it logically follows that you’d want to record audio at 23.98 (or 25) as well. This doesn’t always end up being the case, and sometimes audio gets recorded at 29.97 NDF (non-drop frame) instead. This isn’t a major issue in postproduction, but be consistent and aware of it. Sound is always being recorded at the same speed; it’s a question of how timecode is being measured. If you do go with 29.97 on the audio recorder, choose the CROSS option in the RED’s timecode menu (Figure 5.12). Doing so makes the camera jam sync the equivalent 23.98 timecode from a 29.97 NDF source.

Tip
Every once in a while, ask the sound recordist if you can listen to the playback of a recent take. You might hear something you didn’t notice when you heard it live, and be able to request a correction. The sound recordist will (ideally) also appreciate your taking the time to listen to their work. Let them know they’re doing a good job.
Things get trickier when you use more than one RED camera. It goes without saying that you want to jam sync each camera to the timecode source and make sure they all stay jammed to each other throughout the day. You can easily verify this by having the camera operators call out their timecodes by the second every hour or so, and having the sound operator confirm they are all on the same mark. Usually when sync drifts, it goes off by more than a second, so it’s easily spotted this way. A couple of pieces of gear can make the synchronization process even easier.
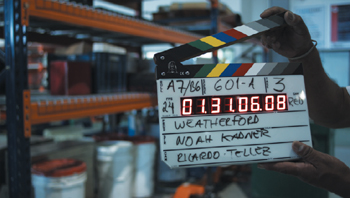
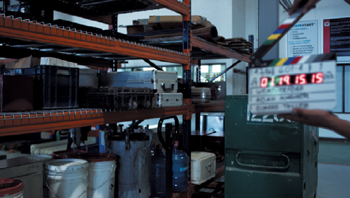
A smart slate, such as the Denecke TS-C (Figure 5.13), is a clapper board with a built-in digital counter that can be synced up to audio gear and the RED. The camera sees and records the slate’s visual timecode, which should precisely match the timecode it’s recording to the R3D files. A smart slate can act as the master timecode source, from which the audio recorder and any number of RED cameras derive their own matching timecode.

Another handy device when working with multiple cameras is a timecode generator. Denecke’s (www.denecke.com) D-Code SBT sync box (Figure 5.14) is a good example of a lightweight, easy-to-use timecode generator. It has very low power consumption and, unlike a smart slate, is able to easily last throughout a long production day without needing its batteries replaced. If you use a timecode generator as your master timecode source, you’ll never have to worry about losing sync when you run out of batteries on a slate or camera. You can use a timecode generator as the timecode master source for everything, including the smart slate, your audio recorder, and the camera.

The actual action of the clapper sticks closing serves as another method of manual sync in post should timecodes fail to match. If everything works properly with the timecode, the takes can be synced without ever looking at the sticks. However, it’s good to have for redundancy, and psychologically speaking, there is something special about the slate clapping shut that gets the crew and actors a little more focused on making a movie.
As a DP or director, you’re probably not going to run your own slate. But it might fall to someone who’s never done it before, like a production assistant. So, here are some tips for doing the job right.
Make sure the slate is accurately marked for each scene number and take using a dryerase marker or pieces of removable gaffer’s tape and a Sharpie. Keep the sticks open before marking so the editor can easily tell the moments before they come together when scrubbing (quickly playing backward and forward) through a take. Shoot the slate well lit, in focus, and as close to full frame as possible (Figure 5.15a)—focus the lens onto it (if the focus is initially set on a different subject). A slate that’s out of focus, out of frame, or unlit is not very useful to an editor (Figure 5.15b). Call out the scene/take as listed on the slate clearly after sound and camera are rolling, and say “marker” to cue the closing.
Clap the sticks together swiftly. Or if it’s MOS (a silent take), keep the slate closed entirely. Clapping doesn’t have to be especially loud. As a courtesy in an actor’s close-up, keep it particularly quiet. The clapper sticks make an audio spike that’s very easy to spot on a waveform in postproduction (more on that later). Hold the clapper still for a second after closing, and then quickly exit the frame. Make sure to have a good exit route planned before the roll is called. There’s nothing more embarrassing than being trapped holding a slate in frame while the director is waiting to call action. Call out “second sticks” if for whatever reason the camera didn’t catch the first marker.
You can also slate at the end of a shot—say if the camera came down from a high crane shot or it was otherwise impractical to shoot the slate until the end of the take. Hold it upside down to signify tail slate, and call out “tail slate.” These procedures might all sound like overkill, but when audio and picture are separated, you’ll want all the clues you can get to merge them back together.
As with everything else you do on a production, taking careful notes about your sound recordings is an excellent way to prepare for postproduction. Some of the recorders mentioned earlier, such as the Aaton Cantar, can be set up to take notes automatically. Otherwise, you’ll want to do it with a spreadsheet on a laptop or simply with pen and paper. Location Sound Corporation (www.locationsound.com) makes a nice form (Figure 5.16) complete with carbon copies so every department that needs a copy can receive one.

So, you’ve read everything here regarding double-system sound, but you still prefer to use the RED onboard audio instead. Or perhaps you’re on a run-and-gun shoot that can’t accommodate or doesn’t have the budget for full double-system sound equipment and personnel. For these cases, this section covers the RED’s onboard audio.
You should at least consider running the mic through an outboard mixer before going into the camera. The RED has no hardware audio-level volume controls, which means you have to set audio levels via the on-screen menu. This is fairly tricky to do for general levels, because you have to adjust the input and then switch back to the main display to see its effects on the meters. Making these adjustments is even more challenging to pull off during an actual take. As a bonus, external amplified mixers usually come with headphone outputs, so you don’t have to tether your headphones directly to the RED.
The RED direct audio setup is fairly straightforward. One of the most important aspects is making sure you have the right cables. Just about every professional microphone uses a standard XLR connector, whereas the RED uses Mini XLR connectors (also known as TA3M). It’s important to know this up front because the Mini XLR cable is not common and will not come in the box with most microphones. Coffey Sound (www.coffeysound.com) makes a 5-pin adaptor cable specifically designed for RED. Coffey also offers a special mini 5-pin to standard ⅛-inch mini jack so you can monitor audio outboard without connecting directly to the camera’s onboard headphone jack.
Next, from the Audio/Video menu, select the appropriate channel, power, and level settings for your mic. (Review the “Audio” and “Sound Menu” sections of RED’s Operations Guide for details on this.) You have four channels of audio and four connectors on the RED to connect to. Typically you would use the mic setting if the microphone is connected directly and you’re using the camera as a mixer. If you’re connecting the mic first to an outboard mixer and then routing to the camera, choose the line level input (Figure 5.17). Consult your microphone’s instruction manual to determine whether it requires 48-volt phantom power (the technical term used for microphones that don’t use batteries and draw power directly from the recording device they’re plugged into). The RED can supply this through the Audio/Video menu (Figure 5.18), but make absolutely certain first. Sending phantom power to a mic that doesn’t require it can damage the mic.


Note
If you’re renting a camera, inquire whether it’s had the audio hardware updated by RED. The initial versions of the camera had audio hardware with lower-fidelity and nonstandard wiring for phantom power. So, make sure you’re getting an upgraded camera.
Use the audio-level meters to adjust the sound level. You want to set it so that your levels peak past the first hash mark just out of the green (Figure 5.19). As levels on the meters get higher and higher, they begin to show as yellow, orange, and finally solid red when levels have overloaded (Figure 5.20). In digital audio recording, once a sound is recorded overloaded, the sound is distorted and cannot be recovered. So if you want to err on the side of caution, keep the levels in the green but just a little low. It’s a lot easier to boost levels and perform noise reduction in post than try to recover badly distorted audio. You can set up an outboard mixer with an electronic limiter to keep any loud sounds from peaking, which is another reason I recommended that you use one.


Let’s assume all went well in production and you’re ready to start working with your audio in postproduction. If you shot with audio going directly into the camera, your setup work is going to be relatively easy. All you have to do is ingest your R3D footage into your non-linear editing system (NLE), and the audio will come along already synced up. The QuickTime proxies files will also contain the onboard audio. Check the first few takes to make sure everything is in sync.
You shouldn’t have any issues—but just in case, you’ll want to learn about any as soon as possible so you can troubleshoot. An out-of-sync take with a current build of the camera is pretty rare and can indicate a need to update your operating system or NLE software. Or perhaps your hard drives need to be replaced. You can always unlink audio from video in your editing program and then slide them back into sync manually (Figure 5.21). This should not be happening in the first place, but keep an eye and ear out for it.

If you shot double-system sound, you need to get the audio resynced. Most of the recorders discussed in this chapter can record in WAV or BWF format. The BWF format is nice because it lends itself to automatic sync, especially when combined with the XML files that some of the recorders such as Sound Devices will create to ease syncing in post. BWF is supported in most NLE programs including Final Cut Pro, Avid, and Premiere Pro.
Depending on your editing software, the sync between BWF and your RED clips can be done automatically according to timecode. In Final Cut Pro, you’ll want an excellent third-party tool called BWF2XML from Spherico (www.spherico.com), which takes the XML and BWF and sorts everything into bins ready to auto-sync in Final Cut Pro (Figure 5.22).

If you’re unable to sync automatically via timecode, you can also do it manually by visually spotting the moment where the clapper comes together in the picture and aligning this with the frame of audio spiking in your waveform. Look for the very first frame after the clapper sticks are closing. When the sticks are still moving, they will be blurry, making them easy to spot. Next, search for the spike in the audio waveform (Figure 5.23), which is typically very easy to hear and spot. Line up the audio and video in your NLE software (Figure 5.24). Typically the audio will run slightly longer than the picture, so you can trim the audio to match exactly if you want to be really careful. Listen toward the middle and end of the take to make sure there’s no sync drift. If all is well, keep doing this with each take until you have everything synced up.


Tip
Try putting a small mic on the camera just to capture one channel of internal audio as a reference. This is audio that will not really be usable quality-wise because of the mic placement, but it can be an invaluable secondary check on sync by comparing it to the dual-system audio in your NLE software. Out-of-phase sync is very easy to spot because it sounds like an echo until the sync is perfect. Then, you can mute or delete the internal audio and keep the synced dual-system audio. Of course, this works best in quieter locations, where the actors are closer to mic. If the location is loud or the actors are far away from the onboard mic, you might not hear them well enough to take advantage of this tip.
If your production audio is simply too noisy, is too low quality, or just didn’t get recorded properly, you can always do what’s called dubbing, looping, or automated dialogue replacement (ADR) in post. I recommend avoiding ADR as much as possible. It can be a lifesaver, but it can be difficult on a budget to make ADR sound natural and properly integrated with the original production audio. Also, not all actors are skilled at perfectly repeating their dialogue and matching their original performance and timing. And for some projects, such as documentaries, it isn’t completely ethical to ADR original dialogue.
Good noise-reduction programs are readily available, some of which are included with affordable postproduction audio suites such as ProTools, SoundTrack Pro, and Adobe Soundbooth that can rescue relatively noisy production sound.
Note
If you have a noisy sound clip that’s irreplaceable, you can have it reclaimed by a professional sound studio using a high-end tool such as the CEDAR audio restoration system. CEDAR is expensive, of course, but can work minor miracles on noisy audio.
Do your absolute best to get great audio to match your 4K imagery. A high-quality soundtrack is an audience expectation, and if done well, it will simply slip into the background of your audience’s enjoyment of the story. Work hard on your soundtrack, and you’ll end up with a higher-quality final project.

DIGITAL IMAGING TECHNICIAN, KOSMOS INNERTAINMENT GROUP
Dean Georgopoulos owns RED camera serial number 31 but came into the RED world almost by accident. He’d worked for more than 20 years as a producer and post-production supervisor in Hollywood. One of his highest-profile jobs before the RED was overseeing the Digital Entertainment Network (DEN). Founded at the height of the late 1990s Internet boom, DEN was a multimillion-dollar startup producing 26 original series for the Web.
“I was running DEN as an Avid editorial operation with 30 editors on staff cutting 24 hours a day in two shifts,” recalls Georgopoulos. “I built a post facility in Los Angeles at the corner of Olympic and Barrington, and I became good friends with Peter Fasciano of Avid. He had modified a BetaSP camera to be able to shoot directly to a 9 GB hard drive. It cost him millions to develop the technology, but you could pull it directly off the camera and start cutting. In a way, RED is a manifestation of that dream.”
Today, Georgopoulos’s daily work typically finds him as a DIT on commercials and features in Hollywood. “I was working with CamTec camera rentals, teaching everybody about the RED camera when it was brand new, and that just snowballed for me,” he says. “Fifty percent of every job I’ve done since then is with a first-timer on a RED. They’ve told their producer, ‘We want to use the camera, and we want to work with Dino.’ I’ve developed relationships with directors of photography, producers, directors, and major clients like Mattel, Nike, and HBO.”
Though Georgopoulos rents his camera and services as a package, he leaves certain accessories such as optics up to the client. “Within 50 miles of L.A. there are tens of thousands of lenses,” he observes. “I don’t have $100,000 sitting around to buy glass, and I don’t know anything about taking lenses apart to maintain them either. Rental houses like CamTec, Abel Cine Tech, and Birns and Sawyer employ full-time technicians for their lenses. I simply own the 18–50mm RED lens, which none of my clients really use, but it’s enough to see an image and test the camera. From there they can order the glass they really want.”
Georgopoulos’s primary duties are data management and camera operations. “I bring three separate Mac systems to the set,” he explains. “This has evolved over time, starting with just my laptop. Then I added a 24-inch iMac and finally an eight-core Mac Pro into the mix. The laptop transfers files via FireWire 800 to G-RAID G21 TB hard drives. Then I’ll run another transfer on the iMac. We work with whatever media they’re shooting to: CF cards with FireWire 800 readers or FireWire direct from a RED-DRIVE. It’s drag and drop off one box and then over to the next one. I wind up with four copies from two CPUs, all copying the original data. If there’s a hiccup, it won’t be on both machines.
“Depending on the postproduction path the client wants, I’m often making ProRes 1K files from every shot on the Mac Pro via REDrushes on set,” Georgopoulos continues. “My work is a combination of keeping a log of what’s come off the camera and literally looking at a drive to see how shots are transferring. I’ll also create a REDCINE and a Final Cut Pro project for every show while on the set. I can just scrub through a shot on the iMac while I’m tweaking the color in REDCINE. On commercials and music videos, I’ve actually cut part of the project together when there’s downtime. On a lot of the early jobs, the clients were just stunned when they saw 4K on the Cinema Display.”
As a production day continues, Georgopoulos prepares deliverables for his clients. “If they want tape masters, I prep R3D files for PlasterCITY Digital Post,” he explains. “They take my drives and run layoffs to HDCAM tape in real time. When the shoot wraps, I’m typically still working. But when I’m finished transferring for the day, I’m usually done with the project. Anybody can call me with questions afterwards, and I often act as a bridge between production and post, if needed.”
Being in demand has permitted Georgopoulos to work with a wide variety of high-profile filmmakers, including a recent job with renowned director Terrence Malick (Days of Heaven, The Thin Red Line), cinematographer Emmanuel “Chivo” Lubezki, ASC (Children of Men, Burn After Reading), and Oscar-winner Sean Penn. “I got that job through RED,” says Georgopoulos. “Chivo contacted RED and said he wanted to rent a camera and shoot tests for an upcoming project. RED referred him to me, and I ended up flying out to Texas to work with the crew.
“They wanted to use RED in a compact mode for some very specific shots from late in the day, dusk to actual nighttime,” Georgopoulos says. “I spent about seven days shooting with Malick and Chivo. Terrence Malick is a genius filmmaker and very spontaneous. He decides what he wants to shoot and where he wants to do it in natural lighting situations and with very small crews. We got to do a scene with Sean Penn where he was driving. I was tucked in the back of a BMW SUV, and it was just awesome. We were driving around Houston, Texas, at 1 in the morning, and Sean got a green light to do whatever he wanted. It was like being with a 15-year-old who’d just stolen his dad’s Porsche.”
Dean Georgopoulos’s Web site is www.red31.com.