

As noted throughout this book, the ends determine the means when working with RED footage. In other words, the type of final output you need determines your workflow. Depending on the path you take, some of the utility applications covered in this chapter will be useful to you, and others won’t apply.
This chapter notes the main uses for each of these applications and details some of the most common working methods. We begin by looking at the applications RED offers directly and then explore some third-party applications. This list is by no means exhaustive, because many third-party applications have emerged and continue to evolve.
All the RED applications discussed in this section are available free from the company’s Web site at www.red.com/support. Their primary use is viewing and transcoding native R3D files. This function used to be of greater importance because no other applications were available that could play back RED’s file formats. However, with the QuickTime Player plugin and broad editing software support, plenty of alternatives are available now. Some of the RED applications are Mac-only, so factor that in when choosing a RED editing/finishing system (and refer to Chapter 8 for further Mac versus PC discussion). With that in mind, let’s look at how you can use each RED application in your workflow.
Note
As this book went to press, RED announced a new generation of helper applications including ROCKETCine-X and REDCINE-X. They are designed to be easier to use while offering all of the functionality of the original applications. For more details, visit this book’s Web site at www.peachpit.com/red.
RED Alert! was one of the first applications released by RED. It’s designed primarily as a quick shot development/one-light grading station. RED Alert! can work on only a single clip at a time, which limits its usefulness for processing vast amounts of footage. You can work in one of two modes: re-grading proxies (lower-resolution QuickTime versions of R3D files created by the camera) or transcoding from R3D to another format such as DPX or TIF.
Note
Film labs refer to the initial prints made from processed negatives as one-light because they give all shots the same settings and don’t manually correct for variations in color and exposure. It’s just a quick way to see what’s been photographed.
Working with proxies is useful because they allow you to tap into the RED RAW workflow without doing a lot of transcoding up front. For example, say you have a shot that was taken with the wrong color temperature or you just want to warm up the look a bit. Load up an R3D into RED Alert! and adjust the Kelvin (color temperature) slider until you get the color balance you want. Then choose File > Make QuickTimes. You’ll instantly have a full set of all the different QuickTime proxy sizes with those new settings “baked in.” Figure 9.1 and Figure 9.2 show Red Alert! creating different looks by adjusting the color temperature.


To go back to the way the files looked straight out of the camera, reload the R3D, and click the Metadata button. You might do this if you don’t like the way your corrections turned out or if you want to compare to the original look. Choose File > Make QuickTimes, and your proxies will return to their original settings (Figure 9.3). Altering the proxies is instant and allows you to quickly experiment with different looks. Another benefit is that if you are editing with proxies, your changes in RED Alert! immediately update in your NLE software.

Two other useful features of RED Alert! are the Histogram and the Zebra. The Histogram (Figure 9.4) is essentially a graphical analysis of the brightness values of red, green, and blue in your clip. The more the peaks hit the top part of the graph, the more your shot is exposed in that color. Peaks toward the left indicate underexposure, while peaks toward the right mean overexposure.

The Zebra superimposes a zebra-striped pattern over areas of your image that are overexposed by a certain percentage. In Figure 9.5, I’ve set it for 95 percent. That means the areas on the cars’ hoods that are covered with the zebra pattern are more than 95 percent exposed. I could turn my exposure slider down just a bit so these areas won’t read as pure white in my QuickTime movies.

Tip
Remember, the original R3D file contains more information and detail than the QuickTime proxies, so this is where you want to squeeze out the best exposure and color you can.
Each time you make adjustments in RED Alert!, a new RSX settings file is automatically created in the folder of the clip you are adjusting. The next time you open the R3D in this folder, that RSX file will be loaded as well, showing all the image adjustments you’ve made.
Remember the RSX file, because some of the other tools covered in this chapter can also use it.
REDCINE is intended as a color correction suite and is available for both Mac and PC (Figure 9.6). Its purpose is to take the place of a telecine transfer session in a traditional film workflow. You can perform color corrections and export to a variety of movie and still image formats with plenty of down-conversion and image-cropping options along the way.

The color controls are configured differently from RED Alert!’s, but REDCINE can load groups of clips simultaneously and apply settings globally. Also, REDCINE can process and output shots in batches. So you could, for example, load an entire magazine’s footage and correct it all at once. Be aware that REDCINE has a limit as to the amount of footage you can load, which comes out to approximately 10 minutes for 4K.
Note
REDCINE runs as a maximized application in Mac OS X at all times. It will not minimize or play in a window and doesn’t hide with the Command-H key. This can be a little disconcerting at first compared to most other OS X applications. To switch to another program without quitting REDCINE, press the F11 key.
You need to learn two main sets of controls to start working with this program. In the main window on the top-left side, you’ll find four radio buttons. These allow you to toggle through most of the other controls, organized into four groups: Project, Shot, Color, and Output (Figure 9.7).

Project is where you choose the global settings for your project, such as the format type, frame rate, aspect ratio, output resolution, and whether you want to apply frame guides to your exported footage.
Shot lets you adjust the in and out points of your shot, such as if you have a particularly long take and you want to process only part of it, for example. You can also reframe and scale shots if you are going from 4K to HD and you want to crop out a part of the frame, for example. You can’t key frame cropping (or anything else), so if you want to make changes over time, you need to do that in another application.
The Color section gives you access to most of the same color correction options in RED Alert! They are organized a bit differently but are mostly the same concepts.
Finally, the Output section is where you make format adjustments when you export a shot or group of shots. You can export to QuickTime in a variety of codecs as well as to image sequence formats such as DPX and Cineon (a format originally created by Kodak for the digital storage of film material). You can also choose to superimpose timecode on your shots, which can be useful if you’re working offline and want everyone who sees your footage to have visual verification of timecode.
Another key feature of REDCINE is the Library/Player button (Figure 9.8). This button toggles back and forth between the main window, where the image-adjustment controls are, and the Library view (Figure 9.9), where you can see all the clips associated with a project. You can also stack different versions of your grades so you can easily toggle between them and decide which one you like best.


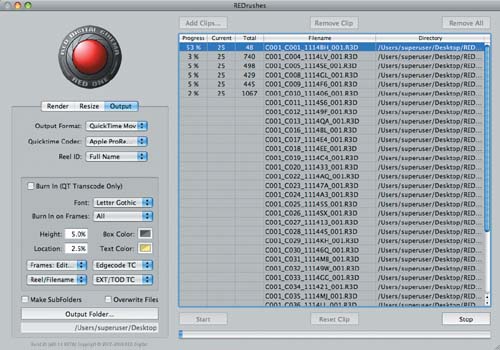
REDrushes (Figure 9.10) is an application from RED designed to batch process single clips or large groups of R3D files all at once. You can use it for tasks such as creating offline copies of your RED footage for viewing or editing or for making online HD down-conversions of your footage for use as a finishing format. You can also use REDrushes to create new QuickTime proxy versions of footage with different color space settings.
Note
REDrushes gets its name from the term rushes, which some film crews (especially in the United Kingdom) use to describe the first set of lab prints or dailies from a day’s work.
REDrushes doesn’t have the viewing or image-grading capabilities of RED Alert! or REDCINE, but it makes up for that with speed and simplicity. The application features a single window with controls for render quality, resizing/cropping, and file type output on the left and a list of currently loaded clips on the right.
The workflow for REDrushes is straightforward if you follow these steps:
Open your R3D file in REDrushes and click the Add Clips button.
Navigate to the first folder of RED shots you want to process. Then choose your clip settings.
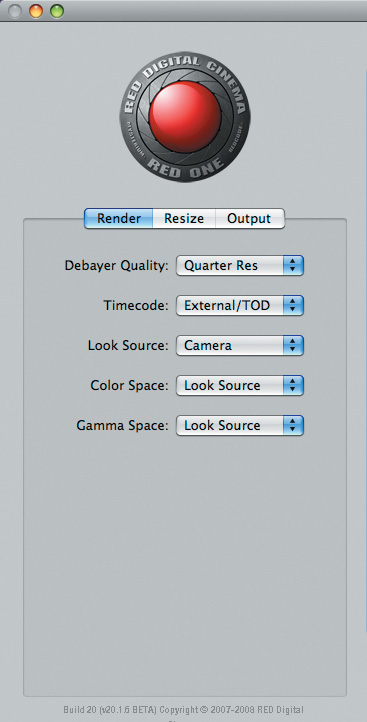
On the Render tab (Figure 9.11), you’ll find the options Debayer Quality, Timecode, Look Source, Color Space, and Gamma Space. Pick your settings according to your project needs.
Debayer Quality determines how good the footage will look by how the raw sensor image data is being reprocessed. Full is the highest quality but requires the most time to process; the others are Half Res (resolution), Quarter Res, and Eighth Res. It’s worth experimenting with each Debayer Quality setting to see which speed/quality combination you like best.
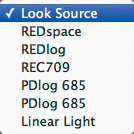
Next you can choose whether the timecode source will be from the time-of-day counter on the camera or the edge code, which starts from zero on each shot. The Look Source setting will match either the LOOK settings originally set in the camera or an RSX file you may have generated using RED Alert!
Color Space determines which color space to work in: Look Source, REDspace, CameraRGB, or REC 709.
Gamma Space lets you choose between gamma settings such as Linear Light, REC 709, REDspace, REDlog, and PDlog 685. (For more details about these options, see the “Color and Gamma Space” section later in this chapter.)
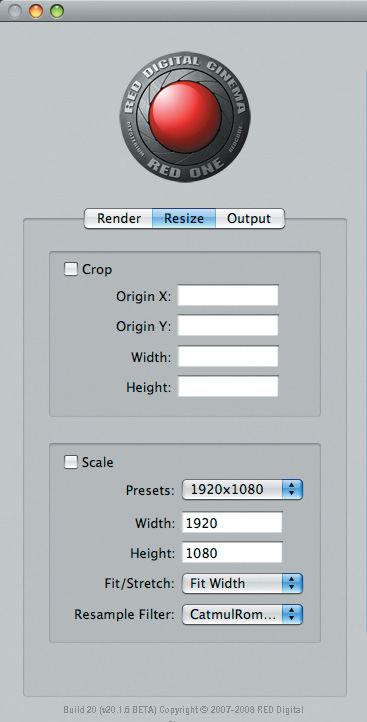
The Resize tab (Figure 9.12) has options for cropping and scaling footage. You might want to extract a 4:3-sized frame for standard-definition TV viewing, for example. You’ll also find some presets for 1080 and 720 HD resolutions as well as 2K film resolution. Finally, there’s a Resample Filter option that determines the quality and look of the scaling; some algorithms are faster than others. The filters each have a different degree of sharpening as well, so it’s worth a little experimentation to determine which results you prefer.
The last tab, Output (Figure 9.13), contains the export options. You can choose to output to a QuickTime movie or a TIFF or DPX image sequence. A QuickTime movie is best used for both offline- and online-quality editorial, and the still images are best used for visual effects work, high-end color correction, or output to film. You can choose from a variety of codecs and can determine whether you want to use the full name of the clip’s reel or one shortened to eight characters.
A couple of other REDrushes controls can be helpful. Choose Settings > Render and you can choose to render multiple clips simultaneously; if you have a powerful desktop machine, try cranking these up to the maximum for faster processing. The QT Wrappers menu gives you options for creating new proxies with the current settings built-in. The File menu offers a couple of edit decision list (EDL) formats that can assist in importing footage for editing.
When you have all the settings the way you want them, select your output folder by clicking the Output Folder button, and click Start.

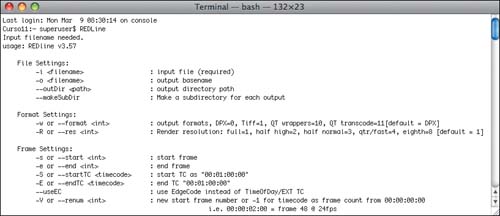
REDLine (Figure 9.14) is a Mac-only, command-line application that gives you access to all of the same transcoding and rendering operations that RED Alert! uses via the Terminal window (Terminal is available in your Applications/Utilities folder). It’s not nearly as user-friendly as some of the other applications, but if you’re familiar with the Terminal in Mac OS X, REDLine gives you powerful automation capabilities. It’s especially useful if you’re processing lots of clips and projects. To see all the options REDLine has, open a Terminal window, and type redline.
As with RED’s applications, more third-party applications are available for Mac than PC at the moment, so that’s something to consider when choosing your RED postproduction platform. Applications such as Crimson Workflow, Monkey Extract, and Clipfinder help you view footage and transcode to HD, 2K, and even 4K versions. In this section, you’ll learn how each utility operates on a typical project.
Crimson Workflow (www.crimsonworkflow.com) is a powerful program. Its main focus is importing a Final Cut Pro XML file and using it to extract full-resolution footage from original R3D camera files in a wide variety of user-selectable formats. (XML stands for Extensible Markup Language, a universal data exchange format that can be used to export edit decision lists.) Once the footage is rendered at the desired settings, Crimson Workflow creates an updated XML file for Final Cut Pro with pointers to the new media.
Alternatively, if you want to do an extensive color correction session with REDCINE, Crimson Workflow can generate a special XML file that REDCINE can use to import only the parts of the R3D media you used in your edit. You then render your corrected clips out of REDCINE, generate a new round-trip XML file in Crimson Workflow, and re-import with the updated media into Final Cut Pro.
Let’s take a look at how to extract footage to 1080/24p HD from RED files:
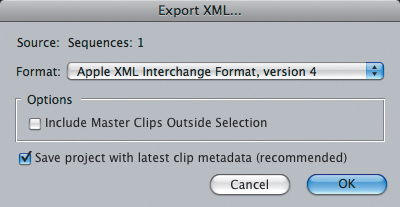
Starting in Final Cut Pro with a completed edit, select your sequence, and then choose File > Export > XML (Figure 9.15). Choose version 4 in the Format list of options, and then save the XML with the default options (as shown in the figure).
Import the XML into Crimson Workflow by clicking the Choose button (Figure 9.16). Drag the folders where your camera originals are into the Search Folders window, and click Match. Crimson Workflow should match the XML edits to the R3D files.
Now you can use the REDLine tab to render your footage out directly, or you can export a REDCINE XML and do additional color correction there. Let’s start with the REDLine method.
Click the Frame tab, and choose High Definition 1080p as the Preset option (Figure 9.17).
Click the REDLine tab, and choose the Output Format and QT Codec. I’ve chosen QT Movie and Apple ProRes 42 in Figure 9.18. Click the Render with REDline button to begin rendering.
When rendering is complete, switch to the Roundtrip tab (Figure 9.19). Make sure the locations of your original Final Cut Pro XML file and your rendered files are correct. Then click Generate Roundtrip XML.
Open Final Cut Pro, and import that XML. It should now point to the newly rendered footage you created in Crimson Workflow.


The alternate method for working with Crimson Workflow is to send the footage to REDCINE for color correction:
Click the REDCINE tab in Crimson Workflow, and click the Export Redcine XML button(Figure 9.20).
Import the clips you made with Crimson (they’re stored in Documents/crimson by default) with the Load All command.
In REDCINE, open the telecine file you exported from Crimson. Do your one-light color correction work, and save a new XML in REDCINE when you’re done.
Return to Crimson Workflow and reload that newly-saved XML for rendering.

Monkey Extract (www.rubbermonkeysoftware.com) is a Mac-only tool designed to import an edit decision list (EDL) from your editing program (or an XML from Final Cut Pro) and export the footage used in your edit to another format. Its chief advantage over Crimson is ease of use, with most of the power hidden under the hood of a simplified interface (Figure 9.21). Make sure you have the latest version of RED Alert! installed before running Monkey Extract, because it uses RED Alert!’s rendering engine.
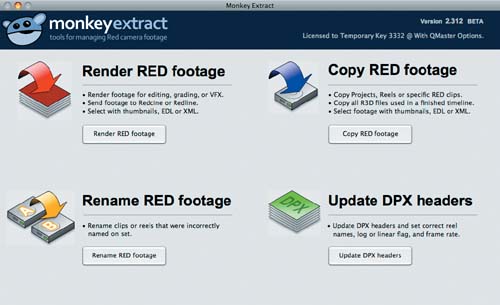
In addition to rendering footage from an EDL, Monkey Extract can also copy RED footage in batches, rename footage, and update DPX metadata. Sometimes it’s necessary to change DPX metadata because settings such as the timecode, frame rate, and reel names of your edit don’t match the DPX files you want to work with. Also, by exporting an updated EDL, you can go directly into an application such as Color, which supports DPX, while skipping Final Cut Pro, which does not (at least not without a plugin). Another feature of Monkey Extract is its upgradeable capability to use multiple computers in parallel and speed up rendering of a project via Apple’s Qmaster network management utility.
Let’s take a look at how to extract footage for a 1080/24p HD down-convert from RED files using the same project we used for Crimson Workflow:
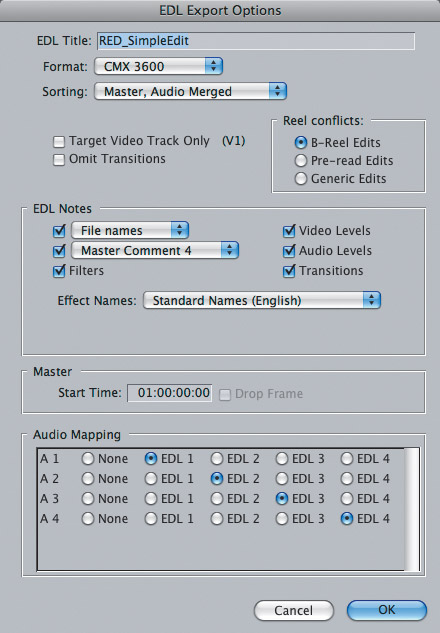
Starting in Final Cut Pro with a completed edit, select that edit, and then choose File > Export > EDL (Figure 9.22). Choose CMX 3600 for the Format option and save the EDL with the default options (as shown in the figure).
Switch to Monkey Extract, and click the Render RED footage button. Load the EDL you just exported, and then select the folder containing original camera files (Figure 9.23).
Finally, select an output folder for the converted files—make sure this is not the same folder as the one that holds your camera files. Then click the Start Render button (Figure 9.24).


When rendering is complete, you’ll have the footage in the desired output format; you’ll get a new EDL to import into a color correction program and an XML to reload into Final Cut Pro when you choose File > Import in Final Cut Pro. Monkey Extract is easy to use, and it offers a powerful way to render only the portions of RED footage you actually use in an edit.
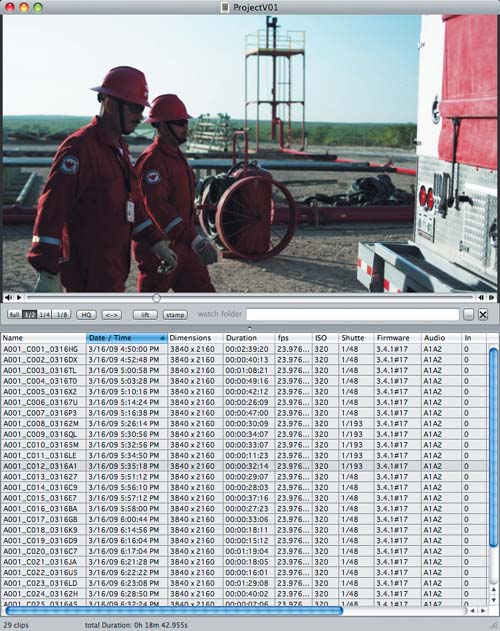
Clipfinder (www.daun.ch/software) is a Mac-only RED R3D clip-browsing tool with some additional useful features. Think of it as iPhoto on steroids for your RED clips. You can drag and drop entire magazines or folders of RED footage directly into Clipfinder and quickly see thumbnails of each shot. Clipfinder can also easily swap proxies in a Final Cut Pro Timeline. For example, you could edit with M proxies and switch to H whenever you want.
Some other nice features are Lift & Stamp, which applies look settings from one clip to all selected clips. You can also “Data Exchange” clips directly into Final Cut Pro with names and custom field data. Do this by pressing Alt-Command-F. Clipfinder can also output Web pages and PDF contact sheets of your clips, along with metadata and thumbnails. Clipfinder has two basic viewing modes: a standard list layout (Figure 9.25) and a thumbnail layout (Figure 9.26). You can toggle back and forth between these modes by pressing Command-T.

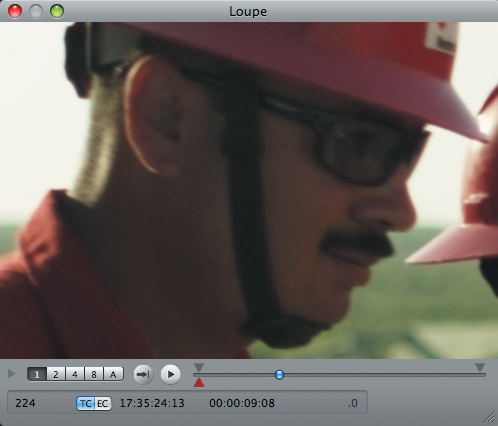
Clipfinder also has a Loupe viewer (Figure 9.27) that zooms into a portion of a clip at a 1:1, 100 percent resolution, which can be helpful for checking the sharpness of a clip or the amount of grain/noise present.
In addition to viewing clips, Clipfinder can also speed up and automate your workflow. You can use it to process footage into other formats and make outputs, similar to the way REDrushes works. You can also set up a watch folder for Clipfinder to monitor. Then, whenever new clips are moved or copied into this folder, Clipfinder will automatically process them according to the current output settings.
Color space and gamma were briefly mentioned earlier in this chapter and elsewhere in the book, and now we’ll get into greater technical detail. Color and gamma space are especially important to understand because they determine the appearance of your footage. Learning about color and gamma will help you get a final image that looks the way you intended when you shot it.
Color space is a mathematical way to describe how color will be represented on a given medium—in our case, a computer screen. If you’ve ever worked with Adobe Photoshop, you’ve probably heard of the RGB and CMYK color spaces, which are typically used for computer and print output, respectively. (RGB stands for red, green, blue, and CMYK stands for cyan, magenta, yellow, key—or cyan, magenta, yellow, black.)
Gamma refers to how the tonal range from light to dark is expressed on your computer monitor. The RED ONE is capable of capturing a greater range of gamma than can be accurately displayed on your computer or a TV screen. So, you must apply some sort of gamma correction to try to squeeze what’s really in the RAW footage from the camera onto your screen. The different gamma and color space settings available to many RED applications determine how the conversion is handled.
In the RED camera and RED applications, three color spaces are currently available: CameraRGB, REC 709, and REDspace (Figure 9.28).

CameraRGB is the original, uncorrected sensor data without any sort of profiling applied (called RAW on the camera controls). To the eye it can look a bit washed out and devoid of color, but this is more because of monitor limitations than reality. REC 709 is the standard color space specification for high-definition video and is the format you should use if you’re planning to finish your project for HD. Finally, REDspace gives you an expanded color space over REC 709 and is intended for film output and digital cinema mastering.
For gamma, you have more settings than Color Space (Figure 9.29).
The available options are REDspace, REDlog, REC 709, PDlog 685 and 985, and Linear Light (Figure 9.30). Linear Light is the baseline, with no gamma adjustment made at all to the original sensor data. As with the CameraRGB color space setting, Linear Light can look a bit flat to your eye, which is accustomed to seeing gamma-corrected images on monitors. REC 709 is the standard gamma for viewing footage on an HD monitor. REDspace is reasonably similar to REC 709 but has been adjusted by the engineers at RED to look more appealing via increased contrast and brighter midtones. REDlog converts the 12-bit native RED gamma curve into a 10-bit curve that is more suitable for display on a monitor while keeping as much of the data as possible intact for later color correction. PDlog 685 is another kind of logarithmic display setting that is useful for film transfer. PDlog 985 is similar to 685 but with an increase in brightness sensitivity. PDlog 985 also uses more of the R3D’s available data; your post house should inform you which it prefers.

So, what settings do you use and when? REDspace is especially useful for reviewing footage on set and at the start of editing because it gives the closest approximation of what your eyes see when looking at the image in front of the camera. REC 709 should be used primarily when working toward a video finish in HD. REC 709 will give you the must accurate representation of your footage as it will look on an HDTV monitor.
REDlog attempts to preserve more detail in the image, especially when going to DPX and eventually onto film. REDlog may look flat on your screen, but more information is being preserved for later usage in color correction. The PDlog modes are designed specifically for film output and working with Cineon files. You probably won’t get into those settings unless your post house or film lab specifically requests them.
This chapter has thrown a lot of technical data at you, and it’s not necessary to understand every last bit to work with RED. It’s important to know which mode to use for what occasion to keep your work accurate and your final outputs as expected. Most of the applications surveyed in this chapter can switch between these modes as you transcode and move from RAW 12-bit R3D to 8-bit and 10-bit finishing formats. As with everything else in this book, experiment to find the applications and settings that work best for the type of project you’re creating.

DIGITAL IMAGING TECHNICIAN, ER
ER cinematographer Arthur Albert (whose POV interview you can also find in this book) initially expected that the changeover of his show to digital would mean a reduction in the size of his crew. He quickly realized it would actually need to grow. “You’d think the film loader position would no longer be necessary, but the loader does a lot of other tasks, like moving gear around, prepping, and slating shots,” says Albert. “We needed the help as well because the RED camera has more parts and accessories to keep track of than our previous Panavision cameras. Then we also added a digital imaging technician (DIT) to be responsible for footage downloads, backing data up, and everything technical to do with the camera.”
The DIT position went to Brook Willard, who has lots of experience with RED and a wide variety of other high-definition and film cameras. His credits include dozens of commercials and other TV series. Willard also spends some of his available spare time as a forum moderator on Reduser.net. He first got the call for ER via his work with the same producers on another show.
“I had recently worked with RED on the NBC pilot for Southland as a DIT, and we were also just finishing up with a live-action shoot for the videogame Need for Speed: Undercover,” Willard recalls. “Robert Keslow, of Keslow Camera in Santa Monica, brought me in. Keslow is the biggest RED rental house in Hollywood right now; they have 27 RED bodies. Robert reserved five the day camera reservations were first opened at NAB [in April 2007].”
Willard gives some insight into his daily routine as a DIT on ER. “I split my time between running data and transfers at my cart and working alongside the camera,” he reveals. “In the beginning I was spending more time at the camera, helping the crew get accustomed to the RED and how it operates. I’ve built and rebuilt this camera 1,000 times, and they were coming from a Panavision package, so we spent a lot of time adapting their techniques. I’m also on top of exposure; Arthur [Albert] and I will sit together at the monitor and work out the appropriate stop for a shot. Most of the stages are prelit, so 98 percent of the time, we set the stop for a scene and forget about it.”
Even though the show is broadcast in high definition and standard definition, it’s being shot at RED’s highest-quality settings. “We shoot 4K HD at 23.98 with REDCODE 36,” says Willard. “The HD frame is easier on post than 2:1 or 16:9, and it transcodes much more quickly. For optics, we use the ARRI primes and all four of the major Angenieux Optimo zooms, including the 17–80mm and the 24–290mm. We also shoot with Cooke S4i’s, but the Optimos are really the primary workhouse with all of our Steadicam and handheld work.”
The ER crew recorded to CompactFlash cards instead of hard drives. “We managed to obtain about 30 16 GB cards for the show,” says Willard. “This allows us to hold onto cards for 36 hours from when they’re shot until they go back into a camera again. So if there are any issues, I can go right back to the original and re-transfer. Every card is labeled with the current reel number. When the crew rolls out on a shot, they eject the card and put tape over the pins. From there it goes into a special Pelican case on the DIT cart, and I provide them with a fresh one from another marked case. I also reformat the cards in a special way so that the camera thinks they’re empty but the footage can still be accessed. If the ACs load a card I haven’t cleared like that, they get an in-camera formatting error, and they know something is wrong. That way it’s always clear which cards are ready for reuse.”
Willard’s cart features a Mac Pro in a shock-mounted hard case connected to an HD monitor via a Blackmagic HD-SDI output card. The system has 14 TB of RAID 6 storage capable of read/write speeds up to 800 MB per second. “I back up every shot onto various different drives and RAIDs,” he notes. “Then I create initial grades before sending footage off to postproduction. For CF card readers, I’ve built a few eSATA units of my own based on Addonics parts connected to a Sonnet eSATA card in the Mac Pro. I also have Hama USB and FireWire 800 readers and a SanDisk FireWire 800 reader as backups.”
To do the actual copying from CF card to hard drive, Willard uses a modified version of the OS X Finder. “I’ve got it configured to do a checksum, so I know every copy is perfect,” he explains. “I’ve tried some of the dedicated data transfer applications, but I found them to be a bit more unstable than I’d like, so I’ve stuck with the Finder.
For audio, the show recorded double-system sound, and the sound department had its own recording device. “We have a Denecke SB-T Time Code Generator on top of every RED,” says Willard. “We considered recording RED audio as well, briefly, but there was ultimately no reason to have it. The assistant editor syncs up the takes in postproduction.”
ER partially leveraged RED’s RAW workflow before finishing in a more conventional tape-based color correction session. “We send R3D and RSX files with each hard drive after doing some initial grading on the set,” Willard notes. “The R3D files are then transcoded by R!OT Post directly to Avid’s DNxHD format. They make a DNx36 transcode for editorial on the Avid. Then they do a higher-quality DPX encode for the high-definition tape-to-tape the color correction on a da Vinci at Level 3.”
Taking note of the impact of a show like ER switching to RED, Willard observed a lot of interest during his time on the set. “We had directors of photography and producers from every show you can imagine stop by,” he says. “They all wanted to know how well it was working and what the footage looked like. ER was the big show that opened the floodgates and made it a whole lot easier to accept the idea of using this camera.”
Brook Willard’s Web sites are www.brookwillard.com and www.4kninjas.net.