
Up to this point you’ve learned about equipment and accessories, as well as operating the camera and the basic workflow in the field. Starting with this chapter, we’ll move from production to postproduction topics. Postproduction includes editing, color correction, effects work, and output to a variety of destinations such as film, TV, the Internet, and more.
Because the RED shoots 4K resolution, the system you choose for postproduction needs to be as powerful as you can afford. Though it is possible to edit and finish RED projects using a relatively modest system, it increases the time you have to wait for tasks such as rendering and debayering. (Debayering is the process of converting RAW R3D data into a video format you can play back directly. The faster your system, the quicker you can do the conversions.) In this chapter, I’ll give you my recommendations for the best possible computer hardware and software to use for maximum efficiency and performance during postproduction.
In subsequent chapters, we’ll get into more detail about manipulating RED footage using third-party utilities and common editing applications such as Apple Final Cut Pro, Adobe Premiere Pro, and Avid Media Composer. You’ll learn different ways to edit and color correct footage, discover a variety of output formats, and learn how to archive your completed projects for safekeeping and future reuse.
The first decision you need to make is which system platform you will use. Now, I know there are lots of nice Linux boxes and other platforms out there, but they enjoy little RED support. You’re welcome to try one, but prepare to be in the wilderness as far as getting help and up-to-date tech support. The best option, as far as RED is concerned, is Macintosh or Windows. I know that brings us to an age-old debate, so let me just cut to the chase. I have to come down on a side, and that side is the Mac.
I have plenty of good reasons for recommending the Mac as a RED editing platform. Many of the staff and engineers at RED are unabashed in their support for Macintosh products. If you’ve ever visited RED or its booths at NAB, you’ll see lots of Macs. As a result, some of RED’s helper utilities—which you’ll want to have the latest versions of—are developed first for the Mac and then later for Windows. Some applications—such as RED Alert!—don’t even exist for Windows at the time of this writing. Also, the camera itself shoots its proxies to QuickTime, which is the Mac’s native video format. The proxy files won’t work on a Windows machine because RED’s QuickTime proxy codec is Mac-only. So, you’ll have to convert the R3D files in your editing application in Windows.
Many of the third-party applications and software you need to work with RED footage either are available exclusively for the Mac, such as Final Cut Pro, or are available for both platforms, such as Avid and Premiere Pro. ASSIMILATE SCRATCH stands out as one key application that’s Windows-only, but that’s a major investment which renders the platform itself somewhat immaterial (for more on SCRATCH see the “Desktop Color Correction” section of Chapter 13). In other words, the Mac currently offers more choices and support for third-party RED workflow software.
If you do go with the Windows platform, head over to the REDuser forum (www.reduser.net), and ask around to see what the hottest Windows systems are these days. Premiere Pro and Avid are cross-platform, so when we get into those workflows in the upcoming chapters, almost everything discussed regarding the Mac applies to Windows.
People often ask me, “What’s the best machine to get?” That’s easy: Get the most powerful machine you can afford. Working with the RED, you’ll never feel like you have a system that’s too powerful. If you can afford an eight-core Mac Pro ($3,299 and up as of this writing), you’ll be well on your way (Figure 8.1). You can use a MacBook Pro (about $1,999 and up) or even an iMac ($1,199 to $2,199), but your workflow will be slower. You need an Intel-based Mac because the RED applications won’t run on older PowerPC machines such as PowerBooks and G5s. Also, ProRes, which is key to many of these workflows, is for Intel-chipped machines. See the sidebar “Recommended RED Mac Systems” for what I consider minimum, optimum, and price-is-no-object-maximum RED Mac systems.

The faster the processor, of course, the faster you’ll be able to convert files, process effects, output finished edits, and so forth. RAM (memory) allows you to run more programs simultaneously and more instances of the same program. For example, RED’s command line footage processing software, REDLine, takes advantage of multiple processors and more RAM to convert R3D to other formats.
Hard drive space is another key feature, and more is always better. At 4K REDCODE 36, you’re creating footage at 36 MB per second. That jumps way up once you start transcoding to formats such as DPX, uncompressed, and ProRes. You’ll learn how to augment the internal storage space with outboard storage in the “Storage Options” section later in this chapter.
Higher-end Mac systems are expensive, but if you think about the difference of a few thousand dollars when you’re already spending $17,500 for the camera body alone, it’s a relatively small portion of your whole budget. Your work can only be as efficient and enjoyable as its weakest link, so I urge you to invest a little extra on a more powerful machine. I haven’t had to pull an all-nighter because of a slow computer in a few years now, and that’s a good thing.
Once you decide on a platform, it’s time to select the most important piece of software: your nonlinear editor. Before the advent of computer editing software, you were stuck cutting either directly on film or with videotape. Either way, you were cutting pictures with minimal sound editing. You did color correction and effects in a completely different step. With today’s editing software, you can do almost every task within the editing application—sound and picture editing, transitions, effects, mixing, color correction, compositing, and more. Before getting into specific software recommendations, let’s define a few key terms and workflows you should consider as you think about editing programs.
Offline editing means that you are editing at a lower resolution and quality than your final output in exchange for better performance and efficiency. The first nonlinear editing programs were capable of editing offline only. You would digitize 35mm film or standard-definition video and compress it to a smaller file size. When you were done editing, the program would export either a negative cut list for film or an edit decision list (EDL) for video. You’d take that output and either conform film negative to it or online tape-to-tape edit the original format videotape from the EDL.
Modern editing programs offer some form of online editing, where the quality and format you are working with in your editing program is the same as the final finishing format. This is a lot simpler when you’re coming from a relatively low-bandwidth format such as standard-definition DV or HD formats such as DVCPROHD, HDV, and AVCHD. It becomes more complex with RED footage because online resolution is harder to define. You can edit RED in high-definition—at the same resolution as you plan to finish—and this in a sense is online editing, because you don’t need to convert to another format before finishing the edit. Some programs offer the ability to cut R3D files natively in 4K, which is closer to true online editing.
If you’re planning to finish out to film at 4K, it makes sense to edit at a lower resolution, such as 1080p or 2K, and then conform the final edit to 4K. Otherwise, your editing software’s performance on all but the most powerful hardware is going to lag (and some won’t even support 4K editing). It’s better to work quickly and more efficiently at a lower resolution and then conform everything to the online resolution when you’re done editing.
If you intend to finish out to high-definition or even standard-definition video, then an online workflow at HD makes more sense. There are a number of different ways you can get RED footage into a high-definition edit; some are faster than others and they offer different levels of quality. Each editing program offers a different way of working as well.
Depending on whether you want to work at online or offline resolution, you also need to consider the types of files you want to use. With the RED, you have three basic choices once you’re done shooting: native, proxy, or transcode.
Native means you work directly with the R3D files in your timeline. At the time of this writing, only Premiere Pro supports a truly native editorial workflow with R3D. Even that is not completely native because there’s no way to encode to the R3D format outside the camera. So, anything that’s not a straight cut—such as filters, effects, color correction, and transitions—still has to be rendered in another format. Final Cut Pro offers a way to transfer R3D files into QuickTime that preserves the native metadata.
Proxies are created right in the camera when you shoot and instantly become playable in QuickTime Player. They are immediately editable in any program that supports proxies, such as Final Cut Pro. That means you can conceivably go immediately from shooting to cutting simply by dragging and dropping the proxy files into your NLE. You need to figure out which size proxy to work with, which we’ll look at later in the chapters on specific editing programs.
You could do an offline/online proxy workflow in which you edit with lower-resolution proxy files for speed and then conform to the higher-resolution versions when you’re ready for output. If you’re working in standard definition or HD, the proxy files have high enough image quality to make great-looking output. You can even instantly color-correct and change their look just by reprocessing via RED Alert! or REDCINE (learn more about these helper applications in Chapter 9).
A third file format workflow is transcoding, which is taking the R3D files and exporting them to a different format for editing and possible finishing. Transcoding can be done in different ways, but the two most common are transcoding within the computer or playing a RED clip out to a tape format and recording it.
For the computer method, you can use a number of applications, such as REDrushes. You can also use the import tools in some editing applications to do this. Both Avid and Final Cut Pro offer utilities to convert from R3D to other formats. In Final Cut Pro, the conversion is typically to ProRes, and for Avid it’s to DNxHD. Both are optimized for smooth editorial work while maintaining very high image quality for final output. You can easily create an online version for an HD or SD workflow using transcoded files.
The one major downside to working with transcoded files is that because you are converting RAW sensor data from R3D files to an RGB file format, you’re losing the ability to grade the original camera RAW metadata that you have with R3D files. Also, by exporting to a specific format, you’re essentially locking in a resolution, be that high-definition, 2K, or whatever format you choose. You can always take an edit completed with transcoded files and conform it to proxies or another format. Utilities such as Crimson Workflow make this possible (you’ll learn more about this in Chapter 9).
Coming back to the RAW workflow for a moment, you should decide whether you want to preserve the capability to access the original RAW R3D files for grading after the edit is complete. Typically, if you work with transcoded files, you color correct those and don’t go back to the RAW workflow. However, if you edit native or proxy, you have a simpler path to going back into RED Alert! or REDCINE and completing a color grade from the RAW files. Some third-party color-correction applications (such as Scratch) permit grading directly from R3D as well.
Note
I call transcoded files baked in because the RAW metadata is no longer adjustable and your gamma and color settings at the moment of transcode are locked in.
For my taste, I prefer working with RAW versus transcoded files and their baked-in color. You can still do significant color correction from DNxHD or ProRes files, so you shouldn’t feel like baked in means locked in. Sometimes the RAW workflow is overkill for a simple or rush project. However, if your project is destined for film output or has a lot of intensive effects or compositing, I’d be more inclined to finish RAW. That gives you maximum flexibility with the final look. It takes some doing but you can switch a project from baked-in transcoded files to RAW, or vice versa.
The next choice to make in your postproduction system is which editing program to use. In my opinion, the choice comes down to: Final Cut Pro, Premiere Pro, and Avid. Here are a few pros and cons to consider (we’ll get into more detail in Chapters 10–12).
Final Cut Pro (included in the Final Cut Studio package for $999—see Figure 8.2) happens to be my favorite editing application. As I mentioned earlier in this chapter, it’s Mac-only. The current version of Final Cut Pro offers support for RED in a number of different workflows.

Apple has worked closely with the engineers at RED to provide broad support. You can edit footage by transcoding to ProRes using the Log and Transfer window within Final Cut Pro. This takes more time up front and moves you away from the ability to manipulate footage in RAW, but it does buy you a much more fluid edit and the ability to add more real-time filters and effects. You can also convert R3D files into special QuickTime files that can be graded with RED native metadata in Color, Final Cut Studio’s color-correction application. (We’ll look at the preferred workflows for different types of projects in Chapter 10.)
Premiere Pro ($799 or $1,699 with Production Premium suite—see Figure 8.3) permits as much of a RAW editorial workflow as possible, at least in terms of the ability to drop R3D files directly onto a Timeline. Adobe has worked hard on its RED integration, and it shows in how much you can work natively. Premiere Pro is also cross-platform, so you can use it on Mac or Windows and easily exchange project and media files. This may be critical or not so critical, depending on your needs. If you’re in an all-Mac or all-Windows shop, cross-platform capability is not that important. But if you’re working with a lot of different editors or service bureaus with both Mac and Windows, a cross-platform application such as Premiere Pro is advantageous.

In the past, I used Premiere on Windows and found it to be a powerful application. It’s also very well integrated with the rest of the Adobe applications such as After Effects for compositing, Encore for DVD and Blu-ray authoring, Photoshop for image editing, and more. The one downside to Premiere is it has probably the fewest number of users of the three editing applications surveyed in this chapter. You’ll find it in lots of event and corporate video shops, but you’ll be hard pressed to find Premiere used much in the TV or big-budget film worlds—they tend to use Final Cut Pro and Avid. That’s not an issue if you’re working on your own, but if you’re planning to make a career in editing or want to be able to easily exchange projects with a wide user base, it’s an important consideration to make. You’ll see the Premiere Pro RED workflow in more detail in Chapter 11.
Avid has a number of editing products in its lineup, compared to the single versions of Final Cut Pro and Premiere Pro. Avid DS, Media Composer (Figure 8.4), and Symphony all work with the RED. Media Composer offers a complete editing solution for $2,499 while the other programs range in price and options. Avid uses a transcoding workflow, in which you convert R3D files to another format to edit.

You transcode from R3D to DNxHD for editing using Avid’s MetaFuze application (which currently runs on Windows only). You then edit with the DNxHD clips in Media Composer. When your edit is complete, you can export your sequence to DS for effects and finishing. DS allows the direct loading of R3D files, enabling a much higher level of control over the final output. Because Avid’s original products were offline editors for film negative finishing, the two-step approach is in keeping with its established methodology.
Note
Read more about Avid and RED in Chapter 12 as well as in the POV Interview with Michael Phillips, Avid’s principal product designer.
Among these three applications, my recommendation is personal; I happen to use Final Cut Pro and am happy with it. That said, I think Premiere Pro and Media Composer are both worthy editors, and it’s worth your time to test drive each before making your choice. The cross-platform packages have time-limited demos that you can download and install on your own system. Final Cut Pro isn’t available as a downloadable demo, but you can walk into an Apple Store and try it there. Whichever application you go with, make sure it works well with the particular RED workflow you plan to use, whether it’s offline or online, RAW or baked in, or native/proxy/transcode.
Almost as important as choosing a platform and an editing application is storage (hard drives). The storage used for your postproduction system is generally separate from the storage you use with your camera in the field (see Chapter 14 to learn more about that). You want as much fast hard drive space as possible, because RED projects will take up all you can spare.
“Just a bunch of disks” (JBOD) is a cute phrase for single-disk drives that are not configured into RAIDs (described in detail in the next section). You can get powerful and vast storage with FireWire 400/800, USB 2.0, and eSATA connections. Some solid brands include G-Tech, CalDigit, and Dulce Systems. These sorts of single-drive units are great for storage but not so good for editing directly from. You can use them to transfer assets from one place to another, or even onto and off your set, but I think you’ll find much better performance editing from RAID solutions.
A Redundant Array of Independent Disks (RAID) is essentially multiple hard drives electronically linked together to provide extra speed and/or redundancy. I’m a big fan of RAIDs. See Table 8.1 for some of the more common RAID configurations.
Table 8.1. Common RAID Configurations
RAID 1 | RAID 5 | RAID 0/1 (RAID 10) | ||
|---|---|---|---|---|
Description | Data striping (no data protection) | Disk mirroring | Data striping with distributed parity | RAID 0 and RAID 1 combined |
Minimum number of drives | Two | Two | Three | Four |
Benefit | Highest performance | Data protection through redundancy | Best balance of cost/performance/data protection | Highest performance with data protection |
You can get a simple RAID housed in a portable enclosure. You can also create a RAID in software by linking several drives either mounted inside a desktop machine or connected via FireWire or eSATA. From there you can move up to a more robust solution that comes with a special RAID controller card. Finally, there are storage area networks (SANs) that use a very powerful array of RAIDs to service several users across a network to centralized storage.
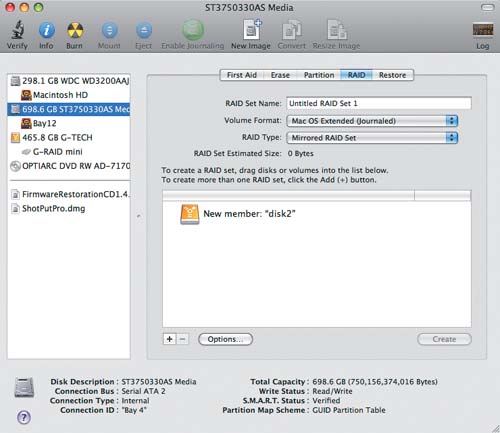
For software RAIDs, you can begin with the built-in tools that come with your OS. On the Mac, use the Disk Utility in the Applications > Utilities folder (Figure 8.5). First click the RAID tab, and then drag the drives you want to associate as RAIDs into the window. The drives must be identical in size and type to function as a RAID. This method is very easy to set up, but it’s not the most powerful RAID you can have.
The next step up is a drive in a single enclosure that is actually two drives running together. This can be a nice starter system because the costs are low and the performance is noticeably better than a single-drive system. Some examples are the G-Tech (www.g-technology.com) G-RAID2 and G-RAID3, which are mostly RAID 0. These are great little units, with USB, FireWire 400/800, and eSATA connections at up to 3 TB (terabytes—a terabyte is 1,000 GB), and they range in price from $300 to $650 depending on capacity. G-Tech also offers bus-powered portable versions, though these are a little less speedy, and more powerful G-SAFEs and G-SPEEDs, which move you up to RAID 1 for mirrored/redundant storage. You can’t go wrong with any of these units—as with anything else important, don’t pinch pennies on good hard drives. Remember, that’s your hard work in there.
Tip
RAID 0 is considered in some circles to not be a true RAID because it offers no redundancy. But you can use a RAID for performance, protection, or both.
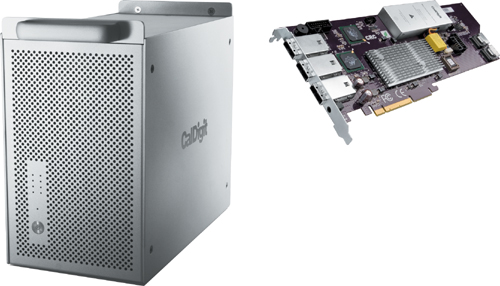
Another step up is a RAID that connects to your system via a RAID controller card. This card boosts performance another notch and may be more suitable for intensive color correction and effects work or when you’re working with a multilayered sequence in your editing application. I like the CalDigit HDElement (www.caldigit.com), which comes complete with a RAID card and can be set up in a number of different RAID level configurations (Figure 8.6). For less than $3,000, this is a bargain that can give you up to 370MB/second of playback speed. As with the rest of the components surveyed here, when it comes to RED, there’s no such thing as too much power.
For the really high end, when you want to support several editing stations across a network with really fast performance, you’ll need to create a SAN. A SAN is one very powerful set of hard drives that other computers connect to via Ethernet or Fibre Channel rather than FireWire or eSATA. This arrangement affords centralized administration as well as sharing of assets across many artists and postproduction personnel. For this setup, I recommend something like the Active Storage XRAID (www.getactivestorage.com), which starts at $11,999 for 8 TB. (See Chapter 14’s “Postproduction Archiving” section for an image of the XRAID.) That may sound pricey, but it’s still less than the camera body you have, and it can play uncompressed 2K footage; try doing that with FireWire!
As with the all of the items covered so far, scale your system to your needs. If you’re doing moderate amounts of editing as a single-person operation, a nice external RAID connected via RAID card or FireWire 800/eSATA will get the job done. If you’re working with a group of editors in a production house or TV network, move up to the higher-performance RAID drives or consider a full-blown SAN.
The last of the most critical purchases is the monitor. You’ll likely be spending a lot more of your time staring into your computer monitor than the camera’s electronic viewfinder. Thus, it makes a lot of sense to get the highest-quality monitor you can afford—for your own eye comfort, for the accuracy it will help you achieve, and for your own image and reputation working in front of a client.
When working with RED footage, or footage from any camera for that matter, you really need to understand the difference between a computer monitor and a display or broadcast monitor. A computer monitor uses RGB color space and is optimized for displaying the output of a computer’s graphic display card. A broadcast monitor uses YUV color (like a TV) and is typically fed a composite or component video signal. Therefore, you should consider two different monitors: First, you need an RGB monitor for your computer’s desktop and your editing application’s timeline. Second, you need a YUV monitor, which is important for color correction and more accurate evaluation of your footage.
Note
YUV refers to a color television display, where Y indicates the luma (brightness) value and U and V refer to the chroma (color) components.
Before considering which computer monitor you need, you should consider how many you need. There are two schools of thought on this: that you should get either one big monitor or two (or more) medium-sized ones. If you’re cramped for desk space or you don’t edit constantly, a single large monitor may be more than enough. If you edit all the time, you might find having two monitors much more user-friendly. You can put all of your source clips on one monitor and have your Timeline and program window on the other.
Tip
Although it’s possible to color correct footage using an RGB monitor alone, it’s inaccurate compared to a true broadcast monitor. So if you’re doing work for broadcast or theatrical release, don’t even think about color correction on anything other than a broadcast monitor.
Liquid-crystal display (LCD) flat-panel monitors have largely replaced the cathode ray tube (CRT) displays of a decade ago. This is great because LCDs have gotten very accurate, they take up less space, and they are more mobile than CRT monitors. If you’re working with a Mac, the Apple Cinema Displays are very popular. They are nice and sharp, perfectly matched to the Mac Pro’s output resolutions, and look very high-end sitting on your desk. Apple recently switched over from LCD to light-emitting diode (LED), which is supposed to offer an even brighter picture. Apple’s 30-inch LCD runs about $1,799 (Figure 8.7) while the 24-inch LED Cinema Display goes for $899. Some other solid LCD monitor brands to consider are Dell, Asus, Samsung, ViewSonic, and HP.

As with computer monitors, you can work with one or multiple broadcast monitors. The principal purpose of a broadcast monitor is accuracy for color correction and compositing. You also need a converter card to display HD video properly on a broadcast monitor (more on converter cards in the next section).
If you’re working mostly on your own, a decent-sized (15- to 21-inch) HD display should do the trick. However, if you’re often working in front of a client, you might want to consider a larger display, such as a large LCD or plasma screen (you can find surprisingly high quality and affordable ones at the big chain stores such as Best Buy and Costco) for clients to sit and watch the work. Then you can have your smaller and more accurate HD broadcast monitor for the critical decisions. It’s up to you and, of course, your budget.
For smaller HD displays, I’m a big fan of the Sony and Panasonic HD production monitors. Sony offers the LUMA, PVM, and BVM (some of which are still CRTs) series for a variety of budget and quality levels. Sony’s Trimaster BVML170 LCD (about $13,000) is a particularly impressive and accurate LCD monitor to check out.
On the Panasonic side there’s the BT-LH series LCD monitors; the BT-LH2550 is a nice value at $5,995. For the big plasma client display, I’m also partial to Panasonic’s offerings, such as the TH-42PF11UK for about $2,400. Panasonic has been making and perfecting plasmas for a long time, and when you walk down the aisles at electronic trade shows such as NAB, you see Panasonic plasmas in lots of booths. Image is important both literally and figuratively, so don’t skimp on monitors if you can afford not to.
If you choose to work with a broadcast monitor, you need a special conversion or capture card to output a proper high-definition component video signal from your computer to the monitor. Typically, these are PCI cards that go into a desktop machine, which is another advantage over a laptop. There are two brands I recommend for this task: AJA (www.aja.com) and Blackmagic Design (www.blackmagic-design.com). To work at some of the higher resolutions, you’ll also want a powerful RAID system to support the increased bandwidth. Consult the companies’ respective Web sites to determine specific hardware requirements.
AJA offers several different cards for displaying footage on an HD monitor. My favorite is the Kona 3 (about $2,700), which enables SD, HD, and even 2K output via SDI and HD-SDI connections. The Kona 3 also supports integrated real-time ProRes encoding, so if you’re working in a transcoded files workflow, you can play ProRes footage directly out to your monitor in high quality without rendering. The Kona 3 is very well integrated with Final Cut Pro.
Tip
AJA also makes the io HD, which allows you to connect a laptop to HD monitors, should a high-end desktop machine be out of the budget. It’s a portable solution for displaying high-definition video on a monitor and getting native ProRes support directly from a laptop.
Blackmagic Design’s cards are a little more affordable while offering many of the same features as the AJA cards. The DeckLink HD Extreme ($995) offers SD, HD, and up to 2K monitoring with real-time down-conversion (Figure 8.8). For example, if you want to view a 2K edit on a standard-definition monitor to get a sense of how it might look on a DVD, you can do that. DeckLink is also well integrated with Final Cut Pro and Premiere Pro.

Tip
Both the AJA and Blackmagic cards also offer HD and SD input capabilities, ideal if you need to mix RED footage with other sources.
The bottom line is that a nice Mac Pro, armed with a reasonably powerful RAID, along with desktop and broadcast monitors and a capture card, will give you everything you need to edit and finish RED-originated projects. You can scale everything up or down to suit your budget and needs. With what you’ve learned in this chapter, you’ll be well positioned to make informed decisions about the system that will form the heart of your postproduction workflow.

FOUNDER AND CEO, LIGHTIRON DIGITAL
Michael Cioni has more than a decade of progressive postproduction filmmaking experience. He cofounded and built one of Hollywood’s first desktop-toolset postproduction facilities, PlasterCITY Digital Post in 2003. While at PCDP, Michael ran day-to-day operations, assembled what quickly became an industry-respected team of artists and technologists, and led the organization’s business development efforts.
In 2009, Michael launched his new postproduction facility, LIGHTIRON Digital, LLC. LIGHTIRON is the first Hollywood-based facility focusing entirely on end-to-end, file-based workflow sequencing. Coupling state-of-the-art technology with cost-conscious business acumen, LIGHTIRON has a multi-faceted approach toward serving the post-production community.
In addition to scores of RED commercials and music videos, Michael has been involved with several high-profile features during the initial few years of the camera’s existence. These have included Steven Soderbergh’s The Informant, starring Matt Damon; Manure, starring Billy Bob Thornton, directed by the Polish Brothers, and shot by M. David Mullen, ASC; S. Darko, A Donnie Darko Tale, photographed by Marvin Rush, ASC; and Hybrid, shot by John R. Leonetti, ASC.
“My team is made up of data-centric enthusiasts working almost entirely with digital cameras,” says Cioni. “Fifty percent of our recent projects are RED-based, and the other half come from cameras such as the Vision Research Phantom, Sony F23, Panavision Genesis, ARRI D-20/D21, and the Thomson Viper. Some of those are tape-based cameras, but we encourage filmmakers to transfer their project into a tapeless workflow as early as possible. Then we can start to cut out all the time-consuming and limiting issues tape entails, such as cross-conversion, frame rate concerns, resolution, and aspect ratio incompatibilities, and help our customer start saving money.
“We have many RED ONE workflow guides we use that ask the client which camera build, aspect ratio, frame rate, resolution, and so on,” adds Cioni. “Then they specify whether they want to edit with Avid, Final Cut Pro, or Premiere and have footage delivered on tape or hard drive. It’s like buying and configuring a car online, for example: Do you want four-wheel drive, an eight-cylinder engine, etc.? And with our checklists we can tell them, ‘That car doesn’t exist.’ In other words, ‘That workflow won’t work, but here’s one that will.’”
Along with educational outreach, Cioni tries to make sure LIGHTIRON’s workload is balanced between larger projects and more independent fare. “I have worked on well over 100 indie projects,” he says. “It really helps when producers on a tight budget do their homework and determine how much work they can do on their side of the fence and how much they need us to do. They might, for example, do all their editing offline, and then we come in and conform and color correct their material.”
Regarding RED’s proliferation across the Internet and the heated online discussions it often stimulates, Cioni takes a hands-off approach. “I typically stay away from the boards,” he says. “We come by our post information through firsthand experience. My team has executed around two hundred RED jobs and counting, and we’ve worked hands-on with the camera for the last few years. We’ve had our share of mistakes and successes, and all of that feeds into our ongoing development.”
With a dozen Final Cut Studio workstations, LIGHTIRON has extensive capabilities with Final Cut Pro and QuickTime in the high-end arena of 2K and 4K digital intermediates. “Because LIGHTIRON is tapeless, it’s very easy for us to move up and down the ladder between different resolutions up to 4K uncompressed DI mastering,” Cioni notes.
“We’re building 500 TBs of storage with a four-lane and eight-lane Fibre Channel infrastructure,” he continues. “That encompasses a 175 TB Apple Xsan along with a couple of smaller ones and Promise Technology RAIDs, which enable users to achieve over 2 GB per second of throughput. With a series of LTO-3A and DLT-S4 drives for archiving, we can backup every project asset and then vault that for long-term storage. When completed, an entire feature can easily fit into a shoebox.
“The RED shoots compressed REDCODE to a relatively small file of around 36 MB per second or approximately 100 GB per hour,” Cioni says. “When you process to uncompressed for the DI, it can get up to 50 MB a frame. At this point we’re not doing uncompressed dailies, so instead we do real-time transfers to compressed media files or out to HD videotape. It’s easy to create real-time DNxHD files for Avid and ProRes for Final Cut Pro since some productions want tape, and others want hard drives.”
When it comes time to finish a project, LIGHTIRON brings heavy-duty hardware to bear. “Our color-correction suite features Quantel’s 4K Pablo, which is one of the premiere DI tools in the world right now,” emphasizes Cioni. “The system allows us to produce 4K DPX files, suitable for film or tape output. We can edit, color correct, and composite in 4K all in real time. Almost no other system can do that. It’s a great way to color-correct high-resolution footage like RED and the work looks beautiful on the big screen. Our team is used to doing two to three features a month along with music videos, commercials, and other short-form work. It’s all pretty challenging for a DI lab, but we work hard to be fast and efficient.”
Asked about his own expectations for digital cinema’s future, Cioni is highly optimistic. “I’m looking forward to the next generation of RED cameras with even higher image quality and lower compression,” he says. “This is really just the beginning. Imagine how much time it took for Ford to build the first Model-T and then how long for cars to evolve into how we know them today; with this camera, that’s all happening overnight. Other manufacturers are now building their versions of the RED, which means more competition and cameras to choose from. It will also inspire everyone to switch to tapeless, and we see that as the most exciting thing for this industry.”
Michael Cioni’s Web site is www.lightirondigital.com.