
Using an Avid system for your RED projects involves a two-step process that combines transcoding and native workflows. You begin by editing a project in Avid Media Composer, using footage transcoded by Avid’s MetaFuze utility from R3D to DNxHD-formatted MXF files. (DNxHD is Avid’s native video codec, optimized for all of its applications, and Material Exchange Format [MXF] is Media Composer’s native editing file format.) You then complete final color correction natively with R3D files using Avid DS. It may sound a little complex at first, but if you have some familiarity with the Avid system, this is a similar workflow to film or HD online finishing. Avid has worked hard to adapt the RED workflow to its software, rather than the other way around.
The Apple Final Cut Pro and Adobe Premiere Pro workflows function well on the Mac platform, but for Avid I recommend going with a Windows machine. Media Composer is cross-platform, but MetaFuze and DS, which are central to the process, are Windows-only. You can run them in Windows virtualization on a Mac via Boot Camp or VMware’s Fusion (www.vmware.com), but you’ll face potential performance and disk-formatting issues. If you’ve ever exchanged media projects between Mac and Windows, you know this can be a real pain.
Note
Although this book focuses on Avid Media Composer for editing, the Avid Symphony editing suite is also capable of utilizing RED DNxHD transcoded footage from MetaFuze.
Tip
One way around the MetaFuze requirement, if you’re on a Mac, is to use RED’s REDCINE application to derive your transcoded files for editing. This steps outside of Avid’s product line a bit, but it can make all the difference in successfully completing a Mac-only RED project. For demonstration purposes, this chapter uses MetaFuze, but the methodology is essentially the same once you complete the conversion of R3D to DNxHD. It’s just a different application doing the actual transcoding.
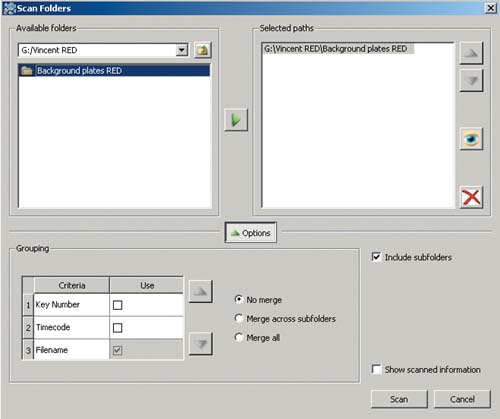
To begin a project, first organize your RED media files under a single main project folder. This is not essential—and may not even be practical if you have a huge project or if you’re ingesting footage on a daily basis—but it will make your work go faster. You can rerun the MetaFuze transcoding process as needed while you continue to edit. For each directory, simply point MetaFuze to the top level containing your RDM folders, and it will scan for all available R3D files (Figure 12.1). (Make sure to include subfolders in the scan.) You can also choose the destination media folder for completed transcodes.
Once the R3D files are all loaded, you can set the transcoding format options and which level of DNxHD compression you want to use (Figure 12.2). The higher the number after DNx, the better the image quality. DNx 36 is suitable for offline editing with minimum hard drive space requirements. DNx 175 is of sufficient visual quality to potentially be usable as a finishing format. You’ll want to evaluate for yourself whether the image quality is truly acceptable for online at 175 or whether you want to continue into an R3D native finish in DS. For example, the postproduction team on ER determined that DNx 175 wasn’t working for certain shots, so they re-exported to DPX files for their final color correction outputs (though at the time they were using a version of DNx 175 that had not been fully optimized for the RED).

In addition to standard formatting options, RED-specific transcoding options in MetaFuze can help determine the visual quality of your transcoded files (Figure 12.3). You can adjust the debayer quality, ISO, optical low-pass filter (OLPF) compensation (which helps determine the transcoded image’s sharpness), and decoding resolution (full, half, quarter, or eighth).

Each of these selections determines how the resulting transcodes look, but the higher the quality, the longer the transcodes will take. Experiment to determine the best trade-off of time versus quality for your own process. If you’ve done any preliminary color correction in RED Alert!, you can also import the resulting RLX file and apply it to the transcode.
Tip
Once you’ve found a favorite combination of settings for a project, you can save a preset by clicking the Save Preset button on the lower-right side of the MetaFuze application window.
An option that will be familiar to Avid veterans is the ability to set a timecode burn-in, which appears as visible metadata directly overlaid onto the transcoded footage (Figure 12.4 and Figure 12.5). Burn-ins can be very helpful to verify timecode across departments, help assure audio sync, and give precise frame counts to visual effects and animation crews. In addition to standard edge code and time-of-day timecode, you can also burn in a wide variety of other metadata from the original R3D files, such as ISO, debayer mode, camera clip name, and so on.


Note
Because MetaFuze outputs R3D files to HD-resolution files, the gamma space is always REC 709. Keep this in mind if you’ve been monitoring your camera footage with a different gamma profile, such as REDspace, so you’re not surprised if your footage looks different in editing.
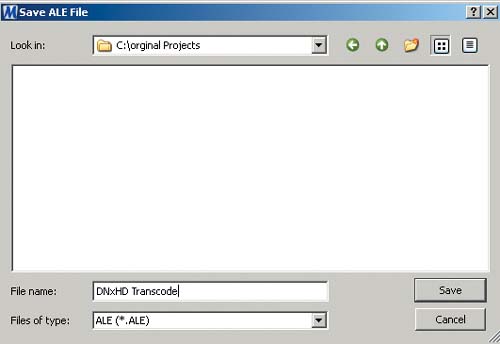
Once you’ve set everything the way you want, click the Transcode button at the bottom of the MetaFuze window and wait. The files will be transcoded and will begin appearing in the destination media folder. When the process is complete, the final step in MetaFuze is to create an Avid Log Exchange (ALE) file. This file is a record of all the files you transcoded in this session, along with their settings, and will assist the import process in Media Composer. To create the ALE file, click the Export ALE button at the bottom of the application window, and save the file with the name of your project (Figure 12.6).
The next phase is editing with Media Composer. As I mentioned at the start of this chapter, Avid’s approach calls for doing creative editing work in Media Composer, with final color correction and high-quality format output in Avid DS. The image quality in Media Composer can be very high, depending on the DNxHD compression settings you chose in MetaFuze. But keep in mind that footage will look even better once you get to the last steps in DS, working directly from the R3D files. (Finishing from the R3D files should be considered essential for film outputs and 2K or higher, while HD and SD work can be finished in Media Composer from DNx 175 files.)
To begin editing your RED footage in Avid Media Composer, create a new project in Media Composer using the same frame rate of the R3D files (such as 23.98 or 25) and the resolution of the MetaFuze DNxHD transcodes (typically 720p or 1080p). Then follow these steps:
Start Media Composer. The Select Project dialog opens.
Click New Project and enter the name of your project.
Click the Format menu, and then pick your footage frame rate and DNxHD footage resolution. Then click OK. Your new project opens.
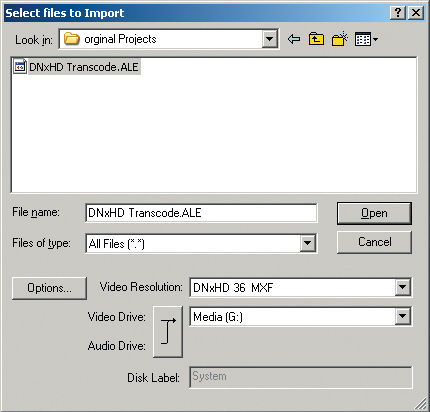
Next, import the ALE file you created in MetaFuze by choosing File > Import (Figure 12.7). Then choose your ALE file and click OK, which should bring in all of the associated transcoded media (Figure 12.8).
If any media doesn’t come across, launch the Avid Media tool by choosing Tools > Media Tool, and manually drag the transcodes into a bin.

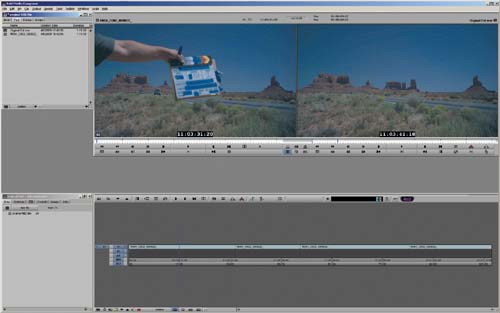
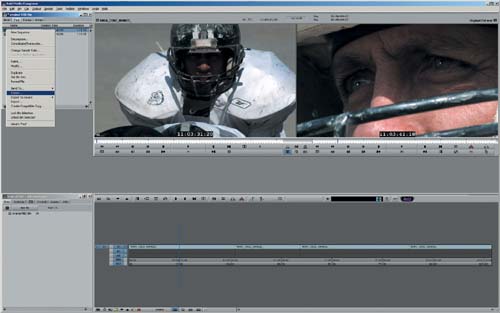
Once you have all of your DNxHD transcoded footage loaded properly into Media Composer, you can edit as you would any high-definition project (Figure 12.9). One consideration is where you intend to finish. The nice aspect of finishing in Avid DS is that it’s a very simple process to get from a Media Composer edit; additionally, all the filters and effects you apply in Media Composer are automatically translated into your DS project. I will assume that’s your intended workflow as this chapter continues.
When you have completed your editing work in Media Composer and are ready to move onto finishing in DS, you need to export an Avid File Exchange (AFE) file. AFE is a special format designed to facilitate project sharing between Avid applications. To create the AFE file, simply select the current sequence, and choose File > Export (Figure 12.10). Select AFE as the Export setting, and click the Save button.
Conforming is the process of taking the offline edit you made in Media Composer and correlating it to the original R3D files using Avid DS. This gives you the maximum possible image quality and resolution to derive your final outputs such as HD and film. To begin the conform process in Avid DS, follow these steps:
Create a new project. Make sure to match the resolution, aspect ratio, and frame rate of your original R3D files (not your Media Composer edit). You’ll find presets for all the available RED formats under the Film settings in DS. In Figure 12.11, I’m setting up to conform a project shot at 2K 16:9 and 24p (23.98) using the Video Settings section of the New Project dialog.
Next, choose File > Open and load the AFE file. You’ll notice it contains not just your sequence but all the media used in the Media Composer project (Figure 12.12).
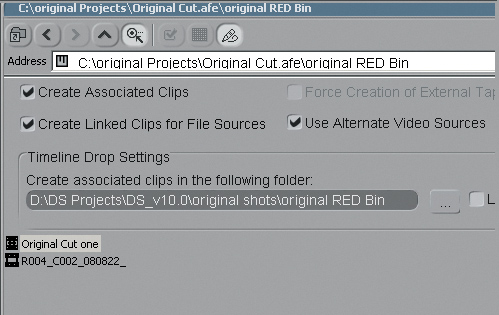
Select the sequence you want to conform (Figure 12.13). Select the Create Associated Clips, Create Linked Clips for Files Sources, and Use Alternate Video Sources check boxes. Then click the Configure button.
In the Choose Alternate Video Sources dialog that launches, select the top-level folder containing your R3D camera originals (Figure 12.14). Make sure no other formats (such as DPX) are in here.
Confirm that all the directories and clips you expect appear in the window, and click OK.
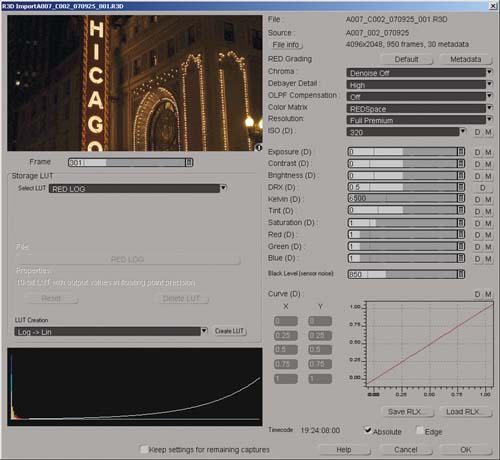
The Color Management window launches (Figure 12.15). You’ll find these controls familiar if you’ve worked with RED applications such as RED Alert! Since DS uses the SDK from RED, many of the options here are identical.
Within the Color Management window, you can access the R3D files directly and choose important options such as your gamma and color space, extensive color and exposure controls, and debayer method. You can also load RLX files from RED Alert! if you want to reuse color corrections you made before starting postproduction. (You can always return to this window on a shot-by-shot basis from within DS by right-clicking a clip in the Timeline and selecting the Properties option.)
Once you set the Color Management options, drag the sequence directly into the Timeline. It should now be a complete conform of your Media Composer offline edit pointing to the full-resolution, native R3D files (Figure 12.16).


Now that you have a conformed project in Avid DS referencing the native R3D files, your options are wide open. You can easily create an HD or SD down-conversion to a variety of formats, either compressed with the codec of your choice or uncompressed. You can also export to DPX image sequence files if, for example, your final destination is a film print.
To create a DPX output, follow these steps:
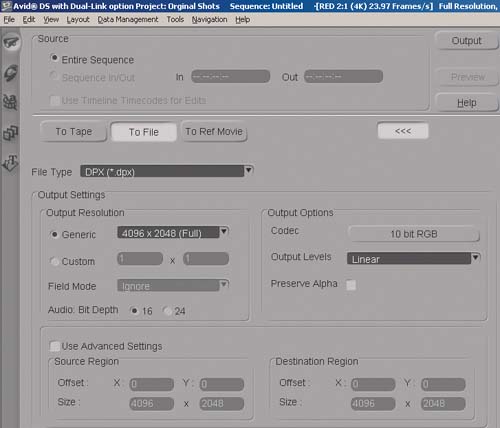
Select the sequence and then choose View > Single Instance View > Output Tool. The Output Tool opens (Figure 12.17).
Click the To File button.
Next choose your output format options. In this example I’ve chosen to output Entire Sequence as my Source to DPX. I’ve also chosen 4096 × 2048 for a full 4K output resolution.
You can also create a custom color lookup table (LUT) to go with your DPX files (Figure 12.18). This is a key step because you can load LUTs in most color correction suites (such as a da Vinci), and it will go a long way in assuring that the look of footage you’re seeing in DS is the same as in the color correction suite.

Tip
The export process is the same for outputting your project to HD or SD—just choose the desired resolution and file format in place of DPX and 2K.
Avid’s approach has evolved significantly since the RED camera first came out and may have changed even more by the time you read this chapter. For the latest techniques and updates, visit the book’s companion Web site at www.peachpit.com/red or Avid’s RED support page at www.avid.com/RED.
PRINCIPAL PRODUCT DESIGNER, AVID TECHNOLOGY
As principal product designer for nonlinear editing pioneer Avid, Michael Phillips has observed multiple digital revolutions in the movie business. One revolution happened in 1992 when Avid (www.avid.com) introduced Film Composer, the first native 24 fps digital nonlinear editing platform, enabling moviemakers to edit projects on a computer rather than directly slicing pieces of film. Over the years, Avid’s software has evolved to support many different cameras and resolutions from standard-definition videotape all the way up to 2K/4K file-based finishing and beyond. With the RED ONE, Phillips is watching another digital revolution change the movie world.
Avid’s interest in RED began as soon as the camera was unveiled in April 2006. “We saw the camera at NAB when it first came out,” recalls Phillips. “Within three months we visited RED at their offices at Oakley and said, ‘Whenever you have something available to test, please let us know.’ They went through many development phases, which took about a year. Then it became a real workflow solution project for us, learning what the camera could do.”
While analyzing the camera and its file-based methodology, Phillips took note of how working methods were evolving over time. “It’s interesting to see how much postproduction is moving onto the set,” he notes. “As a camera operator, assistant, or DIT, you need to be aware of post more than ever. It’s not as easy as the good old days when you handed over a roll of film or a tape and said good-bye. There’s a real convergence of post and camera coming to a head right now. RED is leading the charge on that because of its immediate accessibility.
“Anything that’s a disruptive technology is very interesting to watch,” Phillips adds. “When Film Composer came out in 1992 as a true 24-frame digital editing system, you saw a very quick adoption rate. Panasonic’s DVX100 was another disruptive technology. As the first 24p DV camera, it was outselling every other DV camera at the time 10 to 1 in the filmmaking market. RED has a fantastic marketing strategy that keeps interest at an all-time high. They also maintain good customer interactions, with Jim Jannard directly engaging customers on REDuser (www.reduser.net). You couldn’t do all of that as a public company, but a private company has that ability.”
Avid uses RED’s software development kit (SDK) to be able to read RED’s native R3D files and access their metadata in order to facilitate ingest into its products like Avid DS and Avid Media Composer. A special Avid-designed utility called Avid MetaFuze handles the conversion from R3D to Avid’s MXF-wrapped DNxHD codec.
“I don’t think it’s necessary to be able to transcode back to R3D right now,” Phillips says. “At some point they will need some sort of encoder, especially when they release the RED-RAY [RED’s proposed player device for R3D files encoded on disc]. It will also help in other places to do native R3D encoding. If you look at Adobe doing native, unless you’re doing a bunch of straight cuts, you’re going to have to render at some point, whether it’s color correction or effects. That’s going to be some other format that isn’t R3D. You can’t stay fully native throughout the production process.”
Phillips continues, “The workflow doesn’t lend itself to native all the time either. The bonding company wants to know where those R3D files are going and who really owns them. The turnaround deliverables on a production also remain the same, regardless of the acquisition format. On TV and features, the next morning after a shoot, they want to start editing and need viewing DVDs and H.264s for producers to review on a Web site. People are looking for pipelines that allow them to maintain all those expectations.”
Turning to the world of independent production, Phillips observes that time is often more available than money. “There’s still going to be a performance benefit to transcoding to DNxHD or ProRes, and if it takes you an extra day, that’s what you’ll do,” he says. “Editors have a certain expectation as to what they can do in real time, like eight streams of DNx36 on multicam shows, and so on. I don’t think you’ll get that with native RAW files for a while because the decoding is a computationally expensive process.”
For Phillips, the question is whether the transcoding will be done by the editors themselves or farmed out to post-production facilities. “The issue is scaling for many different deliverables versus one tape,” he observes. “If you have one system that can churn out dailies at something less than real time and you have just one project, you can turn it around within 24 hours. But if you have 20 projects, that’s a different story. Solutions like ASSIMILATE’s SCRATCH CINE or Baselight Transfer (BLT) become interesting because they can play RED footage in real time with color correction. Then one post room can handle multiple projects in a more streamlined manner. That’s where you have to decide whether you’re going to do a tape-based workflow or a transcode/file workflow. In the end you’re still getting the same edit from the same media—it’s just how fast you get it that’s driving decisions.”
Asked about Avid’s long-term goals for working with cameras like RED, Phillips envisions a further expansion of support. “There are lots of cameras out there, and RED is certainly a priority right now,” he says. “But what’s even more important is the infrastructure we’re putting in place to allow camera manufacturers to come into the Avid world themselves. We want to place an open, native wrapper around incoming camera formats that goes directly into the editorial environment without Avid adding support directly for every model. AMA (Avid Media Access) was released with version 3.5 of Media Composer. That initiative’s acceptance is based on priorities and engineering resources at each company.”
As someone who’s seen many new technologies alter the movie industry, Phillips expects a continued evolution for the foreseeable future. “It’s just human nature that bigger and better formats mean bigger and better quality,” he says. “Now all the tent-pole directors like Spielberg want to shoot IMAX for certain scenes because The Dark Knight did it. IMAX looks better, and it’s a creative challenge for them. You’ll see that in file-based cameras that will go to 2K, 4K, 6K, 8K, and just on and on. You’ll probably always be editing with a proxy while the CPUs catch up to the playback speed of newer formats. We’re all just chasing the technology.”
Avid’s Web site is www.avid.com.