
7
Using the Level Sequencer
In the previous chapter, we learned how to bring our own motion capture data into Unreal and retarget it to a MetaHuman. However, there are times when we need to make adjustments that are required to fix issues or add an extra level of creativity to its performance.
One issue we came across in the last chapter was caused by the discrepancies between using A-Pose and T-Pose, and we were able to fix that by editing the A-Pose of our MetaHuman inside the MetaHuman Blueprint.
In this chapter, we are going to look at another way to make changes to our character’s pose to fix minor issues, such as an arm colliding with the torso of the MetaHuman, but will also look at how we can refine the motion of the character. For this, we will use the Level Sequencer, which is the tool we use for animating anything in Unreal Engine, and in many ways, works like a timeline in a video editing application.
So, in this chapter, we will cover the following topics:
- Introducing the Level Sequencer
- Creating a Level Sequencer and importing our character Blueprint
- Adding the retargeted animation to the character Blueprint
- Adding and editing the Control Rig
- Adding a camera to the Level Sequencer
- Rendering a test animation from the Level Sequencer
Technical requirements
In terms of computer power, you will need the technical requirements detailed in Chapter 1 and the MetaHuman plus the Unreal Engine Mannequin that we imported into UE5 in Chapter 2. Both of these will need to be saved in the same project in UE and you will need to have UE running for this chapter.
For this chapter, you will also need to have access to the motion capture data that you just retargeted in Chapter 6.
Introducing the Level Sequencer
Until now, you’ve only been able to preview your animation either within the character Blueprint or within the viewport using the Play button. The Play button is effectively simulating gameplay, which is purely for an interactive experience.
The Level Sequencer can be used in gameplay, but for the purpose of this book, we want to focus on using the Level Sequencer to make the most of our motion capture animation. A Level Sequencer is a timeline within our level where we can control our animations. It is similar to any other timeline in an editing program, except that instead of adding video clips, we add elements to our scene, and then apply animatable attributes.
When using Unreal Engine for animation, anything you want animated needs to be added to a Level Sequencer, including lights, cameras, actors, vehicles, and even audio, and you can have more than one Level Sequencer in any given project.
The beauty of the Level Sequencer is that it allows you to only focus on the animated objects, and also allows us to effectively tweak animation by adding independent keyframes without being overwhelmed by all the keyframes that come with the motion capture data. Using it, we can make changes to the motion capture animation without having to depend on getting absolutely perfect takes when working with a motion capture solution such as DeepMotion or motion capture library files such as Mixamo.
In the next section, we’ll go through the process of getting a character into a Level Sequencer.
Creating a Level Sequencer and importing our character Blueprint
So, let’s get started with creating a Level Sequencer (there isn’t a lot to it).
First, you need to right-click anywhere within your Content folder; in my case, I did just that within my MetaHumans folder, which you can see in Figure 7.1. Then, go to Animation, and then click on Level Sequencer.
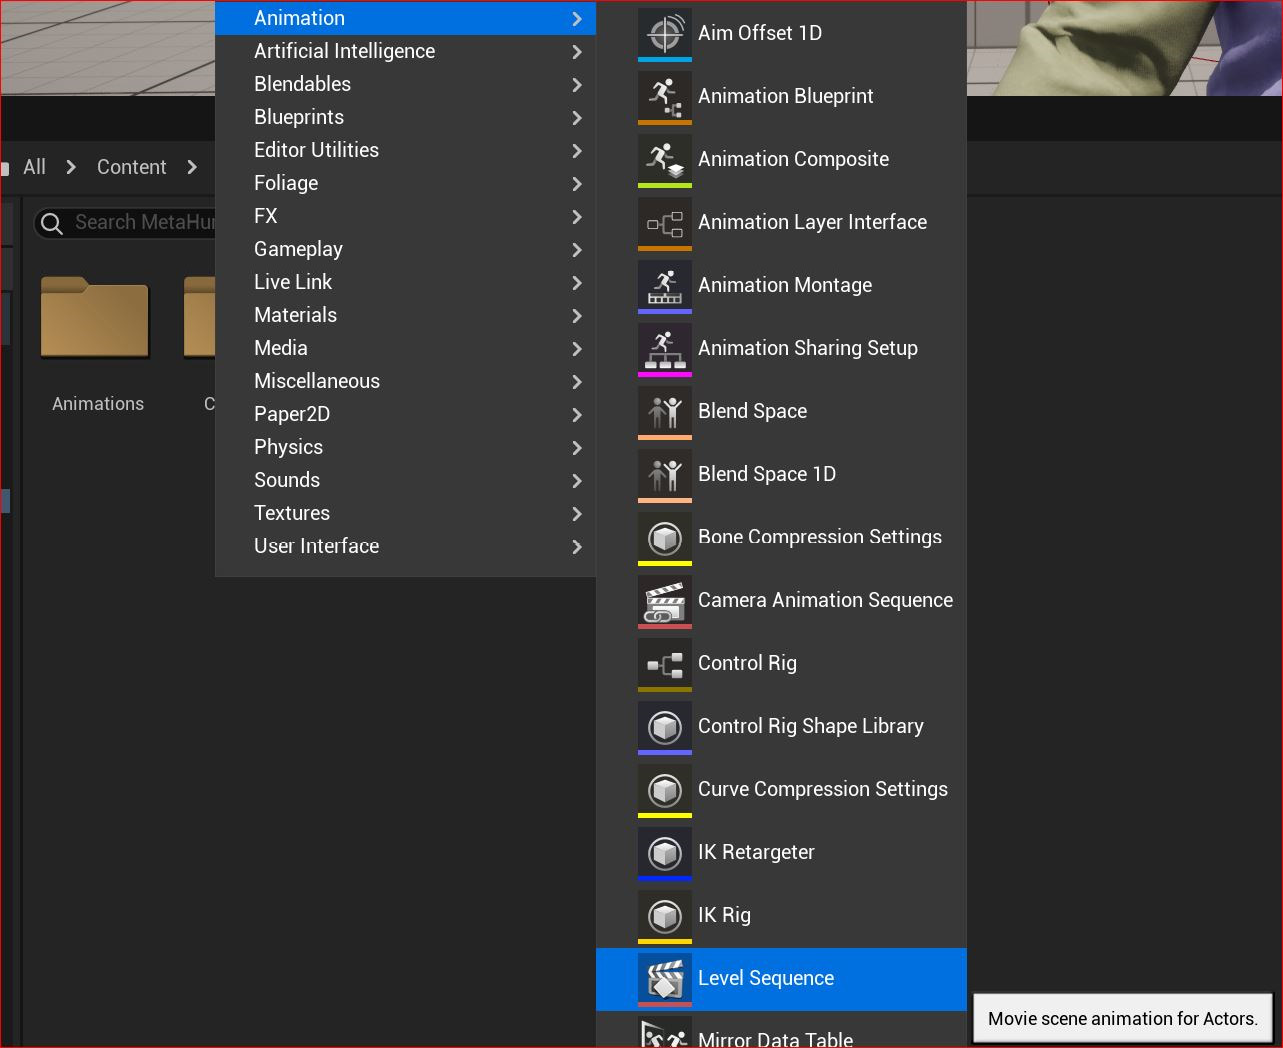
Figure 7.1: Creating a Level Sequencer
With the Level Sequencer created, you’ll see a Level Sequencer clapper icon in the Content folder. Double-click on the Level Sequencer icon to open it. You will see an empty Sequencer as per Figure 7.2:

Figure 7.2: An empty Level Sequencer
In order to animate using the Level Sequencer, you need to add an actor. An actor can be pretty much anything that you want to animate. Once an actor is added to a Sequencer, an animation track is created.
Because we want to animate our MetaHuman character, we will need to add the MetaHuman Blueprint as our animation track. To do this, simply click on + Track and then Actor To Sequencer:

Figure 7.3: Adding an Actor to the Sequencer
In Figure 7.3, you can see a list of actors that are available to add as tracks. At the very top of the actor list is BP_Glenda, which is my MetaHuman character. Click on your MetaHuman Blueprint to import it into the Level Sequencer as an animation track.
Once you add the Blueprint to the Sequencer, you will get two tracks: one for the body and one for the face. As you can see from Figure 7.4, each of these tracks has a Control Rig. Initially, the Face Rig should be selected, which will reveal a yellow interface on the viewport with controls to animate the face (although we won't be looking at these).

Figure 7.4: Adding the MetaHuman Blueprint
The other rig available to us is the Body Rig. If you select the Body track in the Sequencer, the rig will become visible in the viewport, now demonstrated in Figure 7.5:
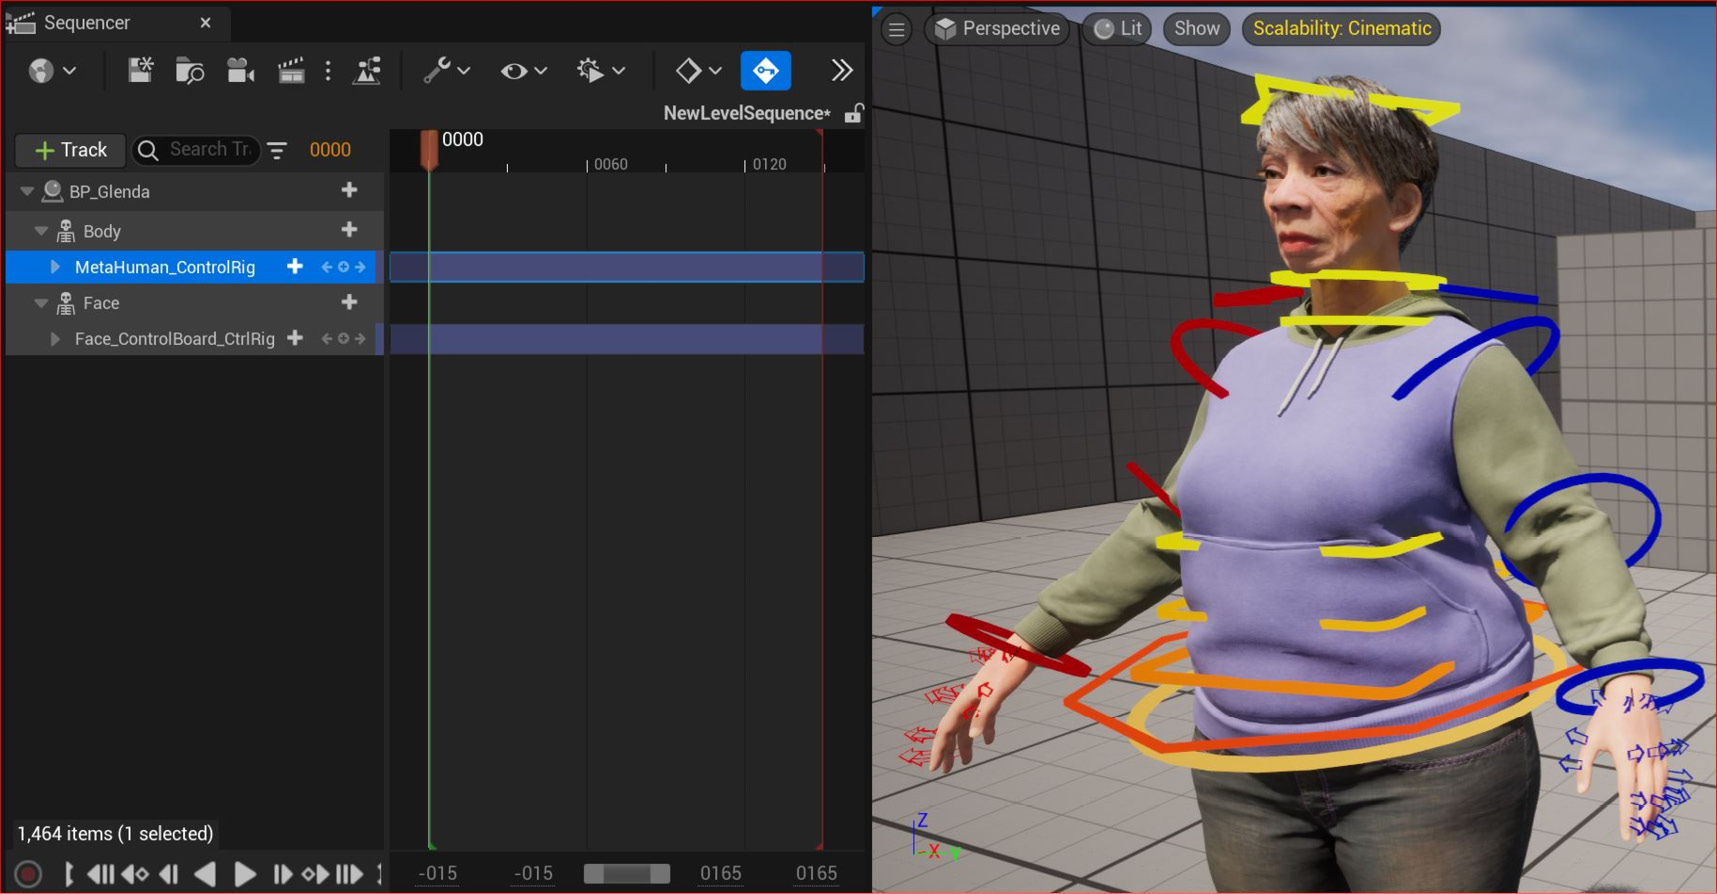
Figure 7.5: The MetaHuman Control Rig
At this point, you have just gained a vast amount of control over your MetaHuman Character in terms of animation. Whether you are a seasoned animator or a novice, I recommend you experiment with these animation controls. In particular, experiment with rotating any of the colored components of the MetaHuman Control Rig as per Figure 7.5, before you move on to the next section.
With the character Blueprint added to the Level Sequencer as an actor, we are now ready to bring in some motion capture data, which we will do in the next section.
Adding the retargeted animation to the character Blueprint
Before we continue to our DeepMotion animation into the Sequencer, I need to warn you that we are going to take a step that will seem somewhat counter-intuitive: we will delete the Control Rigs for both the body and the face only to end up adding a body Control Rig back in again. In this chapter, our aim is to add the motion capture data and then add an additional track of keyframe animation. However, to do that, we need to have the motion capture data baked into the control rig and then we need to have another control rig for additional animation.
So, let’s delete the two current Control Rigs. You can do this by simply clicking on Metahuman Control Rig and Face_ControlBoard_CtrlRig in the Sequencer and hitting Delete on your keyboard.
Now, with Body selected in the Sequencer, click on the + icon, and then from Animation, search for Retargeted. This should call up the retargeted data created by the IK Retargeter from the previous chapter, which you can see in Figure 7.6:

Figure 7.6: Adding the retargeted mocap data
Once you have selected the retargeted mocap, it will appear on the timeline within the Sequencer.
Note
The animation will start at wherever your play head is on the timeline. The play head is the position on the sequencer timeline that it’s currently paused at, and the frame the animation will start from. In Figure 7.6, my play head is at the frame numbered 0115 (indicated by the red arrow).
When you have imported the mocap animation as a track, you can reposition this track to start at any time by simply dragging the track left or right. The track itself includes the title of the animation displayed within it. In Figure 7.7, you can see the animation track under the horizontal blue line.

Figure 7.7: The animation track
In order to modify the animation, we must convert the motion capture data into keyframe data on a Control Rig. This process is called baking, and we can do this by simply right-clicking on the body track, choosing Bake to Control Rig, and selecting Metahuman_ControlRig as seen in Figure 7.8:
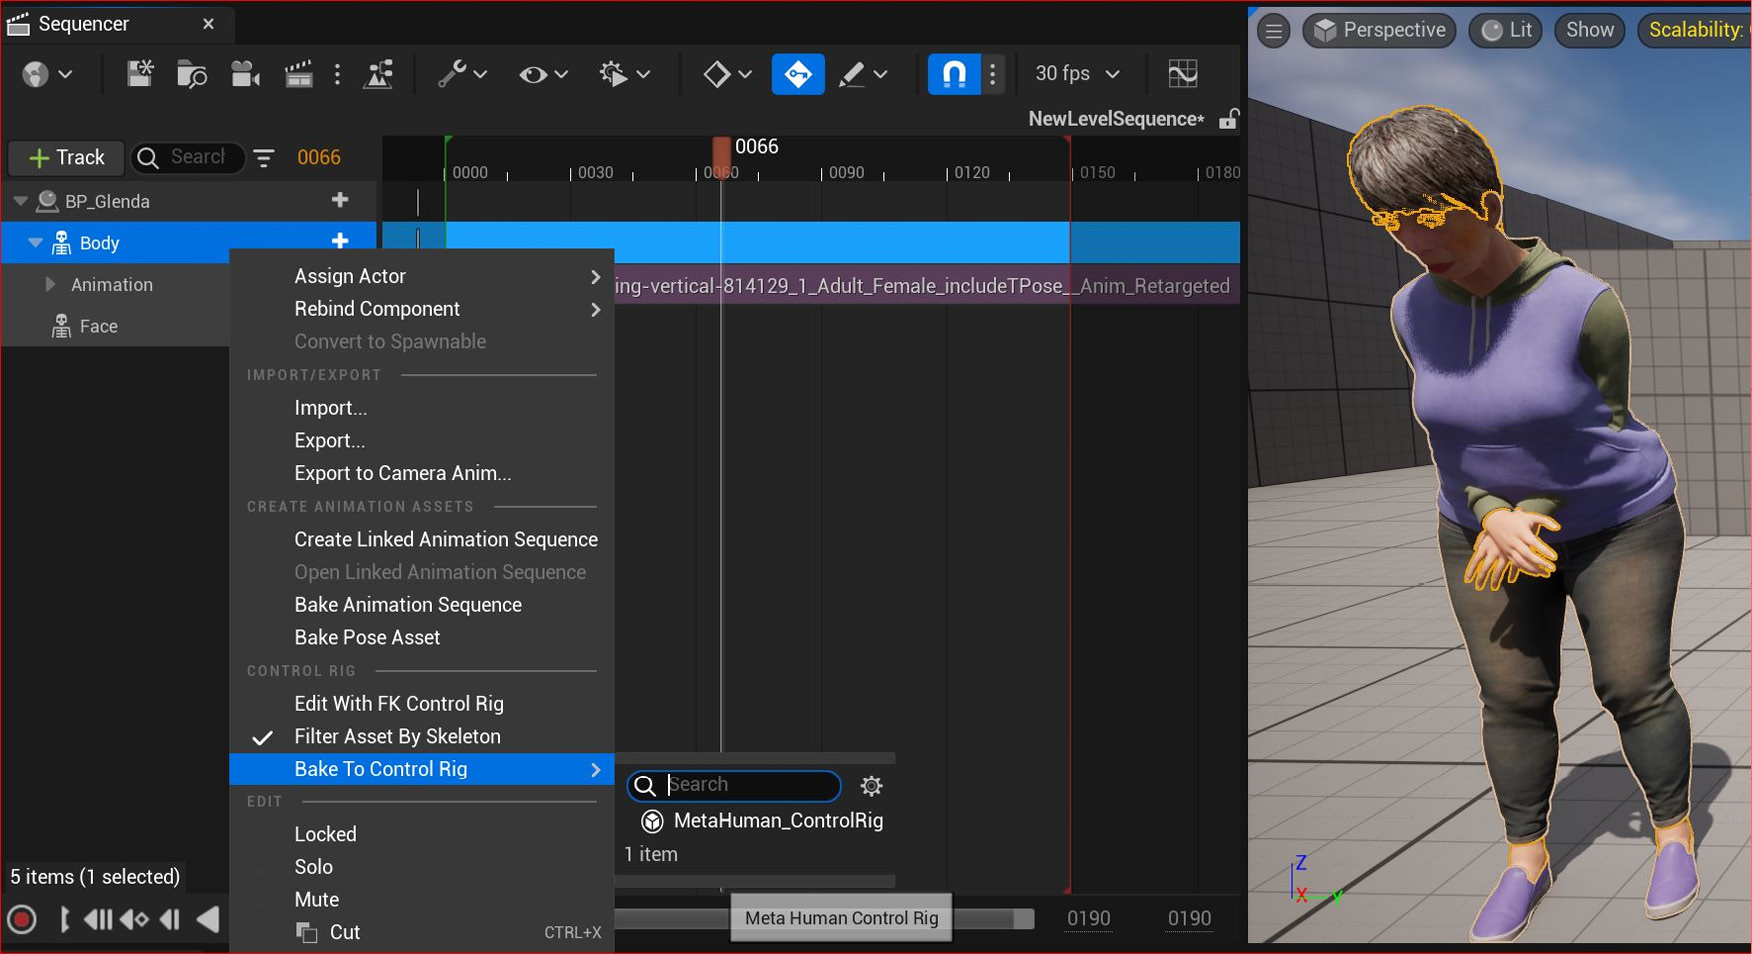
Figure 7.8: Baking to the Control Rig
Once you have started the baking process, you will see the Options for Baking dialog box. Because we don’t need to reduce keys, you can keep the default settings and just click Create.

Figure 7.9: Options for baking
In Figure 7.10, you can see that the mocap animation I imported is now baked into the MetaHuman Control Rig and the character in the viewport is now animated.

Figure 7.10: Mocap baked into MetaHuman Control Rig
Now, you can activate the play function by either hitting the spacebar or using the Play button at the bottom of the Sequencer tab.
With the mocap animation working in the viewport, the next step is to set up a way to make edits to the animation. Because there is now a keyframe on every single frame for every bone in the MetaHuman body, attempting to make any changes to the current MetaHuman Rig would be practically impossible. For example, if we choose to go to frame 100 and change the pose on that particular frame, only frame 100 would be affected as all the other frames have poses based on the mocap data we converted earlier. Let’s see how to get around this.
Adding and editing the Control Rig
To get around our keyframes problem, we need to create another MetaHuman Control Rig with no keyframes, so that any keyframes that we do add will have an additive effect.
What do we mean by additive? For example, if a rotation of a shoulder joint on the x-axis was 100 degrees as a result of motion capture, then using an additive workflow, rotating a shoulder by a further 20 degrees on the x-axis would result in the final rotation being 120 degrees. We get to 120 degrees because we are simply adding 100 + 20 degrees.
Note
Keyframes on the additive section will not affect the original keyframes of the baked Control Rig. However, they do affect the end result.
In order to gain an additive effect, we must create an Additive section in our Sequencer, as seen in Figure 7.11:
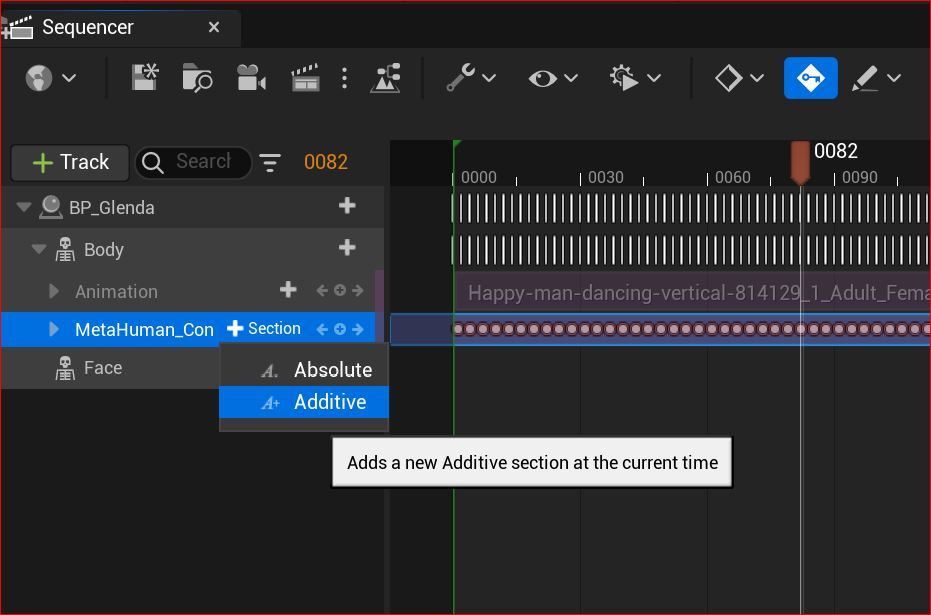
Figure 7.11: Adding an Additive section
As per Figure 7.12, the Additive track is added, which is a sub-track of the Control Rig we just created. This is where we can address animation issues or add changes to the animation without affecting the original motion capture:
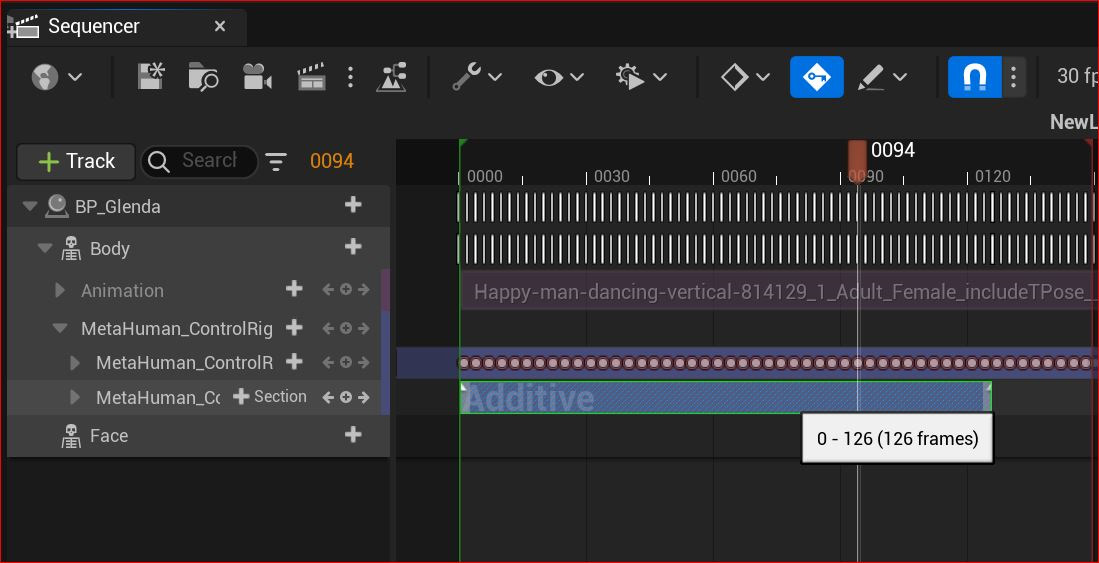
Figure 7.12: The Additive section track
At this point, we effectively have two rigs, each with its own track: one track has keyframes for every bone on every frame and the other has zero keyframes. In the next section, we will be adding keyframes to the additive section/track only. Even though we are making changes to the animation as it appears in the viewport, we won’t be editing the original keyframes of the motion capture. In essence, this is a non-destructive workflow.
Note
The use of the words section and track are synonymous in the case of adding an Additive or absolute section/track.
To edit the Additive section, make sure that you have the Additive section selected in the Sequencer, which I have done in Figure 7.13:

Figure 7.13: Adjusting the Additive control track
You can also see that this is a problematic clip because the mocap has collision issues with Glenda’s left arm – it’s colliding with her body, which is most likely due to the source character being much leaner than the target. However, with the additive workflow, we can just concern ourselves with fixing the time frame where that becomes an issue.
Figure 7.13 shows us that, in frame 0099, Glenda’s arm intersects with her body, so we need to fix that frame. We can do that by rotating one of the arm joints.
To do this, hit the E key to use the Rotate function. Then, click on the drop-down arrow on the left of Metahuman_Control Rig in the Sequencer. In Figure 7.14, you can see the drop-down list that allows me to gain access to all the different bones. For this issue, in particular, I want to just alter the left upper arm and left lower arm.

Figure 7.14: Setting keyframes on the Additive track
By default, as soon as you make a change, a keyframe is set. You can see the keyframe highlighted in Figure 7.14 and, in the viewport next to it, you can see the effect of that change in the viewport. Because I have no other keyframes set in the additive track, the effects of that change will be apparent for the whole duration of the clip.
If I wanted to just adjust to a specific time period such as 2 seconds, I would need to create 3 keyframes. The 1st and 3rd keyframe would be to preserve the original pose and the 2nd (middle) keyframe would be where the change would take place.
Take a look at Figure 7.15 and you will see how I have added extra keyframes:

Figure 7.15: Adding extra keyframes to the Additive track
The middle keyframe is where the most extreme change has been made because this was the problem area. As you can see in Figure 7.15, I have numerical control over the Location, Rotation, and Scale settings, which is what I used to rotate the shoulder so that the arm isn’t penetrating through the torso anymore, thus fixing the problem. You could use the spline for editing, as shown in the graph on the right of Figure 7.15, but I personally find it cumbersome, albeit useful for visualizing changes.
There are endless possibilities when it comes to adding keyframes to fix animation or to add a level of creativity. You may decide to add a head turn, a blink, a wave, or something else you didn’t get at the motion capture stage. All this is now possible with the Additive selection within the Level Sequencer.
Note
When you want to edit a particular joint, use the search option to find the joint. This will show just the joint you searched for, which allows you to focus just on that should you find the list of joints distracting.
Now that we’ve got our character into the Level Sequencer and made some tweaks, the next thing we need to do is to create a camera in order for us to render out a movie.
Adding a camera to the Level Sequencer
The UE5 camera is a powerful tool, as it operates just like a real camera. I could write a whole book on the camera alone, but in the interest of completing this chapter, you’ll just learn about some very basic camera tips that relate specifically to the Level Sequencer.
For simplicity, we are going to create a camera using the Level Sequencer. We also need a Camera Cut; this is like a master track, mainly designed for the use of multiple cameras, but we still need it for just one camera. The Camera Cut is only automatically generated when we create a camera from within the Level Sequencer.
Before we can do that, first we need to create a playback range. You can do this by right-clicking anywhere on the timeline within the Level Sequencer, choosing Set Start Time, and then clicking where you want to start the animation. Then, do the same with our Set End Time. The difference between these two times is the playback; however, this range is also used for defining the range of frames to render at a later stage.

Figure 7.16: Setting a start frame for the playback range
You will know when you have created a playback range because you will see both a green and red line, as per Figure 7.16 – I have selected the start time at the beginning of the keyframes that I baked earlier, and the end time is just where the keyframes end. This ensures that my playback range is the same length as the entirety of the animation. You can always extend your playback range by simply dragging the red line to the right-hand end of the timeline.
With the playback range created, now we can create a camera that will automatically create a Camera Cut to fill the playback range that we created. Very simply, click on the camera icon at the top of the Sequencer:

Figure 7.17: The camera icon
A camera will be created, and more tracks will have been created within the Sequencer:

Figure 7.18: The camera created
You can see from Figure 7.18 that we have now obtained a Cine Camera Actor (which is a virtual version of a real camera). With the camera, we also have a number of parameters, such as the following:
- Aperture: This is how wide the iris of the lens is. A lower number means that more of the picture will be out of focus, while a higher number provides a sharper image. This realistically mimics how cameras work in terms of depth of field, but not exposure.
- Focal Length: Just like with a real camera, the focal length is measured in millimeters. A lower number creates a wider-angle lens and a higher number creates a telephoto or long lens.
- Manual Focus Distance: Again, just like a real camera, the focus area is set to a given distance from the camera. For example, you may only want to be focused on objects that are 5,000 mm away from the camera.
- Spawned: A feature aimed at game simulation. If checked, the game engine will spawn the camera when the game starts.
- Transform: An editable parameter for moving, rotating, and scaling the camera.
For the most part, you will only want to animate the following parameters: Moving and Rotating in Transform, along with Focus Distance.
Before you go about setting keyframes, a useful function is to pilot the camera to animate. In other words, you can see through the viewport to make sure you’ve got the best composition. In Figure 7.19, I have highlighted the camera icon on both the CameraComponents track and the Cine Camera Actor track. These need to be toggled until you get the Eject icon (the triangle), which I have also highlighted.

Figure 7.19: The camera created
Figure 7.19 demonstrates that the camera is now being piloted, which is a far more efficient way of controlling your camera. If you’re familiar with 3D programs or first-person games, you will find that the navigation with the camera is very intuitive:
- Alt + left-click to orbit (move around)
- Alt + middle click to track (move left to right and up and down)
- Alt + right-click to dolly (move forward and backward)
When you are familiar with navigating your scene with the camera, let’s create your first animation of a camera:
- Click on Transform under CameraComponent inside the Sequencer.
- Then, ensuring your play head is parked close to the beginning of Play Range, hit Enter. This will create a keyframe for all of the transform parameters, such as Location, Rotation, and Scale.
- Do the same with the Focus Distance attribute after first ensuring your MetaHuman is in focus just like in Figure 7.19. You will need to click on Manual Focus Distance, change the value, and hit Enter to create a keyframe.
- When you’re happy with both your composition and your focus, park your play head at a different frame.
- Once you reposition your camera, a keyframe will automatically be placed. If it doesn’t get placed automatically, just click on the Transform attribute as before and hit Enter.
You’ve now created your first animation of a camera while filming a MetaHuman. You may have to edit the Focus Distance attribute to make sure your MetaHuman remains in focus throughout the shot.
It takes a little while to plot camera moves and you may find that you are creating keyframes only to have to delete them again and again. This is perfectly normal. Once you feel you’ve got a reasonable camera movement, it’s time to render some animations.
Rendering a test animation from the Level Sequencer
To render out an animation, first, click on the Movie Scene Capture button (it’s the clapper board icon) at the top of your Sequencer:

Figure 7.20: Clapper board icon
Note
If you have installed the Movie Render Queue plug-in, you will be given a choice of which renderer to use. If so, choose Movie Scene Capture (Legacy).
You will then get the following Render Movie Settings dialog box:
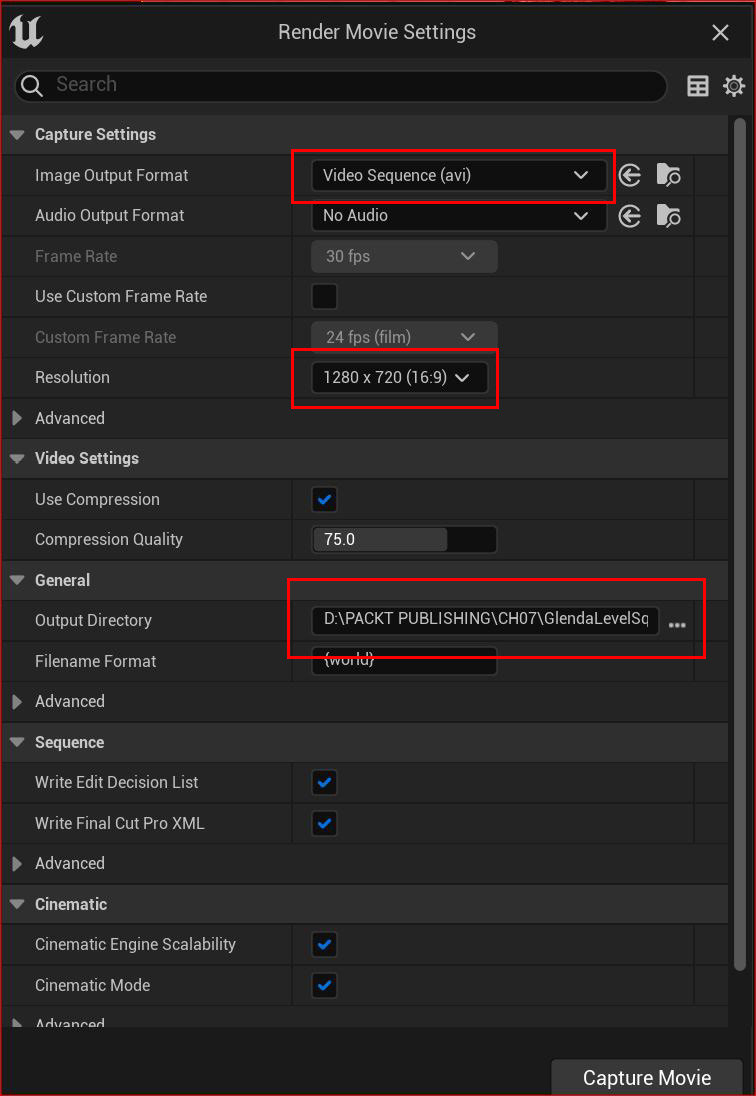
Figure 7.21: Render Movie Settings
In Figure 7.21, I have left all the settings with their default values. Three important settings to note are:
- Image Output Format: You need to render a movie in a format that your system can play. The default is AVI but you can change it to a QuickTime Pro Res file.
Note
To ensure that you can render Apple Pro Res, go to Edit, then Plugins, search for prores, and check the Apple ProRes Media checkbox. Then, you will need to restart Unreal.
- Resolution: The default resolution is 1280 x 720 (16.9) pixels, but you can change it to a higher resolution if you like.
- Output Directory: By default, the Render Movie renderer will try to render the file to your project folder to use as the output directory. You can choose another directory if you prefer.
Once you are happy with your render settings, click on Capture Movie. It will take a few minutes to render your file – while you wait, you can see a preview of your render, as seen in Figure 7.22. You can see that my file is being written to a bespoke directory that I created for this book.
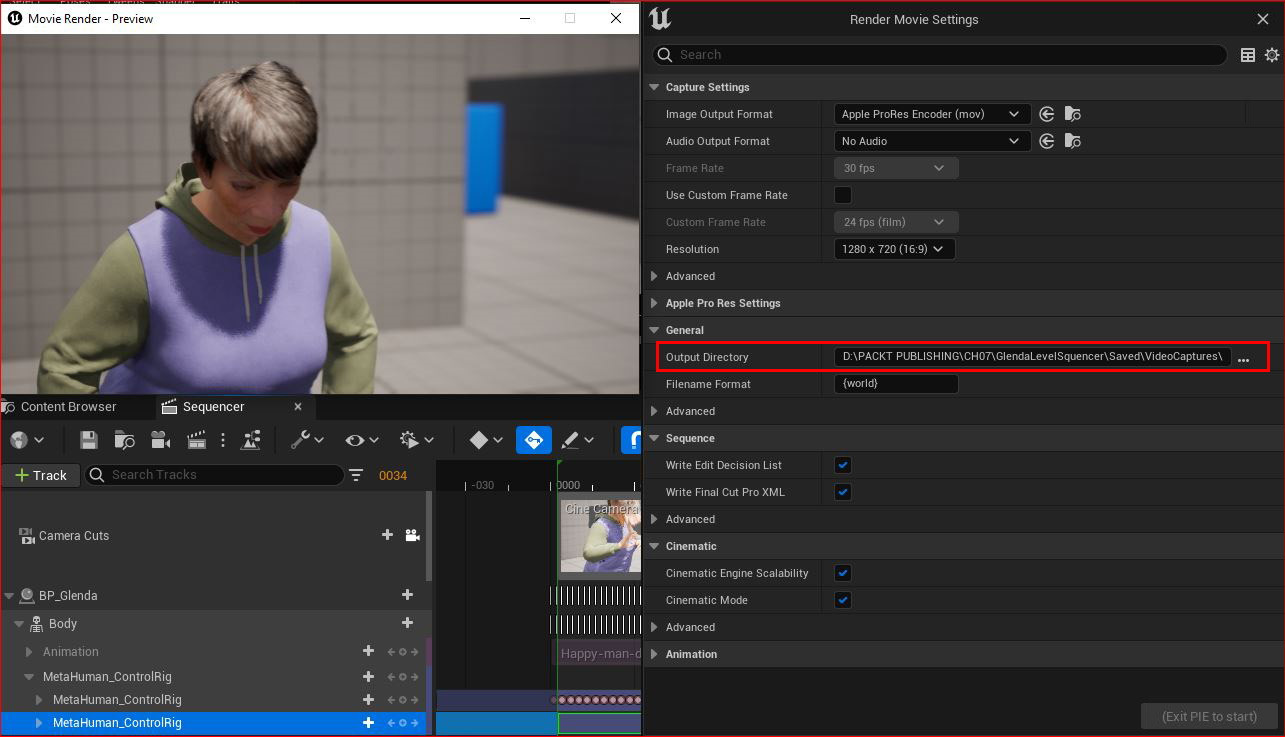
Figure 7.22: The movie render – preview window
To view your finished video, go to the output directory on your PC and click on the MOV file created to play your animation.
Note
On slower systems, when your render looks like it has finished rendering, the render preview window will remain open. The renderer goes through a process of writing all the frames and then through another process of containing the frames within the QuickTime file. At higher resolutions, with bigger files, and slower machines, this process can take almost as long as the initial render.
Summary
In this chapter, we learned how to create a Level Sequencer and add our character to it. We also learned how to create a keyframed MetaHuman Rig based on our mocap data from the previous chapter and an Additive section to apply additional keyframes for the purpose of fixing issues.
Then, we briefly covered keyframing within the Level Sequencer before moving on to creating a camera and animating it in the Level Sequencer. Finally, we learned how to export video files from UE5.
In the next chapter, we are going to work with Facial Motion Capture using an iPhone.