
2
Creating Characters in the MetaHuman Interface
In the previous chapter, you learned how to install the Epic Games Launcher, the UE5 engine, and Bridge to your machine. Additionally, you went through the steps of setting up an Epic Games user account, which you must use again to sign into Quixel Bridge.
This chapter will cover everything you need to know about the MetaHumans Creator (MHC) and the online session where all the character designing takes place. We will look at all the editable features of the many MHC templates, including the face, hair, body, blend, move, and sculpt parameters, as well as the best practices of when to use each attribute within the character design phase.
The primary goal of this chapter is to get you accustomed to the interface and the character design potential, but it will also provide notes on how to implement the same design tools for a more acutely focused design process.
In addition to the various tools and preset editors, you will become familiar with learning just how MHC has become the best-in-class of photorealistic character design as we delve into some of the science around skin shaders.
So, we will cover the following topics:
- Starting up Quixel Bridge
- Editing your MetaHuman
- Using the Move and Sculpt tools
- Downloading and exporting your character
Technical requirements
We will be continuing from the previous chapter, so you will need UE5 and Bridge installed, along with a reliable internet connection. A strong internet connection is particularly important here as you will be downloading over 1 GB of data per character.
Starting up Quixel Bridge
When you are ready, go to Quixel Bridge and open up MetaHuman. You can do this easily by simply typing in Bridge next to the Windows start icon at the bottom left of the screen and then hitting Enter. This will start up Quixel Bridge, as shown in Figure 2.1:

Figure 2.1: Starting up Bridge
Take note of the column on the left-hand side. Clicking on the person icon will bring up the MHC templates, which you need to choose from before you can start your MHC session. This will bring up a few images of male and female MetaHumans with a wide range of ethnicities and age groups.
Clicking on a profile will open a panel on the right, showing you an enlarged image of your selection and the character’s name, as shown in Figure 2.2:
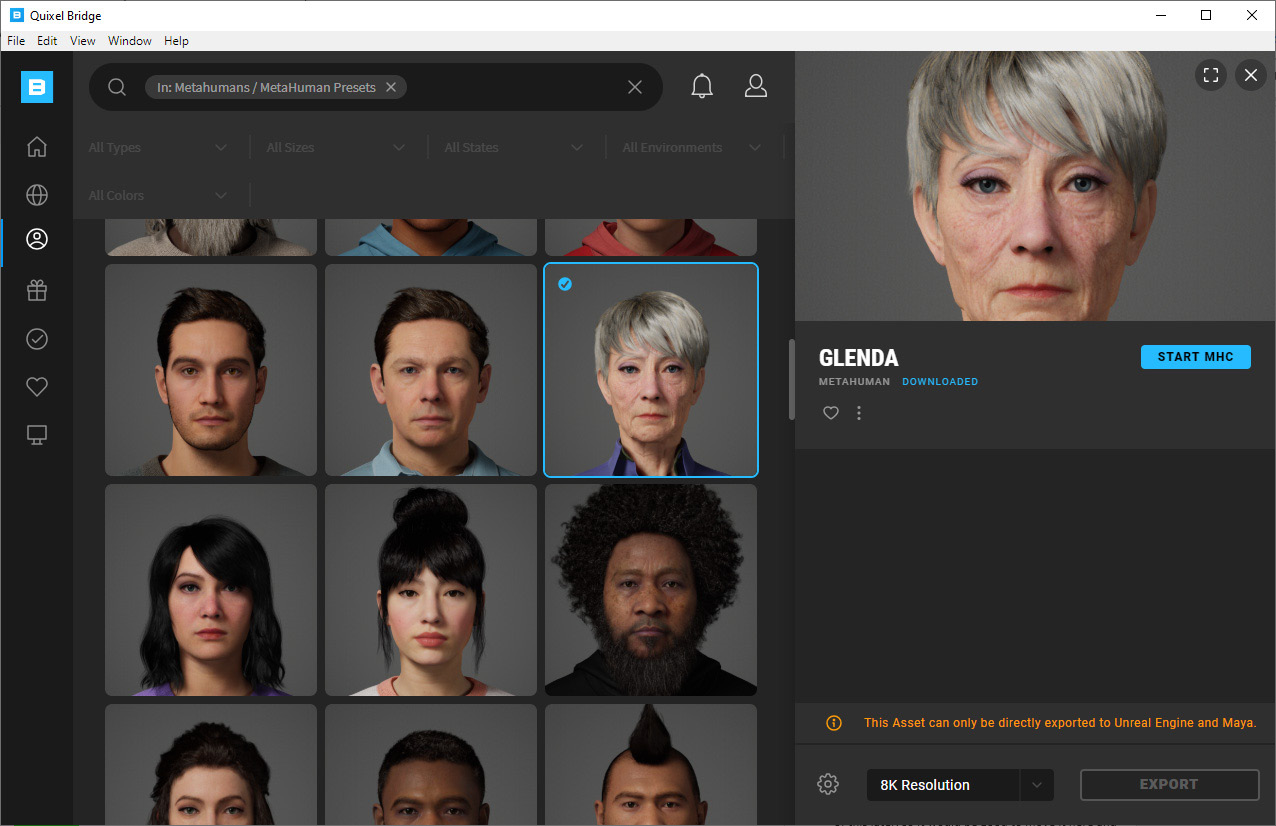
Figure 2.2: Starting the MHC
You’ll notice further options at the bottom of the screen, such as Resolution, but we will come back to those at the end of this chapter. All you need to do to start your first character creation session is to click START MHC.
Once you do this, a web browser will appear, similar to what’s shown in Figure 2.3:

Figure 2.3: Waiting for the MetaHuman Creator connection
At this point, you may need to be patient as the session can take seconds, if not minutes, to boot up. However, now is not the time to run off to the kitchen to make a cup of tea. The reason is that the MHC will also time out if left idle for a few minutes. If you do happen to walk away mid-session and find that the session has closed due to the session being idle, simply refresh your web browser and it will start up again.
Once the session has loaded, you can choose another template if you want. If, however, you have had a previous MHC session, Bridge will automatically save your session under MY METAHUMANS.
However, if you’re happy with your original selection, click NEXT, as shown in Figure 2.4:

Figure 2.4: Choosing from CREATE METAHUMAN or MY METAHUMANS
Note
It is worth noting that by this time, you will have been given two opportunities to pick a template. If you have a specific character design in mind – for example, an elderly African-American male – it wouldn’t make sense to choose a young Caucasian female as a template to start from. That’s not to say you couldn’t edit one preset to resemble the desired design you are going for. However, while you could potentially edit the ethnicity of your character from one to the next, you will have problems when it comes to gender. This comes down to some templates having limited editing abilities. So, in short, ensure that you choose the age and gender that best matches the design you have in mind (if you have one) when you start your session.
After choosing NEXT, your session will begin. By default, you will be greeted by the template character of your choice coming to life:

Figure 2.5: Editable parameters
At the bottom of the screen, you will see player controls. By default, it is on PREVIEW. Note that while in PREVIEW mode, you can’t make any edits to your character.
However, this is a great opportunity to see just how realistic MHC is. You will be given three options to choose from when it comes to animation previews. You need to click on the filmstrip icon to see these options, as illustrated in Figure 2.6:

Figure 2.6: Animation previews
The options are as follows:
- Idle: Provides a small range of motion, which is suitable for a background character.
- Face ROM: Provides a full range of motion for the face, where the animation is extreme enough to effectively show any potential issues that may come up should your project require close-up facial animation.
- Body Technical ROM: Provides animation that’s extreme enough to show any potential issues where there is a lot of body motion.
Note
The MHC gives a range of motion designed to give you an idea of what your character will look like animated. It is not a definitive debugging tool for all possibilities of what could go right or wrong when you add your own animation.
If you are familiar with 3D character design in the traditional sense, character design must take the full range of motion into account to work effectively. The model or mesh must allow for the desired type of movement. At a very basic level, the animation must not alter the mesh of the character where parts of the character intersect with other parts. For example, a very thin person can walk in a way where their hands can be closer to their sides – effectively, their wrist bones can come very close to their hip bones during a stride – however, this wouldn’t be the same for somebody larger, even with the same type of stride and range of motion.
With all that said, the fidelity of MHC characters does a lot of this calibration. So, what would have been very laborious for someone working in Maya, 3ds Max, or Houdini to account for a varying range of motions is done automatically in an MHC session.
We will come back to some of this later in Chapter 3, Diving into the MetaHuman Blueprint, when we introduce animation to the MetaHuman character within Unreal, but in short, you can push the attributes of characters as much as you want without finding any unusable oddities within any given range of motion during the MHC session.
While we are in the preview mode, it is worth getting to know some of the hotkeys, which will allow you to preview the range of motion or character in static form at any angle you wish. If you take a look at the HOTKEY REFERENCE area shown in Figure 2.7, you’ll notice a list of keyboard and mouse click combinations that will allow you to navigate freely:
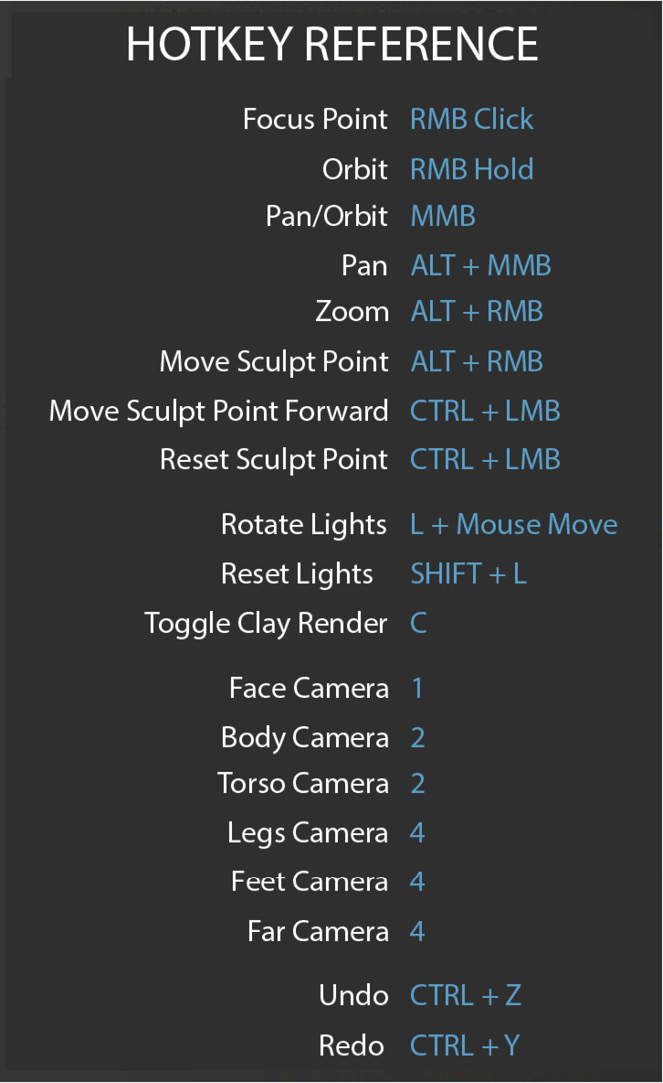
Figure 2.7: HOTKEY REFERENCE
If you are new to 3D applications such as Maya and Unreal, it is certainly worth paying close attention to these as some of the navigation hotkeys are the same. You can have a lot of fun simply navigating around the viewport of the MHC while previewing the animations.
In this section, we launched our MetaHumans session and started to become familiar with the interface where we will be spending most of our time designing the character. In the next section, we will look at the face. This section will be split into several subsections to coincide with how it is broken down in the MHC interface.
Editing your MetaHuman
Now, it’s time to edit your MetaHuman. You can find the editable parameters at the top right of the interface, as per Figure 2.8:
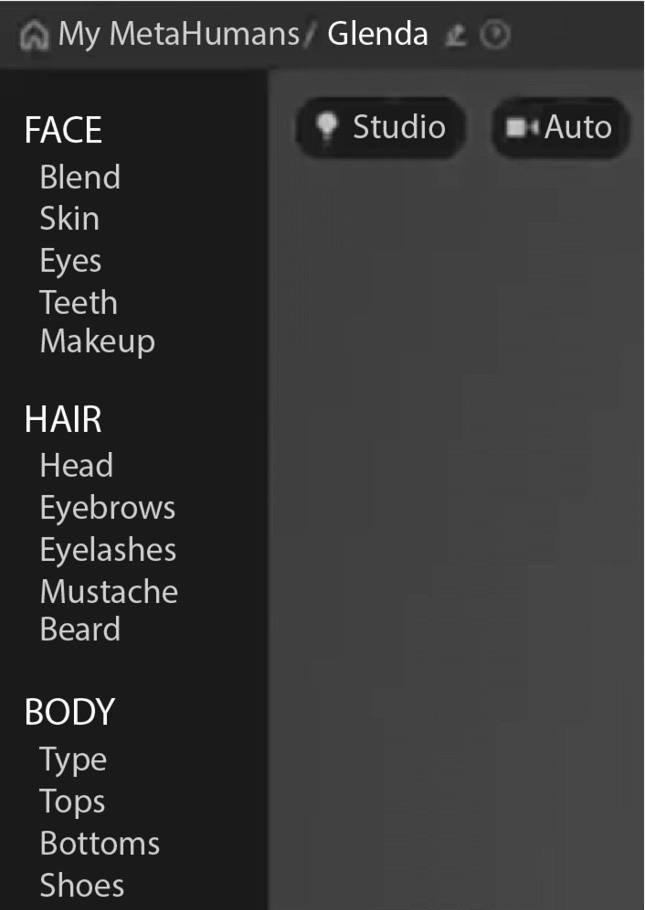
Figure. 2.8: FACE, HAIR, and BODY
We’re going to go through all of these options in the upcoming sections. All of these are very powerful editors and, as I write this, I’m confident that Quixel and Epic Games will have added more functionality by the time this book goes to print.
Face
First, we’ll take at the editable options for our MetaHuman’s face. Under FACE, we have the following subcategories:
- Blend
- Skin
- Eyes
- Teeth
- Makeup
Let’s explore these five subcategories now. To get started, ensure you have stopped the animation preview of any range of motion. In Figure 2.9, we can see a couple of options to choose from:

Figure 2.9: Choosing BLEND
We will want to click BLEND to continue to the next section.
Blend
First, we will take a look at the Blend function. Put simply, Blend allows us to blend the facial features of our chosen template with other existing templates. This is a great starting point as it is a very intuitive process. For example, we may have selected a male character from our template, but we would like to make him look a little more feminine or perhaps older. Taking that second example, we can target the eyes and blend just the eyes with that of an older character template.
In Figure 2.10, I have dragged three template characters into the circle at the top left. The Glenda character in the main viewport on the right is now set for editing:

Figure 2.10: Edit points
Take a close look at the many small and very subtle circles around her face. Each circle represents a feature of the face that is editable. By left-clicking a small circle and dragging in the direction of one of the three characters I have added to the left, it will blend that feature into the corresponding feature in the main viewport. I have placed a young lady at the top, so if I click and drag upward, just the eyes will blend into the eyes of the young lady’s eyes:

Figure 2.11: Blending the eyes by clicking and dragging
Note
Note that the edit points are very subtle. You must click on a point in the main viewport on the right and drag toward your preferred character in the corresponding circle on the highlighted viewport.
In the example given here, I have loaded up three characters into the Blend viewport on the left. You can load up as many as six templates but note that the first three will have a greater influence. The second set of three, denoted by the smaller circles (which I have left empty), is helpful for subtle blending.
Editing a character with blending requires a little planning. It’s best practice to choose a character that resembles your desired design as much as possible and then use the Blend option to get the template as close to your imagined design.
Skin
While we can do quite a lot with the Blend tool, such as changing the shape of facial attributes, it isn’t helpful if you want to change a character’s skin tone. This is where the Skin editor comes in useful, as shown in Figure 2.12:
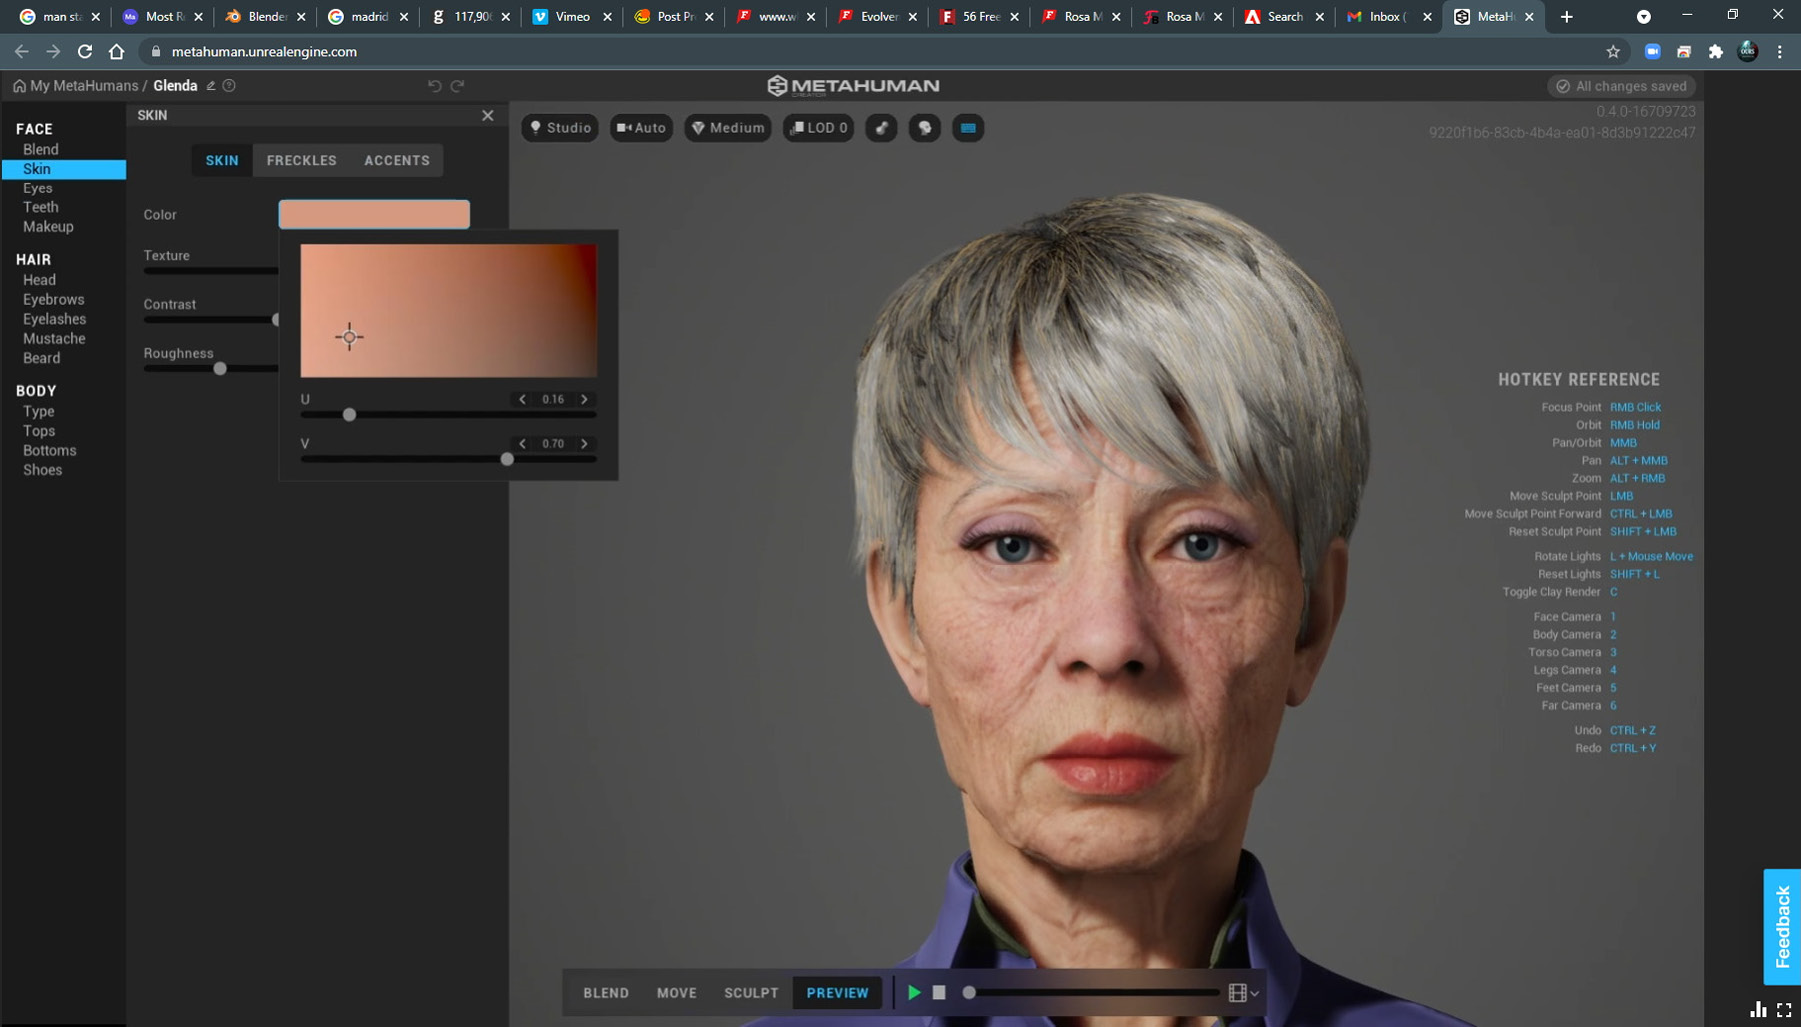
Figure 2.12: Skin
Here are some features that we can edit when it comes to skin:
- Texture: A very important feature when it comes to aging or de-aging your character. It introduces fine lines and wrinkles but also broader deformation such as sagging skin.
- Contrast: This is another useful feature for aging your character, further deepening those wrinkles and folds.
- Roughness: In CGI, the word “roughness” is a common term used to describe how shiny or reflective a surface is. We know that if a surface is rough, light isn’t bounced back in as much of a direct way as that of a smooth surface such as a mirror. On skin, a smooth surface could be due to the oiliness of the surface, and this gives us a more realistic effect. Rarely do we get a completely rough surface on the skin without the help of foundation makeup. Another factor that introduces roughness to skin is the micro hair follicles on the surface of the skin, which are barely visible to the human eye but are factored into the final model. (At the time of writing, there is no direct way to edit roughness in terms of both skin and micro follicles within the MHC, but they are editable once we get into advanced editing within Unreal Engine.)
Figure 2.13 is the Glenda character with Texture, Contrast, and Roughness set to zero. The reduction of texture and contrast makes her look much younger; we can see that contrast had a significant impact on the geometry (shape) of her face:
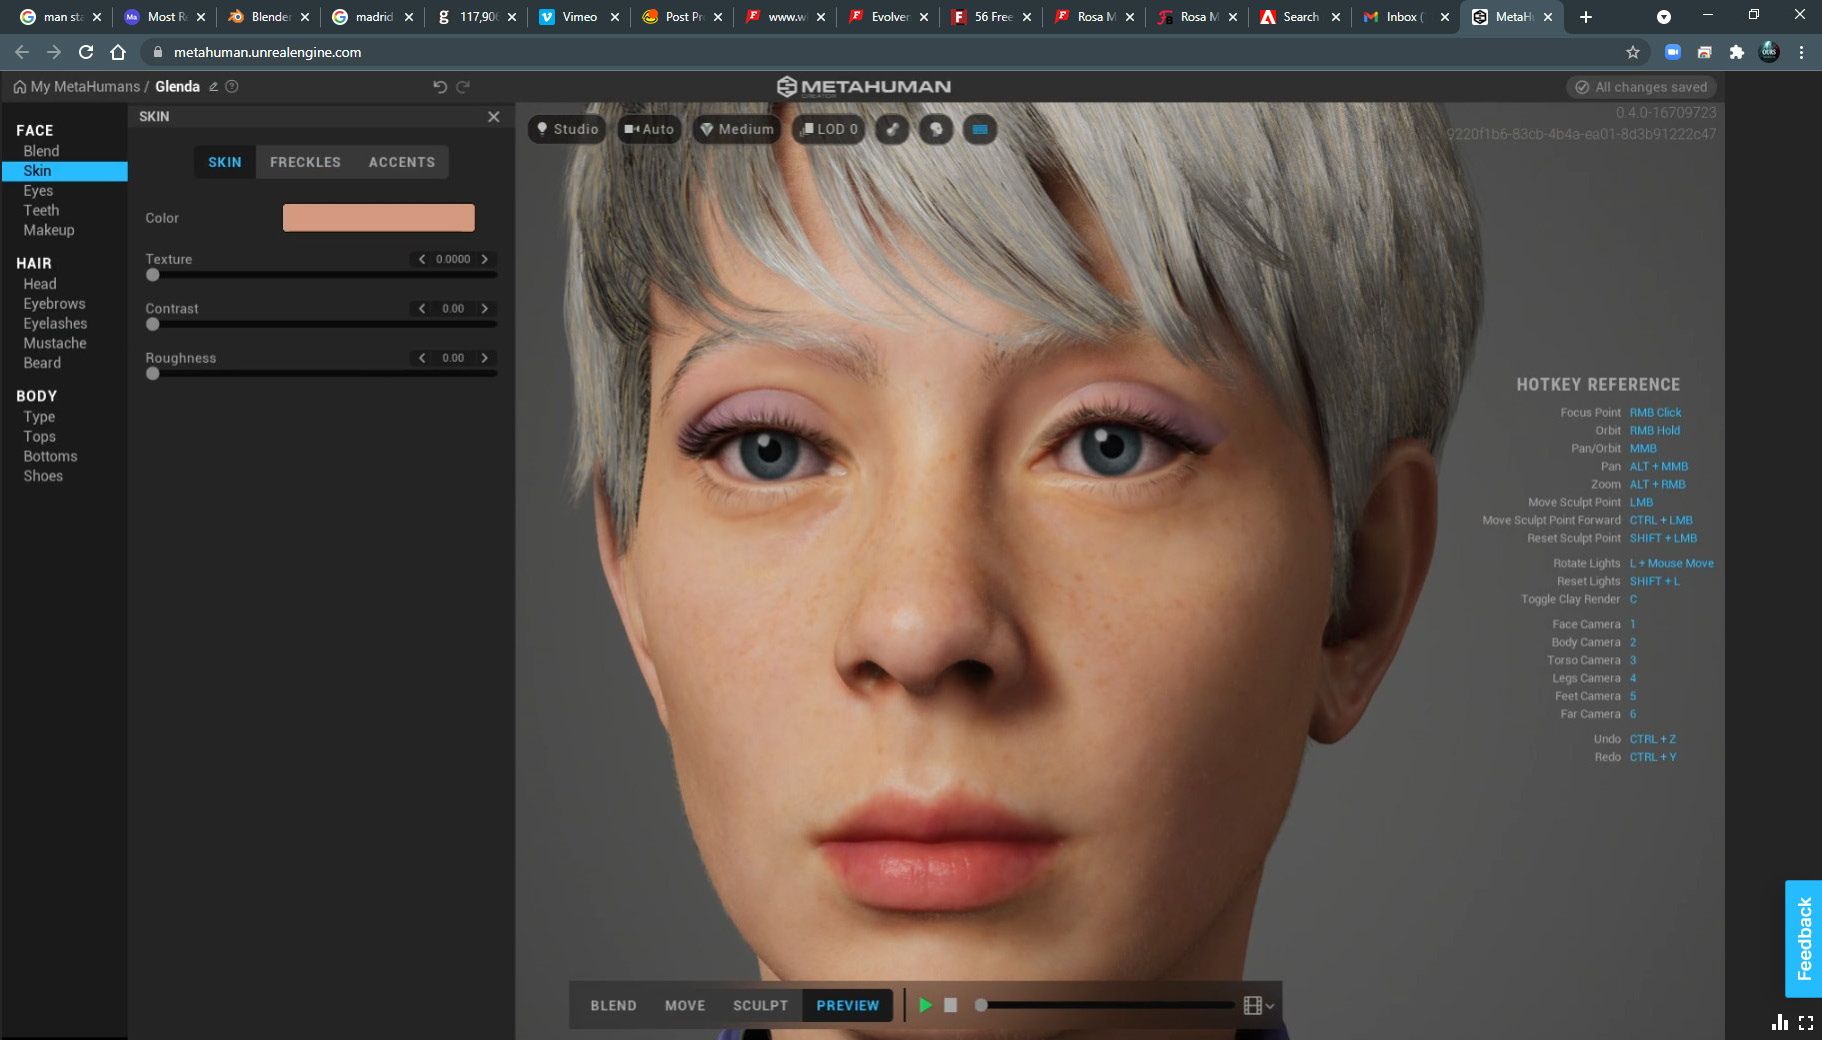
Figure 2.13: Texture, Contrast, and Roughness
However, the reduction of roughness down to zero does give us a slightly unrealistic look, which is probably not what you want. You can play with these settings to make the skin look more realistic.
Freckles
In Figure 2.14, you can see that I have re-applied all the texture and contrast that the Glenda template had before and that I have now added freckles:
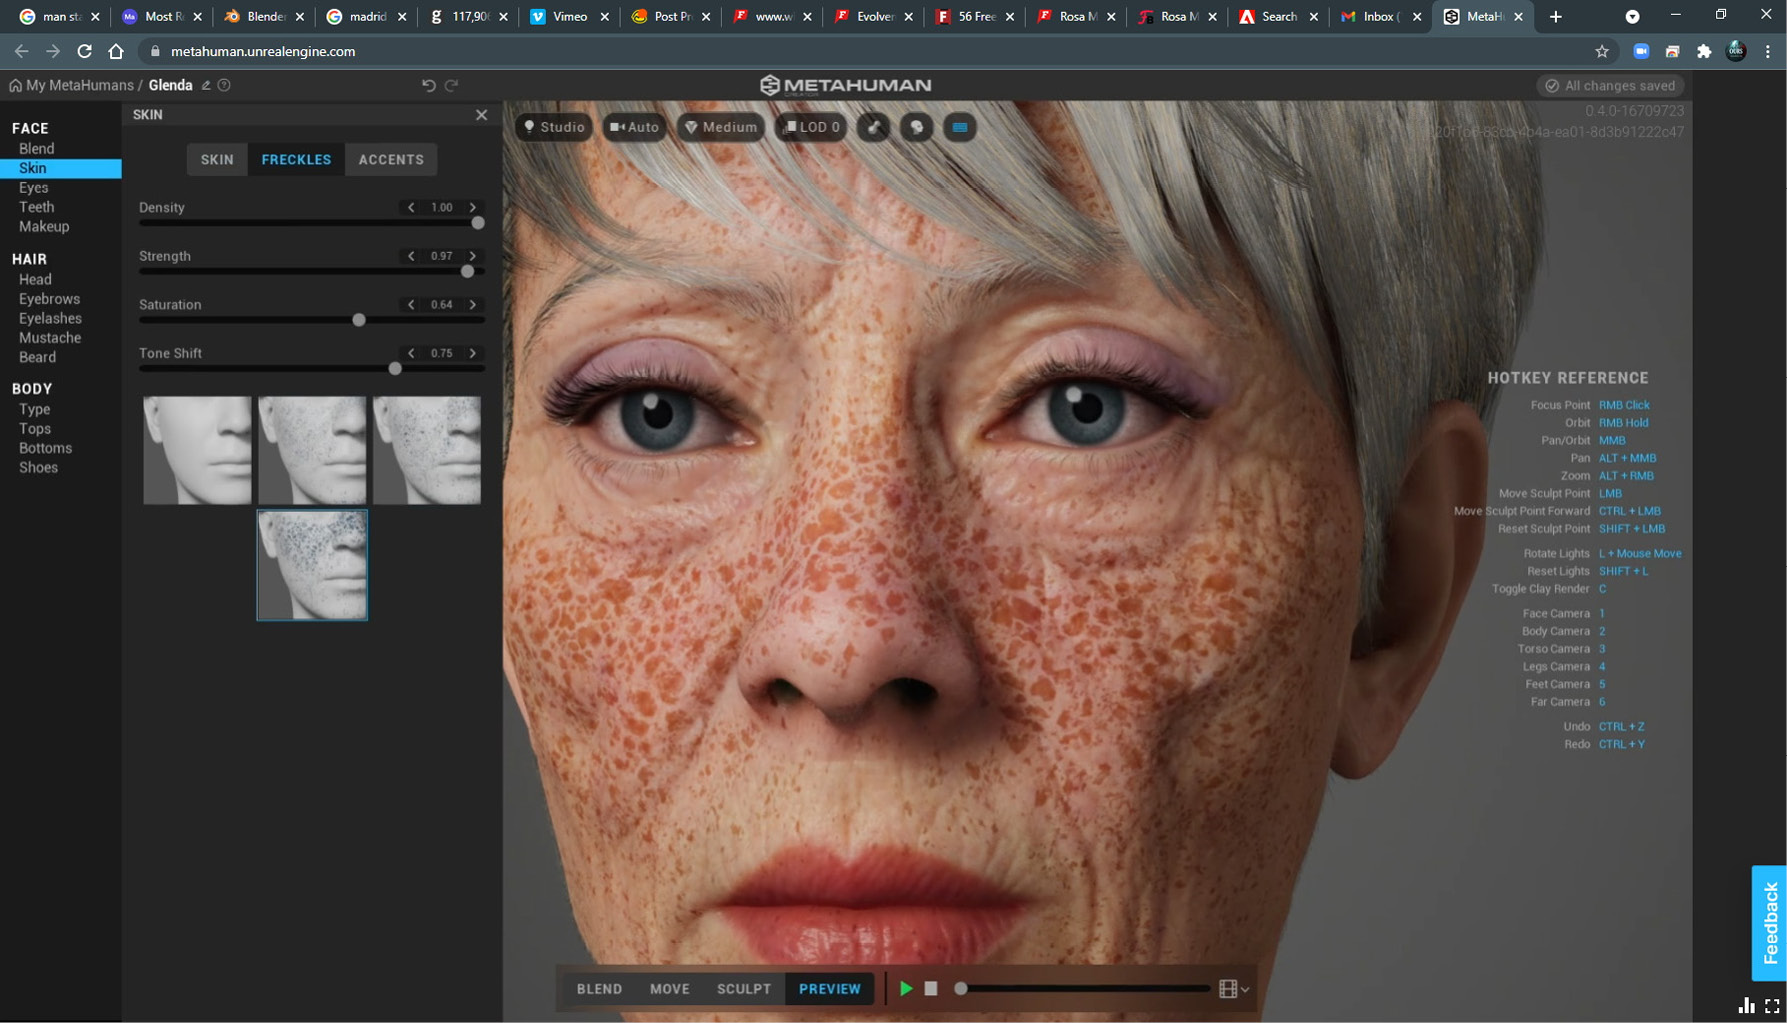
Figure 2.14: Freckles
Note the four gray images – each of these are presets of freckle patterns. The fourth is the most prominent freckle pattern with the highest density. In this example, I have the density up high just for illustration, but subtle use of this tool will give you very realistic results.
Be sure to edit the saturation and strength to your liking. As you add freckles, no matter how extreme or subtle you want them, it is helpful to go back to the Skin tab and play around with texture, contrast, and roughness again. One reason is that the addition of freckles will change the overall skin tone of your character and you may want to adjust the tone under the skin adjustment to compensate. By adding saturation to your freckles, the overall saturation of the face will also naturally increase.
While we are on the subject of skin tone, the MHC has four preview features that need to be considered for making more informed decisions on skin tone. Due to the subtle variations prevalent in skin tones, additional features that allow us to see those variations are very welcome. Those features are as follows:
- Lighting
- Camera
- Render Quality
- LOD
You can see these options here:

Figure 2.15: Viewing options
Let’s take a look at each option now.
Lighting
In most of MHC’s lighting setups, image-based lighting is used. Put simply, an image-based light is a sphere that has an image on the inside that is used as a light source for the entire scene. This gives us a very realistic lighting result and is also a process used within Unreal. To understand image-based lighting in the real world, take a large piece of paper and hold it close to your computer monitor, and play a video full frame. Make sure all your lights are off and your computer screen is at full brightness. You’ll see that the screen is now lighting the piece of paper, with the video influencing both intensity and color. The more reflective the paper, the more obvious the lighting influence is to the eye.
If you click Studio, which you can see in Figure 2.15, you’ll see several lighting setups that will help you design a particular scene you have in mind. There are 13 lighting presets, which you can see in Figure 2.16:

Figure 2.16: Various lighting rigs
Let’s go through each option now:
- Studio (the default setting): A lighting setup made of a small number of soft lights to mimic soft photography lighting. This is the default lighting rig.
- Indoor: This preset consists of lighting that utilizes an image rather than a set of lights (as explained, this is known as image-based lighting). In this case, it is an image of an interior, captured at an angle of 360 degrees, giving us realistic lighting from every angle. This preset allows users to see their characters with the level of contrast typical of when a subject is lit from a window and reflective ambient light.
- Outdoor: This is another example of image-based light that allows the user to see the effects of outdoor ambient light but also the harshness of direct sunlight and the resulting shadows cast on the character’s skin.
- Silhouette: An important yet overlooked feature when it comes to character design is to see the character in a silhouette. It gives us the ability to see the shape of the character quickly without the distraction of color, reflective, and shadow features.
- Split: While similar to the Studio light preset, Split gives us high contrast and is a great way of measuring the translucency of the character’s skin due to the intensity of the key light or main light. In this preset, we have a split of high-intensity key light to complete darkness. It is a great way to showcase both realism and extreme lighting and to determine both the realism and style of light falling off from intense light to darkness. The areas between the high-intensity lighting and shadow, particularly on the skin, are known as roll-offs, a commonly used term by cinematographers.
- Fireside: Similar to Split, we get high contrast, but we also get the gradual fall-off and attenuation typical of fire. In addition, we get the tonality typical of fire from orange to deep blue. Most importantly, Fireside allows the user to determine the roll-off of intense light and how it falls off into shadow around the face and whether or not detail in the skin is still present with this subtlety compared to the Split preset, which would present obvious detail in the skin’s surface.
- Moonlight: Similar to Fireside, we are presented with vibrant tones – in this case, blue moonlight. However, it is a much more ambient light with less intensity from any one angle.
- Tungsten: While not completely representing the tonality of a common tungsten lamp, it does allow us to see how the skin tone would respond to a tungsten lamp. A lighting preset like this could determine how much detail in freckles would be lost or gained in a similar scenario.
- Portrait: This is a very handy preset as it can double as an indoor and outdoor light to determine how our character’s skin behaves. For example, by rotating the scene light using the Left Mouse + L, or using the Light Rig Rotation slider shown in Figure 2.16, we can mimic a window with daylight lighting without the distraction found in the background image that comes with the Indoor lighting preset.
- Red Lantern: Similar to Fireside, we have strong red hues to work with, but we have the advantage of seeing much more intensity without the deep blue background. This allows us to work with a more dramatic lighting setup in mind.
- GR22 Rooftop: This is a very effective use of image-based lighting, but one that gives slightly overcast lighting. This is a convenient lighting preset that will work for a lot of daylight scenes because there are areas of high intensity but, for the most part, we get a slightly diffused light. This diffused light comes from direct light being bounced back from buildings and ground surfaces, much like in the real world.
- Downtown Night: This is very similar to GR22 Rooftop, except it’s at night and lit purely by electrical lights from sources such as street lighting and cars.
- Underpass Night: This is similar to Downtown Night but in closer quarters. It only features fixed lighting, combining multiple tungsten lights of varying hues and intensities.
To take this a step further, the MHC has a background color option. For some of the lighting presets, you can see a strong impact on changing the background color. For example, you may want to see what your character looks like in a generic studio soft light but want to see your character up against a particular color that you had in mind for your scene. In Figure 2.17, I have illustrated some lighting rigs with the Glenda character:

Figure 2.17: Various lighting examples
Camera
As per Figure 2.15, the default camera is set to Face. However, there are several preset camera angles for which you can use keyboard shortcuts:
- 1: Face
- 2: Body
- 3: Torso
- 4: Legs
- 5: Feet
- 6: Face
Alternatively, you can just as easily navigate with your mouse instead of using any camera presets. If you ever find yourself lost in the scene, a handy shortcut to use is the 1 key to get back to looking at the front of your character’s head using the Face camera preset.
In addition, we can preview several different render quality presets to emulate the render quality settings that exist in Unreal Engine.
Render Quality
The MHC has three options to choose from when it comes to rendering quality:
- Medium (this is the default setting)
- High (ray traced)
- Epic (ray traced)
If you choose the highest quality with ray traced settings, this won’t have any impact on your machine because the processing of the high-quality render is all done in the cloud. However, this feature is a useful indicator of the result you will get when you use the highest settings under a similar lighting setting.
The differences between the render settings are subtle. You may notice the quality under the hair intensify, depending on the quality you use. They are there only to give you an indication of what your character would look like should you provide a similar setting, using the corresponding render quality settings that come with Unreal Engine.
Level of Detail
Level of Detail (LOD) is the generation of multiple meshes and texture maps based on one source object. Each mesh and map will have varying amounts of detail.
The purpose of LOD is engine optimization. As one of the design principles of a game engine is real-time rendering, LOD helps this by reducing the number of triangles in a mesh or pixels in a texture map when they’re not needed. LOD works on the principle of changing the complexity of a mesh based on camera distance. The further away the camera is from an object, the less detail is required without breaking the illusion of realism.
For example, a close-up shot of a MetaHuman’s face would require the best quality possible. In this case, we would need to be looking at the original mesh and texture maps. In general, the original mesh for an MHC is about 35,000 triangles and is made up of texture maps as big as 8,000 pixels in width. It would be a vast waste of resources to be rendering this kind of data if it wasn’t necessary.
A good exercise to see how effective LOD is on your character is to go to the viewport and look through the Face camera. You can do this by simply pressing 1 on your keyboard. This will give you a close-up of the character. From there, you can choose from all the various LODs, from LOD 0 right down to LOD 7.
At first, you won’t notice much of a difference between LOD 0 and LOD 1, but as soon as you get down to LODs 5, 6, and 7, you will notice significant degradation of both the geometry and the texture map quality. You can see this change in Figure 2.18:

Figure 2.18: LODs from 0 to 7
We can push this illustration further by using the Far camera; you can do this by pressing 6 on your keyboard. Unfortunately, this is as far as we can go back with the camera in the MHC. However, by toggling between LODs 6 and 7, we can see a difference. This is because LODs 6 and 7 are designed to be used when the camera is even further back.
In this view, if you toggle between LOD 3 and LOD 4, you won’t see much of a difference. Therefore, it would be a clear waste of resources to be displaying LOD 0, which is around 35,000 triangles and 8K texture maps. Without LOD, computers would never be able to handle multiple characters, let alone crowds.
Much of this process is automated for you when it comes to MetaHumans and Unreal Engine, but we will discuss LOD when we bring our character into Unreal, particularly for hair.
We have covered a lot of ground with the skin editor and at this point, I would like to remind you that additional editing of the skin can always be done within Unreal Engine. But for now, in the next section, we will discuss the eyes.
Eyes
The MHC has an incredibly powerful eye-editing tool. What’s also very special about it is that some of the eye tools are editable within Unreal. For example, if you wanted to animate the size of the iris, you can do that within Unreal.
Here, we will take a look at the following attributes of the Eyes editor:
- PRESETS
- IRIS
- SCLERA
Let’s take a look at these now.
Presets
As shown in Figure 2.19, the MHC has some great presets to choose from, providing an array of different brown, blue, and green eyes to choose from:

Figure 2.19: Eye presets
For the most part, you can work with the default presets, but you may want to go into specific details (which we will go through in the next section) where you can achieve very specific yet natural looks, from healthy eyes to very unhealthy eyes.
Note
Before you start editing your character’s eyes, take advantage of the lighting tools to ensure you have the best lighting available. The eyes have quite a lot of detail, so you’ll need to be up and close and at a LOD of 0, thus rendering in the highest quality.
Iris
Let’s take a look at the IRIS panel next, which you can see in Figure 2.20. Without going too far into detail regarding what everything does, the first choice you have is to edit the right, left, or both eyes. Base Color allows you to edit the color closest to the iris, while Detail Color allows you to edit the outside area of the eye closest to the limbus. You also get to edit the Color Balance and Color Balance Smoothness options and choose from nine iris patterns:
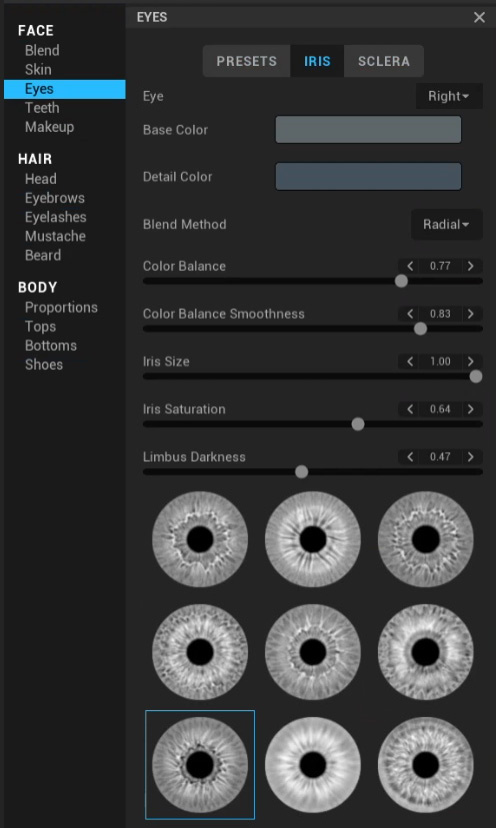
Figure 2.20: IRIS
Just like with skin tones, the IRIS editing function is limited to natural looks. However, you can get some pretty wild-looking effects by pushing the limbus darkness and aiming for high saturation in your color editors.
Sclera
While the IRIS editor is a great tool, much of the realism comes out of the SCLERA tab, as you can see in Figure 2.21. Effectively, this involves editing the white of the eye. While you can do a lot with the Tint option, which is a balance between blue and yellow, the Brightness option in conjunction with Tint is very powerful in terms of aging the eye:

Figure 2.21: SCLERA
The MHC also brings a lot of detail with the Vascularity slider. You can see this clearly when you start rotating the veins. These are very powerful tools for extreme close-ups, and it is worth spending some time on them before exporting your MetaHuman. CGI characters commonly lose realism when their eyes are too bright and perfect.
Let’s look at an example of combining the Eyes editing options. Most of the editing in Figure 2.22 was done using the SCLERA editing tab except for lightening up the limbus in the IRIS editing tab and reducing the color in both the base and detail color pickers:
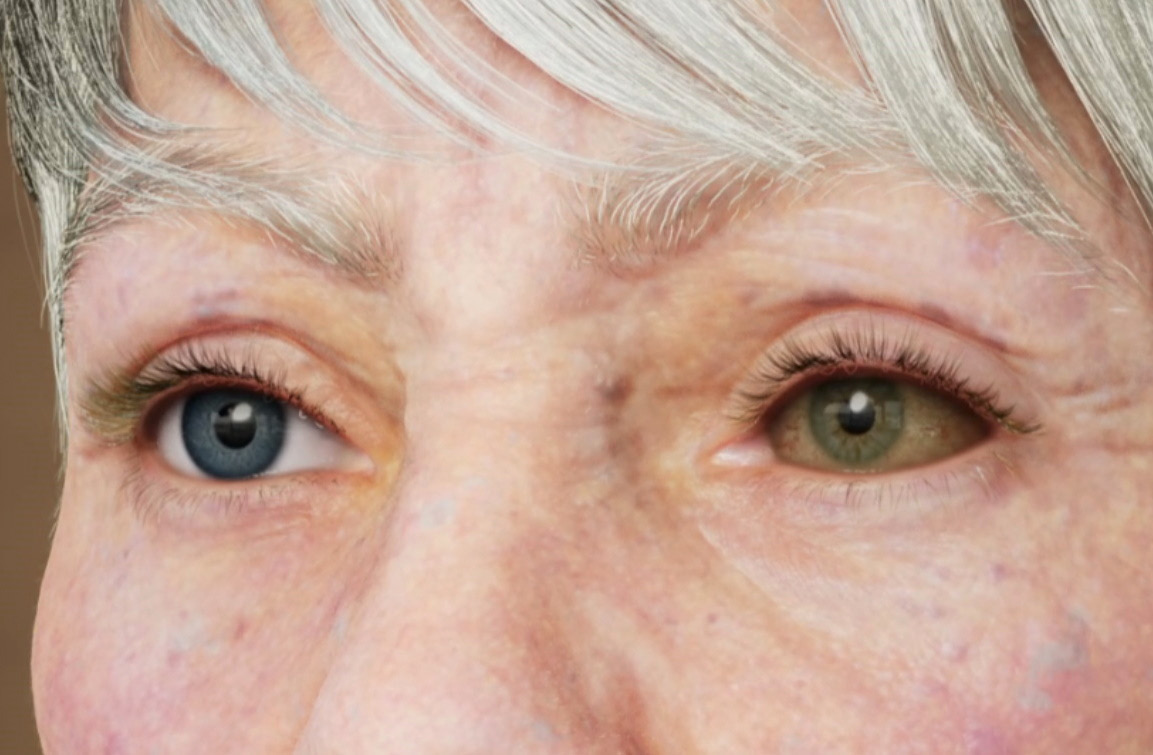
Figure 2.22: Separate eye editing example
My goal here was to simply age the eye. By and large, I went a little too far and poor Glenda should see a doctor at this stage. However, the result of her right eye does look a little more realistic simply because of the added detail and removing the perfect whiteness.
Teeth
Another great yet overlooked tool to add realism to a MetaHuman is the Teeth editor. Just like the eyes, the MHC adds a layer of detail and imperfections that make characters more realistic. We can make teeth yellowish from realistic staining and/or realistically crooked. We can even recede the gums. The MHC has quite a lot of editors for teeth and has all you need to achieve a massive variation of looks.
To begin with, it’s a good idea to ensure you are in a reasonably well-lit environment, and that you open the jaw of your character to get a better idea of how your changes look when editing the teeth. For the latter, there is a handy Jaw Open slider.
Looking at Figure 2.23, straight off the bat, we can see that Glenda has great teeth. They are completely uniform, perfectly white, with no signs of plaque or any other issues:

Figure 2.23: Teeth before
There are two ways to go about editing:
- In Figure 2.23, the red box indicates the visual way to edit. By holding your mouse on each of the gray circles, you’ll see what each slider edits – for example, Tooth Length, Tooth Spacing, and so on.
- However, another way to do this is using the drop-down list from where it says Tooth Length, as shown in Figure 2.24:
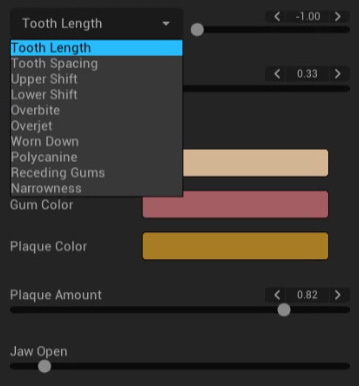
Figure 2.24: Editing teeth
I recommend using the drop-down list for editing as it gives you a slider for the intensity of the edit, plus another slider for variation, all while reminding you of what you are editing, such as Tooth Length, Tooth Spacing, Overbite, and so on. The visual diagram of the teeth has sliders, as shown in the upper left of Figure 2.25, but they only allow you to edit the intensity of any given parameter, such as Overbite.
Much of the realism can be found by making subtle changes to teeth such as plaque color and adding subtle variations with little intensity to everything in the drop-down menu, again featured in Figure 2.25. Working the drop-down menu, sliders, and swatches under the TEETH diagram will give you the greatest amount of control:

Figure 2.25: The Teeth editor
With that said, if you are making dramatic changes, it is worth previewing the Face ROM component as the teeth do have a significant impact on the overall expression of your character. A major consideration would be how much gum or overbite exists. An overbite can give the impression of an undeveloped jaw and a naive expression, while an underbite can give the impression of an over-developed jaw and a stern expression. Of course, a lot of this is subjective but certainly worth consideration.
To wrap up this section on teeth, I would like to emphasize how important teeth editing is to overall character design and that it is frequently overlooked.
We’ll now move on and look at a feature that doesn’t apply to all character design but is a powerful editing tool within the MHC: makeup, and applying it to characters.
Makeup
The MHC has some very remarkable makeup features that work in tandem with the skin tone of the character. The Makeup editor has been divided into four tabs:
- FOUNDATION
- EYES
- BLUSH
- LIPS
Let’s take a look at each of these now.
Foundation
As mentioned earlier, the Makeup editor works in tandem with the skin tone of your character. Earlier, under the Skin editor, we were given the option to edit the overall skin tone. This information is factored into the makeup FOUNDATION editor to provide the user with a color palette suitable to the skin tone you originally chose for your character. This is to simulate real-world makeup decisions. For example, the makeup selection of a Caucasian would be different from the makeup selection of an African American.
As you can see in Figure 2.26, the palette available to us for the foundation is very much limited to the character’s skin tone; this is to provide the best result:
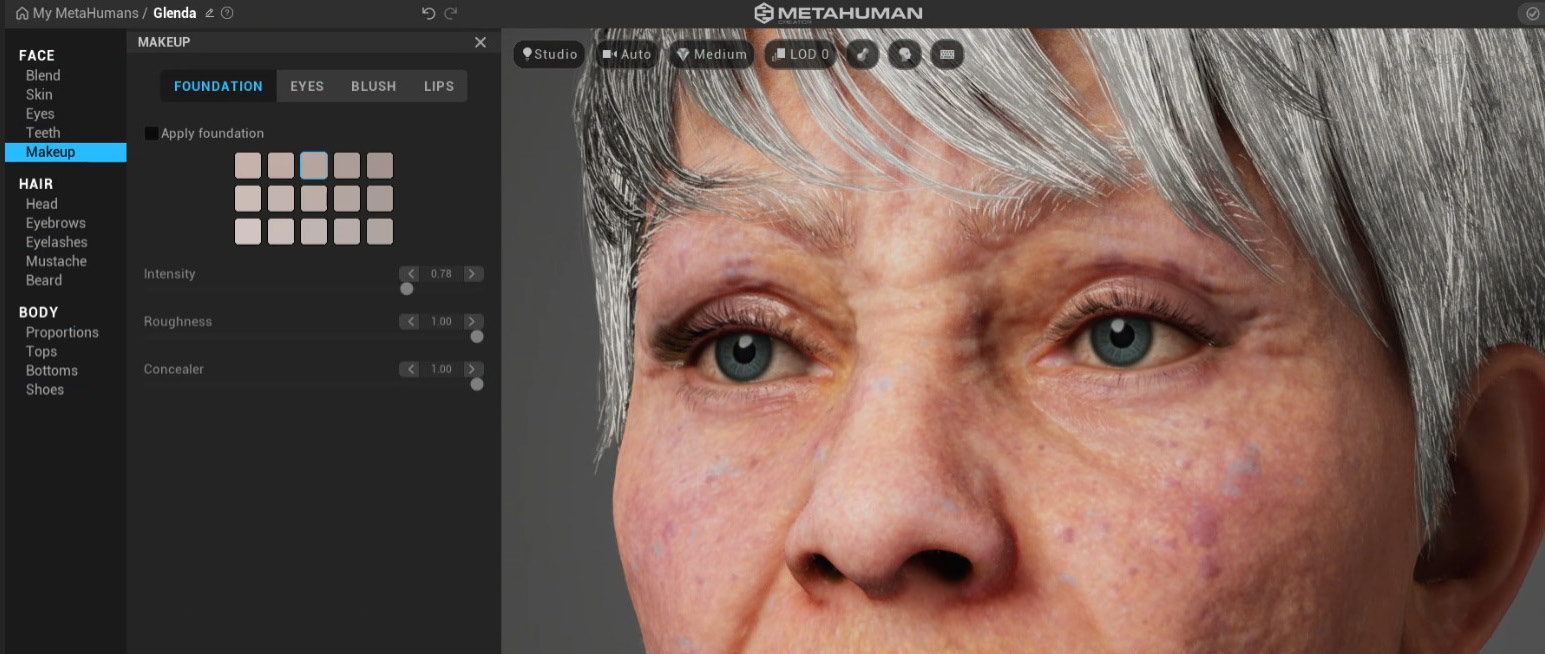
Figure 2.26: With no foundation makeup
Be sure to check Apply foundation and select one color from the palette given. After that, you can edit the Intensity, Roughness, and Concealer options. Intensity is self-explanatory, but in makeup terms, it can be understood as how thick the application of the foundation is. Roughness can be understood as the difference between an oil-based foundation and a powder-based foundation. Concealer, however, is the intensity of the application just under the eyes.
Also, if you were to go back and increase the intensity and density of your character’s freckles, you would get a better idea of just how intense or thick the application of the foundation makeup you have made was. In Figure 2.27, I did exactly that:

Figure 2.27: Foundation with a new palette
I also made the makeup very rough and dialed the intensity down enough so that we can just about see the freckles come through. Note that the palettes between Figure 2.26 and 2.27 are very different.
Eyes
Not to be confused with the earlier eye editor, this editor is exclusively for eye makeup. Figure 2.28 shows an array of presets for eye makeup:
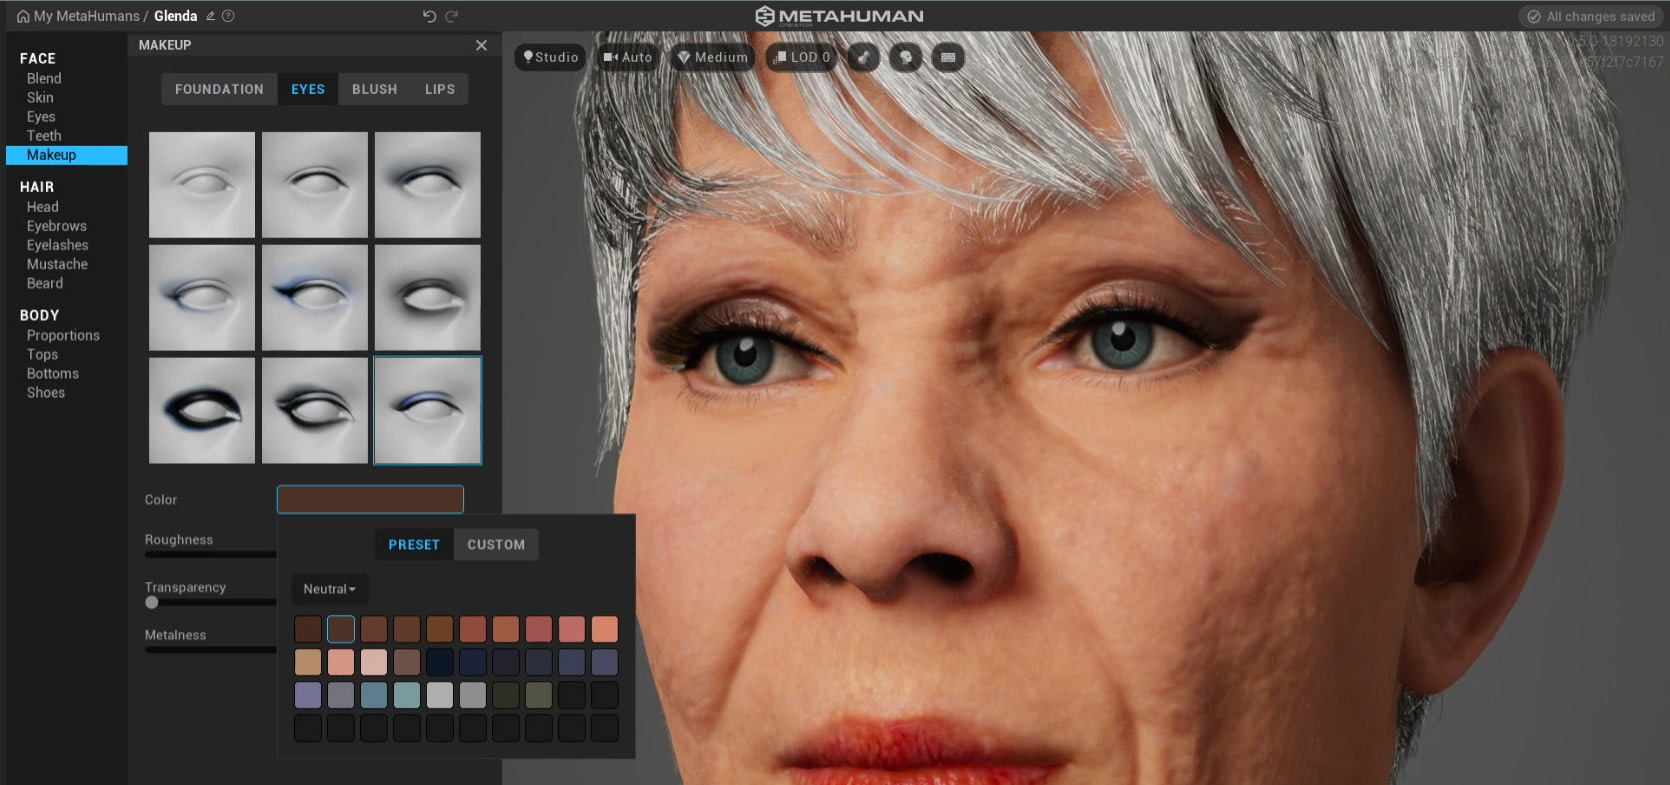
Figure 2.28: Eye makeup
Similar to the eye editor from earlier, we also have a selection of makeup shapes. For example, we could choose from one of the thin liner presets at the top or the dramatic smudge shape at the bottom.
Again, the palette available to us complements the skin tone, which you can see in Figure 2.29, but rather than just getting a naturally complementary palette to choose from under presets, you can also choose other options such as Neutral, Deep, and Vibrant; your choice of palette will often depend on your character. You can also create a custom palette:
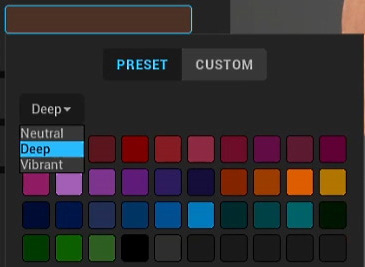
Figure 2.29: Eye makeup palette options
Like the FOUNDATION tab, we have sliders that allow us to edit the following:
- Roughness: Allows us to edit how reflective the eye makeup is to light. A roughness of 0 is very reflective while a roughness of 1 is non-reflective.
- Transparency: This works the same way as intensity did; the less transparent it is, the thicker the eye makeup that’s been applied.
- Metalness: This is a type of reflectivity and indicates that the more metalness, the more detail we will see in the reflection; a low setting would give us a duller shine. For example, a surface that is highly metallic and has no roughness will appear like a mirror. If it has a low metalness and low roughness, it will be shiny but the reflections will be faint. Finally, if it has low metalness and is very rough, it would be very dull indeed, similar to clay or plaster.
Like many of the previous features, such as foundation, eye makeup gets us some pretty realistic results. We’ll see more of this in the next section, where we will look at the cheeks and blush makeup.
Blush
Again, the BLUSH palette reflects a palette complementary to the skin tone. Unlike the eye shadow editor, we are only given one palette as blushers tend only to come in complementary tones rather than the vibrant alternatives given under the eye shadow editor:
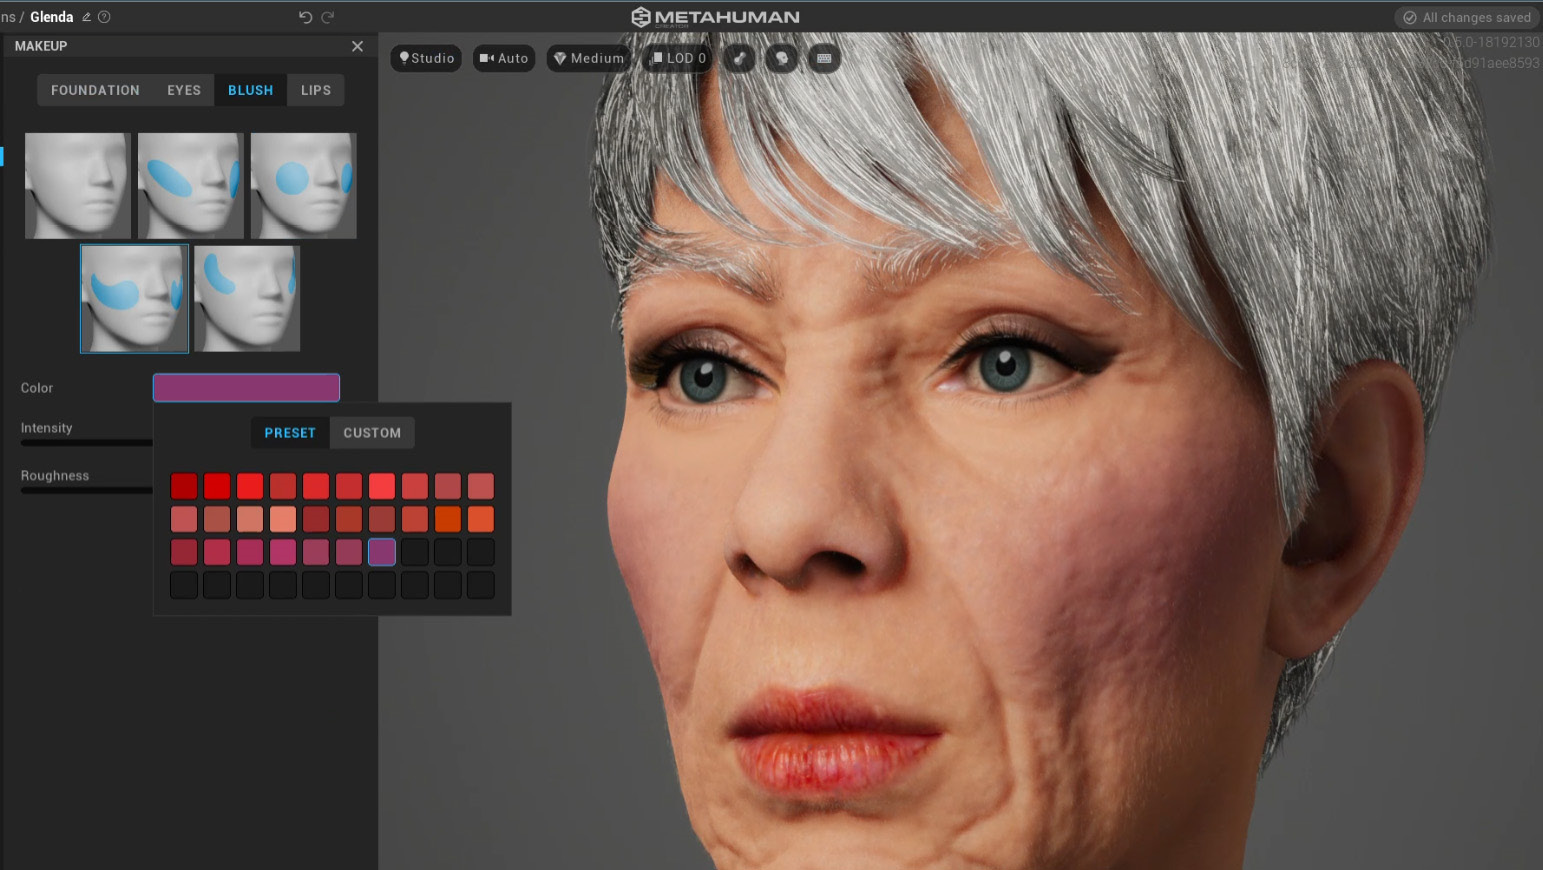
Figure 2.30: Blush palette options
From the top left, we can choose the areas we wish to be affected, which are primarily around the cheeks and temples, as indicated in blue in Figure 2.30.
We also get Intensity and Roughness sliders, which allow us to achieve a further sense of realism. A blusher that has a low roughness will have a shininess different from that of the foundation and different again from the underlying skin tone. All these subtle variations of makeup on the skin add to the realism and are certainly worth playing around with.
Lips
Finally, let’s discuss the LIPS editor, which you can see in Figure 2.31. Like the BLUSH selection, there isn’t a huge amount of variation, but at least we can play around with Roughness, Transparency, and Color, which is close enough to the variety available in BLUSH:
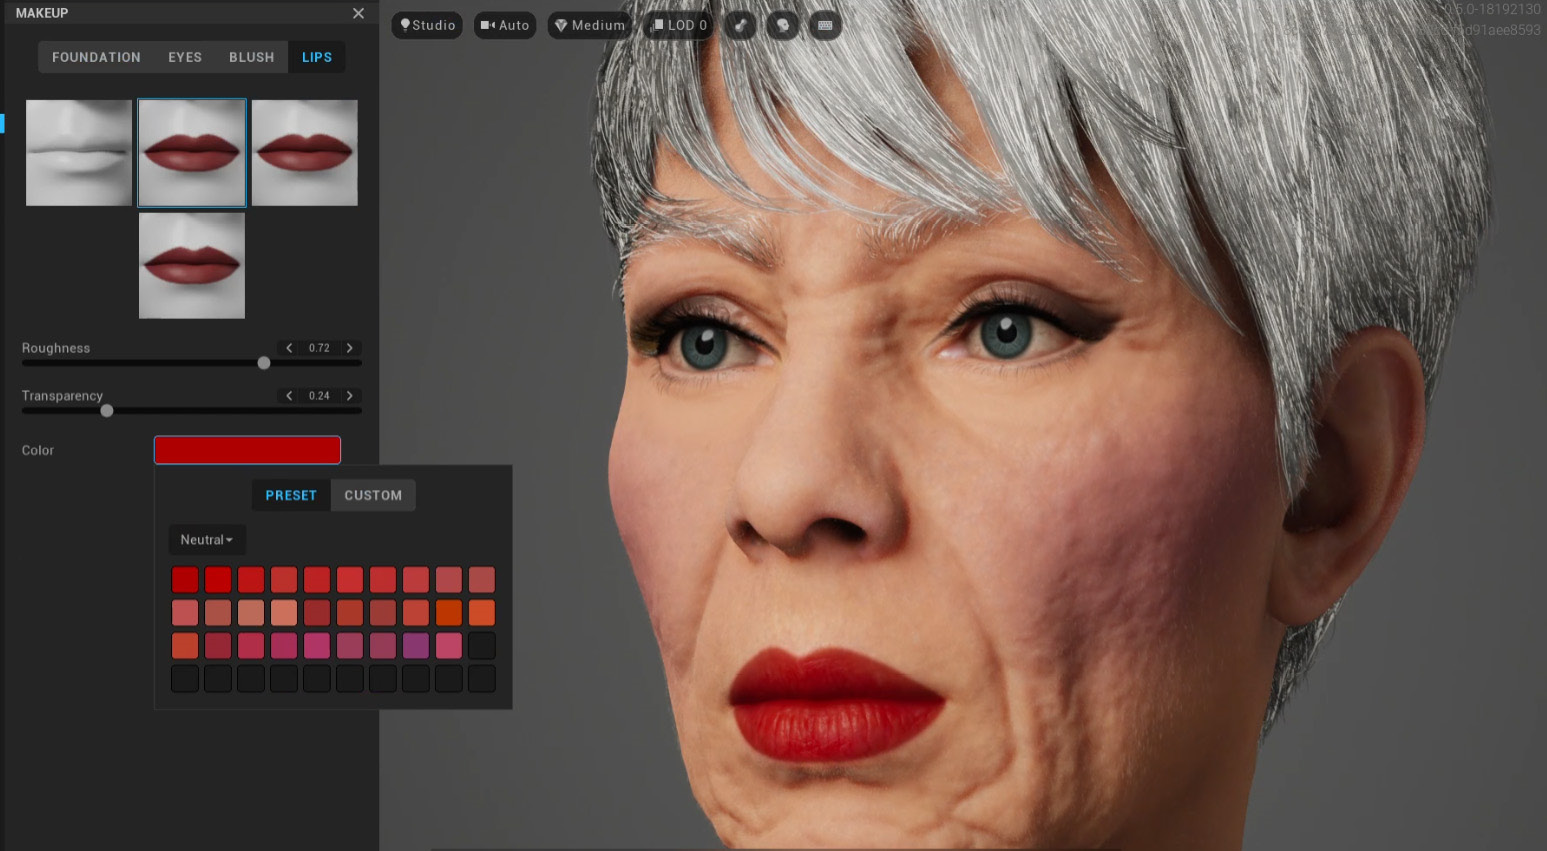
Figure 2.31: Lipstick palette options
The grey thumbnails at the top indicate how the lipstick is painted on: the first indicates no lipstick, while the remaining three options give us very subtle differences in how the lipstick is painted, with some being slightly out of the lip area and some being less liberal.
We do, however, get further options to choose from if we want to go for something a little more vibrant or funky. We can also fine-tune our color selection using the CUSTOM button. As before, the Roughness slider allows us to make the lipstick shinier and more reflective. At this point, we have played around with roughness a lot; the result of roughness being low will produce an actual response to the light in your scene. In Figure 2.32, the white areas of the lips are reflections of a light source:

Figure 2.32: Lipstick Roughness set to zero
Note
To see the effect of roughness, try reducing the roughness on the lips to zero, zoom into the lips, and, with the L key pressed, left-click your mouse around the main viewport to move the scene lights.
So far in this chapter, we have covered the face in great detail. In the next section, we’ll move on to something very different, and you will be introduced to some new concepts as we delve into hair and hair physics.
Hair
Just like the face, the MHC comes with many presets to choose from but also offers some custom modifications. If you load up a long-haired character, you’ll notice straight away that the hair moves very realistically; you can expect the very same results within Unreal Engine.
There are two main factors to consider when it comes to hair rendering:
- Hair strands or Strand Based Grooms: These use splines for individual hairs, although there is a little bit of cheating to give the illusion of more hair. With strand-based grooms, we get a far more realistic look but the physics of how the hair moves and collides with the body is more accurate.
- Hair cards: These are simple poly shapes with images of multiple hairs. Hair cards are also easier to render and are the default when it comes to displaying lower LODs.
By default, the MHC uses Strand Based Grooms for LOD 0 and LOD 1. In other words, they are used for close-ups and mid-shots (head and shoulder shots). When the character is further away from the camera, the complexity of Strand Based Grooms is overkill and redundant and so hair cards are used instead. The MHC also offers the option of just using cards should you find that your performance or frame rate is low.
Note
Some of the presets when it comes to LODs are still in development and only offer Strand Based Grooms, which, as I mentioned earlier, are available in LOD 0 and LOD 1 only. Because there is no hair card alternative, your character will appear bald at farther distances unless you force a LOD of 0 or 1 within Unreal Engine. You will learn how to do that after we bring our character into the engine.
One more consideration to take on board concerning Hair LOD is the rendering quality. You may recall that, in the Render Quality section earlier in this chapter, Epic (Ray Traced) provides us with much more realistic shadowing within the hair, so it is worth considering that to get the best result from hair. When working with a LOD of LOD 1 or LOD 2, it is very likely you’ll need the Epic (Ray Traced) setting if you want to achieve photorealism in a close-up shot.
Saying that, depending on your character’s distance from the camera, you also may get away with a lower render quality setting, which will allow for a faster rendering time.
In addition to scalp hair, the MHC also provides solutions for eyebrows, eyelashes, mustaches, and beards. We will discuss these elements now. As we go through each of these options, we’ll see that there are a lot of similarities in terms of what’s available to us for editing. For the most part, it’s just color, roughness, and salt and pepper.
Head
The Head editor provides us with all the available tools to edit head hair, as shown in Figure 2.33. Unlike many other character creation tools, the MHC provides a physics dynamics solution within Unreal. In short, this means that hair will move realistically and interact with objects such as characters’ shoulders and respond to factors such as gravity and wind. The shorter the hair, the less obvious the hair dynamics:

Figure 2.33: Head hair presets
In Figure 2.33, you can see that, apart from choosing dozens of presets, there isn’t much in terms of editing other than choosing what hairstyle you want from the preset menu.
For the Glenda example, I have retained the gray preset but found that I had to alter the Color option before I was able to edit both Roughness and Salt & Pepper. Roughness is perfect for introducing a matte or shiny hair look, while Salt & Pepper is for adding or reducing gray hair.
In Figure 2.34, you can see just how detailed the hair can be for close-ups. In this example, we can see individual strands of hair:
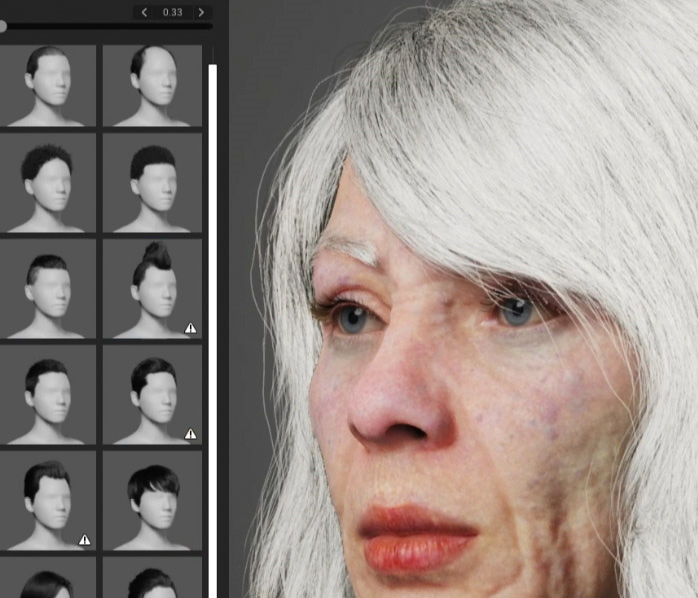
Figure 2.34: Individual hair strands are visible
Like we had for the makeup editor, we can also choose between PRESET and CUSTOM. You’ll see a drop-down menu under PRESET, as shown in Figure 2.35, allowing us to keep within a Neutral palette or Deep and Vibrant palettes. If you choose CUSTOM, you get a much wider color gamut to choose from:

Figure 2.35: Head hair presets
The thumbnails containing the warning icons are presets with limited LODs. You can see these icons on the bottom right of the preset thumbnails in Figure 2.35; the warning says that This MetaHuman uses grooms currently in development, only displayed at LODs 0 & 1. This means that it can only offer a display of no LOD, which is the maximum strand-based hair rendering, and a LOD value of 1, which is also strand-based. This means that Unreal Engine will try to render the hair at maximum quality, regardless of the camera distance. Inside the engine, it will hide the hair when a LOD value of 2 would normally be engaged. In the instances of characters that don’t have a LOD level of 2 or more, Unreal Engine will render no hair. While not being particularly useful with the warnings here, it is good to make a note of these warnings as you will need to force the engine to use no LOD at all when using a character that has limited LODs. Otherwise, your character will appear to go bald if the camera is too distant.
Eyebrows
With the Eyebrows panel, as seen in Figure 2.36, we have just a small number of presets to choose from (only 11 at the time of writing), with the usual color palette and set of parameters to edit that we saw previously, including Salt & Pepper:
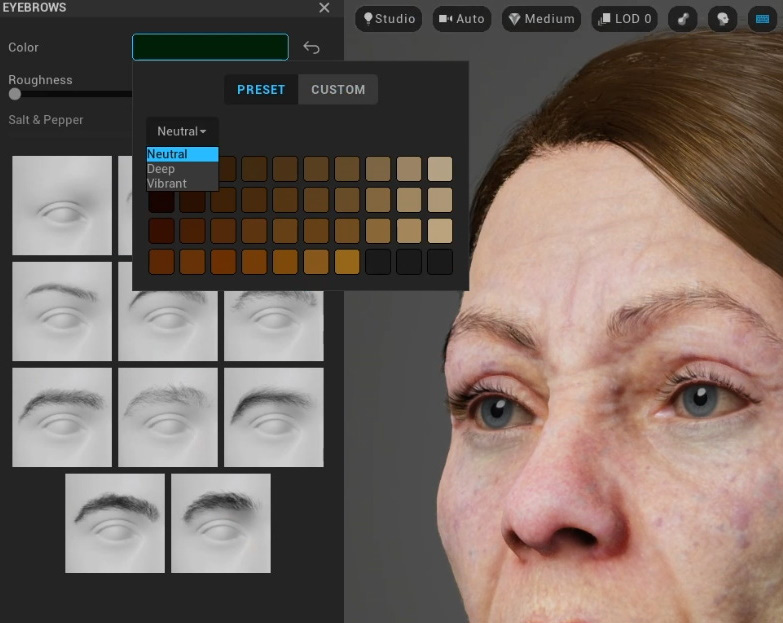
Figure 2.36: Eyebrows
Eyelashes
You’ll notice that apart from the presets available to us, the Eyelash parameters in Figure 2.37 are identical to those in the Eyebrows panel. However, once within Unreal Engine, we’ll get a little more editing control over this parameter:

Figure 2.37: Eyelashes
Mustache
There’s quite a lot of detail involved in the Mustache panel. As you can see in Figure 2.38, from what we learned earlier, we can see that it is a spline-based hair solution, which gives us the best detail. Just like the previous two editors, we have the same parameters to edit with:

Figure 2.38: Mustache
However, unfortunately, in terms of the pattern of hair growth, we are limited to just choosing a small selection of presets. Similar to the eyelashes, we do have further options to edit once we get the character inside Unreal Engine.
Beard
Finally, we have the last hair-related editor: the beard. Again, we have several great presets to play with, as shown in Figure 2.39, and have the usual parameters to edit. Just like the Scalp Hair section, the beard will respond well to animation, particularly in terms of collision dynamics such as colliding against the upper chest realistically:
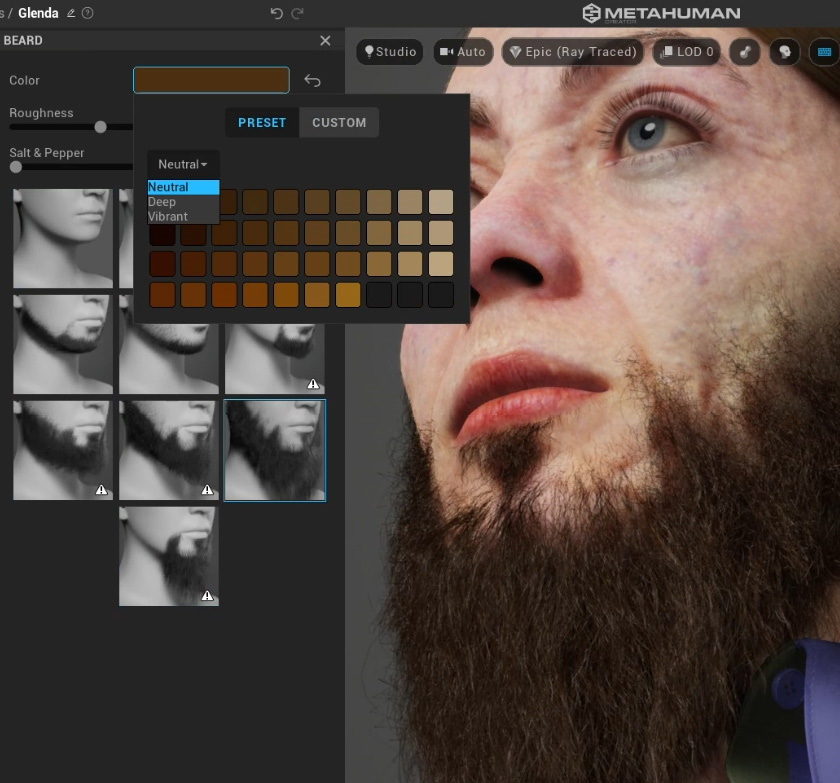
Figure 2.39: Beard
In this section, we covered a lot of the presets that are provided to us concerning editing in the MHC. Some of these concepts are already familiar to us from when we edited the face, such as the color palette’s LOD, but we’ve looked at some new concepts too, such as briefly touching on hair dynamics. It is worth noting that additional editing can be done in Unreal Engine; for example, we can add a separate physics solver to get unique animation results from the eyelashes if we wished. Generally speaking, we don’t need to do this.
In the next section, we’ll be covering some new ground as we look at the body.
Body
In the BODY section, we can edit the proportions of our character, but we also have options to edit clothing and shoes. Let’s look at those now.
Proportions
First, we need to take a look at the body proportions and the presets that come shipped with the MHC. We can see these in Figure 2.40:
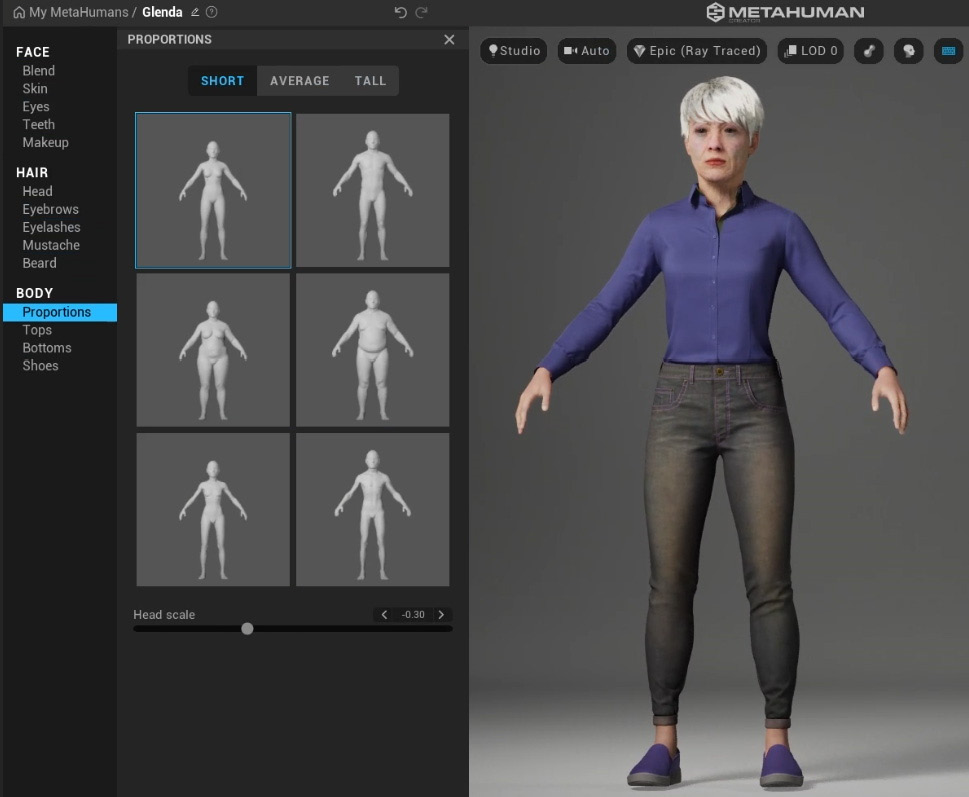
Figure 2.40: Body proportions
There are three proportion categories: SHORT, AVERAGE, AND TALL. In each category, there are Male and Female options. Both of these have three main body types: Mesomorph, Endomorph, and Ectomorph (muscular, overweight, and underweight). Unlike the face, we aren’t given as much fine-tuning ability (for example, we can’t blend between body types).
Compared to other programs dedicated almost exclusively to character creation, such as Character Creator, MHC has limitations. It would be unfair to try to make a side-by-side comparison because the MHC’s focus is on realistic humans, whereas programs such as Realusion’s Character Creator allow you to make dramatic changes to both physiology and skin type to the extent that you can very easily create a character that is way beyond the realm of a human. So, while the limitations constrain us to create more human characters, it is still a limitation nonetheless. It’s also worth noting that MHC is still very much in development, so we’ll likely see more features in the future. One example of this is the limitation to only create adults with a very finite set of ratios, such as knee to hip, neck length, foot size, and so on.
With all of that said, currently, in MHC, there are body types per gender, which isn’t too bad. If you take a look at Figure 2.40, where I have selected the SHORT tab within the Proportions editor, you’ll notice three body types per gender: thin, medium, and large. Because there are three tabs relating to height – SHORT, AVERAGE, AND TALL – we get nine body types per gender, giving us 18 body types in total. Skin weights and cloth dynamics do come into this but they are outside the scope of this book.
Also, you may be wondering about scale. Rescaling characters is perfectly doable when inside Unreal Engine, without any negative impact on the functionality of the characters.
Tops
Within the BODY section of the interface, you’ll see from Figure 2.41 that we also have the option (albeit a limited one) to change the character’s clothing:
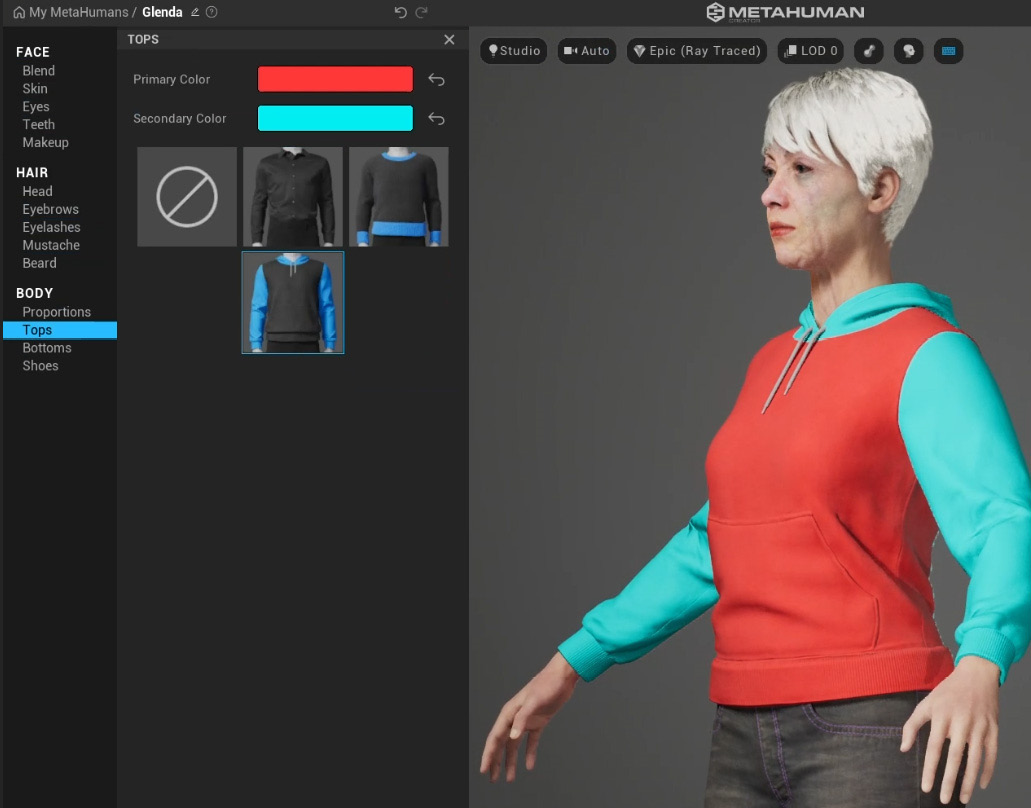
Figure 2.41: Tops
However, a little goes a long way and you can change the color of the various elements of each of the tops here. For example, I’ve given Glenda a two-toned hoodie.
Note
I can only speculate at this point that Epic and Quixel plan to add more features, but you can imagine how many dials and buttons are required to accommodate the variation of any one person’s wardrobe. For now, you can customize your character’s clothing, even with accurate cloth dynamics, but it requires the use of third-party software such as Marvelous Designer, Maya, or Blender.
Bottoms
Similar to Tops, as you can see in Figure 2.42, there are major limitations regarding the Bottoms features. As you can see when we compared the two, we only get two extra presets for Bottoms, but also like the Tops presets, a little goes a long way:

Figure 2.42: Bottoms
Shoes
Similar to Tops and Bottoms, there are some major limitations when it comes to Shoes in MHC; however, the customization in terms of mesh/geometry is much more fluid as it doesn’t involve redistributing weight painting concerning cloth simulations. While that sounds complicated, it just means that shoes aren’t as complex as a shirt in terms of how the body influences the movement of the clothing. A shoe doesn’t change its shape, even when it’s not being worn; it is still in the shape of a foot. However, a shirt can be rolled into a ball when not worn.
As a result of this lower level of complexity, it is much more straightforward to model or buy a 3D model of a shoe of your choice and replace it in Unreal. For the time being, we are limited to a small number of shoes where we can edit the primary and secondary colors.
Other than editing the primary and secondary colors, currently, there are no other editing options for shoes in the MHC, as shown in Figure 2.43:

Figure 2.43: Shoes
I’m sure you will agree that the body and clothing editors aren’t as detailed as that of the face and skin and other areas covered in this chapter, but you may be surprised to learn that, in this next section, we’re going to jump right back into some of the face editors for additional refining.
Using the Move and Sculpt tools
While I could have introduced Sculpt and Move at the beginning of this chapter, as they relate to the head only, I left them for last for a good reason. Up until now, you have seen that the MHC provides a wealth of options that give very real-world and realistic results. There are also ample opportunities to customize the face using the Blend tool. But sometimes, there are occasions when we want to push things a little further and exaggerate certain characteristics. There are also times when we are looking for something less symmetrical that is closer to reality, or when we simply want to hone in on a specific detail.
With the Sculpt and Move tools, you can add a little more than the preset blending has to offer, but it’s harder to get back to where you were should you not get it right. So, Sculpt and Move should be left until you’ve exhausted the other areas.
Within the interface, the main visible difference between Move and Sculpt is the controllers:
- In Move, you work with guidelines that indicate the area of the face that you are editing. When moving guidelines, you move clusters of points that influence their surrounding area.
- In Sculpt, you work with points on the face and can only sculpt one point at a time.
Both functions work similarly and, to a very large extent, give similar results, so much so that I would say that choosing between the two is a matter of personal preference. In Figure 2.44, you can just about make out the points on the left-hand side, whereas the guidelines in the image on the right are much clearer:
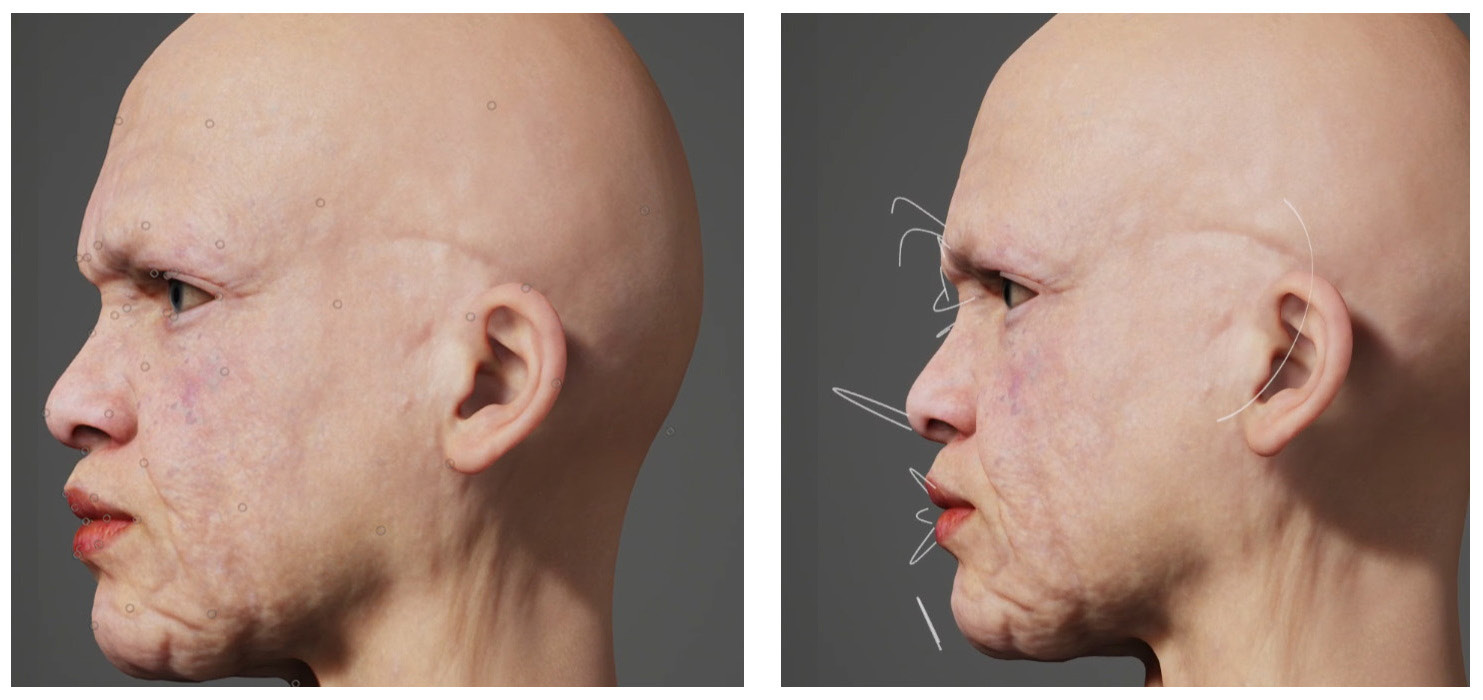
Figure 2.44: Sculpt points and Move guidelines
To see just how Move behaves differently to Sculpt, look at the front of the face and edit one of the eyebrows. In Move mode, when you edit an eyebrow, you will see three points appear as you move the eyebrow, thus indicating that you are moving three points simultaneously in Move mode. In Sculpt mode, you are just moving one point, with the greatest influence of change occurring at that one point.
Something else to consider is asymmetry. The Move guidelines are very helpful indicators to show you just what you can do to create asymmetry in your character. For example, the nose and lips are manipulated by the same guidelines, so it’s very difficult to create asymmetry in those areas. On the other hand, the left ear and right ear have their own set of guidelines that you can manipulate.
To disable symmetry, toggle the symmetry buttons, as shown in Figure 2.45, to the right of the PREVIEW option:

Figure 2.45: Disabling symmetry
I may have gone too far in Figure 2.46 and poor Glenda has seen better days. However, this is a good example of pushing the asymmetry to the maximum using both the Sculpt and Move tools with the symmetry option turned off:
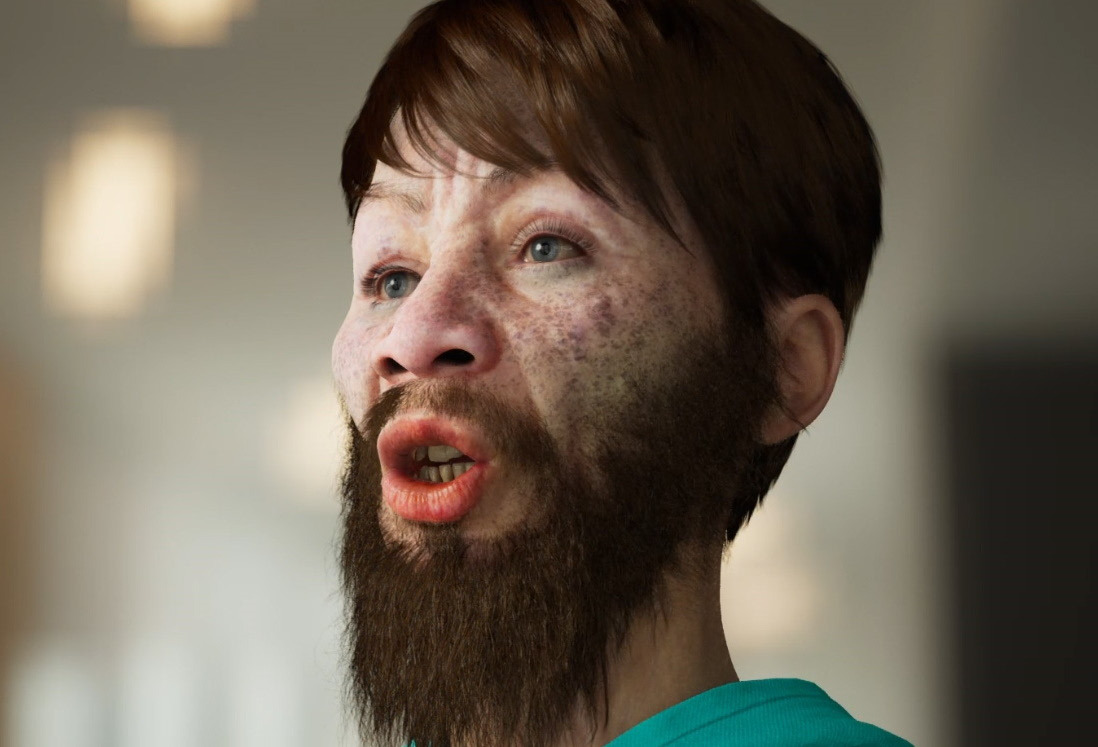
Figure 2.46: Editing beyond realism
Note
Asymmetry is heavily overlooked in the creation of realism when it comes to digital character design. Because humans don’t have identical sides of the face, it is very important to introduce some level of asymmetry, no matter how subtle. Historically, CGI characters have suffered from what is known as the uncanny valley, and much of this uncanniness is due to the presence of perfect symmetry, which doesn’t exist in nature.
We have covered quite a lot of detail in this chapter regarding how we can use the MHC to create a unique character; I urge you to play around with multiple characters before you move on to the next section. In the next section, if you’re happy with your character design, you will download and export your character.
Downloading and exporting your character
It’s time to download your character and export it from MHC and into Unreal Engine. To do this, you need to open up Bridge and navigate to your character. You may remember this from the moment before you first launched the MHC. However, if you have done some editing, you will notice that the picture of your character in Bridge has also been updated since the last autosave. If you look at Figure 2.47, you’ll notice that my Glenda character has been updated in Bridge:
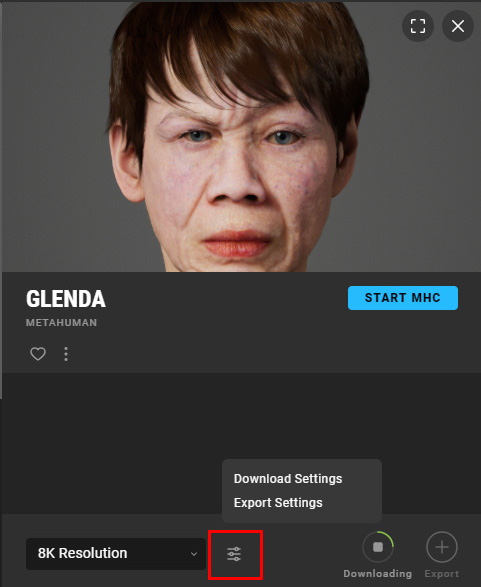
Figure 2.47: Download and Export settings
This is where you can change the Resolution, Download Settings, and Export Settings options, which we will take a look at here.
Resolution
At the bottom left of Figure 2.47, you will see a dropdown menu that relates to the resolution of the texture maps for our characters.
The highest available is 8K resolution. This means that the highest texture map is over 8,000 pixels wide. That’s a lot of pixels; I strongly recommend starting with 2K or even 1K since characters with 8K texture maps take a long time to generate and download and take a long time to compile when first introduced to the engine.
If your computer screen can display 4,000 pixels across, then the texture map of 8K will be displayed very adequately. In particular, a texture of a face being at 8K is more than enough to display a close-up on a 4K monitor. Also, keep in mind that there are several texture maps for the face that are all blended to give you even extra detail. The combined texture maps for the Glenda character come to 1.6 GB.
Note
You can always swap out your characters at a later stage. So, you can work out your entire production using a lower-resolution proxy of your character and then swap it out for an 8K version when you are at the lighting and rendering phase of your production. This is a very easy process, with the download and export part taking by far the most time.
Download considerations
Whenever you close the MHC or just stop using it, your character is ready to be downloaded at any time from within Bridge. If you have Bridge open, with your character selected, you will see it update from time to time, particularly once you’ve closed down your MHC session.
To change the download settings, click Download Settings, as shown in Figure 2.48. You'll see two tabs - TEXTURES and MODELS.
First, let’s look at the TEXTURES tab:

Figure 2.48: Textures settings
TEXTURES has already got just about half of the potential textures ticked by default, which is good enough for most cases. We are given the extra choice of choosing what Image format to choose from – that is, JPEG, EXR, or JPEG+EXR I highly recommend that you stick with JPEG as EXR files are considerably larger, will add to your download and processing time, and may even cause performance issues in Unreal. In most cases, there isn’t enough pixel data to justify the use of the EXR file format.
Now, let’s switch to the MODELS tab; here, we have different options:
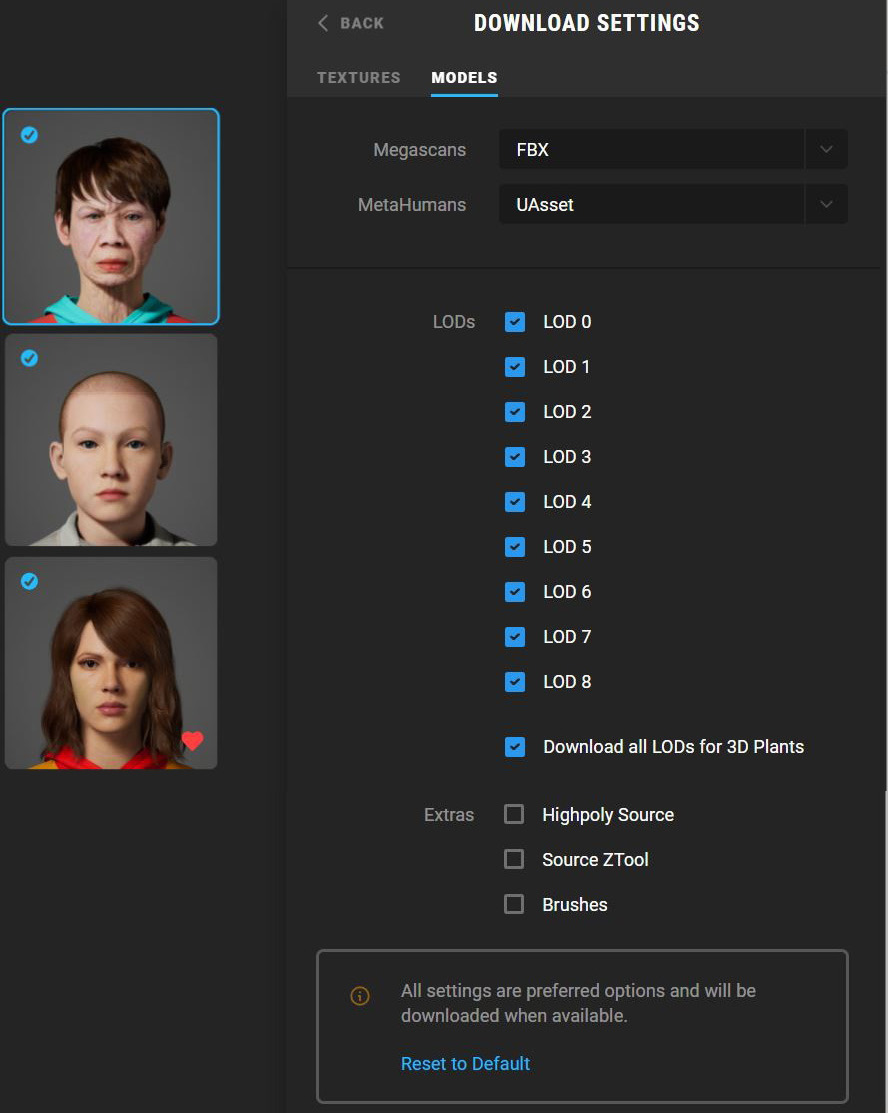
Figure 2.49: Models settings
Because this is Bridge, we have options for Megascans and MetaHumans when it comes to choosing what format we want our 3D models to be in. We just need to concern ourselves with the MetaHumans drop-down list, which gives us two formats to choose from – that is, UAsset and UAsset + Source Asset.
Choosing UAsset + Source Asset will download the character mesh in a format only readable in Unreal and also the more universal format, FBX. This is the safest bet as we can’t just download UAsset on its own as it will most likely cause the export process to fail. (We can also go to Export Settings to give us more options for third-party 3D programs should you only want to work with your MetaHuman in Maya, Houdini, or Blender.)
Once you have reviewed the settings, you can click the Back button, and then the green Download button that will appear at the bottom of the panel shown in Figure 2.47. The download process takes a considerable amount of time because the MHC is baking out the texture maps based on your modifications, generating new meshes, and writing out new Unreal files. It’s also compressing and decompressing the files for the download process.
Now, let’s look at the Export Settings options.
Export considerations
Next, we will look at Export Settings (which you can find below Downloads Settings in Figure 2.47). Here is the window you will see:
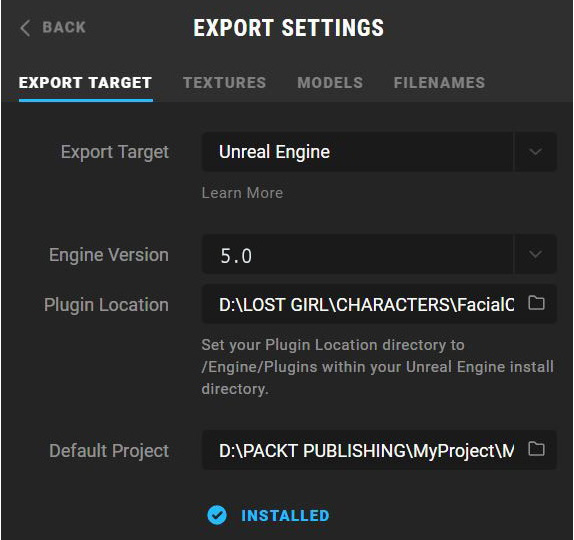
Figure 2.50: Export Settings
To export your character, do the following:
- Set Unreal Engine as your Export Target.
- Set Engine Version to the version you have installed, which should be version 5.0.
- Set Plugin Location to the directory where you installed Unreal (choosing this folder will allow Bridge to install the plugins automatically.)
- Choose the location of your project folder as the default location under Default Project.
Note
Should you export your character as an Unreal asset only and then later wish to bring your character into Maya, Blender, or another third-party application, you can either download it again from Bridge but change the export settings so that Export Target is set to Maya or Blender, or export your character as an FBX directly from Unreal using the Level Sequencer.
Once done, you can find the Export button in the same panel as shown in Figure 2.47.
An alternative and advisable way of bringing your character into the correct project safely is by utilizing the Bridge plugin within your Unreal project. This plugin comes enabled in UE5 by default. It’s a mini version of Bridge that is launched exclusively from within Unreal. To use Bridge from Unreal, navigate to the Content folder at the bottom of your screen and click on the +ADD button. Here, you will see Add Quixel Content; click on it. You can see both of these highlighted in Figure 2.51:

Figure 2.51: Loading Quixel Bridge from within the Content folder in Unreal 5
You may be asked to sign in again at this point. Once signed in using your Epic Games credentials, you’ll see your MetaHuman’s content and a similar interface where you can download and add the character directly within the open Unreal project.
The advantage of doing it this way is that there is less chance of user error of accidentally exporting your character to the wrong project folder. Also, if your plugins haven’t been installed, the Quixel importer that you engaged when clicking +ADD will check to see whether the plugins have been installed and will automatically install them for you after prompting you at the bottom right of the screen; we will look at this in more detail in this section.
Processing in the background
UE5 will bring the files that have been downloaded to your machine into Unreal Engine. Simply put, Bridge saves the relative files into a folder called MetaHumans, which can be found in the Content folder of your Unreal project. If you don’t have the MetaHumans plugins installed (such as the Hair Grooms plugin), don’t worry – this is where the mini Bridge plugin saves the day by installing them automatically during the export step.
At the bottom of the screen, various notifications regarding all the MetaHumans-related plugins will appear. It may ask you to click Enable Missing regarding plugins. Be sure to hit Enable Missing, as demonstrated in Figure 2.52:

Figure 2.52: Missing plugins and project settings
In addition, UE5 will also compute things such as skin weights and compiling shaders. This will take a couple of minutes and you won’t be able to use Unreal Editor while this is happening.
When finished, look for the MetaHumans folder that’s been created in the Content Browser area within your UE5 project, as shown in Figure 2.53. All your MetaHuman characters will be imported into this folder; they will be created the first time you go through the export process:

Figure 2.53: The MetaHumans folder
Inside that, you’ll see a folder with your character’s name on it. Open that and you’ll see a little thumbnail of your character. In my case, it’s called BP_Glenda (BP stands for Blueprint).
Figure 2.54 shows that I’ve brought my character into the viewport. I did this by simply dragging and dropping the Blueprint into the viewport:

Figure 2.54: Dragging and dropping the Blueprint
Note
You can edit your scene at any time. In Figure 2.54, I used a blank template and dragged and dropped the HDRI backdrop into my scene to give me an easy but realistic lighting setup.
Feel free to drag and drop your character Blueprint anywhere in your viewport so that you can start inspecting it. Also, note the additional folders that are created within your character folder. You should see the following:
- Body
- Face
- Female (if you created a male character, it would say Male)
- FemaleHair (if you created a male character, it would say MaleHair)
- Materials
- Blueprint
You can browse through these folders to find the various texture maps.
In this section, we focused on how to get your custom MetaHuman into Unreal Engine. This is where you’re likely to notice just how much data is involved in each character by the download and export time required. We have just begun to look at Unreal Engine and the folder structure behind the characters, but rest assured, you will become much more familiar with them by the end of the next chapter.
Summary
In this chapter, we learned how to get up and running with the MHC, all the various parameters that we can use to customize our characters, and some best practices to aid our design process.
We also learned a little about how textures and shaders work and how they are used to provide specific results. In addition to learning about all the available design tools, we learned a little about optimization with the use of LODs.
While we’ve gone through many of the editable attributes such as the body, face, eyes, hair, clothing, and all of the presets to choose from, we also looked at the Move and Sculpt tools, which we can use to fine-tune our characters and introduce asymmetry.
Finally, we learned about the download and export stage and some workarounds to some known problems, such as only the Bridge plugin recognizing the UE5 installation.
We leave this chapter having brought our custom character into the engine, but now, we need to learn how to animate our MetaHuman. To do this, in the next chapter, we will explore the concepts of Blueprints, what they are, and what we need to do with them to bring our characters to life.